Python学习之文件操作(二)
CSV文件处理
在Python中处理CSV文件可以使用模块csv。有关csv模块的官方资料看这里。
1 读取csv文件
csv.reader(csvfile, dialect='excel', **fmtparams)
使用reader()函数来读取csv文件,返回一个reader对象。reader对象可以使用迭代获取其中的每一行。
>>> import csv

>>> with open('userlist.csv','rt') as csv_file:

    csv_conent = [ row for row in csv.reader(csv_file)]

>>> csv_conent

[['Doctor', 'No'], ['Rosa', 'Klebb'], ['Mister', 'Big'], ['Auric', 'Goldfinger'], ['Ernst', 'Blofeld']]

>>>
class csv.DictReader(csvfile, fieldnames=None, restkey=None, restval=None, dialect='excel', *args, **kwds)
可以使用DicReader()按照字典的方式读取csv内容,如下:
>>> import csv

>>> with open('userlist3.csv','rt',newline='') as csvfile:

    reader = csv.DictReader(csvfile, fieldnames =[1,2],delimiter=':')

    for row in reader:

        print(row[1],row[2])

Doctor No

Rosa Klebb

Mister Big

Auric Gold

Ernst Blofeld

>>>
2 写入csv文件
csv.writer(csvfile, dialect='excel', **fmtparams)
使用writer()函数来写csv文件,返回一个writer对象。writer对象可以使用writerow()写一行数据,或者使用。writerows()写多行数据
>>> import csv
>>> namelist = []
>>> namelist = [
['Doctor','No'],
['Rosa','Klebb'],
['Mister','Big'],
['Auric','Gold'],
['Ernst','Blofeld'],
]
>>> with open('userlist2.csv','wt') as c_file:
csvout = csv.writer(c_file, delimiter=':')
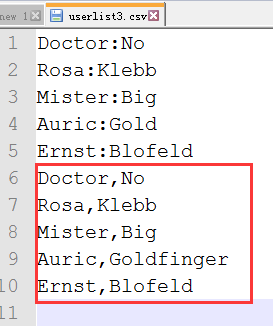
csvout.writerows(namelist) >>> with open('userlist3.csv','wt',newline='') as c_file:
csvout = csv.writer(c_file, delimiter=':')
csvout.writerows(namelist)
生成的csv文件如下:

class csv.DictWriter(csvfile, fieldnames, restval='', extrasaction='raise', dialect='excel', *args, **kwds)
使用DictWriter把字典类型的数据写入到csv文件中,如下:
>>> import csv

>>> villains = [

{'first': 'Doctor', 'last': 'No'},

{'first': 'Rosa', 'last': 'Klebb'},

{'first': 'Mister', 'last': 'Big'},

{'first': 'Auric', 'last': 'Goldfinger'},

{'first': 'Ernst', 'last': 'Blofeld'},

]

>>> with open('userlist3.csv','at',newline='') as csvfile:

    writer = csv.DictWriter(csvfile,['first','last'])

    writer.writerows(villains)
XML文件处理
XML是可扩展标记语言,它使用tag来分隔数据。
处理XML文件,可以使用python中的xml模块,它包含下面的几个子模块:
xml.etree.ElementTree: the ElementTree API, a simple and lightweight XML processor
xml.dom: the DOM API definition
xml.dom.minidom: a minimal DOM implementation
xml.dom.pulldom: support for building partial DOM trees
xml.sax: SAX2 base classes and convenience functions
xml.parsers.expat: the Expat parser binding
xml模块更多的相关内容参考官方文档。
使用xml.etree.ElementTree来解析处理XML文件内容,如下:
<?xml version="1.0"?>

<data>

    <country name="Liechtenstein">

        <rank>1</rank>

        <year>2008</year>

        <gdppc>141100</gdppc>

        <neighbor name="Austria" direction="E"/>

        <neighbor name="Switzerland" direction="W"/>

    </country>

    <country name="Singapore">

        <rank>4</rank>

        <year>2011</year>

        <gdppc>59900</gdppc>

        <neighbor name="Malaysia" direction="N"/>

    </country>

    <country name="Panama">

        <rank>68</rank>

        <year>2011</year>

        <gdppc>13600</gdppc>

        <neighbor name="Costa Rica" direction="W"/>

        <neighbor name="Colombia" direction="E"/>

    </country>

</data>
sample.xml
>>> import xml.etree.ElementTree as et

>>> tree = et.ElementTree(file='sample.xml')

>>> root = tree.getroot()

>>> root.tag

'data'

>>> for child in root:

    print('tag:',child.tag, 'attributes:',child.attrib)

    for grandchild in child:

        print('\ttag:',grandchild.tag,'attributes:',grandchild.attrib)

tag: country attributes: {'name': 'Liechtenstein'}

    tag: rank attributes: {}

    tag: year attributes: {}

    tag: gdppc attributes: {}

    tag: neighbor attributes: {'name': 'Austria', 'direction': 'E'}

    tag: neighbor attributes: {'name': 'Switzerland', 'direction': 'W'}

tag: country attributes: {'name': 'Singapore'}

    tag: rank attributes: {}

    tag: year attributes: {}

    tag: gdppc attributes: {}

    tag: neighbor attributes: {'name': 'Malaysia', 'direction': 'N'}

tag: country attributes: {'name': 'Panama'}

    tag: rank attributes: {}

    tag: year attributes: {}

    tag: gdppc attributes: {}

    tag: neighbor attributes: {'name': 'Costa Rica', 'direction': 'W'}

    tag: neighbor attributes: {'name': 'Colombia', 'direction': 'E'}

>>> len(root)

3

>>> len(root[0])

5

>>> len(root[1])

4

>>>
JSON/pickle数据处理
python中使用json模块把复杂结构的数据转换成JSON字符串,或者把JSON字符串转换成数据。
一个典型的复杂结构的数据如下:
>>> menu = \

    {

    "breakfast": {

                "hours": "7-11",

                "items": {

                        "breakfast burritos": "$6.00",

                        "pancakes": "$4.00"

                        }

                },

    "lunch" : {

            "hours": "11-3",

            "items": {

                    "hamburger": "$5.00"

                    }

            },

    "dinner": {

            "hours": "3-10",

            "items": {

                    "spaghetti": "$8.00"

                    }

            }

    }
menu
1 转换成JSON字符串
使用dumps()将menu转换成JSON格式的字符串如下:
>>> import json

>>> menu_json = json.dumps(menu)

>>> menu_json

'{"dinner": {"items": {"spaghetti": "$8.00"}, "hours": "3-10"}, "breakfast": {"items": {"pancakes": "$4.00", "breakfast burritos": "$6.00"}, "hours": "7-11"}, "lunch": {"items": {"hamburger": "$5.00"}, "hours": "11-3"}}'

>>>
更多json模块的用法参考官方文档。
2 转换成复杂结构的数据
使用loads()函数把JSON字符串转换成python的结构数据,如下:
>>> menu2 = json.loads(menu_json)

>>> menu2

{'dinner': {'items': {'spaghetti': '$8.00'}, 'hours': '3-10'}, 'breakfast': {'items': {'pancakes': '$4.00', 'breakfast burritos': '$6.00'}, 'hours': '7-11'}, 'lunch': {'items': {'hamburger': '$5.00'}, 'hours': '11-3'}}

>>> type(menu2)

<class 'dict'>

>>> type(menu_json)

<class 'str'>

>>>
pickle的功能类似于json,也可以将python中的结构化的数据序列化(转换为字符串)。其优点是可以序列化更多的python中的数据对象,比如datetime对象。其缺点是只能在python中使用,json的话其他语言也支持。
例子如下:
>>> import json

>>> import pickle

>>> import datetime

>>> now1 = datetime.datetime.utcnow()

>>> jsoned = json.dumps(now1)

Traceback (most recent call last):

  File "<pyshell#89>", line 1, in <module>

    jsoned = json.dumps(now1)

  File "C:\Python35-32\lib\json\__init__.py", line 230, in dumps

    return _default_encoder.encode(obj)

  File "C:\Python35-32\lib\json\encoder.py", line 199, in encode

    chunks = self.iterencode(o, _one_shot=True)

  File "C:\Python35-32\lib\json\encoder.py", line 257, in iterencode

    return _iterencode(o, 0)

  File "C:\Python35-32\lib\json\encoder.py", line 180, in default

    raise TypeError(repr(o) + " is not JSON serializable")

TypeError: datetime.datetime(2016, 11, 5, 7, 22, 20, 551139) is not JSON serializable

>>> pickled = pickle.dumps(now1)

>>> now1

datetime.datetime(2016, 11, 5, 7, 22, 20, 551139)

>>> now2 = pickle.loads(pickled)

>>> now2

datetime.datetime(2016, 11, 5, 7, 22, 20, 551139)

>>>
YAML文件处理
python使用第三方模块pyyaml来操作数据。官方文档点这里。
一个典型的YAML文件如下:
name:

    first: James

    last: McIntyre

dates:

    birth: 1828-05-25

    death: 1906-03-31

details:

    bearded: true

    themes: [cheese, Canada]

books:

    url: http://www.gutenberg.org/files/36068/36068-h/36068-h.htm

poems:

    - title: 'Motto'

      text: |

        Politeness, perseverance and pluck,

        To their possessor will bring good luck.

    - title: 'Canadian Charms'

      text: |

        Here industry is not in vain,

        For we have bounteous crops of grain,

        And you behold on every field

        Of grass and roots abundant yield,

        But after all the greatest charm

        Is the snug home upon the farm,

        And stone walls now keep cattle warm.
>>> with open('sample.yml','rt') as y_file:

    text = y_file.read()

>>> data = yaml.load(text)

>>> data['poems']

[{'text': 'Politeness, perseverance and pluck,\nTo their possessor will bring good luck.\n', 'title': 'Motto'}, {'text': 'Here industry is not in vain,\nFor we have bounteous crops of grain,\nAnd you behold on every field\nOf grass and roots abundant yield,\nBut after all the greatest charm\nIs the snug home upon the farm,\nAnd stone walls now keep cattle warm.', 'title': 'Canadian Charms'}]

>>> data['details']

{'bearded': True, 'themes': ['cheese', 'Canada']}

>>> data['poems'][0]

{'text': 'Politeness, perseverance and pluck,\nTo their possessor will bring good luck.\n', 'title': 'Motto'}

>>>
配置文件处理
Python中可以使用configparser模块来处理如下格式的配置文件。
[DEFAULT]

ServerAliveInterval = 45

Compression = yes

CompressionLevel = 9

ForwardX11 = yes

[bitbucket.org]

User = hg

[topsecret.server.com]

Port = 50022

ForwardX11 = no
>>> import configparser

>>> config = configparser.ConfigParser()

>>> config['DEFAULT'] = {'ServerAliveInterval': '',

...                      'Compression': 'yes',

...                      'CompressionLevel': ''}

>>> config['bitbucket.org'] = {}

>>> config['bitbucket.org']['User'] = 'hg'

>>> config['topsecret.server.com'] = {}

>>> topsecret = config['topsecret.server.com']

>>> topsecret['Port'] = ''     # mutates the parser

>>> topsecret['ForwardX11'] = 'no'  # same here

>>> config['DEFAULT']['ForwardX11'] = 'yes'

>>> with open('example.ini', 'w') as configfile:

...   config.write(configfile)

...
更多configeparser的内容参考官方文档。
Excel表格处理
处理Excel文件的模块有很多,例如openpyxl, xlsxwriter, xlrd等。详细请参考官方文档。
Python学习之文件操作(二)的更多相关文章
- python学习笔记:文件操作和集合(转)
转自:http://www.nnzhp.cn/article/16/ 这篇博客来说一下python对文件的操作. 对文件的操作分三步: 1.打开文件获取文件的句柄,句柄就理解为这个文件 2.通过文件句 ...
- python学习日记(文件操作)
文件操作概述 计算机系统分为:操作系统,计算机硬件,应用程序. 我们用python或其他语言编写的应用程序若想要把数据永久保存下来,必须要保存于硬盘中,这就涉及到应用程序要操作硬件,众所周知,应用程序 ...
- python学习总结---文件操作
# 文件操作 ### 目录管理(os) - 示例 ```python # 执行系统命令 # 清屏 # os.system('cls') # 调出计算器 # os.system('calc') # 查看 ...
- 03 python学习笔记-文件操作(三)
本文内容主要包括以下方面: 1. 文件操作基本认识2. 只读(r, rb)3. 只写(w, wb)4. 追加(a, ab)5. r+读写6. w+写读7. a+写读(追加写读)8. 文件的修改 一.文 ...
- python学习day8 文件操作(深度学习)
文件操作 (day7内容扩展) 1 文件基本操作 obj = open('路径',mode='模式',encoding='编码')obj.write()obj.read()obj.close() 2 ...
- Python学习 :文件操作
文件基本操作流程: 一. 创建文件对象 二. 调用文件方法进行操作 三. 关闭文件(注意:只有在关闭文件后,才会写入数据) fh = open('李白诗句','w',encoding='utf-8') ...
- python 学习分享-文件操作篇
文件操作 f_open=open('*.txt','r')#以只读的方式(r)打开*.txt文件(需要与py文件在同一目录下,如果不同目录,需写全路径) f_open.close()#关闭文件 打开文 ...
- Python学习笔记——文件操作
python中,一切皆对象. 一.文件操作流程 (1)打开文件,得到一个文件句柄(对象),赋给一个对象: (2)通过文件句柄对文件进行操作: (3)关闭文件. 文件对象f通过open()函数来创建 ...
- Python学习之==>文件操作
1.打开文件的模式 r,只读模式(默认)[不可写:文件不存在,会报错] w,只写模式[不可读:不存在则创建:存在则删除内容] a,追加模式[不可读:不存在则创建:存在则追加内容] r+,读写模式[可读 ...
随机推荐
- 42 github 开源代码 ——README.md语法/相关操作等
0 引言 最近在github上开源了pro/E二次开发的代码,发现README.md的编辑方式很有趣,需要稍微了解一下. 1 markdown语法 参考了两篇博客的内容,链接如下. https://b ...
- 17 win7 sp1 x64/VS2015下配置creo4.0二次开发环境——调用了众多开源库(ceres-solver,PCL1.8.0,office 2016COM接口,MySql数据库等)
0 引言 本次开发环境的配置是在综合考虑了开源库的版本.VS版本以及CREO4.0的版本,同时针对甲方需求选择了win7 sp1 x64系统. 配置的过程中遇到了形形色色的问题,但是一一解决了.通过这 ...
- NOIp2018集训test-9-4
老张让我们2.5h考NOI%你题,喵喵喵? 因为今(我)天(实)的(在)题(太)鬼(弱)畜(了)了,我还只改了t1. Problem A. reorder 考试的时候大家都写了最长不降子序列,然后全员 ...
- (转)简述负载均衡&CDN技术
转:http://www.cnblogs.com/mokafamily/p/4402366.html#commentform 曾经见到知乎上有人问“为什么像facebook这类的网站需要上千个工程师维 ...
- (转)当android调试遇到ADB server didn't ACK以及顽固的sjk_daemon进程 .
转:http://blog.csdn.net/wangdong20/article/details/20839533 做Android调试的时候经常会遇到,程序写好了,准备接上手机调试,可不一会儿出现 ...
- Aliyun 安装NPM 总是3.5.2 解决方案
由于默认的命令 阿里云安装的 Node 是 8.x 版本 导致NPM 一直安装的都是 3.5.2 版本,死活升级不上去 最后手动安装指定版本解决 wget -qO- https://deb.nodes ...
- idea 设置默认maven auto import,不需要每次都弹出
1 2 误区 从这里点进去进行设置,或者每次打开项目右击下方的 auto impot都是不对的.
- mybatis 处理CLOB/BLOB类型数据
BLOB和CLOB都是大字段类型. BLOB是按二进制来存储的,而CLOB是可以直接存储文字的. 通常像图片.文件.音乐等信息就用BLOB字段来存储,先将文件转为二进制再存储进去.文章或者是较长的文字 ...
- <mysql>mysql基础学习
1.Join语法 JOIN 按照功能大致分为如下三类: INNER JOIN(内连接,或等值连接):取得两个表中存在连接匹配关系的记录. LEFT JOIN(左连接):取得左表(table1)完全记录 ...
- 解决centos7没有显示ipv4的问题
很多小伙伴再安装centos7的时候,都是一直默认安装.所以导致后来没有ipv4 那么到底什么原因呢,我最近找到了原因: 就是在这里没有选择: 将这个地方打开之后,就会有了,那么问题就是那个原因.如果 ...