【Java基础总结】GUI
- GUI(Graphical User Interface),图形用户接口
- CLI(Command Line User Interface),命令行用户接口
1. 容器 Container
GUI主要位于 java.awt 和 javax.swing 两个包及其子包中
Container 和 Component 是AWT中的两个核心类,Container是Component子类,Container子类对象可以“容纳”别的Component对象。
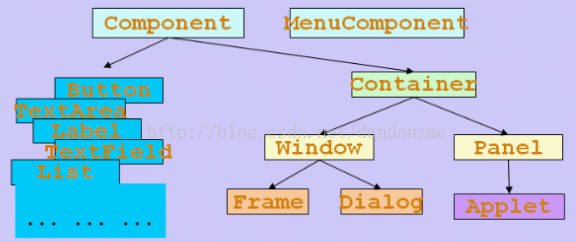
Frame是Window的子类,由Frame或其子类创建的对象为一个窗体。
    public static void main(String[] args){

        Frame f = new Frame("AwtDemo1");

        f.setSize(500, 300);            //设置窗体大小(width, high)

        f.setLocation(300, 200);        //设置窗体位置(x, y)

        //设置Frame显示

        f.setVisible(true);

    }
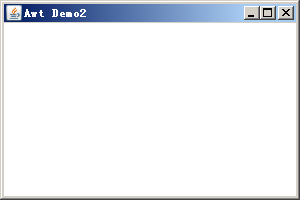
对于Frame的编程而言,比较常用的方式是继承Frame类,并且在构造函数或者新编写一个函数来设置Frame的信息
public class AwtDemo2 extends Frame{

    public AwtDemo2(){

        this.setTitle("Awt Demo2");

        this.setBounds(500, 300, 300, 200);    //x, y, width, height

        this.setVisible(true);

    }

    public static void main(String[] args){

        new AwtDemo2();

    }

}
运行上面代码会生成如下这样一个窗体:
Panel对象可以看成可以容纳Component的空间,可以拥有自己的布局管理器。
2. 组件 Component
代码1:按钮、标签、复选框 、下拉列表等组件
public class ComponentDemo1 extends Frame{

    public static void main(String[] args){

        new ComponentDemo1();

    }

    public ComponentDemo1(){

        //标签Label,第一个参数是标题,第二个参数是排列方式

        this.add(new Label("姓名", Label.LEFT));

        //文本框,第一个参数是标题,第二个参数是长度

        TextField tf = new TextField ("小明", 15);

        this.add(tf);

        //文本域TextArea,第一参数是行数,第二个参数是列数

        TextArea ta = new TextArea (2, 25);

        ta.setText ("你好!");    //设置默认内容

        this.add(ta);

        //复选框Checkbox,第一个参数是名称,第二参数可选,表示是否选中状态

        Checkbox cb1 = new Checkbox ("系统管理员");

        Checkbox cb2 = new Checkbox ("用户", true);

        Checkbox cb3 = new Checkbox ("过客", true);

        //将复选框添加到复选框组里,就变成单选框

        CheckboxGroup g = new CheckboxGroup();

        cb1.setCheckboxGroup (g);

        cb2.setCheckboxGroup (g);

        cb3.setCheckboxGroup (g);

        //setBounds 移动组件并调整其大小。

        cb1.setBounds (20,60,140,20);

        cb2.setBounds (20,80,140,20);

        cb3.setBounds (20,100,140,20);

        this.add(cb1);

        this.add(cb2);

        this.add(cb3);

        //下拉列表Choice

        Choice choice = new Choice();

        choice.add("英语");

        choice.add("法语");

        choice.add("德语");

        this.add(choice);

        //列表List,可以多选

        List list = new List(3, true);

        list.add("大学物理");

        list.add("数据结构");

        list.add("计算机网络");

        this.add(list);

        this.setTitle("AWT组件库Component演示1");

        this.setLayout(new FlowLayout());

        this.setBounds(200, 200, 400, 200);

        this.setVisible(true);

    }

}
运行结果:

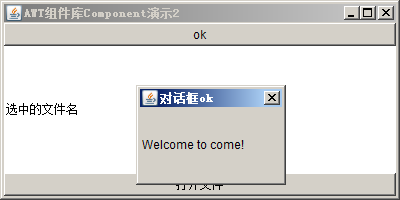
代码2:对话框和文件对话框
public class ComponentDemo2 extends Frame{

    public static void main(String[] args){

        new ComponentDemo2();

    }

    public ComponentDemo2(){

        this.setTitle("AWT组件库Component演示2");

        this.setBounds(200, 200, 400, 200);

        final Label fileLabel = new Label("选中的文件名");

        this.add(fileLabel, BorderLayout.CENTER);    //默认是BorderLayout

        //对话框Dialog,第一参数是父窗口,第二参数是标题,第三个参数表示是否显示

        final Dialog dialog = new Dialog(this, "对话框ok", false);

        Label label = new Label("Welcome to come!");

        dialog.add(label);

        dialog.setBounds(300, 300, 150, 100);

        dialog.addWindowListener(new WindowAdapter() {

            public void windowClosing(WindowEvent e){

                dialog.setVisible(false);

            }

        });

        //按钮Button,第一参数是名称

        Button btn = new Button("ok");

        btn.addActionListener(new ActionListener(){

            public void actionPerformed(ActionEvent e){

                dialog.setVisible(true);

            }

        });

        this.add(btn, BorderLayout.NORTH);

        //文件对话框FileDialog,第1个参数是父窗口,第2个参数是标题,第3个参数是文件对话框的作用是打开还是保存

        final FileDialog fileDialog = new FileDialog(this, "打开文件", FileDialog.LOAD);

        fileDialog.setBounds(300, 300, 150, 100);

        Button btn2 = new Button("打开文件");

        btn2.addActionListener(new ActionListener(){

            public void actionPerformed(ActionEvent e){

                fileDialog.setVisible(true);

                String dir = fileDialog.getDirectory();

                String file = fileDialog.getFile();//获取选中的文件名称

                fileLabel.setText(dir + "" + file);

            }

        });

        this.add(btn2, BorderLayout.SOUTH);

        this.addWindowListener(new WindowAdapter() {

            public void windowClosing(WindowEvent e){

                System.exit(0);

            }

        });

        this.setVisible(true);

    }

}
运行结果:
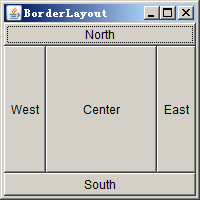
3. 布局管理器 Layout
下面这窗体中的组件太乱了,有什么办法让他们变的整齐一些吗?使用布局管理器可以达到布局整齐的效果!
三种布局管理器:
- BorderLayout
- FlowLayout
- GridLayout
简单的代码说明:
 public class LayoutDemo1 extends Frame{

     public static void main (String args[]) {

         new LayoutDemo1(args[0]);

     }

     public LayoutDemo1(String layout){

         this.setTitle(layout);

         this.setBounds(300, 200, 200, 200);

         this.addWindowListener(new WindowAdapter(){

             public void windowClosing(WindowEvent e){

                 System.exit(0);

                 super.windowClosing(e);

             }

         });

         switch(layout){

             case "BorderLayout" :

                 addBorderLayout();

             break;

             case "FlowLayout" :

                 addFlowLayout();

             break;

             case "GridLayout" :

                 addGridLayout();

             break;

             default:

                 addBorderLayout();

             break;

         }

         this.setVisible(true);

     }

     public void addBorderLayout(){

         this.setLayout(new BorderLayout());

         this.add(new Button("North"), BorderLayout.NORTH);

         this.add(new Button("South"), BorderLayout.SOUTH);

         this.add(new Button("East"), BorderLayout.EAST);

         this.add(new Button("West"), BorderLayout.WEST);

         this.add(new Button("Center"), BorderLayout.CENTER);

     }

     public void addFlowLayout(){

         this.setLayout(new FlowLayout());

         this.add(new Button("Button1"));

         this.add(new Button("Button2"));

         this.add(new Button("Button3"));

         this.add(new Button("Button4"));

     }

     public void addGridLayout(){

         //new GridLayout(3,2) 构造一个3行2列的网格

         setLayout(new GridLayout(3,2));

         add(new Button("1"));

         add(new Button("2"));

         add(new Button("3"));

         add(new Button("4"));

         add(new Button("5"));

         add(new Button("6"));

     }

 }
运行结果:


4. 菜单
简单的菜单演示:
class MenuDemo1 extends Frame{

    private MenuBar menuBar;

    private Menu menu, secondLevelMenu;

    private MenuItem exitItem,subItem;

    MenuDemo1(){

        this.setTitle("MenuDemo1");

        this.setBounds(200,200,500,400);    //setBounds(x, y, width, high)

        //菜单栏

        menuBar = new MenuBar();

        //一级菜单

        menu = new Menu("文件");

        //二级菜单

        secondLevelMenu = new Menu("新建");

        //子菜单

        exitItem = new MenuItem("退出");

        subItem = new MenuItem("Java文件");

        secondLevelMenu.add(subItem);

        menu.add(secondLevelMenu);

        menu.add(exitItem);

        menuBar.add(menu);

        //添加菜单栏

        this.setMenuBar(menuBar);

        this.addWindowListener(new WindowAdapter(){

            public void windowClosing(WindowEvent e){

                System.exit(0);

            }

        });

        this.setVisible(true);

    }

    public static void main(String[] args){

        new MenuDemo1();

    }

}
运行结果:

5. 事件处理机制
6. 绘图
【Java基础总结】GUI的更多相关文章
- 黑马程序员:Java基础总结----GUI图形化界面
黑马程序员:Java基础总结 GUI图形化界面 ASP.Net+Android+IO开发 . .Net培训 .期待与您交流! GUI(Graphical User Interface)图形化界 ...
- 黑马程序员:Java基础总结----GUI&网络&IO综合开发
黑马程序员:Java基础总结 GUI&网络&IO综合开发 ASP.Net+Android+IO开发 . .Net培训 .期待与您交流! 网络架构 C/S:Client/Server ...
- 黑马程序员——【Java基础】——GUI(图形用户界面)
---------- android培训.java培训.期待与您交流! ---------- 一.概述 1.GUI(GraphicalUser Interface):又称图形用户界面,是计算机用户与计 ...
- 黑马程序员——JAVA基础之GUI
-----Java培训.Android培训.iOS培训..Net培训.期待与您交流! ------- GUI(图形用户界面) GUI • Graphical User Interface(图形用 ...
- Java基础学习 -- GUI之 事件处理基础
事件处理可以简单地这么理解,当有一个事件产生,程序要根据这个事件做出响应.比如,我们做了一个可以通过按钮改变背景颜色的窗口,当我们点击按钮时便产生了一个事件,程序会根据这个事件来做出响应,也就是去改变 ...
- 二十二、Java基础--------GUI入门
在java学习过程中GUI是一个比较特殊的知识体系(笔者对安卓不是很了解),似乎在为安卓的学习做着准备,本文将将展示一个综合案例. 创建一个类似于记事本的程序,包含打开与保存功能. package G ...
- Java基础知识【上】(转载)
http://blog.csdn.net/silentbalanceyh/article/details/4608272 (最终还是决定重新写一份Java基础相关的内容,原来因为在写这一个章节的时候没 ...
- Java基础常见英语词汇
Java基础常见英语词汇(共70个) ['ɔbdʒekt] ['ɔ:rientid]导向的 ['prəʊɡræmɪŋ]编程 OO: object ...
- 经典的Java基础面试题集锦
经典的Java基础面试题集锦,欢迎收藏和分享. 问题:如果main方法被声明为private会怎样? 答案:能正常编译,但运行的时候会提示”main方法不是public的”. 问题:Java里的传引用 ...
- Java基础知识学习(九)
GUI开发 先前用Java编写GUI程序,是使用抽象窗口工具包AWT(Abstract Window Toolkit).现在多用Swing.Swing可以看作是AWT的改良版,而不是代替AWT,是对A ...
随机推荐
- HMM——维特比算法(Viterbi algorithm)
1. 前言维特比算法针对HMM第三个问题,即解码或者预测问题,寻找最可能的隐藏状态序列: 对于一个特殊的隐马尔可夫模型(HMM)及一个相应的观察序列,找到生成此序列最可能的隐藏状态序列. 也就是说给定 ...
- 【t065】最敏捷的机器人
Time Limit: 1 second Memory Limit: 128 MB [问题描述] [背景] Wind设计了很多机器人.但是它们都认为自己是最强的,于是,一场比赛开始了~ [问题描述] ...
- Python--day70--csrf简单用法、 跨站请求伪造和csrf_token使用
1,csrf简单用法 2,Django里面的setting加入了防跨站伪造:这段代码帮你生成特殊字符串,帮你塞到html页面中来 3,csrf_token使用:
- axis2 wsdl2java工具
wsdl2java工具使用方法描述: C:\Users\Administrator>wsdl2java -h Using AXIS2_HOME: E:\Apache_Projects\axis2 ...
- Capistrano:自动完成多台服务器上新版本的同步更新,包括数据库的改变
https://baike.baidu.com/item/Capistrano/6844928?fr=aladdin Capistrano是一种在多台服务器上运行脚本的开源工具,它主要用于部署we ...
- UVA 11996 Jewel Magic —— splay、序列的分裂与合并、LCP的哈希算法
#include <cstdio> #include <cstdlib> #include <iostream> #include <algorithm> ...
- 2019-10-24-dotnet-列表-Linq-的-Take-用法
title author date CreateTime categories dotnet 列表 Linq 的 Take 用法 lindexi 2019-10-24 9:4:23 +0800 201 ...
- 【codeforces 789A】Anastasia and pebbles
[题目链接]:http://codeforces.com/contest/789/problem/A [题意] 有n种物品,每种物品有wi个; 你有两个口袋,每个口袋最多装k个物品; 且口袋里面只能装 ...
- js 键盘事件keyCode 总结
开发中经常页面中的某些按钮或元素需要绑定到键盘的输入事件 keydown.keyup 事件 keydown 键盘按下触发事件 $("#btn").keydown(function( ...
- 2018-2-13-win10-uwp-InkCanvas控件数据绑定
title author date CreateTime categories win10 uwp InkCanvas控件数据绑定 lindexi 2018-2-13 17:23:3 +0800 20 ...