Spring,Struts2,MyBatis,Activiti,Maven,H2,Tomcat集成(三)——H2,MyBatis集成
1、配置h2,连接池,MyBatis Maven依赖;
    <!-- spring与数据库访问集成(非Hibernate) -->

    <dependency>

      <groupId>org.springframework</groupId>

      <artifactId>spring-jdbc</artifactId>

      <version>4.1.4.RELEASE</version>

    </dependency>

    <!-- h2数据库核心包 -->

    <dependency>

      <groupId>com.h2database</groupId>

      <artifactId>h2</artifactId>

      <version>1.4.189</version>

    </dependency>

    <!-- 添加druid连接池包 -->

    <dependency>

      <groupId>com.alibaba</groupId>

      <artifactId>druid</artifactId>

      <version>1.0.12</version>

    </dependency>

    <!-- 添加mybatis的核心包 -->

    <dependency>

      <groupId>org.mybatis</groupId>

      <artifactId>mybatis</artifactId>

      <version>3.2.8</version>

    </dependency>

    <!-- 添加mybatis与Spring整合的核心包 -->

    <dependency>

      <groupId>org.mybatis</groupId>

      <artifactId>mybatis-spring</artifactId>

      <version>1.2.2</version>

    </dependency>
2、spring.xml中增加连接池配置;
    <!-- 引入属性文件,config.properties位于src/main/resources目录下 -->

    <context:property-placeholder location="classpath:config.properties"/>

    <!-- ========================================配置数据源========================================= -->

    <!-- 配置数据源,使用的是alibaba的Druid(德鲁伊)数据源 -->

    <bean name="dataSource" class="com.alibaba.druid.pool.DruidDataSource" init-method="init" destroy-method="close">

        <property name="url" value="${jdbc_url}" />

        <property name="username" value="${jdbc_username}" />

        <property name="password" value="${jdbc_password}" />

        <!-- 初始化连接大小 -->

        <property name="initialSize" value="0" />

        <!-- 连接池最大使用连接数量 -->

        <property name="maxActive" value="20" />

        <!-- 连接池最大空闲 -->

        <property name="maxIdle" value="20" />

        <!-- 连接池最小空闲 -->

        <property name="minIdle" value="0" />

        <!-- 获取连接最大等待时间 -->

        <property name="maxWait" value="60000" />

        <!--

        <property name="poolPreparedStatements" value="true" />

        <property name="maxPoolPreparedStatementPerConnectionSize" value="33" />

        -->

        <property name="validationQuery" value="${validationQuery}" />

        <property name="testOnBorrow" value="false" />

        <property name="testOnReturn" value="false" />

        <property name="testWhileIdle" value="true" />

        <!-- 配置间隔多久才进行一次检测,检测需要关闭的空闲连接,单位是毫秒 -->

        <property name="timeBetweenEvictionRunsMillis" value="60000" />

        <!-- 配置一个连接在池中最小生存的时间,单位是毫秒 -->

        <property name="minEvictableIdleTimeMillis" value="25200000" />

        <!-- 打开removeAbandoned功能 -->

        <property name="removeAbandoned" value="true" />

        <!-- 1800秒,也就是30分钟 -->

        <property name="removeAbandonedTimeout" value="1800" />

        <!-- 关闭abanded连接时输出错误日志 -->

        <property name="logAbandoned" value="true" />

        <!-- 监控数据库 -->

        <!-- <property name="filters" value="stat" /> -->

        <property name="filters" value="mergeStat" />

    </bean>
3、添加数据库连接信息config.properties;
driverClassName=org.h2.Driver

validationQuery=SELECT 1

jdbc_url=jdbc:h2:tcp://localhost/D:/software/h2/db/h2learn

jdbc_username=sa

jdbc_password=sa
4、spring文件中配置数据库事务;
    <!-- ========================================spring事务配置================================= -->

    <!-- 配置Spring的事务管理器 -->

    <bean id="transactionManager" class="org.springframework.jdbc.datasource.DataSourceTransactionManager">

        <property name="dataSource" ref="dataSource" />

    </bean>

    <!-- 注解方式配置事物 -->

    <!-- <tx:annotation-driven transaction-manager="transactionManager" /> -->

    <!-- 拦截器方式配置事物 -->

    <tx:advice id="transactionAdvice" transaction-manager="transactionManager">

        <tx:attributes>

            <tx:method name="insert*" propagation="REQUIRED" />

            <tx:method name="update*" propagation="REQUIRED" />

            <tx:method name="delete*" propagation="REQUIRED" />

            <tx:method name="get*" propagation="SUPPORTS" />

            <tx:method name="*" propagation="SUPPORTS" />

        </tx:attributes>

    </tx:advice>

    <aop:config>

        <aop:pointcut id="transactionPointcut" expression="execution(* com.coshaho.learn.service..*Impl.*(..))" />

        <aop:advisor pointcut-ref="transactionPointcut" advice-ref="transactionAdvice" />

    </aop:config>
注:spring文件中申明tx,aop标签定义;
<?xml version="1.0" encoding="UTF-8"?>

<beans xmlns="http://www.springframework.org/schema/beans"

xmlns:xsi="http://www.w3.org/2001/XMLSchema-instance"

xmlns:context="http://www.springframework.org/schema/context"

xmlns:tx="http://www.springframework.org/schema/tx"

xmlns:aop="http://www.springframework.org/schema/aop"

xsi:schemaLocation="http://www.springframework.org/schema/beans

http://www.springframework.org/schema/beans/spring-beans-3.0.xsd

http://www.springframework.org/schema/context

http://www.springframework.org/schema/context/spring-context-3.0.xsd

http://www.springframework.org/schema/tx

http://www.springframework.org/schema/tx/spring-tx-3.0.xsd

http://www.springframework.org/schema/aop

http://www.springframework.org/schema/aop/spring-aop-3.0.xsd">
5、添加spring事务jar包依赖;
    <!-- ===========================spring事务========================== -->

    <!--添加aspectjweaver包,spring-jdbc已经包含spring-tx -->

    <dependency>

      <groupId>org.aspectj</groupId>

      <artifactId>aspectjweaver</artifactId>

      <version>1.8.5</version>

    </dependency>
6、增加pojo,dao,service,action层相应测试类;
package com.coshaho.learn.pojo;

public class User

{

    private int id;

    private String username;

    private String password;

    private String description;

    public int getId() {

        return id;

    }

    public void setId(int id) {

        this.id = id;

    }

    public String getUsername() {

        return username;

    }

    public void setUsername(String username) {

        this.username = username;

    }

    public String getPassword() {

        return password;

    }

    public void setPassword(String password) {

        this.password = password;

    }

    public String getDescription() {

        return description;

    }

    public void setDescription(String description) {

        this.description = description;

    }

}
package com.coshaho.learn.dao;

import com.coshaho.learn.pojo.User;

public interface UserDao

{

    User getUser(int id);

    int insertUser(User user);

    int updateUser(User user);

    int deleteUser(int id);

    int getUserNum(User user);

}
package com.coshaho.learn.service;

import com.coshaho.learn.pojo.User;

public interface UserServiceI

{

    User getUser(int id);

    int insertUser(User user);

    int updateUser(User user);

    int deleteUser(int id);

    int getUserNum(User user);

}
package com.coshaho.learn.service.impl;

import org.springframework.beans.factory.annotation.Autowired;

import org.springframework.stereotype.Service;

import com.coshaho.learn.dao.UserDao;

import com.coshaho.learn.pojo.User;

import com.coshaho.learn.service.UserServiceI;

@Service("userServiceImpl")

public class UserServiceImpl implements UserServiceI

{

    @Autowired

    private UserDao userDao;

    public User getUser(int id)

    {

        return userDao.getUser(id);

    }

    public int insertUser(User user)

    {

        return userDao.insertUser(user);

    }

    public int updateUser(User user)

    {

        return userDao.updateUser(user);

    }

    public int deleteUser(int id)

    {

        return userDao.deleteUser(id);

    }

    public int getUserNum(User user)

    {

        return userDao.getUserNum(user);

    }

}
package com.coshaho.learn.action;

import org.springframework.beans.factory.annotation.Autowired;

import org.springframework.stereotype.Controller;

import com.coshaho.learn.pojo.User;

import com.coshaho.learn.service.UserServiceI;

@Controller("loginDB")

public class LoginDBAction

{

    @Autowired

    private UserServiceI userService;

    private String username;

    private String password;

    public String getUsername() {

        return username;

    }

    public void setUsername(String username) {

        this.username = username;

    }

    public String getPassword() {

        return password;

    }

    public void setPassword(String password) {

        this.password = password;

    }

    public String authority()

    {

        User user = new User();

        user.setUsername(username);

        user.setPassword(password);

        if(userService.getUserNum(user) > 0 )

        {

            return "success";

        }

        return "error";

    }

}
7、增加MyBatis映射文件UserMapper.xml;
<?xml version="1.0" encoding="UTF-8"?>

<!DOCTYPE mapper PUBLIC "-//mybatis.org//DTD Mapper 3.0//EN" "http://mybatis.org/dtd/mybatis-3-mapper.dtd">

<mapper namespace="com.coshaho.learn.dao.UserDao">

    <select id="getUser" parameterType="int" resultType="com.coshaho.learn.pojo.User">

        SELECT * FROM USER WHERE ID=#{id}

    </select>

    <select id="getUserNum" parameterType="com.coshaho.learn.pojo.User" resultType="int">

        SELECT count(0) FROM USER WHERE USERNAME=#{username} AND PASSWORD=#{password}

    </select>

    <insert id="insertUser" parameterType="com.coshaho.learn.pojo.User">

        insert into user(id, username, password, description)

        values(#{id,jdbcType=INTEGER},#{username,jdbcType=VARCHAR},

        #{password,jdbcType=VARCHAR},#{description,jdbcType=VARCHAR});

    </insert>

    <update id="updateUser" parameterType="com.coshaho.learn.pojo.User">

        update user

        <set>

            <if test="username!=null">

                username=#{username,jdbcType=VARCHAR},

            </if>

            <if test="password!=null">

                password=#{password,jdbcType=VARCHAR},

            </if>

            <if test="description!=null">

                description=#{description,jdbcType=VARCHAR},

            </if>

        </set>

        where id=#{id,jdbcType=INTEGER}

    </update>

    <delete id="deleteUser" parameterType="int">

        delete from user where id=#{id}

    </delete>

</mapper>
注:映射文件中namespace要和dao层接口名称一致。
8、spring.xml中集成MyBatis;
    <!-- ========================================针对myBatis的配置项============================== -->

    <!-- 配置sqlSessionFactory -->

    <bean id="sqlSessionFactory" class="org.mybatis.spring.SqlSessionFactoryBean">

        <property name="dataSource" ref="dataSource"/>

        <property name="mapperLocations" value="classpath:com/coshaho/learn/pojo/*.xml"/>

    </bean>

    <bean class="org.mybatis.spring.mapper.MapperScannerConfigurer">

        <property name="basePackage" value="com.coshaho.learn.dao"/>

        <property name="sqlSessionFactoryBeanName" value="sqlSessionFactory"/>

    </bean>
9、配置struts2文件;
    <action name="authorityDB" class="loginDB" method="authority">

        <result name="success">/success.jsp</result>

        <result name="error">/error.jsp</result>

    </action>
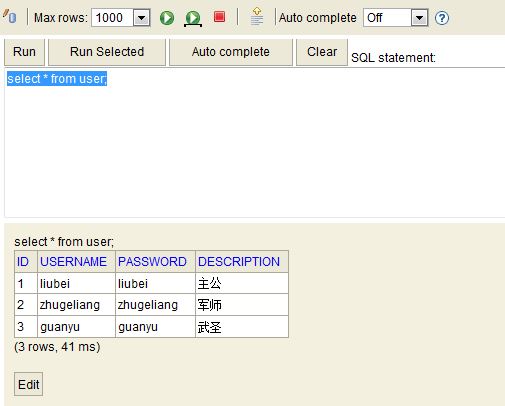
10、H2数据库USER表并插入测试数据;
11、增加登陆页面logindb.jsp;
<html>

<head>

<%String path = request.getContextPath();%>

</head>

<body>

    <form action="<%=path%>/framework/authorityDB.action" method="post">

        UserName:<input type="text" name="username"/><p/>

        Password:<input type="password" name="password"/><p/>

        <input type="submit" name="submit"/>

    </form>

</body>

</html>
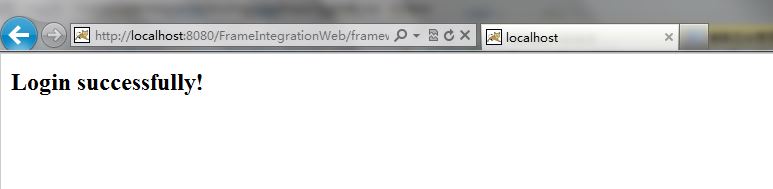
12、启动tomcat,访问http://localhost:8080/FrameIntegrationWeb/logindb.jsp。

Spring,Struts2,MyBatis,Activiti,Maven,H2,Tomcat集成(三)——H2,MyBatis集成的更多相关文章
- Spring学习总结(五)——Spring整合MyBatis(Maven+MySQL)二
接着上一篇博客<Spring整合MyBatis(Maven+MySQL)一>继续. Spring的开放性和扩张性在J2EE应用领域得到了充分的证明,与其他优秀框架无缝的集成是Spring最 ...
- Spring学习总结(五)——Spring整合MyBatis(Maven+MySQL)一
MyBatis-Spring 会帮助你将 MyBatis 代码无缝地整合到 Spring 中. 使用这个类库中的类, Spring 将会加载必要的MyBatis工厂类和 session 类. 这个类库 ...
- spring+struts2+mybatis
struts2.2.3 + spring3.1.0 + mybatis3.1.0集成简单demo 项目下载地址:http://download.csdn.net/detail/afgasdg/4171 ...
- 整合第二次(SSM第一次)------------>spring+struts2+mybatis
今天我们来讲解一下SSM整合,感觉整合这个比上一篇整合更费时,原因在于自己不太熟悉MyBatis了,下午的时候恶补了一下,看了一下相关的文档和PDF电子书,知识真的是你不用就会忘记的,以后还是不能懈怠 ...
- dubbo+zookeeper+jsp+springmvc+spring+mybatis+mysql+maven完整示例
项目分为三部分,这里分为三个maven项目(基于web,所以最后一个为maven创建的web项目) 1.接口定义以及实体类定义(api+pojo) --- maven创建java项目,打包成jar 2 ...
- (4)Maven快速入门_4在Spring+SpringMVC+MyBatis+Oracle+Maven框架整合运行在Tomcat8中
利用Maven 创建Spring+SpringMVC+MyBatis+Oracle 项目 分了三个项目 Dao (jar) Service (jar) Controller (web) ...
- 手动配置三大框架整合:Spring+Struts2+mybatis
如今主流的项目框架中,数据库持久层有可能不是hibernate,而是mybatis或者ibatis,事实上它们都是一样的,以下我来把环境搭建一下: [导入相关jar包]新建web项目projectms ...
- Spring+Mybatis+SpringMVC+Maven+MySql搭建实例
林炳文Evankaka原创作品.转载请注明出处http://blog.csdn.net/evankaka 摘要:本文主要讲了如何使用Maven来搭建Spring+Mybatis+SpringMVC+M ...
- mybatis+spring+struts2框架整合
近期公司要开发新的项目,要用struts2+mybatis+spring框架,所以学习了下,来自己的博客发表下,希望能给大家带来帮助!下边我把我的myschool开发的源代码以及数据库贴出来! 开 ...
- 构建 shiro struts2 spring3 mybatis 的maven项目
书接上回 构建 struts2 spring3 mybatis 的maven项目 构建 pom.xml 继续在原有框架下 融合shiro ,具体shiro是啥 这里就不解释了,恩 反正功能挺强大的 本 ...
随机推荐
- CBV之详解
一,CBV,基于反射实现根据请求方式不同,执行不同的方法. 1. 开发模式 - 普通开发方式(前后端放在一起写) - 前后端分离 2. 后端开发 为前端提供URL(API/接口的开发) 注:永远返回H ...
- 9.11 Django视图 view和路由
2018-9-11 16:34:16 2018-9-11 19:00:24 越努力,.越幸运! Django框架参考: https://www.cnblogs.com/liwenzhou/p/8296 ...
- 第一次php之旅
话说起来,我也是刚接触php不久,刚开始是因为想自己做一个从前端到后台完整的网站,所以去学后台技术,在各种语言的选择中,由于php语言的简单,易学,功能强大,开发速度快等原因,最终我选择了php! 一 ...
- hdu2222 Keywords Search【AC自动机】
Keywords Search Time Limit: 2000/1000 MS (Java/Others) Memory Limit: 131072/131072 K (Java/Others ...
- windows10配置tensorflow深度学习环境(GPU版)各种坑
我们配置一个tensorflow-gpu版的深度学习环境 windows10 64 python3.5 vs2017(需要C++部分) cuda9.0 cudnn7.1 GeForce GTX1060 ...
- Anaconda中配置Pyspark的Spark开发环境
1.windows下载并安装Anaconda集成环境 URL:https://www.continuum.io/downloads 2.在控制台中测试ipython是否启动正常 3.安装JDK 3.1 ...
- Linux:发行版安装包的下载地址
1.Linux发行版网址 发行版 http://distrowatch.com Linux发行版信息大全 Ubuntu http://www.ubuntu.com 官网 http://cdimage. ...
- POJ_1050_To the Max
To the Max Time Limit: 1000MS Memory Limit: 10000K Total Submissions: 49811 Accepted: 26400 Desc ...
- python3学习笔记(9)_closure
#python 学习笔记 2017/07/13 # !/usr/bin/env python3 # -*- conding:utf-8 -*- #从高阶函数的定义,我们可以知道,把函数作为参数的函数, ...
- J - Fire!---UVA 11624
题目链接 题意:J代表Joe的位置,F代表火的起点,下一刻火将会向四周扩散,求Joe逃离的最短时间,如果不能逃离输出IMPOSSIBLE; 注意火的起点可能不止一处 可以用两次bfs分别求出人到达某个 ...