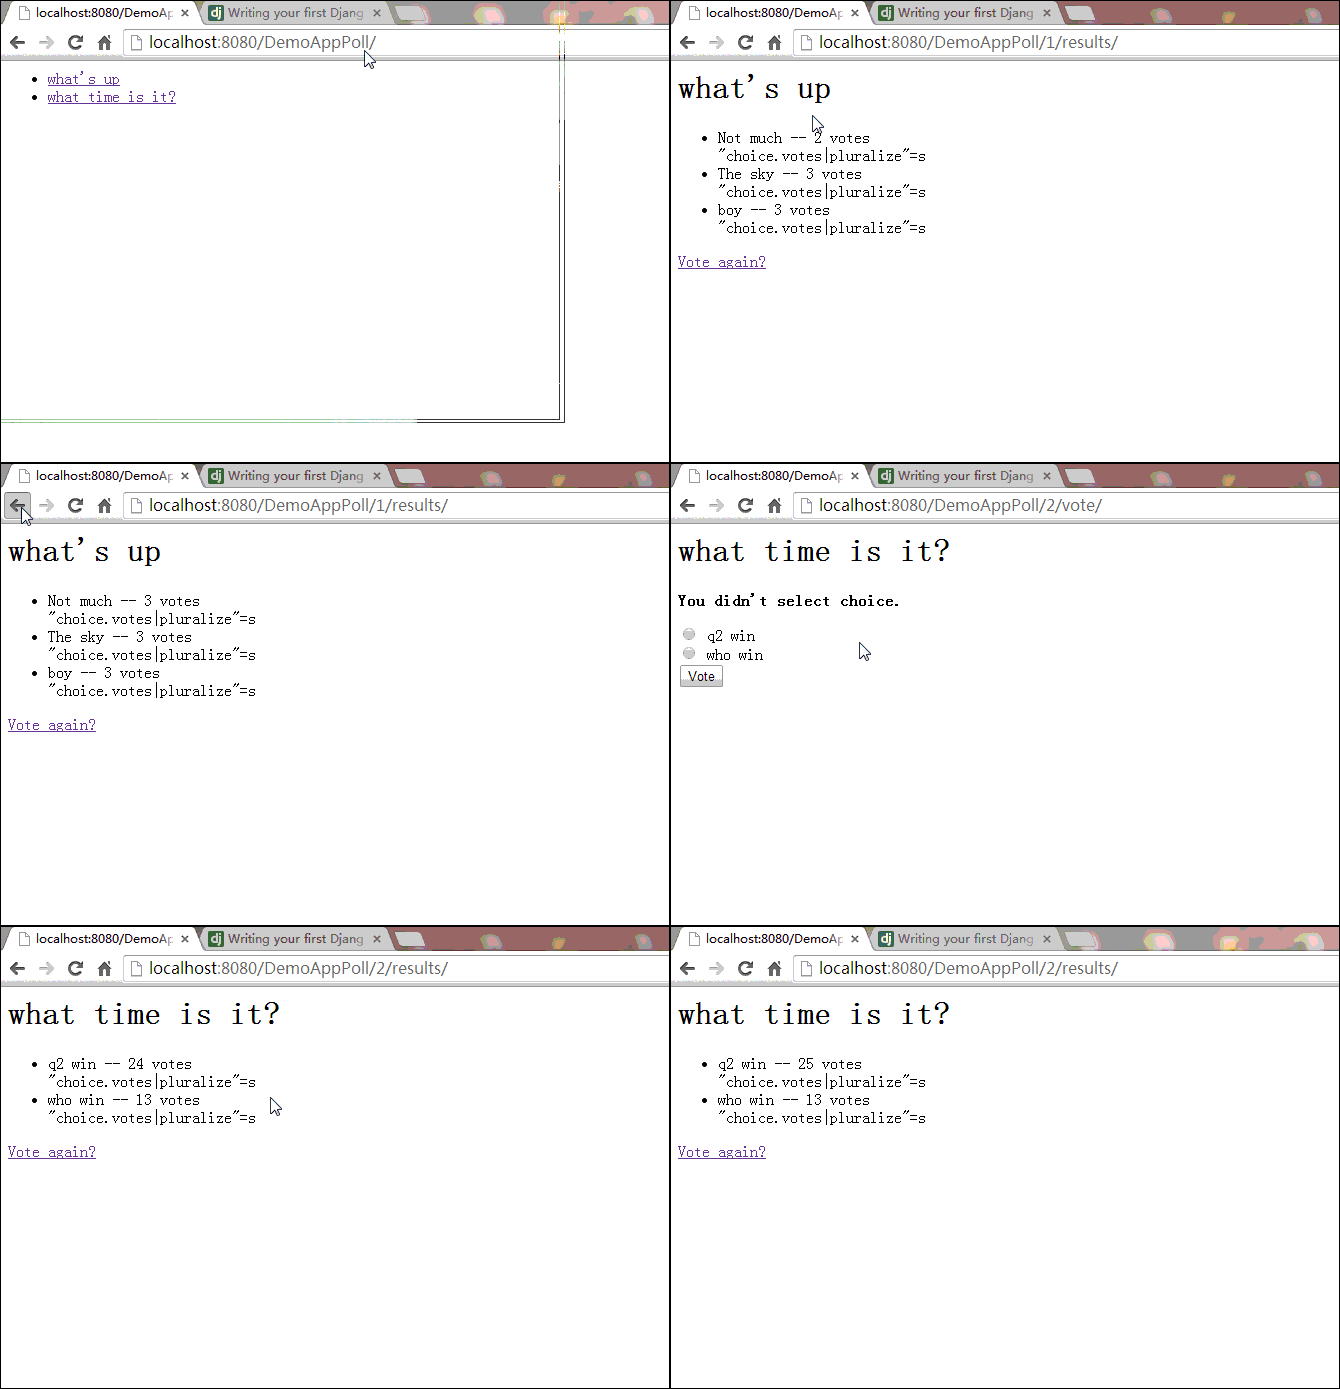
# Writing your-first Django-app-part 4-simple-form
- 简单的表单
- 处理表单提交-跳转/错误信息
- 处理表单提交--结果显示
- 通用view (generic view) 设计:越少代码越好?
- 1.修改DemoAppPoll/urls.py
- 2.修改DemoAppPoll/views.py
简单的表单
DemoAppPoll/templates/details.html
<h1>{{ question.question_text }}</h1>

{% if error_message %}<p><strong>{{ error_message }}</strong></p>{% endif %}

<form action="{% url 'DemoAppPoll:vote' question.id %}" method="post">

    {% csrf_token %}

    {% for choice in question.choice_set.all %}

        <input type="radio" name="choice" id="choice{{ forloop.counter }}" value="{{ choice.id }}" />

        <label for="choice{{ forloop.counter }}">{{ choice.choice_text }}</label><br />

    {% endfor %}

    <input type="submit" value="Vote" />

</form>
转换成源码文件是:
<h1>what time is it?</h1>

<form action="/DemoAppPoll/2/vote/" method="post">

<input type='hidden' name='csrfmiddlewaretoken' value='nEUM2klSzxP2tZFq9oFnVai2MqqUt2z2' />

    <input type="radio" name="choice" id="choice1" value="4" />

    <label for="choice1">q2 win</label><br />

    <input type="radio" name="choice" id="choice2" value="5" />

    <label for="choice2">who win</label><br />

<input type="submit" value="Vote" />

</form>
这里有几个要关注的地方:
1> 表单的提交地址,我们写的是{% url 'DemoAppPoll:vote' question.id %},在DemoAppPoll/urls.py里,我们使用
url(r'^(?P<question_id>\d+)/vote/$', views.vote, name='vote'
名称为vote来处理这个url匹配,全称需要加上命名空间,就成了DemoAppPoll:vote(http://localhost:8080/DemoAppPoll/2/vote/)
2>forloop.counter,用来显示循环的次数.
3>跨域保护CSRF, {% csrf_token %},自动生成一个隐藏的input.作为校验,保护.
处理表单提交-跳转/错误信息
上面的表单提交后,并没有做有效的处理.
DemoAppPoll/views.py
from django.shortcuts import render,get_object_or_404

from django.http import HttpResponse,HttpResponseRedirect

from django.core.urlresolvers import reverse

from DemoAppPoll.models import Question,Choice

def vote(request, question_id):

    #return HttpResponse("You're voting on question %s." % question_id)

    q = get_object_or_404(Question,pk=question_id)

    try:

        selected_choice=q.choice_set.get(pk=request.POST['choice'])

    except(KeyError,Choice.DoesNotExist):

        return render(request,'DemoAppPoll/detail.html',{

            'question':q,

            'error_message':"You didn't select choice.",

            })

    else:

        selected_choice.votes+=1

        selected_choice.save()

        print "question.id=",q.id

        print "question_text=",q.question_text

        print "selected_choice.id=",selected_choice.id

        print "selected_choice.votes=",selected_choice.votes

        print "url-redirect=",reverse('DemoAppPoll:results',args=(q.id,))

        return HttpResponseRedirect(reverse('DemoAppPoll:results',args=(q.id,)))
首先,根据问题ID,查找问题,确认为有效问题.
然后,根据post信息,判断是哪个选项.
投票的票数增加1之后,网页跳转.
有几个要点:
1>reqest.POST,类字典型数据(key-value).value总是Strngs
2>同理reqest.GET可以从GET方法中获取数据.
3>HttpResponseRedirect(url-to-redirect),网页跳转,仅带一个参数,那就是要跳转到的网页.
这里
4>需要跳转的url,使用了reverse()方法,返回:
"/DemoAppPoll/2/results/"
处理表单提交--结果显示
提交表单后,跳转到"/DemoAppPoll/2/results/",这个页面还没有显示什么实际的内容.
首先需要确认问题,然后指定模版来处理url:
DemoAppPoll/views.py/[fun]results
def results(request, question_id):

    #response = "You're looking at the results of question %s."

    #return HttpResponse(response % question_id)

    question = get_object_or_404(Question, pk=question_id)

    return render(request, 'DemoAppPoll/results.html', {'question': question})
下面就需要编写结果显示的界面:
DemoAppPoll/templates/results.html
<h1>{{ question.question_text }}</h1>

<ul>

{% for choice in question.choice_set.all %}

    <li>{{ choice.choice_text }} -- {{ choice.votes }} vote{{ choice.votes|pluralize }}</li>

	"choice.votes|pluralize"={{ choice.votes|pluralize }}

{% endfor %}

</ul>

<a href="{% url 'DemoAppPoll:detail' question.id %}">Vote again?</a>
"choice.votes|pluralize"=s ,单词加复数的方法.
通用viw设计:越少代码越好?
detail(),results(),index(),这三个views里方法,都代表了一个通用的网页开发过程:
根据URL参数,从数据库得到数据
加载模版,返回渲染后数据.
更为便捷的方法是,使用"generic views":
- 转换URLconf
- 删除冗余代码
- 使用"generic views."
1.修改DemoAppPoll/urls.py
from django.conf.urls import patterns,url

from DemoAppPoll import views

urlpatterns = patterns('',

    url(r'^$',views.IndexView.as_view(),name='index'),

    url(r'^(?P<pk>\d+)/$',views.DetailView.as_view(),name='detail'),

    url(r'^(?P<pk>\d+)/results/$',views.ResultsView.as_view(),name='results'),

    url(r'^(?P<question_id>\d+)/vote/$',views.vote,name='vote'),

)
和之前比较一下:
    url(r'^$', views.index, name='index'),

    url(r'^(?P<question_id>\d+)/$', views.detail, name='detail'),

    url(r'^(?P<question_id>\d+)/results/$', views.results, name='results'),

    url(r'^(?P<question_id>\d+)/vote/$', views.vote, name='vote'),
使用<pk>代替了<question_id>
2.修改DemoAppPoll/views.py
from django.views import generic

class IndexView(generic.ListView):

    template_name='DemoAppPoll/index.html'

    context_object_name='latest_question_list'

    def get_queryset(self):

        return Question.objects.order_by('-pub_date')[:5]

class DetailView(generic.DetailView):

    model = Question

    template_name="DemoAppPoll/detail.html"

class ResultsView(generic.DetailView):

    model = Question

    template_name="DemoAppPoll/results.html"
新导入了包,传入参数也有了变化.
之前是:
def index(request):

    latest_question_list = Question.objects.order_by('-pub_date')[:5]

    context = {'latest_question_list': latest_question_list}

    return render(request, 'DemoAppPoll/index.html', context)

def detail(request, question_id):

    question = get_object_or_404(Question, pk=question_id)

    return render(request, 'DemoAppPoll/detail.html', {'question': question})

def results(request, question_id):

    #response = "You're looking at the results of question %s."

    #return HttpResponse(response % question_id)

    question = get_object_or_404(Question, pk=question_id)

    return render(request, 'DemoAppPoll/results.html', {'question': question})
这里我们使用了2个view:
- ListView
- DetailView
1>每一个"geneic view"需要知道所作用的model.
2>DetailView需要一个 primary key,(pk,关键字).
3>ListView的默认模版是:"app name>/_list.html"
4>DetailView的默认模版是"app name>/_detail.html."
为了指定模版而不是默认的模版,给变量template_name赋值.
5>传递变量: quesiton对象,由于使用了modle:Question,需要另外再次传递.
但是,默认提供的的 question_list,我们需要使用的是latest_question_list变量,所以通过
context_object_name='latest_question_list'
这段代码,达到我们的目的.
# Writing your-first Django-app-part 4-simple-form的更多相关文章
- Writing your first Django app, part 1(转)
Let’s learn by example. Throughout this tutorial, we’ll walk you through the creation of a basic pol ...
- Django App(六) Customing Admin Form
这一篇主要是呼应第二篇时留下来的一个问题,就是如何自定义默认app admin下的Form 1.绑定数据实体 通过第二篇的努力,已经完成了数据实体到数据库的映射,可以将界面的更改保存到数据库,我们建 ...
- # Writing your first Django app, part 2
创建admin用户 D:\desktop\todoList\Django\mDjango\demoSite>python manage.py createsuperuser 然后输入密码 进入a ...
- Django App(四) Submit a form
经过前面的努力,到这里我们已经基本完成了,从服务器到浏览器的数据下发,还没有解决从浏览器到服务器的数据上传,这一节将创建一个Form获取从浏览器提交的数据 1.新建Form 接着前面建的项目,网上调查 ...
- Writing your first Django
Quick install guide 1.1 Install Python, it works with Python2.6, 2.7, 3.2, 3.3. All these version ...
- Python-Django 第一个Django app
第一个Django app by:授客 QQ:1033553122 测试环境: Python版本:python-3.4.0.amd64 下载地址:https://www.python.org/do ...
- Django APP打包重用
引言 有时候,我们需要将自己写的app分发(dist)给同事,分享给朋友,或者在互联网上发布,这都需要打包.分发我们的app. Django的子系统重用是基于app级别的.也就是一个项目可以包含多个互 ...
- Django 2.0.1 官方文档翻译: 编写你的第一个 Django app,第一部分(Page 6)
编写你的第一个 Django app,第一部分(Page 6)转载请注明链接地址 Django 2.0.1 官方文档翻译: Django 2.0.1.dev20171223092829 documen ...
- Django 2.0.1 官方文档翻译: 编写你的第一个 Django app,第七部分(Page 12)
编写你的第一个 Django app,第七部分(Page 12)转载请注明链接地址 本节教程承接第六部分(page 11)的教程.我们继续开发 web-poll应用,并专注于自定义django的自动生 ...
- Django 2.0.1 官方文档翻译:编写你的第一个 Django app,第六部分(Page 11)
编写你的第一个 Django app,第六部分(Page 11)转载请注明链接地址 本教程上接前面第五部分的教程.我们构建了一个经过测试的 web-poll应用,现在我们会添加一个样式表和一张图片. ...
随机推荐
- Oracle 12C -- top-n查询新特性
Oracle 12C -- top-n查询新特性在12C中,增加了一些新的特性.可以指定返回结果集的指定数量的行.或按照百分比返回行. SQL> select count(*) from emp ...
- 12C -- 配置EM Express的端口
EM Express是基于web接口的图形化数据库管理工具. 内嵌到数据库中,可以用来监控.管理数据的性能和完成大多数管理工作. EM Express是轻量级的管理工具,减少了数据库服务器的开销.没有 ...
- 传智播客c/c++公开课学习笔记--邮箱账户的破解与邮箱安全防控
一.SMTP协议 SMTP(SimpleMail Transfer Protocol)即简单邮件传输协议. SMTP协议属于TCP/IP协议簇,通过SMTP协议所指定的server,就能够把E-mai ...
- jlink下载不进去程序
- springboot 多环境配置yml或properties
https://www.cnblogs.com/mr-yang-localhost/p/8971327.html springboot 多环境配置 https://blog.csdn.net/li ...
- Navicat_Premium 连接oracle遇到ORA-28457
解决方案很简单,我用oracle文件目录下的oci.dll替换了navicat文件目录下的oci.dll,之后很顺畅地就连上了.
- jota-time 练习
public static void main(String[] args) { LocalDate now = new LocalDate(); //输出形式为yyyy-MM-dd System.o ...
- java.lang.RuntimeException: Date pattern must be set for column update_time in the schema of component
使用Talend open studio ,从mysql数据源中读取数据,将数据导出到excel文档,另外一个mysql数据库,和一个普通文件,遇到标题的错误,模型如下图所示: tMap将30.7中 ...
- [LeetCode] Contains Duplicate & Contains Duplicate II
Contains Duplicate Given an array of integers, find if the array contains any duplicates. Your funct ...
- Android 性能优化总结
App 流畅运行,是用户体验的第一步.App 流程运行,涉及到性能优化,主要涉及到布局优化, 绘制优化,内存泄漏优化,响应速度优化,列表展示优化,Bitmap 优化,线程优化,包大小优化. 布局优化 ...

