Tornado之模板
知识点
- 静态文件配置
- static_path
- StaticFileHandler
- 模板使用
- 变量与表达式
- 控制语句
- 函数
- 块
4.1 静态文件
现在有一个预先写好的静态页面文件 (下载静态文件资源), 我们来看下如何用tornado提供静态文件。
static_path
我们可以通过向web.Application类的构造函数传递一个名为static_path的参数来告诉Tornado从文件系统的一个特定位置提供静态文件,如:
app = tornado.web.Application(

    [(r'/', IndexHandler)],

    static_path=os.path.join(os.path.dirname(__file__), "statics"),

)
在这里,我们设置了一个当前应用目录下名为statics的子目录作为static_path的参数。现在应用将以读取statics目录下的filename.ext来响应诸如/static/filename.ext的请求,并在响应的主体中返回。
对于静态文件目录的命名,为了便于部署,建议使用static
对于我们提供的静态文件资源,可以通过http://127.0.0.1/static/html/index.html来访问。而且在index.html中引用的静态资源文件,我们给定的路径也符合/static/...的格式,故页面可以正常浏览。
<link href="/static/plugins/bootstrap/css/bootstrap.min.css" rel="stylesheet">

<link href="/static/plugins/font-awesome/css/font-awesome.min.css" rel="stylesheet">

<link href="/static/css/reset.css" rel="stylesheet">

<link href="/static/css/main.css" rel="stylesheet">

<link href="/static/css/index.css" rel="stylesheet">

<script src="/static/js/jquery.min.js"></script>

<script src="/static/plugins/bootstrap/js/bootstrap.min.js"></script>

<script src="/static/js/index.js"></script>
StaticFileHandler
我们再看刚刚访问页面时使用的路径http://127.0.0.1/static/html/index.html,这中url显然对用户是不友好的,访问很不方便。我们可以通过tornado.web.StaticFileHandler来自由映射静态文件与其访问路径url。
tornado.web.StaticFileHandler是tornado预置的用来提供静态资源文件的handler。
import os

current_path = os.path.dirname(__file__)

app = tornado.web.Application(

    [

        (r'^/()$', StaticFileHandler, {"path":os.path.join(current_path, "statics/html"), "default_filename":"index.html"}),

        (r'^/view/(.*)$', StaticFileHandler, {"path":os.path.join(current_path, "statics/html")}),

    ],

    static_path=os.path.join(current_path, "statics"),

)
- path 用来指明提供静态文件的根路径,并在此目录中寻找在路由中用正则表达式提取的文件名。
- default_filename 用来指定访问路由中未指明文件名时,默认提供的文件。
现在,对于静态文件statics/html/index.html,可以通过三种方式进行访问:
4.2 使用模板
1. 路径与渲染
使用模板,需要仿照静态文件路径设置一样,向web.Application类的构造函数传递一个名为template_path的参数来告诉Tornado从文件系统的一个特定位置提供模板文件,如:
app = tornado.web.Application(

    [(r'/', IndexHandler)],

    static_path=os.path.join(os.path.dirname(__file__), "statics"),

    template_path=os.path.join(os.path.dirname(__file__), "templates"),

)
在这里,我们设置了一个当前应用目录下名为templates的子目录作为template_path的参数。在handler中使用的模板将在此目录中寻找。
现在我们将静态文件目录statics/html中的index.html复制一份到templates目录中,此时文件目录结构为:
.

├── statics

│   ├── css

│   │   ├── index.css

│   │   ├── main.css

│   │   └── reset.css

│   ├── html

│   │   └── index.html

│   ├── images

│   │   ├── home01.jpg

│   │   ├── home02.jpg

│   │   ├── home03.jpg

│   │   └── landlord01.jpg

│   ├── js

│   │   ├── index.js

│   │   └── jquery.min.js

│   └── plugins

│       ├── bootstrap

│       │   └─...

│       └── font-awesome

│           └─...

├── templates

│   └── index.html

└── test.py
在handler中使用render()方法来渲染模板并返回给客户端。
class IndexHandler(RequestHandler):

    def get(self):

        self.render("index.html") # 渲染主页模板,并返回给客户端。

current_path = os.path.dirname(__file__)

app = tornado.web.Application(

    [

        (r'^/$', IndexHandler),

        (r'^/view/(.*)$', StaticFileHandler, {"path":os.path.join(current_path, "statics/html")}),

    ],

    static_path=os.path.join(current_path, "statics"),

    template_path=os.path.join(os.path.dirname(__file__), "templates"),

)
2. 模板语法
2-1 变量与表达式
在tornado的模板中使用{{}}作为变量或表达式的占位符,使用render渲染后占位符{{}}会被替换为相应的结果值。
我们将index.html中的一条房源信息记录
<li class="house-item">

    <a href=""><img src="/static/images/home01.jpg"></a>

    <div class="house-desc">

        <div class="landlord-pic"><img src="/static/images/landlord01.jpg"></div>

        <div class="house-price">¥<span>398</span>/晚</div>

        <div class="house-intro">

            <span class="house-title">宽窄巷子+160平大空间+文化保护区双地铁</span>

            <em>整套出租 - 5分/6点评 - 北京市丰台区六里桥地铁</em>

        </div>

    </div>

</li>
改为模板:
<li class="house-item">

    <a href=""><img src="/static/images/home01.jpg"></a>

    <div class="house-desc">

        <div class="landlord-pic"><img src="/static/images/landlord01.jpg"></div>

        <div class="house-price">¥<span>{{price}}</span>/晚</div>

        <div class="house-intro">

            <span class="house-title">{{title}}</span>

            <em>整套出租 - {{score}}分/{{comments}}点评 - {{position}}</em>

        </div>

    </div>

</li>
渲染方式如下:
class IndexHandler(RequestHandler):

    def get(self):

        house_info = {

            "price": 398,

            "title": "宽窄巷子+160平大空间+文化保护区双地铁",

            "score": 5,

            "comments": 6,

            "position": "北京市丰台区六里桥地铁"

        }

        self.render("index.html", **house_info)
{{}}不仅可以包含变量,还可以是表达式,如:
<li class="house-item">

    <a href=""><img src="/static/images/home01.jpg"></a>

    <div class="house-desc">

        <div class="landlord-pic"><img src="/static/images/landlord01.jpg"></div>

        <div class="house-price">¥<span>{{p1 + p2}}</span>/晚</div>

        <div class="house-intro">

            <span class="house-title">{{"+".join(titles)}}</span>

            <em>整套出租 - {{score}}分/{{comments}}点评 - {{position}}</em>

        </div>

    </div>

</li>

class IndexHandler(RequestHandler):

    def get(self):

        house_info = {

            "p1": 198,

            "p2": 200,

            "titles": ["宽窄巷子", "160平大空间", "文化保护区双地铁"],

            "score": 5,

            "comments": 6,

            "position": "北京市丰台区六里桥地铁"

        }

        self.render("index.html", **house_info)
2-2 控制语句
可以在Tornado模板中使用Python条件和循环语句。控制语句以{\%和\%}包围,并以类似下面的形式被使用:
{% if page is None %}
或
{% if len(entries) == 3 %}
控制语句的大部分就像对应的Python语句一样工作,支持if、for、while,注意end:
{% if ... %} ... {% elif ... %} ... {% else ... %} ... {% end %}

{% for ... in ... %} ... {% end %}

{% while ... %} ... {% end %}
再次修改index.html:
<ul class="house-list">

    {% if len(houses) > 0 %}

        {% for house in houses %}

        <li class="house-item">

            <a href=""><img src="/static/images/home01.jpg"></a>

            <div class="house-desc">

                <div class="landlord-pic"><img src="/static/images/landlord01.jpg"></div>

                <div class="house-price">¥<span>{{house["price"]}}</span>/晚</div>

                <div class="house-intro">

                    <span class="house-title">{{house["title"]}}</span>

                    <em>整套出租 - {{house["score"]}}分/{{house["comments"]}}点评 - {{house["position"]}}</em>

                </div>

            </div>

        </li>

        {% end %}

    {% else %}

        对不起,暂时没有房源。

    {% end %}

</ul>
python中渲染语句为:
class IndexHandler(RequestHandler):

    def get(self):

        houses = [

        {

            "price": 398,

            "title": "宽窄巷子+160平大空间+文化保护区双地铁",

            "score": 5,

            "comments": 6,

            "position": "北京市丰台区六里桥地铁"

        },

        {

            "price": 398,

            "title": "宽窄巷子+160平大空间+文化保护区双地铁",

            "score": 5,

            "comments": 6,

            "position": "北京市丰台区六里桥地铁"

        },

        {

            "price": 398,

            "title": "宽窄巷子+160平大空间+文化保护区双地铁",

            "score": 5,

            "comments": 6,

            "position": "北京市丰台区六里桥地铁"

        },

        {

            "price": 398,

            "title": "宽窄巷子+160平大空间+文化保护区双地铁",

            "score": 5,

            "comments": 6,

            "position": "北京市丰台区六里桥地铁"

        },

        {

            "price": 398,

            "title": "宽窄巷子+160平大空间+文化保护区双地铁",

            "score": 5,

            "comments": 6,

            "position": "北京市丰台区六里桥地铁"

        }]

        self.render("index.html", houses=houses)
2-3 函数
static_url()
Tornado模板模块提供了一个叫作static_url的函数来生成静态文件目录下文件的URL。如下面的示例代码:
<link rel="stylesheet" href="{{ static_url("style.css") }}">
这个对static_url的调用生成了URL的值,并渲染输出类似下面的代码:
<link rel="stylesheet" href="/static/style.css?v=ab12">
优点:
- static_url函数创建了一个基于文件内容的hash值,并将其添加到URL末尾(查询字符串的参数v)。这个hash值确保浏览器总是加载一个文件的最新版而不是之前的缓存版本。无论是在你应用的开发阶段,还是在部署到生产环境使用时,都非常有用,因为你的用户不必再为了看到你的静态内容而清除浏览器缓存了。
- 另一个好处是你可以改变你应用URL的结构,而不需要改变模板中的代码。例如,可以通过设置static_url_prefix来更改Tornado的默认静态路径前缀/static。如果使用static_url而不是硬编码的话,代码不需要改变。
转义
我们新建一个表单页面new.html
<!DOCTYPE html>

<html>

    <head>

        <title>新建房源</title>

    </head>

    <body>

        <form method="post">

            <textarea name="text"></textarea>

            <input type="submit" value="提交">

        </form>

        {{text}}

    </body>

</html>
对应的handler为:
class NewHandler(RequestHandler):

    def get(self):

        self.render("new.html", text="")

    def post(self):

        text = self.get_argument("text", "")

        print text

        self.render("new.html", text=text)
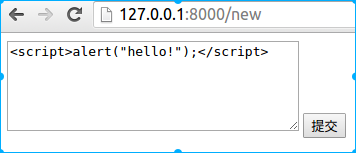
当我们在表单中填入如下内容时:
<script>alert("hello!");</script>

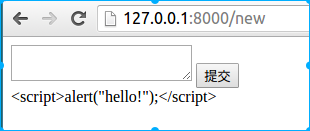
写入的js程序并没有运行,而是显示出来了:

我们查看页面源代码,发现<、>、"等被转换为对应的html字符。
<script>alert("hello!");</script>
这是因为tornado中默认开启了模板自动转义功能,防止网站受到恶意攻击。
我们可以通过raw语句来输出不被转义的原始格式,如:
{% raw text %}
注意:在Firefox浏览器中会直接弹出alert窗口,而在Chrome浏览器中,需要set_header("X-XSS-Protection", 0)
若要关闭自动转义,一种方法是在Application构造函数中传递autoescape=None,另一种方法是在每页模板中修改自动转义行为,添加如下语句:
{% autoescape None %}
escape()
关闭自动转义后,可以使用escape()函数来对特定变量进行转义,如:
{{ escape(text) }}
自定义函数
在模板中还可以使用一个自己编写的函数,只需要将函数名作为模板的参数传递即可,就像其他变量一样。
我们修改后端如下:
def house_title_join(titles):

    return "+".join(titles)

class IndexHandler(RequestHandler):

    def get(self):

        house_list = [

        {

            "price": 398,

            "titles": ["宽窄巷子", "160平大空间", "文化保护区双地铁"],

            "score": 5,

            "comments": 6,

            "position": "北京市丰台区六里桥地铁"

        },

        {

            "price": 398,

            "titles": ["宽窄巷子", "160平大空间", "文化保护区双地铁"],

            "score": 5,

            "comments": 6,

            "position": "北京市丰台区六里桥地铁"

        }]

        self.render("index.html", houses=house_list, title_join = house_title_join)
前段模板我们修改为:
<ul class="house-list">

    {% if len(houses) > 0 %}

        {% for house in houses %}

        <li class="house-item">

            <a href=""><img src="/static/images/home01.jpg"></a>

            <div class="house-desc">

                <div class="landlord-pic"><img src="/static/images/landlord01.jpg"></div>

                <div class="house-price">¥<span>{{house["price"]}}</span>/晚</div>

                <div class="house-intro">

                    <span class="house-title">{{title_join(house["titles"])}}</span>

                    <em>整套出租 - {{house["score"]}}分/{{house["comments"]}}点评 - {{house["position"]}}</em>

                </div>

            </div>

        </li>

        {% end %}

    {% else %}

        对不起,暂时没有房源。

    {% end %}

</ul>
2-4 块
我们可以使用块来复用模板,块语法如下:
{% block block_name %} {% end %}
现在,我们对模板index.html进行抽象,抽离出父模板base.html如下:
<!DOCTYPE html>

<html>

<head>

    <meta charset="utf-8">

    <meta http-equiv="X-UA-Compatible" content="IE=edge">

    <meta name="viewport" content="width=device-width, initial-scale=1, maximum-scale=1, user-scalable=no">

    {% block page_title %}{% end %}

    <link href="{{static_url('plugins/bootstrap/css/bootstrap.min.css')}}" rel="stylesheet">

    <link href="{{static_url('plugins/font-awesome/css/font-awesome.min.css')}}" rel="stylesheet">

    <link href="{{static_url('css/reset.css')}}" rel="stylesheet">

    <link href="{{static_url('css/main.css')}}" rel="stylesheet">

    {% block css_files %}{% end %}

</head>

<body>

    <div class="container">

        <div class="top-bar">

            {% block header %}{% end %}

        </div>

        {% block body %}{% end %}

        <div class="footer">

            {% block footer %}{% end %}

        </div>

    </div>

    <script src="{{static_url('js/jquery.min.js')}}"></script>

    <script src="{{static_url('plugins/bootstrap/js/bootstrap.min.js')}}"></script>

    {% block js_files %}{% end %}

</body>

</html>
而子模板index.html使用extends来使用父模板base.html,如下:
{% extends "base.html" %}
{% block page_title %}
<title>爱家-房源</title>
{% end %}
{% block css_files %}
<link href="{{static_url('css/index.css')}}" rel="stylesheet">
{% end %}
{% block js_files %}
<script src="{{static_url('js/index.js')}}"></script>
{% end %}
{% block header %}
<div class="nav-bar">
<h3 class="page-title">房 源</h3>
</div>
{% end %}
{% block body %}
<ul class="house-list">
{% if len(houses) > 0 %}
{% for house in houses %}
<li class="house-item">
<a href=""><img src="/static/images/home01.jpg"></a>
<div class="house-desc">
<div class="landlord-pic"><img src="/static/images/landlord01.jpg"></div>
<div class="house-price">¥<span>{{house["price"]}}</span>/晚</div>
<div class="house-intro">
<span class="house-title">{{title_join(house["titles"])}}</span>
<em>整套出租 - {{house["score"]}}分/{{house["comments"]}}点评 - {{house["position"]}}</em>
</div>
</div>
</li>
{% end %}
{% else %}
对不起,暂时没有房源。
{% end %}
</ul>
{% end %}
{% block footer %}
<p><span><i class="fa fa-copyright"></i></span>爱家租房 享受家的温馨</p>
{% end %}
4.3 练习
对比Django模板与Tornado模板的异同。
练习使用Tornado模板的语法。
4.3 练习
对比Django模板与Tornado模板的异同。
练习使用Tornado模板的语法。
Tornado之模板的更多相关文章
- 学习tornado:模板
第一次接触tornado的template,是在做oastub的时候,因为一位同学在handler里面硬编码了html代码,我决定引入template机制来降低逻辑与页面的耦合. 简介 tornado ...
- 第二百六十一节,Tornado框架模板引擎本质
Tornado框架模板引擎本质 只需要了解一下即可 本篇就来详细的剖析模板处理的整个过程. 上图是返回给用户一个html文件的整个流程,较之前的Demo多了绿色流线的步骤,其实就是把[self.wri ...
- 第二百五十九节,Tornado框架-模板语言的三种方式
Tornado框架-模板语言的三种方式 模板语言就是可以在html页面,接收逻辑处理的self.render()方法传输的变量,将数据渲染到对应的地方 一.接收值渲染 {{...}}接收self.re ...
- tornado下模板引擎的使用
模板引擎 Tornado中的模板语言和django中类似,模板引擎将模板文件载入内存,然后将数据嵌入其中,最终获取到一个完整的字符串,再将字符串返回给请求者. Tornado =的模板支持“控制语句” ...
- tornado之模板扩展
当我们有多个模板的时候,很多模板之间其实相似度很高.我们期望可以重用部分网页代码.这在tornado中可以通过extends语句来实现.为了扩展一个已经存在的模板,你只需要在新的模板文件的顶部放上一句 ...
- tornado 04 模板
一.模板 #模板就是一个HTML文件,只是其中添加了模板语法,需要服务器的渲染才能正常显示数据 #通过render可以返回一个html网页,不过那都是固定的页面,固定的数据,如果数据是不确定的,是会不 ...
- web框架详解之 tornado 四 模板引擎、session、验证码、xss
一.模板引擎 基本使用 继承,extends 页面整体布局用继承 导入,include 如果是小组件等重复的那么就用导入 下面是目录 首先在controllers里面创建一个文件,文件里面是页面类 # ...
- web框架详解之tornado 一 模板语言以及框架本质
一.概要 Tornado 是 FriendFeed 使用的可扩展的非阻塞式 web 服务器及其相关工具的开源版本.这个 Web 框架看起来有些像web.py 或者 Google 的 webapp,不过 ...
- 2018护网杯easy_tornado(SSTI tornado render模板注入)
考点:SSTI注入 原理: tornado render是python中的一个渲染函数,也就是一种模板,通过调用的参数不同,生成不同的网页,如果用户对render内容可控,不仅可以注入XSS代码,而且 ...
随机推荐
- Windows-CreateProcess-fdwCreate
DEBUG_PROCESS: DEBUG_ONLY_THIS_PROCESS: CREATE_SUSPENDED: DETACHED_PROCESS: CREATE_NEW_CONSOLE: CREA ...
- [UE4]虚幻4的智能指针
虚幻自己实现了一套智能指针系统,为了跨平台. 指针: 占用8个字节,4个字节的Object指针,4字节的引用计数控制器的指针, 引用计数控制器需要12字节, 一个C++的Object指针4字节,一个共 ...
- 《DSP using MATLAB》 Problem 3.22
代码: %% ------------------------------------------------------------------------ %% Output Info about ...
- 线程池、及使用场景、线程安全封装、ConcurrentHashMap应用场景
https://blog.csdn.net/sinbadfreedom/article/details/80467253 :1.HashMap与ConcurrentHashMap的区别与应用场景 h ...
- smarty学习——缓存
存被用来保存一个文档的输出从而加速display()或fetch()函数的执行.如果一个函数被加进缓存,那么实际输出的内容将用缓存来代替. 缓存可让事物非常快速的执行,特别是带有长计算时间的模板.一旦 ...
- smarty 学习 ——smarty 开发环境配置
smarty 对于开发的便利性不用多说了,直接进行开发环境的配置. 1.下载smarty 开发包 直接在官网进行下载即可 2.引用开发核心库 将libs文件中的东西拷贝到工程. smarty.clas ...
- Understanding Safari Reader
Interesting enough to find out the Reader function in Safari is actually Javascript and there are ma ...
- button使用注意
<button type="button" class="btn btn-primary" onclick="ChangePassword(); ...
- yum下载文件的存放位置
yum下载文件的存放位置 默认是: /var/cache/yum 也可以在 /etc/yum.conf 指定 cachedir=/var/cache/yum #存放目录keepcache=1 # ...
- Windows OS系统变量
%userprofile% C:\Users\Administrator\ %windir% C:\Windows\
