Java学习之==>IO文件操作体系
一、概述
在整个 Java.io 中最重要的就是5个类和一个接口。5个类指的是 File、InputStream、OutputStream、Reader、Writer,一个接口指的是Serializable。掌握了这些IO的核心操作那么对于Java中的IO体系也就有了一个初步的认识了。
- File(文件类):主要用来描述文件或目录的属性,例如:文件大小,修改文件名,删除文件,判断文件所在路径等。
- InputStream(字节输入流):抽象类,基于字节的输入操作,是所有输入流的父类。定义了所有输入流都具有的共同特征。
- OutputStream(字节输出流):抽象类。基于字节的输出操作。是所有输出流的父类。定义了所有输出流都具有的共同特征。
- Reader(输入流):抽象类,基于字符的输入操作。
- Writer(输出流):抽象类,基于字符的输出操作。
- Serializable():
二、File 类
从定义看,File类是Object的直接子类,同时它继承了Comparable接口可以进行数组的排序。File 类的操作包括文件的创建、删除、重命名、得到路径、创建时间等,以下是文件操作常用的函数。

File类是对文件系统中文件以及文件夹进行封装的对象,可以通过对象的思想来操作文件和文件夹。File类保存文件或目录的各种元数据信息,包括文件名、文件长度、最后修改时间、是否可读、获取当前文件的路径名,判断指定文件是否存在、获得当前目录中的文件列表,创建、删除文件和目录等方法。
private static void demo01() {

  File file = new File("/course/test.log");

  boolean canRead = file.canRead();

  System.out.println("canRead = " + canRead);

  boolean canWrite = file.canWrite();

  System.out.println("canWrite = " + canWrite);

  boolean canExecute = file.canExecute();

  System.out.println("canExecute = " + canExecute);

  file.setReadable(true);

  canRead = file.canRead();

  System.out.println("canRead = " + canRead);

}

private static void demo02() {

  File file = new File("/course/test.log");

  String fileName = file.getName();

  System.out.println("fileName = " + fileName);

  File fileAbsoluteFile = file.getAbsoluteFile();

  System.out.println("fileAbsoluteFile = " + fileAbsoluteFile);

  String fileAbsolutePath = file.getAbsolutePath();

  System.out.println("fileAbsolutePath = " + fileAbsolutePath);

  String fileParent = file.getParent();

  System.out.println("fileParent = " + fileParent);

  File fileParentFile = file.getParentFile();

  System.out.println("fileParentFile = " + fileParentFile);

  String filePath = file.getPath();

  System.out.println("filePath = " + filePath);

}

private static void demo03() {

  File file = new File("/course");

  System.out.println("file.isFile() = " + file.isFile());

  System.out.println("file.isDirectory() = " + file.isDirectory());

}

private static void demo04() {

  File file = new File("/course/test.log");

  final boolean exists = file.exists();

  System.out.println("exists = " + exists);

  boolean canRead = file.canRead();

  System.out.println("canRead = " + canRead);

  boolean canWrite = file.canWrite();

  System.out.println("canWrite = " + canWrite);

  boolean canExecute = file.canExecute();

  System.out.println("canExecute = " + canExecute);

  boolean isFile = file.isFile();

  System.out.println("isFile = " + isFile);

  boolean isDir = file.isDirectory();

  System.out.println("isDir = " + isDir);

}
文件属性操作
/**

 * 遍历本地一个目录下.找到后缀名是.log的,且占用空间最大的那个文件删除之

 * 目录下还有目录,使用递归实现

 */

public class Case1 {

    public static void main(String[] args) {

        deleteLog("D:\\TestDir",".log");

    }

    /**

     * 遍历目下下的文件,删除指定后缀且文件大小最大的文件

     * @param path   遍历目录的路径

     * @param endstr 文件后缀

     */

    public static void deleteLog(String path,String endstr){

        // 定位文件描述

        File dir = new File(path);

        // 列出该目录下所有的文件对象,存入一个文件对象数组当中

        File[] files = dir.listFiles();

        // 初始化最大文件对象和最大文件大小

        long maxFileSize = 0;

        File maxFile = null;

        // 遍历文件对象数组

        for (File file:files) {

            // 如果是文件,则找出指定后缀且大小最大的文件

            if (file.isFile()){

                long len = file.length();

                String fileName = file.getName();

                if (fileName.endsWith(endstr)){

                    if (len >maxFileSize ){

                        maxFileSize = len;

                        maxFile = file;

                    }

                }

            }

            // 如果是目录,则递归调用deleteLog

            if (file.isDirectory()){

                path =file.getAbsolutePath();

                deleteLog(path,endstr);

            }

        }

        if (maxFile != null){

            System.out.println("删除"+maxFile.getAbsolutePath()+"文件");

            maxFile.delete();

            System.out.println("删除成功");

        }

        else {

            System.out.println("未找到目标文件");

        }

    }

}
练习一
/**

 * case1: 实现文件复制,从指定位置复制到目标位置.

 * 思考,若指定文件不存在?

 * 若目标位置文件已存在?

 * 若目标位置目录不存在?

 * 其他请自行发挥

 */

public class Case3 {

    public static void main(String[] args) {

        String initialFile = "D:\\TestDir\\1.log";

        String targetDir = "D:\\TestDir\\subdir\\1.log";

        BufferedReader br = null;

        BufferedWriter bw = null;

        try {

            // 读文件

            br = new BufferedReader(new FileReader(initialFile));

            String value;

            String data = "";

            while ((value = br.readLine()) != null){

                data += value + "\n";

            }

            // 写文件

            bw = new BufferedWriter(new FileWriter(targetDir));

            bw.write(data);

            bw.flush();

        // 捕获异常

        }catch (FileNotFoundException ex){

            ex.printStackTrace();

        }catch (IOException ix) {

            ix.printStackTrace();

        }finally {

            try {

                if (null != br && null != bw){

                    br.close();

                    bw.close();

                }

            } catch (IOException e) {

                e.printStackTrace();

            }

        }

    }

}
练习二
三、IO流的分类
1、流的概念和作用
- 流代表任何有能力产出数据的数据源对象,或者是有能力接收数据的接收端对象。
- 流的本质是数据传输,根据数据传输特性将流抽象为各种类,方便更直观的进行数据操作。
- 流的作用是为数据源和目的地建立一个输送通道。
Java 中将输入输出抽象称为流,就好像水管,将两个容器连接起来。流是一组有顺序的,有起点和终点的字节集合,是对数据传输的总称或抽象。即数据在两设备间的传输称为流。
2、 IO流的分类
根据数据流向不同分为:输入流和输出流。
- 输入流: 从外部介质(磁盘,网络)->内存;
- 输出流: 从内存->外部介质(磁盘,网络);
根据处理数据类型的不同分为:字符流和字节流。
- 字节流:读取二进制数据,图片,视频,可执行文件等;
- 字符流:一般用于读取文本文件;
四、IO流体系结构

如上图所示,正如我们文章开篇讲到的,Java 的 IO 体系最重要的 5 个类,除了 File 类以外,整个 IO 体系将近 50 个类,都是由其余四个类(InputStream、OutputStream、Reader、Writer)派生出来的。但是这四个类都是抽象类,他们当中的绝大部分方法需要通过他们的子类来实现。
1、文件操作流

这四个类是专门操作文件流的,用法高度相似,区别在于前面两个是操作字节流,后面两个是操作字符流。它们都会直接操作文件流,直接与OS底层交互。因此他们也被称为节点流。注意使用这几个流的对象之后,需要关闭流对象,因为java垃圾回收器不会主动回收。
下面演示这四个流对象的基本用法:
public class App {

  public static void main(String[] args) {

    File file = new File("test.log");

    try (InputStream ins = new FileInputStream(file)) {

      byte[] buf = new byte[512];

      int len = 0;

      while ((len = ins.read(buf)) != -1) {

        String val = new String(buf, 0, len);

        System.out.println(val);

      }

    } catch (IOException ex) {

      throw new IllegalStateException(ex);

    }

  }

}
FileInputStream
public class App {

  public static void main(String[] args) {

    OutputStream outputStream = null;

    try {

      // 1.定位文件描述

      File file = new File("test.log");

      // 2.实例化要写文件的基本类FileOutputStream

      outputStream = new FileOutputStream(file);

      // 3.写数据

      String str = "hello world!";

      outputStream.write(str.getBytes());

    } catch (FileNotFoundException ffe) {

      ffe.printStackTrace();

    } catch (IOException ioe) {

      ioe.printStackTrace();

    } finally {

      try {

        // 4.关流,千万要记得关闭

        if (null != outputStream) {

          outputStream.close();

        }

      } catch (IOException e) {

        e.printStackTrace();

      }

    }

  }

}
FileOutputStream
public class App {

  public static void main(String[] args) {

    FileReader reader = null;

    try {

      // 1.文件描述

      File file = new File("test.log");

      // 2.定义文件读取流

      reader = new FileReader(file);

      // 3.文件读取

      char[] buf = new char[4];

      // 标准的写法

      int len = 0;

      while ((len = reader.read(buf)) != -1) {

        System.out.println("len=" + len);

        // 这里要注意,String的构造,要注意边界

        String val = new String(buf, 0, len);

        System.out.println(val);

      }

      // 这里的读取,如果不使用len来进行标识会有问题

      // while (reader.read(buf) != -1) {

      //   String val = new String(buf, 0, buf.length);

      //   System.out.println(val);

      // }

      // 理解的读取过程

      // while (len != -1) {

      //   len = reader.read(buf);

      //   if (len != -1) {

      //     String val = new String(buf, 0, len);

      //     System.out.println(val);

      //   }

      // }

    } catch (FileNotFoundException fnfe) {

      fnfe.printStackTrace();

    } catch (IOException ioe) {

      ioe.printStackTrace();

    } finally {

      // 4.关流

      if (null != reader) {

        try {

          reader.close();

        } catch (IOException e) {

          e.printStackTrace();

        }

      }

    }

  }

}
FileReader
public class App {

  public static void main(String[] args) {

    FileWriter fileWriter = null;

    try {

      // 1.定位文件描述

      File file = new File("test.log");

      // 2.实例化要写文件的基本类FileWriter

      fileWriter = new FileWriter(file);

      // 3.写数据

      String str = "hello world!";

      fileWriter.write(str);

    } catch (FileNotFoundException ffe) {

      ffe.printStackTrace();

    } catch (IOException ioe) {

      ioe.printStackTrace();

    } finally {

      try {

        // 4.关流,千万要记得关闭

        if (null != fileWriter) {

          fileWriter.close();

        }

      } catch (IOException e) {

        e.printStackTrace();

      }

    }

  }

}
FileWriter
2、缓冲操作流
计算机访问外部设备非常耗时。访问的频率越高,造成CPU闲置的概率就越大。为了减少访问外部存储的次数,应该在一次对外部设备的访问中,读写更多的数据。为此,除了程序和流节点间交换数据必需的读写机制外,还应该增加缓冲机制。缓冲流就是每一个数据流分配一个缓冲区,一个缓冲区就是一个临时存储数据的内存。这样可以减少访问硬盘的次数,提高传输效率。
- BufferedInputStream:当向缓冲流写入数据时候,数据先写到缓冲区,待缓冲区写满后,系统一次性将数据发送给输出设备;
- BufferedOutputStream :当从向缓冲流读取数据时候,系统先从缓冲区读出数据,待缓冲区为空时,系统再从输入设备读取数据到缓冲区;
- BufferedReader/BufferedWriter是将字符流(Reader)包装成缓冲流;
- BufferedReader提供一个readLine()可以方便地读取一行,而FileInputStream和FileReader只能读取一个字节或者一个字符;
同样,我们来演示一下基本用法:
public class BufferedReaderDemo {

  public static void main(String[] args) {

    test01("test.log");

    test02("test.log");

  }

  private static void test02(String fileName) {

    BufferedReader reader = null;

    try {

      // 1.文件描述

      File file = new File(fileName);

      // 2.定义文件读取流

      // 使用BufferedReader时,就这里与FileReader不同

      reader = new BufferedReader(new FileReader(file));

      // 3.文件读取

      String val = null;

      // 一行一行读取文件内容

      while ((val = reader.readLine()) != null) {

        System.out.println(val);

      }

    } catch (IOException ie) {

      ie.printStackTrace();

    } finally {

      // 4.关流

      if (null != reader) {

        try {

          reader.close();

        } catch (IOException e) {

          e.printStackTrace();

        }

      }

    }

  }

  private static void test01(String fileName) {

    Reader reader = null;

    try {

      // 1.文件描述

      File file = new File(fileName);

      // 2.定义文件读取流

      // 使用BufferedReader时,就这里与FileReader不同

      reader = new BufferedReader(new FileReader(file));

      // 3.文件读取

      char[] buf = new char[4];

      // 标准的写法

      int len = 0;

      while ((len = reader.read(buf)) != -1) {

        System.out.println("len=" + len);

        // 这里要注意,String的构造,要注意边界

        String val = new String(buf, 0, len);

        System.out.println(val);

      }

    } catch (IOException ie) {

      ie.printStackTrace();

    } finally {

      // 4.关流

      if (null != reader) {

        try {

          reader.close();

        } catch (IOException e) {

          e.printStackTrace();

        }

      }

    }

  }

}
BufferedReader
public class BufferedWriterDemo {

  public static void main(String[] args) {

    File file = new File("test.log");

    Writer writer = null;

    try {

      writer = new BufferedWriter(new FileWriter(file));

      String str = "Hello,world!!";

      writer.write(str);

    }catch (IOException e) {

      e.printStackTrace();

    } finally {

      if (null != writer) {

        try {

          writer.close();

        } catch (IOException e) {

          e.printStackTrace();

        }

      }

    }

  }

}
BufferedWriter
public class BufferedInputStreamDemo {

  public static void main(String[] args) {

    InputStream inputStream = null;

    try {

      File file = new File("test.log");

      inputStream = new BufferedInputStream(new FileInputStream(file));

      byte[] bytes = new byte[128];

      int len = 0;

      while ((len =inputStream.read(bytes)) != -1) {

        String val = new String(bytes,0,len);

        System.out.println("val = " + val);

      }

    } catch (IOException e) {

      e.printStackTrace();

    }finally {

      if (null != inputStream) {

        try {

          inputStream.close();

        } catch (IOException e) {

          e.printStackTrace();

        }

      }

    }

  }

}
BufferedInputStream
public class BufferedOutputStreamDemo {

  public static void main(String[] args) {

    OutputStream outputStream = null;

    try {

      // 1.定位文件描述

      File file = new File("test.log");

      // 2.实例化要写文件的基本类BufferedOutputStream

      // outputStream = new FileOutputStream(file);

      // 唯一的区别就在这里,把FileOutputStream作为构造的参数传递进去了

      outputStream = new BufferedOutputStream(new FileOutputStream(file));

      // 3.写数据

      String str = "hello world";

      outputStream.write(str.getBytes());

    } catch (IOException ie) {

      ie.printStackTrace();

    } finally {

      try {

        // 4.关流,千万要记得关闭

        if (null != outputStream) {

          outputStream.close();

        }

      } catch (IOException e) {

        e.printStackTrace();

      }

    }

  }

}
BufferedOutputStream
3、总结
流的基本操作过程:
- 给定待操作的对象(File);
- 建立具体操作流,类(InputStream/OutputStream/Writer/Reader的具体实现类);
- 文件操作,读/写;
- 关闭流;
结论:
- 操作二进制文件时,如:视频、音频文件,只能用字节流,文本文件使用字符流;
- buffer是缓冲操作,没有特殊要求的情况下都能使用buffer,推荐使用buffer,效率比较高;
五、读取properties文件
Java 中有个比较重要的类 Properties(Java.util.Properties),主要用于读取 Java 的配置文件,各种语言都有自己所支持的配置文件,配置文件中很多变量是经常改变的,这样做也是为了方便用户,让用户能够脱离程序本身去修改相关的变量设置。在Java中,其配置文件常为.properties文件,格式为文本文件,文件的内容的格式是“键=值”的格式,文本注释信息可以用"#"来注释。下面来看一下它的用法:
public class PropDemo {

  @Test

  public void demo1() throws IOException {

    Properties prop = new Properties();

    // 这里是需要是绝对路径,否则会报错

    // File propFile = new File("E:\\Java_Project\\MyProject\\resources\\config.properties");

    // prop.load(new FileInputStream(propFile));

    // 使用ClassLoader来读取,文件放在resources目录下,路径就可写相对路径

    prop.load(PropDemo.class.getClassLoader().getResourceAsStream("config.properties"));

    // get:返回的是对象

    // getProperty:返回的是字符串

    Object driver = prop.get("driver");

    String url = prop.getProperty("url");

    System.out.println(url);

    System.out.println(driver);

  }

  @Test

  public void demo02() throws IOException {

    Properties prop = new Properties();

    // 使用ClassLoader来读取

    prop.load(PropDemo.class.getClassLoader().getResourceAsStream("config.properties"));

    prop.setProperty("name", "jim");

    String property1 = prop.getProperty("name");

    String property2 = prop.getProperty("YY", "abc");

    System.out.println(property1);

    System.out.println(property2);

  }

}
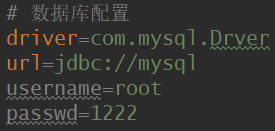
配置文件内容如下:
Java学习之==>IO文件操作体系的更多相关文章
- Java 学习笔记(14)—— 文件操作
java文件操作主要封装在Java.io.File中,而文件读写一般采用的是流的方式,Java流封装在 java.io 包中.Java中流可以理解为一个有序的字符序列,从一端导向到另一端.建立了一个流 ...
- 【java学习笔记】文件操作
文件操作 java.io.File ①创建删除文件及目录 ②查看文件及目录属性 ③文件过滤器 (PS:不包括文件读写数据) 1.单个文件 创建单个文件,查看属性,删除单个文件. package tmp ...
- java学习之IO文件分割
package om.gh.homework; import java.io.*; /** * 实现分割文件; * @param file */ public class HomeWork { /** ...
- java学习总结之文件操作--ByteArrayOutputStream的用法
ByteArrayOutputStream类是在创建它的实例时,程序内部创建一个byte型别数组的缓冲区, 然后利用ByteArrayOutputStream和ByteArrayInputStream ...
- Java IO,io,文件操作,删除文件,删除文件夹,获取文件父级目录
Java IO,io,文件操作,删除文件,删除文件夹,获取文件父级目录 这里先简单的贴下常用的方法: File.separator //当前系统文件分隔符 File.pathSeparator // ...
- java学习一目了然——IO
java学习一目了然--IO IO是java学习当中很重要的一部分.IO流实现数据的上传下载,即读写数据,包括输入和输出流,输入流指的是将数据以字符或字节形式从外部媒介比如文件.数据库等读取到内存中所 ...
- Java学习-014-文本文件写入实例源代码(两种写入方式)
此文源码主要为应用 Java 读取文本文件内容实例的源代码.若有不足之处,敬请大神指正,不胜感激! 第一种:文本文件写入,若文件存在则删除原文件,并重新创建文件.源代码如下所示: /** * @fun ...
- Java学习-013-文本文件读取实例源代码(两种数据返回格式)
此文源码主要为应用 Java 读取文本文件内容实例的源代码.若有不足之处,敬请大神指正,不胜感激! 1.读取的文本文件内容以一维数组[LinkedList<String>]的形式返回,源代 ...
- Java学习-011-创建文件实例及源代码
此文源码主要为应用 Java 创建文件的源代码.若有不足之处,敬请大神指正,不胜感激! 创建文件的源代码如下所示: /** * @function 文件操作:创建文件.若文件不存在,则直接创建文件:若 ...
随机推荐
- mysql自增字段AUTO_INCREMENT重排或归零
由于删除了某些记录行,导致自增字段不连续了,重排或归零的方法: 方法1:truncate table 你的表名//这样不但重新定位自增的字段,而且会将表里的数据全部删除,慎用! 方法2:delete ...
- [uboot] (番外篇)uboot之fdt介绍 (转)
以下例子都以project X项目tiny210(s5pv210平台,armv7架构)为例 [uboot] uboot流程系列:[project X] tiny210(s5pv210)上电启动流程(B ...
- CH5104 I-country[线性DP+分类讨论]
http://contest-hunter.org:83/contest/0x50%E3%80%8C%E5%8A%A8%E6%80%81%E8%A7%84%E5%88%92%E3%80%8D%E4%B ...
- VS插件CodeRush for Visual Studio全新发布v19.1.7|附下载
CodeRush是一个强大的Visual Studio® .NET 插件,它利用整合技术,通过促进开发者和团队效率来提升开发者体验. CodeRush能帮助你以极高的效率创建和维护源代码.Consum ...
- linux的逻辑运算符
1:expression :用于计算括号中的组合表达式,如果整个表达式的计算按结果为真,则测试结果也为真. 2:!exp:客队表达式进行逻辑非运算,即对测试结果求反 3:符合 -a 或者 && ...
- python--Excel模块xlwings
安装:pip install xlwings 基本操作: xlwings的特色: xlwings能够非常方便的读写Excel文件中的数据,并且能够进行单元格格式的修改 可以和matplotlib以及p ...
- Table表中数据类型的转换
各位大神帮我看下这还有别的方法转换类型吗? using System;using System.Collections.Generic;using System.Linq;using System.T ...
- Nowcoder Sum of Maximum ( 容斥原理 && 拉格朗日插值法 )
题目链接 题意 : 分析 : 分析就直接参考这个链接吧 ==> Click here 大体的思路就是 求和顺序不影响结果.故转化一下思路枚举每个最大值对答案的贡献最后累加就是结果 期间计数的过程 ...
- no matches for kind "ReplicaSet" in version "extensions/v1beta1"
原来的yaml的资源清单为 apiVersion: extensions/v1beta1 kind: ReplicaSet metadata: name: frontend spec: replica ...
- unittest详解(七) 自动生成测试报告
用例执行完成后,执行结果默认是输出在屏幕上,其实我们可以把结果输出到一个文件中,形成测试报告. unittest自带的测试报告是文本形式的,如下代码: import unittest if __nam ...