SpringBoot日记——Redis整合
上一篇文章,简单记录了一下缓存的使用方法,这篇文章将把我们熟悉的redis整合进来。
那么如何去整合呢?首先需要下载和安装,为了使用方便,也可以做环境变量的配置。
下载和安装的方法,之前有介绍,在docker中的使用,这里不做相关介绍,有想在windows环境下使用的,自己搜一下如何windows安装使用redis吧~(看这里也可以)
正题: SpringBoot对应(自带)RedisClient是不同的
SpringBoot1.5.x版本 -> jedis
SpringBoot2.x版本 - > lettuce (本文以2.x为例)
Redis启动与应用
启动redis服务,并打开管理客户端。其中默认的端口号,可以通过修改config来实现。

按照如图所示的步骤,链接本地的redis,如果你是在远程服务器安装的,ip记得填写服务器的。

选中我们做好的链接,右键打开console或者ctrl+T,打开控制台,我们来测试一下命令是否可用~
在控制台输入命令,看一下(Redis命令点击查看)
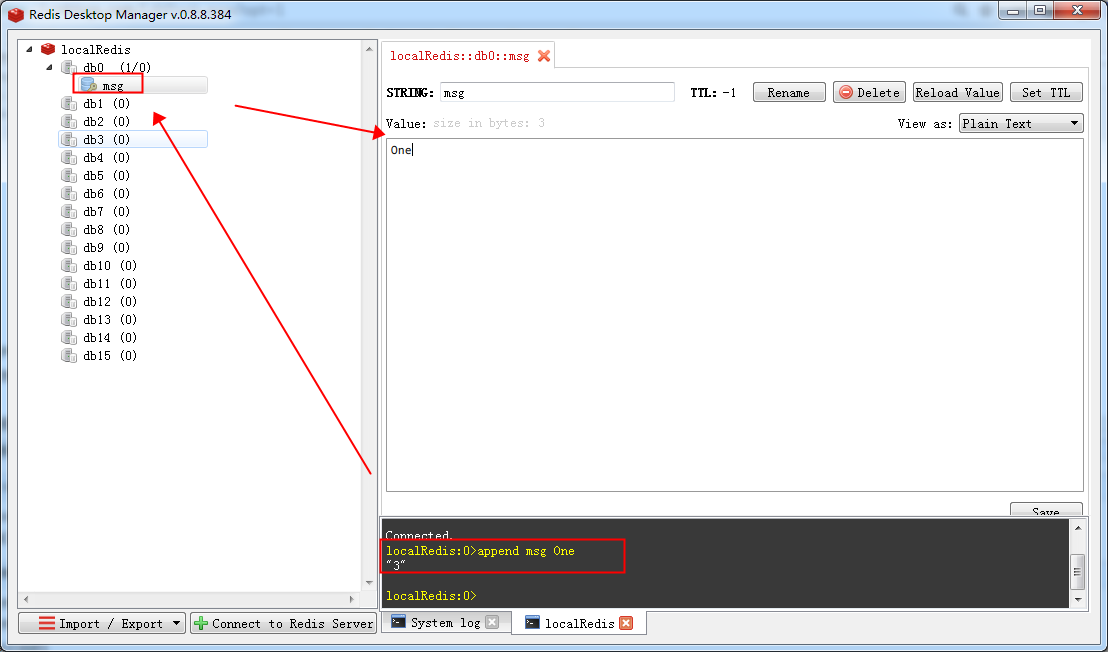
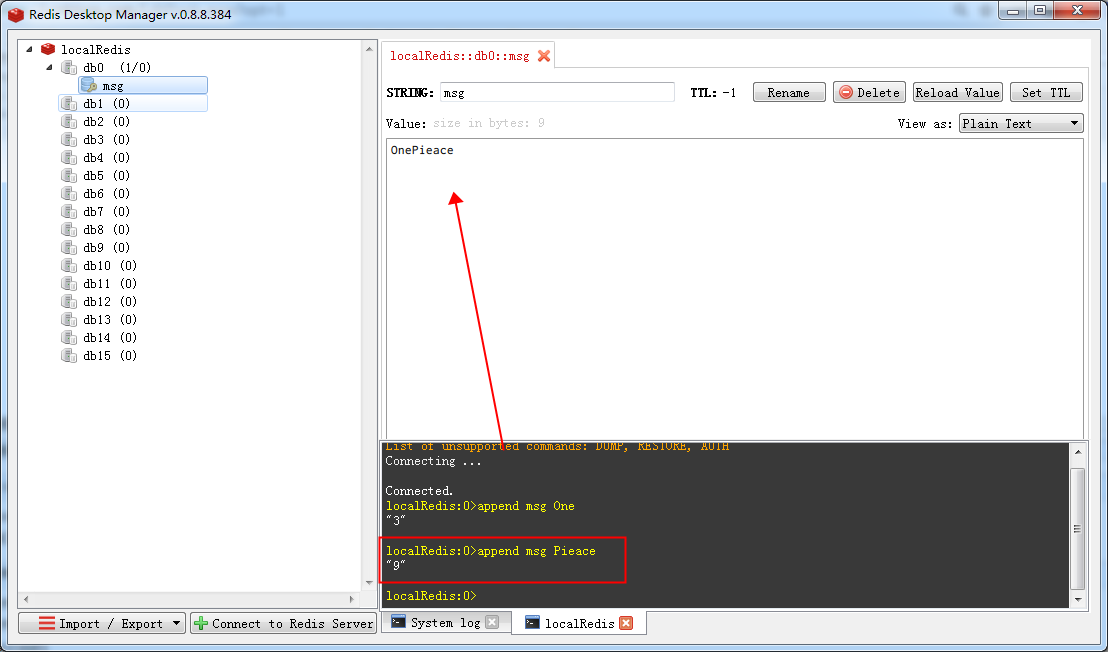
继续输入命令,可以看到字符串会相应的做拼接,这就是追加key值的命令的作用。其他命令,自己可以去试一下~
整合到SpringBoot中
接下来,我们将这个redis整合到SpringBoot中来,首先,在pom.xml中添加
        <dependency>

            <groupId>org.springframework.boot</groupId>

            <artifactId>spring-boot-starter-data-redis</artifactId>

        </dependency>
1.配置redis:到配置文件中添加:(如果是远程服务器,自己替换IP)
spring.redis.host=127.0.0.1
添加好以后我们来测试一下,首先,为了存取数据到redis中,添加如下的代码,我们接着看这两个如何使用。
    @Autowired

    StringRedisTemplate stringRedisTemplate;    // k-v都是字符串

    @Autowired

    RedisTemplate redisTemplate;    // k-v都是对象
先看字符串的,跟之前在console中输入命令一样的作用,执行测试后,检查下redis中,确实有生成的msg,说明我们的关联和操作是成功的。
stringRedisTemplate.opsForValue().append("msg", "Hello"); //append中添加的是两个字符串,也就是上边的k-v字符串操作
所以,你该明白第二个k-v是对象的意思了吧?继续测试方法中这样写:(我们将查询的这个对象存到缓存中)
        Employee empById = employeeMapper.getEmpById(1);

        redisTemplate.opsForValue().set("emp-01", empById);
来看结果:(Cannot serialize表示无法序列化,这里先看下如何处理,稍后来说为什么以及如何优化)

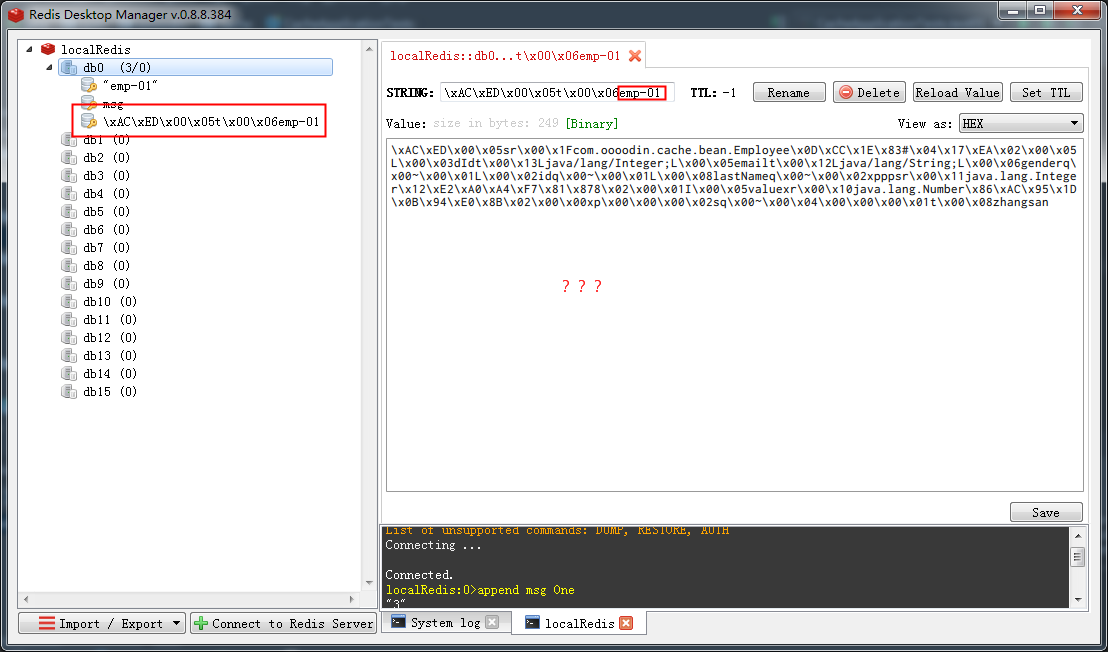
我们将bean.Employee的类这样写,就可以保证基本的序列化: implements Serializable
public class Employee implements Serializable {xxxx}
再次运行,查看结果:(运行成功了,可这一堆乱码一样的是什么呢?)
其实默认的序列化是JDK的,我们需要自己优化一下,比如编程json的序列化。
来看如何优化呢,我们需要自己创建一个redis的配置,来序列化我们自己想要的json格式(其实就是把RedisAutoConfiguration中的方法拿出来稍微的修改一下)
注意,我把主程序中的@EnableCaching,放到这里了,主程序那里就不用写了?后边我们再来实验一下
import org.springframework.cache.annotation.EnableCaching;

import org.springframework.context.annotation.Bean;

import org.springframework.context.annotation.Configuration;

import org.springframework.data.redis.cache.RedisCacheConfiguration;

import org.springframework.data.redis.cache.RedisCacheManager;

import org.springframework.data.redis.cache.RedisCacheWriter;

import org.springframework.data.redis.connection.RedisConnectionFactory;

import org.springframework.data.redis.serializer.GenericJackson2JsonRedisSerializer;

import org.springframework.data.redis.serializer.RedisSerializationContext;

import java.time.Duration;

@Configuration

@EnableCaching

public class MyRedisConfig {

    @Bean

    public RedisCacheManager empCacheManager(RedisConnectionFactory redisConnectionFactory) {

        RedisCacheConfiguration redisCacheConfiguration = RedisCacheConfiguration.defaultCacheConfig()

                .entryTtl(Duration.ofHours(1))  // 设置缓存有效期一小时

                .serializeValuesWith(RedisSerializationContext.SerializationPair.fromSerializer(

                        new GenericJackson2JsonRedisSerializer())); // 设置json格式序列化

        return RedisCacheManager

                .builder(RedisCacheWriter.nonLockingRedisCacheWriter(redisConnectionFactory))

                .cacheDefaults(redisCacheConfiguration).build();

    }

}
然后使用我们自己建立的template方法,做一个测试,看下结果:(注解证明木有问题)
        Employee empById = employeeMapper.getEmpById(1);

        employeeRedisTemplate.opsForValue().set("emp-01", empById);
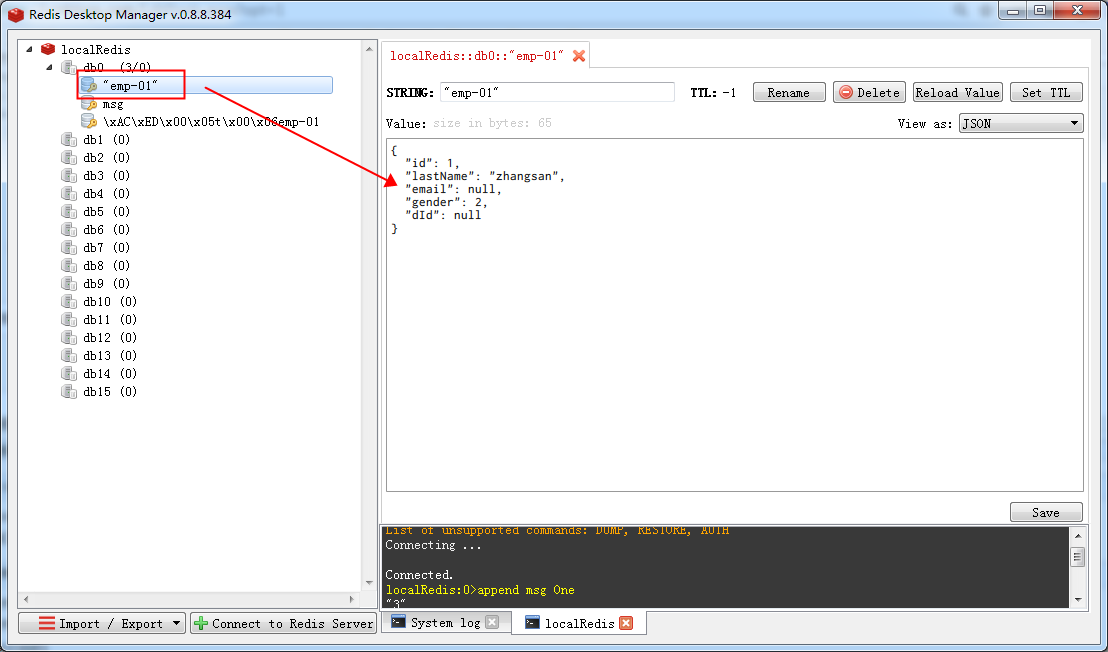
是不是看起来舒服多了。
当然,如果我们针对不同的情况做不同的书写有时候也是必要的,所以也可以这样写:(new那一行,看下变化,你就知道了~),但记住,如果你有多个个性配置的时候要加入注解@Primary,这个可以让该bean作为默认的主缓存管理器来使用,不然会报错滴~
    @Bean

    public RedisCacheManager empCacheManager(RedisConnectionFactory redisConnectionFactory) {

        RedisCacheConfiguration redisCacheConfiguration = RedisCacheConfiguration.defaultCacheConfig()

                .entryTtl(Duration.ofHours(1))  // 设置缓存有效期一小时

                .serializeValuesWith(RedisSerializationContext.SerializationPair.fromSerializer(

                        new Jackson2JsonRedisSerializer<Employee>(Employee.class))); // 设置json格式序列化

        return RedisCacheManager

                .builder(RedisCacheWriter.nonLockingRedisCacheWriter(redisConnectionFactory))

                .cacheDefaults(redisCacheConfiguration).build();

    }
如上,redis的简单使用就说这些,后边我可能还会把文章扩展一下,具体说说怎么使用,尽请关注~
SpringBoot日记——Redis整合的更多相关文章
- redis(七)---- SpringBoot和redis整合
SpringBoot和Redis整合非常简单 添加pom依赖 <dependency> <groupId>org.springframework.boot</groupI ...
- springboot和Redis整合
springboot简化了许多的配置,大大提高了使用效率.下面介绍一下和Redis整合的一些注意事项. 首先介绍单机版的redis整合. 1.第一步当然是导入依赖 <dependency> ...
- SpringBoot + Mybatis + Redis 整合入门项目
这篇文章我决定一改以往的风格,以幽默风趣的故事博文来介绍如何整合 SpringBoot.Mybatis.Redis. 很久很久以前,森林里有一只可爱的小青蛙,他迈着沉重的步伐走向了找工作的道路,结果发 ...
- 7.springboot+mybatis+redis整合
选择生成的依赖 选择保存的工程路径 查询已经生成的依赖,并修改mysql的版本 <dependencies> <dependency> <groupId>org.s ...
- SpringBoot+Redis整合
SpringBoot+Redis整合 1.在pom.xml添加Redis依赖 <!--整合Redis--> <dependency> <groupId>org.sp ...
- springboot+shiro+redis(单机redis版)整合教程-续(添加动态角色权限控制)
相关教程: 1. springboot+shiro整合教程 2. springboot+shiro+redis(单机redis版)整合教程 3. springboot+shiro+redis(集群re ...
- springboot+shiro+redis(集群redis版)整合教程
相关教程: 1. springboot+shiro整合教程 2. springboot+shiro+redis(单机redis版)整合教程 3.springboot+shiro+redis(单机red ...
- springboot+shiro+redis(单机redis版)整合教程
相关教程: 1. springboot+shiro整合教程 2. springboot+shiro+redis(集群redis版)整合教程 3.springboot+shiro+redis(单机red ...
- springboot和Redis集群版的整合
此篇接上一个文章springboot和Redis单机版的整合 https://www.cnblogs.com/lin530/p/12019023.html 下面接着介绍和Redis集群版的整合. 1. ...
随机推荐
- IntelliJ IDEA2018激活方法
前言: IntelliJ IDEA2018请在官网下载:https://www.jetbrains.com/idea/ 一.license server激活 输入http://idea.jialeen ...
- C#-老生常谈的 值类型与引用类型
特殊的String 说起值类型和引用类型,大家都知道这么个事,很多时候我们会拿String做值类型来做比较,但实际上String虽然是值类型,却表现的有点特别 String示例 看下面的一个例子: 话 ...
- LUA 运算笔记
循环 比如要实现这样的一个For for(int i=10;i>1;i—) { print(i) } lua的for循环 转换成LUA for i=10,1,-1 do print(i) end ...
- Centos7 永久更改主机名
操作环境: [root@bogon ~]# uname -a Linux #localhost.localdomain 3.10.0-514.el7.centos.plus.i686 #1 SMP W ...
- mitmproxy
通过脚本定制化实现篡改request或者response mitmproxy 顾名思义中间人代理[man-in-the-middle proxy],和fiddler.Charles等工具类似,通过代理 ...
- SDN期末作业验收
作业链接:https://edu.cnblogs.com/campus/fzu/SoftwareDefinedNetworking2017/homework/1585 负载均衡程序 1.github链 ...
- PyQt5--GridLayout
# -*- coding:utf-8 -*- ''' Created on Sep 13, 2018 @author: SaShuangYiBing ''' import sys from PyQt5 ...
- LVM操作
创建LVM,并挂载 1.对磁盘进行分区fdisk /dev/sdb [root@testdb ~]# fdisk /dev/sdbDevice contains neither a valid DOS ...
- Vue2.0中v-for迭代语法变化(key、index)【转】
转自:http://blog.csdn.net/sinat_35512245/article/details/53966788 Vue2.0的代码中发现 $key这个值并不能渲染成功,问题如下:但是v ...
- 构造方法、 This关键字 、static、封装
1.1 构造方法 构造方法是一种特殊的方法,专门用于构造/实例化对象,形式: [修饰符] 类名(){ } 构造方法根据是否有参数分为无参构造和有参构. 1.1.1 无参构造 无参构造方法就是构造方法没 ...