ue4音效、动画结合实例
在游戏中,许多音效需要在动画恰当的时机出现,例如行走、奔跑,就需要恰好在足部落地瞬间播放。
而AnimNotify就能非常方便地处理此类问题。
AnimNotify,顾名思义就是动画通知,能在特定的动画片段播放到特定进度时“发出消息”。
目前我们的工程有前、后、左、右、左前、右前、左后、右后八向的跑动动画。

先以向前跑为例,用右键添加通知的方式,分别在右脚、左脚落地时添加了lfoot_touchground与rfoot_touchground的两个自定义通知
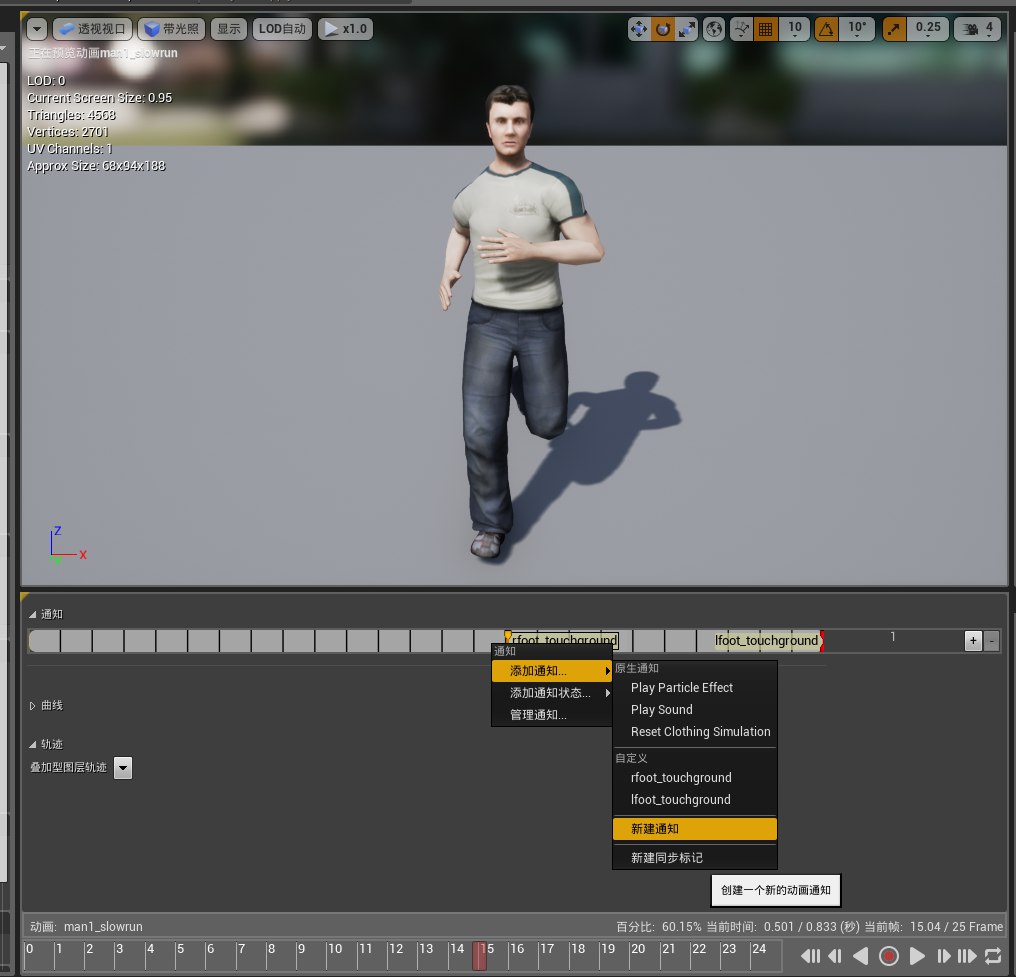
当然直接添加playsound通知也是可以的,能很方便地直接设置声音,但为了功能的可扩展性我们还是使用自定义通知。
然而我们如何才能获取这些通知呢?
if (mesh) {

        UAnimInstance* anim=mesh->GetAnimInstance();

        if (anim) {

            TArray<const struct FAnimNotifyEvent*> AnimNotifies=anim->NotifyQueue.AnimNotifies;

            range(i,,AnimNotifies.Num()) {

                FString NotifyName=AnimNotifies[i]->NotifyName.ToString();

                /*GEngine->A/ddOnScreenDebugMessage

                (-1, 5.f, FColor::Red, FString::FromInt(i)+" "+ NotifyName);*/

                if (NotifyName=="lfoot_touchground") {

                    audio_lfoot->SetSound(sb_walks[]);

                    audio_lfoot->Play();

                }

                else if (NotifyName == "rfoot_touchground") {

                    audio_rfoot->SetSound(sb_walks[]);

                    audio_rfoot->Play();

                }

                else {

                }

            }

        }

    }
没错,就是这么简单anim->NotifyQueue即为动画通知队列,AnimNotifies就能获取当前所有通知事件,上述代码去掉注释即可打印当前帧所有动画通知名称。
为了实现播放音效,我们还需要绑定在左右脚的AudioComponent,如果当前通知队列中有对应的通知,就先SetSound设置将要播放的声音资源后再Play。
我把所有需要绑定在Chracter的Mesh上的AudioComponent“打包装入“了一个叫AudioController的类,在Character的构造函数中进行了AudioController的构造,并将AudioController中的各音效组件绑定到对应的socket上。
AudioController.h文件
// Fill out your copyright notice in the Description page of Project Settings. #pragma once #include "Components/ActorComponent.h"
#include "Components/AudioComponent.h"
#include "Components/SkeletalMeshComponent.h"
#include "AudioController.generated.h" UCLASS( ClassGroup=(Custom), meta=(BlueprintSpawnableComponent) )
class MYSOUNDANDEFFECTS_API UAudioController : public UActorComponent
{
GENERATED_BODY() public:
// Sets default values for this component's properties
UAudioController();
//UAudioController(USkeletalMeshComponent* mesh_); protected:
// Called when the game starts
virtual void BeginPlay() override; public:
// Called every frame
virtual void TickComponent(float DeltaTime, ELevelTick TickType, FActorComponentTickFunction* ThisTickFunction) override; UPROPERTY(Category = Audio, VisibleDefaultsOnly, BlueprintReadOnly, meta = (AllowPrivateAccess = "true"))
UAudioComponent* audio_lfoot = NULL;
UPROPERTY(Category = Audio, EditDefaultsOnly, BlueprintReadOnly, meta = (AllowPrivateAccess = "true"))
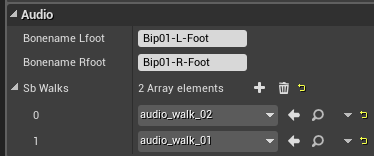
FString bonename_lfoot = "Bip01-L-Foot"; UPROPERTY(Category = Audio, VisibleDefaultsOnly, BlueprintReadOnly, meta = (AllowPrivateAccess = "true"))
UAudioComponent* audio_rfoot = NULL;
UPROPERTY(Category = Audio, EditDefaultsOnly, BlueprintReadOnly, meta = (AllowPrivateAccess = "true"))
FString bonename_rfoot = "Bip01-R-Foot"; USkeletalMeshComponent* mesh = NULL; void my_init(USkeletalMeshComponent* mesh_); UPROPERTY(Category = Audio, EditDefaultsOnly, BlueprintReadOnly, meta = (AllowPrivateAccess = "true"))
TArray<class USoundBase*> sb_walks; };
AudioController.cpp文件
// Fill out your copyright notice in the Description page of Project Settings.

#include "MySoundAndEffects.h"

#include "Animation/AnimInstance.h"

#include "AudioController.h"

// Sets default values for this component's properties

UAudioController::UAudioController()

{

    // Set this component to be initialized when the game starts, and to be ticked every frame.  You can turn these features

    // off to improve performance if you don't need them.

    PrimaryComponentTick.bCanEverTick = true;

    // ...

    audio_lfoot = CreateDefaultSubobject<UAudioComponent>("audio_lfoot");

    audio_rfoot = CreateDefaultSubobject<UAudioComponent>("audio_rfoot");

}

//UAudioController::UAudioController(USkeletalMeshComponent* mesh_)

//{

//    // Set this component to be initialized when the game starts, and to be ticked every frame.  You can turn these features

//    // off to improve performance if you don't need them.

//    PrimaryComponentTick.bCanEverTick = true;

//

//    // ...

//

//

//

//}

void UAudioController::my_init(USkeletalMeshComponent* mesh_) {

    this->mesh = mesh_;

    //UAudioController();

    audio_lfoot->SetupAttachment(mesh_, FName(*bonename_lfoot));

    audio_rfoot->SetupAttachment(mesh_, FName(*bonename_rfoot));

}

// Called when the game starts

void UAudioController::BeginPlay()

{

    Super::BeginPlay();

    // ...

}

// Called every frame

void UAudioController::TickComponent(float DeltaTime, ELevelTick TickType, FActorComponentTickFunction* ThisTickFunction)

{

    Super::TickComponent(DeltaTime, TickType, ThisTickFunction);

    // ...

    if (mesh) {

        UAnimInstance* anim=mesh->GetAnimInstance();

        if (anim) {

            TArray<const struct FAnimNotifyEvent*> AnimNotifies=anim->NotifyQueue.AnimNotifies;

            range(i,,AnimNotifies.Num()) {

                FString NotifyName=AnimNotifies[i]->NotifyName.ToString();

                /*GEngine->A/ddOnScreenDebugMessage

                (-1, 5.f, FColor::Red, FString::FromInt(i)+" "+ NotifyName);*/

                if (NotifyName=="lfoot_touchground") {

                    audio_lfoot->SetSound(sb_walks[]);

                    audio_lfoot->Play();

                }

                else if (NotifyName == "rfoot_touchground") {

                    audio_rfoot->SetSound(sb_walks[]);

                    audio_rfoot->Play();

                }

                else {

                }

            }

        }

    }

    else {

        throw std::exception("mesh not exist!!");

    }

}
还有character类中audiocontroller的定义和创建:
AAimPraticeHuman::AAimPraticeHuman()

{

#ifdef AudioController_h

	audiocontroller = CreateDefaultSubobject<UAudioController>("audiocontroller");

	audiocontroller->my_init(GetMesh());

#endif

}
UPROPERTY(Category = Audio, VisibleDefaultsOnly, BlueprintReadOnly, meta = (AllowPrivateAccess = "true"))
  class UAudioController* audiocontroller = NULL;
最后就是音效导入,看似简单其实有很多细节。
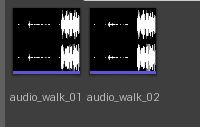
建议直接拖入wav格式文件,如果导入失败应该是wav文件具体参数的问题。
(我用Audition把一长串的跑步音效分割出了两声脚碰地的声音,直接导入ue4报错,然而先用格式工厂转一下就ok了)
当然现在的音效还不能直接用于游戏脚步,还需要先设置并发和立体效果。
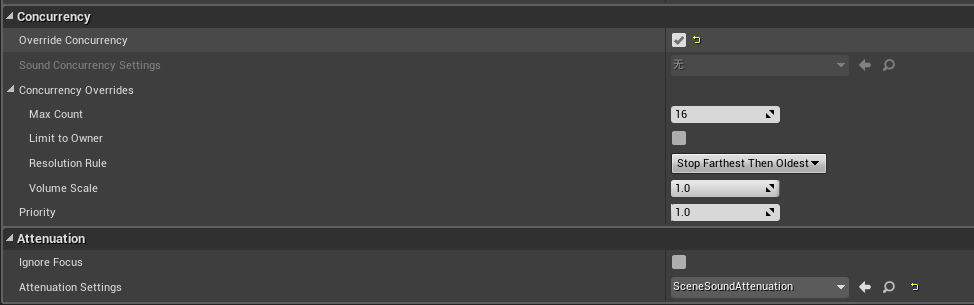
Concurrency项勾选override即可,使用”先远后旧“的并发停止策略问题也不大。
Attenuation项我新建了一个叫SceneSoundAttenuation蓝图,设置如下:
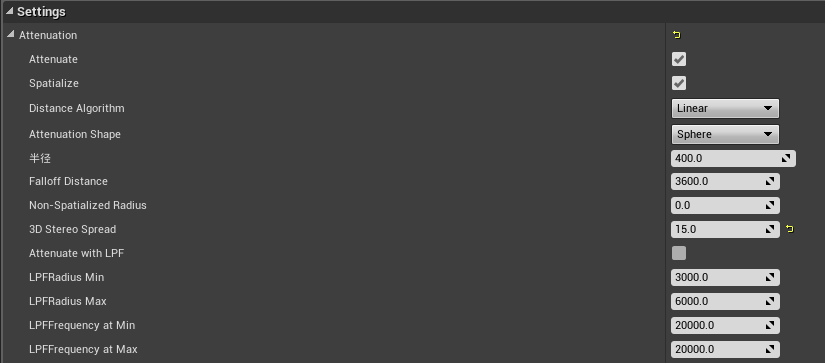
这些选项看字面都比较好理解,3D Stereo Spread的意思其实就是左右耳间距。
最后别忘了设置character蓝图的sb_walks数组的值,以及左右脚的socketname

大功告成啦!
具体效果。。。反正你们也听不到。。。
------------------------------------------------
下期预告:美妙的IK(反向动力学)
ue4音效、动画结合实例的更多相关文章
- Wpf(Storyboard)动画简单实例
原文:Wpf(Storyboard)动画简单实例 动画的三种变换方式 RotateTransform:旋转变换变化值:CenterX围绕转的圆心横坐标 CenterY纵坐标 Angle旋转角度(角度正 ...
- jQuery动画特效实例教程
本文以实例形式详细讲述了jQuery动画特效的实现方法. 1.自制折叠内容块 内容块如下: <div class="module"> <div cla ...
- UE4帧动画Matineed
发一句牢骚,ue4除了渲染好一点,其他操作都没有unity便利,最近需要在项目中,调几个简单的动画使用到了Matineed,相当不好用.也可能是unity转ue4,有先入为主的观念,哈哈,never ...
- 微信小程序之自定义模态弹窗(带动画)实例
1.基本需求. 实现用户自定义弹框 带动画(动画可做参靠,个人要是觉得不好看可以自定义动画) 获取弹出框的内容,自定义事件获取 2.案例目录结构 二.程序实现具体步骤 1.弹框index.wxml代码 ...
- [UE4]蒙太奇动画运行时不播放,预览是好的
动画实例里面没有添加“DefaultSlot”就会出现这样的问题
- UE4中动画蒙太奇的合成
在游戏中的技能施法动作是可以通过软件合成的,笔者在这里介绍一种用UE4合成多个动画的操作. 在UE4中角色的动作可以由多种方式达成,一种是混合空间,例如角色的跑动和跳跃,其中的动作是由状态机控制的,原 ...
- [UE4]Montage动画设置Slot
最后一张图看下,配合官网motage教程,容易理解push anim具体用法 http://aigo.iteye.com/blog/2277545 如何新建一个Montage的步骤这里省略了,网上很多 ...
- 关于UE4音效的一些小问题
前言 前几天实在忍受不了StarterContent默认音效的折磨,去网上翻罗了一下初中时很着迷的游戏<Bounce-Tales>的音效,在导入音效时出了点问题,特此说明一下解决方案,希望 ...
- Ace 动画应用实例 ------启动欢迎界面
仔细观察手机应用很多都用到了动画效果 那么咱们也做一个 除了位移没有使用 其他都有 布局随便放张图片 public class SplashActivity extends Activity { pr ...
随机推荐
- Nlpir Parser灵玖文本语义挖掘系统数据采集
在计算机广泛应用的今天,数据采集的重要性是十分显著的.它是计算机与外部物理世界连接的桥梁.各种类型信号采集的难易程度差别很大. 灵玖软件Nlpir Parser文本语义挖掘系统以分词技术为基础,集成了 ...
- 快学 Scala 入门 3 部曲
1 基础 1.1 Scala 解释器 REPL - 交互式解释器环境 R(read).E(evaluate).P(print).L(loop) 输入值,交互式解释器会读取输入内容并对它求值,再返回结果 ...
- Python应用场景
Web应用开发 Python经常被用于Web开发.比如,通过mod_wsgi模块,Apache可以运行用Python编写的Web程序.Python定义了WSGI标准应用接口来协调Http服务器与基于P ...
- Open-Falcon第六步安装Dashboard(小米开源互联网企业级监控系统)
安装Dashboard dashboard是面向用户的查询界面,在这里,用户可以看到push到graph中的所有数据,并查看其趋势图. yum install -y python-virtualenv ...
- Windows下搭建Git 服务器: BONOBO GIT SERVER + TortoiseGit
本文将介绍如何在Windows操作系统下搭建Git服务器和客户端.服务器端采用的是Bonobo Git Server,一款用ASP.NET MVC开发的Git源代码管理工具,界面简洁,基于Web方式配 ...
- suffix tree
文章出处:http://www.cnblogs.com/snowberg/archive/2011/10/21/2468588.html 3 What is a Suffix Tree Suf ...
- 嵌入式GPIO接口及操作(一)
GPIO意思就是通用输入输出,一些引脚可以通过他们输出高低电平,或者通过它们读入引脚的状态.对GPIO的操作是对所有硬件的操作最基本的技能.一.通过寄存器来操作GPIO引脚,一个引脚可以用于输入.输出 ...
- 逻辑回归的实现(LogicalRegression)
1.背景知识 在刚刚结束的天猫大数据s1比赛中,逻辑回归是大家都普遍使用且效果不错的一种算法. (1)回归 先来说说什么是回归,比如说我们有两类数据,各有50十个点 ...
- 曲线点抽稀算法-Python实现
何为抽稀 在处理矢量化数据时,记录中往往会有很多重复数据,对进一步数据处理带来诸多不便.多余的数据一方面浪费了较多的存储空间,另一方面造成所要表达的图形不光滑或不符合标准.因此要通过某种规则,在保证矢 ...
- node.js之模块
node.js之模块 1.自定义模块的设置 加载自定义模块利用require: eg: require('./custom_module.js') 2.从模块外部访问模块内的成员 2.1使用expor ...