AndroidProjects个人项目归纳
AndroidProjects
- 个人总结归纳-目录大纲
1.Data Binding框架MVVM
项目源码位置:AndroidProjects/DataBinding目录
介绍
Data binding 在2015年7月发布的Android Studio v1.3.0 版本上引入,在2016年4月Android Studio v2.0.0 上正式支持。目前为止,Data Binding 已经支持双向绑定了。
Data Binding 解决了 Android UI 编程中的一个痛点,官方原生支持 MVVM 模型可以让我们在不改变既有代码框架的前提下,非常容易地使用这些新特性;
Databinding 是一个实现数据和UI绑定的框架,是一个实现 MVVM 模式的工具,有了 Data Binding,在Android中也可以很方便的实现MVVM开发模式。
Data Binding 是一个support库,最低支持到Android 2.1(API Level 7+)。
Data Binding 之前,我们不可避免地要编写大量的毫无营养的代码,如 findViewById()、setText(),setVisibility(),setEnabled() 或 setOnClickListener() 等,通过 Data Binding , 我们可以通过声明式布局以精简的代码来绑定应用程序逻辑和布局,这样就不用编写大量的毫无营养的代码了。
参考资料
https://developer.android.com/topic/libraries/data-binding/index.html
http://tech.vg.no/2015/07/17/android-databinding-goodbye-presenter-hello-viewmodel/
Gradle配置:
android {

    dataBinding {

        enabled = true

    }

}
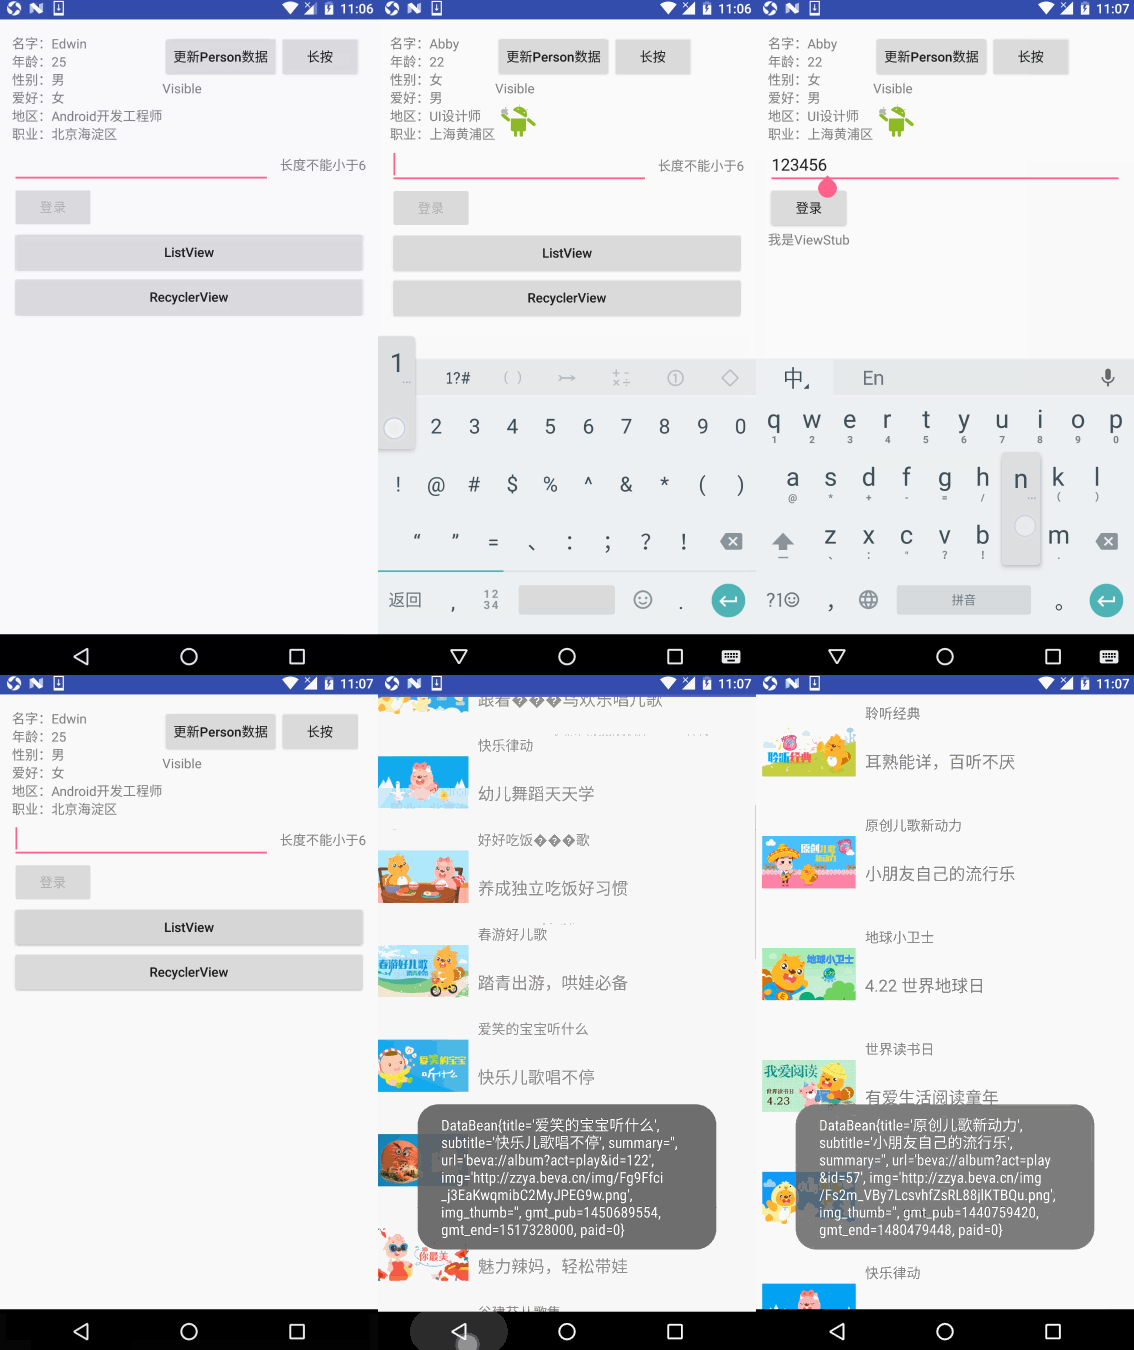
效果图
示例代码
/**

 * BaseActivity

 *

 * @author Edwin.Wu

 * @version 2016/11/25 16:21

 * @since JDK1.8

 */

public abstract class BaseActivity<T extends ViewDataBinding> extends AppCompatActivity {

    protected Context mContext;

    protected T b;

    @Override

    protected void onCreate(@Nullable Bundle savedInstanceState) {

        super.onCreate(savedInstanceState);

        mContext = this;

        bindView();

        setUpData();

    }

    @LayoutRes

    protected abstract int getLayoutResId();

    protected void bindView() {

        b = DataBindingUtil.setContentView(this, getLayoutResId());

    }

    protected abstract void setUpData();

}
/**

 * BaseFragment

 *

 * @author Edwin.Wu

 * @version 2016/11/25 16:20

 * @since JDK1.8

 */

public abstract class BaseFragment<T extends ViewDataBinding> extends Fragment {

    protected Context mContext;

    protected T b;

    @Override

    public void onCreate(Bundle savedInstanceState) {

        super.onCreate(savedInstanceState);

        mContext = getActivity();

    }

    @Nullable

    @Override

    public View onCreateView(LayoutInflater inflater, ViewGroup container, Bundle savedInstanceState) {

        bindView(inflater, container);

        setUpData();

        return b.getRoot();

    }

    @LayoutRes

    protected abstract int getLayoutResId();

    private void bindView(LayoutInflater inflater, ViewGroup container) {

        b = DataBindingUtil.inflate(inflater, getLayoutResId(), container, false);

    }

    protected abstract void setUpData();

}
/**

 * BindingViewHolder

 *

 * @author Edwin.Wu

 * @version 2016/11/28 11:01

 * @since JDK1.8

 */

class BindingViewHolder<T extends ViewDataBinding> extends RecyclerView.ViewHolder {

    private T binding;

    BindingViewHolder(View itemView) {

        super(itemView);

    }

    public T getBinding() {

        return binding;

    }

    public void setBinding(T binding) {

        this.binding = binding;

    }

}
/**

 * ListView

 *

 * @author Edwin.Wu

 * @version 2016/11/28 00:25

 * @since JDK1.8

 */

public class ListViewAdapter extends BaseAdapter {

    private List<Bean.DataBean> data;

    private LayoutInflater mLayoutInflater;

    private ItemListBinding binding;

    public ListViewAdapter(Context context, List<Bean.DataBean> allData) {

        this.data = allData;

        this.mLayoutInflater = (LayoutInflater) context.getSystemService(Context.LAYOUT_INFLATER_SERVICE);

    }

    @Override

    public int getCount() {

        return data.size();

    }

    @Override

    public Bean.DataBean getItem(int position) {

        return data.get(position);

    }

    @Override

    public long getItemId(int position) {

        return position;

    }

    @Override

    public View getView(int position, View convertView, ViewGroup parent) {

        if (convertView == null) {

            binding = DataBindingUtil.inflate(mLayoutInflater, R.layout.item_list, parent, false);

            convertView = binding.getRoot();

            convertView.setTag(binding);

        } else {

            binding = (ItemListBinding) convertView.getTag();

        }

        binding.setData(data.get(position));

        return convertView;

    }

}
/**

 * RecyclerView

 *

 * @author Edwin.Wu

 * @version 2016/11/28 11:02

 * @since JDK1.8

 */

public class RecyclerViewAdapter extends RecyclerView.Adapter<BindingViewHolder<ItemRecyclerViewBinding>> {

    private List<Bean.DataBean> data;

    private LayoutInflater mLayoutInflater;

    private onItemClickLister mLister;

    public interface onItemClickLister {

        void onItemClick(View itemView, Bean.DataBean employee, int position);

    }

    public RecyclerViewAdapter(Context context, List<Bean.DataBean> data) {

        this.mLayoutInflater = (LayoutInflater) context.getSystemService(Context.LAYOUT_INFLATER_SERVICE);

        this.data = data;

    }

    @Override

    public BindingViewHolder<ItemRecyclerViewBinding> onCreateViewHolder(ViewGroup parent, int viewType) {

        ItemRecyclerViewBinding binding = DataBindingUtil.inflate(mLayoutInflater, R.layout.item_recycler_view, parent, false);

        BindingViewHolder<ItemRecyclerViewBinding> holder = new BindingViewHolder<ItemRecyclerViewBinding>(binding.getRoot());

        holder.setBinding(binding);

        return holder;

    }

    @Override

    public void onBindViewHolder(final BindingViewHolder<ItemRecyclerViewBinding> holder, final int position) {

        holder.itemView.setOnClickListener(new View.OnClickListener() {

            @Override

            public void onClick(View v) {

                if (mLister != null) {

                    mLister.onItemClick(holder.itemView, data.get(position), position);

                }

            }

        });

        holder.getBinding().setData(data.get(position));

    }

    @Override

    public int getItemCount() {

        return data.size();

    }

    public void setOnItemClickLister(onItemClickLister mLister) {

        if (mLister != null) {

            this.mLister = mLister;

        } else {

            throw new NullPointerException("onItemClickLister is null");

        }

    }

    public void addAll(List<Bean.DataBean> beanList) {

        if (beanList != null) {

            data.addAll(beanList);

        } else {

            throw new NullPointerException("List<Bean.DataBean> is null");

        }

    }

    public void add(int position, Bean.DataBean dataBean) {

        if (dataBean != null) {

            data.add(position, dataBean);

            notifyItemInserted(position);

        } else {

            throw new NullPointerException("dataBean is null");

        }

    }

    public void remove(int position) {

        if (data.size() == 0) {

            return;

        }

        data.remove(position);

        notifyItemRemoved(position);

    }

}
/**

 * ViewModel

 * <p>

 * dataBinding绑定

 *

 * @author Edwin.Wu

 * @version 2016/11/25 20:38

 * @since JDK1.8

 */

public class ViewBindingAdapter {

    /**

     * dataBinding

     * 图片加载

     *

     * @param view

     * @param url

     * @param drawable

     */

    @BindingAdapter({"app:imageUrl", "app:placeHolder"})

    public static void loadImageFromUrl(ImageView view, String url, Drawable drawable) {

        Glide.with(view.getContext())

                .load(url)

                .placeholder(drawable)

                .diskCacheStrategy(DiskCacheStrategy.RESULT)

                .error(drawable)

                .into(view);

    }
item_recycler_view.xml

<?xml version="1.0" encoding="utf-8"?>

<layout xmlns:android="http://schemas.android.com/apk/res/android"

    xmlns:app="http://schemas.android.com/apk/res-auto">

    <data>

        <variable

            name="data"

            type="com.github.why168.databinding.model.Bean.DataBean" />

    </data>

    <LinearLayout

        android:layout_width="match_parent"

        android:layout_height="100dp"

        android:layout_margin="10dp"

        android:orientation="horizontal">

        <ImageView

            android:id="@+id/image_recycler_view"

            android:layout_width="100dp"

            android:layout_height="100dp"

            app:imageUrl="@{data.img}"

            app:placeHolder="@{@drawable/ic_launcher}" />

        <LinearLayout

            android:layout_width="match_parent"

            android:layout_height="match_parent"

            android:layout_marginLeft="10dp"

            android:orientation="vertical">

            <TextView

                android:id="@+id/tv_recycler_title"

                android:layout_width="wrap_content"

                android:layout_height="0dp"

                android:layout_weight="1"

                android:text="@{data.title}"

                android:textSize="15sp" />

            <TextView

                android:id="@+id/tv_recycler_subtitle"

                android:layout_width="wrap_content"

                android:layout_height="0dp"

                android:layout_weight="1"

                android:text="@{data.subtitle}"

                android:textSize="18sp" />

        </LinearLayout>

    </LinearLayout>

</layout>
2. BaseView
项目源码位置:AndroidProjects/BaseView目录
介绍
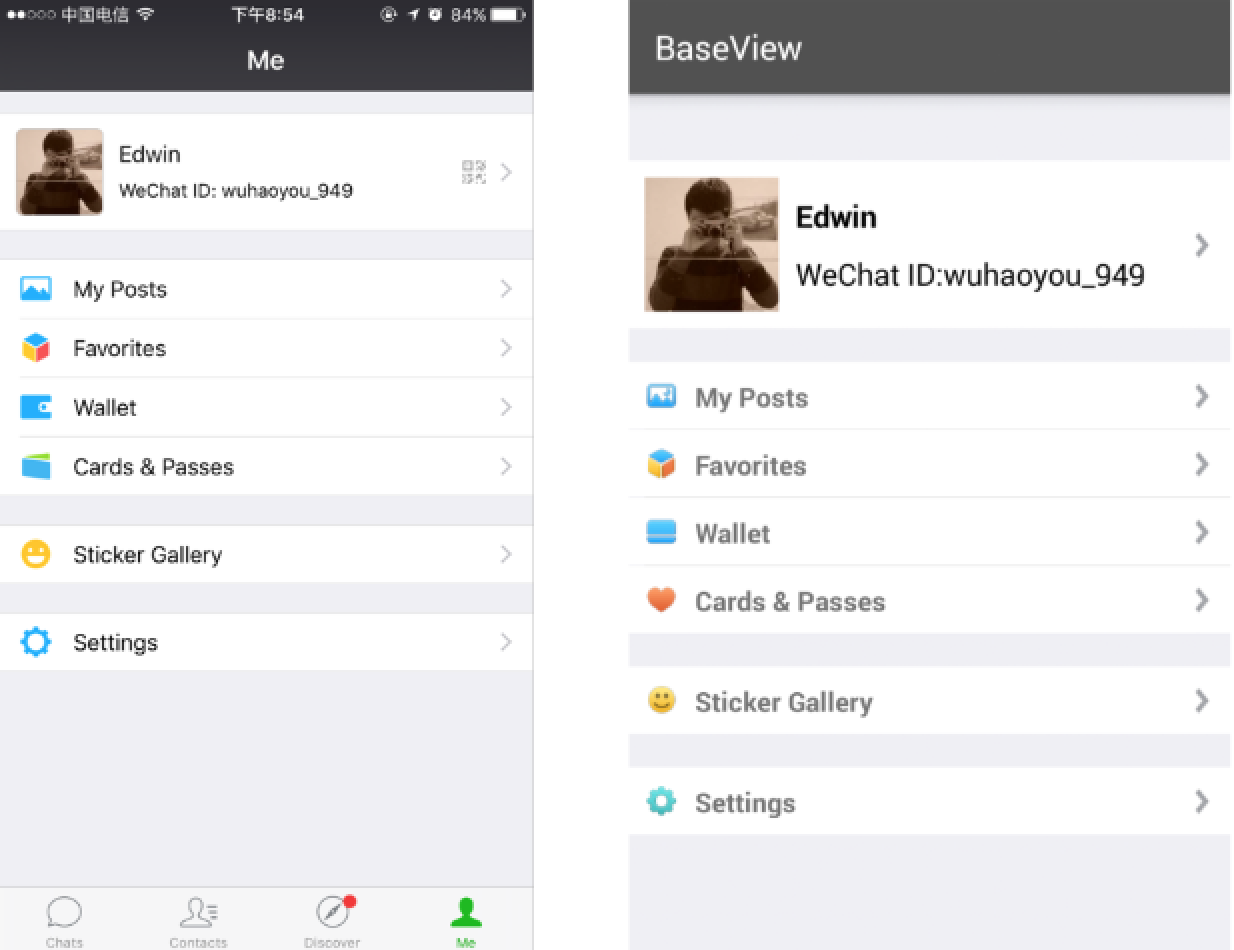
- 手写代码通过参数配置布局,提高APP性能,提高复用。
参考资料
效果图
示例代码
/**

 * MainActivity

 *

 * @author Edwin.Wu

 * @version 2016/5/28 21:15

 * @since JDK1.8

 */

public class MainActivity extends AppCompatActivity implements OnRowClickListener {

    @Override

    protected void onCreate(Bundle savedInstanceState) {

        super.onCreate(savedInstanceState);

        setContentView(R.layout.activity_main);

        ContainerView mWidgetRowContainerView = (ContainerView) findViewById(R.id.mWidgetRowContainerView);

        ArrayList<GroupDescriptor> groupDescriptors = new ArrayList<GroupDescriptor>();

        ArrayList<BaseRowDescriptor> descriptors1 = new ArrayList<BaseRowDescriptor>();

        descriptors1.add(new RowProfileDescriptor("imagurl", "Edwin", "WeChat ID:wuhaoyou_949", RowActionEnum.MY_POSTS));

        GroupDescriptor groupDescriptor1 = new GroupDescriptor(descriptors1);

        groupDescriptors.add(groupDescriptor1);

        ArrayList<BaseRowDescriptor> descriptors2 = new ArrayList<BaseRowDescriptor>();

        descriptors2.add(new RowDescriptor(R.mipmap.more_my_album, "My Posts", RowActionEnum.ALBUM));

        descriptors2.add(new RowDescriptor(R.mipmap.more_my_favorite, "Favorites", RowActionEnum.FAVORITE));

        descriptors2.add(new RowDescriptor(R.mipmap.more_my_bank_card, "Wallet", RowActionEnum.BANK_CARD));

        descriptors2.add(new RowDescriptor(R.mipmap.emotionstore_custom_icon, "Cards & Passes", RowActionEnum.CUSTOM_ICON));

        GroupDescriptor groupDescriptor2 = new GroupDescriptor(descriptors2);

        groupDescriptors.add(groupDescriptor2);

        ArrayList<BaseRowDescriptor> descriptors3 = new ArrayList<BaseRowDescriptor>();

        descriptors3.add(new RowDescriptor(R.mipmap.emotionstore_emoji_icon, "Sticker Gallery", RowActionEnum.EMOJI_ICON));

        GroupDescriptor groupDescriptor3 = new GroupDescriptor(descriptors3);

        groupDescriptors.add(groupDescriptor3);

        ArrayList<BaseRowDescriptor> descriptors4 = new ArrayList<BaseRowDescriptor>();

        descriptors4.add(new RowDescriptor(R.mipmap.more_setting, "Settings", RowActionEnum.SETTING));

        GroupDescriptor groupDescriptor4 = new GroupDescriptor(descriptors4);

        groupDescriptors.add(groupDescriptor4);

        mWidgetRowContainerView.initializeData(groupDescriptors, this);

        mWidgetRowContainerView.notifyDataChanged();

    }

    @Override

    public void onRowClick(RowActionEnum actionEnum) {

        Toast.makeText(this, "RowActionEnum--->" + actionEnum.name(), Toast.LENGTH_SHORT).show();

        //TODO 根据不同的action实现逻辑

        switch (actionEnum) {

            case ALBUM:

                break;

            case FAVORITE:

                break;

            case BANK_CARD:

                break;

            case CUSTOM_ICON:

                break;

            case EMOJI_ICON:

                break;

            case SETTING:

                break;

        }

    }

}
3.CollapseView
项目源码位置:AndroidProjects/CollapseView目录
介绍
- CollapseView 折叠/展开
- FlowLayout 流式布局
参考资料
效果图

示例代码
/**

 * 折叠/展开ViewGroup

 *

 * @author Edwin.Wu

 * @version 2016/06/05 上午1:57

 * @since JDK1.8

 */

public class CollapseView extends LinearLayout {

    private final Context mContext;

    private long duration = 555;//展开/折叠的时间(s)

    private TextView mNumberTextView;

    private TextView mTitleTextView;

    private RelativeLayout mTitleRelativeLayout;

    private RelativeLayout mContentRelativeLayout;

    private ImageView mArrowImageView;

    private int parentWidthMeasureSpec;

    private int parentHeightMeasureSpec;

    public CollapseView(Context context) {

        super(context);

        mContext = context;

        LayoutInflater.from(context).inflate(R.layout.collapse_layout, this);

        init();

    }

    public CollapseView(Context context, AttributeSet attrs) {

        super(context, attrs);

        mContext = context;

        LayoutInflater.from(context).inflate(R.layout.collapse_layout, this);

        init();

    }

    public CollapseView(Context context, AttributeSet attrs, int defStyleAttr) {

        super(context, attrs, defStyleAttr);

        mContext = context;

        LayoutInflater.from(context).inflate(R.layout.collapse_layout, this);

        init();

    }

    @Override

    protected void onMeasure(int widthMeasureSpec, int heightMeasureSpec) {

        super.onMeasure(widthMeasureSpec, heightMeasureSpec);

        parentWidthMeasureSpec = widthMeasureSpec;

        parentHeightMeasureSpec = heightMeasureSpec;

    }

    private void init() {

        mNumberTextView = (TextView) findViewById(R.id.numberTextView);

        mTitleTextView = (TextView) findViewById(R.id.titleTextView);

        mTitleRelativeLayout = (RelativeLayout) findViewById(R.id.titleRelativeLayout);

        mContentRelativeLayout = (RelativeLayout) findViewById(R.id.contentRelativeLayout);

        mArrowImageView = (ImageView) findViewById(R.id.arrowImageView);

        mTitleRelativeLayout.setOnClickListener(new OnClickListener() {

            @Override

            public void onClick(View v) {

                rotateArrow();

            }

        });

        collapse(mContentRelativeLayout);

    }

    public void setNumber(String number) {

        if (!TextUtils.isEmpty(number)) {

            mNumberTextView.setText(number);

        }

    }

    public void setTitle(String title) {

        if (!TextUtils.isEmpty(title)) {

            mTitleTextView.setText(title);

        }

    }

    public void setContent(int resID) {

        View view = LayoutInflater.from(mContext).inflate(resID, null);

        RelativeLayout.LayoutParams layoutParams =

                new RelativeLayout.LayoutParams(LayoutParams.MATCH_PARENT,

                        LinearLayout.LayoutParams.WRAP_CONTENT);

        view.setLayoutParams(layoutParams);

        mContentRelativeLayout.addView(view);

    }

    private void rotateArrow() {

        int angle = 0;

        if (mArrowImageView.getTag() == null || mArrowImageView.getTag().equals(true)) {

            mArrowImageView.setTag(false);

            angle = -180;

            //TODO 展开

            expand(mContentRelativeLayout);

        } else {

            angle = 0;

            mArrowImageView.setTag(true);

            //TODO 折叠

            collapse(mContentRelativeLayout);

        }

        mArrowImageView.animate().setDuration(duration).rotation(angle);

    }

    /**

     * 折叠

     *

     * @param view 视图

     */

    private void collapse(final View view) {

        final int measuredHeight = view.getMeasuredHeight();

        Animation animation = new Animation() {

            @Override

            protected void applyTransformation(float interpolatedTime, Transformation t) {

                Log.e("TAG", "interpolatedTime = " + interpolatedTime);

                if (interpolatedTime == 1) {

                    mContentRelativeLayout.setVisibility(GONE);

                } else {

                    view.getLayoutParams().height = measuredHeight - (int) (measuredHeight * interpolatedTime);

                    view.requestLayout();

                }

            }

        };

        animation.setDuration(duration);

        view.startAnimation(animation);

    }

    @Override

    protected void onLayout(boolean changed, int l, int t, int r, int b) {

        super.onLayout(changed, l, t, r, b);

    }

    /**

     * 展开

     *

     * @param view 视图

     */

    private void expand(final View view) {

        view.measure(parentWidthMeasureSpec, parentHeightMeasureSpec);

        final int measuredHeight = view.getMeasuredHeight();

        view.setVisibility(View.VISIBLE);

        Animation animation = new Animation() {

            @Override

            protected void applyTransformation(float interpolatedTime, Transformation t) {

                Log.e("TAG", "interpolatedTime = " + interpolatedTime);

                if (interpolatedTime == 1) {

                    view.getLayoutParams().height = measuredHeight;

                } else {

                    view.getLayoutParams().height = (int) (measuredHeight * interpolatedTime);

                }

                view.requestLayout();

            }

            @Override

            public boolean willChangeBounds() {

                return true;

            }

        };

        animation.setDuration(duration);

        view.startAnimation(animation);

    }

}
4.Notification
项目源码位置:AndroidProjects/Notification目录
介绍
- Notification API
参考资料
https://developer.android.com/guide/topics/ui/notifiers/notifications.html?hl=zh-cn#Managing
https://developer.android.com/reference/android/support/v4/app/NotificationCompat.html
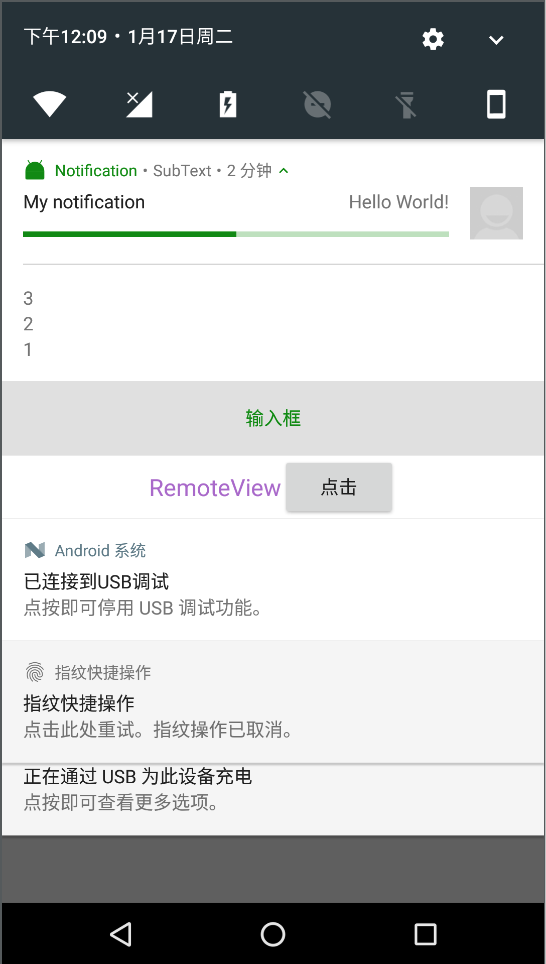
效果图
示例代码
PendingIntent activities = PendingIntent.getActivity(getApplicationContext()

                , 1

                , new Intent(getApplicationContext(), ResultActivity.class)

                , Intent.FILL_IN_ACTION);

        RemoteInput remoteInput = new RemoteInput.Builder("")

                .setLabel("label")

                .build();

        // Build an Android N compatible Remote Input enabled action.

        NotificationCompat.Action actionReplyByRemoteInput = new NotificationCompat.Action.Builder(

                R.mipmap.ic_launcher, "输入框", activities)

                .addRemoteInput(remoteInput)

                .build();

        RemoteViews remoteViews = new RemoteViews(getPackageName(), R.layout.item_remote_view);

        NotificationCompat.Builder mBuilder = new NotificationCompat.Builder(this)

                .setSmallIcon(R.mipmap.ic_launcher)

                .setVisibility(View.VISIBLE)

                .setContentTitle("My notification")//标题

                .setContentText("Hello World!")//正文

                .setSubText("SubText")//设置在平台通知模板文本的第三行

                .setRemoteInputHistory(new CharSequence[]{"1", "2", "3"})//设置远程输入历史。

                .setContent(remoteViews)//提供一个定制RemoteViews,而不是使用标准之一。

                .setDeleteIntent(activities)//供应PendingIntent时通报用户直接从通知面板清除发送。

                .setFullScreenIntent(activities, false)//意图发动,而不是张贴通知状态栏。

                .setTicker("Tocker")//设置显示在状态栏时通报首先到达的文本。

                .setSortKey("排序键")//设置听命于同一包内的其他通知中此通知的排序键

                .setOnlyAlertOnce(false)//设置此标志,如果你只喜欢的声音,震动和股票要如果通知尚未显示播放。

                .setPriority(NotificationCompat.PRIORITY_MAX)//设置相对优先级此通知。

                .setColor(2554444)//颜色

                .setCategory(NotificationCompat.CATEGORY_PROMO)//设置的通知类别。

                .setLargeIcon(BitmapFactory.decodeResource(getResources(), R.mipmap.android_contact))//设置大图标所示股票和通知。

                .setNumber(3)//设置信息条数

                .setContentInfo("在右边设置大型文本的通知")

                .setWhen(System.currentTimeMillis())//设置时间

                .setShowWhen(true)//现实When

                .setContentIntent(activities)//设置Intent

                .setVibrate(new long[]{3000, 1000, 3000, 1000})//震动

                .setLights(0xff0000ff, 300, 0)//闪光灯

                .setAutoCancel(true)//点击之后自动消失

                .setOngoing(false)//用户不能手动清除

                .setProgress(100, 50, false)//进度条

                .addAction(actionReplyByRemoteInput);

        if (isPlayMusic)

            mBuilder.setSound(Uri.parse("android.resource://" + getPackageName() + "/" + R.raw.actor));//设置声音播放。它将在默认流上播放。

        else

            mBuilder.setDefaults(Notification.DEFAULT_ALL);//设置将要使用的默认通知选项。

        NotificationManagerCompat.from(getApplicationContext()).notify(count, mBuilder.build());
5.MultiChannelBuild
项目源码位置:AndroidProjects/MultiChannelBuild目录
介绍
- Gradle多渠道打包
- Gradle动态打包(包名,Logo,APP名称)
- Gradle对生成APK名称重命名
- Gradle签名配置
- Gradle支持lambda
- Gralde编译JDK1.8
- Gradle存储库maven仓库设置
Gradle常见命令
- ./gradlew clean:清理删除build文件夹
- ./gradlew build:检查依赖并编译打包debug和release版本
- ./gradlew -v:版本号
- ./gradlew assembleRelease:打包所有渠道release版本
- ./gradlew assembleBaiduRelease:打某个渠道的release版本
- ./gradlew assembleDebug:打包所有渠道debug版本
- ./gradlew assembleBaiduDebug:打某个渠道的debug版本
- ./gradlew installRelease:打包并安装Release模式包
- ./gradlew installBaiduRelease:同上
- ./gradlew uninstallRelease:卸载Release模式包
- ./gradlew uninstallBaiduRelease:同上
Gradle注意事项
- linux下使用./gradlew
- windows下使用gradlew
- 打包后的apk文件在app–>build–>outputs—>apk
- 使用gradlew时可能出现没有找到该命令,需要chmod 755 gradlew
示例代码
apply plugin: 'com.android.application'

android {

    /**

     * apk签名脚本

     */

    signingConfigs {

        config {

            keyAlias 'Edwin'

            keyPassword 'Edwin666666'

            storeFile file('./AppKeyStore.jks')

            storePassword '666666'

            v2SigningEnabled false //Android 7.0 中新增了 APK Signature Scheme v2 签名方式

        }

    }

    /**

     * 自定义包名

     */

    def pageName = "com.github.why168.multichannelbuild"

    /**

     * 自定义名字

     */

    def appName = "MultiChannelBuild"

    /**

     * 自定义Logo

     */

    def appLogo = "@mipmap/ic_launcher"

    compileSdkVersion 25

    buildToolsVersion "25.0.2"

    defaultConfig {

        applicationId pageName

        minSdkVersion 11

        targetSdkVersion 25

        versionCode 1

        versionName "1.0"

        /**

         * 支持lambda

         */

        jackOptions {

            enabled true

        }

        /**

         * 类似下面productFlavors

         */

        manifestPlaceholders = [

                APP_ID  : "APP_ID111111",

                APP_KEY : "APP_KEY222222",

                APP_NAME: appName,

                APP_LOGO: appLogo

        ]

        /**

         * Native Development Kit

         */

        ndk {

            abiFilters 'armeabi', 'armeabi-v7a', 'arm64-v8a', 'x86', 'mips'

        }

    }

    buildTypes {

        debug {

            debuggable true

            buildConfigField "boolean", "LOG_DEBUG", "true"

            minifyEnabled false   //混淆

            shrinkResources false //去除无效的资源文件

            zipAlignEnabled false //Zipalign优化

            signingConfig signingConfigs.config

        }

        release {

            debuggable false

            buildConfigField "boolean", "LOG_DEBUG", "false"

            minifyEnabled true

            shrinkResources false

            zipAlignEnabled true

            proguardFiles getDefaultProguardFile('proguard-android.txt'), 'proguard-rules.pro'

            signingConfig signingConfigs.config

        }

    }

    /**

     * 源设置

     */

    sourceSets {

        main {

            jniLibs.srcDirs = ['libs']

        }

    }

    /**

     * 多渠道配置,下面的关键字'CHANNEL_NAME'与AndroidManifest里面必须一致。

     */

    productFlavors {

        baidu {//百度市场

            manifestPlaceholders = [CHANNEL_NAME: 500001]

        }

        yingyongbai {//腾讯应用市场

            manifestPlaceholders = [CHANNEL_NAME: 500002];

        }

        xiaomi {//小米应用市场

            manifestPlaceholders = [CHANNEL_NAME: 500003];

        }

        store360 {//360商店

            manifestPlaceholders = [CHANNEL_NAME: 500004];

        }

        anzhi {//安智市场

            manifestPlaceholders = [CHANNEL_NAME: 500005];

        }

    }

    /**

     * apk名字自定义

     */

    android.applicationVariants.all { variant ->

        variant.outputs.each { output ->

            def outputFile = output.outputFile

            def releaseTime = new Date().format("yyyy-MM-dd HH:MM", TimeZone.getTimeZone("UTC"))

            def fileName = outputFile.name.replace(".apk", "-V" + defaultConfig.versionName + "_" + releaseTime + ".apk")

            output.outputFile = new File(outputFile.parent, fileName)

        }

    }

    /**

     * JDK1.8编译选项

     */

    compileOptions {

        sourceCompatibility JavaVersion.VERSION_1_8

        targetCompatibility JavaVersion.VERSION_1_8

    }

    /**

     * 存储库maven仓库设置

     */

    repositories {

        flatDir {

            dirs 'libs'

        }

        mavenCentral()

        jcenter()

        maven { url "https://jitpack.io" }

    }

    /**

     * 移除lint检测的error

     */

    lintOptions {

        checkReleaseBuilds false

        abortOnError false

    }

    aaptOptions {

        cruncherEnabled = false

        useNewCruncher = false

    }

}

dependencies {

    compile fileTree(include: ['*.jar'], dir: 'libs')

    compile 'com.android.support:appcompat-v7:25.1.0'

}
6.Activity滑动关闭
项目源码位置:AndroidProjects/SwipeBack目录
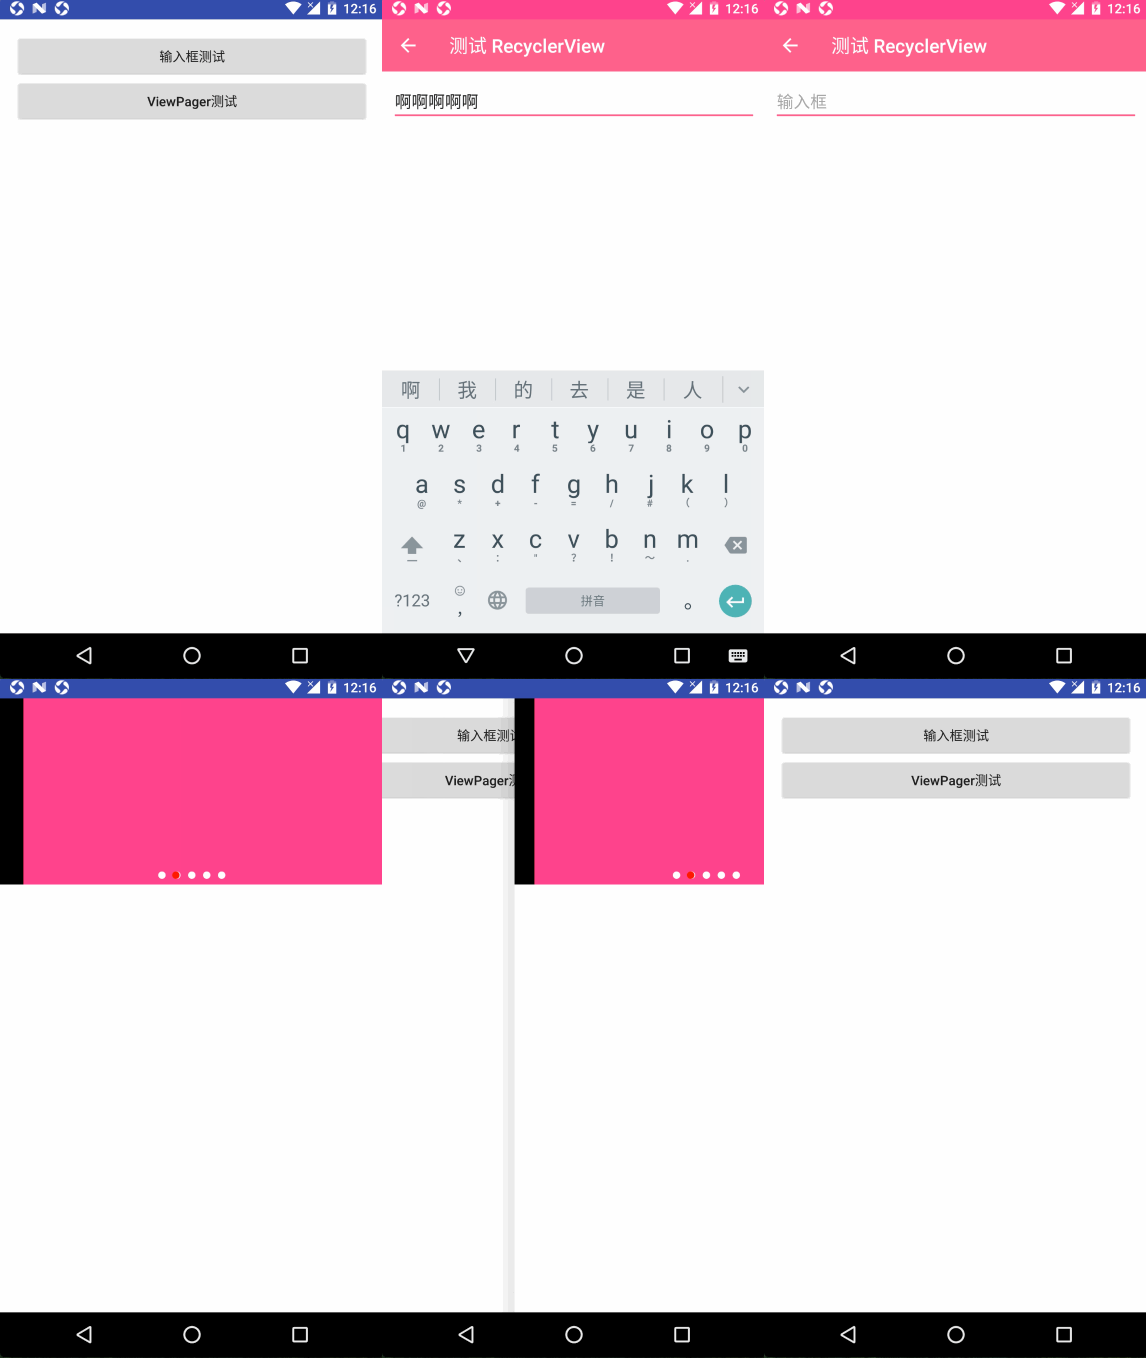
介绍
- 通过修改 support-v4 包中 SlidingPaneLayout 的源码来实现滑动返回布局
- 动态设置滑动返回是否可用
- 动态设置是否仅仅跟踪左侧边缘的滑动返回
- 动态设置是否是微信滑动返回样式
- 动态设置是否显示滑动返回的阴影效果
参考资料
效果图
示例代码
/**

 * 滑动返回Activity基类

 *

 * @author Edwin.Wu

 * @version 2017/2/7 18:05

 * @since JDK1.8

 */

public class SwipeBackActivity extends AppCompatActivity implements SwipeBackHelper.Delegate {

    protected SwipeBackHelper mSwipeBackHelper;

    @Override

    protected void onCreate(@Nullable Bundle savedInstanceState) {

        initSwipeBack();

        super.onCreate(savedInstanceState);

    }

    private void initSwipeBack() {

        mSwipeBackHelper = new SwipeBackHelper(this, this);

        // 设置滑动返回是否可用。默认值为 true

        mSwipeBackHelper.setSwipeBackEnable(true);

        // 设置是否仅仅跟踪左侧边缘的滑动返回。默认值为 true

        mSwipeBackHelper.setIsOnlyTrackingLeftEdge(true);

        // 设置是否是微信滑动返回样式。默认值为 true

        mSwipeBackHelper.setIsWeChatStyle(true);

        // 设置阴影资源 id。默认值为 R.drawable.bga_sbl_shadow

        mSwipeBackHelper.setShadowResId(R.drawable.bga_sbl_shadow);

        // 设置是否显示滑动返回的阴影效果。默认值为 true

        mSwipeBackHelper.setIsNeedShowShadow(true);

        // 设置阴影区域的透明度是否根据滑动的距离渐变。默认值为 true

        mSwipeBackHelper.setIsShadowAlphaGradient(true);

    }

    @Override

    public boolean isSupportSwipeBack() {

        return true;

    }

    /**

     * 正在滑动返回

     *

     * @param slideOffset 从 0 到 1

     */

    @Override

    public void onSwipeBackLayoutSlide(float slideOffset) {

    }

    /**

     * 没达到滑动返回的阈值,取消滑动返回动作,回到默认状态

     */

    @Override

    public void onSwipeBackLayoutCancel() {

    }

    /**

     * 滑动返回执行完毕,销毁当前 Activity

     */

    @Override

    public void onSwipeBackLayoutExecuted() {

        mSwipeBackHelper.swipeBackward();

    }

    /**

     * 返回操作

     */

    @Override

    public void onBackPressed() {

        mSwipeBackHelper.backward();

    }

    /**

     * 设置状态栏颜色

     *

     * @param color number

     */

    protected void setStatusBarColor(@ColorInt int color) {

        setStatusBarColor(color, 0);

    }

    /**

     * 设置状态栏颜色

     *

     * @param color          number

     * @param statusBarAlpha 透明度

     */

    public void setStatusBarColor(@ColorInt int color, @IntRange(from = 0, to = 255) int statusBarAlpha) {

        StatusBarUtil.setColorForSwipeBack(this, color, statusBarAlpha);

    }

}
7.CustomTabs
项目源码位置:AndroidProjects/CustomTabs目录
介绍
Chrome 浏览器现在已经成为 Android 原生系统的默认浏览器了。如果在您的应用中需要打开网页内容,之前的做法要么使用 WebView 或者 直接打开第三方浏览器来显示内容。典型的场景比如微信里面的大部分内容都是先在微信自己的 WebView 中显示,然后你可以选择菜单中的在浏览器中打开。而 Chrome 团队认为现在在应用中显示网页内容已经非常常见了,为了方便大家显示网页内容并且保存良好的用户体验,实现了这么一个功能。具体来说,如果您想在应用中打开一个网页,你可以通过 Chrome Custom Tabs 来打开 Chrome 浏览器的一个自定义 Tab 来显示该网页,你可以自定义这个 Tab 的一些属性来保持良好的用户体验,并且让用户感觉这个自定义 Tab 就是您应用的一部分。目前可以自定义如下内容:
- ActionBar(也就是最上面的 Toolbar,网址一栏)的颜色
- 自定义 Tab 的进入和退出过场动画
- 在自定义 Tab 的 ActionBar 上添加自定义图标和菜单
- 自定义返回图标
- 自定义 Tab 可以通过回调接口来通知应用网页导航的情况
- 性能更好,使用 Custom Tab 来打开网页的时候,还可以预先加载网页内容,这样当打开的时候,用户感觉非常快。
- 生命周期管理,使用 Custom tab 可以和您的应用绑定一起,当用户在浏览网页的时候,您的应用也被认为是互动的程序,不会被系统杀死。
- 可以共享 Chrome 浏览器的 Cookie ,这样用户就不用再登录一遍网站了。
- 如果用户开启了 Chrome 的数据压缩功能,则一样可以使用
- 和 Chrome 一样的自动补全功能
- 只需点击左上角的返回按钮一次就可以返回您的应用中了
- 每次用的都是最新版本的 Chrome
何时选择使用 WebView 和 Chrome Custom Tabs 呢?
如果你之前使用的不是 WebView ,则这种情况都应该用 Chrome Custom Tabs 来打开网页。如果你之前使用的是 WebView,则这里有两种情况来帮组您选择哪种情况更适合你:如果要显示的网页内容是由您自己控制的,并且网页内容需要和 Android 组件交互,比如通过 JavaScript 接口来调用 Android 系统的一些功能,这种情况下你还需要用 WebView 来实现;其他情况都可以用 Chrome Custom Tabs 来实现。
Chrome Custom Tabs 使用起来非常简单,简单的使用只需要一行代码,和直接调用系统浏览器显示网页没啥区别。通过简单的几项设定,就能让用户感觉浏览第三方网页就像您应用本身的功能一样。
使用注意
- 在CustomTabActivityHelper这个类里面的openCustomTab这个方法说明了一下:packageName is null打开自己定义的WebviewActivity的WebView,is not null打开一个自定义选项卡URL
- 我通过2个手机测试发现
- 谷歌亲儿子Nexus5:打开的是Chrome浏览器
- 乐视X608:打开都是都是自己定义的WebviewActivity的WebView
- 总结国内的ROM厂商已经干掉了Chrome,所以使用这个库意义不大。
参考资料
- https://developer.android.com/topic/libraries/support-library/features.html#custom-tabs
- https://developer.chrome.com/multidevice/android/customtabs
- https://github.com/GoogleChrome/custom-tabs-client
效果图
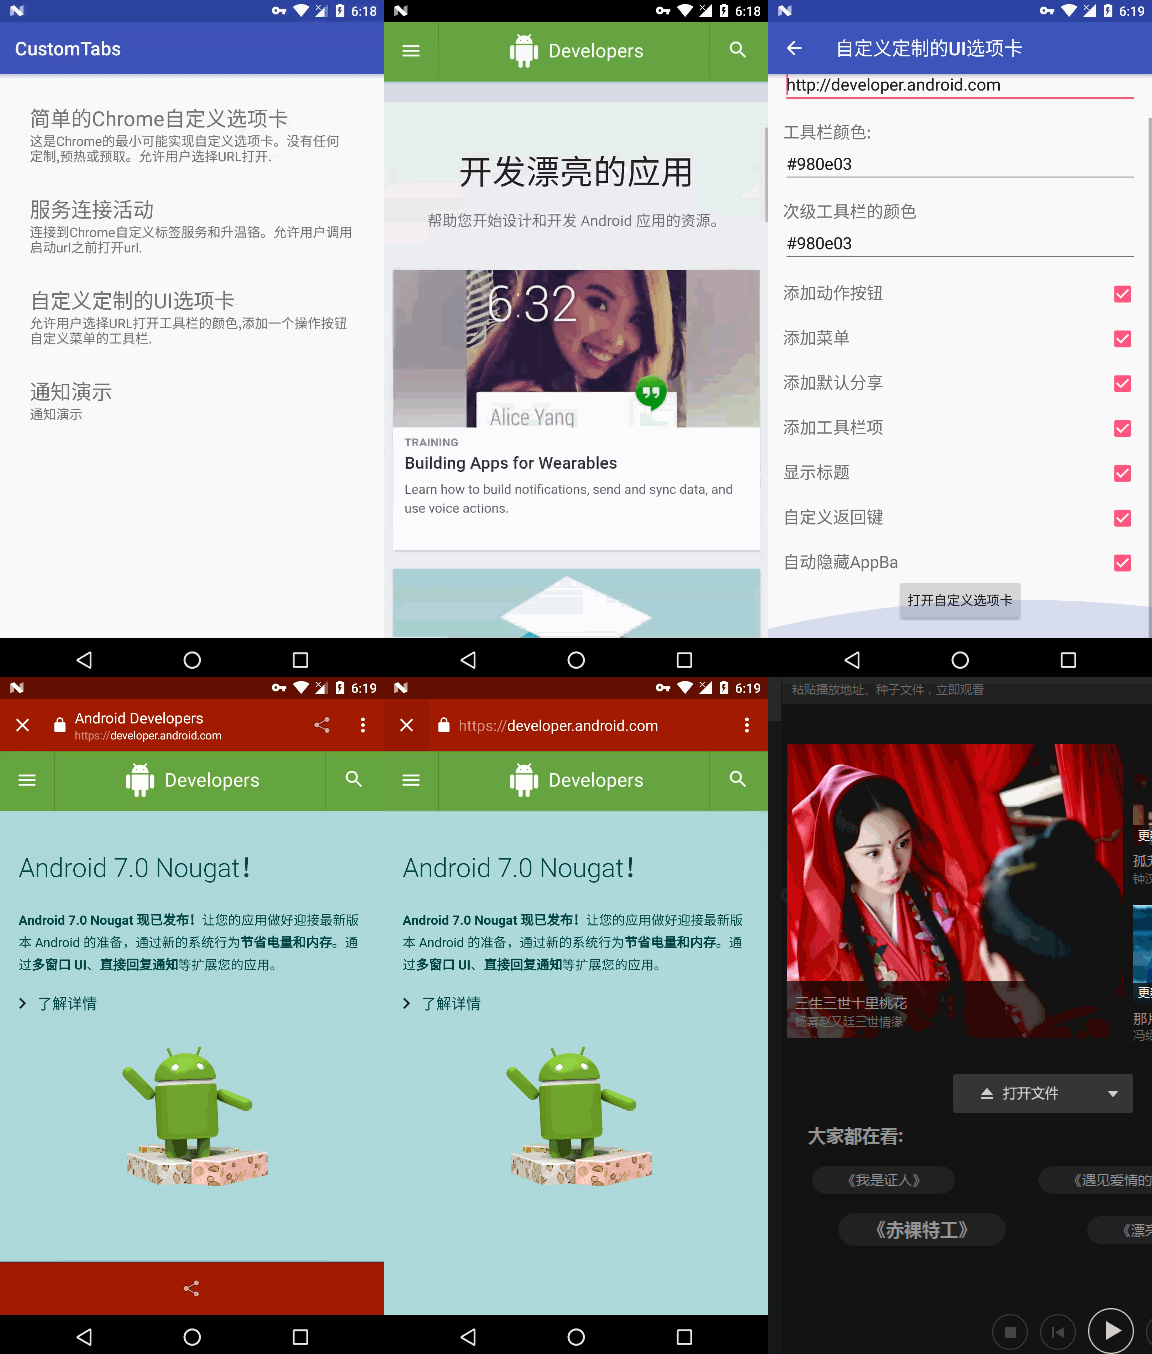
示例代码
CustomTabActivityHelpe.java
/**

 * Opens the URL on a Custom Tab if possible. Otherwise fallsback to opening it on a WebView.

 *

 * @param activity         The host activity.

 * @param customTabsIntent a CustomTabsIntent to be used if Custom Tabs is available.

 * @param uri              the Uri to be opened.

 * @param fallback         a CustomTabFallback to be used if Custom Tabs is not available.

 */

public static void openCustomTab(Activity activity,

                                 CustomTabsIntent customTabsIntent,

                                 Uri uri,

                                 CustomTabFallback fallback) {

    String packageName = CustomTabsHelper.getPackageNameToUse(activity);

    //If we cant find a package name, it means theres no browser that supports

    //Chrome Custom Tabs installed. So, we fallback to the webview

    if (packageName == null) {

        if (fallback != null) {

            fallback.openUri(activity, uri);

        }

    } else {

        customTabsIntent.intent.setPackage(packageName);

        customTabsIntent.launchUrl(activity, uri);

    }

}
CustomTabsIntent.Builder intentBuilder = new CustomTabsIntent.Builder();

// 修改 ActionBar 的颜色

intentBuilder.setToolbarColor(color);

// 设置辅助工具栏颜色

intentBuilder.setSecondaryToolbarColor(color);

// 添加一个分享按钮

String shareLabel = getString(R.string.label_action_share);

Bitmap icon = BitmapFactory.decodeResource(getResources(),android.R.drawable.ic_menu_share);

PendingIntent pendingIntent = createPendingIntent();

intentBuilder.setActionButton(icon, shareLabel, pendingIntent);

// 设置菜单

String menuItemTitle = getString(R.string.menu_item_title);

PendingIntent menuItemPendingIntent = createPendingIntent(ActionBroadcastReceiver.ACTION_MENU_ITEM);

intentBuilder.addMenuItem(menuItemTitle, menuItemPendingIntent);

// 设置默认

intentBuilder.addDefaultShareMenuItem();

// 是否显示网页标题

intentBuilder.setShowTitle(mShowTitleCheckBox.isChecked());

// 设置工具栏

String actionLabel = getString(R.string.label_action);

Bitmap icon = BitmapFactory.decodeResource(getResources(),android.R.drawable.ic_menu_share);

PendingIntent pendingIntent = createPendingIntent(ActionBroadcastReceiver.ACTION_TOOLBAR);

intentBuilder.addToolbarItem(TOOLBAR_ITEM_ID, icon, actionLabel, pendingIntent);

// 自定义关闭 Custom tabs 的图标

intentBuilder.setCloseButtonIcon(BitmapFactory.decodeResource(getResources(), R.drawable.ic_arrow_back));

// 自定义 Activity 转场 动画

intentBuilder.setStartAnimations(this, R.anim.slide_in_right, R.anim.slide_out_left);

intentBuilder.setExitAnimations(this, android.R.anim.slide_in_left,android.R.anim.slide_out_right);

// 最后调用助手类 CustomTabActivityHelper 的 openCustomTab 函数来打开一个网址

CustomTabActivityHelper.openCustomTab(this, intentBuilder.build(), Uri.parse(url), new WebviewFallback());
8.更新中...
项目源码位置:AndroidProjects/xxx目录
介绍
参考资料
效果图
示例代码
#### 技术交流大本营
>欢迎加入Android技术交流大群,群号码:554610222
> > Android技术交流,进群后请改名片.
例如:北京-李四.
群内交流以技术为主,乱发黄图乱发广告乱开车者一律踢.
> >
> >
MIT License
Copyright (c) 2016 Edwin

Permission is hereby granted, free of charge, to any person obtaining a copy

of this software and associated documentation files (the "Software"), to deal

in the Software without restriction, including without limitation the rights

to use, copy, modify, merge, publish, distribute, sublicense, and/or sell

copies of the Software, and to permit persons to whom the Software is

furnished to do so, subject to the following conditions:

The above copyright notice and this permission notice shall be included in all

copies or substantial portions of the Software.

THE SOFTWARE IS PROVIDED "AS IS", WITHOUT WARRANTY OF ANY KIND, EXPRESS OR

IMPLIED, INCLUDING BUT NOT LIMITED TO THE WARRANTIES OF MERCHANTABILITY,

FITNESS FOR A PARTICULAR PURPOSE AND NONINFRINGEMENT. IN NO EVENT SHALL THE

AUTHORS OR COPYRIGHT HOLDERS BE LIABLE FOR ANY CLAIM, DAMAGES OR OTHER

LIABILITY, WHETHER IN AN ACTION OF CONTRACT, TORT OR OTHERWISE, ARISING FROM,

OUT OF OR IN CONNECTION WITH THE SOFTWARE OR THE USE OR OTHER DEALINGS IN THE

SOFTWARE.
AndroidProjects个人项目归纳的更多相关文章
- 4、传统三层架构与DDD分层架构
4.传统三层架构与DDD分层架构 模型是抽象的 现实是形象的 技巧是重要的 思想是永恒的 从传统三层架构与DDD分层架构的编程演变其实是思想的演变. 传统三层架构,即用户界面层UI.业务逻辑层BAL. ...
- Maven学习归纳(三)——依赖添加依赖排除与项目整合
一.Maven的坐标 1. 坐标的定义 数学意义上的坐标可以是平面上的(x,y)也可以是空间上的(x,y,z),都可以确定一个质点的位置和方向. Maven中有很多构件,为了能够自动化解析任何一个构件 ...
- e3mall商城的归纳总结1之项目的架构
首先来谈谈e3mall商城,e3mall商城是黑马推出一个学习的项目,前身是淘淘商城.两个用的技术差不多.,但由于后期加了一些新技术,更名为e3mall商城.本商城为分布式商城,主要用到的技术使mav ...
- Atitit. 项目文档目录大纲 总集合 v2
Atitit. 项目文档目录大纲 总集合 v2 -----Atitti.原有项目源码的架构,框架,配置与环境说明 v3 q511 -----Atitit.开发环境 与 工具 以及技术框架 以及 注意 ...
- 攻城记:Thinkphp框架的项目规划总结和踩坑经验
一.项目模块规划 1.项目分为PC端.移动端.和PC管理端,分为对应目录为 /Application/Home,/Application/Mobile,/Application/Admin: 对应入口 ...
- 某CRM项目招投标工作的感悟
最近参与了某公司的CRM项目招标工作, 由于此项目涉及到的二级单位比较多,以及项目金额比较大,所以此招标工作从准备到宣布中标一直持续了大概3个月时间,中间过程发生了一些颇有意思的事情,因为保密的原因无 ...
- 团队项目——站立会议DAY13
第十三次站立会议记录: 参会人员:张靖颜,钟灵毓秀,何玥,赵莹,王梓萱 项目进展: 1.张靖颜:在完成各项功能的基础上继续进行扩展完善 2.钟灵毓秀:进行模块分类的整合与纠错修改,整理错误向队友提出 ...
- 软件项目发展历史<人月神话>这本书好
几乎是计算机软件开发的发展历史 人月神话,增加人手并不一定能提高开发速度. 原因在于,有些任务是无法分解的,存在先后顺序.无法同步进行. 增加人手,增加的是沟通成本,相互牵制.可以分解的任务就 ...
- PMBOK学习笔记二-项目管理过程
项目管理过程可归纳为五类,即五大项目管理过程组 启动过程组.定义一个新项目或现有项目的一个新阶段,授权开始该项目或阶段的一组过程..规划过程组.明确项目范围,优化目标,为实现目标制定行动方案的一组过程 ...
随机推荐
- 【Web动画】CSS3 3D 行星运转 && 浏览器渲染原理
承接上一篇:[CSS3进阶]酷炫的3D旋转透视 . 最近入坑 Web 动画,所以把自己的学习过程记录一下分享给大家. CSS3 3D 行星运转 demo 页面请戳:Demo.(建议使用Chrome打开 ...
- ASP.NET Web API Selfhost宿主环境中管道、路由
ASP.NET Web API Selfhost宿主环境中管道.路由 前言 前面的几个篇幅对Web API中的路由和管道进行了简单的介绍并没有详细的去说明一些什么,然而ASP.NET Web API这 ...
- Objective-C 生成器模式 -- 简单实用和说明
1.生成器模式的定义 将一个复杂的对象的构件与它的表示分离,使得同样的构建过程可以创建不同的表示 2.生成器模式的UML Builder :生成器接口,定义创建一个Product各个部件的操作 Con ...
- [Java]Java日期及时间库插件 -- Joda Time.
来到新公司工作也有一个多月了, 陆陆续续做了一些简单的项目. 今天做一个新东西的时候发现了 Joda Time的这个东西, 因为以前用的都是JDK原生的时间处理API, 大家都知道Java原生的时间处 ...
- iOS-推送,证书申请,本地推送
介绍一点点背景资料 众所周知,使用推送通知是一个很棒的.给应用添加实时消息通知的方式.这样做的结局是,开发者和用户之间,彼此永远保持着一种令人愉悦的亲密关系. 然而不幸的是,iOS的推送通知并非那么容 ...
- 03.Web大前端时代之:HTML5+CSS3入门系列~H5功能元素
Web大前端时代之:HTML5+CSS3入门系列:http://www.cnblogs.com/dunitian/p/5121725.html 2.功能元素 1.hgroup 对网页或区段(secti ...
- 【WCF】授权策略详解
所谓授权者,就是服务授予客户端是否具有调用某个服务操作的权限. 授权过程可以通过一系列授权策略来进行评估,即每个特定的授权策略都按照各自的需求,衡量一下调用方是否具备访问服务操作的权限.在默认情况下, ...
- 判断一个值是否为null或者undefined
var a=null; var b=undefined; if(a===null){ //a==null alert("a=null") }else{ alert("a= ...
- Python标准模块--multiprocessing
1 模块简介 multiprocessing模块在Python2.6中引入.最初的multiprocessing是由Jesse Noller和Richard Oudkerk在PEP 371中定义.就像 ...
- ElasticSearch 5学习(3)——单台服务器部署多个节点
一般情况下单台服务器只会部署一个ElasticSearch node,但是在学习过程中,很多情况下会需要实现ElasticSearch的分布式效果,所以需要启动多个节点,但是学习开发环境(不想开多个虚 ...
