python重拾第十一天-RABBITMQ队列
安装python rabbitMQ module
pip install pika

官网 https://pypi.python.org/pypi/pika
安装rabbit-server服务,centos7系统
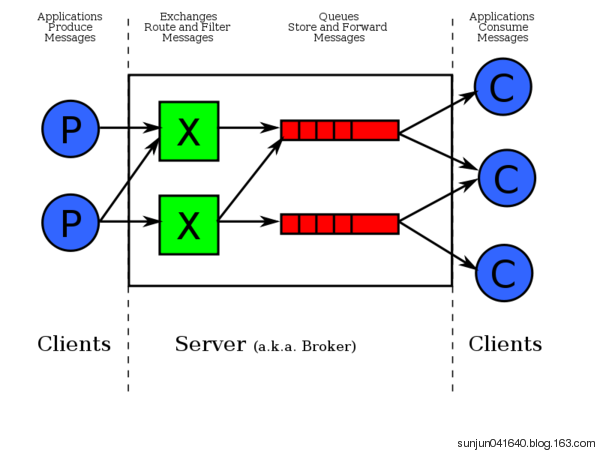
这个中间商就是MQ erlang语言支持的

安装依赖ERLANG

wget https://mirrors.tuna.tsinghua.edu.cn/epel/7/x86_64/Packages/e/epel-release-7-11.noarch.rpm

rpm -ivh epel-release-7-11.noarch.rpm

yum repolist

yum clean all

yum install erlang

安装依赖SOCAT

yum - y install socat

安装RABBITMQ

rpm - ivh https: // bintray.com / rabbitmq / rabbitmq - server - rpm / download_file?file_path = rabbitmq - server - 3.6.10 - 1.el7.noarch.rpm

/sbin/service rabbitmq - server start

端口号 5672
简单队列通信

远程连接rabbit server的话,需要配置远程用户,权限
在rabbitmq server上创建用户
rabbitmqctl add_user joker 123456
配置权限,允许从外面访问
rabbitmqctl set_permissions -p "/" joker '.*' '.*' '.*'
set_permissions [-p vhost] {user} {conf} {write} {read}
vhost
The name of the virtual host to which to grant the user access, defaulting to /.
user
The name of the user to grant access to the specified virtual host.
conf
A regular expression matching resource names for which the user is granted configure permissions.
write
A regular expression matching resource names for which the user is granted write permissions.
read
A regular expression matching resource names for which the user is granted read permissions.
消息队列收发端连接到远程的rabbit-server需要配置认证参数
credentials = pika.PlainCredentials('joker', 'joker123')

connection = pika.BlockingConnection(pika.ConnectionParameters(

    'remoteip',5672,'/',credentials))

channel = connection.channel()
send端
import pika

connection = pika.BlockingConnection(pika.ConnectionParameters(

               'localhost'))    # 建立socket

channel = connection.channel()  # 建立通道

#声明queue

channel.queue_declare(queue='hello') # 通道里面声明队列

#n RabbitMQ a message can never be sent directly to the queue, it always needs to go through an exchange.

channel.basic_publish(exchange='',

                      routing_key='hello', # 队列

                      body='Hello World!') # 消息

print(" [x] Sent 'Hello World!'")

connection.close()
receive端
import pika

connection = pika.BlockingConnection(pika.ConnectionParameters(

               'localhost'))

channel = connection.channel()

#You may ask why we declare the queue again ‒ we have already declared it in our previous code.

# We could avoid that if we were sure that the queue already exists. For example if send.py program

#was run before. But we're not yet sure which program to run first. In such cases it's a good

# practice to repeat declaring the queue in both programs.

channel.queue_declare(queue='hello')

def callback(ch, method, properties, body):

    print(" [x] Received %r" % body)

channel.basic_consume(callback,

                      queue='hello',

                      no_ack=True)    # 这个是不需要接收确认信息,后面会继续说

print(' [*] Waiting for messages. To exit press CTRL+C')

channel.start_consuming() # 开始接收消息,这里是阻塞状态,一直接收下去
Work Queues

这种模式下,RabbitMQ会默认把p发的消息依次分发给各个消费者(c),跟负载均衡差不多
采用轮训机制,如果有多个消费者,会按照先后顺序发送消息
消费者处理完了告诉生产者处理完了,生产者就会从消息队列删除消息,如果没有处理完宕机了,那消息就没了
no_ack=FALSE
# 当消费者执行任务的时候断掉,那么这个消息就掉了,no_ack注销掉,消费者就必须给服务器信息,是否执行完了,手动给服务器确认
# 判断断掉的机制就是SOCKET断了
ch.basic_ack(delivery_tag=method.delivery_tag) # 手动跟服务端确认
消息持久化
channel.queue_declare(queue='hello', durable=True) # 持久化消息队列名称

channel.basic_publish(exchange='',

                      routing_key="task_queue",

                      body=message,

                      properties=pika.BasicProperties(

                         delivery_mode = 2, # make message persistent # 消息持久化

                      ))
服务器宕机,队列里的消息持久在
消息公平发布
消息公平分发,谁有本事(性能高)你多发,看队列有多少消息channel.basic_qos(prefetch_count=1),我这里有一条消息就先别给我发

channel.basic_qos(prefetch_count=1)
生产者端
# !/usr/bin/env python

# _*_coding:utf-8_*_

# Author:Joker

import pika

username = 'joker'

pwd = '123456'

user_pwd = pika.PlainCredentials(username, pwd)

connection = pika.BlockingConnection(pika.ConnectionParameters(

    host='remoteip',port=5672,credentials=user_pwd))  # 建立SOCKET

channel = connection.channel() # 建立通道

# 管道里面声明queue

channel.queue_declare(queue='hello2',durable=True) # 持久化队列

# n RabbitMQ a message can never be sent directly to the queue, it always needs to go through an exchange.

channel.basic_publish(exchange='',

                      routing_key='hello2',  # QUEUE名字

                      body='Hello World!',

                      properties=pika.BasicProperties( # 消息持久化

                          delivery_mode=2,  # make message persistent

                      )

                      )  # 消息内容

print(" [x] Sent 'Hello World!'")

connection.close()
消费者端
# !/usr/bin/env python

# _*_coding:utf-8_*_

# Author:Joker

import pika,time

username = 'joker'

pwd = '123456'

user_pwd = pika.PlainCredentials(username, pwd)

connection = pika.BlockingConnection(pika.ConnectionParameters(

    host='remoteip',port=5672,credentials=user_pwd))

channel = connection.channel()

# You may ask why we declare the queue again ‒ we have already declared it in our previous code.

# We could avoid that if we were sure that the queue already exists. For example if send.py program

# was run before. But we're not yet sure which program to run first. In such cases it's a good

# practice to repeat declaring the queue in both programs.

channel.queue_declare(queue='hello2',durable=True) # 无法保证生产消费谁先运行,为了不出错可以自己声明,durable=True持久化队列

def callback(ch, method, properties, body):

    print(ch,method,properties)

    # <BlockingChannel impl=<Channel number=1 OPEN conn=<SelectConnection OPEN socket=('192.168.0.139', 49993)->('60.205.188.107', 5672) params=<ConnectionParameters host=60.205.188.107 port=5672 virtual_host=/ ssl=False>>>>

    # <Basic.Deliver(['consumer_tag=ctag1.e67a54d9b91a40ab82647f2dafa9d9ba', 'delivery_tag=2', 'exchange=', 'redelivered=False', 'routing_key=hello'])>

    # <BasicProperties(['delivery_mode=2'])>

    # 通道的内存对象,链接的消息,消息属性见下面

    # time.sleep(30)

    print(" [x] Received %r" % body)

    ch.basic_ack(delivery_tag=method.delivery_tag) # 手动跟服务端确认,devlivery_tag是信息标签,一般是第一条是1,第二条是2

channel.basic_qos(prefetch_count=1) # 如果我这里还有消息就先别发给我

channel.basic_consume(# 消费消息

                      callback,  # 如果收到消息,就调用CALLBACK函数来处理消息

                      queue='hello2', # 从哪个队列收消息

                      # no_ack=True) # 不会给服务端发消息,是否处理完

                        )

print(' [*] Waiting for messages. To exit press CTRL+C')

channel.start_consuming() # 永远收下去
Propertie
content_type : 消息内容的类型

content_encoding: 消息内容的编码格式

priority: 消息的优先级

correlation_id:关联id

reply_to: 用于指定回复的队列的名称

expiration: 消息的失效时间

message_id: 消息id

timestamp:消息的时间戳

type: 类型

user_id: 用户id

app_id: 应用程序id

cluster_id: 集群id
Publish\Subscribe(消息发布\订阅)
我们在之前学习的是1对1的消息发送接收,也就是消息只能发送到指定的queue,如果你想发送的消息让所有的queue收到,就要用到exchage了
Exchange在定义的时候有类型的,以决定到底是哪些queue符合条件,可以接收消息
fanout: 所有bind到此exchange的queue都可以接收消息
EXCHANGE FANDOUT 纯广播,因为广播的原因,不会帮你保留消息,消费者先启动才能收到消息,每个人都能收到
消息publisher
# !/usr/bin/env python

# _*_coding:utf-8_*_

# Author:Joker

import pika

import sys

username = 'joker'

pwd = '123456'

user_pwd = pika.PlainCredentials(username, pwd)

connection = pika.BlockingConnection(pika.ConnectionParameters(

    host='remoteip',port=5672,credentials=user_pwd))  # 建立SOCKET

channel = connection.channel() # 建立通道

channel.exchange_declare(exchange='logs',exchange_type='fanout')   # 广播不需要写Q

message = ' '.join(sys.argv[1:]) or "info: Hello World!"

channel.basic_publish(exchange='logs',

                      routing_key='', # Q 名

                      body=message)

print(" [x] Sent %r" % message)

connection.close()
消息subscriber
# !/usr/bin/env python

# _*_coding:utf-8_*_

# Author:Joker

import pika

username = 'joker'

pwd = '123456'

user_pwd = pika.PlainCredentials(username, pwd)

connection = pika.BlockingConnection(pika.ConnectionParameters(

    host='remoteip',port=5672,credentials=user_pwd))  # 建立SOCKET

channel = connection.channel() # 建立通道

channel.exchange_declare(exchange='logs',exchange_type='fanout')

result = channel.queue_declare(exclusive=True)  # 不指定queue名字,rabbit会随机分配一个名字,exclusive=True会在使用此queue的消费者断开后,自动将queue删除

queue_name = result.method.queue

print(queue_name) # 随机

channel.queue_bind(exchange='logs', # 绑定Q到转发器EXCHAGE上

                   queue=queue_name) #

print(' [*] Waiting for logs. To exit press CTRL+C')

def callback(ch, method, properties, body):

    print(" [x] %r" % body)

channel.basic_consume(callback,

                      queue=queue_name,

                      no_ack=True)

channel.start_consuming()
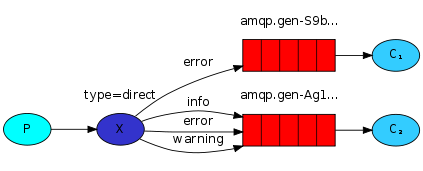
有选择的接收消息exchage type=direct
队列绑定关键字,发送者将数据根据关键字发送到消息exchange,exchange根据 关键字 判定应该将数据发送至指定队列

publisher
# !/usr/bin/env python

# _*_coding:utf-8_*_

# Author:Joker


import pika

import sys

username = 'joker'

pwd = '123456'

user_pwd = pika.PlainCredentials(username, pwd)

connection = pika.BlockingConnection(pika.ConnectionParameters(

    host='remoteip',port=5672,credentials=user_pwd))  # 建立SOCKET

channel = connection.channel() # 建立通道

channel.exchange_declare(exchange='direct_logs',

                         exchange_type='direct')

severity = sys.argv[1] if len(sys.argv) > 1 else 'info'

message = ' '.join(sys.argv[2:]) or 'Hello World!'

channel.basic_publish(exchange='direct_logs',

                      routing_key=severity,

                      body=message)

print(" [x] Sent %r:%r" % (severity, message))

connection.close()

# import sys

# print(sys.argv[0]) # /Users/liqianlong/Desktop/Django project/kkk/开启py之旅/消息队列/7DIRECT_PUBLISHER.py
subscriber
# !/usr/bin/env python

# _*_coding:utf-8_*_

# Author:Joker

import pika

import sys

username = 'joker'

pwd = '123456'

user_pwd = pika.PlainCredentials(username, pwd)

connection = pika.BlockingConnection(pika.ConnectionParameters(

    host='remoteip',port=5672,credentials=user_pwd))  # 建立SOCKET

channel = connection.channel() # 建立通道

channel.exchange_declare(exchange='direct_logs',

                         exchange_type='direct')

result = channel.queue_declare(exclusive=True)

queue_name = result.method.queue

severities = sys.argv[1:]   # 获取脚本后面跟的参数,WARNING,ERROR,INFO ..

if not severities:

    sys.stderr.write("Usage: %s [info] [warning] [error]\n" % sys.argv[0])

    sys.exit(1)

for severity in severities:

    channel.queue_bind(exchange='direct_logs',

                       queue=queue_name,

                       routing_key=severity)

print(' [*] Waiting for logs. To exit press CTRL+C')

def callback(ch, method, properties, body):

    print(" [x] %r:%r" % (method.routing_key, body))

channel.basic_consume(callback,

                      queue=queue_name,

                      no_ack=True)

channel.start_consuming()
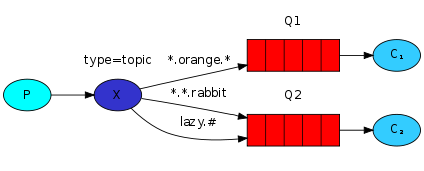
更细致的消息过滤exchage type=topic

publisher
# !/usr/bin/env python

# _*_coding:utf-8_*_

# Author:Joker

import pika

import sys

username = 'joker'

pwd = '123456'

user_pwd = pika.PlainCredentials(username, pwd)

connection = pika.BlockingConnection(pika.ConnectionParameters(

    host='remoteip',port=5672,credentials=user_pwd))  # 建立SOCKET

channel = connection.channel() # 建立通道

channel.exchange_declare(exchange='topic_logs',

                         exchange_type='topic')

routing_key = sys.argv[1] if len(sys.argv) > 1 else 'anonymous.info'

message = ' '.join(sys.argv[2:]) or 'Hello World!'

channel.basic_publish(exchange='topic_logs',

                      routing_key=routing_key,

                      body=message)

print(" [x] Sent %r:%r" % (routing_key, message))

connection.close()
subscriber
# !/usr/bin/env python

# _*_coding:utf-8_*_

# Author:Joker

import pika

import sys

username = 'joker'

pwd = '123456'

user_pwd = pika.PlainCredentials(username, pwd)

connection = pika.BlockingConnection(pika.ConnectionParameters(

    host='remoteip',port=5672,credentials=user_pwd))  # 建立SOCKET

channel = connection.channel() # 建立通道

channel.exchange_declare(exchange='topic_logs',

                         exchange_type='topic')

result = channel.queue_declare(exclusive=True)

queue_name = result.method.queue

binding_keys = sys.argv[1:] # 监测的文件匹配

if not binding_keys:

    sys.stderr.write("Usage: %s [binding_key]...\n" % sys.argv[0])

    sys.exit(1)

for binding_key in binding_keys:

    channel.queue_bind(exchange='topic_logs',

                       queue=queue_name,

                       routing_key=binding_key)

print(' [*] Waiting for logs. To exit press CTRL+C')

def callback(ch, method, properties, body):

    print(" [x] %r:%r" % (method.routing_key, body))

channel.basic_consume(callback,

                      queue=queue_name,

                      no_ack=True)

channel.start_consuming()
To receive all the logs run:
python receive_logs_topic.py "#" 可以收取所有的信息
To receive all logs from the facility "kern":
python receive_logs_topic.py "kern.*"
Or if you want to hear only about "critical" logs:
python receive_logs_topic.py "*.critical"
You can create multiple bindings:
python receive_logs_topic.py "kern.*" "*.critical"
And to emit a log with a routing key "kern.critical" type:
python emit_log_topic.py "kern.critical" "A critical kernel error"
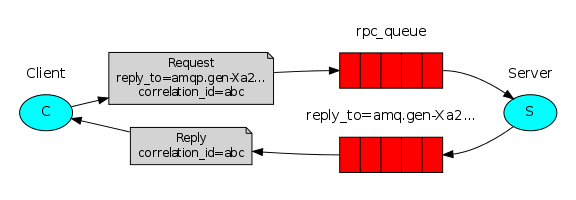
Remote procedure call(RPC)
远程调用方法执行,SNMP简单网络管理协议,发一条执行返回结果就是一个简单的RPC,实现的就是服务器端也是客户端双向

server
#_*_coding:utf-8_*_

__author__ = 'joker lii'

import pika

import time

connection = pika.BlockingConnection(pika.ConnectionParameters(

        host='localhost'))

channel = connection.channel()

channel.queue_declare(queue='rpc_queue')

def fib(n):

    if n == 0:

        return 0

    elif n == 1:

        return 1

    else:

        return fib(n-1) + fib(n-2)

def on_request(ch, method, props, body):

    n = int(body)

    print(" [.] fib(%s)" % n)

    response = fib(n)

    ch.basic_publish(exchange='', # 结果发挥给客户端

                     routing_key=props.reply_to, # props指的就是客户端里面的replay_to的q

                     properties=pika.BasicProperties(correlation_id = \

                                                         props.correlation_id), # 客户端的correlation_id

                     body=str(response))

    ch.basic_ack(delivery_tag = method.delivery_tag) # 确保消息消费了

channel.basic_qos(prefetch_count=1)

channel.basic_consume(on_request, queue='rpc_queue')

print(" [x] Awaiting RPC requests")

channel.start_consuming()
client
import pika

import uuid
import time

class FibonacciRpcClient(object):

    def __init__(self):

        self.connection = pika.BlockingConnection(pika.ConnectionParameters(

                host='localhost'))  # socket

        self.channel = self.connection.channel() # 通道

        result = self.channel.queue_declare(exclusive=True)

        self.callback_queue = result.method.queue # 随机q

        self.channel.basic_consume(self.on_response, no_ack=True,  # on_response 回调函数

                                   queue=self.callback_queue)      # 随机q

    def on_response(self, ch, method, props, body): # 消息收到后做了些什么

        if self.corr_id == props.correlation_id: # 先判断自己当前的id和服务器端的id是否一样,保证消息一对一

            self.response = body # 这里将收到的消息赋值response,看是不是none

    def call(self, n):

        self.response = None # response,谁会将这个none改为true,因为none就会一直收

        self.corr_id = str(uuid.uuid4()) # 唯一的随机一串数字


        self.channel.basic_publish(exchange='', # 发消息

                                   routing_key='rpc_queue', # rpc_queue

                                   properties=pika.BasicProperties( # 消息持久化

                                         reply_to = self.callback_queue, # 让服务器端执行完命令返回这个q里面

                                         correlation_id = self.corr_id, # 唯一的随机一串数字

                                         ),

                                   body=str(n)) # 发的消息


        while self.response is None: # response为none就会一直收

            self.connection.process_data_events() # 非阻塞版的start_consuming(),收到消息触发回调函数,没有收到继续往下走
       print('no msg...')
            time.sleep(0.5)

        return int(self.response)

fibonacci_rpc = FibonacciRpcClient()

print(" [x] Requesting fib(30)")

response = fibonacci_rpc.call(30) # 调用call方法

print(" [.] Got %r" % response)
python重拾第十一天-RABBITMQ队列的更多相关文章
- Python学习笔记整理总结【RabbitMQ队列】
RabbitMQ是消息队列.之前学过的队列queue:线程queue(threading queue),只是多个线程之间进行数据交互.进程queue(processing queue),只是父进程与子 ...
- Python自动化 【第十一篇】:Python进阶-RabbitMQ队列/Memcached/Redis
本节内容: RabbitMQ队列 Memcached Redis 1. RabbitMQ 安装 http://www.rabbitmq.com/install-standalone-mac.htm ...
- Python开发【十一章】:RabbitMQ队列
RabbitMQ队列 rabbitMQ是消息队列:想想之前的我们学过队列queue:threading queue(线程queue,多个线程之间进行数据交互).进程queue(父进程与子进程进行交互或 ...
- Day10 - Python协程、异步IO、redis缓存、rabbitMQ队列
Python之路,Day9 - 异步IO\数据库\队列\缓存 本节内容 Gevent协程 Select\Poll\Epoll异步IO与事件驱动 Python连接Mysql数据库操作 RabbitM ...
- (十一)RabbitMQ消息队列-如何实现高可用
原文:(十一)RabbitMQ消息队列-如何实现高可用 在前面讲到了RabbitMQ高可用集群的搭建,但是我们知道只是集群的高可用并不能保证应用在使用消息队列时完全没有问题,例如如果应用连接的Rabb ...
- Python之协程、异步IO、redis缓存、rabbitMQ队列
本节内容 Gevent协程 Select\Poll\Epoll异步IO与事件驱动 Python连接Mysql数据库操作 RabbitMQ队列 Redis\Memcached缓存 Paramiko SS ...
- python RabbitMQ队列/redis
RabbitMQ队列 rabbitMQ是消息队列:想想之前的我们学过队列queue:threading queue(线程queue,多个线程之间进行数据交互).进程queue(父进程与子进程进行交互或 ...
- python RabbitMQ队列使用(入门篇)
---恢复内容开始--- python RabbitMQ队列使用 关于python的queue介绍 关于python的队列,内置的有两种,一种是线程queue,另一种是进程queue,但是这两种que ...
- python RabbitMQ队列使用
python RabbitMQ队列使用 关于python的queue介绍 关于python的队列,内置的有两种,一种是线程queue,另一种是进程queue,但是这两种queue都是只能在同一个进程下 ...
- 重拾python
前一段碰到几次关于日期计算的题:给出一个日期,计算下一天的日期.虽然不限语言,可是我就C/C++还算熟悉,别的都是刚了解皮毛,根本不会用现成的库啊,无奈啊...只好用c语言一点点实现了,当时真是无比怀 ...
随机推荐
- SpringBoot使用JSch操作Linux
推荐使用Hutool的Jsch工具包(它用的连接池的技术) 一.SSH远程连接服务器 SSH更多见:http://t.csdnimg.cn/PrsNv 推荐连接工具:FinalShell.Xshell ...
- Rust 错误处理
rust 处理错误,不使用 try catch, 而是使用 Result<T, E>. 简单的处理rust错误 在各种关于rust错误处理的文档中,为了解释清楚其背后的机制,看着内容很多, ...
- JDK源码阅读-------自学笔记(二十一)(java.util.ArrayList详细版集合类)
一.前景提要 本人经历了IT行业的多种类型企业,外包/创业小公司/中型公司,一步步成长起来,现在可以给大家透露下为什么进大企业在IT行业是重要的: 在外包公司,你要做的就是对接别人写好的接口,然后按照 ...
- Web3连接以太网
1. Infura Infura 是一种托管服务,提供对各种区块链网络的安全可靠访问,消除了管理区块链基础设施的复杂性,使开发者能够专注于构建创新的 Web3 应用程序. Infura 作为连接应用程 ...
- 5GC 系统架构
目录 文章目录 目录 前文列表 4G/5G 核心网对比 4G/5G 核心网融合架构 5GC 架构 AMF 功能 SMF 功能 NSSF 功能 UPF 功能 AF.PCF & NEF 功能 BS ...
- Debian中配置NIS:用户账号管理
1.添加指定gid的组 groupadd -g 1001 upload # 添加了一个指定gid为1001的upload用户 2.添加指定uid的用户,并加入到指定组 useradd -u 1001 ...
- python垃圾回收和缓存管理
Python垃圾回收和缓存管理 你有没有想过为什么我们频繁地使用Python敲代码做项目,实际上一直在生产对象并不断占用内存,而我们很少会去清理Python的内存,理论上来讲它总有一天把内存消耗殆尽( ...
- 代码界的超级英雄:GitHub的奇幻冒险之旅
GitHub简介 GitHub是一个用于代码托管.版本控制和协作开发的平台.它于2008年2月8日由Chris Wanstrath.PJ Hyett和Tom Preston-Werner创立,目前由微 ...
- Kubernetes操作图
- iOS使用SignalR客户端代码典范-桥接web SignalR 客户端库
一.SignalR介绍 SignalR是微软基于.Net提供的一个开源实时Web RPC库,可以用在web实时通信的需求上面,比如聊天,web数据更新 SignalR的接口使用十分简单 由于最近的一个 ...
