linux版火狐浏览器部署详解
Firefox下载地址
Firefox全历史版本下载:
http://ftp.mozilla.org/pub/firefox/releases/
Firefox驱动问题下载 https://github.com/mozilla/geckodriver/releases
我本地测试用的驱动版本:geckodriver-v0.30.0-win64.zip
我本地测试用的火狐版本:92.0
我本地测试用的操作系统:centos7
火狐浏览器解压安装出现的问题
下载火狐版本包,上传,解压(tar jxf)执行命令报错如下:
问题一:
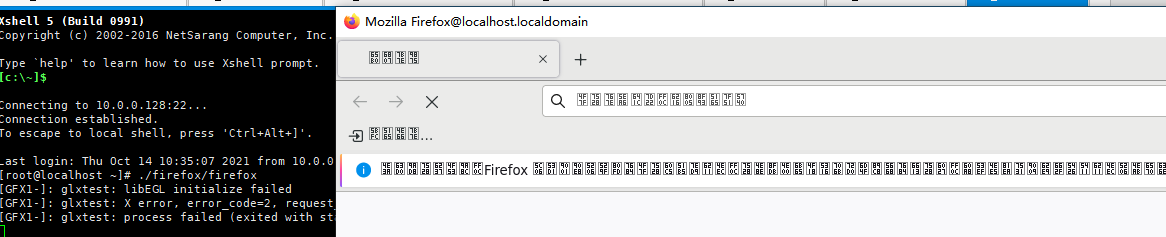
[machangwei@xxx ~]$ ./firefox/firefox
XPCOMGlueLoad error for file /home/machangwei/firefox/libmozgtk.so:
libgtk-3.so.0: cannot open shared object file: No such file or directory
Couldn't load XPCOM. 问题二: [deployer@xxx firefox]$ ./firefox
XPCOMGlueLoad error for file /apps/svr/firefox/libxul.so:
libXt.so.6: cannot open shared object file: No such file or directory
Couldn't load XPCOM.
问题复现及解决
问题一复现及解决:
问题一缺少gtk3,执行如下命令解决
yum install -y gtk3
如果还不行,把gtk2也装上,回头补充详情
问题二复现及解决:
移除libXt文件,问题复现,重新yum安装,问题解决
[root@localhost ~]# ./firefox/firefox >/dev/null 2>&1 &

[1] 9310

[root@localhost ~]# ps -ef|grep firefox

root       9310   9294 48 09:13 pts/6    00:00:11 ./firefox/firefox

root       9437   9310  9 09:13 pts/6    00:00:01 /root/firefox/firefox-bin -contentproc -childID 1 -isForBrowser -prefsLen 1 -prefMapSize 248973 -jsInit 285716 -parentBuildID 20210901125518 -appdir /root/firefox/browser 9310 true tab

root       9488   9310  6 09:13 pts/6    00:00:00 /root/firefox/firefox-bin -contentproc -childID 2 -isForBrowser -prefsLen 160 -prefMapSize 248973 -jsInit 285716 -parentBuildID 20210901125518 -appdir /root/firefox/browser 9310 true tab

root       9524   9310  6 09:13 pts/6    00:00:00 /root/firefox/firefox-bin -contentproc -childID 4 -isForBrowser -prefsLen 5583 -prefMapSize 248973 -jsInit 285716 -parentBuildID 20210901125518 -appdir /root/firefox/browser 9310 true tab

root       9541   9294  0 09:13 pts/6    00:00:00 grep --color=auto firefox

[root@localhost ~]# rpm -qa|grep libXt

libXtst-1.2.3-1.el7.x86_64

libXt-1.1.5-3.el7.x86_64

yum remove libXt-1.1.5-3.el7.x86_64

Removed:

  libXt.x86_64 0:1.1.5-3.el7

Dependency Removed:

  dbus-x11.x86_64 1:1.10.24-15.el7              firefox.x86_64 0:78.14.0-1.el7.centos     libXaw.x86_64 0:1.0.13-4.el7            libXmu.x86_64 0:1.1.2-2.el7

  xorg-x11-server-utils.x86_64 0:7.7-20.el7     xorg-x11-xauth.x86_64 1:1.0.9-1.el7       xorg-x11-xinit.x86_64 0:1.3.4-2.el7     xterm.x86_64 0:295-3.el7_9.1

[root@localhost ~]# ./firefox/firefox

XPCOMGlueLoad error for file /root/firefox/libxul.so:

libXt.so.6: cannot open shared object file: No such file or directory

Couldn't load XPCOM.

[root@localhost ~]#

yum install -y libXt-1.1.5-3.el7.x86_64

Running transaction

  Installing : libXt-1.1.5-3.el7.x86_64                                                                                                                          1/1

  Verifying  : libXt-1.1.5-3.el7.x86_64                                                                                                                          1/1

Installed:

  libXt.x86_64 0:1.1.5-3.el7

[root@localhost ~]# ./firefox/firefox

Error: no DISPLAY environment variable specified

[root@localhost ~]# yum install -y xorg-x11-server-utils.x86_64 xorg-x11-xinit.x86_64

Installed:

  xorg-x11-server-utils.x86_64 0:7.7-20.el7                                            xorg-x11-xinit.x86_64 0:1.3.4-2.el7

Dependency Installed:

  libXmu.x86_64 0:1.1.2-2.el7                                                   xorg-x11-xauth.x86_64 1:1.0.9-1.el7

[root@localhost ~]# ./firefox/firefox

Error: no DISPLAY environment variable specified

[root@localhost ~]# eval `dbus-launch --sh-syntax`

-bash: dbus-launch: command not found

[root@localhost ~]# yum install -y dbus-x11.x86_64

[root@localhost ~]# eval `dbus-launch --sh-syntax`

[root@localhost ~]# ./firefox/firefox

Error: no DISPLAY environment variable specified
重新打开一个会话窗口,成功启动进程
[root@localhost ~]# ./firefox/firefox >/dev/null 2>&1 &

[1] 2333

[root@localhost ~]# ps -ef|grep firefox

root       2333   1891 22 10:40 pts/2    00:00:04 ./firefox/firefox

root       2484   2333  6 10:40 pts/2    00:00:01 /root/firefox/firefox-bin -contentproc -childID 1 -isForBrowser -prefsLen 1 -prefMapSize 249090 -jsInit 285716 -parentBuildID 20210901125518 -appdir /root/firefox/browser 2333 true tab

root       2536   2333  0 10:40 pts/2    00:00:00 /root/firefox/firefox-bin -contentproc -childID 2 -isForBrowser -prefsLen 96 -prefMapSize 249090 -jsInit 285716 -parentBuildID 20210901125518 -appdir /root/firefox/browser 2333 true tab

root       2601   2333  5 10:40 pts/2    00:00:00 /root/firefox/firefox-bin -contentproc -childID 4 -isForBrowser -prefsLen 5590 -prefMapSize 249090 -jsInit 285716 -parentBuildID 20210901125518 -appdir /root/firefox/browser 2333 true tab

root       2665   2333  2 10:40 pts/2    00:00:00 /root/firefox/firefox-bin -contentproc -parentBuildID 20210901125518 -prefsLen 5590 -prefMapSize 249090 -appdir /root/firefox/browser 2333 true rdd

root       2718   1891  0 10:40 pts/2    00:00:00 grep --color=auto firefox


需要安装的libXt依赖包总结:
libXt.x86_64 dbus-x11.x86_64 firefox.x86_64 libXaw.x86_64 libXmu.x86_64
xorg-x11-server-utils.x86_64 xorg-x11-xauth xorg-x11-xinit.x86_64 xterm.x86_64
[machangwei@aocxxx ~]$ rpm -qa|grep "libXt|dbus-x11|libXaw|libXmu|xorg-x11-server-utils|xorg-x11-xauth|xorg-x11-xinit|xterm"
[machangwei@aocxxx ~]$
firefox
问题3解决乱码:
Centos Firefox中文乱码(对Centos7/8都有效)

 yum -y groupinstall Fonts

马上生效。

查看是否安装成功

下载依赖包到本地:
yum install --downloadonly --downloaddir=/root/mcw/prob1 libXt dbus-x11 libXaw libXmu dbus-x11  xorg-x11-server-utils xorg-x11-xauth xorg-x11-xinit xterm

yum groupinstall --downloadonly --downloaddir=/root/mcw/language Fonts
功能测试
windows上打开linux版浏览器测试,正常访问
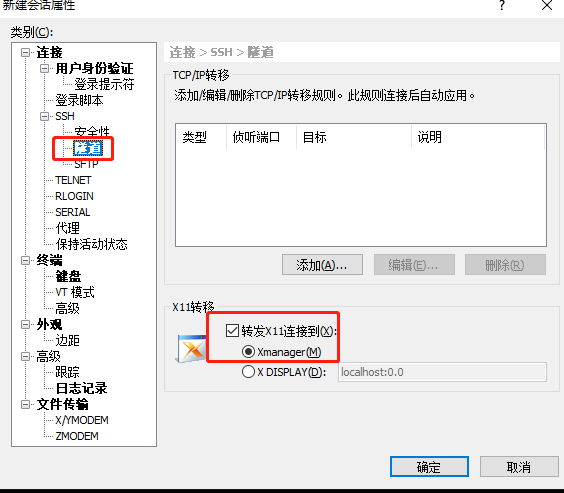
windows上启用linux版火狐,需要安装图形化界面,安装xmanger,xshell启用xmanager
linux火狐能正常访问

python程序测试火狐浏览器是否能正常使用
from selenium.webdriver.chrome.options import Options

from time import sleep

from selenium import webdriver

# 创建一个参数对象,用来控制chrome以无界面模式打开

chrome_options = Options()

chrome_options.add_argument('--headless')

chrome_options.add_argument('--disable-gpu')

options.add_argument(’–headless’)

options.add_argument(’--no-sandbox’)

options.add_argument(’--disable-dev-shm-usage’)#实例化一个浏览器对象

bro = webdriver.Chrome(executable_path=r'/root/chrome/chromedriver',chrome_options=chrome_options)

bro.get('https://www.baidu.com')

sleep(2)

bro.save_screenshot('1.png')

print(bro.page_source)

sleep(2)

bro.quit()
执行程序,成功截图访问百度的页面

启动Linux版火狐浏览器,需要使用xmanger连接(4a登录的主机无法使用xmanager连接),支持图形化界面才能启动成功,并且在自己笔记本上打开图形化的linux火狐浏览器。
之前进入了一个误区,安装了软件就需要启动。自动化测试只需要使用无头浏览器来调用火狐,启动火狐进程。所以无需安装图形化界面等,只需要解决火狐的缺少的库文件,中文字符之类的问题,就可以使用程序测试是否能正常使用浏览器。
文档整理不全,可参考笔记信息:
yum install -y https://mirrors.aliyun.com/epel/epel-release-latest-8.noarch.rpm
yum install -y http://archives.fedoraproject.org/pub/archive/epel/6/x86_64/epel-release-6-8.noarch.rpm
#wget http://dl.fedoraproject.org/pub/epel/6/x86_64/epel-release-6-8.noarch.rpm
#rpm -Uvh epel-release--.noarch.rpm
http://archives.fedoraproject.org/pub/archive/epel/
https://npm.taobao.org/mirrors/chromium-browser-snapshots/Win_x64/884014/
https://download.csdn.net/download/qq_40949759/11593946
启动命令,火狐启动后出来火狐浏览器中文乱码
./firefox/firefox >/dev/null 2>&1 &
/opt/google/chrome/google-chrome --disable-setuid-sandbox --user-data-dir --no-sandbox
/opt/google/chrome/google-chrome --disable-setuid-sandbox --user-data-dir --no-sandbox >/dev/null 2>&1 &
说明dbus没有建立,要安装必要的工具:
# apt-get install dbus-x11
运行 dbus-launch :
# dbus-launch
1.启动Chrome
/usr/bin/google-chrome
会报错:
[31560:31560:0207/085601.085852:ERROR:zygote_host_impl_linux.cc(90)] Running as root without --no-sandbox is not supported. See https://crbug.com/638180.
修改 /usr/bin/google-chrome文件
将 exec -a "$0" "$HERE/chrome" "$@" 改为
exec -a "$0" "$HERE/chrome" "$@" --user-data-dir --no-sandbox
就可以直接启动了
Ubuntu
链接:https://www.jianshu.com/p/ea9a1a4ab95c
xmanager使用
https://blog.csdn.net/yongwan5637/article/details/84060709
xmanager安装
https://www.xshellcn.com/xiazai.html
启动程序
https://blog.csdn.net/longgeaisisi/article/details/90519690
安装x11
https://blog.csdn.net/h106140873/article/details/107135811
安装xterm,xterm出来小窗口
https://www.jianshu.com/p/23ba123ee874
2.在服务器端vi /etc/ssh/sshd_config,添加一行:需要root,不确定是否开启了的
X11Forwarding yes
dbus命令没有
dbus-x11 yum安装
centos6的源
https://developer.aliyun.com/mirror/
epel 6的源
http://archives.fedoraproject.org/pub/archive/epel/
yum install -y https://mirrors.aliyun.com/epel/epel-release-latest-8.noarch.rpm
yum install -y http://archives.fedoraproject.org/pub/archive/epel/6/x86_64/epel-release-6-8.noarch.rpm

linux版火狐浏览器部署详解的更多相关文章
- legend3---Windows 7/8/10 系统下Laravel框架的开发环境安装及部署详解(Vagrant + Homestead)
legend3---Windows 7/8/10 系统下Laravel框架的开发环境安装及部署详解(Vagrant + Homestead) 一.总结 一句话总结: 1.安装的话就是下载好git,va ...
- centos7.2环境elasticsearch-5.0.1+kibana-5.0.1+zookeeper3.4.6+kafka_2.9.2-0.8.2.1部署详解
centos7.2环境elasticsearch-5.0.1+kibana-5.0.1+zookeeper3.4.6+kafka_2.9.2-0.8.2.1部署详解 环境准备: 操作系统:centos ...
- 【转】Nginx+php-fpm+MySQL分离部署详解
转:http://www.linuxidc.com/Linux/2015-07/120580.htm Nginx+php-fpm+MySQL分离部署详解 [日期:2015-07-26] 来源:Linu ...
- [r]Ubuntu Linux系统下apt-get命令详解
Ubuntu Linux系统下apt-get命令详解(via|via) 常用的APT命令参数: apt-cache search package 搜索包 apt-cache show package ...
- Solr部署详解
Solr部署详解 时间:2013-11-24 方式:转载 目录 1 solr概述 1.1 solr的简介 1.2 solr的特点 2 Solr安装 2.1 安装JDK 2.2 安装Tomcat 2.3 ...
- MySql绿色版配置及使用详解
原文:MySql绿色版配置及使用详解 最近在做项目开发时用到了MySql数据库,在看了一些有关MySql的文章后,很快就上手使用了.在使用的过程中还是出现了一些问题,因为使用的是绿色免安装版的MySq ...
- Linux文件系统的目录结构详解
Linux文件系统的目录结构详解 一.前 言 文章对Linux下所有目录一一说明,对比较重要的目录加以重点解说,以帮助初学者熟练掌握Linux的目录结构. 二.目 录 1.什么是文件系统 2.文件 ...
- MySQL高可用方案-PXC(Percona XtraDB Cluster)环境部署详解
MySQL高可用方案-PXC(Percona XtraDB Cluster)环境部署详解 Percona XtraDB Cluster简称PXC.Percona Xtradb Cluster的实现是在 ...
- linux下getsockopt和setsockopt详解及测试
linux下getsockopt和setsockopt详解及测试 NAME 名字 getsockopt, setsockopt - get and set options on sockets 获取或 ...
随机推荐
- Pycharm去除波浪线等相关操作
- 安全测试工具(1)- Burp Suite Pro的安装教程
啥是Burp Suite 用于攻击web 应用程序的集成平台 程序员必备技能,不仅可以拿来做渗透测试.漏洞挖掘还能帮助程序员调试程序 Bug 它包含了许多Burp工具,这些不同的burp工具通过协同工 ...
- Mysql - You can't specify target table '表名' for update in FROM clause 错误解决办法
背景 在MySQL中,写SQL语句的时候 ,可能会遇到 You can't specify target table '表名' for update in FROM clause 这样的错误 错误含义 ...
- docker-compose up -d nginx 报错
在阿里云ECS上创建nginx容器时,报错如上图. The solution: In your Dockerfile, before running any apt commands, add the ...
- Filter案例之敏感词过滤和代理模式
一.需求分析 二 .代理模式 1.概念 2.代码实现 代理对象可以强转为真实对象,即对应的接口类: 3.通过代理增强方法 其中,方法对象invoke真实对象,反射原理: 三.过滤敏感词汇案例代码实现 ...
- 九、Abp vNext 基础篇丨评论聚合功能
介绍 评论本来是要放到标签里面去讲的,但是因为上一章东西有点多了,我就没放进去,这一章单独拿出来,内容不多大家自己写写就可以,也算是对前面讲解的一个小练习吧. 相关注释我也加在代码上面了,大家看看代码 ...
- vue中的watch
1.第一种 watch:{ total:{ // total:要检测的数据 handler:(val,oldVal)=>{ // handler方法自动执行 }, deep:true / ...
- 离散化模板题 II ——重复元素离散化后的数字不相同
离散化模板题 II --重复元素离散化后的数字不相同 题目描述 现有数列A1, A2, ⋯, An,数列中可能有重复元素. 现在要求输出该数列的离散化数列,重复元素离散化后的数字不相同. 输入 第一行 ...
- 抽奖之Flash大转盘
1.搭建JS与Flash互通的环境 function thisMovie(movieName){ if (window.document[movieName]) { return window.doc ...
- 自己实现一个Controller——终极型
经过前两篇的学习与实操,也大致掌握了一个k8s资源的Controller写法了,如有不熟,可回顾 自己实现一个Controller--标准型 自己实现一个Controller--精简型 但是目前也只能 ...