本文介绍如何使用 Docker Swarm 来部署 Nebula Graph 集群,并部署客户端负载均衡和高可用
本文作者系:视野金服工程师 | 吴海胜
首发于 Nebula Graph 论坛:https://discuss.nebula-graph.com.cn/t/topic/1388
一、前言
本文介绍如何使用 Docker Swarm 来部署 Nebula Graph 集群,并部署客户端负载均衡和高可用。

二、nebula 集群搭建
2.1 环境准备
机器准备
| ip | 内存(Gb) | cpu(核数) |
|---|---|---|
| 192.168.1.166 | 16 | 4 |
| 192.168.1.167 | 16 | 4 |
| 192.168.1.168 | 16 | 4 |
在安装前确保所有机器已安装 Docker
2.2 初始化 swarm 集群
在 192.168.1.166 机器上执行
$ docker swarm init --advertise-addr 192.168.1.166

Swarm initialized: current node (dxn1zf6l61qsb1josjja83ngz) is now a manager.

To add a worker to this swarm, run the following command:

 docker swarm join \

 --token SWMTKN-1-49nj1cmql0jkz5s954yi3oex3nedyz0fb0xx14ie39trti4wxv-8vxv8rssmk743ojnwacrr2e7c \

 192.168.1.166:2377

To add a manager to this swarm, run 'docker swarm join-token manager' and follow the instructions.
2.3 加入 worker 节点
根据 init 命令提示内容,加入 swarm worker 节点,在 192.168.1.167 192.168.1.168 分别执行
docker swarm join \

 --token SWMTKN-1-49nj1cmql0jkz5s954yi3oex3nedyz0fb0xx14ie39trti4wxv-8vxv8rssmk743ojnwacrr2e7c \

 192.168.1.166:2377
2.4 验证集群
docker node ls

ID                            HOSTNAME            STATUS              AVAILABILITY        MANAGER STATUS      ENGINE VERSION

h0az2wzqetpwhl9ybu76yxaen *   KF2-DATA-166        Ready               Active              Reachable           18.06.1-ce

q6jripaolxsl7xqv3cmv5pxji     KF2-DATA-167        Ready               Active              Leader              18.06.1-ce

h1iql1uvm7123h3gon9so69dy     KF2-DATA-168        Ready               Active                                  18.06.1-ce
2.5 配置 docker stack
vi docker-stack.yml
配置如下内容
version: '3.6'

services:

  metad0:

    image: vesoft/nebula-metad:nightly

    env_file:

      - ./nebula.env

    command:

      - --meta_server_addrs=192.168.1.166:45500,192.168.1.167:45500,192.168.1.168:45500

      - --local_ip=192.168.1.166

      - --ws_ip=192.168.1.166

      - --port=45500

      - --data_path=/data/meta

      - --log_dir=/logs

      - --v=0

      - --minloglevel=2

    deploy:

      replicas: 1

      restart_policy:

        condition: on-failure

      placement:

        constraints:

          - node.hostname == KF2-DATA-166

    healthcheck:

      test: ["CMD", "curl", "-f", "http://192.168.1.166:11000/status"]

      interval: 30s

      timeout: 10s

      retries: 3

      start_period: 20s

    ports:

      - target: 11000

        published: 11000

        protocol: tcp

        mode: host

      - target: 11002

        published: 11002

        protocol: tcp

        mode: host

      - target: 45500

        published: 45500

        protocol: tcp

        mode: host

    volumes:

      - data-metad0:/data/meta

      - logs-metad0:/logs

    networks:

      - nebula-net

  metad1:

    image: vesoft/nebula-metad:nightly

    env_file:

      - ./nebula.env

    command:

      - --meta_server_addrs=192.168.1.166:45500,192.168.1.167:45500,192.168.1.168:45500

      - --local_ip=192.168.1.167

      - --ws_ip=192.168.1.167

      - --port=45500

      - --data_path=/data/meta

      - --log_dir=/logs

      - --v=0

      - --minloglevel=2

    deploy:

      replicas: 1

      restart_policy:

        condition: on-failure

      placement:

        constraints:

          - node.hostname == KF2-DATA-167

    healthcheck:

      test: ["CMD", "curl", "-f", "http://192.168.1.167:11000/status"]

      interval: 30s

      timeout: 10s

      retries: 3

      start_period: 20s

    ports:

      - target: 11000

        published: 11000

        protocol: tcp

        mode: host

      - target: 11002

        published: 11002

        protocol: tcp

        mode: host

      - target: 45500

        published: 45500

        protocol: tcp

        mode: host

    volumes:

      - data-metad1:/data/meta

      - logs-metad1:/logs

    networks:

      - nebula-net

  metad2:

    image: vesoft/nebula-metad:nightly

    env_file:

      - ./nebula.env

    command:

      - --meta_server_addrs=192.168.1.166:45500,192.168.1.167:45500,192.168.1.168:45500

      - --local_ip=192.168.1.168

      - --ws_ip=192.168.1.168

      - --port=45500

      - --data_path=/data/meta

      - --log_dir=/logs

      - --v=0

      - --minloglevel=2

    deploy:

      replicas: 1

      restart_policy:

        condition: on-failure

      placement:

        constraints:

          - node.hostname == KF2-DATA-168

    healthcheck:

      test: ["CMD", "curl", "-f", "http://192.168.1.168:11000/status"]

      interval: 30s

      timeout: 10s

      retries: 3

      start_period: 20s

    ports:

      - target: 11000

        published: 11000

        protocol: tcp

        mode: host

      - target: 11002

        published: 11002

        protocol: tcp

        mode: host

      - target: 45500

        published: 45500

        protocol: tcp

        mode: host

    volumes:

      - data-metad2:/data/meta

      - logs-metad2:/logs

    networks:

      - nebula-net

  storaged0:

    image: vesoft/nebula-storaged:nightly

    env_file:

      - ./nebula.env

    command:

      - --meta_server_addrs=192.168.1.166:45500,192.168.1.167:45500,192.168.1.168:45500

      - --local_ip=192.168.1.166

      - --ws_ip=192.168.1.166

      - --port=44500

      - --data_path=/data/storage

      - --log_dir=/logs

      - --v=0

      - --minloglevel=2

    deploy:

      replicas: 1

      restart_policy:

        condition: on-failure

      placement:

        constraints:

          - node.hostname == KF2-DATA-166

    depends_on:

      - metad0

      - metad1

      - metad2

    healthcheck:

      test: ["CMD", "curl", "-f", "http://192.168.1.166:12000/status"]

      interval: 30s

      timeout: 10s

      retries: 3

      start_period: 20s

    ports:

      - target: 12000

        published: 12000

        protocol: tcp

        mode: host

      - target: 12002

        published: 12002

        protocol: tcp

        mode: host

    volumes:

      - data-storaged0:/data/storage

      - logs-storaged0:/logs

    networks:

      - nebula-net

  storaged1:

    image: vesoft/nebula-storaged:nightly

    env_file:

      - ./nebula.env

    command:

      - --meta_server_addrs=192.168.1.166:45500,192.168.1.167:45500,192.168.1.168:45500

      - --local_ip=192.168.1.167

      - --ws_ip=192.168.1.167

      - --port=44500

      - --data_path=/data/storage

      - --log_dir=/logs

      - --v=0

      - --minloglevel=2

    deploy:

      replicas: 1

      restart_policy:

        condition: on-failure

      placement:

        constraints:

          - node.hostname == KF2-DATA-167

    depends_on:

      - metad0

      - metad1

      - metad2

    healthcheck:

      test: ["CMD", "curl", "-f", "http://192.168.1.167:12000/status"]

      interval: 30s

      timeout: 10s

      retries: 3

      start_period: 20s

    ports:

      - target: 12000

        published: 12000

        protocol: tcp

        mode: host

      - target: 12002

        published: 12004

        protocol: tcp

        mode: host

    volumes:

      - data-storaged1:/data/storage

      - logs-storaged1:/logs

    networks:

      - nebula-net

  storaged2:

    image: vesoft/nebula-storaged:nightly

    env_file:

      - ./nebula.env

    command:

      - --meta_server_addrs=192.168.1.166:45500,192.168.1.167:45500,192.168.1.168:45500

      - --local_ip=192.168.1.168

      - --ws_ip=192.168.1.168

      - --port=44500

      - --data_path=/data/storage

      - --log_dir=/logs

      - --v=0

      - --minloglevel=2

    deploy:

      replicas: 1

      restart_policy:

        condition: on-failure

      placement:

        constraints:

          - node.hostname == KF2-DATA-168

    depends_on:

      - metad0

      - metad1

      - metad2

    healthcheck:

      test: ["CMD", "curl", "-f", "http://192.168.1.168:12000/status"]

      interval: 30s

      timeout: 10s

      retries: 3

      start_period: 20s

    ports:

      - target: 12000

        published: 12000

        protocol: tcp

        mode: host

      - target: 12002

        published: 12006

        protocol: tcp

        mode: host

    volumes:

      - data-storaged2:/data/storage

      - logs-storaged2:/logs

    networks:

      - nebula-net

  graphd1:

    image: vesoft/nebula-graphd:nightly

    env_file:

      - ./nebula.env

    command:

      - --meta_server_addrs=192.168.1.166:45500,192.168.1.167:45500,192.168.1.168:45500

      - --port=3699

      - --ws_ip=192.168.1.166

      - --log_dir=/logs

      - --v=0

      - --minloglevel=2

    deploy:

      replicas: 1

      restart_policy:

        condition: on-failure

      placement:

        constraints:

          - node.hostname == KF2-DATA-166

    depends_on:

      - metad0

      - metad1

      - metad2

    healthcheck:

      test: ["CMD", "curl", "-f", "http://192.168.1.166:13000/status"]

      interval: 30s

      timeout: 10s

      retries: 3

      start_period: 20s

    ports:

      - target: 3699

        published: 3699

        protocol: tcp

        mode: host

      - target: 13000

        published: 13000

        protocol: tcp

#        mode: host

      - target: 13002

        published: 13002

        protocol: tcp

        mode: host

    volumes:

      - logs-graphd:/logs

    networks:

      - nebula-net

  graphd2:

    image: vesoft/nebula-graphd:nightly

    env_file:

      - ./nebula.env

    command:

      - --meta_server_addrs=192.168.1.166:45500,192.168.1.167:45500,192.168.1.168:45500

      - --port=3699

      - --ws_ip=192.168.1.167

      - --log_dir=/logs

      - --v=2

      - --minloglevel=2

    deploy:

      replicas: 1

      restart_policy:

        condition: on-failure

      placement:

        constraints:

          - node.hostname == KF2-DATA-167

    depends_on:

      - metad0

      - metad1

      - metad2

    healthcheck:

      test: ["CMD", "curl", "-f", "http://192.168.1.167:13001/status"]

      interval: 30s

      timeout: 10s

      retries: 3

      start_period: 20s

    ports:

      - target: 3699

        published: 3640

        protocol: tcp

        mode: host

      - target: 13000

        published: 13001

        protocol: tcp

        mode: host

      - target: 13002

        published: 13003

        protocol: tcp

#        mode: host

    volumes:

      - logs-graphd2:/logs

    networks:

      - nebula-net

  graphd3:

    image: vesoft/nebula-graphd:nightly

    env_file:

      - ./nebula.env

    command:

      - --meta_server_addrs=192.168.1.166:45500,192.168.1.167:45500,192.168.1.168:45500

      - --port=3699

      - --ws_ip=192.168.1.168

      - --log_dir=/logs

      - --v=0

      - --minloglevel=2

    deploy:

      replicas: 1

      restart_policy:

        condition: on-failure

      placement:

        constraints:

          - node.hostname == KF2-DATA-168

    depends_on:

      - metad0

      - metad1

      - metad2

    healthcheck:

      test: ["CMD", "curl", "-f", "http://192.168.1.168:13002/status"]

      interval: 30s

      timeout: 10s

      retries: 3

      start_period: 20s

    ports:

      - target: 3699

        published: 3641

        protocol: tcp

        mode: host

      - target: 13000

        published: 13002

        protocol: tcp

#        mode: host

      - target: 13002

        published: 13004

        protocol: tcp

        mode: host

    volumes:

      - logs-graphd3:/logs

    networks:

      - nebula-net

networks:

  nebula-net:

    external: true

    attachable: true

    name: host

volumes:

  data-metad0:

  logs-metad0:

  data-metad1:

  logs-metad1:

  data-metad2:

  logs-metad2:

  data-storaged0:

  logs-storaged0:

  data-storaged1:

  logs-storaged1:

  data-storaged2:

  logs-storaged2:

  logs-graphd:

  logs-graphd2:

  logs-graphd3:
编辑 nebula.env,加入如下内容
TZ=UTC

USER=root
2.6 启动 nebula 集群
docker stack deploy nebula -c docker-stack.yml
三、集群负载均衡及高可用配置
Nebula Graph 的客户端目前(1.X)没有提供负载均衡的能力,只是随机选一个 graphd 去连接。所以生产使用的时候要自己做个负载均衡和高可用。
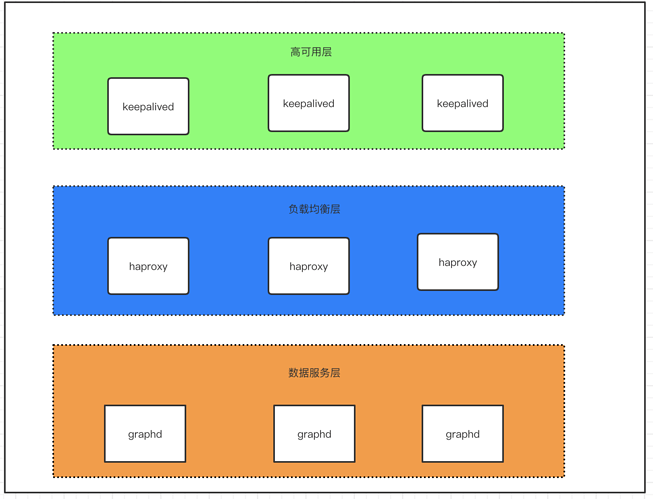
图 3.1
将整个部署架构分为三层,数据服务层,负载均衡层及高可用层。如图 3.1 所示
负载均衡层:对 client 请求做负载均衡,将请求分发至下方数据服务层
高可用层: 这里实现的是 haproxy 的高可用,保证负载均衡层的服务从而保证整个集群的正常服务
3.1 负载均衡配置
haproxy 使用 docker-compose 配置。分别编辑以下三个文件
Dockerfile 加入以下内容
FROM haproxy:1.7

COPY haproxy.cfg /usr/local/etc/haproxy/haproxy.cfg

EXPOSE 3640
docker-compose.yml 加入以下内容
version: "3.2"

services:

  haproxy:

    container_name: haproxy

    build: .

    volumes:

      - ./haproxy.cfg:/usr/local/etc/haproxy/haproxy.cfg

    ports:

      - 3640:3640

    restart: always

    networks:

      - app_net

networks:

  app_net:

    external: true
haproxy.cfg 加入以下内容
global

    daemon

    maxconn 30000

    log 127.0.0.1 local0 info

    log 127.0.0.1 local1 warning

defaults

    log-format %hr\ %ST\ %B\ %Ts

    log  global

    mode http

    option http-keep-alive

    timeout connect 5000ms

    timeout client 10000ms

    timeout server 50000ms

    timeout http-request 20000ms

# custom your own frontends && backends && listen conf

# CUSTOM

listen graphd-cluster

    bind *:3640

    mode tcp

    maxconn 300

    balance roundrobin

    server server1 192.168.1.166:3699 maxconn 300 check

    server server2 192.168.1.167:3699 maxconn 300 check

    server server3 192.168.1.168:3699 maxconn 300 check

listen stats

    bind *:1080

    stats refresh 30s

    stats uri /stats
3.2 启动 haproxy
docker-compose up -d
3.3 高可用配置
注:配置 keepalive 需预先准备好 vip(虚拟 ip),在以下配置中 192.168.1.99 便为虚拟 ip
在 192.168.1.166 、192.168.1.167、192.168.1.168上 均做以下配置
安装 keepalived
apt-get update && apt-get upgrade && apt-get install keepalived -y
更改 keepalived配置文件 /etc/keepalived/keepalived.conf(三台机器中 做如下配置,priority 应设置不同值确定优先级)
192.168.1.166 机器配置
global_defs {

    router_id lb01 # 标识信息,一个名字而已;

}

vrrp_script chk_haproxy {

    script "killall -0 haproxy"    interval 2

}

vrrp_instance VI_1 {

    state MASTER

    interface ens160

    virtual_router_id 52

    priority 999

    # 设定 MASTER 与 BACKUP 负载均衡器之间同步检查的时间间隔,单位是秒

    advert_int 1

    # 设置验证类型和密码

    authentication {

    # 设置验证类型,主要有 PASS 和 AH 两种

        auth_type PASS

    # 设置验证密码,在同一个 vrrp_instance 下,MASTER 与 BACKUP 必须使用相同的密码才能正常通信

        auth_pass amber1

    }

    virtual_ipaddress {

        # 虚拟 IP 为 192.168.1.99/24; 绑定接口为 ens160; 别名 ens169:1,主备相同

        192.168.1.99/24 dev ens160 label ens160:1

    }

    track_script {

        chk_haproxy

    }

}
167 机器配置
global_defs {

    router_id lb01 # 标识信息,一个名字而已;

}

vrrp_script chk_haproxy {

    script "killall -0 haproxy"    interval 2

}

vrrp_instance VI_1 {

    state BACKUP

    interface ens160

    virtual_router_id 52

    priority 888

    # 设定 MASTER 与 BACKUP 负载均衡器之间同步检查的时间间隔,单位是秒

    advert_int 1

    # 设置验证类型和密码

    authentication {

    # 设置验证类型,主要有 PASS 和 AH 两种

        auth_type PASS

    # 设置验证密码,在同一个 vrrp_instance 下,MASTER 与 BACKUP 必须使用相同的密码才能正常通信

        auth_pass amber1

    }

    virtual_ipaddress {

        # 虚拟 IP 为 192.168.1.99/24; 绑定接口为 ens160; 别名 ens160:1,主备相同

        192.168.1.99/24 dev ens160 label ens160:1

    }

    track_script {

        chk_haproxy

    }

}
168 机器配置
global_defs {

    router_id lb01 # 标识信息,一个名字而已;

}

vrrp_script chk_haproxy {

    script "killall -0 haproxy"    interval 2

}

vrrp_instance VI_1 {

    state BACKUP

    interface ens160

    virtual_router_id 52

    priority 777

    # 设定 MASTER 与 BACKUP 负载均衡器之间同步检查的时间间隔,单位是秒

    advert_int 1

    # 设置验证类型和密码

    authentication {

    # 设置验证类型,主要有 PASS 和 AH 两种

        auth_type PASS

    # 设置验证密码,在同一个 vrrp_instance 下,MASTER 与 BACKUP 必须使用相同的密码才能正常通信

        auth_pass amber1

    }

    virtual_ipaddress {

        # 虚拟 IP 为 192.168.1.99/24;绑定接口为 ens160; 别名 ens160:1,主备相同

        192.168.1.99/24 dev ens160 label ens160:1

    }

    track_script {

        chk_haproxy

    }

}
keepalived 相关命令
# 启动 keepalived

systemctl start keepalived

# 使 keepalived 开机自启

systemctl enable keeplived

# 重启 keepalived

systemctl restart keepalived
四、其他
离线怎么部署?把镜像更改为私有镜像库就成了,有问题欢迎来勾搭啊。

我的小鱼你醒了 还认识早晨吗 昨夜你曾经说 愿夜幕永不开启
如果你对本文有任何疑问,欢迎来论坛和原作者聊聊~~ 原帖地址:https://discuss.nebula-graph.com.cn/t/topic/1388

本文介绍如何使用 Docker Swarm 来部署 Nebula Graph 集群,并部署客户端负载均衡和高可用的更多相关文章
- 用Docker swarm快速部署Nebula Graph集群
用Docker swarm快速部署Nebula Graph集群 一.前言 本文介绍如何使用 Docker Swarm 来部署 Nebula Graph 集群. 二.nebula集群搭建 2.1 环境准 ...
- Docker Swarm和Kubernetes在大规模集群中的性能比较
Contents 这篇文章主要针对Docker Swarm和Kubernetes在大规模部署的条件下的3个问题展开讨论.在大规模部署下,它们的性能如何?它们是否可以被批量操作?需要采取何种措施来支持他 ...
- Linux 集群概念 , wsgi , Nginx负载均衡实验 , 部署CRM(Django+uwsgi+nginx), 部署学城项目(vue+uwsgi+nginx)
Linux 集群概念 , wsgi , Nginx负载均衡实验 , 部署CRM(Django+uwsgi+nginx), 部署学城项目(vue+uwsgi+nginx) 一丶集群和Nginx反向代理 ...
- SaltStack一键部署负载均衡和高可用
一.负载均衡的部署 server1 haproxy (调度器) server2 apache server3 nginx 1)在server1上首先安装salt-minion服务.并 ...
- Docker Swarm(十)Portainer 集群可视化管理
前言 搭建好我们的容器编排集群,那我们总不能日常的时候也在命令行进行操作,所以我们需要使用到一些可视化的工具,Docker图形化管理提供了很多工具,有Portainer.Docker UI.Shipy ...
- 使用容器编排工具docker swarm安装clickhouse多机集群
1.首先需要安装docker最新版,docker 目前自带swarm容器编排工具 2.选中一台机器作为master,执行命令sudo docker swarm init [options] 3,再需 ...
- HBase 1.2.6 完全分布式集群安装部署详细过程
Apache HBase 是一个高可靠性.高性能.面向列.可伸缩的分布式存储系统,是NoSQL数据库,基于Google Bigtable思想的开源实现,可在廉价的PC Server上搭建大规模结构化存 ...
- 使用 Kubeadm+Containerd 部署一个 Kubernetes 集群
本文独立博客阅读地址:https://ryan4yin.space/posts/kubernetes-deployemnt-using-kubeadm/ 本文由个人笔记 ryan4yin/knowle ...
- 简述SQL2008部署多实例集群(学习)
数据库集群 集群的存在意义是为了保证高可用.数据安全.扩展性以及负载均衡. 什么是集群? 由二台或更多物理上独立的服务器共同组成的"虚拟"服务器称之为集群服务器.一项称做M ...
随机推荐
- Ubuntu下开启/关闭防火墙及端口
有管理员权限可省略sudo. 1.查看端口开启状态 sudo ufw status 2.开启某个端口(以8866为例) sudo ufw allow 8866 3.开启防火墙 sudo ufw ena ...
- 实践案例丨基于 Raft 协议的分布式数据库系统应用
摘要:简单介绍Raft协议的原理.以及存储节点(Pinetree)如何应用 Raft实现复制的一些工程实践经验. 1.引言 在华为分布式数据库的工程实践过程中,我们实现了一个计算存储分离. 底层存储基 ...
- python中的锁lock=threading.Lock()
避免多个线程保卫同一块数据的时候,产生错误,所以加锁来防止这种问题 个人理解:当打印结果是交替打印时,但是如果需求是需要打印完一个线程的内容后,再去打印另一个线程的内容,就需要用到锁 不加锁打印结果: ...
- 理解C#中的ExecutionContext vs SynchronizationContext
原文:https://devblogs.microsoft.com/pfxteam/executioncontext-vs-synchronizationcontext/ 作者:Stephen 翻译: ...
- 第15课 - make的隐式规则(上)
第15课 - make的隐式规则(上) 1. 问题 如果把同一个目标的命令拆分的写到不同地方,会发生什么? 执行make all 这个实验表明了:如果同一个目标的命令拆分的写到不同地方,那么 make ...
- 软件开发过程中常用的环境解释DEV FAT UAT PRO
1.DEV Development environment 开发环境,用于开发者调试使用 2.FAT Feature Acceptance Test environment 功能验收测试环境,用于软件 ...
- 浅入 ABP 系列(4):事件总线
浅入 ABP 系列(4):事件总线 版权护体作者:痴者工良,微信公众号转载文章需要 <NCC开源社区>同意. 目录 浅入 ABP 系列(4):事件总线 事件总线 关于事件总线 为什么需要这 ...
- github无法访问
打开 C:\Windows\System32\Drivers\etc 找到hosts文件. 添加以下代码 #github 192.30.255.112 github.com git 185.31.16 ...
- Java虚拟机栈--栈帧
栈帧的内部结构 每个栈帧中存储着 1.局部变量表(Local Variables) 2.操作数栈(Operand Stack)(或表达式栈) 3.动态链接(Dynamic Linking)(或执行&q ...
- 云计算openstack核心组件——glance— 镜像服务(6)
一.glance介绍: Glance是Openstack项目中负责镜像管理的模块,其功能包括虚拟机镜像的查找.注册和检索等. Glance提供Restful API可以查询虚 ...