python xmind转Excel(puppet洛洛原创)
需求:将xmind文件转为Excel文件,并添加UI界面操作以降低操作难度。
这个需求一句话就讲清楚了,但实际上还需要做很多工作:
1,了解Xmind文件结构
2,提取Xmind文件分支内容(重点)
3,UI界面(非必要)
一,了解Xmind文件结构
1,xmind文件形式:树形分支结构(可以先思考如何提取各分支内容)。
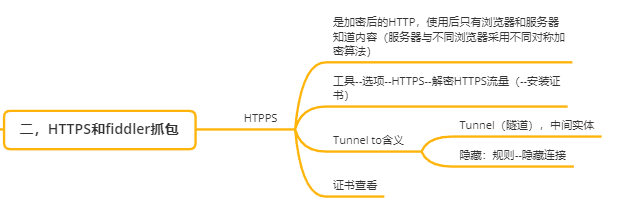
Excel提取为何种形式:主干与分支连接,用“\”号连接。(了解原理后也可以写成其他你想要的形式)
举例:
https\Tunnel to含义\Tunnel(隧道),中间实体
https\Tunnel to含义\隐藏:规则-隐藏连接
二,提取Xmind文件分支内容(重点)
那么如何解析上述为具体的数据结构呢?用“from xmindparser import xmind_to_dict”,用xmindparser包将其转化为字典格式再做处理。
再举个例子:
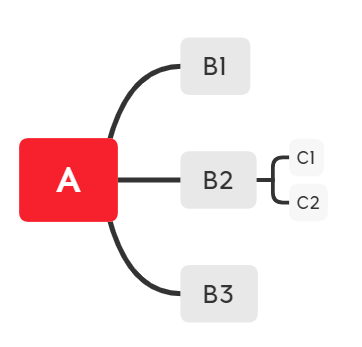
这个xmind文件通过xmind_to_dict可以转换为什么样呢?
{'title': 'A', 'topics': [{'title': 'B1'}, {'title': 'B2', 'topics': [{'title': 'C1'}, {'title': 'C2'}]}, {'title': 'B3'}]}
还是不够直观,用json分析器展开再看:
[
{
'title': '画布 1',
'topic': {
'title': 'A',
'topics': [
{
'title': 'B1'
},
{
'title': 'B2',
'topics': [
{
'title': 'C1'
},
{
'title': 'C2'
}
]
},
{
'title': 'B3'
}
]
},
'structure': 'org.xmind.ui.map.unbalanced'
}
]
内容装在一个list里,字典最外层title为“画布1”,topic装有我们需要的内容(可以看出其他位置叫topics),这是xmind文件中没有的,经验证这是个固定值,可以忽略。然后通过取list,A是字典中value值,key为title,其子节点装在topics的分支中。处理后是这样,最外层是dict:

那么问题来了,如何将其处理为想要的形式呢?一层层的取key、value吗?
当然不是,那工作量将非常庞大,而且不利于阅读和修改。还记得刚才的思考内容吗?这里我们就需要用到你所想的,没错,递归。
为什么要用递归,我们仔细看看结构:
A的三个子节点分别为B1,B2,B3,B2 的子节点为C1C2,参看上图你想到了什么?
1,标题和子节点放在不同的item里,即topic放根节点,那topics则放其子节点。
2,topics无子节点呢?像C1C2那样的点没有子节点,我们发现,它也没有topics;同时,没有子节点证明它是这条分支的最后一层了;试想,如果A没子节点,就只有它一个呢?正如你所想,它只有一个title,没有topics。
3,A的子节点是一个list,list可以有多个子节点,子节点若还有子节点则有topics,若没有则没有topics。
4,title永远装的是string,而topics可以装list,list里还有dict,也可以没有topics。
看了四点还是觉得很乱?
我们需要一层层取子节点才可以得到我们想要的A\B2\C1、A\B2\C2,节点值永远在title里,而子节点却在dict、list里的dict里,而且子节点里有的只有一个title,有的有一个title加一个topics,前文已经说过,有topics的是还有其子节点的。
那么现在应该清晰点了吧?还不清楚?那伪代码再来一遍:
如果 输入字典:
当字典只有有title时:
操作1
当字典有title和topics时:
操作2
如果 输入list:
遍历list里的字典:
对每个字典进行操作3
如果 输入的既不是字典也不是list:
输出值
思路框架已经搭建了,那操作1、2、3是什么呢?其实就是本框架的重复操作,调用下自己就可以了,不严谨的说这就是递归的通俗解释。
我们贴下代码:
 1 def TraversalXmind(root,rootstring):

 2     if isinstance(root, dict):

 3         if len(root) == 2:

 4             TraversalXmind(root['topics'], str(rootstring) )

 5         if len(root) == 1:

 6             TraversalXmind(root['title'],str(rootstring)  )

 7

 8     elif isinstance(root, list):

 9         for sonroot in root:

10             TraversalXmind(sonroot, str(rootstring)  + "\\" + sonroot['title'])

11

12     elif isinstance(root,str):

13         print(str(rootstring) )

14

15 # TraversalXmind(root, "\\AA")
完整代码是什么呢?
将上述转换过程卸载model.py中:
 1 # -*-coding:utf-8 -*-

 2 # Author  : zhengyong

 3 # Time    : 2020/11/5 23:06

 4 # FileName: model.py

 5

 6 from xmindparser import xmind_to_dict

 7 import os,csv

 8 # filepath1 = os.path.abspath(os.path.dirname(__file__))

 9 # print(filepath1)

10

11 # filepath = "D:\\test.xmind"

12 # inputedXmind = xmind_to_dict(filepath)

13 # root = inputedXmind[0]['topic']

14

15 def traversalXmind(root, rootstring,lisitcontainer):

16     """

17     功能:递归dictionary文件得到容易写入Excel形式的格式。

18     注意:rootstring都用str来处理中文字符

19     @param root: 将xmind处理后的dictionary文件

20     @param rootstring: xmind根标题

21     """

22     if isinstance(root, dict):

23         if len(root) == 2:

24             traversalXmind(root['topics'], str(rootstring),lisitcontainer)

25         if len(root) == 1:

26             traversalXmind(root['title'], str(rootstring),lisitcontainer)

27

28     elif isinstance(root, list):

29         for sonroot in root:

30             traversalXmind(sonroot, str(rootstring) + "\\" + sonroot['title'],lisitcontainer)

31

32     elif isinstance(root, str):

33          lisitcontainer.append(str(rootstring))

34

35 def getCase(root):

36     rootstring = root['title']

37     lisitcontainer = []

38     traversalXmind(root, rootstring,lisitcontainer)

39     # print(lisitcontainer)

40     return lisitcontainer

41

42 # def getTestCase(filename,lisitcontainer,directory,group,runType,testcaseType,testType):

43 #     header = [

44 #         '测试案例路径',

45 #         '测试案例名称',

46 #         '测试案例描述',

47 #         '计划执行时长(分钟)',

48 #         '步骤描述',

49 #         '预期结果',

50 #         '优先级',

51 #         '小组',

52 #         '执行方式',

53 #         '测试模块',

54 #         '版本号',

55 #         '用例类型',

56 #         '测试类型',

57 #         '关联故事卡片ID',

58 #     ]

59 #

60 #     with open(filename,'w',newline='') as f:

61 #         writer = csv.DictWriter(f,fieldnames=header),

62 #         writer.writeheader()

63 #         for row in lisitcontainer:

64 #             writer.writerow({

65 #                 '测试案例路径': directory,

66 #                 '测试案例名称': row,

67 #                 '小组': group,

68 #                 '执行方式': runType,

69 #                 '用例类型':testcaseType,

70 #                 '测试类型': testType,

71 #             })
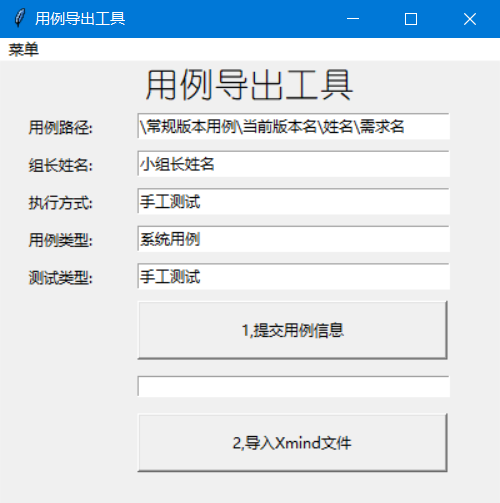
三,UI界面
UI界面用tkinter写的,直接上代码:
  1 #-*-coding:utf-8 -*-

  2 # Author  : zhengyong

  3 # Time    : 2020/11/14 23:54

  4 # FileName: main1.py

  5 # https://github.com/ndnmonkey/transXmindToCSV.git

  6

  7 import model

  8 from xmindparser import xmind_to_dict

  9 import tkinter

 10 from tkinter import filedialog

 11 from tkinter import *

 12 import os,csv

 13

 14

 15 window = tkinter.Tk()

 16 window.title("用例导出工具")

 17 # 设置窗口图标

 18 # window.iconbitmap("D:\Code\Python\XmindToExcel\image\icon.ico")

 19 # window.iconbitmap("image\ifavicon.ico")

 20 window.geometry("400x370+200+50")

 21

 22 # 标题

 23 labeltitle = tkinter.Label(window,text = "用例导出工具",font = ('幼圆',20)).pack()

 24

 25 # 创建菜单栏

 26 MenuBar = tkinter.Menu(window)

 27 # 将菜单栏放到主窗口

 28 window.config(menu=MenuBar)

 29 # 创建文件菜单,不显示分窗

 30 fileBar = tkinter.Menu(MenuBar, tearoff=0)

 31 # 添加文件菜单项

 32 fileBar.add_command(label="用法说明")

 33 # fileBar.add_command(label="联系作者")

 34 # 创建分割线

 35 # fileBar.add_separator()

 36 fileBar.add_command(label="退出", command=window.destroy)

 37 # 将文件菜单添加到菜单栏

 38 MenuBar.add_cascade(label="菜单", menu=fileBar)

 39

 40 xlabe = 20

 41 xtext = 80

 42 y =10

 43 step = 30

 44 textwidth = 250

 45

 46 inputtext1 = tkinter.StringVar(value='\常规版本用例\当前版本名\姓名\需求名')

 47 labe1 = tkinter.Label(window, text='用例路径:').place(x=xlabe,y = y + step)

 48 text1 = tkinter.Entry(window, show=None, textvariable=inputtext1)

 49 text1.place(width=textwidth,x=xtext+ 1*step,y=y + step)

 50

 51 inputtext2 = tkinter.StringVar(value='小组长姓名')

 52 labe2 = tkinter.Label(window, text='组长姓名:').place(x=xlabe,y=y + 2*step)

 53 text2 = tkinter.Entry(window, show=None, textvariable=inputtext2)

 54 text2.place(width=textwidth,x=xtext+ 1*step,y=y + 2*step)

 55

 56 inputtext3 = tkinter.StringVar(value='手工测试')

 57 labe3 = tkinter.Label(window, text='执行方式:').place(x=xlabe,y=y + 3*step)

 58 text3 = tkinter.Entry(window, show=None, textvariable=inputtext3)

 59 text3.place(width=textwidth,x=xtext+ 1*step,y=y + 3*step)

 60

 61 inputtext4 = tkinter.StringVar(value='系统用例')

 62 labe4 = tkinter.Label(window, text='用例类型:').place(x=xlabe,y=y + 4*step)

 63 text4 = tkinter.Entry(window, show=None, textvariable=inputtext4)

 64 text4.place(width=textwidth,x=xtext+ 1*step,y=y + 4*step)

 65

 66 inputtext5 = tkinter.StringVar(value='手工测试')

 67 labe5 = tkinter.Label(window, text='测试类型:').place(x=xlabe,y=y + 5*step)

 68 text5 = tkinter.Entry(window, show=None, textvariable=inputtext5)

 69 text5.place(width=textwidth,x=xtext+ 1*step,y=y + 5*step)

 70

 71 def getTextValues():

 72     templist = []

 73     var1 = text1.get();templist.append(var1)

 74     var2 = text2.get();templist.append(var2)

 75     var3 = text3.get();templist.append(var3)

 76     var4 = text4.get();templist.append(var4)

 77     var5 = text5.get();templist.append(var5)

 78     # print("1",templist)

 79     return templist

 80

 81 casebutton1 = tkinter.Button(window,text = '1,提交用例信息',width=5,height=1,command=getTextValues)

 82 casebutton1.place(x=110,y=y + 6*step)

 83 casebutton1.configure(width = 34, height = 2)

 84

 85 def open_file():

 86     templist = getTextValues()

 87     # print("2",templist)

 88     filename = filedialog.askopenfilename(title='打开Xmind文件', filetypes=[('xmind', '*.xmind')])

 89

 90     entry_filename.delete(0, END)

 91     entry_filename.insert('insert', filename)

 92     # print(entry_filename,type(entry_filename))

 93

 94     # print(filename)

 95     fname = entry_filename.get()  #用get提取entry中的内容

 96     fname = str(fname).replace('/','\\\\')

 97     # print("fname",fname)

 98

 99     # filepath = "D:\\test.xmind"

100     # inputedXmind = xmind_to_dict(filepath)

101     # root = inputedXmind[0]['topic']

102     #

103     inputedXmind = xmind_to_dict(fname)

104     root = inputedXmind[0]['topic']

105     lisitcontainer = model.getCase(root)

106     # print(lisitcontainer)

107

108     # templist

109     directory = templist[0]

110     group = templist[1]

111     runType = templist[2]

112     testcaseType = templist[3]

113     testType = templist[4]

114     # filename = 'testcase.csv'

115     header = [

116         '测试案例路径',

117         '测试案例名称',

118         '测试案例描述',

119         '计划执行时长(分钟)',

120         '步骤描述',

121         '预期结果',

122         '优先级',

123         '小组',

124         '执行方式',

125         '测试模块',

126         '版本号',

127         '用例类型',

128         '测试类型',

129         '关联故事卡片ID',

130     ]

131     # print(filename)  #D:\\test.xmind

132     savepath = fname.split('.')[0] + ".csv"

133     # print("savepath:",savepath)

134

135     with open(savepath, 'w', newline='') as f:

136         writer = csv.DictWriter(f, fieldnames=header)

137         writer.writeheader()

138         for row in lisitcontainer:

139             writer.writerow({

140                 '测试案例路径': directory,

141                 '测试案例名称': row,

142                 '小组': group,

143                 '执行方式': runType,

144                 '用例类型': testcaseType,

145                 '测试类型': testType,

146             })

147

148 # 设置button按钮接受功能

149 importbutton = tkinter.Button(window, text="2,导入Xmind文件", command=open_file)

150 importbutton.place(x=110,y=y + 9*step)

151 importbutton.configure(width =34,height=2)

152

153 # 设置entry

154 entry_filename = tkinter.Entry(window, width=30, font=("宋体", 10, 'bold'))

155 entry_filename.place(width=textwidth,x=xtext+ 1*step,y=y + 8*step)

156

157 # 版权页

158 labelright = tkinter.Label(window,text = "version 0.3  bug修复:zhengyong731@pingan.com.cn",font = ('宋体',8)).place(x=60,y=350)

159 # Tk().iconbitmap('D:\Code\Python\XmindToExcel\image\icon.ico')

160 window.mainloop()
那么这时候还有一个问题,运行之后的结果是什么?
用pyinstaller就可以打包代码文件变成可执行文件:
方法:
1,安装pyinstaller(不具体介绍)
2,使用:
命令行:
pyinstaller -F 主文件名.py
运行可执行文件有黑框怎么办?
pyinstaller -F -w mycode.py (-w就是取消窗口)
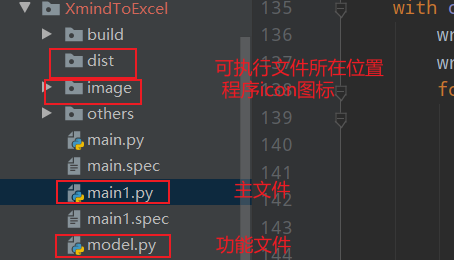
3,生成的可执行文件在哪?
在主文件同级文件夹dist中,
4,具体文件结构:
四,声明
所有代码均为原创,因为实在找不到可用的教程,了解到找教程的艰辛,所以抛砖引玉,本人水平有限,如果文章和代码有表述不当之处,还请不吝赐教,可以交流讨论。
欢迎转载,请注明以下内容:
本人在cnblogs上的ID为puppet洛洛,博客地址为https://www.cnblogs.com/two-peanuts/所有包含原创声明的博客均为本人原创作品。博客的内容除已注明的引用文献外均为本人独立研究成果。除特殊注明外均采用 知识共享 署名-非商业性使用-相同方式共享 3.0 中国大陆 许可协议进行许可。
五,github地址
具体的文件结构已传至github,欢迎star。
python xmind转Excel(puppet洛洛原创)的更多相关文章
- Delphi中使用python脚本读取Excel数据
Delphi中使用python脚本读取Excel数据2007-10-18 17:28:22标签:Delphi Excel python原创作品,允许转载,转载时请务必以超链接形式标明文章 原始出处 . ...
- python批量处理excel文件数据
https://www.zhihu.com/question/39299070?sort=created 作者:水中柳影链接:https://www.zhihu.com/question/392990 ...
- python下读取excel文件
项目中要用到这个,所以记录一下. python下读取excel文件方法多种,用的是普通的xlrd插件,因为它各种版本的excel文件都可读. 首先在https://pypi.python.org/py ...
- Python读写操作Excel模块_xlrd_xlwt_xlutils
Python 读写操作Excel -- 安装第三方库(xlrd.xlwt.xlutils.openpyxl) 如果仅仅是要以表单形式保存数据,可以借助 CSV 格式(一种以逗号分隔的表格数据格式)进行 ...
- python制作简单excel统计报表3之将mysql数据库中的数据导入excel模板并生成统计图
python制作简单excel统计报表3之将mysql数据库中的数据导入excel模板并生成统计图 # coding=utf-8 from openpyxl import load_workbook ...
- python制作简单excel统计报表2之操作excel的模块openpyxl简单用法
python制作简单excel统计报表2之操作excel的模块openpyxl简单用法 # coding=utf-8 from openpyxl import Workbook, load_workb ...
- Python“文件操作”Excel篇(上)
大家好,我们今天来一起探索一下用Python怎么操作Excel文件.与word文件的操作库python-docx类似,Python也有专门的库为Excel文件的操作提供支持,这些库包括xlrd.xlw ...
- 用python实现简单EXCEL数据统计的实例
用python实现简单EXCEL数据统计的实例 下面小编就为大家带来一篇用python实现简单EXCEL数据统计的实例.小编觉得挺不错的,现在就分享给大家,也给大家做个参考.一起跟随小编过来看看吧 任 ...
- 数据测试001:利用python连接数据库插入excel数据
数据测试001:利用python连接数据库插入excel数据 最近在做数据测试,主要是做报表系统,需要往数据库插入数据验证服务逻辑,本次介绍如何利用python脚本插入Oracle和Mysql库中: ...
随机推荐
- rs232转网络
rs232转网络 rs232转网络ZLAN5103可以实现RS232/485/422和TCP/IP之间进行透明数据转发.方便地使得串口设备连接到以太网和Internet,实现串口设备的网络化升级.支持 ...
- go 实现websocket推送
index.html <!DOCTYPE html> <html> <head> <meta charset="utf-8"> &l ...
- Ubuntu Eclipse启动时报错:A Java RunTime Environment (JRE) or Java Development Kit (JDK) must be available in order to run Eclipse. No java virtual machine was found after searching the following locations:
此问题起于我在Ubuntu1004上装了两个版本的eclipse:Galieo+helios:卸载前者后出现启动不了eclipse的问题:在网上找了下,可以按如下过程进行解决: Eclipse 3 ...
- skywalking8.1.0(一) 安装与部署
skywalking部署 背景介绍 目前公司后端服务全部为微服务并运行在kubernetes集群上,而大量的微服务的背后拥有很复杂的调用关系,纵使你是公司的资深开发也很难理清每一个后端服务之间的依赖关 ...
- APP打开(三)—激活率提升20%的思考
激活是APP拉新后的一个重要环节.通常,我们希望用户打开我们的APP之后,能够顺利的被激活,从而留下来成为我们的忠实用户. 激活一词,就跟北斗星指标一样,对每个产品来说都是不一样的.有些APP一旦打开 ...
- 从零造就JVM大牛(一)
引言 从事java的小伙伴大家好,如果你是一名从事java行业的程序员,无论你是小白还是工作多年的老司机,我相信这篇文章一定会给你带来 不同程度的收货不敢说你看完我的文章从此精通jvm打遍天下无对手, ...
- linux压缩和解压文件命令
tar 解包:tar zxvf filename.tar 打包:tar czvf filename.tar dirnamegz命令 解压1:gunzip filename.gz 解压2:gzi ...
- B. Two Fairs 解析(思維、DFS、組合)
Codeforce 1276 B. Two Fairs 解析(思維.DFS.組合) 今天我們來看看CF1276B 題目連結 題目 給一個連通圖,並給兩個點(\(a,b\)),求有多少點對使得:任一路徑 ...
- 【转】Extension Libraries and Loading Other Image Formats
FROM: http://lazyfoo.net/tutorials/SDL/06_extension_libraries_and_loading_other_image_formats/index. ...
- 嵌入式linux和stm32嵌入式开发这两者之间有什么关联性
对于更开始入坑的同学,可能也像我一样搞不清楚两者的区别与联系.现在结合知乎网上的相关资料发一篇文章来具体分析. 基于STM32的开发属于微控制器开发领域,主要开发工具是keil或IAR,这种开发更准确 ...