Spring AOP的源码流程
一、AOP完成日志输出
1,导入AOP模块
- <dependency>
- <groupId>org.springframework</groupId>
- <artifactId>spring-aspects</artifactId>
- <version>5.3.0</version>
- </dependency>
2,定义业务逻辑类
- public class MathCalculator {
- public int div(int i,int j) {
- System.out.println("div....方法被执行");
- return i / j;
- }
- }
3,定义日志切面类


- @Aspect
- public class LogAspects {
- /**
- * 抽取公用的切面表达式
- * 1,本类引用直接使用当前方法名就行
- * 2,其他切面引用则需要加上全类名和方法
- */
- @Pointcut("execution(public int com.xcc.annotation.aop.log.MathCalculator.*(..))")
- public void pointCut() {
- }
- /**
- * 前置处理器
- */
- @Before("pointCut()")
- public void logStart(JoinPoint joinPoint) {
- System.out.println(joinPoint.getSignature().getName()
- + "运行。。。@Before:参数列表是:{" + Arrays.toString(joinPoint.getArgs()) + "}");
- }
- /**
- * 后置处理器
- */
- @After("com.xcc.annotation.aop.log.LogAspects.pointCut()")
- public void logEnd(JoinPoint joinPoint) {
- System.out.println(joinPoint.getSignature().getName()
- + "运行。。。@After ..." );
- }
- /**
- * 返回通知
- * JoinPoint一定要出现在参数表的第一位
- */
- @AfterReturning(value = "pointCut()",returning = "result")
- public void logReturn(JoinPoint joinPoint,Object result) {
- System.out.println(joinPoint.getSignature().getName() + "运行。。。@AfterReturning:返回值为:{" + result + "}");
- }
- @AfterThrowing(value = "pointCut()",throwing = "e")
- public void logException(JoinPoint joinPoint,Exception e) {
- System.out.println(joinPoint.getSignature().getName() +"异常。。。异常信息:{"+e+"}");
- }
- }
在切面类中定义对应的通知方法:
- 前置通知(@Before):logStart:在目标方法(div)运行之前运行
- 后置通知(@After):logEnd:在目标方法(div)运行结束之后运行(无论方法正常结束还是异常结束)
- 返回通知(@AfterReturning):logReturn:在目标方法(div)正常返回之后运行
- 异常通知(@AfterThrowing):logException:在目标方法(div)出现异常以后运行
- 环绕通知(@Around):动态代理,手动推进目标方法运行(joinPoint.procced())
注意:切面类上必须定义@Aspect注解,告知Spring哪个类是切面类
4,将切面类和业务类加入到Spring容器
- @EnableAspectJAutoProxy
- public class Demo01_Aspect {
- @Bean
- public LogAspects logAspects() {
- return new LogAspects();
- }
- @Bean
- public MathCalculator mathCalculator() {
- return new MathCalculator();
- }
- }
注意:必须加@EnableAspectJAutoProxy用于开启基于注解的AOP模式
5,测试
- @Test
- public void testAspect() {
- ApplicationContext applicationContext = new AnnotationConfigApplicationContext(Demo01_Aspect.class);
- MathCalculator bean = applicationContext.getBean(MathCalculator.class);
- bean.div(11, 1);
- }
输出为:
div运行。。。@Before:参数列表是:{[11, 1]}
div....方法被执行
div运行。。。@After ...
div运行。。。@AfterReturning:返回值为:{11}
二、AOP的原理解析
1,查看注解@EnableAspectJAutoProxy
- /**
- * @Import(AspectJAutoProxyRegistrar.class):给容器中导入AspectJAutoProxyRegistrar
- * 利用AspectJAutoProxyRegistrar自定义给容器中注册bean;
- * RootBeanDefinition ..internalAutoProxyCreator = AnnotationAwareAspectJAutoProxyCreator
- * 说白了就是:给容器中注册一个 AnnotationAwareAspectJAutoProxyCreator;
- */
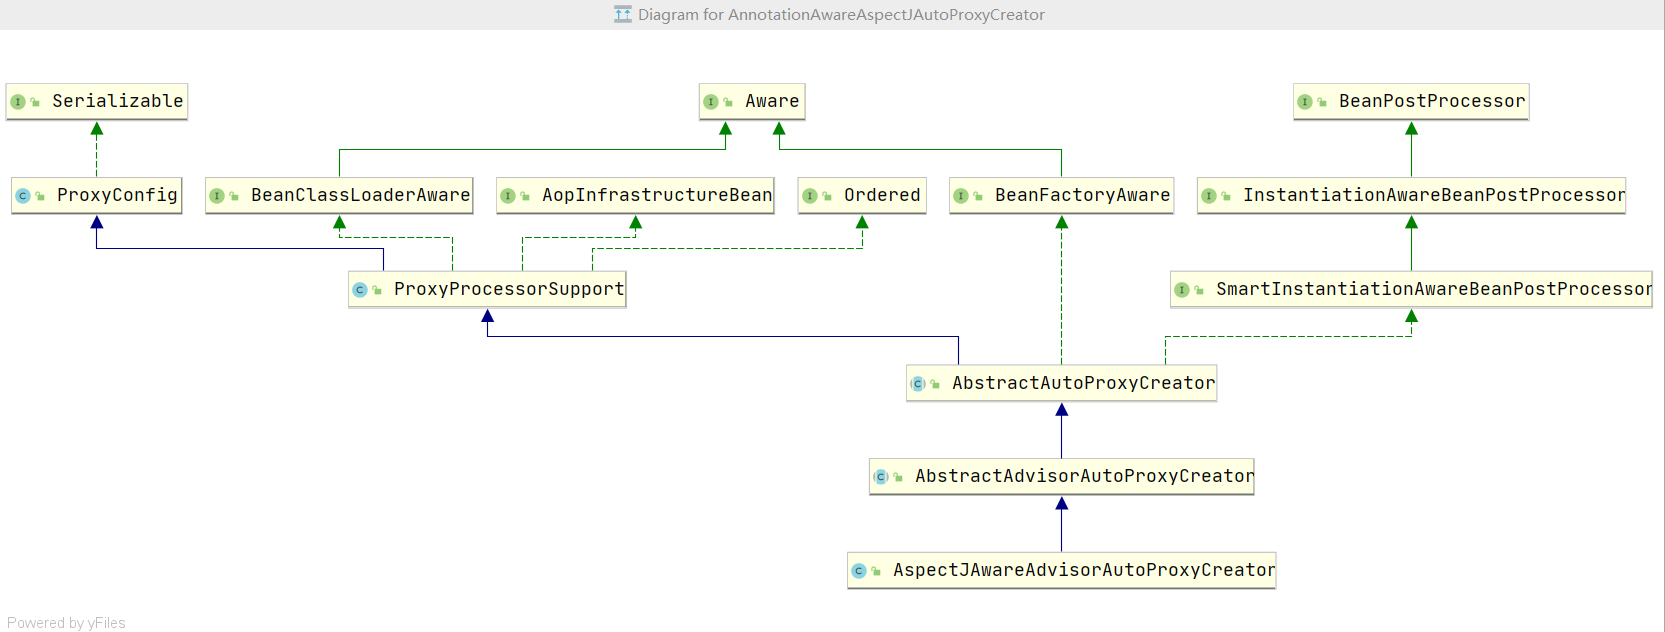
2,查看AnnotationAwareAspectJAutoProxyCreator的构建关系
3,AnnotationAwareAspectJAutoProxyCreator的创建流程
a)AnnotationAwareAspectJAutoProxyCreator的创建
- /**
- * 1)、传入配置类,创建ioc容器
- * 2)、注册配置类,调用refresh()刷新容器;
- * 3)、registerBeanPostProcessors(beanFactory);注册bean的后置处理器来方便拦截bean的创建;
- * 1)、先获取ioc容器已经定义了的需要创建对象的所有BeanPostProcessor
- * 2)、给容器中加别的BeanPostProcessor
- * 3)、优先注册实现了PriorityOrdered接口的BeanPostProcessor;
- * 4)、再给容器中注册实现了Ordered接口的BeanPostProcessor;
- * 5)、注册没实现优先级接口的BeanPostProcessor;
- * 6)、注册BeanPostProcessor,实际上就是创建BeanPostProcessor对象,保存在容器中;
- * 创建internalAutoProxyCreator的BeanPostProcessor【AnnotationAwareAspectJAutoProxyCreator】
- * 1)、创建Bean的实例
- * 2)、populateBean;给bean的各种属性赋值
- * 3)、initializeBean:初始化bean;
- * 1)、invokeAwareMethods():处理Aware接口的方法回调
- * 2)、applyBeanPostProcessorsBeforeInitialization():应用后置处理器的postProcessBeforeInitialization()
- * 3)、invokeInitMethods();执行自定义的初始化方法
- * 4)、applyBeanPostProcessorsAfterInitialization();执行后置处理器的postProcessAfterInitialization();
- * 4)、BeanPostProcessor(AnnotationAwareAspectJAutoProxyCreator)创建成功;--》aspectJAdvisorsBuilder
- * 7)、把BeanPostProcessor注册到BeanFactory中;
- * beanFactory.addBeanPostProcessor(postProcessor);
- */
b)初始化实例BeanFactory,创建剩余bean
- /**
- * AnnotationAwareAspectJAutoProxyCreator => InstantiationAwareBeanPostProcessor
- * 4)、finishBeanFactoryInitialization(beanFactory);完成BeanFactory初始化工作;创建剩下的单实例bean
- * 1)、遍历获取容器中所有的Bean,依次创建对象getBean(beanName);
- * getBean->doGetBean()->getSingleton()->
- * 2)、创建bean
- * 【AnnotationAwareAspectJAutoProxyCreator在所有bean创建之前会有一个拦截,InstantiationAwareBeanPostProcessor,会调用postProcessBeforeInstantiation()】
- * 1)、先从缓存中获取当前bean,如果能获取到,说明bean是之前被创建过的,直接使用,否则再创建;
- * 只要创建好的Bean都会被缓存起来
- * 2)、createBean();创建bean;
- * AnnotationAwareAspectJAutoProxyCreator 会在任何bean创建之前先尝试返回bean的实例
- * 【BeanPostProcessor是在Bean对象创建完成初始化前后调用的】
- * 【InstantiationAwareBeanPostProcessor是在创建Bean实例之前先尝试用后置处理器返回对象的】
- * 1)、resolveBeforeInstantiation(beanName, mbdToUse);解析BeforeInstantiation
- * 希望后置处理器在此能返回一个代理对象;如果能返回代理对象就使用,如果不能就继续
- * 1)、后置处理器先尝试返回对象;
- * bean = applyBeanPostProcessorsBeforeInstantiation():
- * 拿到所有后置处理器,如果是InstantiationAwareBeanPostProcessor;
- * 就执行postProcessBeforeInstantiation
- * if (bean != null) {
- * bean = applyBeanPostProcessorsAfterInitialization(bean, beanName);
- * }
- * 2)、doCreateBean(beanName, mbdToUse, args);真正的去创建一个bean实例;和3.6流程一样;
- */
4,AnnotationAwareAspectJAutoProxyCreator【InstantiationAwareBeanPostProcessor】 的作用
- /**
- * 1)、每一个bean创建之前,调用postProcessBeforeInstantiation();
- * 关心MathCalculator和LogAspect的创建
- * 1)、判断当前bean是否在advisedBeans中(保存了所有需要增强bean)
- * 2)、判断当前bean是否是基础类型的Advice、Pointcut、Advisor、AopInfrastructureBean,
- * 或者是否是切面(@Aspect)
- * 3)、是否需要跳过
- * 1)、获取候选的增强器(切面里面的通知方法)【List<Advisor> candidateAdvisors】
- * 每一个封装的通知方法的增强器是 InstantiationModelAwarePointcutAdvisor;
- * 判断每一个增强器是否是 AspectJPointcutAdvisor 类型的;返回true
- * 2)、永远返回false
- *
- * 2)、创建对象postProcessAfterInitialization;
- * return wrapIfNecessary(bean, beanName, cacheKey);//包装如果需要的情况下
- * 1)、获取当前bean的所有增强器(通知方法) Object[] specificInterceptors
- * 1、找到候选的所有的增强器(找哪些通知方法是需要切入当前bean方法的)
- * 2、获取到能在bean使用的增强器。
- * 3、给增强器排序
- * 2)、保存当前bean在advisedBeans中;
- * 3)、如果当前bean需要增强,创建当前bean的代理对象;
- * 1)、获取所有增强器(通知方法)
- * 2)、保存到proxyFactory
- * 3)、创建代理对象:Spring自动决定
- * JdkDynamicAopProxy(config);jdk动态代理;
- * ObjenesisCglibAopProxy(config);cglib的动态代理;
- * 4)、给容器中返回当前组件使用cglib增强了的代理对象;
- * 5)、以后容器中获取到的就是这个组件的代理对象,执行目标方法的时候,代理对象就会执行通知方法的流程;
- *
- * 3)、目标方法执行 ;
- * 容器中保存了组件的代理对象(cglib增强后的对象),这个对象里面保存了详细信息(比如增强器,目标对象,xxx);
- * 1)、CglibAopProxy.intercept();拦截目标方法的执行
- * 2)、根据ProxyFactory对象获取将要执行的目标方法拦截器链;
- * List<Object> chain = this.advised.getInterceptorsAndDynamicInterceptionAdvice(method, targetClass);
- * 1)、List<Object> interceptorList保存所有拦截器 5
- * 一个默认的ExposeInvocationInterceptor 和 4个增强器;
- * 2)、遍历所有的增强器,将其转为Interceptor;
- * registry.getInterceptors(advisor);
- * 3)、将增强器转为List<MethodInterceptor>;
- * 如果是MethodInterceptor,直接加入到集合中
- * 如果不是,使用AdvisorAdapter将增强器转为MethodInterceptor;
- * 转换完成返回MethodInterceptor数组;
- * 3)、如果没有拦截器链,直接执行目标方法;
- * 拦截器链(每一个通知方法又被包装为方法拦截器,利用MethodInterceptor机制)
- * 4)、如果有拦截器链,把需要执行的目标对象,目标方法,
- * 拦截器链等信息传入创建一个 CglibMethodInvocation 对象,
- * 并调用 Object retVal = mi.proceed();
- * 5)、拦截器链的触发过程;
- * 1)、如果没有拦截器执行执行目标方法,或者拦截器的索引和拦截器数组-1大小一样(指定到了最后一个拦截器)执行目标方法;
- * 2)、链式获取每一个拦截器,拦截器执行invoke方法,每一个拦截器等待下一个拦截器执行完成返回以后再来执行;
- * 拦截器链的机制,保证通知方法与目标方法的执行顺序;
- */
三、总结
- @EnableAspectJAutoProxy 开启AOP功能
- @EnableAspectJAutoProxy 会给容器中注册一个组件 AnnotationAwareAspectJAutoProxyCreator
- AnnotationAwareAspectJAutoProxyCreator是一个后置处理器;
- 容器的创建流程:
- registerBeanPostProcessors()注册后置处理器;创建AnnotationAwareAspectJAutoProxyCreator对象
- finishBeanFactoryInitialization()初始化剩下的单实例bean
- 创建业务逻辑组件和切面组件
- AnnotationAwareAspectJAutoProxyCreator拦截组件的创建过程
- 组件创建完之后,判断组件是否需要增强。是:切面的通知方法,包装成增强器(Advisor);给业务逻辑组件创建一个代理对象(cglib);
- 执行目标方法:
- 代理对象执行目标方法
- CglibAopProxy.intercept();
- 得到目标方法的拦截器链(增强器包装成拦截器MethodInterceptor)
- 利用拦截器的链式机制,依次进入每一个拦截器进行执行;
- 效果:
正常执行:前置通知-》目标方法-》后置通知-》返回通知
出现异常:前置通知-》目标方法-》后置通知-》异常通知
Spring AOP的源码流程的更多相关文章
- Spring AOP高级——源码实现(1)动态代理技术
在正式进入Spring AOP的源码实现前,我们需要准备一定的基础也就是面向切面编程的核心——动态代理. 动态代理实际上也是一种结构型的设计模式,JDK中已经为我们准备好了这种设计模式,不过这种JDK ...
- Spring AOP高级——源码实现(2)Spring AOP中通知器(Advisor)与切面(Aspect)
本文例子完整源码地址:https://github.com/yu-linfeng/BlogRepositories/tree/master/repositories/Spring%20AOP%E9%A ...
- Spring AOP高级——源码实现(3)AopProxy代理对象之JDK动态代理的创建过程
spring-aop-4.3.7.RELEASE 在<Spring AOP高级——源码实现(1)动态代理技术>中介绍了两种动态代理技术,当然在Spring AOP中代理对象的生成也是运用 ...
- Spring AOP部分源码分析
Spring源码流程分析-AOP相关 根据Spring源码整理,其中Calculator为自定义的实现方法. AnnotationConfigApplicationContext()加载配置类的流程 ...
- 分析spring aop的源码实现
AOP就是面向切面编程,我们可以从几个层面来实现AOP. 在编译器修改源代码,在运行期字节码加载前修改字节码或字节码加载后动态创建代理类的字节码,以下是各种实现机制的比较. spring AOP是Sp ...
- Spring IOC 容器源码分析 - 余下的初始化工作
1. 简介 本篇文章是"Spring IOC 容器源码分析"系列文章的最后一篇文章,本篇文章所分析的对象是 initializeBean 方法,该方法用于对已完成属性填充的 bea ...
- Spring IOC 容器源码分析 - 填充属性到 bean 原始对象
1. 简介 本篇文章,我们来一起了解一下 Spring 是如何将配置文件中的属性值填充到 bean 对象中的.我在前面几篇文章中介绍过 Spring 创建 bean 的流程,即 Spring 先通过反 ...
- Spring IOC 容器源码分析 - 循环依赖的解决办法
1. 简介 本文,我们来看一下 Spring 是如何解决循环依赖问题的.在本篇文章中,我会首先向大家介绍一下什么是循环依赖.然后,进入源码分析阶段.为了更好的说明 Spring 解决循环依赖的办法,我 ...
- Spring IOC 容器源码分析 - 创建原始 bean 对象
1. 简介 本篇文章是上一篇文章(创建单例 bean 的过程)的延续.在上一篇文章中,我们从战略层面上领略了doCreateBean方法的全过程.本篇文章,我们就从战术的层面上,详细分析doCreat ...
随机推荐
- CodeForces - 1250J The Parade 二分
题目 题意: 一共n种身高,每一个士兵有一个身高.你需要把他们安排成k行(士兵不需要全部安排),每一行士兵身高差距小于等于1.你要找出来最多能安排多少士兵 题解: 这道题很容易就能看出来就是一道二分, ...
- 洛谷P1462-通往奥格瑞玛的道路-二分+最短路
洛谷P1462-通往奥格瑞玛的道路 题目描述 在艾泽拉斯,有\(n\)个城市.编号为\(1,2,3,...,n\). 城市之间有\(m\)条双向的公路,连接着两个城市,从某个城市到另一个城市,会遭到联 ...
- ssh原理及加密传输
1.ssh??(保证过程中是加密的,即安全的)ssh 是 Secure Shell 的缩写,是一个建立在应用层上的安全远程管理协议.ssh 是目前较为可靠的传输协议,专为远程登录会话和其他网络服务提供 ...
- Kubernets二进制安装(7)之部署主控节点服务--apiserver二进制安装
kube-apiserver集群规划 主机名 角色 IP地址 mfyxw30.mfxyw.com kube-apiserver主 192.168.80.30 mfyxw40.mfyxw.com kub ...
- Java中的变量之成员变量、本地变量与类变量
Java中的变量: 1.成员变量(实例变量,属性) 2.本地变量(局部变量) 3.类变量(静态属性) 一.成员变量(实例变量,属性) 1.1-成员变量:(在类中定义, 访问修饰符 修饰符 ...
- reCAPTCHA OCR 详解 , 验验证, OCR(光学自动识别)
WEB安全专题 reCAPTCHA的诞生及意义 CMU(卡耐基梅隆大学)设计了一个名叫reCAPTCHA的强大系统,让电脑去向人类求助.具体做法是:将OCR(光学自动识别)软件无法识别的文字扫 ...
- Navigator.registerProtocolHandler All In One
Navigator.registerProtocolHandler All In One Web API custom protocol URL Schemes URL Protocols https ...
- js console 性能测试 & don't-use-array-foreach-use-for-instead
don't-use-array-foreach-use-for-instead slower https://coderwall.com/p/kvzbpa/don-t-use-array-foreac ...
- 微信小程序-云开发实战教程
微信小程序-云开发实战教程 云函数,云存储,云数据库,云调用 https://developers.weixin.qq.com/miniprogram/dev/wxcloud/basis/gettin ...
- user tracker with ETag
user tracker with ETag 用户追踪, without cookies clear cache bug 实现原理 HTTP cache hidden iframe 1px image ...