【Azure Redis 缓存】Windows和Linux系统本地安装Redis, 加载dump.rdb中数据以及通过AOF日志文件追加数据
任务描述
本次集中介绍使用Windows和Linux()搭建本地Redis服务器的步骤,从备份的RDB文件中加载数据,以及如何生成AOF文件和通过AOF文件想已经运行的Redis追加数据。
操作步骤
Windows版本
| 启动Redis-server |
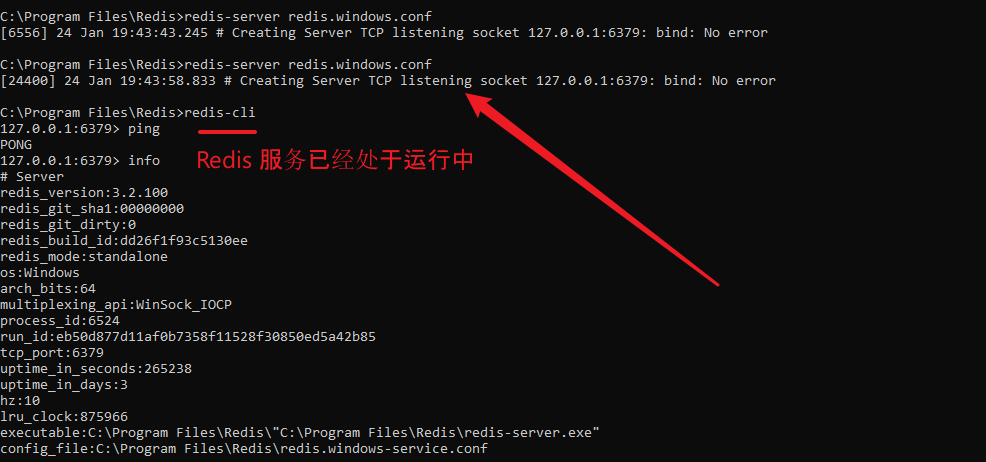
1:下载Redis for Windows的压缩包或者安装文件,此处通过下载zip文件作为示例:https://github.com/microsoftarchive/redis/releases 2:解压压zip包到本地Redis目录,通过CMD命令,启动Redis-server.exe文件。 3:新开CMD窗口。进入Reids目录,通过redis-cli连接到Redis server。
|
| 加载dump.rdb文件 |
把准备好的RDB文件改名为dump.rdb复制到本地与Redis-server.exe同级目录下,重新启动redis-server.exe Redis-Server会默认从当前启动文件夹中加载dump的文件作为初始化数据。 C:\Program Files\Redis>redis-server |
| 追加AOF数据 |
1:准备好aof文件,如无,可以通过redis命令BGREWRITEAOF生成最新的appendonly.aof文件 2:使用redis-cli --pipe命令,追加aof中的数据到Redis中。注: 此处的pipe后符号必须为 < redis-cli --pipe < appendonly.aof
|
Linux版本
| 启动Redis-server |
使用任何方式登录进Linux虚拟机,如本地使用PuTTY,登录到Linux后,完完全全参考Redis的官网启动Reids服务:https://redis.io/download#installation 有三种方式安装Reids,从源代码,从Ubuntu PPA和从Snapcraft
|
| 复制RDB文件进入Linux |
查看当前Linux中运行的Redis目录,使用redis-cli连接成功后,使用config get dir命令查看。 127.0.0.1:6379> config get dir 通常来讲,第二行数据的路径为当前Redis服务的启动路径,把RDB文件改名为dump.rdb后复制到该目录下 使用PSCP命令复制到/tmp目录,然后再Linux中使用root权限复制到/var/lib/redis目录 #在Windows中运行pscp命令。如遇见无法访问某个文件夹,则修改文件目录 |
| 加载dump.rdb文件 |
当dump.rdb文件存在于redis目录后。重启Reids服务即可 |
| 追加AOF数据 |
在Windows中,使用PSCP命令把准备好的AOF文件发送到Linux tmp目录中 在tmp目录下使用 redis-cli --pipe < appendonly.aof 追加aof日志到运行的Redis中。然后通过info Keyspace查看当前的信息
|
操作中遇见的错误:
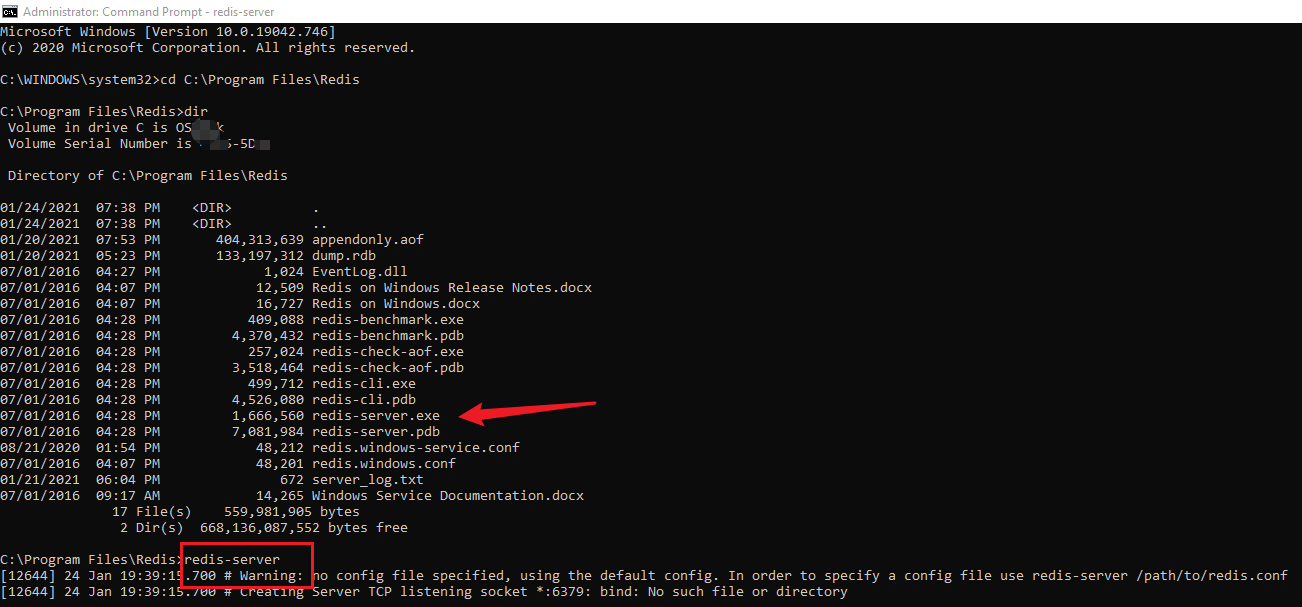
1:no config file specified, using the default config. In order to specify a config file use redis-server /path/to/redis.conf
在redis的目录文件中,已经包含了redis.windows.config文件,可以在启动redis-server时指定config文件。如:redis-server redis.windows.conf
2:Creating Server TCP listening socket 127.0.0.1:6379: bind: No error
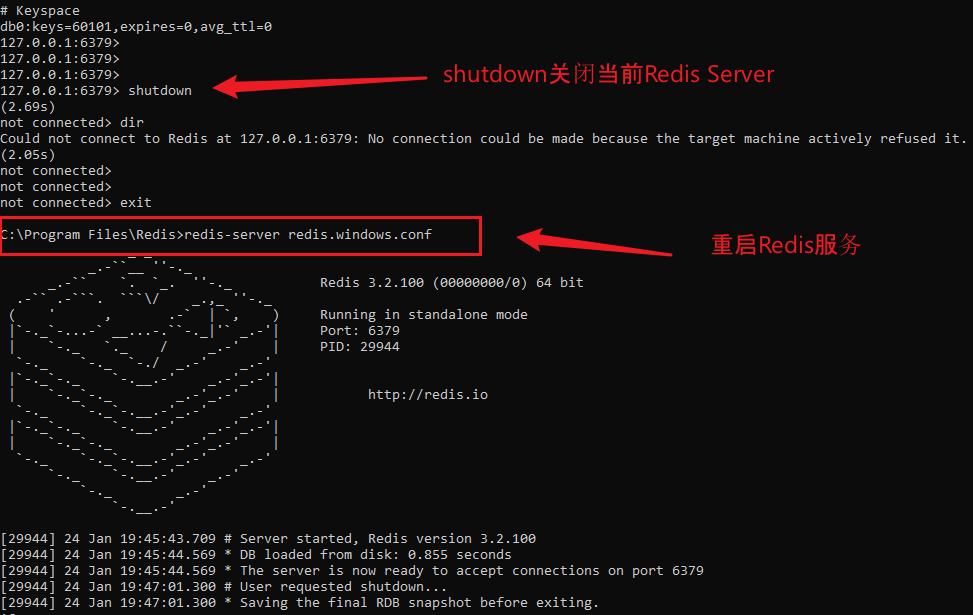
表明6379已经被占用,可以通过redis-cli连接上去。然后执行shutdown命令关闭已经运行的Redis-server, 重启即可。

SHUTDOWN & RESTART

参考资料:
Windows Redis: https://github.com/microsoftarchive/redis/releases
Reids官网:https://redis.io/download#installation
Linux Copy File Command:https://www.cyberciti.biz/faq/copy-command/
Redis Backup:https://www.w3resource.com/redis/redis-backup.php
Copy File:https://comtechies.com/copy-files-between-windows-and-linux.html
Putty Copy File:https://www.ssh.com/ssh/putty/putty-manuals/0.68/Chapter5.html
【Azure Redis 缓存】Windows和Linux系统本地安装Redis, 加载dump.rdb中数据以及通过AOF日志文件追加数据的更多相关文章
- Redis进阶实践之六Redis Desktop Manager连接Windows和Linux系统上的Redis服务
一.引言 今天本来没有打算写这篇文章,当初我感觉使用这个工具应该很简单,下载的过程也不复杂,也没有打算记录下来.但是在使用的过程中还是出现了一些问题,为了给第一次使用Redis Desktop Man ...
- Redis进阶实践之六Redis Desktop Manager连接Windows和Linux系统上的Redis服务(转载6)
Redis进阶实践之六Redis Desktop Manager连接Windows和Linux系统上的Redis服务 一.引言 今天本来没有打算写这篇文章,但是,今天测试Redis的时候发现了两个问题 ...
- Linux系统下安装Redis和Redis集群配置
Linux系统下安装Redis和Redis集群配置 一. 下载.安装.配置环境: 1.1.>官网下载地址: https://redis.io/download (本人下载的是3.2.8版本:re ...
- 在VMware的Linux系统上安装Redis
在VMware的Linux系统上安装Redis 具体过程如下: 下载,解压和编译: 在执行make的时候报错,具体报错信息如下: zmalloc.o: In function `zmalloc_use ...
- CentOS Linux系统下安装Redis过程和配置参数说明
转载于:http://www.itxuexiwang.com/a/shujukujishu/redis/2016/0216/102.html?1455869303 安装过程: 代码如下: wget h ...
- redis在windows和Linux系统下的下载、安装、配置
1.下载redis安装包 在redis的官网只有Linux系统下的安装包,微软的GitHub上有提供windows版本的redis安装包 redis中文网:http://www.redis.cn/ 微 ...
- linux系统下安装redis以及java调用redis
关系型数据库:MySQL Oracle 非关系型数据库:Redis 去掉主外键等关系数据库的关系性特性 1)安装redis编译的c环境,yum install gcc-c++ 2)将redis-2. ...
- linux系统下安装redis及配置
下载Redis redis-3.2.11.tar.gz 解压编译 tar xzf redis-3.2.11.tar.gz cd redis-3.2.11 make 编译完成之后,可以看到解压文件red ...
- Linux系统下安装redis
Linux 下安装 下载地址:http://redis.io/download,下载最新文档版本. 本教程使用的最新文档版本为 2.8.17,下载并安装: $ wget http://download ...
随机推荐
- Flutter InkWell - Flutter每周一组件
Flutter Inkwell使用详解 该文章属于[Flutter每周一组件]系列,其它组件可以查看该系列下的文章,该系列会不间断更新:所有组件的demo已经上传值Github: https://gi ...
- 【JVM】类加载时机与过程
虚拟机把描述类的数据从class文件加载到内存,并对数据进行校验.转换解析和初始化,最终形成可以被虚拟机直接使用的Java类型,这就是虚拟机的类加载机制.下面来总结梳理类加载的五个阶段. 类加载发生在 ...
- 关于AES-CBC模式字节翻转攻击(python3)
# coding:utf-8 from Crypto.Cipher import AES import base64 def encrypt(iv, plaintext): if len(plaint ...
- yii\filters\AccessControl 访问权限控制
Class yii\filters\AccessControl 所有类 | 属性 | 方法 继承 yii\filters\AccessControl » yii\base\ActionFilter ...
- 第一章: 初始JVM
跟很多人一样,我一开始接触 Java 虚拟机只是因为面试需要用到,所以硬着头皮看看.所以很多人对于为什么要学虚拟机这个问题,他们的答案都是:因为面试. 因为装逼 但我经过了几年的学习和实战,我发现其实 ...
- iOS 自定义tabBarController(中间弧形)
效果图 1.在继承自UITabBarController的自定义controller中调用以下方法(LZCustomTabbar为自定义的tabbar) - (void)viewDidAppear:( ...
- (十五)、linux软件的安装与查询-rpm与yum命令
一.RPM软件管理程序:rpm 1.RPM安装软件(install) rpm命令的选项超级多,安装话直接使用-ivh即可,其余做了解即可 命令格式:rpm -ivh package_name.rp ...
- Selenium switch_to方法
在web应用自动化测试中,点击一个链接或者按钮会打开一个新的浏览器窗口,会出现多个窗口实例.默认情况下的焦点在主窗口(父窗口),如果要对子窗口进行操作,就需要首先切换到子窗口. Selenium We ...
- Redis基础篇(四)持久化:内存快照(RDB)
AOF好处是每次执行只需要记录操作命令,记录量不大.但在故障恢复时,需要逐一执行AOF的操作命令,如果日志很大,恢复就很慢. 今天学习另一种持久化方式:内存快照.内存快照,是Redis某一时刻的状态, ...
- Mac付费软件免费获取
很简单,充分利用微信公众号和某宝即可 1.微信公众号里面会分享"XX软件下载"或破解教程只要打开微信搜索就可以搜到. 顺便推荐几个公众号"GameRoom".& ...


