c++多继承浅析


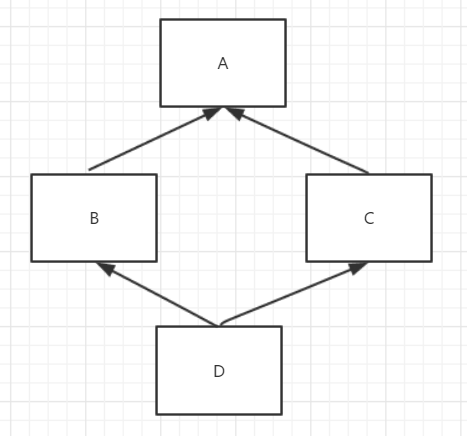
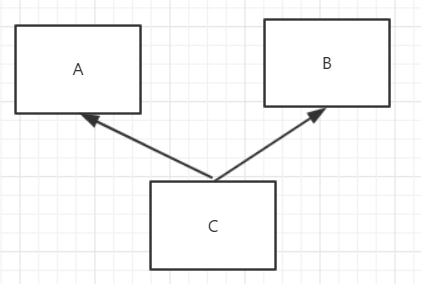
图一 图二
先测试图一结构的多继承:
 #include<iostream>

 using namespace std;

 class Parent {

 public:

     Parent():a(),b(),c()

     {

         cout << "parent 构造。。。\n";

     }

     ~Parent()

     {

         cout << "Parent 析构。。。\n";

     }

     int a;

     int b;

     int c;

     void p_print()

     {

         cout << "a b c is" << a << " " << b << " " << c << endl;

     }

 };

 class Child1 :virtual public Parent

 {

 public:

     Child1() :Parent(), a(), b(), c() { cout << "child 构造\n"; }

     ~Child1()

     {

         cout << "child 析构,,,\n";

     }

     void c_print()

     {

         cout << "a b c is" << a << " " << b << " " << c << endl;

     }

     int a;

     int b;

     int c;

 };

 class Child2 :virtual public Parent

 {

 public:

     Child2() :Parent(), a(), b(), c() { cout << "child 构造\n"; }

     ~Child2()

     {

         cout << "child 析构,,,\n";

     }

     void c_print()

     {

         cout << "a b c is" << a << " " << b << " " << c << endl;

     }

     int a;

     int b;

     int c;

 };

 class Child3 :public Child1,public Child2

 {

 public:

58     Child3() :Parent(),Child1(),Child2(), a(10), b(20), c(30)
       { cout << "child 构造\n"; }//如果前面没有使用虚继承,这里初始化Parent构造函数将出错

     ~Child3()

     {

         cout << "child 析构,,,\n";

     }

     void c_print()

     {

         cout << "a b c is" << a << " " << b << " " << c << endl;

     }

     int a;

     int b;

     int c;

 };

 int main()

 {

     Child3 c3;

     return ;

 }
虚继承的目的是令某个类做出声明,承诺愿意共享它的基类。其中,共享的基类对象称为虚基类。在这种机制下,无论虚基类在继承体系中出现多少次,在派生类中都只包含唯一一个共享的虚基类对象。
为了说明情况,我们把上述代码更改如下:
 #include<iostream>

 using namespace std;

 class Parent {

 public:

     Parent():a(),b(),c()

     {

         cout << "parent 无参构造。。。\n";

     }

     Parent(int test) :a(), b(), c()

     {

         cout << "parent 有参构造。。。\n";

     }

     ~Parent()

     {

         cout << "Parent 析构。。。\n";

     }

     int a;

     int b;

     int c;

     void p_print()

     {

         cout << "a b c is" << a << " " << b << " " << c << endl;

     }

 };

 class Child1 :  public Parent

 {

 public:

     Child1() :Parent(), b(), c() { cout << "child 构造\n"; }

     ~Child1()

     {

         cout << "child 析构,,,\n";

     }

     void c_print()

     {

         cout << "a b c is" << a << " " << b << " " << c << endl;

     }

     //int a;

     int b;

     int c;

 };

 class Child2 : public Parent

 {

 public:

     Child2() :Parent(), b(), c() { cout << "child 构造\n"; }

     ~Child2()

     {

         cout << "child 析构,,,\n";

     }

     void c_print()

     {

         cout << "a b c is" << a << " " << b << " " << c << endl;

     }

     //int a;

     int b;

     int c;

 };

 class Child3 : public Child1,  public Child2

 {

 public:

     Child3() :Child1(),Child2(), b(), c() { cout << "child 构造\n"; }

     ~Child3()

     {

         cout << "child 析构,,,\n";

     }

     //int a;

     int b;

     int c;

 };

 int main()

 {

     Child3 c3;

     c3.a = ;

     return ;

 }
报错如下:

由于在parent类中a被Child1,Child2分别继承,而用Chils3类定义对象c3要去访问属性a,编译器发出抱怨也是应该的,因为它不知道这个a是Child1还是Child2还是parent中的。所以我们要去除这样的二义性。通过把parent类变成虚基类,可以做到,代码如下:
 #include<iostream>

 using namespace std;

 class Parent {

 public:

     Parent():a(),b(),c()

     {

         cout << "parent 无参构造。。。\n";

     }

     Parent(int test) :a(), b(), c()

     {

         cout << "parent 有参构造。。。\n";

     }

     ~Parent()

     {

         cout << "Parent 析构。。。\n";

     }

     int a;

     int b;

     int c;

     void p_print()

     {

         cout << "a b c is" << a << " " << b << " " << c << endl;

     }

 };

 class Child1 : virtual public Parent

 {

 public:

     Child1() :Parent(), b(), c() { cout << "child 构造\n"; }

     ~Child1()

     {

         cout << "child 析构,,,\n";

     }

     void c_print()

     {

         cout << "a b c is" << a << " " << b << " " << c << endl;

     }

     //int a;

     int b;

     int c;

 };

 class Child2 : virtual public Parent

 {

 public:

     Child2() :Parent(), b(), c() { cout << "child 构造\n"; }

     ~Child2()

     {

         cout << "child 析构,,,\n";

     }

     void c_print()

     {

         cout << "a b c is" << a << " " << b << " " << c << endl;

     }

     //int a;

     int b;

     int c;

 };

 class Child3 : public Child1,  public Child2

 {

 public:

     Child3() :Child1(),Child2(), b(), c() { cout << "child 构造\n"; }

     ~Child3()

     {

         cout << "child 析构,,,\n";

     }

     //int a;

     int b;

     int c;

 };

 int main()

 {

     Child3 c3;

     c3.a = ;

     return ;

 }
其实也就是在继承时增加virtual关键字,让派生类包含唯一的共享虚基类。
问题抛出:
在child3中的构造函数:
Child3() :Child1(),Child2(), b(20), c(30) { cout << "child 构造\n"; }
我们把child1和child2的基类构造函数改成有参的,看看child3继承的老祖宗属性是如何的:
 #include<iostream>

 using namespace std;

 class Parent {

 public:

     Parent():a(),b(),c()

     {

         cout << "parent 无参构造。。。\n";

     }

     Parent(int test) :a(), b(), c()

     {

         cout << "parent 有参构造。。。\n";

     }

     ~Parent()

     {

         cout << "Parent 析构。。。\n";

     }

     int a;

     int b;

     int c;

     void p_print()

     {

         cout << "a b c is" << a << " " << b << " " << c << endl;

     }

 };

 class Child1 : virtual public Parent

 {

 public:

     Child1() :Parent(), b(), c() { cout << "child 构造\n"; }

     ~Child1()

     {

         cout << "child 析构,,,\n";

     }

     void c1_print()

     {

         cout << "a b c is" << a << " " << b << " " << c << endl;

     }

     //int a;

     int b;

     int c;

 };

 class Child2 : virtual public Parent

 {

 public:

     Child2() :Parent(), b(), c() { cout << "child 构造\n"; }

     ~Child2()

     {

         cout << "child 析构,,,\n";

     }

     void c2_print()

     {

         cout << "a b c is" << a << " " << b << " " << c << endl;

     }

     //int a;

     int b;

     int c;

 };

 class Child3 : public Child1,  public Child2

 {

 public:

     Child3() : Child1(),Child2(), b(), c() { cout << "child 构造\n"; }

     ~Child3()

     {

         cout << "child 析构,,,\n";

     }

     void c3_print()

     {

         cout << "a b c is" << a << " " << b << " " << c << endl;

     }

     //int a;

     int b;

     int c;

 };

 int main()

 {

     Child3 c3;

     c3.c3_print();

     c3.p_print();

     return ;

 }
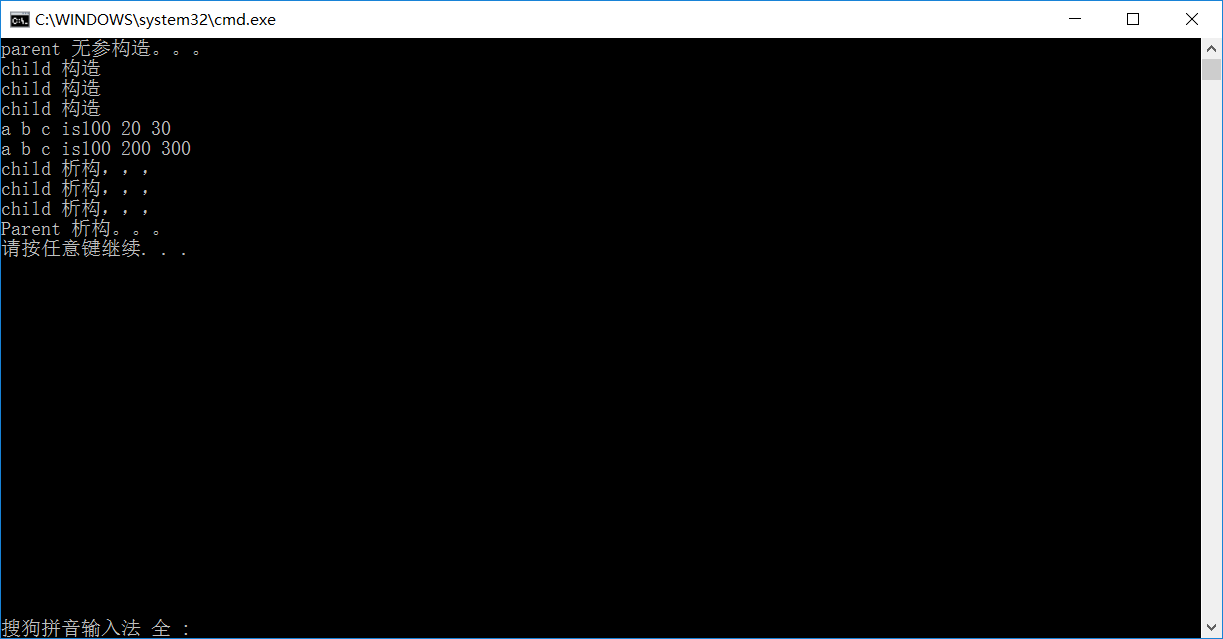
运行结果:

可以看到,child3的属性a是100,等价于parent的无参构造函数,尽管我们的child1和child2用的有参构造函数初始化,但子类child3最终继承的虚基类还是要通过自身的构造函数初始化列表来完成,要想child3中的属性a是parent有参构造的属性a,更改child3的构造函数初始化列表为:
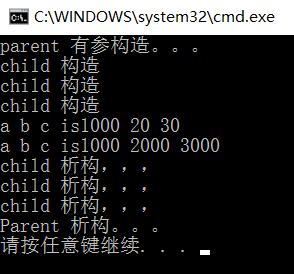
Child3() : Parent(),Child1(),Child2(), b(), c() { cout << "child 构造\n"; }
运行结果:

这样就调用了有参数的parent属性a了。结论:类似于初始化成员的过程,派生类构造函数同样是通过构造函数初始化列表来将实参传递给基类构造函数,在多继承中,哪怕直接基类(child1和child2)构造了间接基类(parent)的无参构造函数,但要传递给派生类child3的属性时,还是根据child3的构造函数初始化列表决定的。
对上面的访问属性a有歧义再探:
上面说得:由于在parent类中a被Child1,Child2分别继承,而用Chils3类定义对象c3要去访问属性a,编译器发出抱怨也是应该的,因为它不知道这个a是Child1还是Child2还是parent中的。所以我们要去除这样的二义性。通过把parent类变成虚基类,可以做到.
当然,问题的关键就在于编译器不知道属性a是哪个对象中,我们除了增加virtual关键字外,还可以:
在child3类中定义同名成员a,这样通过c3访问a时,默认从child3类中寻找:
 #include<iostream>

 using namespace std;

 class Parent {

 public:

     Parent():a(),b(),c()

     {

         cout << "parent 无参构造。。。\n";

     }

     Parent(int test) :a(), b(), c()

     {

         cout << "parent 有参构造。。。\n";

     }

     ~Parent()

     {

         cout << "Parent 析构。。。\n";

     }

     int a;

     int b;

     int c;

     void p_print()

     {

         cout << "a b c is" << a << " " << b << " " << c << endl;

     }

 };

 class Child1 :  public Parent

 {

 public:

     Child1() :Parent(), b(), c() { cout << "child 构造\n"; }

     ~Child1()

     {

         cout << "child 析构,,,\n";

     }

     void c1_print()

     {

         cout << "a b c is" << a << " " << b << " " << c << endl;

     }

     //int a;

     int b;

     int c;

 };

 class Child2 :  public Parent

 {

 public:

     Child2() :Parent(), b(), c() { cout << "child 构造\n"; }

     ~Child2()

     {

         cout << "child 析构,,,\n";

     }

     void c2_print()

     {

         cout << "a b c is" << a << " " << b << " " << c << endl;

     }

     //int a;

     int b;

     int c;

 };

 class Child3 : public Child1,  public Child2

 {

 public:

     Child3() : Child1(),Child2(), b(), c() { cout << "child 构造\n"; }

     ~Child3()

     {

         cout << "child 析构,,,\n";

     }

     void c3_print()

     {

         cout << "a b c is" << a << " " << b << " " << c << endl;

     }

     int a;

     int b;

     int c;

 };

 int main()

 {

     Child3 c3;

     c3.a = ;

     c3.c3_print();

     return ;

 }
这样可以编译通过了,但此时的a是child3中的,仅仅是逃过编译器的错误检测,并没有解决多继承的问题;
我们可能在想,能否通过域作用符来访问去除歧义呢?
test:
int main()

{

    Child3 c3;

    c3.Child1::a = ;

    c3.c3_print();

    return ;

}
依旧报错:
由此可见,多继承是复杂繁琐的,好在一般工程中都会尽量避免使用多继承,但是多继承也是有应用的,至少Qt中就有多继承,就像C语言中的goto语句一样,一般不建议使用,但总会有它上场的时候,goto用于跳出多重循环或者检错,多继承用在一个类想用时拥有其他类的某些功能。所以,必要的多继承语法还是得了解。
对于图2:
 #include<iostream>

 using namespace std;

 class Child1

 {

 public:

     Child1() :a(), b(), c() { cout << "child 构造\n"; }

     ~Child1()

     {

         cout << "child 析构,,,\n";

     }

     void c1_print()

     {

         cout << "a b c is" << a << " " << b << " " << c << endl;

     }

     int a;

     int b;

     int c;

 };

 class Child2

 {

 public:

     Child2() :a(), b(), c() { cout << "child 构造\n"; }

     ~Child2()

     {

         cout << "child 析构,,,\n";

     }

     void c2_print()

     {

         cout << "a b c is" << a << " " << b << " " << c << endl;

     }

     int a;

     int b;

     int c;

 };

 class Child3 : public Child1,  public Child2

 {

 public:

     Child3() : Child1(),Child2(), b(), c() { cout << "child 构造\n"; }

     ~Child3()

     {

         cout << "child 析构,,,\n";

     }

     void c3_print()

     {

         //cout << "a b c is" << a << " " << b << " " << c << endl;

     }

     //int a;

     int b;

     int c;

 };

 int main()

 {

     Child3 c3;

     c3.a = ;

     //c3.Child1::a = 123;

     //c3.c3_print();

     return ;

 }

可以看到还是报错,继续剖析,更改代码如下:
 #include<iostream>

 using namespace std;

 class Child1

 {

 public:

     Child1() :a(), b(), c() { cout << "child 构造\n"; }

     ~Child1()

     {

         cout << "child 析构,,,\n";

     }

     void c1_print()

     {

         cout << "a b c is" << a << " " << b << " " << c << endl;

     }

     int a;

     int b;

     int c;

 };

 class Child2

 {

 public:

     Child2() :a(), b(), c() { cout << "child 构造\n"; }

     ~Child2()

     {

         cout << "child 析构,,,\n";

     }

     void c2_print()

     {

         cout << "a b c is" << a << " " << b << " " << c << endl;

     }

     int a;

     int b;

     int c;

 };

 class Child3 : public Child1,  public Child2

 {

 public:

     Child3() : Child1(),Child2(), b(), c() { cout << "child 构造\n"; }

     ~Child3()

     {

         cout << "child 析构,,,\n";

     }

     void c3_print()

     {

         //cout << "a b c is" << a << " " << b << " " << c << endl;

     }

     //int a;

     int b;

     int c;

 };

 int main()

 {

     Child3 c3;

     //c3.a = 123;

     c3.Child1::a = ;

     c3.c1_print();

     return ;

 }

可以看到,通过域作用符可以消除歧义,那么问题又来了;是否可以通过virtual关键字或者自己定义一个属性a达到消除错误呢?
test:
 #include<iostream>

 using namespace std;

 class Child1

 {

 public:

     Child1() :a(), b(), c() { cout << "child 构造\n"; }

     ~Child1()

     {

         cout << "child 析构,,,\n";

     }

     void c1_print()

     {

         cout << "a b c is" << a << " " << b << " " << c << endl;

     }

     int a;

     int b;

     int c;

 };

 class Child2

 {

 public:

     Child2() :a(), b(), c() { cout << "child 构造\n"; }

     ~Child2()

     {

         cout << "child 析构,,,\n";

     }

     void c2_print()

     {

         cout << "a b c is" << a << " " << b << " " << c << endl;

     }

     int a;

     int b;

     int c;

 };

 class Child3 : public Child1,  public Child2

 {

 public:

     Child3() : Child1(),Child2(), b(), c() { cout << "child 构造\n"; }

     ~Child3()

     {

         cout << "child 析构,,,\n";

     }

     void c3_print()

     {

         //cout << "a b c is" << a << " " << b << " " << c << endl;

     }

     int a;

     int b;

     int c;

 };

 int main()

 {

     Child3 c3;

     c3.a = ;

     //c3.Child1::a = 123;

     //c3.c1_print();

     return ;

 }
自己定义属性a,是可以做到消除歧义的,但属性a还是属于child3的而不是访问继承而来的;
增加virtual关键字
test:
class Child3 : virtual public Child1, virtual public Child2
还是报错,因为virtual的作用是产生虚基类的,virtual说明符表达了一种愿望,即在后续的派生类中共享虚基类的同一份唯一实例,至于什么样的类能作为虚基类没有明确的规定,显然这里和图一不同。
summary:
结论已经显而易见,多继承比单继承复杂,一般不使用,但语法还是得掌握,因为你又可能会用到它,存在一定有它的道理。
c++多继承浅析的更多相关文章
- js 原型,原型链,原型链继承浅析
对于网上的关于原型,原型链和原型链继承的晦涩语言说明就不累赘了,复制粘贴过来再解释一遍怕自己也整蒙了,本人最怕空气突然安静,四目对视,大眼对小眼,一脸懵逼. 我们先看下面
- js原型链+继承 浅析
名称: prototype--原型对象 __proto__--属性 原型链与继承网上搜索定义,看起来挺绕的 .先说继承: 所有的对象实例都可以共享原型对象包含的属性和方法 例如一个实例A ...
- android里的继承浅析
先看一段代码: abstract class A{ public A(){ this.print(); } public abstract void print(); } class B extend ...
- Java 浅析三大特性之一继承
上文Java 浅析三大特性之一封装我们说到Java是一个注重编写类,注重于代码和功能复用的语言.Java实现代码复用的方式有很多,这里介绍一个重要的复用方式--继承. 在介绍继承之前,我们要明确一点, ...
- 浅析 Java 中的继承和重写
浅析 Java 中的继承和重写 Java 中的构造方法不能被继承. Java 中 static 修饰的方法可以被继承,但不能被子类重写. Java 中 final 修饰方法不允许被子类重写,但是可以被 ...
- C++浅析——继承类内存分布和虚析构函数
继承类研究 1. Code 1.1 Cbase, CTEST为基类,CTest2为其继承类,并重新申明了基类中的同名变量 class CBase { public: int Data; CBase() ...
- C++浅析——继承类中构造和析构顺序
先看测试代码,CTEST 继承自CBase,并包含一个CMember成员对象: static int nIndex = 1; class CMember { public: CMember() { p ...
- java对象中继承和变量初始化顺序浅析
先上例子代码 public class F { int age = 5; public F() { print(); } public void print() { System.out.printl ...
- 浅析Javascript原型继承(转)
引自: http://blog.csdn.net/kittyjie/article/details/4380918 原作者解释的浅显易懂,非常不错的JavaScript prototype总结 JS没 ...
随机推荐
- SlackWare安装
Keep It Simple Stupid 01.下载 slackware: http://www.slackware.com/ 中科大: http://mirrors.ustc.edu.cn ...
- android.widget.BaseAdapter调用DataSetObservable.notifyChanged/Invalidated
在android.widget.BaseAdapter类中定义了两个notifyDataXXX方法. public void notifyDataSetChanged() { mDataSet ...
- VS:"64位调试操作花费的时间比预期要长"的一解决途径
解决办法之一: 在命令提示符那里打入如下命令: netsh winsock reset catalognetsh int ip reset reset.log hit 重启电脑后,即可
- java获取某个范围内的一个随机数
一.取模操作 public static void main(String[] args){ for (int i = 1; i <= 20; i++){ int j = i % 11; Sys ...
- Sublime Text 2搭建Go开发环境(Windows)
转自:http://blog.csdn.net/love_se/article/details/7754274 下载packcontrol包地址:http://www.imjeff.cn/blog/6 ...
- Flume多Sink方案修正
在实际项目中采用http://www.cnblogs.com/moonandstar08/p/6091384.html方案进行布署时,由于系统产生的消费比较大按照原方案进行布署时,随着国外局点不断增加 ...
- RHEL7 -- 识别文件系统和设备
逻辑卷依赖于设备映射程序(DM)内核驱动程序. 比如有个逻辑卷组rhel中有一个逻辑卷root,对应的设备为/dev/rhel/root.符号链接/dev/rhel/root指向/dev/dm-< ...
- Open SSH原理
OpenSSH(免费的 SSH 的实现)类似于 telnet 或rsh,ssh 客户程序也可以用于登录到远程机器.所要求的只是该远程机器正在运行 sshd,即 ssh 服务器进程.但是,与 telne ...
- WebDav的java客户端开发包:Jackrabbit
上一篇帖子“WebDav的java客户端开发包:sardine”中说到,对于开发WebDav客户端 sardine是一个很好的选择,但sardine并未实现WevDav的全部规范,所以我又试了试 ap ...
- C语言宏高级用法
1.前言 今天看代码时候,遇到一些宏,之前没有见过,感觉挺新鲜.如是上网google一下,顺便总结一下,方便以后学习和运用.C语言程序中广泛的使用宏定义,采用关键字define进行定义,宏只是一种简 ...
