LTE Module User Documentation(翻译1)——背景、使用概述、基本的仿真程序和配置LTE模型参数
LTE用户文档
2. 使用概述
- 定义仿真场景。
- 编写程序,重建期望的仿真场景拓扑/架构,通过使用 ns3::LteHelper API(定义在 src/lte/helper/lte-helper.h 中)访问 ns-3 LTE 模型库。
- 指定 objects 的配置参数,通过使用 input files(通过 ns3::ConfigStore)或直接在仿真程序中编写。
- 配置仿真器期望的输出。
- 运行仿真。
下面将通过实例解释这些步骤。
3. 基本的仿真程序
#include <ns3/core-module.h>

#include <ns3/network-module.h>

#include <ns3/mobility-module.h>

#include <ns3/lte-module.h>

using namespace ns3;

int main (int argc, char *argv[])

{

  // the rest of the simulation program follows
Ptr<LteHelper> lteHelper = CreateObject<LteHelper> ();
NodeContainer enbNodes;

enbNodes.Create ();

NodeContainer ueNodes;

ueNodes.Create ();
注意上述节点实例此时并没有安装 LTE 协议栈;它们还是空节点。
MobilityHelper mobility;

mobility.SetMobilityModel ("ns3::ConstantPositionMobilityModel");

mobility.Install (enbNodes);

mobility.SetMobilityModel ("ns3::ConstantPositionMobilityModel");

mobility.Install (ueNodes);
上述代码会将所有节点放置在坐标 (0,0,0)。请参考 ns-3 移动性模型文档学习如何设置自己想要的位置或者配置节点运动。
NetDeviceContainer enbDevs;

enbDevs = lteHelper->InstallEnbDevice (enbNodes);
NetDeviceContainer ueDevs;

ueDevs = lteHelper->InstallUeDevice (ueNodes);
lteHelper->Attach (ueDevs, enbDevs.Get ());
enum EpsBearer::Qci q = EpsBearer::GBR_CONV_VOICE;

EpsBearer bearer (q);

lteHelper->ActivateDataRadioBearer (ueDevs, bearer);
Simulator::Stop (Seconds (0.005));
4 配置 LTE 模型参数
CommandLine cmd;

cmd.Parse (argc, argv);

ConfigStore inputConfig;

inputConfig.ConfigureDefaults ();

// parse again so you can override default values from the command line

cmd.Parse (argc, argv);
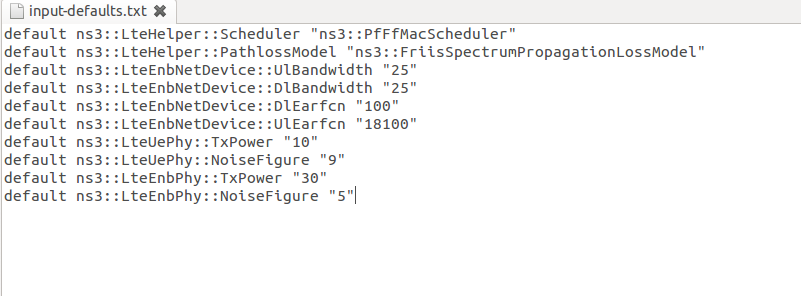
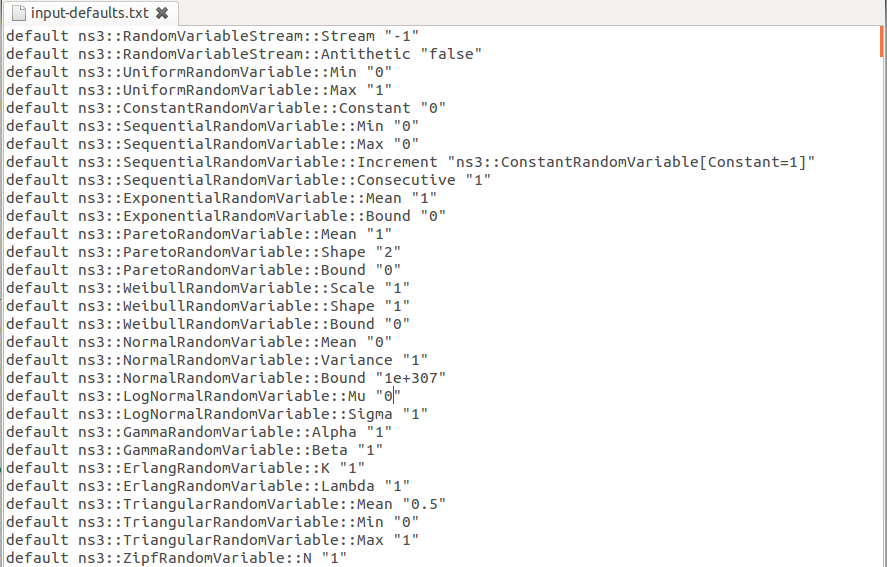
default ns3::LteHelper::Scheduler "ns3::PfFfMacScheduler"

default ns3::LteHelper::PathlossModel "ns3::FriisSpectrumPropagationLossModel"

default ns3::LteEnbNetDevice::UlBandwidth ""

default ns3::LteEnbNetDevice::DlBandwidth ""

default ns3::LteEnbNetDevice::DlEarfcn ""

default ns3::LteEnbNetDevice::UlEarfcn ""

default ns3::LteUePhy::TxPower ""

default ns3::LteUePhy::NoiseFigure ""

default ns3::LteEnbPhy::TxPower ""

default ns3::LteEnbPhy::NoiseFigure ""
./waf --command-template="%s --ns3::ConfigStore::Filename=input-defaults.txt --ns3::ConfigStore::Mode=Load --ns3::ConfigStore::FileFormat=RawText" --run src/lte/examples/lte-sim-with-input
./waf --command-template="%s --ns3::ConfigStore::Filename=input-defaults.txt --ns3::ConfigStore::Mode=Save --ns3::ConfigStore::FileFormat=RawText" --run src/lte/examples/lte-sim-with-input
.png)
#include "ns3/core-module.h"
#include "ns3/network-module.h"
#include "ns3/mobility-module.h"
#include "ns3/lte-module.h"
#include "ns3/config-store.h"
#include <ns3/buildings-helper.h>
//#include "ns3/gtk-config-store.h" using namespace ns3; int main (int argc, char *argv[])
{
CommandLine cmd;
cmd.Parse (argc, argv); //注意,先load 再 save!
// to save a template default attribute file run it like this:
// ./waf --command-template="%s --ns3::ConfigStore::Filename=input-defaults.txt --ns3::ConfigStore::Mode=Save --ns3::ConfigStore::FileFormat=RawText" --run src/lte/examples/lte-sim-with-input
//
// to load a previously created default attribute file
// ./waf --command-template="%s --ns3::ConfigStore::Filename=input-defaults.txt --ns3::ConfigStore::Mode=Load --ns3::ConfigStore::FileFormat=RawText" --run src/lte/examples/lte-sim-with-input ConfigStore inputConfig;
inputConfig.ConfigureDefaults (); // Parse again so you can override default values from the command line
cmd.Parse (argc, argv); Ptr<LteHelper> lteHelper = CreateObject<LteHelper> (); // Uncomment to enable logging
// lteHelper->EnableLogComponents (); // Create Nodes: eNodeB and UE
NodeContainer enbNodes;
NodeContainer ueNodes;
enbNodes.Create ();
ueNodes.Create (); // Install Mobility Model
MobilityHelper mobility;
mobility.SetMobilityModel ("ns3::ConstantPositionMobilityModel");
mobility.Install (enbNodes);
BuildingsHelper::Install (enbNodes);
// mobility.SetMobilityModel ("ns3::ConstantPositionMobilityModel");
// mobility.Install (ueNodes);
// BuildingsHelper::Install (ueNodes); mobility.SetPositionAllocator ("ns3::RandomDiscPositionAllocator",
"X", StringValue ("100.0"),
"Y", StringValue ("100.0"),
"Rho", StringValue ("ns3::UniformRandomVariable[Min=0|Max=30]"));
mobility.SetMobilityModel ("ns3::RandomWalk2dMobilityModel",
"Mode", StringValue ("Time"),
"Time", StringValue ("2s"),
"Speed", StringValue ("ns3::ConstantRandomVariable[Constant=1.0]"),
"Bounds", StringValue ("0|200|0|200"));
mobility.Install(ueNodes);
BuildingsHelper::Install (ueNodes); // Create Devices and install them in the Nodes (eNB and UE)
NetDeviceContainer enbDevs;
NetDeviceContainer ueDevs;
// Default scheduler is PF, uncomment to use RR
//lteHelper->SetSchedulerType ("ns3::RrFfMacScheduler"); enbDevs = lteHelper->InstallEnbDevice (enbNodes);
ueDevs = lteHelper->InstallUeDevice (ueNodes); // Attach a UE to a eNB
lteHelper->Attach (ueDevs, enbDevs.Get ()); // Activate a data radio bearer
enum EpsBearer::Qci q = EpsBearer::GBR_CONV_VOICE;
EpsBearer bearer (q);
lteHelper->ActivateDataRadioBearer (ueDevs, bearer);
//lteHelper->EnableTraces (); Simulator::Stop (Seconds (1.05)); // configure all the simulation scenario here...
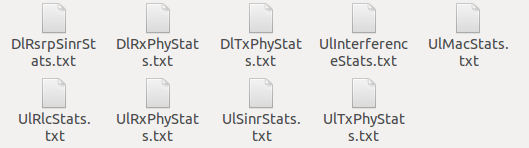
lteHelper->EnablePhyTraces ();
lteHelper->EnableMacTraces ();
lteHelper->EnableRlcTraces ();
lteHelper->EnablePdcpTraces (); Simulator::Run (); // GtkConfigStore config;
// config.ConfigureAttributes (); Simulator::Destroy ();
return ;
}

.png)
.png)

.png)
.png)
参考文献
https://www.nsnam.org/docs/models/html/lte-user.html
LTE Module User Documentation(翻译1)——背景、使用概述、基本的仿真程序和配置LTE模型参数的更多相关文章
- LTE Module User Documentation(翻译15)——示例程序、参考场景以及故障检测和调试技巧
LTE用户文档 (如有不当的地方,欢迎指正!) 21 Examples Programs(示例程序) 路径 src/lte/examples/ 包含一些示例仿真程序,这些例子表明如何仿真不 ...
- LTE Module User Documentation(翻译13)——频率复用算法(Frequency Reuse Algorithms)
LTE用户文档 (如有不当的地方,欢迎指正!) 19 Frequency Reuse Algorithms(频率复用算法) 本节我们将描述如何在 LTE 仿真中使用频率复用(FR)算法.共有两 ...
- LTE Module User Documentation(翻译8)——核心网(EPC)
LTE用户文档 (如有不当的地方,欢迎指正!) 14 Evolved Packet Core (EPC) 我们现在讲解如何编写一个仿真程序——除了 LTE 无线接入网外,还允许仿真 EPC. EP ...
- LTE Module User Documentation(翻译5)——Mobility Model with Buildings
LTE用户文档 (如有不当的地方,欢迎指正!) 8 Mobility Model with Buildings 我们现在通过例子解释如何在 ns-3 仿真程序中使用 buildings 模型(特别 ...
- LTE Module User Documentation(翻译2)——配置LTE MAC 调度器
LTE用户文档 (如有不当的地方,欢迎指正!) 5 配置 LTE MAC 调度器 这里有几种 LTE MAC 调度器用户可以选择.使用下面的代码定义调度器的类型: Ptr<LteHelper ...
- LTE Module User Documentation(翻译14)——Uplink Power Control(上行功率控制)
LTE用户文档 (如有不当的地方,欢迎指正!) 20 Uplink Power Control(上行功率控制) 上行功率控制功能默认是开启的.用户可以通过设置布尔属性 ns3::LteUePhy: ...
- LTE Module User Documentation(翻译12)——X2切换(X2-based handover)
LTE用户文档 (如有不当的地方,欢迎指正!) 18 X2-based handover 正如 3GPP 定义的,切换是改变用户服务小区的连接方式的过程.这一过程中涉及的两个基站通常称为源基站和目 ...
- LTE Module User Documentation(翻译11)——配置用户测量
LTE用户文档 (如有不当的地方,欢迎指正!) 17 Configure UE measurements 仿真中激活的用户测量配置取决于所选的 “consumers”,例如切换算法.用户可能需要添 ...
- LTE Module User Documentation(翻译10)——网络连接(Network Attachment)
LTE用户文档 (如有不当的地方,欢迎指正!) 16 Network Attachment(网络连接) 正如前面章节 Basic simulation program 所述,连接用户到基站时通过调 ...
随机推荐
- HDU 5795:A Simple Nim(博弈)
http://acm.hdu.edu.cn/showproblem.php?pid=5795 A Simple Nim Problem Description Two players take t ...
- Discuz! X2头部header.htm修改指南
相对于1.5版本,2.0版本并没有在模板机制上做太大改动,基本延续了1.5的模板机制.下面我就为和大家一起过一下X2的头部代码.希望大家对头部代码有些认识. 1.顶部的设为首页,和收藏本站.这里是可以 ...
- python: shutil模块 -拷贝文件
import shutil #拷贝文件 #存在文档1文件 shutil.copyfile('文档1','新文件') 随机验证码-4位 import random random_code='' for ...
- Database
1.Mysql 本地计算机登陆mysql,(DOC界面)mysql -h 127.0.0.1 -u root -p
- Unity-Animator深入系列---StateMachineBehaviour状态机脚本学习
回到 Animator深入系列总目录 首先这个脚本必须继承自StateMachineBehaviour public class MySMB : StateMachineBehaviour { pub ...
- Unity物理投射相关问题整理
1.投射目标是否需要附加刚体,是否可忽略触发器? 默认既支持触发器,也支持刚体.投射的最后一个参数queryTriggerInteraction可以设置,是否包含触发器事件. 2.非射线投射,是否有接 ...
- python Flask restful框架
框架地址:https://github.com/flask-restful/flask-restful 文档:http://flask-restful.readthedocs.io/en/0.3.5/ ...
- java 学习路线《转》
*第一阶段:Java基础,包括java语法,面向对象特征,常见API,集合框架: *第二阶段:java界面编程,包括AWT,事件机制,SWING,这个部分也可以跳过,用的时候再看都能来及: *第三阶段 ...
- EasyUI-标签(Tabs)用法
用法示例 创建tabs 1. 经由标记创建Tabs 从标记创建Tabs更容易,我们不需要写任何JavaScript代码.记住把 'easyui-tabs' 类添加到<div/>标记,每个t ...
- Eclipse启动提示Failed to load the JNI shared library JVM.dll
一.出现了上述问题解决办法 1.查看eclipse.ini文件 看看eclipse环境架构需要的是什么. plugins/org.eclipse.equinox.launcher.win32.win3 ...