Background removal with deep learning
[原文链接]
Background removal with deep learning
This post describes our work and research on the greenScreen.AI. We’ll be happy to hear thoughts and comments!
Intro
Throughout the last few years in machine learning, I’ve always wanted to build real machine learning products.
A few months ago, after taking the great Fast.AI deep learning course, it seemed like the stars aligned, and I have the opportunity: The advances in deep learning technology permitted doing many things that weren’t possible before, and new tools were developed and made the deployment process more accessible than ever.
In the aforementioned course, I’ve met Alon Burg, who is an experienced web developer, an we’ve partnered up to pursue this goal. Together, we’ve set ourselves the following goals:
- Improving our deep learning skills
- Improving our AI product deployment skills
- Making a useful product, with a market need
- Having fun (for us and for our users)
- Sharing our experience
Considering the above, we were exploring ideas which:
- Haven't been done yet (or haven't been done properly)
- Will be not too hard to plan and implement — our plan was 2–3 months of work, with a load of 1 weekly work day.
- Will have an easy and appealing user interface — we wanted to do a product that people will use, not only for demonstration purposes.
- Will have training data readily available — as any machine learning practitioner knows, sometimes the data is more expensive than the algorithm.
- Will use cutting edge deep learning techniques (which were still not commoditized by Google, Amazon and friends in their cloud platforms) but not too cutting edge (so we will be able to find some examples online)
- Will have the potential to achieve “production ready” result.
Our early thoughts were to take on some medical project, since this field is very close to our hearts, and we felt (and still feel) that there is an enormous number of low hanging fruits for deep learning in the medical field. However, we realized that we are going to stumble upon issues with data collection and perhaps legality and regulation, which was a contradiction with our will to keep it simple. Our second choice was a background removal product.
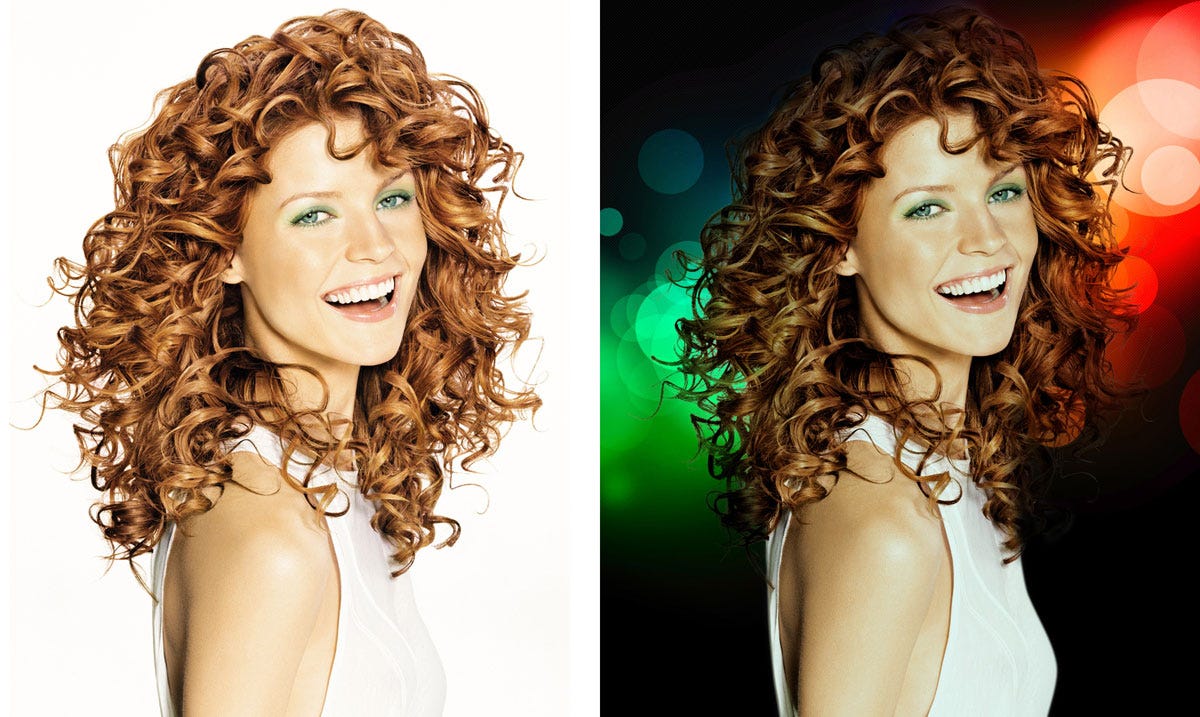
Background removal is a task that is quite easy to do manually, or semi manually (Photoshop, and even Power Point has such tools) if you use some kind of a “marker” and edge detection, see here an example. However, fully automated background removal is quite a challenging task, and as far as we know, there is still no product that has satisfactory results with it, although some do try.
What background will we remove? This turned out to be an important question, since the more specific a model is in terms of objects, angle, etc. the higher quality the separation will be. When starting our work, we thought big: a general background remover that will automatically identify the foreground and background in every type of image. But after training our first model, we understood that it will be better to focus our efforts in a specific set of images. Therefore, we decided to focus on selfies and human portraits.
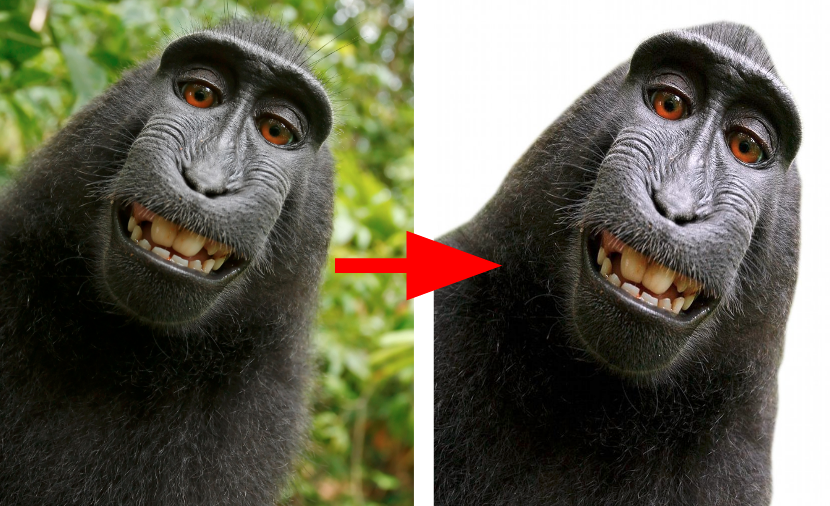
Background removal of (almost) human portrait
A selfie is an image with a salient and focused foreground (one or more “persons”) guarantees us a good separation between the object (face+upper body) and the background, along with quite an constant angle, and always the same object (person).
With these assumptions in mind, we embarked on a journey of research, implementation and hours of training to create a one click easy to use background removal service.
The main part of our work was training the model, but we couldn't underestimate the importance of proper deployment. Good segmentation models are still not compact as the classification model (e.g SqueezeNet) and we actively examined both server and browser deployment options.
If you want to read more details about the deployment process(es) of our product, your are welcomed to check out our posts on server side and client side.
If you want to read about the model and it’s training process, keep going.
Semantic Segmentation
When examining deep learning and computer vision tasks which resemble ours, it is easy to see that our best option is the semantic segmentation task.
Other strategies, like separation by depth detection also exist, but didn’t seem ripe enough for our purposes.
Semantic segmentation is a well known computer vision task, one of the top three, along with classification and object detection. The segmentation is actually a classification task, in the sense of classifying every pixel to a class. Unlike image classification or detection, segmentation model really shows some “understanding” of the images, in not only saying “there is a cat in this image”, but pointing where and what is the cat, on a pixel level.
So how does the segmentation work? To better understand, we will have to examine some of the early works in this field.
The earliest idea was to adopt some of the early classification networks such as VGG and Alexnet. VGG was the state of the art model back in 2014 for image classification, and is very useful nowadays because of it’s simple and straightforward architecture. When examining VGG early layers, it may be noticed that there are high activation around the item to classify. Deeper layers have even stronger activation, however they are coarse in their nature since the repetitive pooling action. With these understandings in mind, it was hypothesized that classification training can also be used with some tweaks to finding/segmenting the object.
Early results for semantic segmentation emerged along with the classification algorithms. In this post, you can see some rough segmentation results that come from using the VGG:
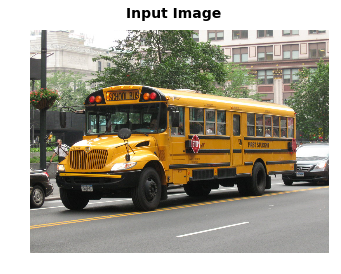
late layer results:

Segmentation of the buss image, light purple (29) is school bus class
after bilinear upsampling:
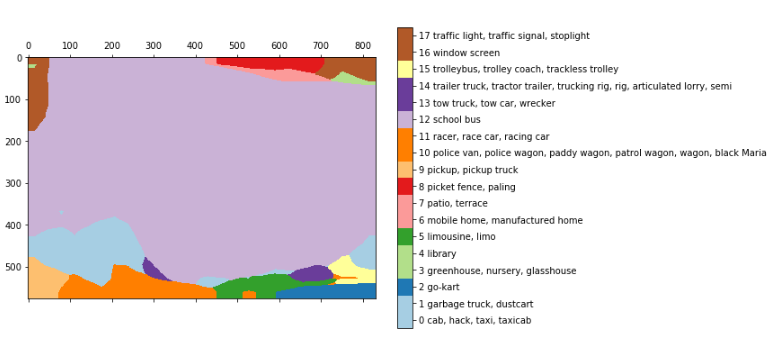
These results comes from merely converting (or maintaining) the fully connected layer into it’s original shape, maintaining its spatial features, getting a fully convolutional network. In the example above, we feed a 768*1024 image into the VGG, and get a layer of 24*32*1000. the 24*32 is the pooled version of the image (by 32) and the 1000 is the image-net class count, from which we can derive the segmentation above.
To smooth the prediction, the researchers used a naive bilienar upsampling layer.
In the FCN paper, the researchers improved the idea above. They connected some layers along the way, to allow a richer interpretations, which were named FCN-32, FCN-16 and FCN-8, according the up-sampling rate:
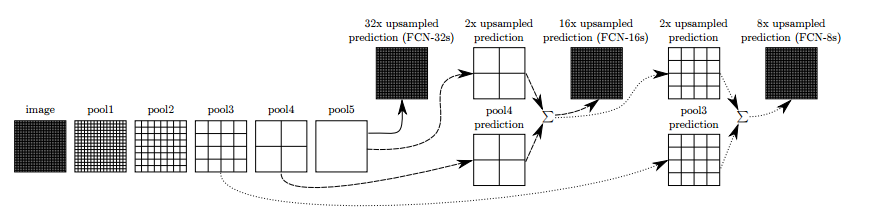
Adding some skip connections between the layers allowed the prediction to encode finer details from the original image. Further training improved the results even more.
this technique showed itself as not so bad as might have been thought, and proved there is indeed potential in semantic segmentation with deep learning.
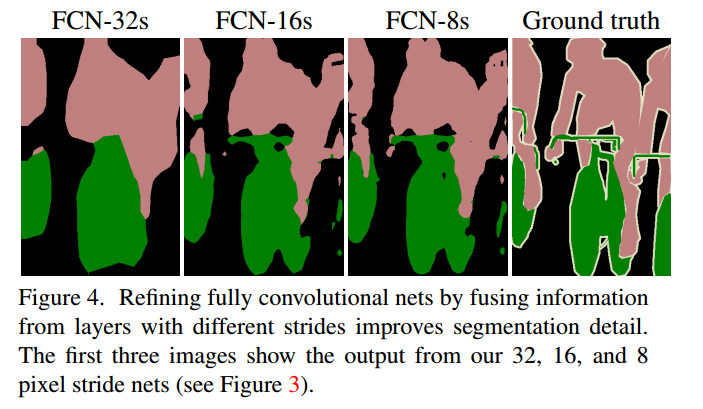
FCN results from the papaer
The FCN unlocked the concept of segmentation, and researchers tried different architectures for this task. The main idea stays similar: using known architectures, up-sampling, and using skip connections are still prominent at the newer models.
You can read about advances in this field in a few good posts: here, here and here. You can alsosee that most architectures keep the encoder- decoder architecture.
Back to our project
After doing some research, we settled on three models, which were available to us: the FCN, Unet and Tiramisu — very deep encoder-decoder atchitecture. We also had some thoughts about the mask-RCNN, but implementing it seemed outside of our projects scope.
FCN didn’t seem relevant since its results weren’t as good as we would have like (even as a starting point), but the 2 other models we’ve mentioned showed results that were not bad: the tiramisu on the CamVid dataset, and the Unet main advantage was it’s compactness and speed. In terms of implementations, the Unet is quite straightforward to implement (we used keras) and the Tiramisu was also implementable. To get us started, we’ve used a good implementation of Tiramisu at the last lesson of Jeremy Howard’sgreat deep learning course.
With these two models, we went ahead and started training on some data-sets. I must say that after we first tried the Tiramisu, we saw that its results had much more potential for us, since it had the ability to capture sharp edges in an image. from the other hand, the unet seemed not fine enough, and the results seemed a bit blobbish.
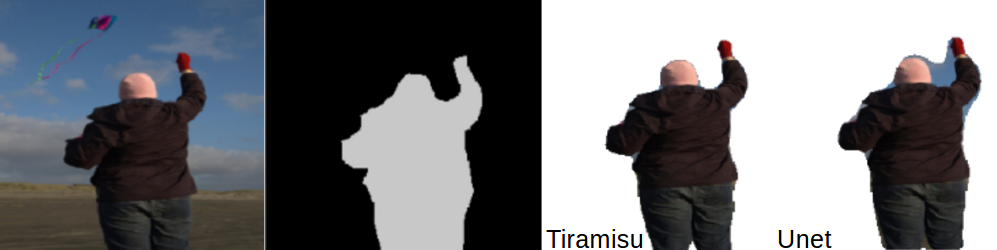
Unet blobbishness
The data
After having our general direction set with the model, we started looking for proper datasets. Segmentation data is not as common as classification or even detection. Additionally, manual tagging is not really a possibility. The most common datasets for segmentation were the COCO dataset, which includes around 80K images with 90 categories, the VOC pascal dataset with 11K images and 20 classes, and the newer ADE20K datasets.
We chose to work with the COCO dataset, since it includes much more images with the class “person” which was our class of interest.
Considering our task, we pondered if we’ll use only the images that are super relevant for us, or use more general dataset. On one hand, using a more general dataset with more images and classes will allow the model to deal with more sceneries and challenges. On the other hand, on overnight training session allowed us going over ~150K images. If we’ll introduce the model with the entire COCO dataset, we will end with the model seeing each image twice (on average) therefore trimming it a little bit will be beneficial. additionally, it will results in a more focused model for our purposes.
One more thing that is worth mentioning — the Tiramisu model was originally trained on the CamVid dataset, which has some flaws, but most importantly it’s images are very monotonous: all images are road pics from a car. As you can easily understand, learning from such dataset (even though it contains people) had no benefit for our task, so after a short trial, we moved ahead.
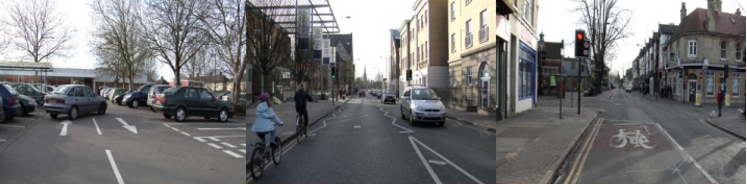
Images from CamVid dataset
The COCO dataset ships with prety straight-forward API which allowed us to know exactly what objects are at each image (according th 90 predifiened classes)
After some experimenting, we’ve decided to dilute the dataset: first we filtered only the images with a person in them, leaving us with 40K images. Then, we dropped all the images with many people in them, and left with only 1 or 2, since this is what our product should find. Finally, we left only the images where 20%-70% of the image are tagged as the person, removing the images with a very small person in the background, or some kind of weird monstrosity (unfortunately not all of them). Our final dataset consisted of 11K images, which we felt was enough at this stage.
Left: good image ___ Center: too many characters ___ Right: OBjective is too small
The Tiramisu model
As said, we were introduced with the Tiramisu model in Jeremy Howard’s course. Though it’s full name “100 layers Tiramisu” implies a gigantic model, it is actually quite economical, with only 9M parameters. The VGG16 for comparison, has more than 130M parameters.
The Tiramisu model was based on the DensNet, a recent image classification model where all layers are interconnected. Moreover, Tiramisu adds skip connections to the up-sampling layers, like the Unet.
If you recall, this architecture is congruent with the idea presented in FCN: using classification architecture, up-sampling, and adding skip connections for refinement.
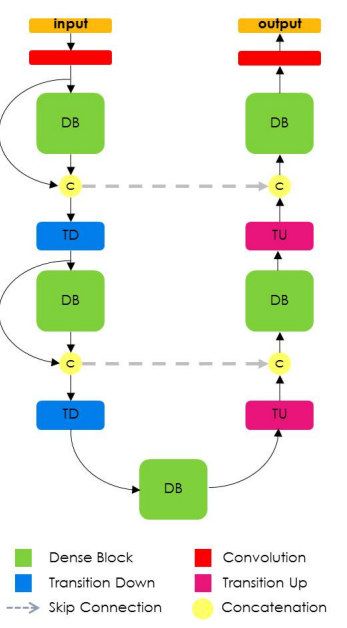
Tiramisu Architecture in general
The DenseNet model can be seen as a natural evolution of the Resnet model, but instead of “remembering” every layer only until the next layer, the Densenet remembers all layers throughout the model. These connections are called highway connections. It causes an inflation of the filter numbers, which is defined as the “growth rate”. The Tiramisu has growth rate of 16, therefore with each layer we add 16 new filters until we reach layers of 1072 filters. You might expect 1600 layers because it’s 100 layer tiramisu, however, the up-sampling layers drop some filters.
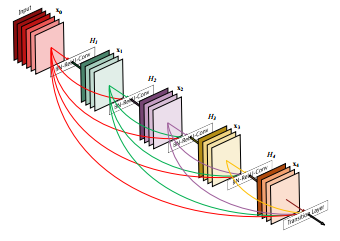
Densenet model sketch — early filters are stacked throughout the model
Training
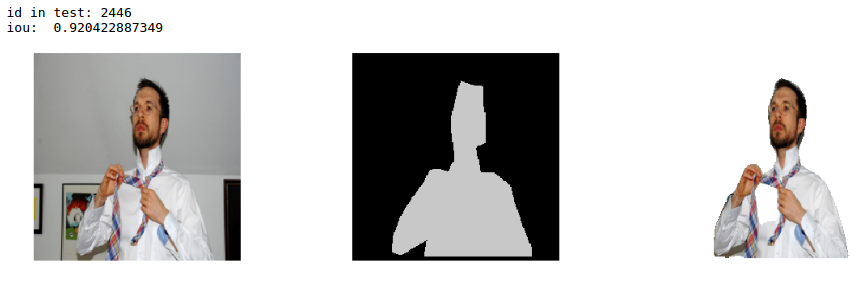
We trained our model with schedule as described in the original paper: standard cross entropy loss, RMSProp optimizer with 1e-3 learning rate and small decay. We split our 11K images into 70% training, 20% validation, 10% test. All images below are taken from our test set.
To keep our training schedule aligned with the original paper, we set the epoch size on 500 images. This also allowed us to save the model periodically with every improvement in results, since we trained it on much more data (the CamVid dataset which was used in the article contains less than 1K images)
Additionally, we trained it on only 2 classes: background and person, while the paper had 12 classes. We first tried to train on some of coco’s classes, however we saw that this doesn’t add to much to our training.
Data Issues
some dataset flaws hindered our score:
- Animals — Our model sometimes segmented animals. this of course leads to a low IOU. adding animals to our task in the same main class or as anther, would probably removed our results
- Body parts — since we filtered our dataset programatically, we had no way to tell if the person class is actually a person or some body part like hand or foot. these images were not in our scope, but still emerged here and there.
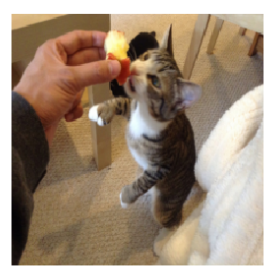
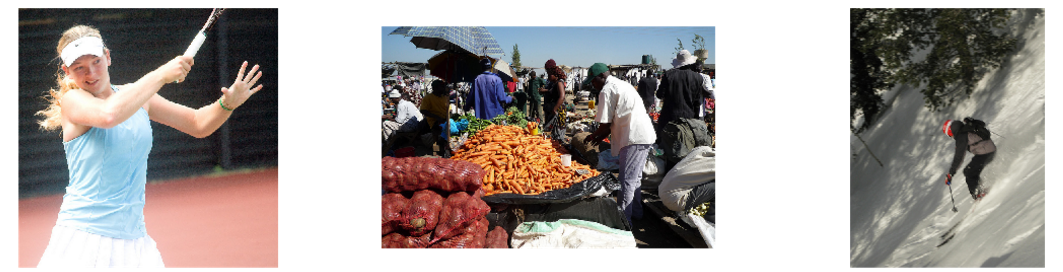
Animal, Body part, hend held object
- Handheld Objects - many Images in the dataset are sports related. Baseball bats, tennis rackets and snowboards where everywhere. Our model was somehow confused how should it segment them. As in the animal case, adding them as part of the main class or as separate class would help the performance of the model in our opinion.
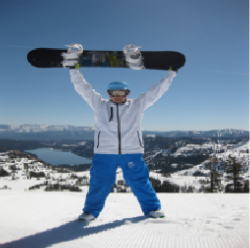
Sporting image with an object
- Coarse ground truth — the coco dataset was not annotated pixel by pixel, but with polygons. Sometimes it’s good enough, but other times the ground truth is very coarse, which possible hinders the model from learning subtleties

Image and (very) Coarse ground truth
Results
Our results were satisfying, tough not perfect: we have reached IoU of 84.6 on our test set, while current state of the art is 85. This number is tricky though: it fluctuates throughout different datasets and classes. there are classes which are inherently easier to segment e.g houses, roads, where most models easily reach results of 90 IoU. Other more challenging classes are trees and humans, on which most models reach results of around 60 IoU. To gauge this difficulty, we helped our network focus on a single class, and limited type of photos.
We still not feel our work is “production ready” as we would want it to be, but we think it’s a good time to stop and discuss our results, since around 50% of the photos will give good results.
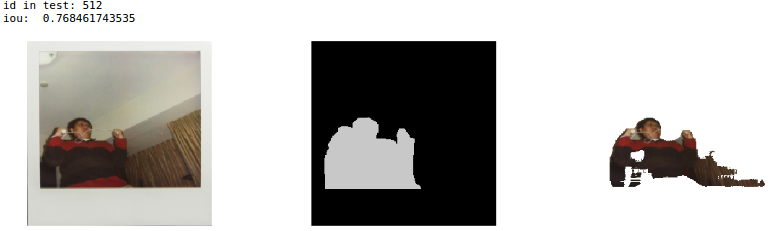
Here are some good examples to give you a feel of the app capabilties:
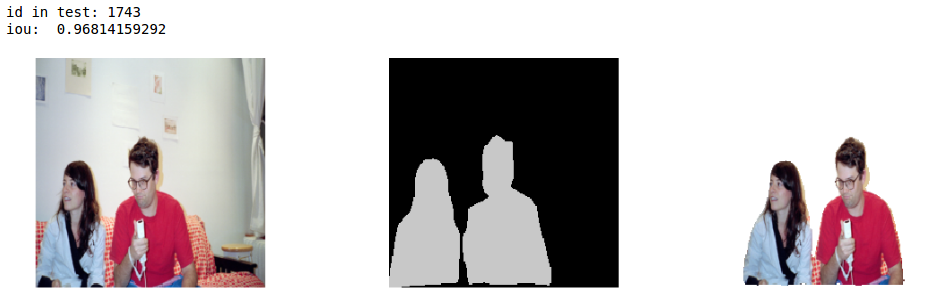
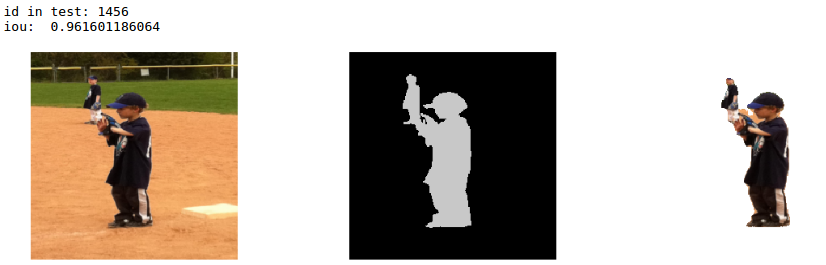
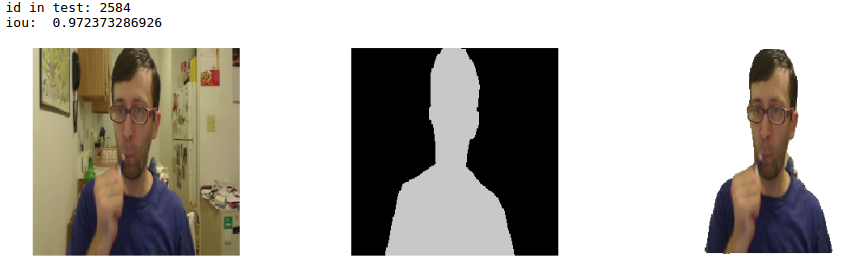
Image, Ground truth, our result (from our test set)
Debugging and logging
A very important part of training neural networks is the debugging. When starting our work, it was very tempting to get right to it, grab the data and the network, start the training, and see what comes out. However, we found out that it extremely important to track every move, and making tools for ourselves for being able to examine results at each step.
Here are the common challenges, and what we did about them:
- Early problems — The model might not be training. It may be because some inherent problem, or because of some kind of pre-processing error, like forgetting to normalize some chunk of the data. Anyhow, simple visualization of results may be very helpful. Here is a good post about this subject.
- Debugging the network itself — after making sure there are no crucial issues, the training starts, with the predefined loss and metrics. In segmentation, the main measure is the IoU — intersect over union. It took us a few sessions to start using the IoU as a main measure for our models (and not the cross entropy loss). Another helpful practice was showing some predictions of our model at every epoch. Here is a good post about debugging machine learning models. Take note that IoU is not a standard metric/loss in keras, but you can easily find it online, e.g here. We also used this gist for plotting the loss and some predictions at every epoch.
- Machine learning version control — when training a model, there are many parameters, some of them are tricky to follow. I must say we still haven't found the perfect method, except from fervently writing up our configurations (and auto-saving best models with keras callback, see below).
- Debugging tool — after doing all the above got us into a point the we can examine our work at every step, but not seamlessly. therefore, the most importent step was combining the steps above together, and creating an Jupyter notebook which allowed us to seamlessly load every model and every image, nad quickly examine it’s results. This way we could easily see differences between models, pitfalls and other issues.
Here are and example of the improvement of our model, throughout tweaking of parameters and extra training:

for saving model with best validation IoU until now: (Keras Provides a very nice callbacks to make these things easier)
callbacks = [keras.callbacks.ModelCheckpoint(hist_model, verbose=1,save_best_only =True, monitor= ’val_IOU_calc_loss’), plot_losses]
In addition to the normal debugging of possible code errors, we’ve noticed that model errors are “predictable”, like “cutting” body parts that seem out of the general body counter, “bites” on large segments, unnecessarily continuing extending body parts, poor lighting, poor quality, and many details. Some of this caveats were treated in adding specific images from different datasets, but others are still remain challenges to be dealt with. To improve results for the next version, we will use augmentation specifically on “hard” images for out model.
We already mentioned this issue above, with the data set issues. Now lets see some of our model difficulties:es:
- Cloths — very dark or very light clothing tends sometimes to be interpreted as bacground
- “Bites” — otherwise good results, had some bites in them
Clothing and bite
3. lighting -poor lightning and obscurity is common in images, however not in COCO dataset. therefore, apart from the standard difficulty of models to deals with tese things, ours haven’t been even prepared fro harder images. This can be improved with getting more data, and additionaly, with data augmentation. meanwhile, it is better not to try our app at night :)
poor lighting example
Further progress options
Further training
Our production results come after training ~300 epochs over our training data. After this period, the model started over-fitting. We’ve reached these results very close to the release, therefore we haven't had the chance to apply the basic practice of data augmentation.
We’ve trained the model after resizing the images to 224X224. Further training with more data and larger images (original size of COCO images is around 600X1000) would also expected to improve results.
CRF and other enhancements
At some stages, we saw that our results are a bit noisy at the edges. A model that may refine this is the CRF. In this blogpost, the author shows slightly naive example for using CRF.
However, it wasn’t very useful for our work, perhaps since it generally helps when results are coarser.
Matting
Even with our current results, the segmentation is not perfect. Hair, delicate clothes, tree branches and other fine objects will never be segmented perfectly, even because the ground truth segmentation does not contain these subtleties. The task of separating such delicate segmentation is called matting, and defines a different challenge. Here is an example of state of the art matting, published earlier this year in NVIDIA conference.

Matting exmple — the imput includes the trimap as well
The matting task is different from other image related tasks, since it’s input includes not only an image, but also a trimap — an outline of the edges of the images, what makes it a “semi supervised” problem.
We experimented with matting a little bit, using our segmentation as the trimap, however we did not reach significant results.
one more issue was the lack of a proper dataset to train on.
Summary
As said in the beginning, our goal was to build a significant deep learning product. As you can see in Alon’s posts, deployment becomes easier and faster all the time. Training a model on the other hand, is tricky — training, especially when done overnight, requires careful planning, debugging, and recording of results.
It is also not easy to balance between research and trying new things, and the mundane training and improving. Since we use deep learning, we always have the feeling that the best model, or the exact model we need, is just around the corner, and another google search or article will lead us to it. But in practice, our actual improvements came from simply “squeezing” more and more from our original model. And as said above, we still feel there is much more to squeeze out of it.
To conclude, we had a lot of fun doing this work, which a few months ago seemed to us like science fiction. we’ll be glad to discuss and answer any questions, and looking forward to see you on our website :)
Background removal with deep learning的更多相关文章
- deep learning 的综述
从13年11月初开始接触DL,奈何boss忙or 各种问题,对DL理解没有CSDN大神 比如 zouxy09等 深刻,主要是自己觉得没啥进展,感觉荒废时日(丢脸啊,这么久....)开始开文,即为记录自 ...
- Deep Learning 5_深度学习UFLDL教程:PCA and Whitening_Exercise(斯坦福大学深度学习教程)
前言 本文是基于Exercise:PCA and Whitening的练习. 理论知识见:UFLDL教程. 实验内容:从10张512*512自然图像中随机选取10000个12*12的图像块(patch ...
- Deep Learning 4_深度学习UFLDL教程:PCA in 2D_Exercise(斯坦福大学深度学习教程)
前言 本节练习的主要内容:PCA,PCA Whitening以及ZCA Whitening在2D数据上的使用,2D的数据集是45个数据点,每个数据点是2维的.要注意区别比较二维数据与二维图像的不同,特 ...
- Deep Learning in a Nutshell: Core Concepts
Deep Learning in a Nutshell: Core Concepts This post is the first in a series I’ll be writing for Pa ...
- (转) Deep Learning in a Nutshell: Core Concepts
Deep Learning in a Nutshell: Core Concepts Share: Posted on November 3, 2015by Tim Dettmers 7 Comm ...
- A beginner’s introduction to Deep Learning
A beginner’s introduction to Deep Learning I am Samvita from the Business Team of HyperVerge. I join ...
- Growing Pains for Deep Learning
Growing Pains for Deep Learning Advances in theory and computer hardware have allowed neural network ...
- Edge Intelligence: On-Demand Deep Learning Model Co-Inference with Device-Edge Synergy
边缘智能:按需深度学习模型和设备边缘协同的共同推理 本文为SIGCOMM 2018 Workshop (Mobile Edge Communications, MECOMM)论文. 笔者翻译了该论文. ...
- What are some good books/papers for learning deep learning?
What's the most effective way to get started with deep learning? 29 Answers Yoshua Bengio, ...
随机推荐
- 终于考完PMP
快到年底,上手了GO语言,搞定了广告后台,觉得年底前应该不忙; 我们的PM也报了PMP,可以一起报团学习,后来由于地理位置关系,我们项目组,三个人报了不同的班,也好,信息可以共享; 跟我们公司合作的培 ...
- GBK转UTF8
shell 脚本自动GBK转UTF8 for i in `find . -name "*.java"`; do iconv -f gbk -t utf-8 $i > $i.n ...
- 【ASP.NET Core】EF Core 模型与数据库的创建
大家好,欢迎收看由土星卫视直播的大型综艺节目——老周吹逼逼. 今天咱们吹一下 EF Core 有关的话题.先说说模型和数据库是怎么建起来的,说装逼一点,就是我们常说的 “code first”.就是你 ...
- 时间序列分析 异常分析 stl
https://blog.csdn.net/snowdroptulip/article/details/79125912 https://www.cnblogs.com/runner-ljt/p/52 ...
- Oracle 学习笔记 10 -- 约束
本次笔记来学习约束,约束在表中无处不在. 比如,表中的数据不同意为空或者是表中id为设为主键,都是约束. 约束分类: 主键约束(PRIMARY KEY):主键表示表中一个唯一的标识,本 ...
- git主要操作命令
1.创建版本库 (1)初始化一个 Git仓库,使用git init命令 (在相应的本地库目录下执行,将该目录初始化为一个Git库): (2)添加文件到Git仓库,分两步: 第一步,使用命令 git a ...
- Windows平台下nginx跨域配置
1)下载地址: http://nginx.org 2)启动 解压至d:\nginx,运行nginx.exe(即nginx -c conf\nginx.conf),默认使用80端口,日志见文件夹D:\n ...
- 微信小程序 this.setData is not a function
在一般的函数中: bindFaChange1: function (e) { console.log('picker发送选择改变,携带值为', e.detail.value) this.setData ...
- maven手动安装本地jar到仓库
1.有时候IDE maven下载不到jar,这时候可以在官网下载对应jar后安装到maven仓库. 下面以jdbc jar为例子,安装命令: mvn install:install-file -Dgr ...
- Fortran+ OpenMP实现实例
PROGRAM parallel_01 USE omp_lib IMPLICIT NONE INTEGER :: i,j INTEGER() :: time_begin, time_end, time ...