.11-浅析webpack源码之Storage模块
至此已完成NodeJsInputFileSysten模块的讲解,下一步就是实际实用的模块:
compiler.inputFileSystem = new CachedInputFileSystem(new NodeJsInputFileSystem(), 60000);
挂载到compiler对象上的输入模块其实是带有缓存的输入模块,源码整理如下(用ES6的class重写):
class CachedInputFileSystem {

    constructor() {

        // fileSystem => NodeJsInputFileSystem => graceful-fs => fs

        this.fileSystem = fileSystem;

        // 生成缓存容器

        this._statStorage = new Storage(duration);

        this._readdirStorage = new Storage(duration);

        this._readFileStorage = new Storage(duration);

        this._readJsonStorage = new Storage(duration);

        this._readlinkStorage = new Storage(duration);

        this._stat = this.fileSystem.stat ? this.fileSystem.stat.bind(this.fileSystem) : null;

        if (!this._stat) this.stat = null;

        // ...more

        // 自定义JSON读取

        if (this.fileSystem.readJson) {

            this._readJson = this.fileSystem.readJson.bind(this.fileSystem);

        } else if (this.readFile) {

            this._readJson = function(path, callback) { /*...*/ }.bind(this);

        } else {

            this.readJson = null;

        }

        // sync...

    }

    stat(path, callback) {

        this._statStorage.provide(path, this._stat, callback);

    };

    // readdir,readFile,readJson,readlink

    // sync...

    purge(what) {

        this._statStorage.purge(what);

        this._readdirStorage.purge(what);

        this._readFileStorage.purge(what);

        this._readlinkStorage.purge(what);

        this._readJsonStorage.purge(what);

    };

}

module.exports = CachedInputFileSystem;
这里的核心是利用Storage来生成一个缓存容器,缓存对应的读操作。
有两个需要注意的地方。
一个是purge方法,这个是Storage的原型方法,所以暂时先放着(形参名有点意思,叫what)。
第二个是这个模块自定义了一个方法专门用来读取JSON文件,源码如下:
this._readJson = function(path, callback) {

    // fs.readFile读取文件

    this.readFile(path, function(err, buffer) {

        if (err) return callback(err);

        try {

            // 先将字节流字符转换成utf-8格式的字符串

            // 再调用JSON.parse进行解析

            var data = JSON.parse(buffer.toString("utf-8"));

        } catch (e) {

            return callback(e);

        }

        // 使用回调处理数据

        callback(null, data);

    });

}.bind(this);
只是调用JSON.parse解析字符,这个方法只能专门处理JSON格式的数据,不然会报错。
Storage
该模块核心在于Storage对象,下面就看一看Storage内部实现,源码如下:
class Storage {

    constructor() {

        // duration => 60000

        this.duration = duration;

        this.running = new Map();

        this.data = new Map();

        this.levels = [];

        if (duration > 0) {

            this.levels.push(new Set(), new Set(), new Set(), new Set(), new Set(), new Set(), new Set(), new Set(), new Set());

            // (duration - 8000) / 500 => 52000 / 500 => 104

            for (var i = 8000; i < duration; i += 500)

                this.levels.push(new Set());

        }

        this.count = 0;

        this.interval = null;

        this.needTickCheck = false;

        this.nextTick = null;

        this.passive = true;

        this.tick = this.tick.bind(this);

    }

    ensureTick() { /*...*/ };

    finished(name, err, result) { /*...*/ };

    finishedSync(name, err, result) { /*...*/ };

    provide(name, provider, callback) { /*...*/ };

    provideSync(name, provider) { /*...*/ };

    tick() { /*...*/ };

    checkTicks() { /*...*/ };

    purge(what) { /*...*/ };

}
构造函数中的Set与Map均为ES6新添加的数据结构,详情自行查阅。
其中levels数组除去本身的9个Set,根据duration的值,再次加了104个Set对象,之后看具体含义。
接下来依次讲解原型函数。
ensureTick
Storage.prototype.ensureTick = function() {

    // 第一调用进行初始化

    // this.tick为定期执行的函数

    // 执行间隔为 (60000 / 113)|0 = 530

    if (!this.interval && this.duration > 0 && !this.nextTick)

        this.interval = setInterval(this.tick, Math.floor(this.duration / this.levels.length));

};
可以看出这是一个初始化的方法,初始化一个定时器,间隔取决于传进来的duration。
做了一个测试,检测从8000开始到60000定时间隔的变化:
let startNum = 8000,

    startLen = 9,

    result = [];

for (; startNum < 60000; startNum += 500, startLen++) {

    result.push((startNum / startLen | 0));

}
输出如图: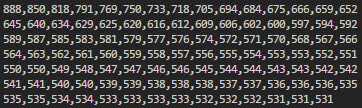
由于levels的长度最低为9,当传入8000时会达到最大值,所以间隔一定小于0.888秒,且随着duration的值增加而减少,将duration设为100万可以发现这个间隔在500会趋于平缓,大部分暂且可以认为间隔是稳定在0.5秒~0.6秒。
checkTicks
Storage.prototype.checkTicks = function() {

    this.passive = false;

    if (this.nextTick) {

        // 无限执行tick直到返回true

        while (!this.tick());

    }

};
finished
Storage.prototype.finished = function(name, err, result) {

    // 获取指定名字的回调事件流

    var callbacks = this.running.get(name);

    this.running.delete(name);

    if (this.duration > 0) {

        // 设置进data

        this.data.set(name, [err, result]);

        // 获取levels的第一个Set对象

        var levelData = this.levels[0];

        // 新增count才会+1

        this.count -= levelData.size;

        levelData.add(name);

        this.count += levelData.size;

        this.ensureTick();

    }

    // 遍历执行回调

    for (var i = 0; i < callbacks.length; i++) {

        callbacks[i](err, result);

    }

};
不应用的话不知道是干嘛用的。
finishedSync
Storage.prototype.finishedSync = function(name, err, result) {

    if (this.duration > 0) {

        // ...一模一样

    }

};
provide
Storage.prototype.provide = function(name, provider, callback) {

    if (typeof name !== "string") {

        callback(new TypeError("path must be a string"));

        return;

    }

    var running = this.running.get(name);

    // 将回调函数加进runnning直接返回

    if (running) {

        running.push(callback);

        return;

    }

    if (this.duration > 0) {

        this.checkTicks();

        // 获取data中对应的事件 异步执行

        var data = this.data.get(name);

        if (data) {

            return process.nextTick(function() {

                callback.apply(null, data);

            });

        }

    }

    // 无法获取running与data时

    this.running.set(name, running = [callback]);

    var _this = this;

    provider(name, function(err, result) {

        _this.finished(name, err, result);

    });

};
该方法会先后尝试从running与data中获取对应的事件,无法获取将设置到running中,并调用提供的provider方法。
tick
Storage.prototype.tick = function() {

    var decay = this.levels.pop();

    for (var item of decay) {

        this.data.delete(item);

    }

    this.count -= decay.size;

    decay.clear();

    // 清空后头部插入

    this.levels.unshift(decay);

    // 当没有事件时初始化条件

    if (this.count === 0) {

        clearInterval(this.interval);

        this.interval = null;

        this.nextTick = null;

        return true;

    } else if (this.nextTick) {

        this.nextTick += Math.floor(this.duration / this.levels.length);

        var time = new Date().getTime();

        if (this.nextTick > time) {

            this.nextTick = null;

            // 初始化定时器

            this.interval = setInterval(this.tick, Math.floor(this.duration / this.levels.length));

            return true;

        }

    } else if (this.passive) {

        clearInterval(this.interval);

        this.interval = null;

        this.nextTick = new Date().getTime() + Math.floor(this.duration / this.levels.length);

    } else {

        this.passive = true;

    }

};
这个方法在使用中再解释吧。
purge
Storage.prototype.purge = function(what) {

    // 不传参数

    // 清空所有数据

    if (!what) {

        this.count = 0;

        clearInterval(this.interval);

        this.nextTick = null;

        this.data.clear();

        this.levels.forEach(function(level) {

            level.clear();

        });

    }

    // 传字符串

    // 移除data中所有以参数开头的key

    else if (typeof what === "string") {

        for (var key of this.data.keys()) {

            if (key.startsWith(what))

                this.data.delete(key);

        }

    }

    // 传数组

    // 递归批量移除

    else {

        for (var i = what.length - 1; i >= 0; i--) {

            this.purge(what[i]);

        }

    }

};
用于清空数据的方法。
总体来说,模块内容如下:
1、levels数组 => 总数据源
2、running对象 => 存储待运行回调事件流
3、data对象 => 存储已完成事件流
4、count => 记录levels数据数量
5、interval => 当前定时器的id
6、needTick,nextTick,passive均为标记
由于没有应用,所以讲起来十分僵硬,后面的源码中会重新回来看这些方法。
.11-浅析webpack源码之Storage模块的更多相关文章
- .6-浅析webpack源码之validateSchema模块
validateSchema模块 首先来看错误检测: const webpackOptionsValidationErrors = validateSchema(webpackOptionsSchem ...
- .4-浅析webpack源码之convert-argv模块
上一节看了一眼预编译的总体代码,这一节分析convert-argv模块. 这个模块主要是对命令参数的解析,也是yargs框架的核心用处. 生成默认配置文件名数组 module.exports = fu ...
- .9-浅析webpack源码之NodeEnvironmentPlugin模块总览
介绍Compiler的构造比较无趣,不如先过后面的,在用到compiler的时候再做讲解. 这一节主要讲这行代码: // 不管这里 compiler = new Compiler(); compile ...
- .15-浅析webpack源码之WebpackOptionsApply模块-plugin事件流总览
总体过了一下后面的流程,发现Compiler模块确实不适合单独讲解,这里继续讲解后面的代码: compiler.options = new WebpackOptionsApply().process( ...
- .14-浅析webpack源码之Watchpack模块
解决掉了最头疼的DirectoryWatcher内部实现,这一节可以结束NodeWatchFileSystem模块. 关于watch的应用场景,仔细思考了下,这不就是热重载的核心嘛. 首先是监视文件, ...
- .13-浅析webpack源码之WatcherManager模块
从模块流可以看出,这个NodeWatchFileSystem模块非常深,这里暂时不会深入到chokidar模块,有点太偏离本系列文章了,从WatcherManager开始讲解. 流程如图: 源码非常简 ...
- .12-浅析webpack源码之NodeWatchFileSystem模块总览
剩下一个watch模块,这个模块比较深,先大概过一下整体涉及内容再分部讲解. 流程图如下: NodeWatchFileSystem const Watchpack = require("wa ...
- .10-浅析webpack源码之graceful-fs模块
在cachedInput.output.watch三大文件系统中,output非常简单,没有必要讲,其余两个模块依赖于input模块,而input主要是引用了graceful-fs的部分API,所以这 ...
- .7-浅析webpack源码之WebpackOptionsDefaulter模块
WebpackOptionsDefaulter模块 通过参数检测后,会根据单/多配置进行处理,本文基于单配置,所以会进行到如下代码: if (Array.isArray(options)) { com ...
随机推荐
- var
在函数中,使用var声明的变量,为局部变量,只能在函数内部访问. 不使用var声明的变量,为全局变量,在函数外边也能访问. 没有var的情况 <script type="text/ja ...
- latex表格代码
基本代码 \begin{table}[!h] \caption{Notations Used in Real-time Analysis.} \label{table:notation} \cent ...
- 【repost】javascript:;与javascript:void(0)使用介绍
有时候我们在编写js过程中,需要触发事件而不需要返回值,那么就可能需要这样的写法 最近看了好几个关于<a>标签和javascript:void(0)的帖子,谨记于此,以资查阅. 注:以下代 ...
- Junit 命令行测试 报错:Could not find class 理解及解决方法
一.报错 : 『Could not find class』 下面给出三个示例比较,其中只有第一个是正确的. 1. MyComputer:bin marikobayashi$ java -cp .:./ ...
- vmware平台下两次网络不通的诡异事件
首先表明以下两种情况确实很少见,也可以说确实非常奇怪,无法定位原因由于机缘巧合确实出现了,虽然本文没有找到根因,但是希望能帮遇到类似问题的同学一点思绪. RouteOS内网网卡不可用 首先强调 ...
- Java集合框架之二:LinkedList源码解析
版权声明:本文为博主原创文章,转载请注明出处,欢迎交流学习! LinkedList底层是通过双向循环链表来实现的,其结构如下图所示: 链表的组成元素我们称之为节点,节点由三部分组成:前一个节点的引用地 ...
- 札记:翻译-使用Scene和Transition实现【场景切换】动画效果
简述:transitions framework 下面翻译transition为"过渡",强调动画过程的含义,不过更多时候使用transition单词本身. Android 4.4 ...
- Delphi - 子窗体继承父窗体后如何显示父窗体上的控件
1.创建子窗体Form1 File -> New -> Form,新建一个form,在form的单元文件中修改 2.子窗体中引用父窗体单元 uses TFatherForm 3.将子窗体中 ...
- Java学习笔记33(集合框架七:Collections工具类)
数组有工具类,方面操作数组 集合也有工具类:Collections 常用方法示例: package demo; import java.util.ArrayList; import java.util ...
- [Swift]扩展UIImage :获取图片指定像素的颜色值
对[UIImage]进行扩展 import UIKit extension UIImage{ /** 根据坐标获取图片中的像素颜色值 */ subscript (x: Int, y: Int) -&g ...