离线方式部署Ambari2.6.0.0
Hadoop生态圈-离线方式部署Ambari2.6.0.0
作者:尹正杰
版权声明:原创作品,谢绝转载!否则将追究法律责任。
我现在所在的公司用的是CDH管理Hadoop集群,前端时间去面试时发现很多企业都在用HDP,于是回来捣鼓来一下HDP的部署方式。部署时也踩过不少坑,这里把正确部署Ambari的方式记录一下。其实部署Ambari的方式和CDH的部署方式大同小异。
本片博客会详细介绍如何使用Ambari来安装HDP发行版本,想要避免去官网踩坑的小伙伴可以这篇笔记很适合你哟!HDP是Hontorworks Data Platform的简称,是Hontorworks公司的Hadoop发行版本,在企业中十分流行。同样著名的还有Cludera公司的CDH发行版本(详情请参考我的笔记:离线方式部署Cloudera Manager5.15.1)。
一.Ambari简介
和CDH一样,Ambari是一款用于部署,管理和监控Hadoop集群服务的开源系统,它实现来以下功能:
1>.安装一个Hadoop集群:
第一:提供了以向导指引的方式安装一个集群,可以在任意的主机上安装Hadoop服务。
第二:提供了对Hadoop服务的配置功能。
2>.管理一个Hadoop集群:
提供了启动,停止等集群管理功能。
3>.监控Hadoop集群:
第一:提供了一个监控Hadoop集群监控状态的仪表盘。
第二:提供了一套监控指标体系来手机监控数据。
第三:提供了一套预警框架,可以结合预定的监控指标实现通知告警。
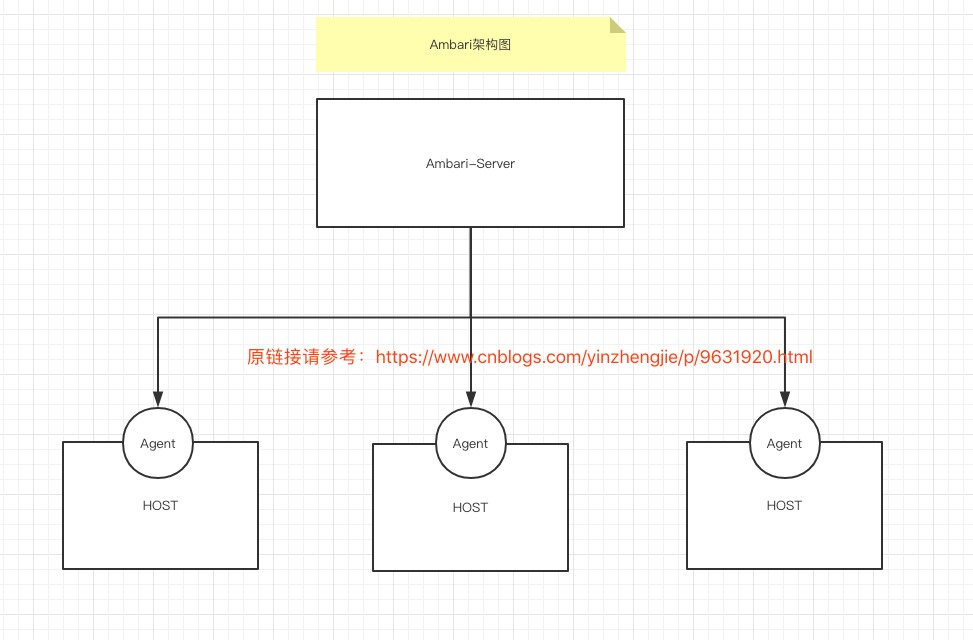
和CDH很像,从设计上看Ambari使用的Master/Slaves架构(主/从架构,由一个Ambari-Server和多个Agent组成)。如下图所示,它是通过一个Server主进程来实现集群的管理和操作命令的发送,而具体管理动作则由安装在每台目标主机上的Agent进程进行执行。例如通过Ambari启动HDFS服务的时候,首先会由Ambari-Server向安装来HDFS服务所在主机的Agent进程发送启动指令,然后再有相关Agent进程执行其所在主机的本地命令来启动HDFS的相应服务。
二.集群服务规划设计
在正式安装之前,我们还需要完成一些前期准备工作,包括集群服务的设计,服务器环境准备和用于安装Ambari的本地yum仓库等。
yum(全称为Yellow dog Updater,Modified)是一个在Fedora和RedHat以及CentOS中的Shell前端软件包管理器。基于RPM包管理,能够从指定的服务器自动下载RPM包并且安装,可以自动处理依赖性关系,并且一次安装所有的以来的软件包,无须繁琐地一次次下载,安装。
在了解了集群服务器角色的职责划分之后,现在可以开始设计以下集群节点的服务划分了。Ambari通过集成HDP这样一个Hadoop发行版安装包来实现对应组件服务的安装。接下来,我们看看截止到HDP2.5版本,它都提供了那些核心服务。
1>.NameNode
分布式文件系统HDFS主控服务,主要用于保存文件系的元数据信息以及操作路由。
2>.SecondNameNode
专职用于帮助NameNode合并快照日志文件的服务,以缓解NameNode压力。
3>.DataNodes
分布式文件系统HDFS的数据存储服务,主要你提供文件数据块的存储和查询功能。
4>.ResourceManger
资源调度系统YARN的主控服务,负责统一的资源分配和调度工作。
5>.NodeManagers
资源调度系统YARN的容器服务,负责具体的任务执行工作,YARN只会将任务分配到安装了NodeManager服务的主机执行任务。
6>.App Timeline Server
负责存储在YARN中执行任务的历史信息,包括任务状态,任务日志等,并提供对这些信息查询的能力。
7>.Histroy Server
负责存储在YARN中执行的任务的历史信息,包括任务状态,任务日志等,并提供对这些信息查询的能力。
8>.Hive Metastore
负责存储数据仓库Hive的元数据信息,例如表名称,表字段和字段属性等。
9>.HiveServer2
Hive在线查询服务,支持通过JDBC和ODBC等标准协议查询数据。
10>.Tez
使用DAG作为计算模型的一款分布式计算引擎,HDP版本里Hive组件的计算引擎使用的正式Tez。
11>.Active HBase Master
分布式NoSQL服务,HBase的主控服务,主要负责Region的分配和DDL操作。
12>.RegionServers
分布式NoSQL服务,HBase的数据存储服务,主要提供具体数据的存储与查询功能。
13>.Zookeeper server
分布式协同管理服务,负责HBase,Ambari Infra 和Kafka等多项服务的协同工作。
14>.Kafka Broker
分布式消息系统Kafka,负责消息的接受,发送,消息主题的管理等工作。
15>.Spark History Server
分布式内存计算框架Spark的任务历史服务,负责存储记录Spark任务的历史信息,包括任务状态,执行时间,任务日志和环境变量等信息。同时也提供这些历史细腻下的查看检索功能。
16>.Spark Thrift Servers
分布式内存计算框架Spark的在线查询服务,和Hive的HiveServer2服务类似。支持通过JDBC和OBDC等标准协议查询数据。
17>.Knox Gateway
网关服务,可以代理HDP中YARN,HBase,HDFS等众多组件的Restful服务。
18>.Ranger Admin
权限管理服务,可以代理YARN,HBase,HDFS等众多组件的权限管理功能。
19>.Ranger KMS Server
Ranger的Key管理服务,用于管理Hadoop集群的认证密钥。
20>.Ranger Usersync
Rabfer的用户同步服务,负责将Hadoop的集群用户同步更新到Ranger的内部服务。
21>.Zepplin
交互式在线分析工具,可以直接通过Web界面编写SQL或代码的形式使用Spark,Hive等服务进行交互式分析。
22>.Log Search
日志采集与分析服务,负责收集所有Hadoop服务的日志文件并提供集中展示和检索功能。
23>.Ambari Infra
搜索服务,用于存储Ranger的审计日志以及Log Search采集到的系统日志等数据。
24>.Clients
各种服务的客户端程序,包括MapReduce2 Clients,YARN Clients,Hive Clients,Zookeeper Clients,Spark Clients,HBase Clients等等。
在了解上述Ambari可以安装的核心服务之后,我们可以根据服务列表自行添加服务,这和我们之前部署CDH自定义需要安装服务几乎如出一辙。想必部署过CDH的小伙伴,对这个理解起来也非常简单的,我在这里就不多费口舌啦~
三.环境准备
1>.Ambari目前只支持64位的操作系统,具体操作如下:
1.1>.RHEL(Redhat Enterprise Linux)6或者7;
1.2>.CentOS6或者CentOS7;
1.3>.OEL(Oracle Enterprise Linux)6或者7;
1.4>.SLES(SuSE Linux Enterprise Server)11;
1.5>.Debian 7;
1.6>.Ubantu12 或者14;
2>.配置主机列表(每台主机都需要配置,我本次实验共计3台服务器)
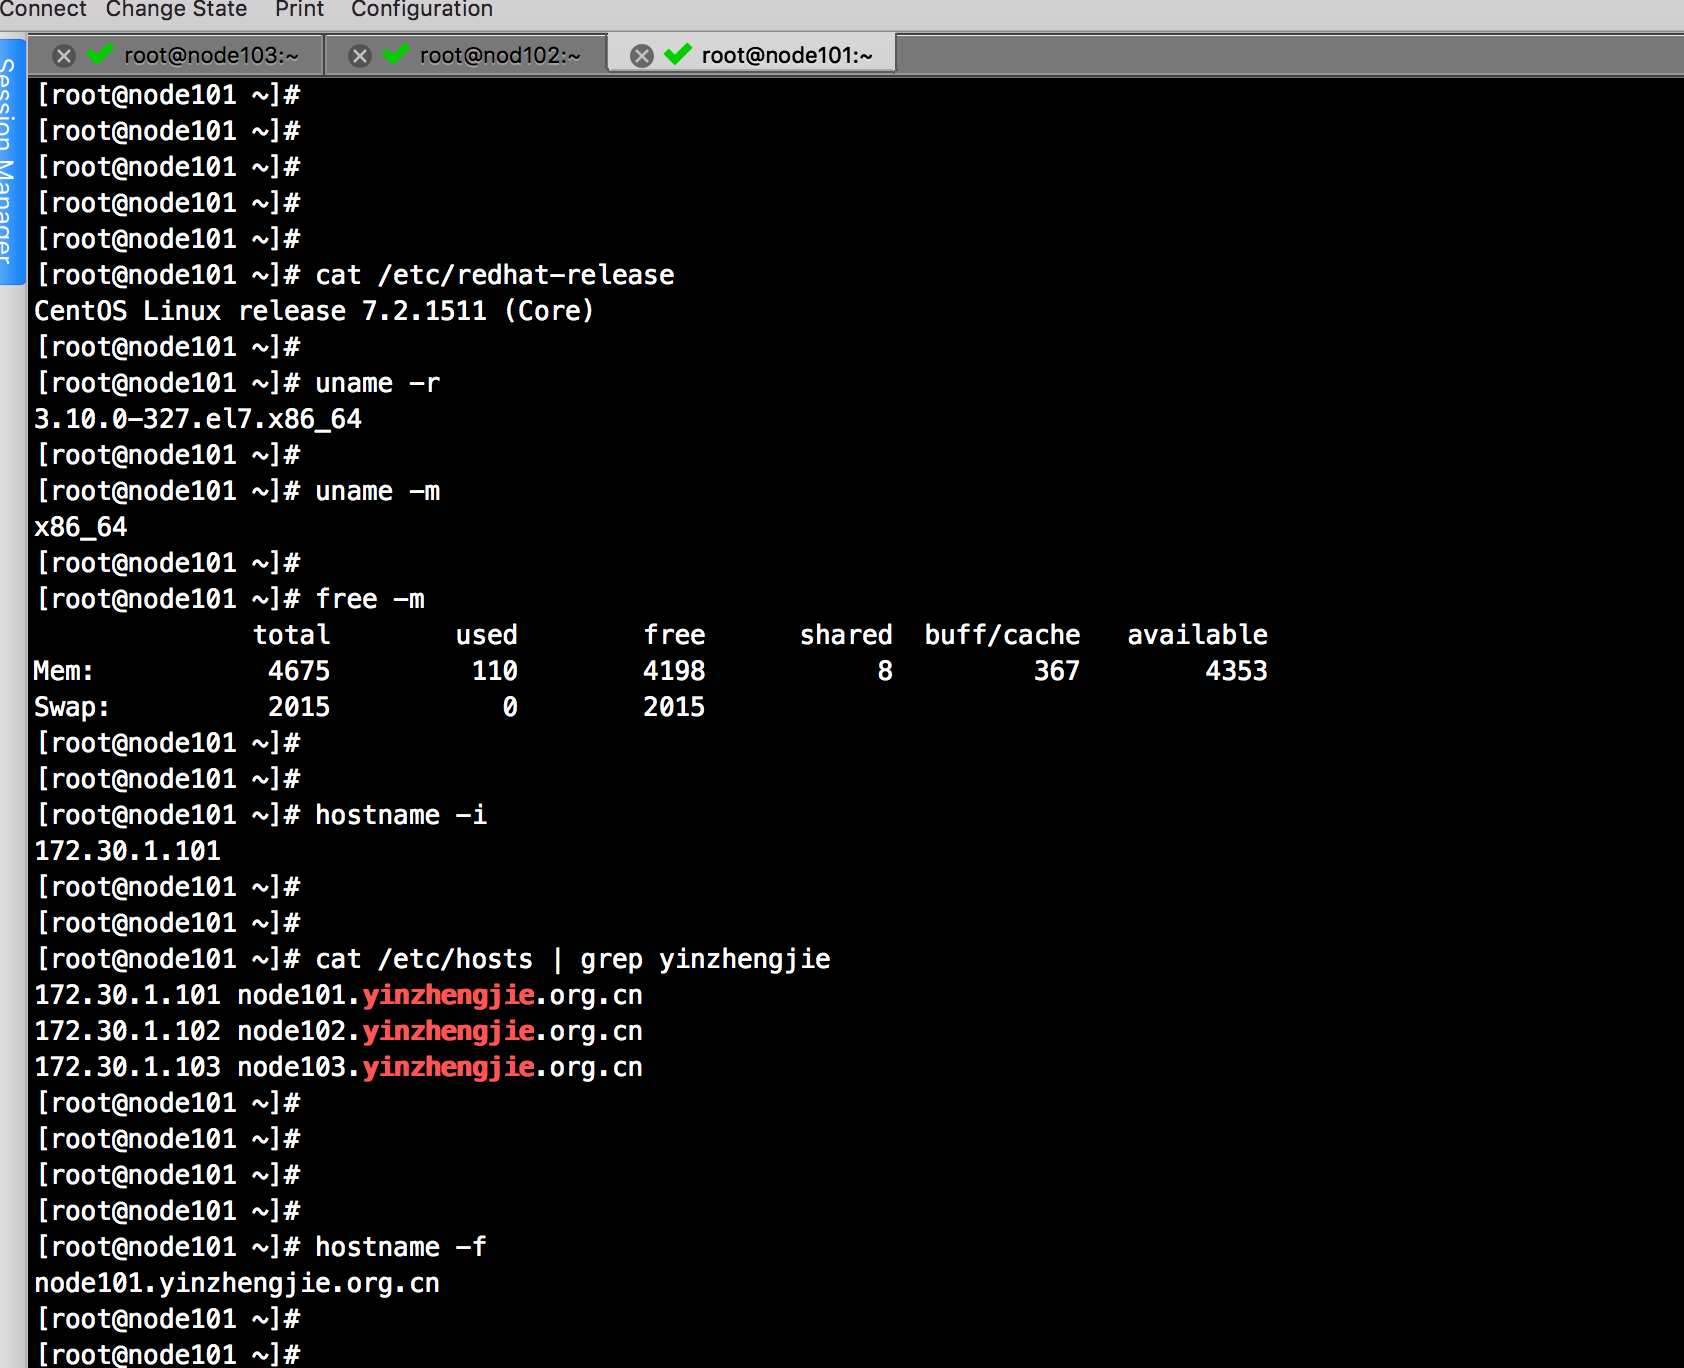
Ambari所管理的各个服务之间需要使用FQDN来进行访问,所以我们还需要为各个服务器配置他们的FQDN。Linux系统可以通过主机表配置它的 FQDN,编辑“/etc/hosts”这个配置文件即可。
[root@node101 ~]# cat /etc/hosts

127.0.0.1   localhost localhost.localdomain localhost4 localhost4.localdomain4

::         localhost localhost.localdomain localhost6 localhost6.localdomain6

172.30.1.101 node101.yinzhengjie.org.cn

172.30.1.102 node102.yinzhengjie.org.cn

172.30.1.103 node103.yinzhengjie.org.cn

[root@node101 ~]#

[root@node101 ~]#

FQDN(Fully Qualified Domain Name):
  完全合格域名/全称域名,是指主机名加上全路径,全路径中列出了序列中所有域成员。全域名可以从逻辑上准确地表示处主机在什么地方,也可以说全域名是主机名的一种完全表示形式。
我都实验环境配置了3台服务器,3台服务器都相同,如下图:
3>.各个主机配置免密登陆(在“node101.yinzhengjie.org.cn”上操作)
[root@node101 ~]# ssh-keygen -t rsa -P '' -f ~/.ssh/id_rsa

Generating public/private rsa key pair.

Created directory '/root/.ssh'.

Your identification has been saved in /root/.ssh/id_rsa.

Your public key has been saved in /root/.ssh/id_rsa.pub.

The key fingerprint is:

d1:::b3:ca::0e::f2::::7d::d4: root@node101.yinzhengjie.org.cn

The key's randomart image is:

+--[ RSA ]----+

|      ooBo .o+..E|

|      .=.B. . o  |

|    . o + ..   . |

|     + + o       |

|      = S        |

|       +         |

|        .        |

|                 |

|                 |

+-----------------+

[root@node101 ~]#

[root@node101 ~]#

[root@node101 ~]#

[root@node101 ~]#

[root@node101 ~]# ll  ~/.ssh/id_rsa

-rw-------.  root root  Dec   : /root/.ssh/id_rsa

[root@node101 ~]#

[root@node101 ~]# cat  ~/.ssh/id_rsa

-----BEGIN RSA PRIVATE KEY-----

MIIEogIBAAKCAQEAwtFCswPu3AOKXa2TzJRBKG/LC8knCtLE54zMVUaMwbWH0fdV

xHpa8n+V15W3HwLFBZDgyNmnPvZkVJUvTYqf5QaLsxm5J0JAxlmBkY/ayByeULLw

SVIXM/hqBulYnbUViVhGEmBbpI3ASjFVXQyiihyNhzoPZBjdiexnTh7aYJDjQ8qL

IZyQu+rjeoqju839dUmm4RfmqgaPsa717CNxqUgUdviTdK2meV4hA7HtKAxMTpYK

JcEAu3lvh9NRT2k8HSMvEaN/WVUF8SrNN1oUC4aFSO9tDmY3euBCccYf+RqSlzys

m5dxCFDk94cEhsvIzfdzUB4usPs1inUHcQ9pqQIDAQABAoIBAAWbPA4myNLwDyVO

/3fdtFpTjUZTjZoUIrJ/LMovc5GHhdcXBRLYapGb9lXz6wcrbzwPxUhCazu2n4CH

oorauGtA2vhWfyuQDokmvkHQH/2uRSgRXjTd9ej69yInyPMQ6QPA1JNmznxXz/bS

oKBC4tKSq8f+db7tsEJt2TM4VBR/Sg0x77LhZA70MC2+vv+9AoIKVVdZ/KNud+Dk

r2c+Hmo4r7I4G2Oqaj33f7RXFsILIwl0SBvpag4GPhwnOuphXDr3DQ1v5j+4x0rx

3JE+HmlpU66XveUuy7pMurdbOCajwPQgLkDo5W7bBUMIlBS/nZvInncVdDPzWFHO

ZlUh8dkCgYEA6Ykewa0oN96XLPdqbADHRqpzxL7zXJJ644Hh2HygyhR0xw3bOI57

IjkYje9e5PVUcXWuOj/oOMfKal2jW/78bnEgukX1JgkX8RHT9zsgZ0AGEpquHkjv

NrB1qrdbEwnNpSLB8pwGveD9zf89yzocZE+5CUBfnsuAgZqPYkjPMwcCgYEA1Y6x

o1ZxxsPGZIk+hZPuynemdZYnQWp3Z9ynVv902x1/sxcn/uZ+0DZDLQbqGA+2WdEg

EQZ9BwKTCkThoPBJKEzR3Ck122ahqSKCEQRGwK0h05uaA3KSTGIbujGaoBfDWG6f

3fTSWZnTNaObmcOhxTgsMRegy/kWOIgYqdX04c8CgYA9rsf+49uBljtb1yW2zSXV

VmQpjT3+L3ph6QZcBd76QRjvEovajlebnHUN2DG6S8o4BZs1K3gMt0iRe5YQUHMg

QKUiTiQIHdLDC7Bu1qEiZFi2RUDEIwN78HPD2ZYmmypD+cA8clWdhXXEGSybJwgk

vqHi/avD54BTux0wGocPtQKBgFY2Ud4nsqzUMg46HaRdUSQpY2jK4jQVX/js6h1D

6Y/fe8L30SylLoKttTbDONPX2/ysYO6emPCwiF236wJGnrIHOR1RAa3947tc8/cc

q9dyzVoY0fccVJVDcgAbsFl63mCf4CgBgr2rTMm1r8ZGZNMyVxzGdiKB/wd5YcOG

XWKfAoGAYpvjXzEYzr7Y7KKlZBR3gUZZwfngYYgf8g1L42oB1un1NUajiMCyPsm6

oxKrFj6a8SH1xy1U0S7QbPK7osjR5qU7SMsqgziouBl1UmAT5WVKoik4UvHLlKC3

hB0HxUvfVYM5lV3BaggVTC/EOAOsa+jqfbrwjBxjn/kmmv2FtLk=

-----END RSA PRIVATE KEY-----

[root@node101 ~]#

[root@node101 ~]#
[root@node101 ~]# ssh-keygen -t rsa -P '' -f ~/.ssh/id_rsa #生成密钥
[root@node101 ~]# ssh-copy-id root@node101.yinzhengjie.org.cn

The authenticity of host 'node101.yinzhengjie.org.cn (172.30.1.101)' can't be established.

ECDSA key fingerprint is e5::dc::ee:e6:ed::de:::a8:c4:::e7.

Are you sure you want to continue connecting (yes/no)? yes

/usr/bin/ssh-copy-id: INFO: attempting to log in with the new key(s), to filter out any that are already installed

/usr/bin/ssh-copy-id: INFO:  key(s) remain to be installed -- if you are prompted now it is to install the new keys

root@node101.yinzhengjie.org.cn's password:

Number of key(s) added:

Now try logging into the machine, with:   "ssh 'root@node101.yinzhengjie.org.cn'"

and check to make sure that only the key(s) you wanted were added.

[root@node101 ~]#

[root@node101 ~]# ssh node101.yinzhengjie.org.cn

Last login: Wed Dec   ::  from 172.30.1.2

[root@node101 ~]# who

root     pts/        -- : (172.30.1.2)

root     pts/        -- : (node101.yinzhengjie.org.cn)

[root@node101 ~]#

[root@node101 ~]# logout

Connection to node101.yinzhengjie.org.cn closed.

[root@node101 ~]#
[root@node101 ~]# ssh-copy-id root@node101.yinzhengjie.org.cn #与本机(node101.yinzhengjie.org.cn)配置免密钥登陆
[root@node101 ~]# ssh-copy-id root@node102.yinzhengjie.org.cn

/usr/bin/ssh-copy-id: INFO: attempting to log in with the new key(s), to filter out any that are already installed

/usr/bin/ssh-copy-id: INFO:  key(s) remain to be installed -- if you are prompted now it is to install the new keys

root@node102.yinzhengjie.org.cn's password:

Number of key(s) added:

Now try logging into the machine, with:   "ssh 'root@node102.yinzhengjie.org.cn'"

and check to make sure that only the key(s) you wanted were added.

[root@node101 ~]#

[root@node101 ~]# ssh node102.yinzhengjie.org.cn

Last login: Wed Dec   ::  from 172.30.1.101

[root@nod102 ~]#

[root@nod102 ~]# who

root     pts/        -- : (172.30.1.2)

root     pts/        -- : (172.30.1.101)

[root@nod102 ~]#

[root@nod102 ~]# logout

Connection to node102.yinzhengjie.org.cn closed.

[root@node101 ~]#
[root@node101 ~]# ssh-copy-id root@node102.yinzhengjie.org.cn #与node102.yinzhengjie.org.cn配置免密钥登陆
[root@node101 ~]# ssh-copy-id root@node103.yinzhengjie.org.cn

/usr/bin/ssh-copy-id: INFO: attempting to log in with the new key(s), to filter out any that are already installed

/usr/bin/ssh-copy-id: INFO:  key(s) remain to be installed -- if you are prompted now it is to install the new keys

root@node103.yinzhengjie.org.cn's password:

Number of key(s) added:

Now try logging into the machine, with:   "ssh 'root@node103.yinzhengjie.org.cn'"

and check to make sure that only the key(s) you wanted were added.

[root@node101 ~]#

[root@node101 ~]# ssh node103.yinzhengjie.org.cn

Last login: Wed Dec   ::  from 172.30.1.101

[root@node103 ~]#

[root@node103 ~]#

[root@node103 ~]# who

root     pts/        -- : (172.30.1.2)

root     pts/        -- : (172.30.1.101)

[root@node103 ~]#

[root@node103 ~]# logout

Connection to node103.yinzhengjie.org.cn closed.

[root@node101 ~]#
[root@node101 ~]# ssh-copy-id root@node103.yinzhengjie.org.cn #与node103.yinzhengjie.org.cn配置免密钥登陆
4>.编写集群管理脚本
在配置FQDN和免密钥登陆后,咱们就可以编写一些集群的管理脚本,便于我们下发文件到其他节点中。
[root@node101 ~]# vi /usr/local/bin/xcall.sh              #我们创建该脚本时,直接就把它放在默认的“PATH”环境变量中。因此编辑好后只要有执行权限就可以在任意路径调用它啦!

[root@node101 ~]#

[root@node101 ~]#

[root@node101 ~]# cat /usr/local/bin/xcall.sh

#!/bin/bash

#@author :yinzhengjie

#blog:http://www.cnblogs.com/yinzhengjie

#EMAIL:y1053419035@qq.com

#判断用户是否传参

if [ $# -lt  ];then

        echo "请输入参数"

        exit

fi

#获取用户输入的命令

cmd=$@

for (( i=;i<=;i++ ))

do

        #使终端变绿色

        tput setaf

        echo ============= node${i}.yinzhengjie.org.cn : $cmd ============

        #使终端变回原来的颜色,即白灰色

        tput setaf

        #远程执行命令

        ssh node${i}.yinzhengjie.org.cn  $cmd

        #判断命令是否执行成功

        if [ $? ==  ];then

                echo "命令执行成功"

        fi

done

[root@node101 ~]#

[root@node101 ~]#

[root@node101 ~]# chmod +x /usr/local/bin/xcall.sh              #别忘记添加执行权限哟!

[root@node101 ~]#

[root@node101 ~]# xcall.sh cat /etc/redhat-release              #我们在这里可以测试一些咱们的脚本是否好使~

============= node101.yinzhengjie.org.cn : cat /etc/redhat-release ============

CentOS Linux release 7.2. (Core)

命令执行成功

============= node102.yinzhengjie.org.cn : cat /etc/redhat-release ============

CentOS Linux release 7.2. (Core)

命令执行成功

============= node103.yinzhengjie.org.cn : cat /etc/redhat-release ============

CentOS Linux release 7.2. (Core)

命令执行成功

[root@node101 ~]#

[root@node101 ~]#
[root@node101 ~]# vi /usr/local/bin/xcall.sh #编写批量执行命令的脚本,我们在创建该脚本时,直接就把它放在默认的“PATH”环境变量中。因此编辑好后只要有执行权限就可以在任意路径调用它啦!
[root@node101 ~]# xcall.sh "yum -y install rsync"

============= node101.yinzhengjie.org.cn : yum -y install rsync ============

Loaded plugins: fastestmirror

Loading mirror speeds from cached hostfile

 * base: mirrors.huaweicloud.com

 * extras: mirrors.huaweicloud.com

 * updates: mirrors..com

Resolving Dependencies

--> Running transaction check

---> Package rsync.x86_64 :3.1.-.el7 will be installed

--> Finished Dependency Resolution

Dependencies Resolved

================================================================================

 Package         Arch             Version                  Repository      Size

================================================================================

Installing:

 rsync           x86_64           3.1.-.el7              base            k

Transaction Summary

================================================================================

Install   Package

Total download size:  k

Installed size:  k

Downloading packages:

Running transaction check

Running transaction test

Transaction test succeeded

Running transaction

  Installing : rsync-3.1.-.el7.x86_64                                     /

  Verifying  : rsync-3.1.-.el7.x86_64                                     /

Installed:

  rsync.x86_64 :3.1.-.el7

Complete!

命令执行成功

============= node102.yinzhengjie.org.cn : yum -y install rsync ============

Loaded plugins: fastestmirror

Repodata is over  weeks old. Install yum-cron? Or run: yum makecache fast

http://mirrors.njupt.edu.cn/centos/7.6.1810/os/x86_64/repodata/bc140c8149fc43a5248fccff0daeef38182e49f6fe75d9b46db1206dc25a6c1c-c7-x86_64-comps.xml.gz: [Errno 12] Timeout on http://10.10.254.10/cache/5/02/mirrors.njupt.edu.cn/033b2636ff3cf3103169fa739764fdd7/bc140c8149fc43a5248fccff0daeef38182e49f6fe75d9b46db1206dc25a6c1c-c7-x86_64-comps.xml.gz: (28, 'Connection timed out after 30682 milliseconds')

Trying other mirror.

http://mirrors.njupt.edu.cn/centos/7.6.1810/updates/x86_64/repodata/8e273c72093a2cfc3f3b2baccfb2b01f7f4bcdc1bb72d53e38074068a756f1c6-primary.sqlite.bz2: [Errno 12] Timeout on http://10.10.254.10/cache/4/02/mirrors.njupt.edu.cn/c35de49cce30395fb97f6c41a56fbad5/8e273c72093a2cfc3f3b2baccfb2b01f7f4bcdc1bb72d53e38074068a756f1c6-primary.sqlite.bz2: (28, 'Connection timed out after 30672 milliseconds')

Trying other mirror.

Determining fastest mirrors

 * base: mirrors.huaweicloud.com

 * extras: mirrors.huaweicloud.com

 * updates: mirrors.neusoft.edu.cn

Resolving Dependencies

--> Running transaction check

---> Package rsync.x86_64 :3.1.-.el7 will be installed

--> Finished Dependency Resolution

Dependencies Resolved

================================================================================

 Package         Arch             Version                  Repository      Size

================================================================================

Installing:

 rsync           x86_64           3.1.-.el7              base            k

Transaction Summary

================================================================================

Install   Package

Total download size:  k

Installed size:  k

Downloading packages:

Running transaction check

Running transaction test

Transaction test succeeded

Running transaction

  Installing : rsync-3.1.-.el7.x86_64                                     /

  Verifying  : rsync-3.1.-.el7.x86_64                                     /

Installed:

  rsync.x86_64 :3.1.-.el7

Complete!

命令执行成功

============= node103.yinzhengjie.org.cn : yum -y install rsync ============

Loaded plugins: fastestmirror

Repodata is over  weeks old. Install yum-cron? Or run: yum makecache fast

http://mirrors.njupt.edu.cn/centos/7.6.1810/os/x86_64/repodata/6614b3605d961a4aaec45d74ac4e5e713e517debb3ee454a1c91097955780697-primary.sqlite.bz2: [Errno 12] Timeout on http://10.10.254.10/cache/5/02/mirrors.njupt.edu.cn/fa6cd86bdbaedbbfedfbfa6d45952cd2/6614b3605d961a4aaec45d74ac4e5e713e517debb3ee454a1c91097955780697-primary.sqlite.bz2: (28, 'Connection timed out after 30867 milliseconds')

Trying other mirror.

Determining fastest mirrors

 * base: mirrors.huaweicloud.com

 * extras: mirrors.huaweicloud.com

 * updates: mirrors.cn99.com

Resolving Dependencies

--> Running transaction check

---> Package rsync.x86_64 :3.1.-.el7 will be installed

--> Finished Dependency Resolution

Dependencies Resolved

================================================================================

 Package         Arch             Version                  Repository      Size

================================================================================

Installing:

 rsync           x86_64           3.1.-.el7              base            k

Transaction Summary

================================================================================

Install   Package

Total download size:  k

Installed size:  k

Downloading packages:

Running transaction check

Running transaction test

Transaction test succeeded

Running transaction

  Installing : rsync-3.1.-.el7.x86_64                                     /

  Verifying  : rsync-3.1.-.el7.x86_64                                     /

Installed:

  rsync.x86_64 :3.1.-.el7

Complete!

命令执行成功

[root@node101 ~]#
[root@node101 ~]# xcall.sh "yum -y install rsync" #使用我们上面自定义脚本批量安装rsync服务
[root@node101 ~]# vi /usr/local/bin/xrsync.sh             #编写同步脚本,注意:我们在编写脚本时,就把脚本放在Linux自带的“PATH”环境变量中。

[root@node101 ~]#

[root@node101 ~]# cat /usr/local/bin/xrsync.sh

#!/bin/bash

#@author :yinzhengjie

#blog:http://www.cnblogs.com/yinzhengjie

#EMAIL:y1053419035@qq.com

#判断用户是否传参

if [ $# -lt  ];then

    echo "请输入参数";

    exit

fi

#获取文件路径

file=$@

#获取子路径

filename=`basename $file`

#获取父路径

dirpath=`dirname $file`

#获取完整路径

cd $dirpath

fullpath=`pwd -P`

#同步文件到DataNode

for (( i=;i<=;i++ ))

do

    #使终端变绿色

    tput setaf

    echo =========== node${i}.yinzhengjie.org.cn : $file ===========

    #使终端变回原来的颜色,即白灰色

    tput setaf

    #远程执行命令

    rsync -lr $filename `whoami`@node${i}.yinzhengjie.org.cn:$fullpath

    #判断命令是否执行成功

    if [ $? ==  ];then

        echo "命令执行成功"

    fi

done

[root@node101 ~]#

[root@node101 ~]#

[root@node101 ~]# chmod +x /usr/local/bin/xrsync.sh          #别忘记添加执行权限哟!

[root@node101 ~]#
[root@node101 ~]# vi /usr/local/bin/xrsync.sh #编写同步脚本,注意:我们在编写脚本时,就把脚本放在Linux自带的“PATH”环境变量中。
[root@node101 ~]# xcall.sh cat /etc/hosts | grep yinzhengjie                    #我们在没有同步“/etc/hosts”配置文件时,发现只有“node101.yinzhengjie.org.cn”中配置了FQDN

============= node101.yinzhengjie.org.cn : cat /etc/hosts ============

172.30.1.101 node101.yinzhengjie.org.cn

172.30.1.102 node102.yinzhengjie.org.cn

172.30.1.103 node103.yinzhengjie.org.cn

============= node102.yinzhengjie.org.cn : cat /etc/hosts ============

============= node103.yinzhengjie.org.cn : cat /etc/hosts ============

[root@node101 ~]#

[root@node101 ~]# xrsync.sh /etc/hosts                                  #我们利用咱们自定义的脚本将“/etc/hosts”配置文件下发到"node102.yinzhengjie.org.cn"和“node103.yinzhengjie.org.cn”上去。

=========== node102.yinzhengjie.org.cn : /etc/hosts ===========

命令执行成功

=========== node103.yinzhengjie.org.cn : /etc/hosts ===========

命令执行成功

[root@node101 ~]#

[root@node101 ~]#

[root@node101 ~]# xcall.sh cat /etc/hosts | grep yinzhengjie                    #我们验证一下,3台机器上陪孩子是否都相同~如果输出相同说明配置生效啦~

============= node101.yinzhengjie.org.cn : cat /etc/hosts ============

172.30.1.101 node101.yinzhengjie.org.cn

172.30.1.102 node102.yinzhengjie.org.cn

172.30.1.103 node103.yinzhengjie.org.cn

============= node102.yinzhengjie.org.cn : cat /etc/hosts ============

172.30.1.101 node101.yinzhengjie.org.cn

172.30.1.102 node102.yinzhengjie.org.cn

172.30.1.103 node103.yinzhengjie.org.cn

============= node103.yinzhengjie.org.cn : cat /etc/hosts ============

172.30.1.101 node101.yinzhengjie.org.cn

172.30.1.102 node102.yinzhengjie.org.cn

172.30.1.103 node103.yinzhengjie.org.cn

[root@node101 ~]#
5>.本篇博客的操作系统环境如下
由于Ambari是使用Java语言开发实现的,所以其部署的服务还需要安装Java环境,Ambari支持1.7或者1.8版本。推荐使用1.8版本,因为jdk1.7官网以及不维护了。
大家可以自行去Oracle官网下载相应的jdk,我这里给出下载地址:https://www.oracle.com/technetwork/java/javase/downloads/jdk8-downloads-2133151.html(推荐下载tar.gz的安装包)。
[root@node101 ~]# yum -y install lrzsz

Loaded plugins: fastestmirror

Repodata is over  weeks old. Install yum-cron? Or run: yum makecache fast

base                                                                                                                                                        | 3.6 kB  ::

extras                                                                                                                                                      | 3.4 kB  ::

updates                                                                                                                                                     | 3.4 kB  ::

(/): base//x86_64/primary_db                                                                                                                             | 6.0 MB  ::

(/): base//x86_64/group_gz                                                                                                                               |  kB  ::

(/): extras//x86_64/primary_db                                                                                                                           |  kB  ::

(/): updates//x86_64/primary_db                                                                                                                          | 1.3 MB  ::

Determining fastest mirrors

 * base: mirrors.huaweicloud.com

 * extras: mirrors.huaweicloud.com

 * updates: mirrors..com

Resolving Dependencies

--> Running transaction check

---> Package lrzsz.x86_64 :0.12.-.el7 will be installed

--> Finished Dependency Resolution

Dependencies Resolved

===================================================================================================================================================================================

 Package                                 Arch                                     Version                                             Repository                              Size

===================================================================================================================================================================================

Installing:

 lrzsz                                   x86_64                                   0.12.-.el7                                      base                                     k

Transaction Summary

===================================================================================================================================================================================

Install   Package

Total download size:  k

Installed size:  k

Downloading packages:

lrzsz-0.12.-.el7.x86_64.rpm                                                                                                                             |   kB  ::

Running transaction check

Running transaction test

Transaction test succeeded

Running transaction

  Installing : lrzsz-0.12.-.el7.x86_64                                                                                                                                     /

  Verifying  : lrzsz-0.12.-.el7.x86_64                                                                                                                                     /

Installed:

  lrzsz.x86_64 :0.12.-.el7

Complete!

[root@node101 ~]#
[root@node101 ~]# yum -y install lrzsz #安装上传和下载的工具,我们可以将下载好的jdk上传到服务上。
[root@node101 ~]# mkdir -pv /yinzhengjie/softwares

mkdir: created directory ‘/yinzhengjie’

mkdir: created directory ‘/yinzhengjie/softwares’

[root@node101 ~]#

[root@node101 ~]# ll -h

total 183M

-rw-r--r--.  root root 183M Dec   : jdk-8u191-linux-x64.tar.gz

[root@node101 ~]#

[root@node101 ~]# tar  -zxf jdk-8u191-linux-x64.tar.gz -C /yinzhengjie/softwares/

[root@node101 ~]#

[root@node101 ~]# ln -s /yinzhengjie/softwares/jdk1..0_191/ /yinzhengjie/softwares/jdk

[root@node101 ~]#

[root@node101 ~]# mkdir /usr/java && cd /usr/java

[root@node101 java]#

[root@node101 java]# ln -s /yinzhengjie/softwares/jdk1..0_191/ /usr/java/jdk1.

[root@node101 java]# ln -s /yinzhengjie/softwares/jdk1..0_191/ /usr/java/defalut

[root@node101 java]#

[root@node101 java]# tail - /etc/profile

#ADD JAVA_PATH

JAVA_HOME=/yinzhengjie/softwares/jdk

PATH=$PATH:$JAVA_HOME/bin

[root@node101 java]#

[root@node101 java]#

[root@node101 java]# source /etc/profile

[root@node101 java]#

[root@node101 java]# java -version

java version "1.8.0_191"

Java(TM) SE Runtime Environment (build 1.8.0_191-b12)

Java HotSpot(TM) -Bit Server VM (build 25.191-b12, mixed mode)

[root@node101 java]#
[root@node101 java]# java -version #在node101.yinzhengjie.org.cn节点上安装jdk环境
[root@node101 java]# xcall.sh python --version

============= node101.yinzhengjie.org.cn : python --version ============

Python 2.7.

命令执行成功

============= node102.yinzhengjie.org.cn : python --version ============

Python 2.7.

命令执行成功

============= node103.yinzhengjie.org.cn : python --version ============

Python 2.7.

命令执行成功

[root@node101 java]#
[root@node101 java]# xcall.sh python --version #Linux自带的python环境
[root@node101 java]# xrsync.sh /yinzhengjie/

=========== node102.yinzhengjie.org.cn : /yinzhengjie/ ===========

命令执行成功

=========== node103.yinzhengjie.org.cn : /yinzhengjie/ ===========

命令执行成功

[root@node101 java]#

[root@node101 java]#

[root@node101 java]# xrsync.sh /etc/profile                                          #同步环境变量

=========== node102.yinzhengjie.org.cn : /etc/profile ===========

命令执行成功

=========== node103.yinzhengjie.org.cn : /etc/profile ===========

命令执行成功

[root@node101 java]#

[root@node101 java]# xcall.sh ln -s /yinzhengjie/softwares/jdk/bin/jps  /usr/local/bin/                #做个软链接,便于xcall.sh 脚本可以直接访问到它

============= node101.yinzhengjie.org.cn : ln -s /yinzhengjie/softwares/jdk/bin/jps /usr/local/bin/ ============

命令执行成功

============= node102.yinzhengjie.org.cn : ln -s /yinzhengjie/softwares/jdk/bin/jps /usr/local/bin/ ============

命令执行成功

============= node103.yinzhengjie.org.cn : ln -s /yinzhengjie/softwares/jdk/bin/jps /usr/local/bin/ ============

命令执行成功

[root@node101 java]#

[root@node101 java]# xcall.sh jps                                                #说明java环境配置成功啦~

============= node101.yinzhengjie.org.cn : jps ============

 Jps

命令执行成功

============= node102.yinzhengjie.org.cn : jps ============

 Jps

命令执行成功

============= node103.yinzhengjie.org.cn : jps ============

 Jps

命令执行成功

[root@node101 java]#
5>.关闭防火墙和selinux
[root@node101 java]# xcall.sh systemctl stop firewalld

============= node101.yinzhengjie.org.cn : systemctl stop firewalld ============

命令执行成功

============= node102.yinzhengjie.org.cn : systemctl stop firewalld ============

命令执行成功

============= node103.yinzhengjie.org.cn : systemctl stop firewalld ============

命令执行成功

[root@node101 java]#
[root@node101 java]# xcall.sh systemctl stop firewalld #关闭防火墙
[root@node101 java]# xcall.sh systemctl disable firewalld

============= node101.yinzhengjie.org.cn : systemctl disable firewalld ============

Removed symlink /etc/systemd/system/dbus-org.fedoraproject.FirewallD1.service.

Removed symlink /etc/systemd/system/basic.target.wants/firewalld.service.

命令执行成功

============= node102.yinzhengjie.org.cn : systemctl disable firewalld ============

Removed symlink /etc/systemd/system/dbus-org.fedoraproject.FirewallD1.service.

Removed symlink /etc/systemd/system/basic.target.wants/firewalld.service.

命令执行成功

============= node103.yinzhengjie.org.cn : systemctl disable firewalld ============

Removed symlink /etc/systemd/system/dbus-org.fedoraproject.FirewallD1.service.

Removed symlink /etc/systemd/system/basic.target.wants/firewalld.service.

命令执行成功

[root@node101 java]#
[root@node101 java]# xcall.sh systemctl disable firewalld #禁用防火墙,防止他开机自启动
[root@node101 java]# xcall.sh systemctl status firewalld

============= node101.yinzhengjie.org.cn : systemctl status firewalld ============

● firewalld.service - firewalld - dynamic firewall daemon

   Loaded: loaded (/usr/lib/systemd/system/firewalld.service; disabled; vendor preset: enabled)

   Active: inactive (dead)

Dec  :: node101.yinzhengjie.org.cn systemd[]: Starting firewalld - dynamic firewall daemon...

Dec  :: node101.yinzhengjie.org.cn systemd[]: Started firewalld - dynamic firewall daemon.

Dec  :: node101.yinzhengjie.org.cn systemd[]: Stopping firewalld - dynamic firewall daemon...

Dec  :: node101.yinzhengjie.org.cn systemd[]: Stopped firewalld - dynamic firewall daemon.

============= node102.yinzhengjie.org.cn : systemctl status firewalld ============

● firewalld.service - firewalld - dynamic firewall daemon

   Loaded: loaded (/usr/lib/systemd/system/firewalld.service; disabled; vendor preset: enabled)

   Active: inactive (dead)

Dec  :: nod102.yinzhengjie.org.cn systemd[]: Starting firewalld - dynamic firewall daemon...

Dec  :: nod102.yinzhengjie.org.cn systemd[]: Started firewalld - dynamic firewall daemon.

Dec  :: nod102.yinzhengjie.org.cn systemd[]: Stopping firewalld - dynamic firewall daemon...

Dec  :: nod102.yinzhengjie.org.cn systemd[]: Stopped firewalld - dynamic firewall daemon.

============= node103.yinzhengjie.org.cn : systemctl status firewalld ============

● firewalld.service - firewalld - dynamic firewall daemon

   Loaded: loaded (/usr/lib/systemd/system/firewalld.service; disabled; vendor preset: enabled)

   Active: inactive (dead)

Dec  :: node103.yinzhengjie.org.cn systemd[]: Starting firewalld - dynamic firewall daemon...

Dec  :: node103.yinzhengjie.org.cn systemd[]: Started firewalld - dynamic firewall daemon.

Dec  :: node103.yinzhengjie.org.cn systemd[]: Stopping firewalld - dynamic firewall daemon...

Dec  :: node103.yinzhengjie.org.cn systemd[]: Stopped firewalld - dynamic firewall daemon.

[root@node101 java]#

[root@node101 java]#

[root@node101 java]#
[root@node101 java]# xcall.sh systemctl status firewalld #查看防火墙状态
[root@node101 ~]# xcall.sh sed -i 's#SELINUX=enforcing#SELINUX=disabled#' /etc/selinux/config

============= node101.yinzhengjie.org.cn : sed -i s#SELINUX=enforcing#SELINUX=disabled# /etc/selinux/config ============

命令执行成功

============= node102.yinzhengjie.org.cn : sed -i s#SELINUX=enforcing#SELINUX=disabled# /etc/selinux/config ============

命令执行成功

============= node103.yinzhengjie.org.cn : sed -i s#SELINUX=enforcing#SELINUX=disabled# /etc/selinux/config ============

命令执行成功

[root@node101 ~]#

[root@node101 ~]#

[root@node101 ~]# xcall.sh  cat /etc/selinux/config | grep SELINUX= | grep -v ^#

SELINUX=disabled

SELINUX=disabled

SELINUX=disabled

[root@node101 ~]#
[root@node101 ~]# xcall.sh sed -i 's#SELINUX=enforcing#SELINUX=disabled#' /etc/selinux/config #禁用selinux,防止它开机自启动,这样修改需要重启操作系统方能生效哦!
[root@node101 ~]# xcall.sh getenforce

============= node101.yinzhengjie.org.cn : getenforce ============

Enforcing

命令执行成功

============= node102.yinzhengjie.org.cn : getenforce ============

Enforcing

命令执行成功

============= node103.yinzhengjie.org.cn : getenforce ============

Enforcing

命令执行成功

[root@node101 ~]#

[root@node101 ~]#

[root@node101 ~]# xcall.sh setenforce

============= node101.yinzhengjie.org.cn : setenforce  ============

命令执行成功

============= node102.yinzhengjie.org.cn : setenforce  ============

命令执行成功

============= node103.yinzhengjie.org.cn : setenforce  ============

命令执行成功

[root@node101 ~]#

[root@node101 ~]# xcall.sh getenforce

============= node101.yinzhengjie.org.cn : getenforce ============

Permissive

命令执行成功

============= node102.yinzhengjie.org.cn : getenforce ============

Permissive

命令执行成功

============= node103.yinzhengjie.org.cn : getenforce ============

Permissive

命令执行成功

[root@node101 ~]#
[root@node101 ~]# xcall.sh setenforce 0 #临时关闭selinux,立即生效!
6>.配置ntpd服务器并配置开机自启动
[root@node101 ~]# xcall.sh yum -y install ntp

============= node101.yinzhengjie.org.cn : yum -y install ntp ============

Loaded plugins: fastestmirror

Loading mirror speeds from cached hostfile

 * base: mirrors.huaweicloud.com

 * extras: mirrors.huaweicloud.com

 * updates: mirrors..com

Resolving Dependencies

--> Running transaction check

---> Package ntp.x86_64 :4.2.6p5-.el7.centos will be installed

--> Processing Dependency: ntpdate = 4.2.6p5-.el7.centos for package: ntp-4.2.6p5-.el7.centos.x86_64

--> Processing Dependency: libcrypto.so.(OPENSSL_1.0.2)(64bit) for package: ntp-4.2.6p5-.el7.centos.x86_64

--> Processing Dependency: libopts.so.()(64bit) for package: ntp-4.2.6p5-.el7.centos.x86_64

--> Running transaction check

---> Package autogen-libopts.x86_64 :5.18-.el7 will be installed

---> Package ntpdate.x86_64 :4.2.6p5-.el7.centos will be installed

---> Package openssl-libs.x86_64 :1.0.1e-.el7. will be updated

--> Processing Dependency: openssl-libs(x86-) = :1.0.1e-.el7. for package: :openssl-1.0.1e-.el7..x86_64

---> Package openssl-libs.x86_64 :1.0.2k-.el7 will be an update

--> Running transaction check

---> Package openssl.x86_64 :1.0.1e-.el7. will be updated

---> Package openssl.x86_64 :1.0.2k-.el7 will be an update

--> Finished Dependency Resolution

Dependencies Resolved

================================================================================

 Package              Arch        Version                       Repository

                                                                           Size

================================================================================

Installing:

 ntp                  x86_64      4.2.6p5-.el7.centos         base       k

Installing for dependencies:

 autogen-libopts      x86_64      5.18-.el7                    base        k

 ntpdate              x86_64      4.2.6p5-.el7.centos         base        k

Updating for dependencies:

 openssl              x86_64      :1.0.2k-.el7               base       k

 openssl-libs         x86_64      :1.0.2k-.el7               base      1.2 M

Transaction Summary

================================================================================

Install   Package  (+ Dependent packages)

Upgrade             (  Dependent packages)

Total download size: 2.4 M

Downloading packages:

Delta RPMs disabled because /usr/bin/applydeltarpm not installed.

--------------------------------------------------------------------------------

Total                                               kB/s | 2.4 MB  :

Running transaction check

Running transaction test

Transaction test succeeded

Running transaction

  Updating   : :openssl-libs-1.0.2k-.el7.x86_64                          /

  Installing : ntpdate-4.2.6p5-.el7.centos.x86_64                         /

  Installing : autogen-libopts-5.18-.el7.x86_64                            /

  Installing : ntp-4.2.6p5-.el7.centos.x86_64                             /

  Updating   : :openssl-1.0.2k-.el7.x86_64                               /

  Cleanup    : :openssl-1.0.1e-.el7..x86_64                             /

  Cleanup    : :openssl-libs-1.0.1e-.el7..x86_64                        /

  Verifying  : :openssl-libs-1.0.2k-.el7.x86_64                          /

  Verifying  : ntpdate-4.2.6p5-.el7.centos.x86_64                         /

  Verifying  : ntp-4.2.6p5-.el7.centos.x86_64                             /

  Verifying  : autogen-libopts-5.18-.el7.x86_64                            /

  Verifying  : :openssl-1.0.2k-.el7.x86_64                               /

  Verifying  : :openssl-libs-1.0.1e-.el7..x86_64                        /

  Verifying  : :openssl-1.0.1e-.el7..x86_64                             /

Installed:

  ntp.x86_64 :4.2.6p5-.el7.centos

Dependency Installed:

  autogen-libopts.x86_64 :5.18-.el7   ntpdate.x86_64 :4.2.6p5-.el7.centos

Dependency Updated:

  openssl.x86_64 :1.0.2k-.el7       openssl-libs.x86_64 :1.0.2k-.el7

Complete!

命令执行成功

============= node102.yinzhengjie.org.cn : yum -y install ntp ============

Loaded plugins: fastestmirror

Loading mirror speeds from cached hostfile

 * base: mirrors.huaweicloud.com

 * extras: mirrors.huaweicloud.com

 * updates: mirrors.neusoft.edu.cn

Resolving Dependencies

--> Running transaction check

---> Package ntp.x86_64 :4.2.6p5-.el7.centos will be installed

--> Processing Dependency: ntpdate = 4.2.6p5-.el7.centos for package: ntp-4.2.6p5-.el7.centos.x86_64

--> Processing Dependency: libcrypto.so.(OPENSSL_1.0.2)(64bit) for package: ntp-4.2.6p5-.el7.centos.x86_64

--> Processing Dependency: libopts.so.()(64bit) for package: ntp-4.2.6p5-.el7.centos.x86_64

--> Running transaction check

---> Package autogen-libopts.x86_64 :5.18-.el7 will be installed

---> Package ntpdate.x86_64 :4.2.6p5-.el7.centos will be installed

---> Package openssl-libs.x86_64 :1.0.1e-.el7. will be updated

--> Processing Dependency: openssl-libs(x86-) = :1.0.1e-.el7. for package: :openssl-1.0.1e-.el7..x86_64

---> Package openssl-libs.x86_64 :1.0.2k-.el7 will be an update

--> Running transaction check

---> Package openssl.x86_64 :1.0.1e-.el7. will be updated

---> Package openssl.x86_64 :1.0.2k-.el7 will be an update

--> Finished Dependency Resolution

Dependencies Resolved

================================================================================

 Package              Arch        Version                       Repository

                                                                           Size

================================================================================

Installing:

 ntp                  x86_64      4.2.6p5-.el7.centos         base       k

Installing for dependencies:

 autogen-libopts      x86_64      5.18-.el7                    base        k

 ntpdate              x86_64      4.2.6p5-.el7.centos         base        k

Updating for dependencies:

 openssl              x86_64      :1.0.2k-.el7               base       k

 openssl-libs         x86_64      :1.0.2k-.el7               base      1.2 M

Transaction Summary

================================================================================

Install   Package  (+ Dependent packages)

Upgrade             (  Dependent packages)

Total download size: 2.4 M

Downloading packages:

Delta RPMs disabled because /usr/bin/applydeltarpm not installed.

--------------------------------------------------------------------------------

Total                                               kB/s | 2.4 MB  :

Running transaction check

Running transaction test

Transaction test succeeded

Running transaction

  Updating   : :openssl-libs-1.0.2k-.el7.x86_64                          /

  Installing : ntpdate-4.2.6p5-.el7.centos.x86_64                         /

  Installing : autogen-libopts-5.18-.el7.x86_64                            /

  Installing : ntp-4.2.6p5-.el7.centos.x86_64                             /

  Updating   : :openssl-1.0.2k-.el7.x86_64                               /

  Cleanup    : :openssl-1.0.1e-.el7..x86_64                             /

  Cleanup    : :openssl-libs-1.0.1e-.el7..x86_64                        /

  Verifying  : :openssl-libs-1.0.2k-.el7.x86_64                          /

  Verifying  : ntpdate-4.2.6p5-.el7.centos.x86_64                         /

  Verifying  : ntp-4.2.6p5-.el7.centos.x86_64                             /

  Verifying  : autogen-libopts-5.18-.el7.x86_64                            /

  Verifying  : :openssl-1.0.2k-.el7.x86_64                               /

  Verifying  : :openssl-libs-1.0.1e-.el7..x86_64                        /

  Verifying  : :openssl-1.0.1e-.el7..x86_64                             /

Installed:

  ntp.x86_64 :4.2.6p5-.el7.centos

Dependency Installed:

  autogen-libopts.x86_64 :5.18-.el7   ntpdate.x86_64 :4.2.6p5-.el7.centos

Dependency Updated:

  openssl.x86_64 :1.0.2k-.el7       openssl-libs.x86_64 :1.0.2k-.el7

Complete!

命令执行成功

============= node103.yinzhengjie.org.cn : yum -y install ntp ============

Loaded plugins: fastestmirror

Loading mirror speeds from cached hostfile

 * base: mirrors.huaweicloud.com

 * extras: mirrors.huaweicloud.com

 * updates: mirrors.cn99.com

Resolving Dependencies

--> Running transaction check

---> Package ntp.x86_64 :4.2.6p5-.el7.centos will be installed

--> Processing Dependency: ntpdate = 4.2.6p5-.el7.centos for package: ntp-4.2.6p5-.el7.centos.x86_64

--> Processing Dependency: libcrypto.so.(OPENSSL_1.0.2)(64bit) for package: ntp-4.2.6p5-.el7.centos.x86_64

--> Processing Dependency: libopts.so.()(64bit) for package: ntp-4.2.6p5-.el7.centos.x86_64

--> Running transaction check

---> Package autogen-libopts.x86_64 :5.18-.el7 will be installed

---> Package ntpdate.x86_64 :4.2.6p5-.el7.centos will be installed

---> Package openssl-libs.x86_64 :1.0.1e-.el7. will be updated

--> Processing Dependency: openssl-libs(x86-) = :1.0.1e-.el7. for package: :openssl-1.0.1e-.el7..x86_64

---> Package openssl-libs.x86_64 :1.0.2k-.el7 will be an update

--> Running transaction check

---> Package openssl.x86_64 :1.0.1e-.el7. will be updated

---> Package openssl.x86_64 :1.0.2k-.el7 will be an update

--> Finished Dependency Resolution

Dependencies Resolved

================================================================================

 Package              Arch        Version                       Repository

                                                                           Size

================================================================================

Installing:

 ntp                  x86_64      4.2.6p5-.el7.centos         base       k

Installing for dependencies:

 autogen-libopts      x86_64      5.18-.el7                    base        k

 ntpdate              x86_64      4.2.6p5-.el7.centos         base        k

Updating for dependencies:

 openssl              x86_64      :1.0.2k-.el7               base       k

 openssl-libs         x86_64      :1.0.2k-.el7               base      1.2 M

Transaction Summary

================================================================================

Install   Package  (+ Dependent packages)

Upgrade             (  Dependent packages)

Total download size: 2.4 M

Downloading packages:

Delta RPMs disabled because /usr/bin/applydeltarpm not installed.

--------------------------------------------------------------------------------

Total                                               kB/s | 2.4 MB  :

Running transaction check

Running transaction test

Transaction test succeeded

Running transaction

  Updating   : :openssl-libs-1.0.2k-.el7.x86_64                          /

  Installing : ntpdate-4.2.6p5-.el7.centos.x86_64                         /

  Installing : autogen-libopts-5.18-.el7.x86_64                            /

  Installing : ntp-4.2.6p5-.el7.centos.x86_64                             /

  Updating   : :openssl-1.0.2k-.el7.x86_64                               /

  Cleanup    : :openssl-1.0.1e-.el7..x86_64                             /

  Cleanup    : :openssl-libs-1.0.1e-.el7..x86_64                        /

  Verifying  : :openssl-libs-1.0.2k-.el7.x86_64                          /

  Verifying  : ntpdate-4.2.6p5-.el7.centos.x86_64                         /

  Verifying  : ntp-4.2.6p5-.el7.centos.x86_64                             /

  Verifying  : autogen-libopts-5.18-.el7.x86_64                            /

  Verifying  : :openssl-1.0.2k-.el7.x86_64                               /

  Verifying  : :openssl-libs-1.0.1e-.el7..x86_64                        /

  Verifying  : :openssl-1.0.1e-.el7..x86_64                             /

Installed:

  ntp.x86_64 :4.2.6p5-.el7.centos

Dependency Installed:

  autogen-libopts.x86_64 :5.18-.el7   ntpdate.x86_64 :4.2.6p5-.el7.centos

Dependency Updated:

  openssl.x86_64 :1.0.2k-.el7       openssl-libs.x86_64 :1.0.2k-.el7

Complete!

命令执行成功

[root@node101 ~]#
[root@node101 ~]# xcall.sh yum -y install ntp #各个节点安装ntp服务
如果你的内网有ntpd服务器的话直接修改每台服务器的“/etc/ntp.conf”配置文件即可,将ntpd服务器的IP地址写进去。如果没有话,那就自己部署一个即可,详情请参考:https://www.cnblogs.com/yinzhengjie/p/9480665.html。我这里就是在“node101.yinzhengjie.org.cn”主机上部署了ntp服务器,并修改了以下参数:
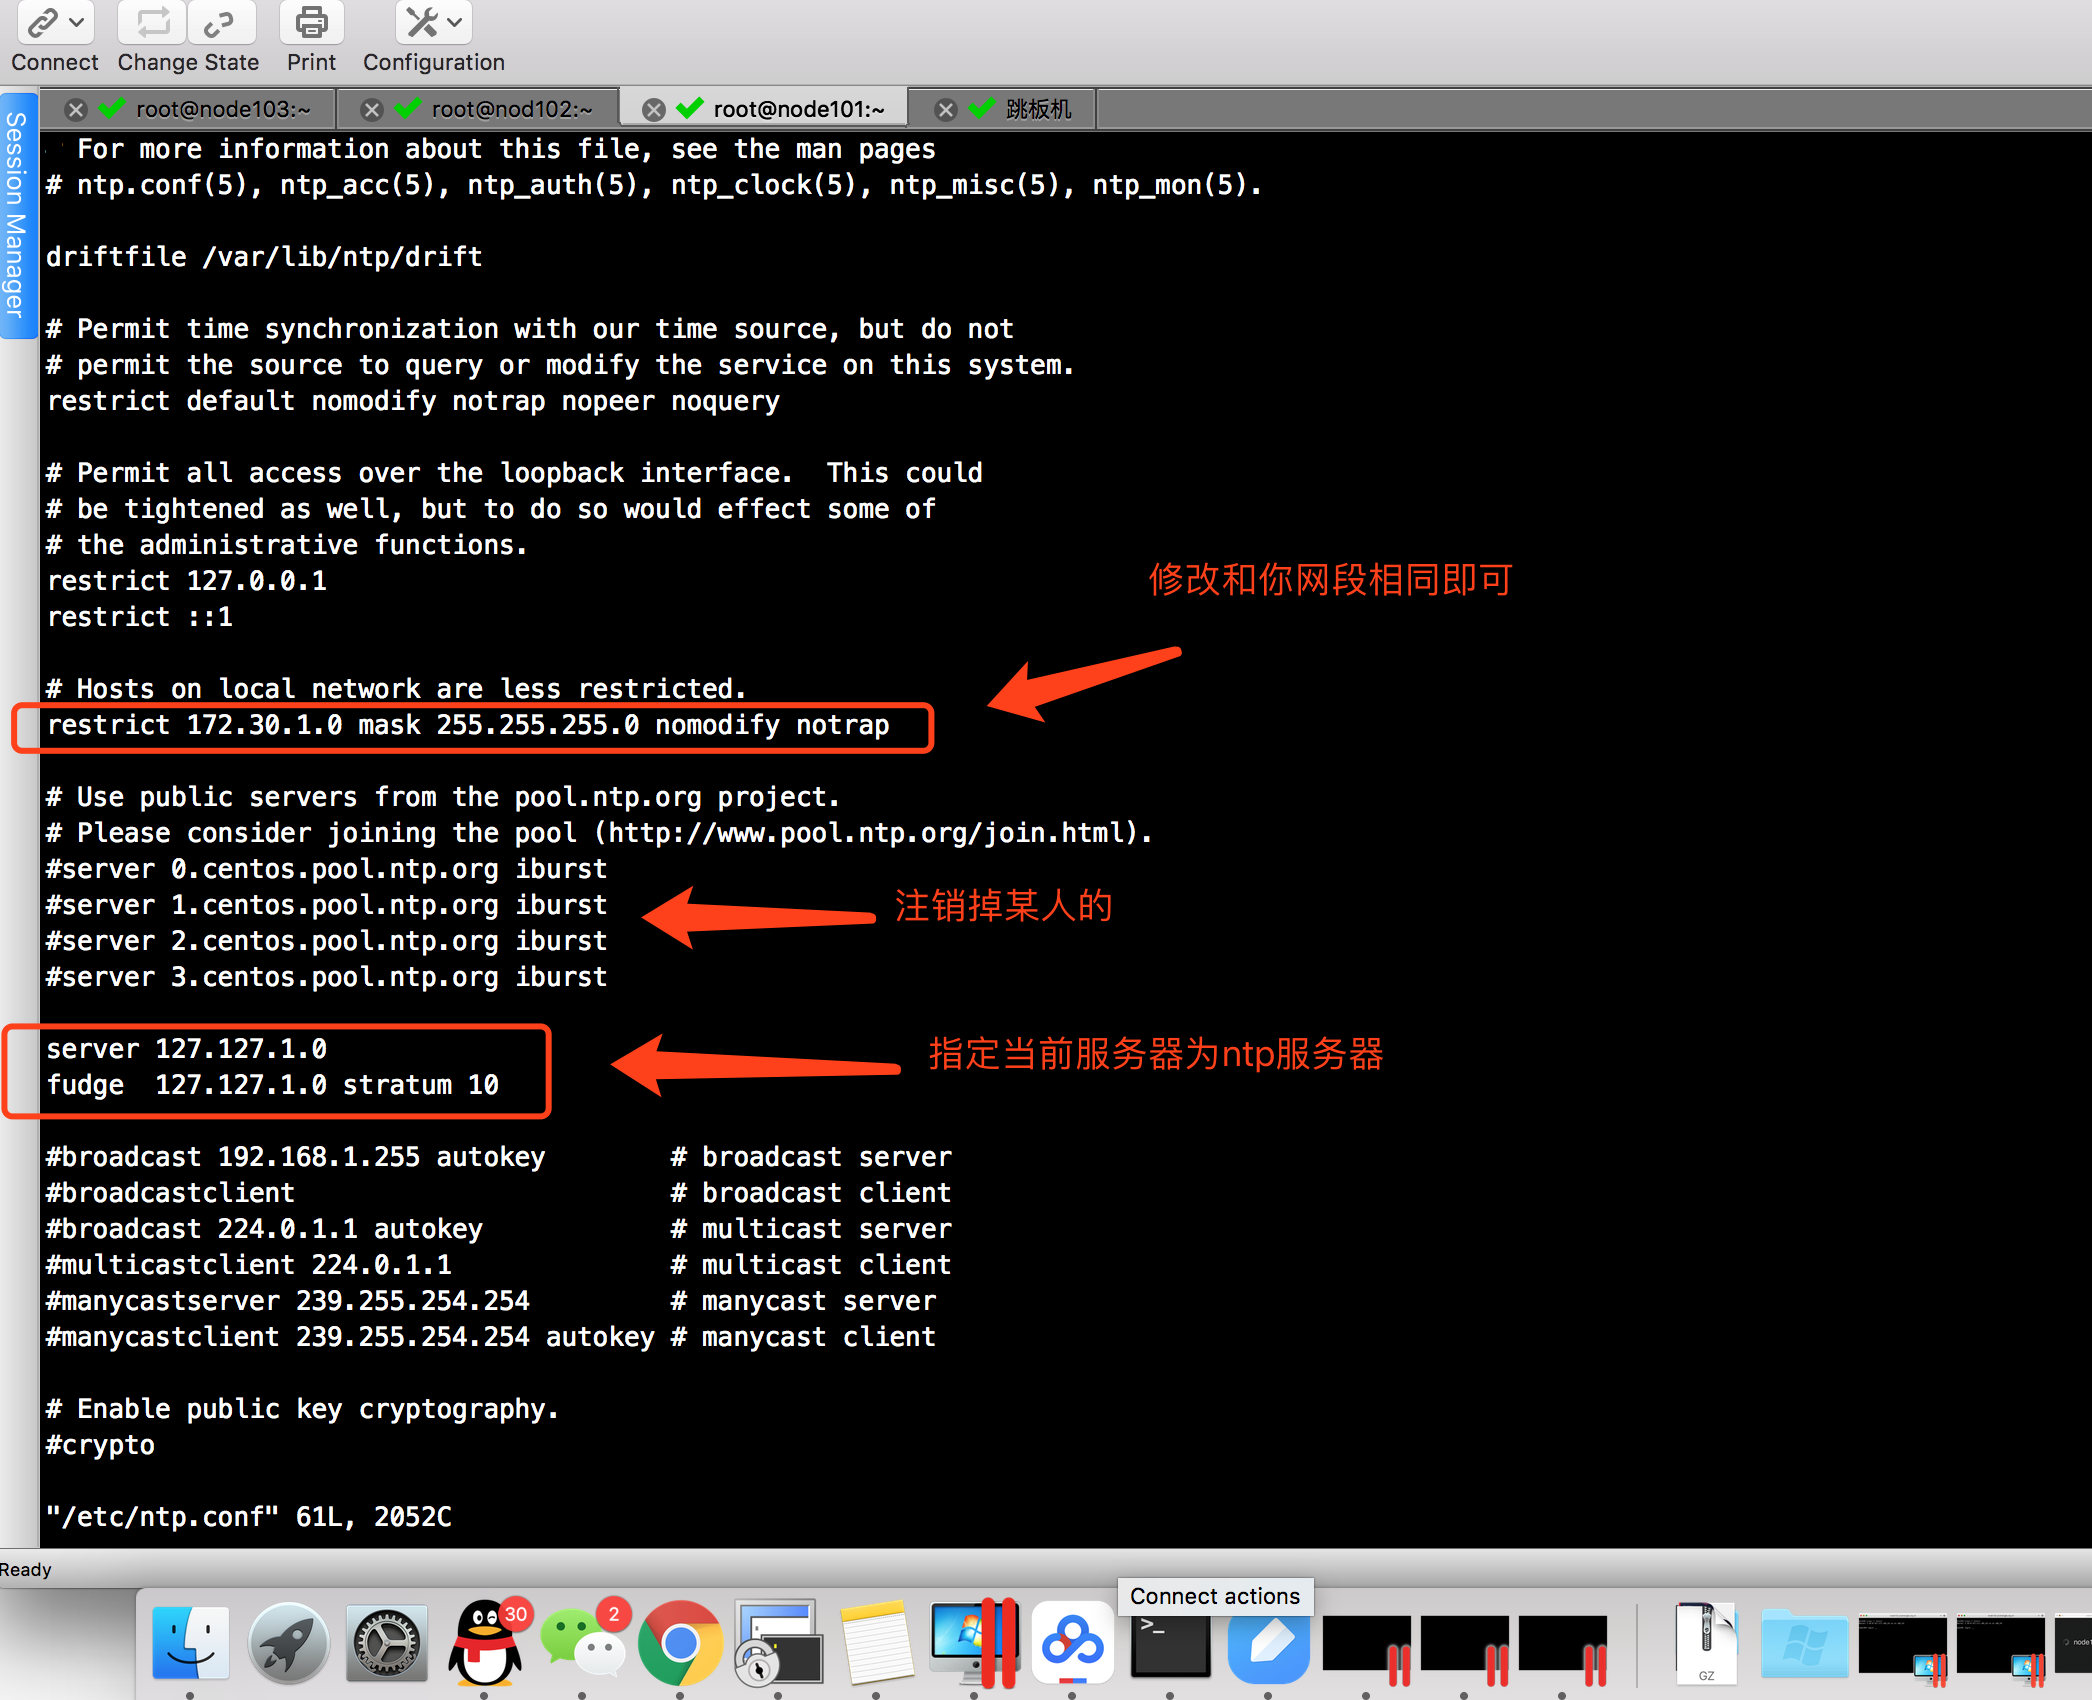
然后在“node102.yinzhengjie.org.cn”和“node103.yinzhengjie.org.cn”这2台主机上配置了周期性的计划任务:
[root@node101 ~]# systemctl start ntpd

[root@node101 ~]#

[root@node101 ~]# systemctl enable ntpd

Created symlink from /etc/systemd/system/multi-user.target.wants/ntpd.service to /usr/lib/systemd/system/ntpd.service.

[root@node101 ~]#

[root@node101 ~]# systemctl status ntpd

● ntpd.service - Network Time Service

   Loaded: loaded (/usr/lib/systemd/system/ntpd.service; enabled; vendor preset: disabled)

   Active: active (running) since Wed -- :: EST; 12s ago

 Main PID:  (ntpd)

   CGroup: /system.slice/ntpd.service

           └─ /usr/sbin/ntpd -u ntp:ntp -g

Dec  :: node101.yinzhengjie.org.cn ntpd[]: Listen normally on  lo 127.0.0.1 UDP

Dec  :: node101.yinzhengjie.org.cn ntpd[]: Listen normally on  eth0 172.30.1.101 UDP

Dec  :: node101.yinzhengjie.org.cn ntpd[]: Listen normally on  lo :: UDP

Dec  :: node101.yinzhengjie.org.cn ntpd[]: Listen normally on  eth0 fe80::21c:42ff:fe58:1b11 UDP

Dec  :: node101.yinzhengjie.org.cn ntpd[]: Listening on routing socket on fd # for interface updates

Dec  :: node101.yinzhengjie.org.cn ntpd[]: 0.0.0.0 c016  restart

Dec  :: node101.yinzhengjie.org.cn ntpd[]: 0.0.0.0 c012  freq_set kernel 0.000 PPM

Dec  :: node101.yinzhengjie.org.cn ntpd[]: 0.0.0.0 c011  freq_not_set

Dec  :: node101.yinzhengjie.org.cn systemd[]: Started Network Time Service.

Dec  :: node101.yinzhengjie.org.cn ntpd[]: 0.0.0.0 c514  freq_mode

[root@node101 ~]#
[root@node101 ~]# systemctl start ntpd #在node101.yinzhengjie.org.cn启动ntpd服务
[root@node101 ~]# xcall.sh crontab -l

============= node101.yinzhengjie.org.cn : crontab -l ============

no crontab for root

============= node102.yinzhengjie.org.cn : crontab -l ============

*/ * * * * /usr/sbin/ntpdate node101.yinzhengjie.org.cn

命令执行成功

============= node103.yinzhengjie.org.cn : crontab -l ============

*/ * * * * /usr/sbin/ntpdate node101.yinzhengjie.org.cn

命令执行成功

[root@node101 ~]#
四.搭建本地yum源仓库(实现离线安装)
安装Ambari系统本身以及通过Ambari安装HDP发行版中的Hadoop服务都需要通过yum的方式进行安装。由于本片博客场景定位的是企业级应用,而企业内部的服务器处于安全考虑通常会通过防火墙隔绝外网环境。就算服务器可以直接联网,HDP那么多达到数G的安装包大小也不适合通过互联网直接安装。所以需要在局域网搭建一套Ambari和HDP的本地yum源仓库用于进行安装。本篇博客将会安装Ambari2.6.0以及对应的HDP2.6.3.0版本。
1>.下载离线安装包(Hortonworks官网文档怎么找?)
[root@node101 ~]# yum -y install wget

Loaded plugins: fastestmirror

Loading mirror speeds from cached hostfile

 * base: mirrors.huaweicloud.com

 * extras: mirrors.huaweicloud.com

 * updates: mirrors..com

Resolving Dependencies

--> Running transaction check

---> Package wget.x86_64 :1.14-.el7 will be installed

--> Finished Dependency Resolution

Dependencies Resolved

===================================================================================================================================================================================

 Package                                 Arch                                      Version                                           Repository                               Size

===================================================================================================================================================================================

Installing:

 wget                                    x86_64                                    1.14-.el7                                       base                                     k

Transaction Summary

===================================================================================================================================================================================

Install   Package

Total download size:  k

Installed size: 2.0 M

Downloading packages:

wget-1.14-.el7.x86_64.rpm                                                                                                                                 |  kB  ::

Running transaction check

Running transaction test

Transaction test succeeded

Running transaction

  Installing : wget-1.14-.el7.x86_64                                                                                                                                         /

  Verifying  : wget-1.14-.el7.x86_64                                                                                                                                         /

Installed:

  wget.x86_64 :1.14-.el7

Complete!

[root@node101 ~]#
[root@node101 ~]# yum -y install wget #安装下载工具包
[root@yinzhengjie hdp]# wget http://public-repo-1.hortonworks.com/HDP/centos7/2.x/updates/2.6.3.0/HDP-2.6.3.0-centos7-rpm.tar.gz

---- ::--  http://public-repo-1.hortonworks.com/HDP/centos7/2.x/updates/2.6.3.0/HDP-2.6.3.0-centos7-rpm.tar.gz

Resolving public-repo-.hortonworks.com (public-repo-.hortonworks.com)... 52.85.158.49, 52.85.158.71, 52.85.158.182, ...

Connecting to public-repo-.hortonworks.com (public-repo-.hortonworks.com)|52.85.158.49|:... connected.

HTTP request sent, awaiting response...  OK

Length:  (.5G) [application/x-tar]

Saving to: ‘HDP-2.6.3.0-centos7-rpm.tar.gz’

%[=======================================================================================================================================>] ,,, .84MB/s   in 17m 11s

-- :: (6.49 MB/s) - ‘HDP-2.6.3.0-centos7-rpm.tar.gz’ saved [/]

[root@yinzhengjie hdp]#

[root@yinzhengjie hdp]# ll

total

-rw-r--r--  root root  Oct    HDP-2.6.3.0-centos7-rpm.tar.gz

[root@yinzhengjie hdp]#
[root@yinzhengjie hdp]# wget http://public-repo-1.hortonworks.com/HDP/centos7/2.x/updates/2.6.3.0/HDP-2.6.3.0-centos7-rpm.tar.gz #下载HDP,大约6.5G
[root@yinzhengjie hdp]# wget http://public-repo-1.hortonworks.com/ambari/centos7/2.x/updates/2.6.0.0/ambari-2.6.0.0-centos7.tar.gz

---- ::--  http://public-repo-1.hortonworks.com/ambari/centos7/2.x/updates/2.6.0.0/ambari-2.6.0.0-centos7.tar.gz

Resolving public-repo-.hortonworks.com (public-repo-.hortonworks.com)... 52.85.158.117, 52.85.158.49, 52.85.158.71, ...

Connecting to public-repo-.hortonworks.com (public-repo-.hortonworks.com)|52.85.158.117|:... connected.

HTTP request sent, awaiting response...  OK

Length:  (.6G) [application/x-tar]

Saving to: ‘ambari-2.6.0.0-centos7.tar.gz’

%[=======================================================================================================================================>] ,,, .44MB/s   in 4m 26s

-- :: (6.31 MB/s) - ‘ambari-2.6.0.0-centos7.tar.gz’ saved [/]

[root@yinzhengjie hdp]#

[root@yinzhengjie hdp]# ll

total

-rw-r--r--  root root  Oct    ambari-2.6.0.0-centos7.tar.gz

-rw-r--r--  root root  Oct    HDP-2.6.3.0-centos7-rpm.tar.gz

[root@yinzhengjie hdp]#

[root@yinzhengjie hdp]#
[root@yinzhengjie hdp]# wget http://public-repo-1.hortonworks.com/ambari/centos7/2.x/updates/2.6.0.0/ambari-2.6.0.0-centos7.tar.gz #下载Ambari,大约1.6G
[root@yinzhengjie hdp]# wget http://public-repo-1.hortonworks.com/HDP-UTILS-1.1.0.21/repos/centos7/HDP-UTILS-1.1.0.21-centos7.tar.gz

---- ::--  http://public-repo-1.hortonworks.com/HDP-UTILS-1.1.0.21/repos/centos7/HDP-UTILS-1.1.0.21-centos7.tar.gz

Resolving public-repo-.hortonworks.com (public-repo-.hortonworks.com)... 52.85.158.117, 52.85.158.49, 52.85.158.71, ...

Connecting to public-repo-.hortonworks.com (public-repo-.hortonworks.com)|52.85.158.117|:... connected.

HTTP request sent, awaiting response...  OK

Length:  (839M) [application/x-tar]

Saving to: ‘HDP-UTILS-1.1.0.21-centos7.tar.gz’

%[=========================================================================================================================================>] ,, .67MB/s   in 2m 7s

-- :: (6.60 MB/s) - ‘HDP-UTILS-1.1.0.21-centos7.tar.gz’ saved [/]

[root@yinzhengjie hdp]#

[root@yinzhengjie hdp]# ll

total

-rw-r--r--  root root  Oct    ambari-2.6.0.0-centos7.tar.gz

-rw-r--r--  root root  Oct    HDP-2.6.3.0-centos7-rpm.tar.gz

-rw-r--r--  root root   Oct    HDP-UTILS-1.1.0.21-centos7.tar.gz

[root@yinzhengjie hdp]#
[root@yinzhengjie hdp]# wget http://public-repo-1.hortonworks.com/HDP-UTILS-1.1.0.21/repos/centos7/HDP-UTILS-1.1.0.21-centos7.tar.gz #下载HDP-UTILS,大约839M左右
大家可以直接在服务端跟我一样使用wget工具下载,如果网速不好端朋友,可以直接用我已经下载好端软件,我这里给出百度云链接:
2>.安装WEB服务器
这里我们可以使用Apache来当作HTTP服务器。当然你也可以用Nginx,由于CentOS的yum源默认就支持可以安装httpd服务,因此我就偷个懒就直接用httpd吧。
[root@node101 ~]# yum -y install httpd

Loaded plugins: fastestmirror

Loading mirror speeds from cached hostfile

 * base: mirrors.huaweicloud.com

 * extras: mirrors.huaweicloud.com

 * updates: mirrors..com

Resolving Dependencies

--> Running transaction check

---> Package httpd.x86_64 :2.4.-.el7.centos will be installed

--> Processing Dependency: httpd-tools = 2.4.-.el7.centos for package: httpd-2.4.-.el7.centos.x86_64

--> Processing Dependency: /etc/mime.types for package: httpd-2.4.-.el7.centos.x86_64

--> Processing Dependency: libaprutil-.so.()(64bit) for package: httpd-2.4.-.el7.centos.x86_64

--> Processing Dependency: libapr-.so.()(64bit) for package: httpd-2.4.-.el7.centos.x86_64

--> Running transaction check

---> Package apr.x86_64 :1.4.-.el7_4. will be installed

---> Package apr-util.x86_64 :1.5.-.el7 will be installed

---> Package httpd-tools.x86_64 :2.4.-.el7.centos will be installed

---> Package mailcap.noarch :2.1.-.el7 will be installed

--> Finished Dependency Resolution

Dependencies Resolved

===================================================================================================================================================================================

 Package                                     Arch                                   Version                                             Repository                            Size

===================================================================================================================================================================================

Installing:

 httpd                                       x86_64                                 2.4.-.el7.centos                                 base                                 2.7 M

Installing for dependencies:

 apr                                         x86_64                                 1.4.-.el7_4.                                     base                                  k

 apr-util                                    x86_64                                 1.5.-.el7                                         base                                   k

 httpd-tools                                 x86_64                                 2.4.-.el7.centos                                 base                                   k

 mailcap                                     noarch                                 2.1.-.el7                                        base                                   k

Transaction Summary

===================================================================================================================================================================================

Install   Package (+ Dependent packages)

Total download size: 3.0 M

Installed size:  M

Downloading packages:

(/): httpd-tools-2.4.-.el7.centos.x86_64.rpm                                                                                                           |   kB  ::

(/): mailcap-2.1.-.el7.noarch.rpm                                                                                                                      |   kB  ::

(/): apr-1.4.-.el7_4..x86_64.rpm                                                                                                                       |  kB  ::

(/): httpd-2.4.-.el7.centos.x86_64.rpm                                                                                                                 | 2.7 MB  ::

(/): apr-util-1.5.-.el7.x86_64.rpm                                                                                                                      |   kB  ::

-----------------------------------------------------------------------------------------------------------------------------------------------------------------------------------

Total                                                                                                                                               kB/s | 3.0 MB  ::

Running transaction check

Running transaction test

Transaction test succeeded

Running transaction

  Installing : apr-1.4.-.el7_4..x86_64                                                                                                                                      /

  Installing : apr-util-1.5.-.el7.x86_64                                                                                                                                     /

  Installing : httpd-tools-2.4.-.el7.centos.x86_64                                                                                                                          /

  Installing : mailcap-2.1.-.el7.noarch                                                                                                                                     /

  Installing : httpd-2.4.-.el7.centos.x86_64                                                                                                                                /

  Verifying  : httpd-tools-2.4.-.el7.centos.x86_64                                                                                                                          /

  Verifying  : apr-1.4.-.el7_4..x86_64                                                                                                                                      /

  Verifying  : mailcap-2.1.-.el7.noarch                                                                                                                                     /

  Verifying  : httpd-2.4.-.el7.centos.x86_64                                                                                                                                /

  Verifying  : apr-util-1.5.-.el7.x86_64                                                                                                                                     /

Installed:

  httpd.x86_64 :2.4.-.el7.centos

Dependency Installed:

  apr.x86_64 :1.4.-.el7_4.             apr-util.x86_64 :1.5.-.el7             httpd-tools.x86_64 :2.4.-.el7.centos             mailcap.noarch :2.1.-.el7

Complete!

[root@node101 ~]#
[root@node101 ~]# yum -y install httpd #通过yum的方式安装httpd服务
[root@node101 ~]# systemctl start httpd                    #启动httpd服务

[root@node101 ~]#

[root@node101 ~]# systemctl enable httpd                   #配置httpd为开机自启动服务

Created symlink from /etc/systemd/system/multi-user.target.wants/httpd.service to /usr/lib/systemd/system/httpd.service.

[root@node101 ~]#

[root@node101 ~]# systemctl status httpd                    #查看httpd的状态

● httpd.service - The Apache HTTP Server

   Loaded: loaded (/usr/lib/systemd/system/httpd.service; enabled; vendor preset: disabled)

   Active: active (running) since Wed -- :: CST; 12s ago

     Docs: man:httpd()

           man:apachectl()

 Main PID:  (httpd)

   Status: "Total requests: 0; Current requests/sec: 0; Current traffic:   0 B/sec"

   CGroup: /system.slice/httpd.service

           ├─ /usr/sbin/httpd -DFOREGROUND

           ├─ /usr/sbin/httpd -DFOREGROUND

           ├─ /usr/sbin/httpd -DFOREGROUND

           ├─ /usr/sbin/httpd -DFOREGROUND

           ├─ /usr/sbin/httpd -DFOREGROUND

           └─ /usr/sbin/httpd -DFOREGROUND

Dec  :: node101.yinzhengjie.org.cn systemd[]: Starting The Apache HTTP Server...

Dec  :: node101.yinzhengjie.org.cn systemd[]: Started The Apache HTTP Server.

[root@node101 ~]#
[root@node101 ~]# systemctl start httpd #启动httpd服务
[root@node101 ~]# mkdir -pv /var/www/html/ambari/HDP-UTILS                  #在这里我们在Apache的默认根目录创建对应的目录,便于存放加压后的数据文件。

mkdir: created directory ‘/var/www/html/ambari’

mkdir: created directory ‘/var/www/html/ambari/HDP-UTILS’

[root@node101 ~]#

[root@node101 ~]# ll /var/www/html/

total

drwxr-xr-x  root root  Dec   : ambari

[root@node101 ~]#

[root@node101 ~]# ll /var/www/html/ambari/

total

drwxr-xr-x  root root  Dec   : HDP-UTILS

[root@node101 ~]#

[root@node101 ~]# ll /var/www/html/ambari/HDP-UTILS/

total

[root@node101 ~]#

[root@node101 ~]# ll                                          #这是我已经下载好的软件包,我们将其解压到web服务器的指定目录中

total

-rwxrwxrwx.  root root  Dec   : ambari-2.6.0.0-centos7.tar.gz

-rwxr-xr-x.  root root  Dec   : HDP-2.6.3.0-centos7-rpm.tar.gz

-rwxr-xr-x.  root root   Dec   : HDP-UTILS-1.1.0.21-centos7.tar.gz

-rw-r--r--.  root root   Dec   : jdk-8u191-linux-x64.tar.gz

[root@node101 ~]#

[root@node101 ~]#

[root@node101 ~]# tar -zxf ambari-2.6.0.0-centos7.tar.gz -C /var/www/html/ambari/    #我们将ambari的安装包解压到指定的目录,然后客户端可以去对应的目录访问相应的数据。加压后会生成一个ambari的目录,下面解压的文件是相同的道理。

[root@node101 ~]#

[root@node101 ~]#

[root@node101 ~]# ll /var/www/html/ambari/

total

drwxr-xr-x.  root root  Dec   : ambari

drwxr-xr-x.  root root  Dec   : HDP-UTILS

[root@node101 ~]#

[root@node101 ~]#

[root@node101 ~]# tar -zxf HDP-2.6.3.0-centos7-rpm.tar.gz -C /var/www/html/ambari/        #解压后会在对应的解压目录中生成一个HDP目录

[root@node101 ~]#

[root@node101 ~]# ll /var/www/html/ambari/

total

drwxr-xr-x.  root root   Dec   : ambari

drwxr-xr-x.   users  Oct    HDP

drwxr-xr-x.  root root   Dec   : HDP-UTILS

[root@node101 ~]#

[root@node101 ~]# ll /var/www/html/ambari/HDP-UTILS/

total

[root@node101 ~]#

[root@node101 ~]# tar -zxf HDP-UTILS-1.1.0.21-centos7.tar.gz -C /var/www/html/ambari/HDP-UTILS/      #加压后在HDP-UTILS目录中会多处很多文件。

[root@node101 ~]#

[root@node101 ~]# ll /var/www/html/ambari/HDP-UTILS/

total

-rw-r--r--.   users  Jun    epel-release--.noarch.rpm

drwxr-xr-x.   users   Oct    extjs

drwxr-xr-x.   users   Oct    fping

drwxr-xr-x.   users   Oct    ganglia

drwxr-xr-x.   users   Oct    hadoop-lzo

-rw-r--r--.   users    Jun    hdp-util.repo

drwxr-xr-x.   users   Oct    jna-source

drwxr-xr-x.   users   Oct    libconfuse

drwxr-xr-x.   users   Oct    lucid

drwxr-xr-x.   users   Oct    lzo

drwxr-xr-x.   users   Oct    mysql

drwxr-xr-x.   users   Oct    mysql-connector-java

drwxr-xr-x.   users   Oct    mysql-connector-java-source

drwxr-xr-x.   users   Oct    nagios

drwxr-xr-x.   users   Oct    nagios-plugins

drwxr-xr-x.   users   Oct    openblas

drwxr-xr-x.   users   Oct    pdsh

drwxr-xr-x.   users   Oct    perl

drwxr-xr-x.   users   Oct    R

drwxr-xr-x.   users   Oct    repodata

drwxr-xr-x.   users   Oct    RPM-GPG-KEY

drwxr-xr-x.   users   Oct    rrdtool

drwxr-xr-x.   users   Oct    snappy

[root@node101 ~]#
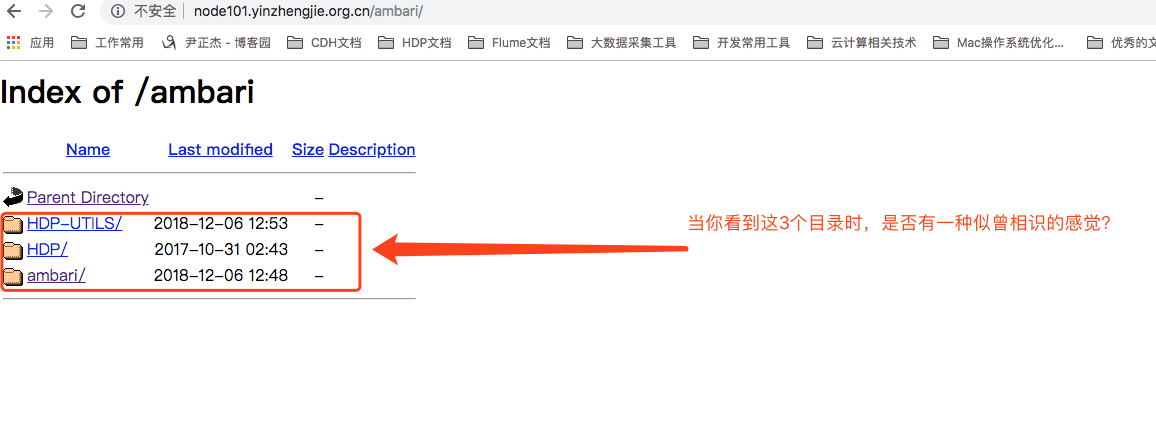
接下来我们也可以访问http://node101.yinzhengjie.org.cn/ambari/:
3>.制作本地源
[root@node101 ~]# yum -y install yum-utils createrepo yum-plugin-priorities
Loaded plugins: fastestmirror
base | 3.6 kB ::
extras | 3.4 kB ::
updates | 3.4 kB ::
Loading mirror speeds from cached hostfile
* base: mirrors.huaweicloud.com
* extras: mirrors.huaweicloud.com
* updates: mirrors..com
Resolving Dependencies
--> Running transaction check
---> Package createrepo.noarch :0.9.-.el7 will be installed
--> Processing Dependency: python-deltarpm for package: createrepo-0.9.-.el7.noarch
--> Processing Dependency: libxml2-python for package: createrepo-0.9.-.el7.noarch
--> Processing Dependency: deltarpm for package: createrepo-0.9.-.el7.noarch
---> Package yum-plugin-priorities.noarch :1.1.-.el7 will be installed
---> Package yum-utils.noarch :1.1.-.el7 will be installed
--> Processing Dependency: yum >= 3.4.- for package: yum-utils-1.1.-.el7.noarch
--> Processing Dependency: python-kitchen for package: yum-utils-1.1.-.el7.noarch
--> Running transaction check
---> Package deltarpm.x86_64 :3.6-.el7 will be installed
---> Package libxml2-python.x86_64 :2.9.-.el7_2. will be installed
--> Processing Dependency: libxml2 = 2.9.-.el7_2. for package: libxml2-python-2.9.-.el7_2..x86_64
---> Package python-deltarpm.x86_64 :3.6-.el7 will be installed
---> Package python-kitchen.noarch :1.1.-.el7 will be installed
--> Processing Dependency: python-chardet for package: python-kitchen-1.1.-.el7.noarch
---> Package yum.noarch :3.4.-.el7.centos.0.1 will be updated
---> Package yum.noarch :3.4.-.el7.centos will be an update
--> Processing Dependency: rpm >= 4.11.- for package: yum-3.4.-.el7.centos.noarch
--> Processing Dependency: python-urlgrabber >= 3.10- for package: yum-3.4.-.el7.centos.noarch
--> Running transaction check
---> Package libxml2.x86_64 :2.9.-.el7_1. will be updated
---> Package libxml2.x86_64 :2.9.-.el7_2. will be an update
---> Package python-chardet.noarch :2.2.-.el7_1 will be installed
---> Package python-urlgrabber.noarch :3.10-.el7 will be updated
---> Package python-urlgrabber.noarch :3.10-.el7 will be an update
---> Package rpm.x86_64 :4.11.-.el7 will be updated
--> Processing Dependency: rpm = 4.11.-.el7 for package: rpm-libs-4.11.-.el7.x86_64
--> Processing Dependency: rpm = 4.11.-.el7 for package: rpm-python-4.11.-.el7.x86_64
---> Package rpm.x86_64 :4.11.-.el7 will be an update
--> Running transaction check
---> Package rpm-libs.x86_64 :4.11.-.el7 will be updated
--> Processing Dependency: rpm-libs(x86-) = 4.11.-.el7 for package: rpm-build-libs-4.11.-.el7.x86_64
---> Package rpm-libs.x86_64 :4.11.-.el7 will be an update
---> Package rpm-python.x86_64 :4.11.-.el7 will be updated
---> Package rpm-python.x86_64 :4.11.-.el7 will be an update
--> Running transaction check
---> Package rpm-build-libs.x86_64 :4.11.-.el7 will be updated
---> Package rpm-build-libs.x86_64 :4.11.-.el7 will be an update
--> Finished Dependency Resolution Dependencies Resolved ===================================================================================================================================================================================
Package Arch Version Repository Size
===================================================================================================================================================================================
Installing:
createrepo noarch 0.9.-.el7 base k
yum-plugin-priorities noarch 1.1.-.el7 base k
yum-utils noarch 1.1.-.el7 base k
Installing for dependencies:
deltarpm x86_64 3.6-.el7 base k
libxml2-python x86_64 2.9.-.el7_2. base k
python-chardet noarch 2.2.-.el7_1 base k
python-deltarpm x86_64 3.6-.el7 base k
python-kitchen noarch 1.1.-.el7 base k
Updating for dependencies:
libxml2 x86_64 2.9.-.el7_2. base k
python-urlgrabber noarch 3.10-.el7 base k
rpm x86_64 4.11.-.el7 base 1.2 M
rpm-build-libs x86_64 4.11.-.el7 base k
rpm-libs x86_64 4.11.-.el7 base k
rpm-python x86_64 4.11.-.el7 base k
yum noarch 3.4.-.el7.centos base 1.2 M Transaction Summary
===================================================================================================================================================================================
Install Packages (+ Dependent packages)
Upgrade ( Dependent packages) Total download size: 4.7 M
Downloading packages:
Delta RPMs disabled because /usr/bin/applydeltarpm not installed.
(/): libxml2-2.9.-.el7_2..x86_64.rpm | kB ::
(/): python-deltarpm-3.6-.el7.x86_64.rpm | kB ::
(/): deltarpm-3.6-.el7.x86_64.rpm | kB ::
(/): python-kitchen-1.1.-.el7.noarch.rpm | kB ::
(/): python-chardet-2.2.-.el7_1.noarch.rpm | kB ::
(/): python-urlgrabber-3.10-.el7.noarch.rpm | kB ::
(/): rpm-build-libs-4.11.-.el7.x86_64.rpm | kB ::
(/): rpm-4.11.-.el7.x86_64.rpm | 1.2 MB ::
(/): yum-3.4.-.el7.centos.noarch.rpm | 1.2 MB ::
(/): yum-plugin-priorities-1.1.-.el7.noarch.rpm | kB ::
(/): yum-utils-1.1.-.el7.noarch.rpm | kB ::
(/): rpm-libs-4.11.-.el7.x86_64.rpm | kB ::
(/): libxml2-python-2.9.-.el7_2..x86_64.rpm | kB ::
(/): rpm-python-4.11.-.el7.x86_64.rpm | kB ::
createrepo-0.9.-.el7.noarch FAILED
http://centos.ustc.edu.cn/centos/7.6.1810/os/x86_64/Packages/createrepo-0.9.9-28.el7.noarch.rpm: [Errno 12] Timeout on http://centos.ustc.edu.cn/centos/7.6.1810/os/x86_64/Packages/createrepo-0.9.9-28.el7.noarch.rpm: (28, 'Operation too slow. Less than 1000 bytes/sec transferred the last 30 seconds')
Trying other mirror.
(/): createrepo-0.9.-.el7.noarch.rpm | kB ::
-----------------------------------------------------------------------------------------------------------------------------------------------------------------------------------
Total kB/s | 4.7 MB ::
Running transaction check
Running transaction test
Transaction test succeeded
Running transaction
Updating : rpm-4.11.-.el7.x86_64 /
Updating : rpm-libs-4.11.-.el7.x86_64 /
Installing : deltarpm-3.6-.el7.x86_64 /
Installing : python-deltarpm-3.6-.el7.x86_64 /
Updating : rpm-build-libs-4.11.-.el7.x86_64 /
Updating : rpm-python-4.11.-.el7.x86_64 /
Installing : python-chardet-2.2.-.el7_1.noarch /
Installing : python-kitchen-1.1.-.el7.noarch /
Updating : libxml2-2.9.-.el7_2..x86_64 /
Installing : libxml2-python-2.9.-.el7_2..x86_64 /
Updating : python-urlgrabber-3.10-.el7.noarch /
Updating : yum-3.4.-.el7.centos.noarch /
Installing : yum-plugin-priorities-1.1.-.el7.noarch /
Installing : createrepo-0.9.-.el7.noarch /
Installing : yum-utils-1.1.-.el7.noarch /
Cleanup : yum-3.4.-.el7.centos.0.1.noarch /
Cleanup : rpm-python-4.11.-.el7.x86_64 /
Cleanup : python-urlgrabber-3.10-.el7.noarch /
Cleanup : rpm-build-libs-4.11.-.el7.x86_64 /
Cleanup : rpm-libs-4.11.-.el7.x86_64 /
Cleanup : rpm-4.11.-.el7.x86_64 /
Cleanup : libxml2-2.9.-.el7_1..x86_64 /
Verifying : rpm-python-4.11.-.el7.x86_64 /
Verifying : rpm-libs-4.11.-.el7.x86_64 /
Verifying : python-urlgrabber-3.10-.el7.noarch /
Verifying : libxml2-2.9.-.el7_2..x86_64 /
Verifying : yum-plugin-priorities-1.1.-.el7.noarch /
Verifying : rpm-4.11.-.el7.x86_64 /
Verifying : rpm-build-libs-4.11.-.el7.x86_64 /
Verifying : libxml2-python-2.9.-.el7_2..x86_64 /
Verifying : deltarpm-3.6-.el7.x86_64 /
Verifying : createrepo-0.9.-.el7.noarch /
Verifying : python-deltarpm-3.6-.el7.x86_64 /
Verifying : yum-utils-1.1.-.el7.noarch /
Verifying : python-chardet-2.2.-.el7_1.noarch /
Verifying : python-kitchen-1.1.-.el7.noarch /
Verifying : yum-3.4.-.el7.centos.noarch /
Verifying : rpm-4.11.-.el7.x86_64 /
Verifying : libxml2-2.9.-.el7_1..x86_64 /
Verifying : rpm-libs-4.11.-.el7.x86_64 /
Verifying : rpm-build-libs-4.11.-.el7.x86_64 /
Verifying : yum-3.4.-.el7.centos.0.1.noarch /
Verifying : rpm-python-4.11.-.el7.x86_64 /
Verifying : python-urlgrabber-3.10-.el7.noarch / Installed:
createrepo.noarch :0.9.-.el7 yum-plugin-priorities.noarch :1.1.-.el7 yum-utils.noarch :1.1.-.el7 Dependency Installed:
deltarpm.x86_64 :3.6-.el7 libxml2-python.x86_64 :2.9.-.el7_2. python-chardet.noarch :2.2.-.el7_1 python-deltarpm.x86_64 :3.6-.el7 python-kitchen.noarch :1.1.-.el7 Dependency Updated:
libxml2.x86_64 :2.9.-.el7_2. python-urlgrabber.noarch :3.10-.el7 rpm.x86_64 :4.11.-.el7 rpm-build-libs.x86_64 :4.11.-.el7 rpm-libs.x86_64 :4.11.-.el7
rpm-python.x86_64 :4.11.-.el7 yum.noarch :3.4.-.el7.centos Complete!
[root@node101 ~]#
[root@node101 ~]# yum -y install yum-utils createrepo yum-plugin-priorities #安装本地源制作相关工具
[root@node101 ~]# cd /var/www/html/ambari/

[root@node101 ambari]#

[root@node101 ambari]# createrepo ./          #创建本地源,会在当前目录下生产一个repodata的目录。

Spawning worker  with  pkgs

Spawning worker  with  pkgs

Workers Finished

Saving Primary metadata

Saving file lists metadata

Saving other metadata

Generating sqlite DBs

Sqlite DBs complete

[root@node101 ambari]#
执行上述操作后,会生产一个目录:
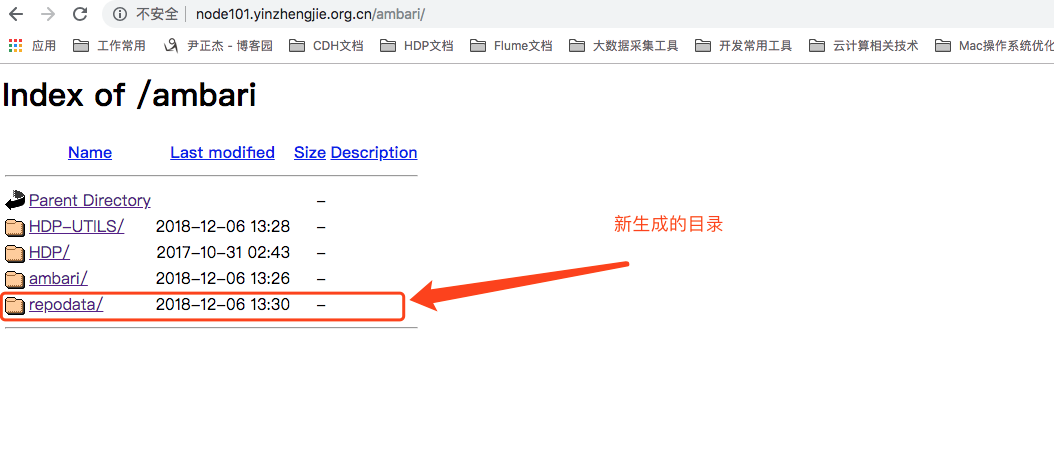
为了能让yum命令能够找到我们的安装文件,还需要在yum的配置目录中“/etc/yum.repos.d/”创建两个仓库的配置文件,名字可以自定义,如下:
[root@node101 ~]# cat /etc/yum.repos.d/ambari.repo

#!/bin/bash

#@author :yinzhengjie

#blog:http://www.cnblogs.com/yinzhengjie

#EMAIL:y1053419035@qq.com

[ambari-2.6.0.0]

name=ambari Version - ambari-2.6.0.0

baseurl=http://node101.yinzhengjie.org.cn/ambari/ambari/centos7/2.6.0.0-267

gpgcheck=

gpgkey=http://node101.yinzhengjie.org.cn/ambari/ambari/centos7/2.6.0.0-267/RPM-GPG-KEY/RPM-GPG-KEY-Jenkins

enabled=

priority=

[root@node101 ~]#
[root@node101 ~]# cat /etc/yum.repos.d/ambari.repo
[root@node101 ~]# cat /etc/yum.repos.d/hdp.repo

#!/bin/bash

#@author :yinzhengjie

#blog:http://www.cnblogs.com/yinzhengjie

#EMAIL:y1053419035@qq.com

[HDP-2.6.3.0]

name=HDP Version - HDP-2.6.3.0

baseurl=http://node101.yinzhengjie.org.cn/ambari/HDP/centos7/2.6.3.0-235/

gpgcheck=

gpgkey=http://node101.yinzhengjie.org.cn/ambari/HDP/centos7/2.6.3.0-235/RPM-GPG-KEY/RPM-GPG-KEY-Jenkins

enabled=

priority=

[HDP-UTILS-1.1.0.21]

name=HDP-UTILS Version - HDP-UTILS-1.1.0.21

baseurl=http://node101.yinzhengjie.org.cn/ambari/HDP-UTILS/

gpgcheck=

gpgkey=http://node101.yinzhengjie.org.cn/ambari/HDP-UTILS/RPM-GPG-KEY/RPM-GPG-KEY-Jenkins

enabled=

priority=

[root@node101 ~]#
[root@node101 ~]# cat /etc/yum.repos.d/hdp.repo
[root@node101 ~]# yum clean all

Loaded plugins: fastestmirror, priorities

Cleaning repos: HDP-2.6.3.0 HDP-UTILS-1.1.0.21 ambari-2.6.0.0 base extras updates

Cleaning up list of fastest mirrors

[root@node101 ~]#
[root@node101 ~]# yum clean all #清除yum的缓存
[root@node101 ~]# yum makecache

Loaded plugins: fastestmirror, priorities

HDP-2.6.3.0                                                                           | 2.9 kB  ::

HDP-UTILS-1.1.0.21                                                                    | 2.9 kB  ::

ambari-2.6.0.0                                                                        | 2.9 kB  ::

base                                                                                  | 3.6 kB  ::

extras                                                                                | 3.4 kB  ::

updates                                                                               | 3.4 kB  ::

(/): HDP-2.6.3.0/filelists_db                                                      |  kB  ::

(/): HDP-2.6.3.0/primary_db                                                        |  kB  ::

(/): HDP-2.6.3.0/other_db                                                          |   kB  ::

(/): HDP-UTILS-1.1.0.21/filelists_db                                               |   kB  ::

(/): HDP-UTILS-1.1.0.21/other_db                                                   |   kB  ::

(/): HDP-UTILS-1.1.0.21/primary_db                                                 |   kB  ::

(/): ambari-2.6.0.0/filelists_db                                                   |  kB  ::

(/): ambari-2.6.0.0/other_db                                                       | 1.3 kB  ::

(/): ambari-2.6.0.0/primary_db                                                     | 8.6 kB  ::

(/): base//x86_64/group_gz                                                       |  kB  ::

(/): extras//x86_64/prestodelta                                                  |   kB  ::

(/): base//x86_64/other_db                                                       | 2.6 MB  ::

(/): extras//x86_64/primary_db                                                   |  kB  ::

(/): extras//x86_64/other_db                                                     |  kB  ::

(/): extras//x86_64/filelists_db                                                 |  kB  ::

(/): updates//x86_64/prestodelta                                                 |  kB  ::

(/): updates//x86_64/primary_db                                                  | 1.3 MB  ::

(/): updates//x86_64/other_db                                                    |  kB  ::

(/): updates//x86_64/filelists_db                                                | 1.3 MB  ::

(/): base//x86_64/filelists_db                                                   | 7.1 MB  ::

(/): base//x86_64/primary_db                                                     | 6.0 MB  ::

Determining fastest mirrors

 * base: mirrors.aliyun.com

 * extras: mirrors.tuna.tsinghua.edu.cn

 * updates: mirrors.tuna.tsinghua.edu.cn

Metadata Cache Created

[root@node101 ~]#
[root@node101 ~]# yum makecache #重新创建yum缓存
[root@node101 ~]# hostname

node101.yinzhengjie.org.cn

[root@node101 ~]#

[root@node101 ~]# yum repolist                                  #检查一下yum的列表清单

Loaded plugins: fastestmirror, priorities

Loading mirror speeds from cached hostfile

 * base: mirrors.aliyun.com

 * extras: mirrors.tuna.tsinghua.edu.cn

 * updates: mirrors.tuna.tsinghua.edu.cn

 packages excluded due to repository priority protections

repo id                                 repo name                                                   status

HDP-2.6.3.0                             HDP Version - HDP-2.6.3.0                                         236            #这个yum源是咱们自己自定义的

HDP-UTILS-1.1.0.21                      HDP-UTILS Version - HDP-UTILS-1.1.0.21                             64            #这远yum源也是咱们自定义的

ambari-2.6.0.0                          ambari Version - ambari-2.6.0.0                                    12            #这个yum元依旧是咱们自定的,如果你发现有这3个yum源是存在的,那么说明你的yum仓库部署就没有问题哟!

base//x86_64                           CentOS- - Base                                             ,+

extras//x86_64                         CentOS- - Extras                                               +

updates//x86_64                        CentOS- - Updates

repolist: ,

[root@node101 ~]#
4>.同步yum源的配置文件(将node101.yinzhengjie.org.cn的2个yum源配置文件拷贝到node102.yinzhengjie.org.cn和node103.yinzhengjie.org.cn上去。)
[root@node101 ~]# xrsync.sh /etc/yum.repos.d/ambari.repo

=========== node102.yinzhengjie.org.cn : /etc/yum.repos.d/ambari.repo ===========

命令执行成功

=========== node103.yinzhengjie.org.cn : /etc/yum.repos.d/ambari.repo ===========

命令执行成功

[root@node101 ~]#
[root@node101 ~]# xrsync.sh /etc/yum.repos.d/ambari.repo #使用咱们自定义的脚本将ambari.repo文件同步到其他2个节点上。
[root@node101 ~]# xrsync.sh /etc/yum.repos.d/hdp.repo

=========== node102.yinzhengjie.org.cn : /etc/yum.repos.d/hdp.repo ===========

命令执行成功

=========== node103.yinzhengjie.org.cn : /etc/yum.repos.d/hdp.repo ===========

命令执行成功

[root@node101 ~]#
[root@node101 ~]# xrsync.sh /etc/yum.repos.d/hdp.repo #同理,将hdp.repo也同步到其他2个节点上
[root@node101 ~]# ssh node102.yinzhengjie.org.cn                        #登陆到node102yinzhengjie.org.cn节点

Last login: Thu Dec   ::  from 172.30.1.2

[root@nod102 ~]#

[root@nod102 ~]# yum clean all                                        #情况yum的缓存

Loaded plugins: fastestmirror

Cleaning repos: HDP-2.6.3.0 HDP-UTILS-1.1.0.21 ambari-2.6.0.0 base extras updates

Cleaning up everything

Cleaning up list of fastest mirrors

[root@nod102 ~]#

[root@nod102 ~]# yum makecache                                    #重新制造缓存

Loaded plugins: fastestmirror

HDP-2.6.3.0                                                                           | 2.9 kB  ::

HDP-UTILS-1.1.0.21                                                                    | 2.9 kB  ::

ambari-2.6.0.0                                                                        | 2.9 kB  ::

base                                                                                  | 3.6 kB  ::

extras                                                                                | 3.4 kB  ::

updates                                                                               | 3.4 kB  ::

(/): HDP-2.6.3.0/primary_db                                                        |  kB  ::

(/): HDP-2.6.3.0/filelists_db                                                      |  kB  ::

(/): HDP-2.6.3.0/other_db                                                          |   kB  ::

(/): HDP-UTILS-1.1.0.21/filelists_db                                               |   kB  ::

(/): HDP-UTILS-1.1.0.21/other_db                                                   |   kB  ::

(/): HDP-UTILS-1.1.0.21/primary_db                                                 |   kB  ::

(/): ambari-2.6.0.0/filelists_db                                                   |  kB  ::

(/): ambari-2.6.0.0/other_db                                                       | 1.3 kB  ::

(/): ambari-2.6.0.0/primary_db                                                     | 8.6 kB  ::

(/): base//x86_64/group_gz                                                       |  kB  ::

(/): extras//x86_64/prestodelta                                                  |   kB  ::

(/): extras//x86_64/primary_db                                                   |  kB  ::

(/): extras//x86_64/other_db                                                     |  kB  ::

(/): extras//x86_64/filelists_db                                                 |  kB  ::

(/): base//x86_64/other_db                                                       | 2.6 MB  ::

(/): updates//x86_64/prestodelta                                                 |  kB  ::

(/): updates//x86_64/primary_db                                                  | 1.3 MB  ::

(/): updates//x86_64/other_db                                                    |  kB  ::

(/): updates//x86_64/filelists_db                                                | 1.3 MB  ::

(/): base//x86_64/primary_db                                                     | 6.0 MB  ::

(/): base//x86_64/filelists_db                                                   | 7.1 MB  ::

Determining fastest mirrors

 * base: mirrors.aliyun.com

 * extras: mirrors.tuna.tsinghua.edu.cn

 * updates: mirrors.tuna.tsinghua.edu.cn

Metadata Cache Created

You have new mail in /var/spool/mail/root

[root@nod102 ~]#

[root@nod102 ~]#

[root@nod102 ~]# yum repolist                            #查看yum的列表

Loaded plugins: fastestmirror

Loading mirror speeds from cached hostfile

 * base: mirrors.aliyun.com

 * extras: mirrors.tuna.tsinghua.edu.cn

 * updates: mirrors.tuna.tsinghua.edu.cn

repo id                                  repo name                                                     status

HDP-2.6.3.0                              HDP Version - HDP-2.6.3.0

HDP-UTILS-1.1.0.21                       HDP-UTILS Version - HDP-UTILS-1.1.0.21

ambari-2.6.0.0                           ambari Version - ambari-2.6.0.0

base//x86_64                            CentOS- - Base                                               ,

extras//x86_64                          CentOS- - Extras

updates//x86_64                         CentOS- - Updates

repolist: ,

[root@nod102 ~]#
[root@node102 ~]# yum repolist #查看node102.yinzhengjie.org.cn服务器的yum的列表
[root@node101 ~]# ssh node103.yinzhengjie.org.cn

Last login: Thu Dec   ::  from 172.30.1.2

[root@node103 ~]#

You have new mail in /var/spool/mail/root

[root@node103 ~]#

[root@node103 ~]# yum clean all

Loaded plugins: fastestmirror

Cleaning repos: HDP-2.6.3.0 HDP-UTILS-1.1.0.21 ambari-2.6.0.0 base extras updates

Cleaning up everything

Cleaning up list of fastest mirrors

[root@node103 ~]#

[root@node103 ~]# yum makecache

Loaded plugins: fastestmirror

HDP-2.6.3.0                                                                           | 2.9 kB  ::

HDP-UTILS-1.1.0.21                                                                    | 2.9 kB  ::

ambari-2.6.0.0                                                                        | 2.9 kB  ::

base                                                                                  | 3.6 kB  ::

extras                                                                                | 3.4 kB  ::

updates                                                                               | 3.4 kB  ::

(/): HDP-2.6.3.0/primary_db                                                        |  kB  ::

(/): HDP-2.6.3.0/filelists_db                                                      |  kB  ::

(/): HDP-2.6.3.0/other_db                                                          |   kB  ::

(/): HDP-UTILS-1.1.0.21/filelists_db                                               |   kB  ::

(/): HDP-UTILS-1.1.0.21/other_db                                                   |   kB  ::

(/): HDP-UTILS-1.1.0.21/primary_db                                                 |   kB  ::

(/): ambari-2.6.0.0/primary_db                                                     | 8.6 kB  ::

(/): ambari-2.6.0.0/filelists_db                                                   |  kB  ::

(/): ambari-2.6.0.0/other_db                                                       | 1.3 kB  ::

(/): base//x86_64/group_gz                                                       |  kB  ::

(/): extras//x86_64/prestodelta                                                  |   kB  ::

(/): extras//x86_64/primary_db                                                   |  kB  ::

(/): extras//x86_64/filelists_db                                                 |  kB  ::

(/): extras//x86_64/other_db                                                     |  kB  ::

(/): updates//x86_64/prestodelta                                                 |  kB  ::

(/): base//x86_64/other_db                                                       | 2.6 MB  ::

(/): updates//x86_64/other_db                                                    |  kB  ::

(/): updates//x86_64/primary_db                                                  | 1.3 MB  ::

(/): base//x86_64/primary_db                                                     | 6.0 MB  ::

(/): updates//x86_64/filelists_db                                                     | 1.3 MB  ::

(/): base//x86_64/filelists_db                                                        | 7.1 MB  ::

Determining fastest mirrors

 * base: mirrors.aliyun.com

 * extras: mirrors.huaweicloud.com

 * updates: mirrors.huaweicloud.com

Metadata Cache Created

You have new mail in /var/spool/mail/root

[root@node103 ~]#

[root@node103 ~]#

[root@node103 ~]# yum repolist

Loaded plugins: fastestmirror

Loading mirror speeds from cached hostfile

 * base: mirrors.aliyun.com

 * extras: mirrors.huaweicloud.com

 * updates: mirrors.huaweicloud.com

repo id                                     repo name                                                       status

HDP-2.6.3.0                                 HDP Version - HDP-2.6.3.0

HDP-UTILS-1.1.0.21                          HDP-UTILS Version - HDP-UTILS-1.1.0.21

ambari-2.6.0.0                              ambari Version - ambari-2.6.0.0

base//x86_64                               CentOS- - Base                                                 ,

extras//x86_64                             CentOS- - Extras

updates//x86_64                            CentOS- - Updates

repolist: ,

[root@node103 ~]#
[root@node103 ~]# yum repolist #同上,在node103.yinzhengjie.org.cn上做相同的操作,也是查看yum的列表
五.安装ambari-server
1>.安装postgresql数据库
和CDH一样,Ambari默认是使用postgresql数据库来保存元数据它的元数据信息,这需要咱们运维的小伙伴对postgresql数据库要具有一定的了解,掌握常见的故障拍错,包括如何配置数据库的主从同步等等。有的人没有懒得去学习也可以使用oracle或者mysql来存放元数据信息,当然,即使你使用来别的数据库,推荐你依然要配置数据库的主从同步,目的是防治单点故障嘛,你懂的。因此,我们可以总结一下为什么不实用postgrsql数据库的原因:
第一:需要学习数据库的成本提升(主从复制);
第二:postgresql数据库的性能我们无法保证,因为我们对他的了解情况不深入;
第三:postgresql数据库的可靠性我们无法保证!
综上所述,我们在生产环境中不推荐使用内置的数据库选项,而是应该使用自己安装的数据库(单本篇博客依旧会介绍如何使用postgresql数据库来安装Ambari服务。),比如关于如何使用mysql存放Ambari元数据的配置案例请参考:https://www.cnblogs.com/yinzhengjie/p/10074613.html。
[root@node101 ~]# yum -y install postgresql-server

Loaded plugins: fastestmirror, priorities

Loading mirror speeds from cached hostfile

 * base: mirrors.aliyun.com

 * extras: mirrors.tuna.tsinghua.edu.cn

 * updates: mirrors.tuna.tsinghua.edu.cn

 packages excluded due to repository priority protections

Resolving Dependencies

--> Running transaction check

---> Package postgresql-server.x86_64 :9.2.-.el7_5 will be installed

--> Processing Dependency: postgresql-libs(x86-) = 9.2.-.el7_5 for package: postgresql-server-9.2.-.el7_5.x86_64

--> Processing Dependency: postgresql(x86-) = 9.2.-.el7_5 for package: postgresql-server-9.2.-.el7_5.x86_64

--> Processing Dependency: libpq.so.()(64bit) for package: postgresql-server-9.2.-.el7_5.x86_64

--> Running transaction check

---> Package postgresql.x86_64 :9.2.-.el7_5 will be installed

---> Package postgresql-libs.x86_64 :9.2.-.el7_5 will be installed

--> Finished Dependency Resolution

Dependencies Resolved

==================================================================================================================

 Package                          Arch                  Version                         Repository           Size

==================================================================================================================

Installing:

 postgresql-server                x86_64                9.2.-.el7_5                  base                3.8 M

Installing for dependencies:

 postgresql                       x86_64                9.2.-.el7_5                  base                3.0 M

 postgresql-libs                  x86_64                9.2.-.el7_5                  base                 k

Transaction Summary

==================================================================================================================

Install   Package (+ Dependent packages)

Total download size: 7.1 M

Installed size:  M

Downloading packages:

(/): postgresql-libs-9.2.-.el7_5.x86_64.rpm                                           |  kB  ::

(/): postgresql-server-9.2.-.el7_5.x86_64.rpm                                         | 3.8 MB  ::

(/): postgresql-9.2.-.el7_5.x86_64.rpm                                                | 3.0 MB  ::

------------------------------------------------------------------------------------------------------------------

Total                                                                              kB/s | 7.1 MB  ::

Running transaction check

Running transaction test

Transaction test succeeded

Running transaction

  Installing : postgresql-libs-9.2.-.el7_5.x86_64                                                          /

  Installing : postgresql-9.2.-.el7_5.x86_64                                                               /

  Installing : postgresql-server-9.2.-.el7_5.x86_64                                                        /

  Verifying  : postgresql-server-9.2.-.el7_5.x86_64                                                        /

  Verifying  : postgresql-libs-9.2.-.el7_5.x86_64                                                          /

  Verifying  : postgresql-9.2.-.el7_5.x86_64                                                               /

Installed:

  postgresql-server.x86_64 :9.2.-.el7_5

Dependency Installed:

  postgresql.x86_64 :9.2.-.el7_5                    postgresql-libs.x86_64 :9.2.-.el7_5

Complete!

[root@node101 ~]#
[root@node101 ~]# yum -y install postgresql-server #使用yum的方式安装postgresql数据库
2>.安装Ambari-Server
注意,在安装Ambari-Server请确保两点:
第一,是否配置好yum源;
第二:是否安装来postgresql数据库(如果没有安装psotgresql数据库的话安装Ambari-Server是会报错的);
[root@node101 ~]# yum -y install ambari-server

Loaded plugins: fastestmirror, priorities

Loading mirror speeds from cached hostfile

 * base: mirrors.aliyun.com

 * extras: mirrors.tuna.tsinghua.edu.cn

 * updates: mirrors.tuna.tsinghua.edu.cn

 packages excluded due to repository priority protections

Resolving Dependencies

--> Running transaction check

---> Package ambari-server.x86_64 :2.6.0.0- will be installed

--> Finished Dependency Resolution

Dependencies Resolved

==================================================================================================================

 Package                     Arch                 Version                      Repository                    Size

==================================================================================================================

Installing:

 ambari-server               x86_64               2.6.0.0-                  ambari-2.6.0.0                M

Transaction Summary

==================================================================================================================

Install   Package

Total download size:  M

Installed size:  M

Downloading packages:

warning: /var/cache/yum/x86_64//ambari-2.6.0.0/packages/ambari-server-2.6.0.0-.x86_64.rpm: Header V4 RSA/SHA1 Signature, key ID 07513cad: NOKEY

Public key for ambari-server-2.6.0.0-.x86_64.rpm is not installed

ambari-server-2.6.0.0-.x86_64.rpm                                                       |  MB  ::

Retrieving key from http://node101.yinzhengjie.org.cn/ambari/ambari/centos7/2.6.0.0-267/RPM-GPG-KEY/RPM-GPG-KEY-Jenkins

Importing GPG key 0x07513CAD:

 Userid     : "Jenkins (HDP Builds) <jenkin@hortonworks.com>"

 Fingerprint: df52 ed4f 7a3a  c099 4c66 b973 3a7a  3cad

 From       : http://node101.yinzhengjie.org.cn/ambari/ambari/centos7/2.6.0.0-267/RPM-GPG-KEY/RPM-GPG-KEY-Jenkins

Running transaction check

Running transaction test

Transaction test succeeded

Running transaction

  Installing : ambari-server-2.6.0.0-.x86_64                                                               /

  Verifying  : ambari-server-2.6.0.0-.x86_64                                                               /

Installed:

  ambari-server.x86_64 :2.6.0.0-

Complete!

[root@node101 ~]#
[root@node101 ~]# yum -y install ambari-server #安装ambari-server服务端
3>.Ambari-Server目录结构介绍
Ambari-Server安装完毕后我们主要关注4个目录,他们分别是以下几个:
[root@node101 ~]# ll /etc/ambari-server/conf/

total

-rwxr-xr-x  root root  Oct    ambari.properties

-rwxr-xr-x  root root   Oct    krb5JAASLogin.conf

-rwxr-xr-x  root root  Dec   : log4j.properties

-rwxr-xr-x  root root  Oct    metrics.properties

[root@node101 ~]#
[root@node101 ~]# ll /etc/ambari-server/conf/ #Ambari的配置文件会全部放在这个目录下。
[root@node101 ~]# ll /usr/lib/ambari-server/

total

-rw-r--r--  root root    Oct    activation-1.1.jar

-rw-r--r--  root root  Oct    ambari-metrics-common-2.6.0.0..jar

-rw-r--r--  root root  Oct    ambari-server-2.6.0.0..jar

-rw-r--r--  root root    Oct    ambari-views-2.6.0.0..jar

-rw-r--r--  root root  Oct    ant-1.6..jar

-rw-r--r--  root root    Oct    ant-launcher-1.7..jar

-rw-r--r--  root root   Oct    antlr-2.7..jar

-rw-r--r--  root root     Oct    aopalliance-1.0.jar

-rw-r--r--  root root    Oct    apacheds-i18n-2.0.-M19.jar

-rw-r--r--  root root   Oct    apacheds-kerberos-codec-2.0.-M19.jar

-rw-r--r--  root root   Oct    apache-log4j-extras-1.2..jar

-rw-r--r--  root root    Oct    api-asn1-api-1.0.-M26.jar

-rw-r--r--  root root    Oct    api-asn1-ber-1.0.-M26.jar

-rw-r--r--  root root    Oct    api-i18n-1.0.-M26.jar

-rw-r--r--  root root   Oct    api-ldap-model-1.0.-M26.jar

-rw-r--r--  root root    Oct    api-util-1.0.-M26.jar

-rw-r--r--  root root    Oct    asm-3.3..jar

-rw-r--r--  root root   Oct    avro-1.7..jar

-rw-r--r--  root root   Oct    c3p0-0.9.5.2.jar

-rw-r--r--  root root   Oct    cglib-2.2..jar

-rw-r--r--  root root    Oct    cloning-1.9..jar

-rw-r--r--  root root    Oct    commonj.sdo-2.1..jar

-rw-r--r--  root root   Oct    commons-beanutils-1.7..jar

-rw-r--r--  root root   Oct    commons-beanutils-core-1.8..jar

-rw-r--r--  root root    Oct    commons-cli-1.3..jar

-rw-r--r--  root root   Oct    commons-codec-1.8.jar

-rw-r--r--  root root   Oct    commons-collections-3.2..jar

-rw-r--r--  root root   Oct    commons-compress-1.5.jar

-rw-r--r--  root root   Oct    commons-configuration-1.6.jar

-rw-r--r--  root root    Oct    commons-csv-1.1.jar

-rw-r--r--  root root   Oct    commons-digester-1.8.jar

-rw-r--r--  root root   Oct    commons-httpclient-3.1.jar

-rw-r--r--  root root   Oct    commons-io-2.1.jar

-rw-r--r--  root root   Oct    commons-lang-2.5.jar

-rw-r--r--  root root    Oct    commons-logging-1.1..jar

-rw-r--r--  root root  Oct    commons-math3-3.1..jar

-rw-r--r--  root root   Oct    commons-net-1.4..jar

-rw-r--r--  root root    Oct    curator-client-2.7..jar

-rw-r--r--  root root   Oct    curator-framework-2.7..jar

-rw-r--r--  root root   Oct    curator-recipes-2.7..jar

-rw-r--r--  root root  Oct    ecj-3.5..jar

-rw-r--r--  root root  Oct    eclipselink-2.6..jar

-rw-r--r--  root root  Oct    ehcache-2.10..jar

-rw-r--r--  root root   Oct    gson-2.2..jar

-rw-r--r--  root root  Oct    guava-16.0.jar

-rw-r--r--  root root   Oct    guice-3.0.jar

-rw-r--r--  root root    Oct    guice-assistedinject-3.0.jar

-rw-r--r--  root root    Oct    guice-multibindings-3.0.jar

-rw-r--r--  root root    Oct    guice-persist-3.0.jar

-rw-r--r--  root root    Oct    guice-servlet-3.0.jar

-rw-r--r--  root root  Oct    h2-1.4..jar

-rw-r--r--  root root    Oct    hadoop-annotations-2.6..jar

-rw-r--r--  root root    Oct    hadoop-auth-2.7..jar

-rw-r--r--  root root  Oct    hadoop-common-2.7..jar

-rw-r--r--  root root  Oct    htrace-core-3.1.-incubating.jar

-rw-r--r--  root root   Oct    httpclient-4.2..jar

-rw-r--r--  root root   Oct    httpcore-4.2..jar

-rw-r--r--  root root    Oct    jackson-annotations-2.8..jar

-rw-r--r--  root root   Oct    jackson-core-asl-1.9..jar

-rw-r--r--  root root    Oct    jackson-jaxrs-1.9..jar

-rw-r--r--  root root   Oct    jackson-mapper-asl-1.9..jar

-rw-r--r--  root root    Oct    jackson-xc-1.9..jar

-rw-r--r--  root root     Oct    javax.inject-.jar

-rw-r--r--  root root    Oct    javax.json-1.0..jar

-rw-r--r--  root root    Oct    java-xmlbuilder-0.4.jar

-rw-r--r--  root root   Oct    javax.persistence-2.1..jar

-rw-r--r--  root root   Oct    javax.servlet-3.0..v201112011016.jar

-rw-r--r--  root root    Oct    javax.servlet-api-3.1..jar

-rw-r--r--  root root   Oct    jaxb-api-2.2..jar

-rw-r--r--  root root   Oct    jaxb-impl-2.2.-.jar

-rw-r--r--  root root     Oct    jcip-annotations-1.0.jar

-rw-r--r--  root root   Oct    jersey-client-1.19.jar

-rw-r--r--  root root   Oct    jersey-core-1.19.jar

-rw-r--r--  root root    Oct    jersey-guice-1.19.jar

-rw-r--r--  root root   Oct    jersey-json-1.19.jar

-rw-r--r--  root root    Oct    jersey-multipart-1.19.jar

-rw-r--r--  root root   Oct    jersey-server-1.19.jar

-rw-r--r--  root root   Oct    jersey-servlet-1.19.jar

-rw-r--r--  root root   Oct    jets3t-0.9..jar

-rw-r--r--  root root   Oct    jetty-6.1..jar

-rw-r--r--  root root    Oct    jetty-client-8.1..v20160209.jar

-rw-r--r--  root root    Oct    jetty-continuation-8.1..v20160209.jar

-rw-r--r--  root root    Oct    jetty-http-8.1..v20160209.jar

-rw-r--r--  root root   Oct    jetty-io-8.1..v20160209.jar

-rw-r--r--  root root    Oct    jetty-security-8.1..v20160209.jar

-rw-r--r--  root root   Oct    jetty-server-8.1..v20160209.jar

-rw-r--r--  root root   Oct    jetty-servlet-8.1..v20160209.jar

-rw-r--r--  root root    Oct    jetty-servlets-8.1..v20160209.jar

-rw-r--r--  root root   Oct    jetty-util-8.1..v20160209.jar

-rw-r--r--  root root   Oct    jetty-webapp-8.1..v20160209.jar

-rw-r--r--  root root    Oct    jetty-xml-8.1..v20160209.jar

-rw-r--r--  root root   Oct    jline-2.11.jar

-rw-r--r--  root root  Oct    jna-4.2..jar

-rw-r--r--  root root   Oct    jsch-0.1..jar

-rw-r--r--  root root    Oct    json-smart-1.1..jar

-rw-r--r--  root root  Oct    jsp-2.1-glassfish-2.1.v20100127.jar

-rw-r--r--  root root   Oct    jsp-api-2.1-glassfish-2.1.v20100127.jar

-rw-r--r--  root root    Oct    jsr305-1.3..jar

-rw-r--r--  root root    Oct    jsr311-api-1.1..jar

-rw-r--r--  root root     Oct    jul-to-slf4j-1.7..jar

-rw-r--r--  root root    Oct    kerberos-client-2.0.-M19.jar

drwxr-xr-x  root root     Dec   : lib

-rw-r--r--  root root    Oct    libpam4j-1.8.jar

-rw-r--r--  root root   Oct    log4j-1.2..jar

-rw-r--r--  root root   Oct    mailapi-1.5..jar

-rw-r--r--  root root   Oct    mchange-commons-java-0.2..jar

-rw-r--r--  root root   Oct    metrics-core-3.1..jar

-rw-r--r--  root root    Oct    metrics-jvm-3.1..jar

-rw-r--r--  root root    Oct    mimepull-1.9..jar

-rw-r--r--  root root   Oct    mina-core-2.0..jar

-rw-r--r--  root root  Oct    netty-3.7..Final.jar

-rw-r--r--  root root   Oct    nimbus-jose-jwt-3.9.jar

-rw-r--r--  root root    Oct    objenesis-2.1.jar

-rw-r--r--  root root    Oct    objenesis-tck-1.2.jar

-rw-r--r--  root root    Oct    oro-2.0..jar

-rw-r--r--  root root    Oct    paranamer-2.3.jar

-rw-r--r--  root root   Oct    postgresql-9.3--jdbc4.jar

-rw-r--r--  root root   Oct    protobuf-java-2.5..jar

-rw-r--r--  root root   Oct    quartz-2.2..jar

-rw-r--r--  root root    Oct    quartz-jobs-2.2..jar

-rw-r--r--  root root    Oct    slf4j-api-1.7..jar

-rw-r--r--  root root     Oct    slf4j-log4j12-1.7..jar

-rw-r--r--  root root    Oct    smtp-1.5..jar

-rw-r--r--  root root   Oct    snappy-java-1.0.4.1.jar

-rw-r--r--  root root   Oct    snmp4j-1.10..jar

-rw-r--r--  root root   Oct    spring-aop-3.0..RELEASE.jar

-rw-r--r--  root root    Oct    spring-asm-3.0..RELEASE.jar

-rw-r--r--  root root   Oct    spring-beans-3.0..RELEASE.jar

-rw-r--r--  root root   Oct    spring-context-3.0..RELEASE.jar

-rw-r--r--  root root   Oct    spring-core-3.0..RELEASE.jar

-rw-r--r--  root root   Oct    spring-expression-3.0..RELEASE.jar

-rw-r--r--  root root   Oct    spring-jdbc-3.0..RELEASE.jar

-rw-r--r--  root root   Oct    spring-ldap-core-2.0..RELEASE.jar

-rw-r--r--  root root   Oct    spring-security-config-3.1..RELEASE.jar

-rw-r--r--  root root   Oct    spring-security-core-3.1..RELEASE.jar

-rw-r--r--  root root    Oct    spring-security-kerberos-core-1.0..RELEASE.jar

-rw-r--r--  root root     Oct    spring-security-kerberos-web-1.0..RELEASE.jar

-rw-r--r--  root root   Oct    spring-security-ldap-4.0..RELEASE.jar

-rw-r--r--  root root   Oct    spring-security-web-3.1..RELEASE.jar

-rw-r--r--  root root   Oct    spring-tx-3.0..RELEASE.jar

-rw-r--r--  root root   Oct    spring-web-3.0..RELEASE.jar

-rw-r--r--  root root    Oct    stax-api-1.0-.jar

-rw-r--r--  root root    Oct    validation-api-1.1..Final.jar

-rw-r--r--  root root   Oct    velocity-1.7.jar

drwxr-xr-x  root root     Dec   : web

-rw-r--r--  root root    Oct    xmlenc-0.52.jar

-rw-r--r--  root root    Oct    xz-1.2.jar

-rw-r--r--  root root   Oct    zookeeper-3.4..jar

[root@node101 ~]#
[root@node101 ~]# ll /usr/lib/ambari-server/ #Ambari自身的服务会安装到这个目录下。
[root@node101 ~]# ll /var/log/ambari-server/

total

-rw-r--r--  root root       Dec   : ambari-alerts.log

-rw-r--r--  root root     Dec   : ambari-audit.log

-rw-r--r--  root root       Dec   : ambari-config-changes.log

-rw-r--r--  root root     Dec   : ambari-eclipselink.log

-rw-r--r--  root root    Dec   : ambari-server-check-database.log

-rw-r--r--  root root    Dec   : ambari-server-command.log

-rw-r--r--  root root  Dec   : ambari-server.log

-rw-r--r--  root root     Dec   : ambari-server.out

drwxr-xr-x  root root    Dec   : capshed-view

drwxr-xr-x  root root    Dec   : files-view

drwxr-xr-x  root root    Dec   : hive20-view

drwxr-xr-x  root root    Dec   : hive-next-view

drwxr-xr-x  root root    Dec   : huetoambarimigration-view

drwxr-xr-x  root root    Dec   : pig-view

drwxr-xr-x  root root    Dec   : slider-view

drwxr-xr-x  root root    Dec   : storm-view

drwxr-xr-x  root root    Dec   : tez-view

drwxr-xr-x  root root    Dec   : wfmanager-view

[root@node101 ~]#
[root@node101 ~]# ll /var/log/ambari-server/ #Ambari自身的服务日志会放到这个目录下。
4>.配置Ambari-Server
在安装Ambari-Server之后,如果我们直接跳过当前的步骤,直接去执行第5步骤,我们会发现启动服务报错,这是因为在启动服务之前必须要先完成初始配置,执行ambari-server setup命令开始配置。
[root@node101 ~]# ambari-server setup

Using python  /usr/bin/python                                      #看到这里的数据,同学们估计已经猜到了,没错Ambari-Server会通过Python脚本启动一个交互式的shell程序来引导用户完成配置,这和CDH几乎是如出一辙啊!!!

Setup ambari-server

Checking SELinux...                                              #咱们再看看这个输出,说明程序配置首先会检查是否已经禁用了SELinux,这项配置在之前步骤已经设置过了,所以下面价差的状态为“disabled”

SELinux status is 'disabled'

Customize user account for ambari-server daemon [y/n] (n)? n          #紧接着,出现了一个交互的场景,问咱们是否要指定Ambari的用户,这里用户使用默认的Amabri用户,输入字母“n”,或者直接按回车即可。

Adjusting ambari-server permissions and ownership...

Checking firewall status...                                        #看到没有,上面检查了selinux的状态,现在又开始检查防火墙的状态啦!下面有紧接着检查JDK环境

Checking JDK...

[] Oracle JDK 1.8 + Java Cryptography Extension (JCE) Policy Files

[] Oracle JDK 1.7 + Java Cryptography Extension (JCE) Policy Files

[] Custom JDK

==============================================================================

Enter choice ():                                     #看到没?让你从上面选择对应的数字,是JDK8还是JDK7,还是咱们自定义安装的jdk,我这里是自定义自定义安装JDK环境的,因此我输入了数字”3”,下面会要求我们指定安装JDK的路径。

WARNING: JDK must be installed on all hosts and JAVA_HOME must be valid on all hosts.

WARNING: JCE Policy files are required for configuring Kerberos security. If you plan to use Kerberos,please make sure JCE Unlimited Strength Jurisdiction Policy Files are valid on all hosts.

Path to JAVA_HOME: /yinzhengjie/softwares/jdk                    #既然上面我们选择的是自定义JDK环境的,那么我们得告诉它我们的JAVA_HOME路径在哪。实事求是,按照你安装的路径输入进去即可。

Validating JDK on Ambari Server...done.

Completing setup...

Configuring database...

Enter advanced database configuration [y/n] (n)? n                #最后是数据库设置,这里为了方便,我就使用了默认的postgresql数据库。大家看到小括号的提示没?他表示默认就是“n”,因此我们是可以直接回车的!我之前也给大家分析了为什么不要使用内置的数据库的原因,但本片博客会展示内置的postgresql数据库存放元数据信息。

Configuring database...

Default properties detected. Using built-in database.

Configuring ambari database...

Checking PostgreSQL...

Running initdb: This may take up to a minute.

Initializing database ... OK

About to start PostgreSQL

Configuring local database...

Configuring PostgreSQL...

Restarting PostgreSQL

Creating schema and user...

done.

Creating tables...

done.

Extracting system views...

..........ambari-admin-2.6.0.0..jar

.

Adjusting ambari-server permissions and ownership...

Ambari Server 'setup' completed successfully.

[root@node101 ~]#
5>.启动Ambari-Server
我们初始化了Ambari-Server的存放元数据信息的数据库以及配置jdk等环境后(也就是第4步骤),我们就可以启动Ambari Serveri数据库啦!
[root@node101 ~]# ambari-server start                       #输入相应的启动命令,你就会发现启动数据是成功的

Using python  /usr/bin/python

Starting ambari-server

Ambari Server running with administrator privileges.

Organizing resource files at /var/lib/ambari-server/resources...

Ambari database consistency check started...

Server PID at: /var/run/ambari-server/ambari-server.pid

Server out at: /var/log/ambari-server/ambari-server.out

Server log at: /var/log/ambari-server/ambari-server.log            #这个文件是存放日志的,上面2个文件存放的是PID以及

Waiting for server start......................

Server started listening on 8080                          #这里自然就是监听服务的端口啦~我们可以通过webUI的方式去访问它。

DB configs consistency check: no errors and warnings were found.

Ambari Server 'start' completed successfully.                  #这里提示我们服务启动成功啦~

[root@node101 ~]#
好啦,既然服务已经启动成功了,那我们也别闲着了,说干就干吧,访问一下WebUI吧:
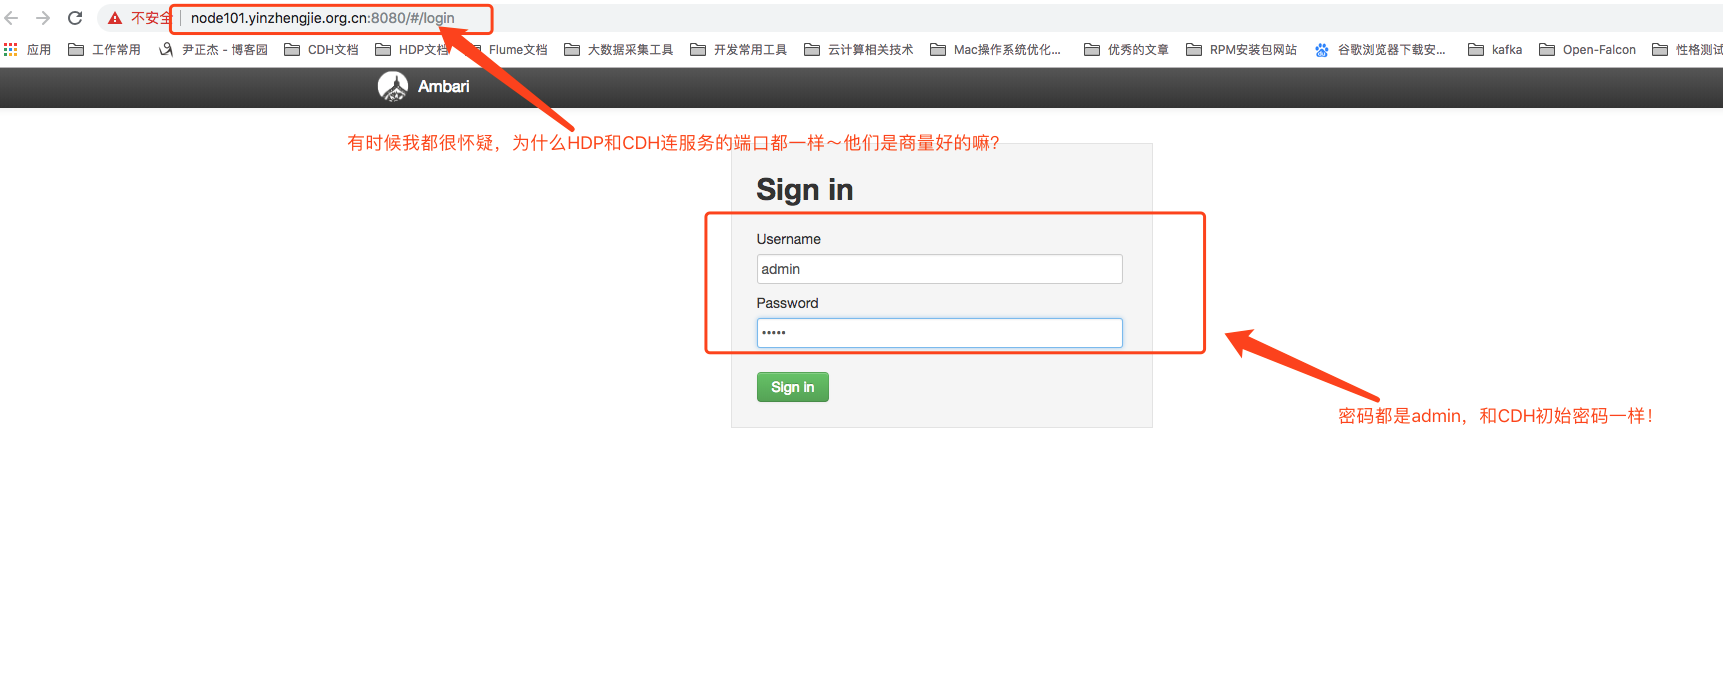
如上图所示,登陆系统之后,会看到Ambari空空如也的欢迎界面,接下来我们就需要介绍如何通过Ambari新建Hadoop集群。详情请参考我的博客:手把手教你通过Ambari新建Hadoop集群图解案例。
离线方式部署Ambari2.6.0.0的更多相关文章
- 运维监控-基于yum的方式部署Zabbix Server 4.0 版本
运维监控-基于yum的方式部署Zabbix Server 4.0 版本 作者:尹正杰 版权声明:原创作品,谢绝转载!否则将追究法律责任. 一.如何选择zabbix版本 1>.打开zabbix官方 ...
- 运维监控-基于yum的方式部署 Zabbix Agent 4.0 版本
运维监控-基于yum的方式部署 Zabbix Agent 4.0 版本 作者:尹正杰 版权声明:原创作品,谢绝转载!否则将追究法律责任. 上一篇博客我们分享了如何基于yum的方式部署zabbix 4. ...
- Apache Hadoop集群离线安装部署(二)——Spark-2.1.0 on Yarn安装
Apache Hadoop集群离线安装部署(一)——Hadoop(HDFS.YARN.MR)安装:http://www.cnblogs.com/pojishou/p/6366542.html Apac ...
- Hadoop生态圈-离线方式部署Cloudera Manager5.15.1
Hadoop生态圈-离线方式部署Cloudera Manager5.15.1 作者:尹正杰 版权声明:原创作品,谢绝转载!否则将追究法律责任. 到目前位置,Cloudera Manager和CDH最新 ...
- 二进制方式部署Kubernetes 1.6.0集群(开启TLS)
本节内容: Kubernetes简介 环境信息 创建TLS加密通信的证书和密钥 下载和配置 kubectl(kubecontrol) 命令行工具 创建 kubeconfig 文件 创建高可用 etcd ...
- Tidb 离线Ansible方式部署实践
1.最近浏览到一个比较新的分布式数据库Tidb,开源看起来比较牛的样子,一时手痒就动手试试部署 2.参考官方 Ansible 离线方式部署 :https://pingcap.com/docs-cn/o ...
- Hadoop生态圈-基于yum源的方式部署Cloudera Manager5.15.1
Hadoop生态圈-基于yum源的方式部署Cloudera Manager5.15.1 作者:尹正杰 版权声明:原创作品,谢绝转载!否则将追究法律责任. 我之前分享过关于离线方式部署Cloudera ...
- Apache Hadoop集群离线安装部署(三)——Hbase安装
Apache Hadoop集群离线安装部署(一)——Hadoop(HDFS.YARN.MR)安装:http://www.cnblogs.com/pojishou/p/6366542.html Apac ...
- Apache Hadoop集群离线安装部署(一)——Hadoop(HDFS、YARN、MR)安装
虽然我已经装了个Cloudera的CDH集群(教程详见:http://www.cnblogs.com/pojishou/p/6267616.html),但实在太吃内存了,而且给定的组件版本是不可选的, ...
随机推荐
- Linux内核分析作业八
进程的切换和系统的一般执行过程 贾瑗 原创作品转载请注明出处 <Linux内核分析>MOOC课程 http://mooc.study.163.com/course/USTC-1000029 ...
- Github学习心得体会
https://github.com/Accredit/TEST 在本学期第一次接触Github,在系统的学习了Github的使用之后,自己对Github有了一个基本的使用了解.在这个过程中,自己也认 ...
- Linux列举所有隐藏文件
ll 命令是 ls -l的缩写 ls -a是列举所有(all)文件,包含隐藏文件,以.开头的文件. ls -l是以列表(list)方式列举文件. http://bbs.chinaunix.net/th ...
- 设备 VMnet0 上的网桥当前未运行。此虚拟机无法与主机或网络中的其他计算机通信。
http://www.cnblogs.com/baihuitestsoftware/articles/4223552.html 因为试用Windows10教育版下的Docker打开过Hyper-V,虽 ...
- [读书笔记]SQLSERVER企业级平台管理实践读书笔记01
1. SQLSERVER信息收集 SQLDIAG 使用界面 C:\Users\Administrator>sqldiag2018/01/02 08:13:26.10 SQLDIAG Collec ...
- 深入理解CSS绝对定位absolute
前面的话 前面已经介绍了定位的偏移和层叠,例子中大量的应用了绝对定位.因为相较于相对定位和固定定位,绝对定位在实际中应用频率更高.应用场景更广泛.本文将介绍使用绝对定位时的具体细节 定义 当元素绝对定 ...
- Check failed: status == CUBLAS_STATUS_SUCCESS (11 vs. 0) CUBLAS_STATUS_MAPPING_ERROR
I0930 21:23:15.115576 30918 solver.cpp:281] Learning Rate Policy: multistepF0930 21:23:17.263314 310 ...
- Django model 中的字段解释
Django 通过 models 实现数据库的创建.修改.删除等操作,本文为模型中一般常用的类型的清单,便于查询和使用: AutoField:一个自动递增的整型字段,添加记录时它会自动增长.你通常不需 ...
- EF 跨库查询
原因:最近公司项目,遇到一个ef跨库查询的问题.(只是跨库,并不是跨服务器哈) 主要我们的一些数据,譬如地址,城市需要查询公共资料库. 但是本身我的程序设计采用的是ef框架的.因此为这事花费了1天时间 ...
- MT【35】用复数得到的两组恒等式
特别的,当$r\rightarrow1^{-}$时有以下两个恒等式: 第二个恒等式有关的自主招生试题参考博文MT[31]傅里叶级数为背景的三角求和 评:利用两种展开形式得到一些恒等式是复数里经常出现的 ...