Python网络爬虫入门篇
1. 预备知识
学习者需要预先掌握Python的数字类型、字符串类型、分支、循环、函数、列表类型、字典类型、文件和第三方库使用等概念和编程方法。
Python入门篇:https://www.cnblogs.com/wenwei-blog/p/10592541.html
2. Python爬虫基本流程

a. 发送请求
使用http库向目标站点发起请求,即发送一个Request,Request包含:请求头、请求体等。
Request模块缺陷:不能执行JS 和CSS 代码。
b. 获取响应内容
如果requests的内容存在于目标服务器上,那么服务器会返回请求内容。
Response包含:html、Json字符串、图片,视频等。
c. 解析内容
对用户而言,就是寻找自己需要的信息。对于Python爬虫而言,就是利用正则表达式或者其他库提取目标信息。
解析html数据:正则表达式(RE模块),第三方解析库如Beautifulsoup,pyquery等
解析json数据:json模块
解析二进制数据:以wb的方式写入文件
d. 保存数据
解析得到的数据可以多种形式,如文本,音频,视频保存在本地。
数据库(MySQL,Mongdb、Redis)
文件
3. Requests库入门
Requests是用python语言基于urllib编写的,采用的是Apache2 Licensed开源协议的HTTP库。
3.1 Requests库安装和测试
安装:
Win平台:以“管理员身份运行cmd”,执行 pip install requests

测试:

3.2 Requests库的7个主要方法
| 方法 | 说明 |
| requests.request() | 构造一个请求,支撑一下个方法的基础方法。 |
| requests.get() | 获取HTML网页的主要方法,对应HTTP的GET |
| requests.head() | 获取HTML网页投信息的方法,对应HTTP的HEAD |
| requests.post() | 向HTML网页提交POST请求的方法,对应HTTP的POST |
| requests.put() | 向HTML网页提交PUT请求的方法,对应HTTP的PUT |
| requests.patch() | 向HTML网页提交局部修改请求,对应HTTP的PATCH |
| requests.delete() | 向HTML网页提交删除请求,对应HTTP的DELETE |
带可选参数的请求方式:
requests.request(method,url,**kwargs)
method:请求方式,对应get/put/post等7种
url:获取页面的url链接
**kwargs:控制访问的参数,均为可选项,共以下13个
params:字典或字节系列,作为参数增加到url中
>>> kv = {'key1':'value1','key2':'value2'}

>>> r = requests.request('GET','http://python123.io/ws',params=kv)

>>> print(r.url)
https://python123.io/ws?key1=value1&key2=value2
data:字典、字节系列或文件对象,作为requests的内容
>>> kv = {'key1':'value1','key2':'value2'}

>>> r = requests.request('POST','http://python123.io/ws',data=kv)

>>> body = '主题内容'

>>> r = requests.request('POST','http:///python123.io/ws',data=body)
json:JSON格式的数据,作为equests的内容
>>> kv = {'key1':'value1','key2':'value2'}

>>> r = requests.request('POST','http://python123.io/ws',json=kv)
headers:字典,HTTP定制头
>>> hd = {'user-agent':'Chrome/10'}

>>> r = requests.request('POST','http://www.baidu.com',headers=hd)
cookies:字典或cookieJar,Request中的cookie
files:字典类型,传输文件
>>> f = {'file':open('/root/po.sh','rb')}

>>> r = requests.request('POST','http://python123.io/ws',file=f)
timeout:设置超时时间,秒为单位。
>>> r = requests.request('GET','http://python123.io/ws',timeout=30)
proxies:字典类型,设置访问代理服务器,可以增加登录验证。
>>> pxs = {'http':'http://user:pass@10.10.10.2:1234',

... 'https':'https://10.10.10.3:1234'}

>>> r = requests.request('GET','http://www.baidu.com',proxies=pxs)
allow_redirects:True/False,默认为True,重定向开关
stream:True/False,默认为True,获取内容立即下载开关
verify:rue/False,默认为True,认证SSL证书开关
Cert:本地SSL证书路径
auth:元组类型,支持HTTP认证功能
3.3 Requests库的get()方法
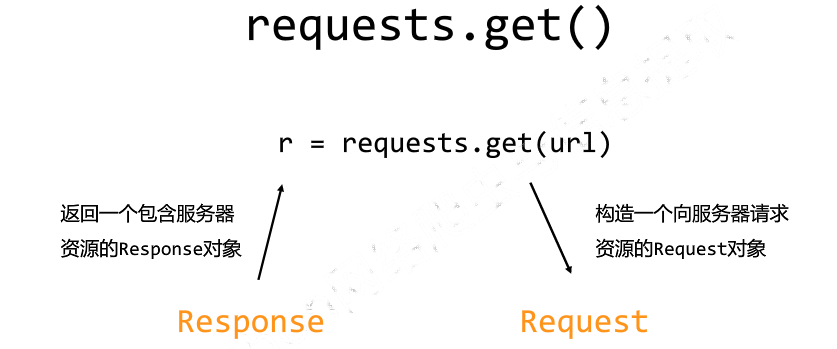

3.4 Requests的Response对象
Response对象包含服务器返回的所有信息,也包含请求的Request信息

Response对象的属性


3.5 理解Response的编码
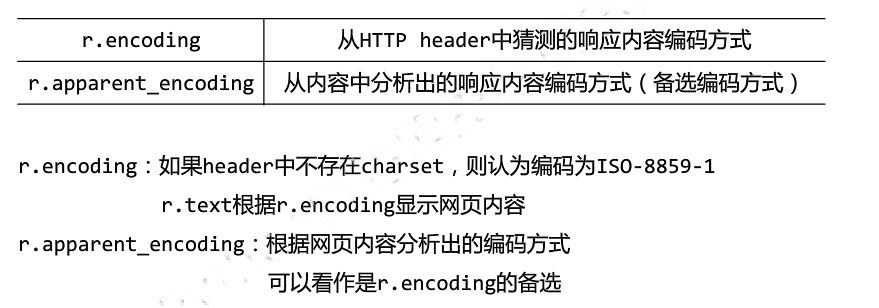
注意:编码为ISO-8859-1不支持编译中文,需要设置 r = encoding="utf-8"
3.6 理解Requests库的异常
Requests库支持常见的6种连接异常
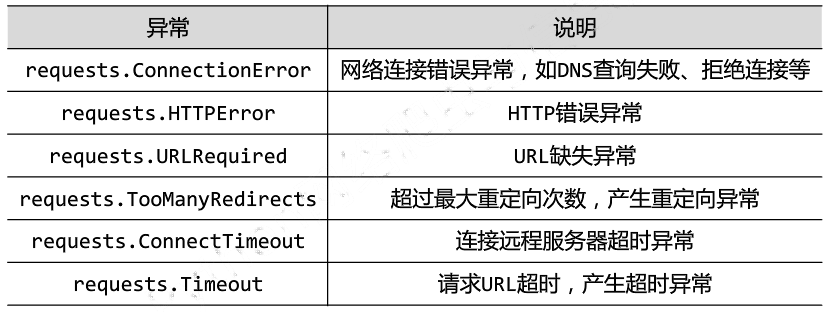
注意:网络连接有风险。异常处理很重要。raise_for_status()如果不等于200则产生异常requests.HTTPError。
3.7 爬取网页的通用代码框架
import requests

def getHTMLText(url):

    try:

        r = requests.get(url,timeout=30)

        r.raise_for_status()

        r.encoding = r.apparent_encoding

        return r.text

    except:

        return "产生异常"

if __name__ == "__main__":

    url = "http://www.baidu.com"

    print(getHTMLText(url))
4. 网络爬虫的“盗亦有道”:Robots协议
robots是网站跟爬虫间的协议,robots.txt(统一小写)是一种存放于网站根目录下的ASCII编码的文本文件,它通常告诉网络搜索引擎的漫游器(又称网络蜘蛛),此网站中的哪些内容是不应被搜索引擎的漫游器获取的,哪些是可以被漫游器获取的。因为一些系统中的URL是大小写敏感的,所以robots.txt的文件名应统一为小写。robots.txt应放置于网站的根目录下。
网络爬虫的尺寸:

4.1 网络爬虫引发的问题
a. 网络爬虫的“性能”骚扰
web默认接受人类访问,由于网络爬虫的频繁访问会给服务器带来巨大的额资源开销。
b. 网络爬虫的法律风险
服务器上的数据有产权归属,网络爬虫获取数据牟利将带来法律风险
c. 网络爬虫的隐私泄露
网络爬虫可能具备突破简单控制访问的能力,获取被保护的数据从而泄露个人隐私。
4.2 网络爬虫限制
a. 来源审查:判断User-Agent进行限制
检查来访HTTP协议头的user-agent域,只响应浏览器或友好爬虫的访问
b. 发布公告:Robots协议
告知所有爬虫网站的爬取策略,要求遵守Robots协议
4.3 真实的Robots协议案例
京东的Robots协议:
https://www.jd.com/robots.txt
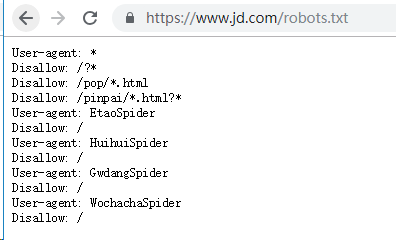
#注释,*代表所有,/代表根目录
4.4 robots协议的遵守方式
对robots协议的理解

自动或人工识别roboes.txt,z再进行内容爬取。
robots协议是建议但非约束性,网络爬虫可以补遵守,但存在法律风险。
原则:人类行为可以补参考robots协议,比如正常阅览网站,或者较少爬取网站频率。
5. Requests库网络爬虫实战
5.1 京东商品页面爬取
目标页面地址:https://item.jd.com/5089267.html

实例代码:
import requests

url = 'https://item.jd.com/5089267.html'

try:

    r = requests.get(url)

    r.raise_for_status()

    r.encoding =r.apparent_encoding

    print(r.text[:1000])

except:

    print("爬取失败")
结果:

5.2 当当网商品页面爬取
目标页面地址:http://product.dangdang.com/26487763.html

代码:
import requests

url = 'http://product.dangdang.com/26487763.html'

try:

    r = requests.get(url)

    r.raise_for_status()

    r.encoding =r.apparent_encoding

    print(r.text[:1000])

except IOError as e:

    print(str(e))
出现报错:
HTTPConnectionPool(host='127.0.0.1', port=80): Max retries exceeded with url: /26487763.html (Caused by NewConnectionError('<urllib3.connection.HTTPConnection object at 0x10fc390>: Failed to establish a new connection: [Errno 111] Connection refused',))
报错原因:当当网拒绝不合理的浏览器访问。
查看初识的http请求头:
print(r.request.headers)

代码改进:构造合理的HTTP请求头
import requests

url = 'http://product.dangdang.com/26487763.html'

try:

    kv = {'user-agent':'Mozilla/5.0'}

    r = requests.get(url,headers=kv)

    r.raise_for_status()

    r.encoding =r.apparent_encoding

    print(r.text[:1000])

except IOError as e:

    print(str(e))
结果正常爬取:

5.3 百度360搜索引擎关键词提交
百度关键词接口:http://www.baidu.com/s?wd=keyword
代码实现:
import requests

keyword = "python"

try:

    kv = {'wd':keyword}

    r = requests.get("http://www.baidu.com/s",params=kv)

    print(r.request.url)

    r.raise_for_status()

    print(len(r.text))

except IOError as e:

    print(str(e))
执行结果:

360关键词接口:
http://www.so.com/s?q=keyword
代码实现:
import requests

keyword = "Linux"

try:

    kv = {'q':keyword}

    r = requests.get("http://www.so.com/s",params=kv)

    print(r.request.url)

    r.raise_for_status()

    print(len(r.text))

except IOError as e:

    print(str(e))
执行结果:

5.4 网络图片爬取和存储
网络图片链接的格式:
http://FQDN/picture.jpg
校花网:http://www.xiaohuar.com
选择一个图片地址:http://www.xiaohuar.com/d/file/20141116030511162.jpg
实现代码:
import requests

import os

url = "http://www.xiaohuar.com/d/file/20141116030511162.jpg"

dir = "D://pics//"

path = dir + url.split('/')[-1] #设置图片保存路径并以原图名名字命名

try:

    if not os.path.exists(dir):

        os.mkdir(dir)

    if not os.path.exists(path):

        r = requests.get(url)

        with open(path,'wb') as f:

            f.write(r.content)

            f.close()

            print("文件保存成功")

    else:

        print("文件已存在")

except IOError as e:

    print(str(e))
查看图片已经存在:

5.5 ip地址归属地查询
ip地址归属地查询网站接口:http://www.ip138.com/ips138.asp?ip=
实现代码:
import requests

url = "http://www.ip38.com/ip.php?ip="

try:

    r = requests.get(url+'104.193.88.77')

    r.raise_for_status()

    r.encoding = r.apparent_encoding

    print(r.text)

except IOError as e:

    print(str(e))
5.5 有道翻译翻译表单提交
打开有道翻译,在开发者模式依次单击“Network”按钮和“XHR”按钮,找到翻译数据:

import requests

import json

def get_translate_date(word=None):

    url = "http://fanyi.youdao.com/translate?smartresult=dict&smartresult=rule"

    #post参数需要放在请求实体里,构建一个新字典

    form_data = {'i': word,

                 'from': 'AUTO',

                 'to': 'AUTO',

                 'smartresult': 'dict',

                 'client': 'fanyideskweb',

                 'salt': '',

                 'sign': 'b2781ea3e179798436b2afb674ebd223',

                 'ts': '',

                 'bv': '94d71a52069585850d26a662e1bcef22',

                 'doctype': 'json',

                 'version': '2.1',

                 'keyfrom': 'fanyi.web',

                 'action': 'FY_BY_REALTlME'

                 }

    #请求表单数据

    response = requests.post(url,data=form_data)

    #将JSON格式字符串转字典

    content = json.loads(response.text)

    #打印翻译后的数据

    print(content['translateResult'][0][0]['tgt'])

if __name__ == '__main__':

    word = input("请输入你要翻译的文字:")

    get_translate_date(word)
执行结果:

6 Beautiful Soup库入门
6.1 简介
6.2 Beautiful Soup安装
6.3 BeautifulSoup库解析器
|
解析器
|
使用方法
|
条件
|
|
bs4的HTML解析器
|
BeautifulSoup(mk,'html.parser')
|
安装bs4库
|
|
lxml的HTML解析器
|
BeautifulSoup(mk,'lxml')
|
pip install lxml
|
|
lxml的XML解析器
|
BeautifulSoup(mk,'xml')
|
pip install lxml
|
|
html5lib的解析器
|
BeautifulSoup(mk,'htmlslib')
|
pip install html5lib
|
from bs4 import BeautifulSoup

soup = BeautifulSoup('<p>Hello</p>','lxml')

print(soup.p.string)
6.4 BeautifulSoup的基本用法
|
基本元素
|
说明
|
|
Tag
|
标签,基本信息组织单元,分别用<>和</>标明开头和结尾
|
|
Name
|
标签的名字,<p></p>的名字是‘p’,格式:<tag>.name
|
|
Attributes
|
标签的属性,字典形式组织,格式:<tag>.attrs
|
|
NavigableString
|
标签内非属性字符串,<>...<>中字符串,格式:<tag>.string
|
|
Comment
|
标签内字符串的注释部分,一种特殊的Comment类型
|
>>> from bs4 import BeautifulSoup

>>> import requests

>>> r = requests.get("http://python123.io/ws/demo.html")

>>> demo = r.text

>>> demo

'<html><head><title>This is a python demo page</title></head>\r\n<body>\r\n<p class="title"><b>The demo python introduces several python courses.</b></p>\r\n<p class="course">Python is a wonderful general-purpose programming language. You can learn Python from novice to professional by tracking the following courses:\r\n<a href="http://www.icourse163.org/course/BIT-268001" class="py1" id="link1">Basic Python</a> and <a href="http://www.icourse163.org/course/BIT-1001870001" class="py2" id="link2">Advanced Python</a>.</p>\r\n</body></html>'

>>> soup = BeautifulSoup(demo,"html.parser")

>>> soup.title #获取标题

<title>This is a python demo page</title>

>>> soup.a #获取a标签

<a class="py1" href="http://www.icourse163.org/course/BIT-268001" id="link1">Basic Python</a>

>>> soup.title.string

'This is a python demo page'

>>> soup.prettify() #输出html标准格式内容

'<html>\n <head>\n <title>\n This is a python demo page\n </title>\n </head>\n <body>\n <p class="title">\n <b>\n The demo python introduces several python courses.\n </b>\n </p>\n <p class="course">\n Python is a wonderful general-purpose programming language. You can learn Python from novice to professional by tracking the following courses:\n <a class="py1" href="http://www.icourse163.org/course/BIT-268001" id="link1">\n Basic Python\n </a>\n and\n <a class="py2" href="http://www.icourse163.org/course/BIT-1001870001" id="link2">\n Advanced Python\n </a>\n .\n </p>\n </body>\n</html>'

>>> soup.a.name #每个<tag>都有自己的名字,通过<tag>.name获取

'a'

>>> soup.p.name

'p'

>>> tag = soup.a

>>> tag.attrs

{'href': 'http://www.icourse163.org/course/BIT-268001', 'class': ['py1'], 'id': 'link1'}

>>> tag.attrs['class']

['py1']

>>> tag.attrs['href']

'http://www.icourse163.org/course/BIT-268001'

>>> type(tag.attrs)

<class 'dict'>

>>> type(tag)

<class 'bs4.element.Tag'>

>>>
6.5 标签树的遍历


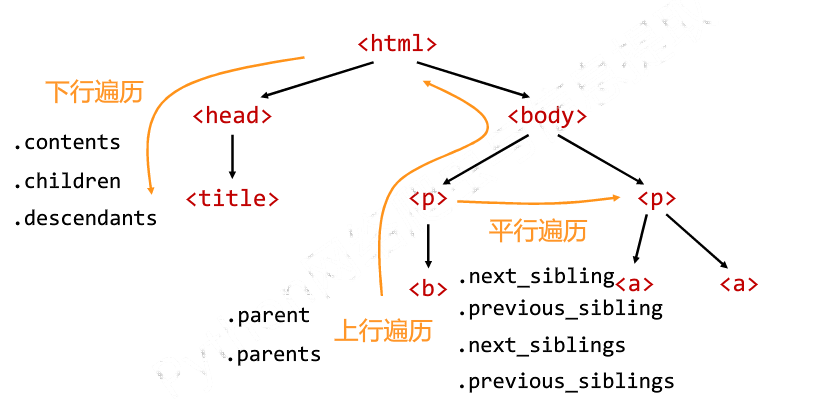
from bs4 import BeautifulSoup

import requests

demo = requests.get("http://python123.io/ws/demo.html").text

soup = BeautifulSoup(demo,"html.parser")

#标签树的上行遍历

print("遍历儿子节点:\n")

for child in soup.body.children:

 print(child)

print("遍历子孙节点:\n")

for child1 in soup.body.descendants:

 print(child1)

print(soup.title.parent)

print(soup.html.parent)

for parent in soup.a.parents:

 if parent is None:

 print(parent)

 else:

 print(parent.name)

#标签树的平行遍历

print(soup.a.next_sibling)

print(soup.a.next_sibling.next_sibling)

print(soup.a.previous_sibling)
7 正则表达式
正则表达式是处理字符串的强大工具,它有自己特定的语法结构,实现字符串的检索、替换、匹配验证都可以。对于爬虫来说,
从HTML里提取想要的信息非常方便。python的re库提供了整个正则表达式的实现
7.1 案例引入
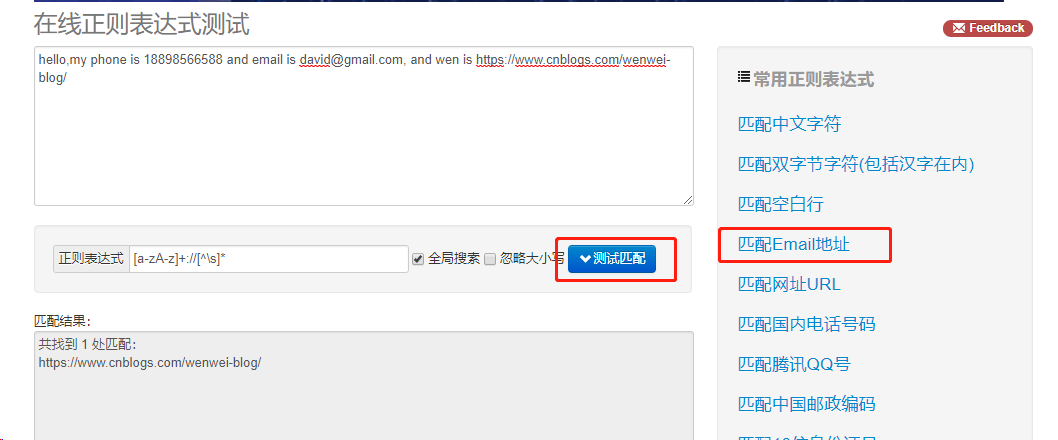
这里介绍一个正则表达式测试工具http://tool.oschina.net/regex,输入待匹配的文本,然选择常用的正则表达式,得到相应的匹配结果,
适合新手入门。这里输入:
hello,my phone is 18898566588 and email is david@gmail.com, and wen is https://www.cnblogs.com/wenwei-blog/
点击“匹配Email地址”,即可匹配出网址。
7.2 常用正则表达式匹配规则
.*? 满足条件的情况只匹配一次,即懒惰匹配。
7.3 常用匹配方法属性函数
|
方法/属性
|
作用
|
|
re.match(pattern, string, flags=0)
|
从字符串的起始位置匹配,如果起始位置匹配不成功的话,match()就返回none
|
|
re.search(pattern, string, flags=0)
|
扫描整个字符串并返回第一个成功的匹配
|
|
re.findall(pattern, string, flags=0)
|
找到RE匹配的所有字符串,并把他们作为一个列表返回
|
|
re.finditer(pattern, string, flags=0)
|
找到RE匹配的所有字符串,并把他们作为一个迭代器返回
|
|
re.sub(pattern, repl, string, count=0, flags=0)
|
替换匹配到的字符串
|
#!/usr/bin/python3

import re

#替换

phone = '18898537584 #这是我的电话号码'

print('我的电话号码:',re.sub('#.*','',phone)) #去掉注释

print(re.sub('\D','',phone))

#search

ip_addr = re.search('(\d{3}\.){1,3}\d{1,3}\.\d{1,3}',os.popen('ifconfig').read())

print(ip_addr)

#match

>>> a = re.match('\d+','2ewrer666dad3123df45')

>>> print(a.group())

2
|
方法/属性
|
作用
|
|
group(num=0)
|
匹配的整个表达式的字符串,group() 可以一次输入多个组号,在这种情况下它将返回一个包含那些组所对应值的元组。
|
|
groups()
|
返回包含所有小组字符串的元组,从1到所含的小组
|
|
groupdict()
|
返回以有别名的组的别名为键、以该组截获的子串为值的字典
|
|
start()
|
返回匹配开始的位置
|
|
end()
|
返回匹配结束的位置
|
|
span()
|
返回一个元组包含匹配(开始,结束)的位置
|
>>> import re

>>> print(re.search(r'(\d+)-([a-z])','34324-dfsdfs777-hhh').group(0)) #返回整体

34324-d

>>> print(re.search(r'(\d+)-([a-z])','34324-dfsdfs777-hhh').group(1))  #返回第一组

34324

>>> print(re.search(r'(\d+)-([a-z])','34324-dfsdfs777-hhh').group(2))  #获取第二组

d

>>> print(re.search(r'(\d+)-([a-z])','34324-dfsdfs777-hhh').group(3))  #不存在。报错“no such group”

Traceback (most recent call last):

File "<stdin>", line 1, in <module>

IndexError: no such group
7.4 re.compile 函数
compile 函数用于编译正则表达式,生成一个正则表达式( Pattern )对象。语法格式:
re.compile(pattern[, flags])
参数:
pattern : 一个字符串形式的正则表达式
flags : 可选,表示匹配模式,比如忽略大小写,多行模式等,具体参数为:
re.I 忽略大小写
re.L 表示特殊字符集 \w, \W, \b, \B, \s, \S 依赖于当前环境
re.M 多行模式
re.S 即为 . 并且包括换行符在内的任意字符(. 不包括换行符)
re.U 表示特殊字符集 \w, \W, \b, \B, \d, \D, \s, \S 依赖于 Unicode 字符属性数据库
re.X 为了增加可读性,忽略空格和 # 后面的注释
常用的是re.I和re.S
>>> import re

>>> pattern = re.compile('\d+',re.S)  #用于匹配至少一个数字

>>> res = re.findall(pattern,"my phone is 18898566588")

>>> print(res)

['']
7.5 爬取猫眼电影TOP排行
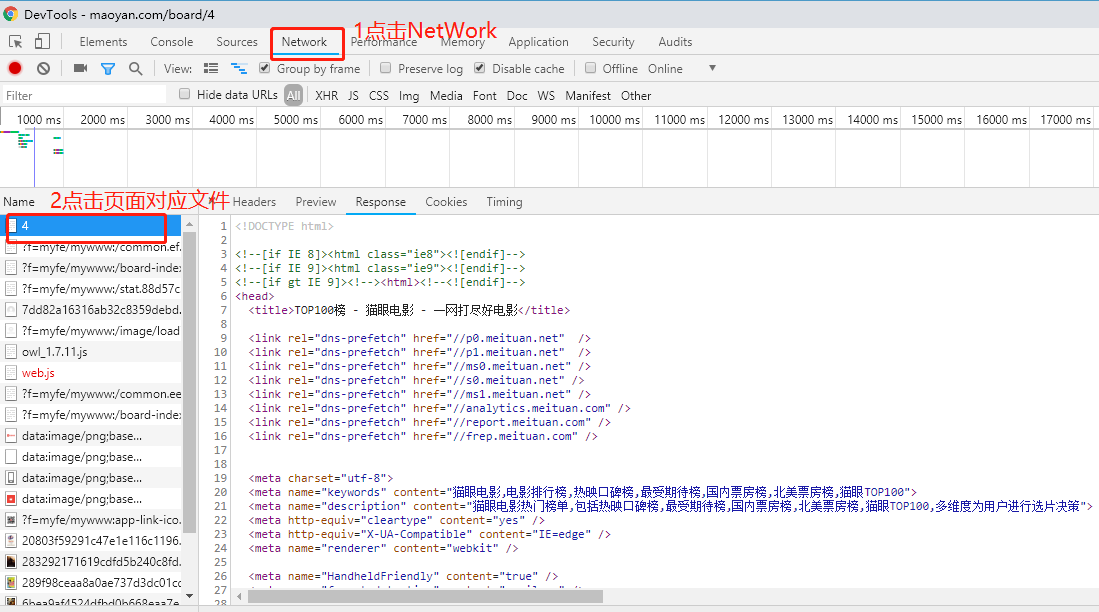

代码整合
import json

import requests

from requests.exceptions import RequestException #引入异常

import re

import time

def get_one_page(url):

    try:

        response = requests.get(url)

        if response.status_code == 200: #由状态码判断返回结果

            return response.text #返回网页内容

        return None

    except RequestException:

        return None

def parse_one_page(html):

    pattern = re.compile('<dd>.*?board-index.*?>(\d+)</i>.*?data-src="(.*?)".*?name"><a'

                         + '.*?>(.*?)</a>.*?star">(.*?)</p>.*?releasetime">(.*?)</p>'

                         + '.*?integer">(.*?)</i>.*?fraction">(.*?)</i>.*?</dd>', re.S) #compile函数表示一个方法对象,re.s匹配多行

    items = re.findall(pattern, html) #以列表形式返回全部能匹配的字符串。

    for item in items:  #将结果以字典形式返回键值对

        yield {   #把这个方法变成一个生成器

            'index': item[0],

            'image': item[1],

            'title': item[2],

            'actor': item[3].strip()[3:],

            'time': item[4].strip()[5:],

            'score': item[5] + item[6]  #将评分整数和小数结合起来

        }

def write_to_file(content):

    with open('result.txt', 'a', encoding='utf-8') as f:  #将结果写入文件

        f.write(json.dumps(content, ensure_ascii=False) + '\n')

def main(offset):

    url = 'http://maoyan.com/board/4?offset=' + str(offset)

    html = get_one_page(url)

    for item in parse_one_page(html):

        print(item)

        write_to_file(item)

if __name__ == '__main__':

    for i in range(10):

        main(offset=i * 10)

        time.sleep(1)
8 Scrapy框架
Scrapy是一个为了爬取网站数据,提取结构性数据而编写的应用框架。 其可以应用在数据挖掘,信息处理或存储历史数据等一系列的程序中。
其最初是为了页面抓取 (更确切来说, 网络抓取 )所设计的, 也可以应用在获取API所返回的数据(例如 Amazon Associates Web Services ) 或者通用的网络爬虫。Scrapy用途广泛,可以用于数据挖掘、监测和自动化测试。Scrapy 使用了 Twisted异步网络库来处理网络通讯。整体架构大致如下
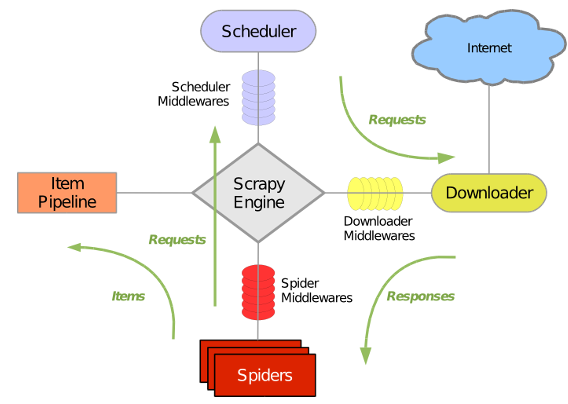
Scrapy主要包括了以下组件:
- 引擎(Scrapy)
用来处理整个系统的数据流处理, 触发事务(框架核心) - 调度器(Scheduler)
用来接受引擎发过来的请求, 压入队列中, 并在引擎再次请求的时候返回. 可以想像成一个URL(抓取网页的网址或者说是链接)的优先队列, 由它来决定下一个要抓取的网址是什么, 同时去除重复的网址 - 下载器(Downloader)
用于下载网页内容, 并将网页内容返回给蜘蛛(Scrapy下载器是建立在twisted这个高效的异步模型上的) - 爬虫(Spiders)
爬虫是主要干活的, 用于从特定的网页中提取自己需要的信息, 即所谓的实体(Item)。用户也可以从中提取出链接,让Scrapy继续抓取下一个页面 - 项目管道(Pipeline)
负责处理爬虫从网页中抽取的实体,主要的功能是持久化实体、验证实体的有效性、清除不需要的信息。当页面被爬虫解析后,将被发送到项目管道,并经过几个特定的次序处理数据。 - 下载器中间件(Downloader Middlewares)
位于Scrapy引擎和下载器之间的框架,主要是处理Scrapy引擎与下载器之间的请求及响应。 - 爬虫中间件(Spider Middlewares)
介于Scrapy引擎和爬虫之间的框架,主要工作是处理蜘蛛的响应输入和请求输出。 - 调度中间件(Scheduler Middewares)
介于Scrapy引擎和调度之间的中间件,从Scrapy引擎发送到调度的请求和响应。
Scrapy运行流程大概如下:
- 引擎从调度器中取出一个链接(URL)用于接下来的抓取
- 引擎把URL封装成一个请求(Request)传给下载器
- 下载器把资源下载下来,并封装成应答包(Response)
- 爬虫解析Response
- 解析出实体(Item),则交给实体管道进行进一步的处理
- 解析出的是链接(URL),则把URL交给调度器等待抓取
scrapy常用命令
scrapy startproject <爬虫名称> 创建爬虫名称(唯一)
scrapy genspider<爬虫项目名称> 创建爬虫项目名称
scrapy list 列出所有爬虫名称
scrapy crawl <爬虫名称> 运行爬虫
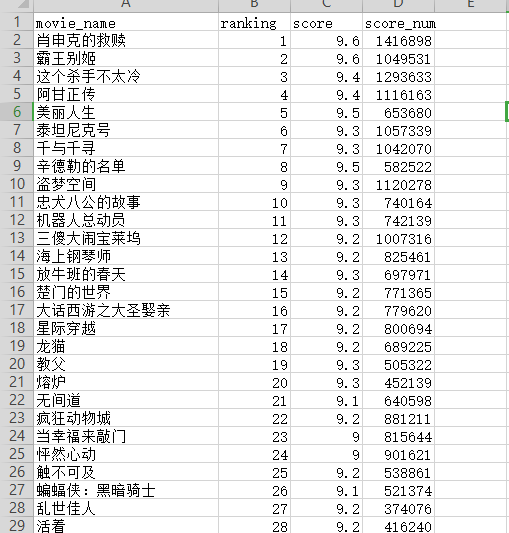
8.1 scrapy爬虫项目一:爬取豆瓣电影TOP250
爬取目标:电影排名、电影名称、电影评分、电影评论数
创建爬虫项目和爬虫
scrapy startproject DoubanMovieTop
cd DoubanMovieTop
scrapy genspider douban
修改默认“user-agent”和reboots为True
修改settings.py文件以下参数:
USER_AGENT = 'Mozilla/5.0 (Windows NT 10.0; Win64; x64) AppleWebKit/537.36 (KHTML, like Gecko) Chrome/74.0.3729.131 Safari/537.36'
ROBOTSTXT_OBEY = False
Item使用简单的class定义语法以及Field对象来声明。
写入下列代码声明Item
import scrapy

class DoubanmovietopItem(scrapy.Item):

    # define the fields for your item here like:

    # name = scrapy.Field()

    #排名

    ranking = scrapy.Field()

    #电影名称

    movie_name = scrapy.Field()

    #评分

    score = scrapy.Field()

    #评论人数

    score_num = scrapy.Field()
分析网页源码抓取所需信息
# -*- coding: utf-8 -*-

import scrapy

from DoubanMovieTop.items import DoubanmovietopItem

class DoubanSpider(scrapy.Spider):

    name = 'douban'

    #allowed_domains = ['movie.douban.com']

    def start_requests(self):

        start_urls = 'https://movie.douban.com/top250'

        yield scrapy.Request(start_urls)

    def parse(self, response):

        item = DoubanmovietopItem()

        movies = response.xpath('//ol[@class="grid_view"]/li')

        for movie in movies:

            item['ranking'] = movie.xpath('.//div[@class="pic"]/em/text()').extract()[0]

            item['movie_name'] = movie.xpath('.//div[@class="hd"]/a/span[1]/text()').extract()[0]

            item['score'] = movie.xpath('.//div[@class="star"]/span[@class="rating_num"]/text()').extract()[0]

            item['score_num'] = movie.xpath('.//div[@class="star"]/span/text()').re(r'(\d+)人评价')[0]  #Selector也有一种.re()

            yield item

        next_url = response.xpath('//span[@class="next"]/a/@href').extract()

        if next_url:

            next_url = 'https://movie.douban.com/top250' + next_url[0]

            yield scrapy.Request(next_url)
运行爬虫写入文件中
scrapy crawl douban -o douban.csv
使用wps打开excel表格查看抓取结果
Python网络爬虫入门篇的更多相关文章
- python网络爬虫入门范例
python网络爬虫入门范例 Windows用户建议安装anaconda,因为有些套件难以安装. 安装使用pip install * 找出所有含有特定标签的HTML元素 找出含有特定CSS属性的元素 ...
- python网络爬虫入门(二)
刚去看了一下,18年2月份写了第一篇关于爬虫的文章(仅仅介绍了使用requests库去获取HTML代码),一年多之后看来很稚嫩也没有多少参考的意义,但没想着要去修改它,留着也是一个回忆吧.至少证明着我 ...
- Python 基础教程 —— 网络爬虫入门篇
前言 Python 是一种解释型.面向对象.动态数据类型的高级程序设计语言,它由 Guido van Rossum 于 1989 年底发明,第一个公开发行版发行于 1991 年.自面世以后,Pytho ...
- Python网络爬虫入门实战(爬取最近7天的天气以及最高/最低气温)
_ 前言 本文文字及图片来源于网络,仅供学习.交流使用,不具有任何商业用途,版权归原作者所有,如有问题请及时联系我们以作处理. 作者: Bo_wen 最近两天学习了一下python,并自己写了一个 ...
- python网络爬虫-入门(二)
为什么要学网络爬虫 可以替代人工从网页中找到数据并复制粘贴到excel中,这种重复性的工作不仅浪费时间还一不留神还会出错----解决无法自动化和无法实时获取数据 对于这些公开数据的应用价值,我 ...
- python网络爬虫-入门(一)
前言 1.爬虫程序是Dt(Data Technology,数据技术)收集信息的基础,爬取到目标网站的资料后,就可以分析和建立应用了. 2.python是一个简单.有效的语言,爬虫所需要的获取.存储.整 ...
- python网络爬虫入门(一)
python网络爬虫(一) 2018-02-10 python版本:python 3.7.0b1 IDE:PyCharm 2016.3.2 涉及模块:requests & builtwit ...
- Python网络爬虫实战(一)快速入门
本系列从零开始阐述如何编写Python网络爬虫,以及网络爬虫中容易遇到的问题,比如具有反爬,加密的网站,还有爬虫拿不到数据,以及登录验证等问题,会伴随大量网站的爬虫实战来进行. 我们编写网络爬虫最主要 ...
- python网络爬虫之入门[一]
目录 前言 一.探讨什么是python网络爬虫? 二.一个针对于网络传输的抓包工具fiddler 三.学习request模块来爬取第一个网页 * 扩展内容(爬取top250的网页) 后记 @(目录) ...
随机推荐
- Java第四次实践作业
1 编写“电费管理类”及其测试类. 第一步 编写“电费管理”类 1)私有属性:上月电表读数.本月电表读数 2)构造方法:无参.2个参数 3)成员方法:getXXX()方法.setXXX()方法 4 ...
- 自动化脚本测试,postman使用沉淀
// 服务器地址 var server = 'XXXXXXXXXXXX'; //秘钥Key var secretKey = 'XXXXXXXXXXXX'; //获取当前时间 function crea ...
- CSCI 1100 — Computer Science 1 Homework
CSCI 1100 — Computer Science 1 Homework 8CS1 Multiverse: ClassesOverviewThis homework is worth 100 p ...
- LeetCode 538 Convert BST to Greater Tree 解题报告
题目要求 Given a Binary Search Tree (BST), convert it to a Greater Tree such that every key of the origi ...
- mysql8.0.13免安装版配置
一.下载 下载地址:https://dev.mysql.com/downloads/mysql/ 二.解压到某个目录,例如:D:/mysql/mysql-8.0.13-winx64 三.配置环境变量 ...
- Spark入门到精通--(第九节)环境搭建(Hive搭建)
上一节搭建完了Hadoop集群,这一节我们来搭建Hive集群,主要是后面的Spark SQL要用到Hive的环境. Hive下载安装 下载Hive 0.13的软件包,可以在百度网盘进行下载.链接: h ...
- 声明式开发 & 命令式开发
何为声明式开发,何又为命令式开发~~~ 这里我不做太多概念的剖析,我们只要明确一个: 声明式开发只是告诉计算机需要什么,而不是把每一步都计划好:典型代表为React: 命令式开发则是每一步明确的去操作 ...
- 修改文件MD5值
1.查看文件的MD5值 (1)下载MD5Checker http://getmd5checker.com/download.html 或者 链接: https://pan.baidu.com/s/1e ...
- Freemaker Replace函数的正则表达式运用
replace(param1,param2,param3) param1 正则表达式:param2 将匹配的字符替换成指定字符:param3 模式 param3 参数如下 模式 i r m ...
- 2018-2019-2 20165236 《网络对抗技术》Exp4 恶意代码分析
2018-2019-2 20165236 <网络对抗技术>Exp4 恶意代码分析 一.1.实践目标 1.1是监控你自己系统的运行状态,看有没有可疑的程序在运行; 1.2是分析一个恶意软件, ...
