11 (OC)* CoreImage
coreimage framework 组成
apple 已经帮我们把image的处理分类好,来看看它的结构: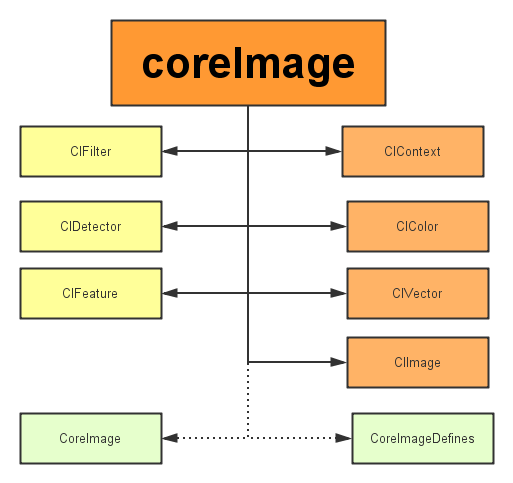
主要分为三部分:
1)定义部分:CoreImage 何CoreImageDefines。见名思义,代表了CoreImage 这个框架和它的定义。
2)操作部分:
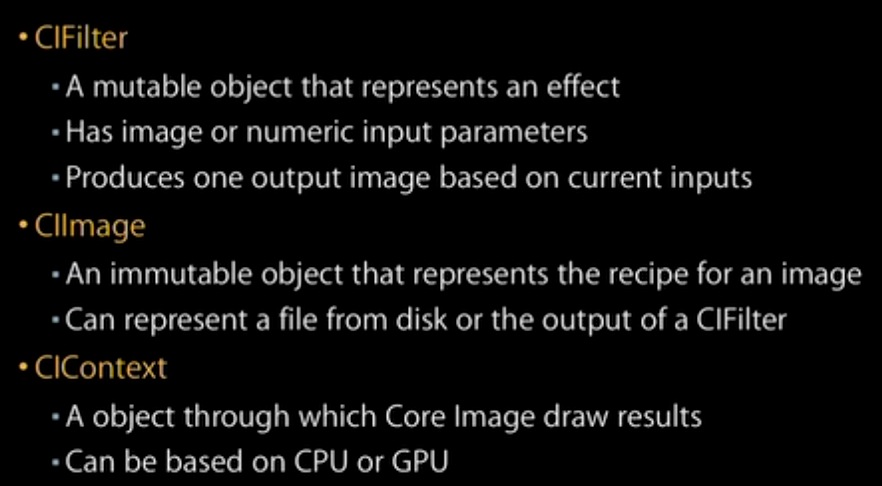
滤镜(CIFliter):CIFilter 产生一个CIImage。典型的,接受一到多的图片作为输入,经过一些过滤操作,产生指定输出的图片。
检测(CIDetector):CIDetector 检测处理图片的特性,如使用来检测图片中人脸的眼睛、嘴巴、等等。
特征(CIFeature):CIFeature 代表由 detector处理后产生的特征。
3)图像部分:
画布(CIContext):画布类可被用与处理Quartz 2D 或者 OpenGL。可以用它来关联CoreImage类。如滤镜、颜色等渲染处理。
颜色(CIColor): 图片的关联与画布、图片像素颜色的处理。
向量(CIVector): 图片的坐标向量等几何方法处理。
图片(CIImage): 代表一个图像,可代表关联后输出的图像。
2. 处理步骤:
1)create a ciimage object;
2) create a cifilter object and set input values
3) create a cicontext object.
4) render the filter output image into a cgimage
3.注意
a。关注Ciimage 产生的途径:
1)通过URL和Data
2)通过其他图片类转换,CGImageRef或其他图片。
3)通过CVpixelBufferRef。
4)一组像素Data。
b. 图片颜色,KCCImageColorSpace 来重载默认颜色空间。
c. 图片Metadata。
4. 使用滤镜。
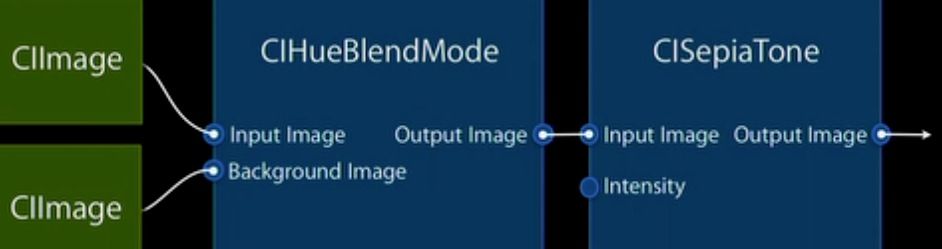
CISepiaTone、CiColorControls、CIHueBlendMode。


处理过程:多个CImage输入 -- 》 CIHeBlendMode --》 CiSepiatone。
渲染输出:
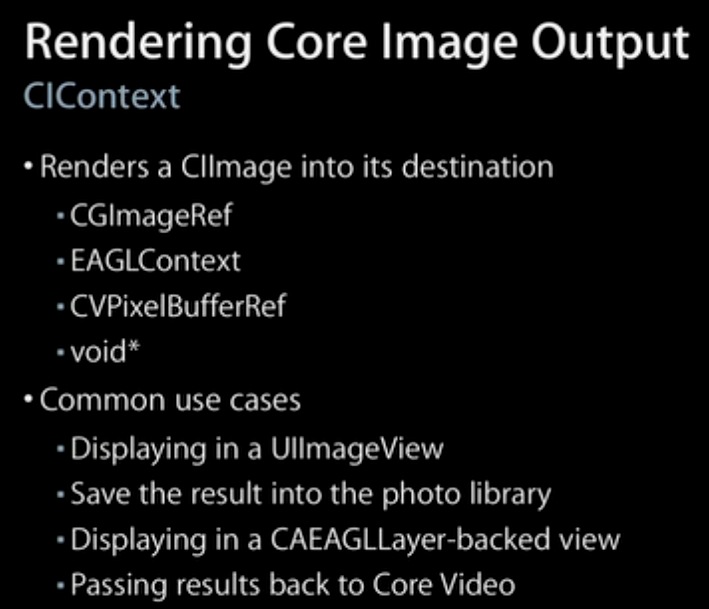
流程: 获取context -》 转成CIimage -》 渲染成CGImageRef -》 转换为UIimage -》 释放 CGImageRef -》 使用UIImage。
5.脸部检测
自动增强: CIRedEyeCorrection 、CIFaceBalance(调整图片来给出更好的皮肤色调)、CIVibrance(在不扭曲皮肤色调的情况下,增加饱和度)、CIToneCurve(调整图片对比)、高亮阴影调整。
CoreImage框架是一个专门用来对图片进行处理的框架,其中提供了许多高级功能,可以帮助开发者完成UIKit或者CoreGraphics框架无法完成的任务,并且使用CoreImage框架可以十分轻松的实现滤镜以及图像识别等流行技术。本篇博客主要介绍和总结CoreImage框架的使用,并提供范例代码。
一、图像过滤器
1.几组内置的过滤器
CIFilter是CoreImage中提供的图像过滤器,也可以将其理解为滤镜。许多美颜应用,图像处理应用等都是为原图添加了滤镜效果。本节我们着重看下与这个类相关的应用。首先,CoreImaghe默认提供了非常多的滤镜效果,但是并没有详细的文档介绍,有关滤镜效果可以分为下面几个类别:
//通过改变图像的几何形状来创建3D效果,类似隆起 过滤器组

NSString * const kCICategoryDistortionEffect;

//旋转扭曲相关过滤器组

NSString * const kCICategoryGeometryAdjustment;

//混合过滤器组 对两个图像进行混合操作

NSString * const kCICategoryCompositeOperation;

//一种色调过滤器组 类似报纸风格

NSString * const kCICategoryHalftoneEffect;

//颜色过滤器组 调整对比度 亮度等

NSString * const kCICategoryColorEffect;

//多个图像源的过滤器

NSString * const kCICategoryTransition;

//平铺图像过滤器

NSString * const kCICategoryTileEffect;

//滤光类过滤器 通常作为其他过滤器的输入

NSString * const kCICategoryGenerator;

//减弱图像数据的过滤器 通常用来进行图像分析

NSString * const kCICategoryReduction;

//渐变过滤器

NSString * const kCICategoryGradient;

//画像过滤器

NSString * const kCICategoryStylize;

//锐化过滤器

NSString * const kCICategorySharpen;

//模糊过滤器

NSString * const kCICategoryBlur;

//视频图片相关过滤器

NSString * const kCICategoryVideo;

//静态图片相关过滤器

NSString * const kCICategoryStillImage;

//交叉图像过滤器

NSString * const kCICategoryInterlaced;

//非矩形图像上的过滤器

NSString * const kCICategoryNonSquarePixels;

//高动态图像的过滤器

NSString * const kCICategoryHighDynamicRange;

//CoreImage内置的过滤器

NSString * const kCICategoryBuiltIn;

//复合的过滤器

NSString * const kCICategoryFilterGenerator;
上面列出了非常多的类别,其实上面只是按照不同的场景将过滤器进行了分类,每个分类中都定义了许多内置的过滤器,使用下面的方法可以获取每个分类下提供的过滤器:
//获取某个分类的所有过滤器名

+ (NSArray<NSString *> *)filterNamesInCategory:(nullable NSString *)category;

//获取一组分类下的所有过滤器名

+ (NSArray<NSString *> *)filterNamesInCategories:(nullable NSArray<NSString *> *)categories;
2.过滤器的一个简单示例
下面示例代码演示过滤器的简单应用:
UIImage * img = [UIImage imageNamed:@"1.png"];

CIImage * image = [[CIImage alloc]initWithImage:img];

CIFilter * filter = [CIFilter filterWithName:@"CIBoxBlur" keysAndValues:kCIInputImageKey,image, nil];

[filter setDefaults];

CIContext * context = [[CIContext alloc]initWithOptions:nil];

CIImage * output = [filter outputImage];

CGImageRef ref = [context createCGImage:output fromRect:[output extent]];

UIImage * newImage = [UIImage imageWithCGImage:ref];

CGImageRelease(ref);

UIImageView * imageView = [[UIImageView alloc]initWithFrame:CGRectMake(170, 30, 150, 400)];

imageView.image = newImage;

[self.view addSubview:imageView];

UIImageView * imageView2 = [[UIImageView alloc]initWithFrame:CGRectMake(0, 30, 150, 400)];

imageView2.image = img;

[self.view addSubview:imageView2];
效果如下图:
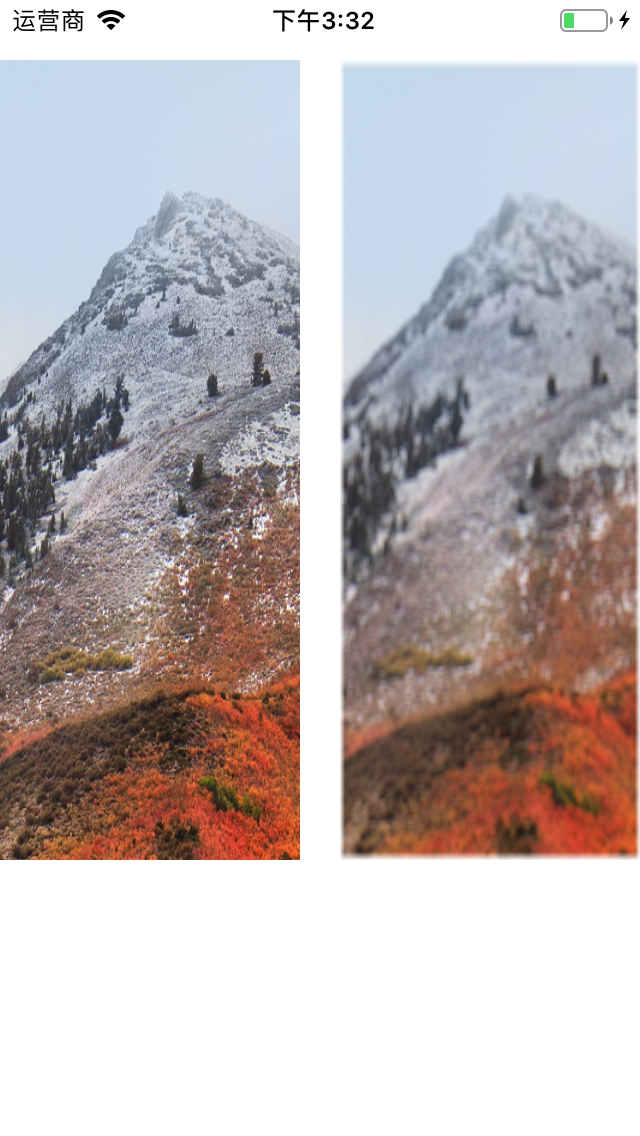
上面演示了简单的模糊过滤效果。
3.对CIFilter类进行解析
CIFilter类的解析如下:
//过滤后输出的图像

@property (readonly, nonatomic, nullable) CIImage *outputImage;

//过滤器名称

@property (nonatomic, copy) NSString *name;

//是否开启CoreAnimation动画效果

@property (getter=isEnabled) BOOL enabled;

//返回当前过滤器所有支持的输入键

@property (nonatomic, readonly) NSArray<NSString *> *inputKeys;

//返回当前过滤器所有支持的输出键

@property (nonatomic, readonly) NSArray<NSString *> *outputKeys;

//将过滤器的所有输入值设置为默认值

- (void)setDefaults;

//返回当前过滤器的属性字段

/*

需要注意这个字段对于学习此过滤器非常有用

其中会声明此过滤器的输入和输出 即如果使用

*/

@property (nonatomic, readonly) NSDictionary<NSString *,id> *attributes;

//用来进行过滤器的自定义 后面会介绍

- (nullable CIImage *)apply:(CIKernel *)k

                  arguments:(nullable NSArray *)args

                    options:(nullable NSDictionary<NSString *,id> *)dict;

//同上

- (nullable CIImage *)apply:(CIKernel *)k, ...;

//根据过滤器的名称创建过滤器

+ (nullable CIFilter *) filterWithName:(NSString *) name;

//创建过滤器 同时进行配置

+ (nullable CIFilter *)filterWithName:(NSString *)name

                        keysAndValues:key0, ...;

+ (nullable CIFilter *)filterWithName:(NSString *)name

                  withInputParameters:(nullable NSDictionary<NSString *,id> *)params;

//注册过滤器

+ (void)registerFilterName:(NSString *)name

               constructor:(id<CIFilterConstructor>)anObject

           classAttributes:(NSDictionary<NSString *,id> *)attributes;

//将一组过滤器进行编码

+ (nullable NSData*)serializedXMPFromFilters:(NSArray<CIFilter *> *)filters

                            inputImageExtent:(CGRect)extent;

//进行反编码

+ (NSArray<CIFilter *> *)filterArrayFromSerializedXMP:(NSData *)xmpData

                                     inputImageExtent:(CGRect)extent

                                                error:(NSError **)outError;
4.常用过滤器详解
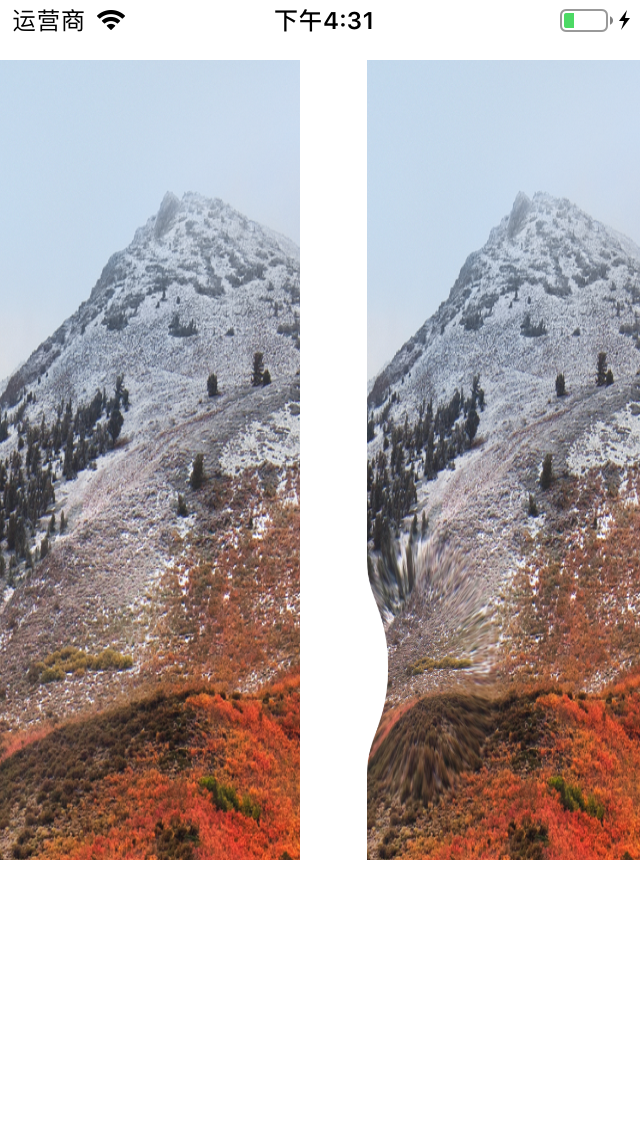
- 区域凸起过滤器
这个过滤器的作用是在图片的某个区域创建一块凸起。示例代码如下:
/*

kCIInputCenterKey键用来设置滤镜中心

kCIInputScaleKey 设置为0则没有影响 1则会凸起效果 -1则会凹入效果

kCIInputRadiusKey 设置滤镜的影响范围

*/

CIFilter * filter = [CIFilter filterWithName:@"CIBumpDistortion" keysAndValues:kCIInputImageKey,image,kCIInputCenterKey,[[CIVector alloc] initWithX:100 Y:200],kCIInputScaleKey,@-1,kCIInputRadiusKey,@150, nil];
效果如下:
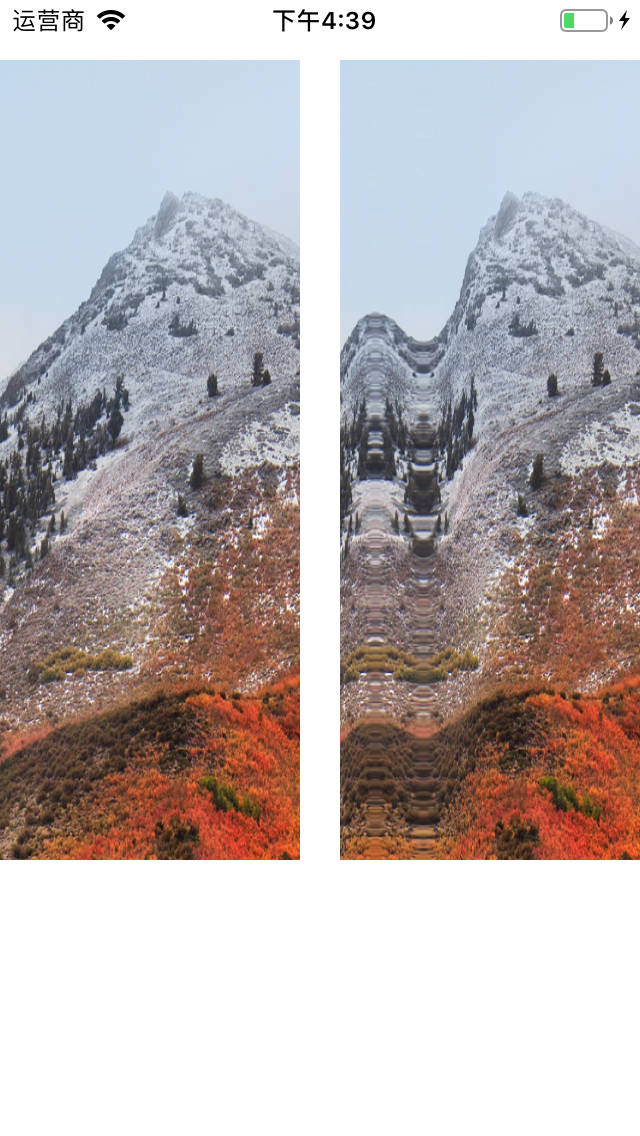
- 线性凹凸过滤器
这个过滤器创建类似波纹效果,示例如下:
/*

与上一个过滤器相比 可以设置

kCIInputAngleKey 角度 0-2π

*/

CIFilter * filter = [CIFilter filterWithName:@"CIBumpDistortionLinear" keysAndValues:kCIInputImageKey,image,kCIInputCenterKey,[[CIVector alloc] initWithX:100 Y:200],kCIInputScaleKey,@-1,kCIInputRadiusKey,@150,kCIInputAngleKey,@(M_PI_2), nil];
效果如下:
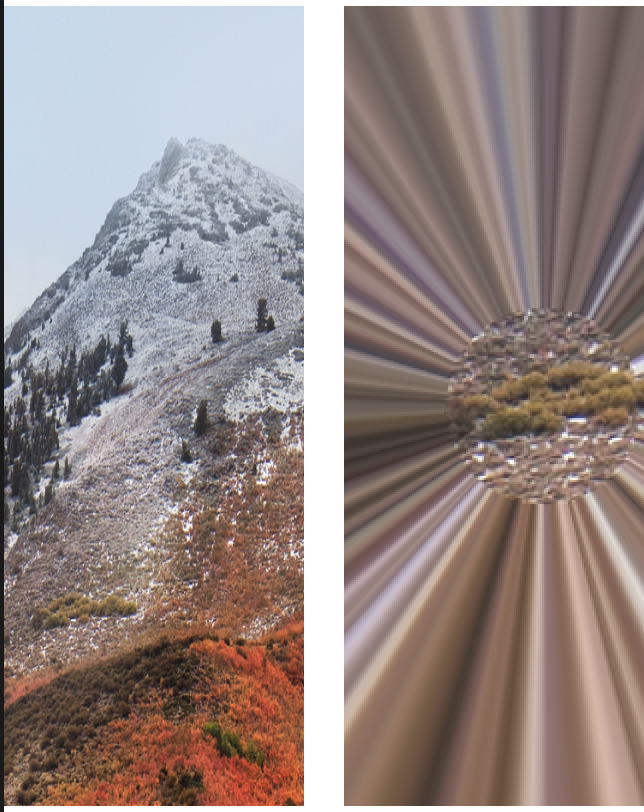
- 圆形飞溅过滤器
这个过滤器的作用是选取图像的某个区域,对其四周进行飞溅拉伸,例如:
CIFilter * filter = [CIFilter filterWithName:@"CICircleSplashDistortion" keysAndValues:kCIInputImageKey,image,kCIInputCenterKey,[[CIVector alloc] initWithX:100 Y:200],kCIInputRadiusKey,@50, nil];
效果如下:
- 圆形缠绕过滤器
这个过滤器选取某个区域,进行缠绕效果,例如:
CIFilter * filter = [CIFilter filterWithName:@"CICircularWrap" keysAndValues:kCIInputImageKey,image,kCIInputCenterKey,[[CIVector alloc] initWithX:100 Y:200],kCIInputRadiusKey,@20, kCIInputAngleKey,@3,nil];
效果如下:

- 灰度混合过滤器
这个过滤器将提供混合图像的灰度值应用于目标图像,例如:
/*

inputDisplacementImage设置要混合的灰度图片

*/

CIFilter * filter = [CIFilter filterWithName:@"CIDroste" keysAndValues:kCIInputImageKey,image,kCIInputScaleKey,@200,@"inputDisplacementImage",image2,nil];
效果如下:
- 递归绘制图像区域
CIFilter * filter = [CIFilter filterWithName:@"CIDroste" keysAndValues:kCIInputImageKey,image,@"inputInsetPoint0",[[CIVector alloc] initWithX:100 Y:100],@"inputInsetPoint1",[[CIVector alloc] initWithX:200 Y:200],@"inputPeriodicity",@1,@"inputRotation",@0,@"inputStrands",@1,@"inputZoom",@1,nil];
效果如下:
- 玻璃纹理过滤器
这个过滤器用提供图片作为目标图片的纹理,进行混合,例如:
/*

inputTexture设置纹理图像

*/

CIFilter * filter = [CIFilter filterWithName:@"CIGlassDistortion" keysAndValues:kCIInputImageKey,image,kCIInputCenterKey,[[CIVector alloc] initWithX:100 Y:200],kCIInputScaleKey,@100,@"inputTexture",image2,nil];
效果如下:
- 菱形透镜过滤器
/*

inputPoint0设置第一个圆的圆心

inputPoint1设置第二个圆的圆心

inputRadius设置半径

inputRefraction设置折射率 0-5之间

*/

CIFilter * filter = [CIFilter filterWithName:@"CIGlassLozenge" keysAndValues:kCIInputImageKey,image,@"inputPoint0",[[CIVector alloc] initWithX:100 Y:200],@"inputPoint1",[[CIVector alloc] initWithX:200 Y:200],@"inputRadius",@100,@"inputRefraction",@2,nil];
效果如下:
- 圆孔形变过滤器
CIFilter * filter = [CIFilter filterWithName:@"CIHoleDistortion" keysAndValues:kCIInputImageKey,image,@"inputRadius",@50,kCIInputCenterKey,[[CIVector alloc] initWithX:100 Y:200],nil];
效果如下:
- 九宫格拉伸过滤器
CIFilter * filter = [CIFilter filterWithName:@"CINinePartStretched" keysAndValues:kCIInputImageKey,image2,@"inputBreakpoint0",[[CIVector alloc] initWithX:50 Y:50],@"inputBreakpoint1",[[CIVector alloc] initWithX:100 Y:100],@"inputGrowAmount",[[CIVector alloc] initWithX:50 Y:50],nil];
效果如下:
- 九宫格复制过滤器
CIFilter * filter = [CIFilter filterWithName:@"CINinePartTiled" keysAndValues:kCIInputImageKey,image2,@"inputBreakpoint0",[[CIVector alloc] initWithX:50 Y:50],@"inputBreakpoint1",[[CIVector alloc] initWithX:100 Y:100],@"inputGrowAmount",[[CIVector alloc] initWithX:50 Y:50],@"inputFlipYTiles",@1,nil];
效果如下:
- 紧缩过滤器
CIFilter * filter = [CIFilter filterWithName:@"CIPinchDistortion" keysAndValues:kCIInputImageKey,image2,@"inputCenter",[[CIVector alloc] initWithX:150 Y:150],@"inputRadius",@500,@"inputScale",@1,nil];
效果如下:
- 拉伸裁剪过滤器
/*

inputSize 设置拉伸裁剪尺寸

*/

CIFilter * filter = [CIFilter filterWithName:@"CIStretchCrop" keysAndValues:kCIInputImageKey,image2,@"inputCenterStretchAmount",@1,@"inputCropAmount",@0.5,@"inputSize",[[CIVector alloc] initWithX:300 Y:150],nil];
效果如下:
- 环状透镜过滤器
这个过滤器创建一个环状透镜,对图像进行扭曲。
/*

inputCenter设置环中心

inputRadius 设置半径

inputRefraction 设置折射率

inputWidth 设置环宽度

*/

CIFilter * filter = [CIFilter filterWithName:@"CITorusLensDistortion" keysAndValues:kCIInputImageKey,image2,@"inputCenter",[[CIVector alloc] initWithX:150 Y:150],@"inputRadius",@150,@"inputRefraction",@1.6,@"inputWidth",@40,nil];
效果如下:
- 旋转过滤器
CIFilter * filter = [CIFilter filterWithName:@"CITwirlDistortion" keysAndValues:kCIInputImageKey,image2,@"inputAngle",@3.14,@"inputCenter",[[CIVector alloc] initWithX:150 Y:150],@"inputRadius",@150,nil];
效果如下:
- 涡流过滤器
//inputAngle 设置涡流角度

CIFilter * filter = [CIFilter filterWithName:@"CIVortexDistortion" keysAndValues:kCIInputImageKey,image2,@"inputAngle",@(M_PI*10),@"inputCenter",[[CIVector alloc] initWithX:150 Y:150],@"inputRadius",@150,nil];
效果如下:
- 形变过滤器
这个过滤器对图像进行简单的形变处理,如缩放,旋转,平移等。
CGAffineTransform tr =  CGAffineTransformMakeRotation(M_PI_2);

CIFilter * filter = [CIFilter filterWithName:@"CIAffineTransform" keysAndValues:kCIInputImageKey,image2,@"inputTransform",[NSValue valueWithCGAffineTransform:tr],nil];
效果如下:
- 矩形裁剪过滤器
CIFilter * filter = [CIFilter filterWithName:@"CICrop" keysAndValues:kCIInputImageKey,image2,@"inputRectangle",[[CIVector alloc] initWithCGRect:CGRectMake(0, 0, 150, 150)],nil];
效果如下:
- 边缘采样过滤器
CIFilter * filter = [CIFilter filterWithName:@"CIEdgePreserveUpsampleFilter" keysAndValues:kCIInputImageKey,image,@"inputLumaSigma",@0.15,@"inputSpatialSigma",@3,@"inputSmallImage",image2,nil];
效果如下:
- 矩形矫正过滤器
CIFilter * filter = [CIFilter filterWithName:@"CIPerspectiveCorrection" keysAndValues:kCIInputImageKey,image2,@"inputBottomLeft",[[CIVector alloc] initWithX:0 Y:0],@"inputBottomRight",[[CIVector alloc] initWithX:150 Y:0],@"inputTopLeft",[[CIVector alloc] initWithX:0 Y:150],@"inputTopRight",[[CIVector alloc] initWithX:150 Y:150],nil];
效果如图:
- 旋转矫正过滤器
CIFilter * filter = [CIFilter filterWithName:@"CIStraightenFilter" keysAndValues:kCIInputImageKey,image2,@"inputAngle",@3.14,nil];
效果如下:
- 背景混合过滤器
通过提供一个图像作为背景与目标图像进行混合。
CIFilter * filter = [CIFilter filterWithName:@"CIAdditionCompositing" keysAndValues:kCIInputImageKey,image2,@"inputBackgroundImage",image,nil];
效果如下:
- 色彩混合过滤器
CIFilter * filter = [CIFilter filterWithName:@"CIColorBlendMode" keysAndValues:kCIInputImageKey,image2,@"inputBackgroundImage",image,nil];
效果如下:
- 暗混合过滤器
CIFilter * filter = [CIFilter filterWithName:@"CIColorBurnBlendMode" keysAndValues:kCIInputImageKey,image2,@"inputBackgroundImage",image,nil];
效果如下:
- 亮混合过滤器
CIFilter * filter = [CIFilter filterWithName:@"CIColorDodgeBlendMode" keysAndValues:kCIInputImageKey,image2,@"inputBackgroundImage",image,nil];
- 暗选择混合模式过滤器
这个过滤器将选择较暗的图像作为混合背景,例如:
CIFilter * filter = [CIFilter filterWithName:@"CIDarkenBlendMode" keysAndValues:kCIInputImageKey,image2,@"inputBackgroundImage",image,nil];
效果如下:
- 亮选择混合模式过滤器
这个过滤器将选择较亮的图像作为混合背景,例如:
CIFilter * filter = [CIFilter filterWithName:@"CIDifferenceBlendMode" keysAndValues:kCIInputImageKey,image2,@"inputBackgroundImage",image,nil];
效果如下:
- 分开混合模式过滤器
CIFilter * filter = [CIFilter filterWithName:@"CIDivideBlendMode" keysAndValues:kCIInputImageKey,image2,@"inputBackgroundImage",image,nil];
效果如下:
- 排除混合模式过滤器
CIFilter * filter = [CIFilter filterWithName:@"CIExclusionBlendMode" keysAndValues:kCIInputImageKey,image2,@"inputBackgroundImage",image,nil];
效果如下:
- 强光混合模式过滤器
CIFilter * filter = [CIFilter filterWithName:@"CIHardLightBlendMode" keysAndValues:kCIInputImageKey,image2,@"inputBackgroundImage",image,nil];
效果如下:
- 色调混合模式过滤器
CIFilter * filter = [CIFilter filterWithName:@"CIHueBlendMode" keysAndValues:kCIInputImageKey,image2,@"inputBackgroundImage",image,nil];
效果如下:
- 减轻混合模式过滤器
CIFilter * filter = [CIFilter filterWithName:@"CILightenBlendMode" keysAndValues:kCIInputImageKey,image2,@"inputBackgroundImage",image,nil];
效果如下:
- 线性燃烧混合模式过滤器
CIFilter * filter = [CIFilter filterWithName:@"CILinearBurnBlendMode" keysAndValues:kCIInputImageKey,image2,@"inputBackgroundImage",image,nil];
效果如下:
- 线性高亮混合过滤器
CIFilter * filter = [CIFilter filterWithName:@"CILinearDodgeBlendMode" keysAndValues:kCIInputImageKey,image2,@"inputBackgroundImage",image,nil];
效果如下:
- 亮度混合过滤器
CIFilter * filter = [CIFilter filterWithName:@"CILuminosityBlendMode" keysAndValues:kCIInputImageKey,image2,@"inputBackgroundImage",image,nil];
效果如下:
- 最大值混合过滤器
CIFilter * filter = [CIFilter filterWithName:@"CIMaximumCompositing" keysAndValues:kCIInputImageKey,image2,@"inputBackgroundImage",image,nil];
效果如下:
- 最小值混合过滤器
CIFilter * filter = [CIFilter filterWithName:@"CIMinimumCompositing" keysAndValues:kCIInputImageKey,image2,@"inputBackgroundImage",image,nil];
效果如下:
- 多重混合过滤器
CIFilter * filter = [CIFilter filterWithName:@"CIMultiplyBlendMode" keysAndValues:kCIInputImageKey,image2,@"inputBackgroundImage",image,nil];
效果如下:
- 多重合成过滤器
CIFilter * filter = [CIFilter filterWithName:@"CIMultiplyCompositing" keysAndValues:kCIInputImageKey,image2,@"inputBackgroundImage",image,nil];
- 重叠混合模式
CIFilter * filter = [CIFilter filterWithName:@"CIOverlayBlendMode" keysAndValues:kCIInputImageKey,image2,@"inputBackgroundImage",image,nil];
- 亮混合模式
CIFilter * filter = [CIFilter filterWithName:@"CIPinLightBlendMode" keysAndValues:kCIInputImageKey,image2,@"inputBackgroundImage",image,nil];
- 饱和混合模式
CIFilter * filter = [CIFilter filterWithName:@"CISaturationBlendMode" keysAndValues:kCIInputImageKey,image2,@"inputBackgroundImage",image,nil];
- 屏幕混合模式
CIFilter * filter = [CIFilter filterWithName:@"CIScreenBlendMode" keysAndValues:kCIInputImageKey,image2,@"inputBackgroundImage",image,nil];
- 源图像上层混合
CIFilter * filter = [CIFilter filterWithName:@"CISourceAtopCompositing" keysAndValues:kCIInputImageKey,image2,@"inputBackgroundImage",image,nil];
- 圆屏过滤器
/*

inputSharpness 设置圆圈锐度

inputWidth 设置间距

*/

CIFilter * filter = [CIFilter filterWithName:@"CICircularScreen" keysAndValues:kCIInputImageKey,image2,kCIInputCenterKey,[[CIVector alloc] initWithX:150 Y:150],@"inputSharpness",@0.7,@"inputWidth",@6,nil];
- 半色调过滤器
CIFilter * filter = [CIFilter filterWithName:@"CICMYKHalftone" keysAndValues:kCIInputImageKey,image2,@"inputAngle",@0,kCIInputCenterKey,[[CIVector alloc] initWithX:150 Y:150],@"inputGCR",@1,@"inputSharpness",@0.7,@"inputUCR",@0.5,@"inputWidth",@6,nil];
- 点屏过滤器
CIFilter * filter = [CIFilter filterWithName:@"CIDotScreen" keysAndValues:kCIInputImageKey,image2,@"inputAngle",@0,kCIInputCenterKey,[[CIVector alloc] initWithX:150 Y:150],@"inputSharpness",@0.7,@"inputWidth",@6,nil];
- 阴影屏过滤器
CIFilter * filter = [CIFilter filterWithName:@"CIHatchedScreen" keysAndValues:kCIInputImageKey,image2,@"inputAngle",@0,kCIInputCenterKey,[[CIVector alloc] initWithX:150 Y:150],@"inputSharpness",@0.7,@"inputWidth",@6,nil];
- 线性sRGB过滤器
CIFilter * filter = [CIFilter filterWithName:@"CILinearToSRGBToneCurve" keysAndValues:kCIInputImageKey,image2,nil];
- 色彩翻转过滤器
CIFilter * filter = [CIFilter filterWithName:@"CIColorInvert" keysAndValues:kCIInputImageKey,image2,nil];
- 色图过滤器
CIFilter * filter = [CIFilter filterWithName:@"CIColorMap" keysAndValues:kCIInputImageKey,image2,@"inputGradientImage",image,nil];
- 单色过滤器
/*

inputColor 设置输入颜色

inputIntensity 设置影响程度

*/

CIFilter * filter = [CIFilter filterWithName:@"CIColorMonochrome" keysAndValues:kCIInputImageKey,image2,@"inputColor",[CIColor colorWithRed:0.5 green:0.5 blue:0.5],@"inputIntensity",@1,nil];
- 分色镜过滤器
/*

inputLevels设置亮度级别

*/

CIFilter * filter = [CIFilter filterWithName:@"CIColorPosterize" keysAndValues:kCIInputImageKey,image2,@"inputLevels",@6,nil];
- 反色过滤器
CIFilter * filter = [CIFilter filterWithName:@"CIFalseColor" keysAndValues:kCIInputImageKey,image2,@"inputColor0",[CIColor colorWithRed:0 green:0 blue:0],@"inputColor1",[CIColor colorWithRed:1 green:1 blue:0],nil];
- 光效褪色过滤器
CIFilter * filter = [CIFilter filterWithName:@"CIPhotoEffectFade" keysAndValues:kCIInputImageKey,image2,nil];
- 光效瞬时过滤器
CIFilter * filter = [CIFilter filterWithName:@"CIPhotoEffectInstant" keysAndValues:kCIInputImageKey,image2,nil];
- 光效单光过滤器
CIFilter * filter = [CIFilter filterWithName:@"CIPhotoEffectMono" keysAndValues:kCIInputImageKey,image2,nil];
- 黑色光效应过滤器
CIFilter * filter = [CIFilter filterWithName:@"CIPhotoEffectNoir" keysAndValues:kCIInputImageKey,image2,nil];
- 光渐进过滤器
CIFilter * filter = [CIFilter filterWithName:@"CIPhotoEffectProcess" keysAndValues:kCIInputImageKey,image2,nil];
- 光转移过滤器
CIFilter * filter = [CIFilter filterWithName:@"CIPhotoEffectTransfer" keysAndValues:kCIInputImageKey,image2,nil];
- 棕褐色过滤器
CIFilter * filter = [CIFilter filterWithName:@"CISepiaTone" keysAndValues:kCIInputImageKey,image2,nil];
- 热图过滤器
CIFilter * filter = [CIFilter filterWithName:@"CIThermal" keysAndValues:kCIInputImageKey,image2,nil];
- X射线过滤器
CIFilter * filter = [CIFilter filterWithName:@"CIXRay" keysAndValues:kCIInputImageKey,image2,nil];
- 模糊过滤器
//参数进行模糊效果的设置

CIFilter * filter = [CIFilter filterWithName:@"CIBokehBlur" keysAndValues:kCIInputImageKey,image2,@"inputSoftness",@0.5,@"inputRingSize",@0.1,@"inputRingAmount",@0,@"inputRadius",@10,nil];
- 盒模糊过滤器
CIFilter * filter = [CIFilter filterWithName:@"CIBoxBlur" keysAndValues:kCIInputImageKey,image2,@"inputRadius",@10,nil];
- 阀瓣模糊过滤器
CIFilter * filter = [CIFilter filterWithName:@"CIDiscBlur" keysAndValues:kCIInputImageKey,image2,@"inputRadius",@25,nil];
- 高斯模糊过滤器
CIFilter * filter = [CIFilter filterWithName:@"CIGaussianBlur" keysAndValues:kCIInputImageKey,image2,@"inputRadius",@10,nil];
- 梯度模糊过滤器
CIFilter * filter = [CIFilter filterWithName:@"CIMorphologyGradient" keysAndValues:kCIInputImageKey,image2,@"inputRadius",@5,nil];
- 运动模糊过滤器
CIFilter * filter = [CIFilter filterWithName:@"CIMotionBlur" keysAndValues:kCIInputImageKey,image2,@"inputRadius",@5,nil];
- 缩放模糊过滤器
CIFilter * filter = [CIFilter filterWithName:@"CIZoomBlur" keysAndValues:kCIInputImageKey,image2,nil];
5.自定义过滤器
上面演示了非常多的常用内置过滤器,我们也可以通过继承CIFilter来自定义过滤器。
自定义过滤器之前,首先需要了解CIKernel这个类,CIKernel是Core Image Kernel Language 的抽象对象。CIKL是CoreImage中专门用来编写像素处理函数的语言。
CIKernel相关类解析如下:
//基类 用于通用的过滤函数

@interface CIKernel : NSObject

//从字符串加载一组过滤函数

+ (nullable NSArray<CIKernel *> *)kernelsWithString:(NSString *)string;

//从字符串加载一个过滤函数

+ (nullable instancetype)kernelWithString:(NSString *)string ;

//名称

@property (atomic, readonly) NSString *name ;

//进行图片生成

- (nullable CIImage *)applyWithExtent:(CGRect)extent

                          roiCallback:(CIKernelROICallback)callback

                            arguments:(nullable NSArray<id> *)args;

@end

//用于颜色修正的过滤函数

@interface CIColorKernel : CIKernel

+ (nullable instancetype)kernelWithString:(NSString *)string;

- (nullable CIImage *)applyWithExtent:(CGRect)extent

                            arguments:(nullable NSArray<id> *)args;

@end

//用于形状修正的过滤函数

@interface CIWarpKernel : CIKernel

+ (nullable instancetype)kernelWithString:(NSString *)string;

@end

//用于色彩混合的过滤函数

@interface CIBlendKernel : CIColorKernel

+ (nullable instancetype)kernelWithString:(NSString *)string;

- (nullable CIImage *)applyWithForeground:(CIImage*)foreground

                               background:(CIImage*)background;

@end
下面是一个简单的翻转图像的自定义过滤器示意,首先新建一个新的cikernel文件,命名为a.cikernel,如下:
kernel vec2 mirrorX ( float imageWidth )

{

// 获取待处理点的位置

vec2 currentVec = destCoord();

// 返回最终显示位置

return vec2 ( imageWidth - currentVec.x , currentVec.y );

}
新建一个过滤器类,命名为MyFilter,如下:
#import <CoreImage/CoreImage.h>

@interface MyFilter : CIFilter

@property(nonatomic,strong)CIImage * inputImage;

@end

#import "MyFilter.h"

@interface MyFilter()

@property(nonatomic,strong)CIWarpKernel * kernel;

@end

@implementation MyFilter

- (instancetype)init {

    self = [super init];

    if (self) {

            //从文件读取过滤函数

            NSBundle *bundle = [NSBundle bundleForClass: [self class]];

            NSURL *kernelURL = [bundle URLForResource:@"a" withExtension:@"cikernel"];

            NSError *error;

            NSString *kernelCode = [NSString stringWithContentsOfURL:kernelURL

                                                            encoding:NSUTF8StringEncoding error:&error];

            NSArray *kernels = [CIKernel kernelsWithString:kernelCode];

            self.kernel = [kernels objectAtIndex:0];

    }

    return self;

}

- (CIImage *)outputImage

{

    CGFloat inputWidth = self.inputImage.extent.size.width;

    CIImage *result = [self.kernel applyWithExtent:self.inputImage.extent roiCallback:^CGRect(int index, CGRect destRect) {

        return destRect;

    } inputImage:self.inputImage arguments:@[@(inputWidth)]];

    return result;

}

//设置说明字典

-(NSDictionary<NSString *,id> *)attributes{

    return @{

             @"inputImage" :  @{

                 @"CIAttributeClass" : @"CIImage",

                 @"CIAttributeDisplayName" : @"Image--",

                 @"CIAttributeType" : @"CIAttributeTypeImage"

                 }};

}

@end
如下进行使用即可:
MyFilter * filter = [[MyFilter alloc]init];

filter.inputImage = image2;

CIContext * context = [[CIContext alloc]initWithOptions:nil];

CIImage * output = [filter outputImage];

CGImageRef ref = [context createCGImage:output fromRect:output.extent];

UIImage * newImage = [UIImage imageWithCGImage:ref];
二、使用CoreImage实现人脸识别
人脸识别是目前非常热门的一种图像处理技术,CoreImage内置了对人脸进行识别的相关功能接口,并且可以对人脸面部特征进行抓取,下面我们来实现一个简单的实时识别人脸特征的Demo。
首先创建一个视图作为图像扫描视图,如下:
.h文件
//.h 文件

@interface FaceView : UIView

@end
.m文件
//

//  FaceView.m

//  CoreImageDemo

//

//  Created by jaki on 2018/12/22.

//  Copyright © 2018年 jaki. All rights reserved.

//

#import "FaceView.h"

#import <AVFoundation/AVFoundation.h>

#import "FaceHandle.h"

//定义线程

#define FACE_SCAN_QUEUE "FACE_SCAN_QUEUE"

@interface FaceView()<AVCaptureVideoDataOutputSampleBufferDelegate>

@property(nonatomic,strong)AVCaptureSession *captureSession;

@property(nonatomic,strong)AVCaptureDeviceInput * captureInput;

@property(nonatomic,strong)AVCaptureVideoDataOutput * captureOutput;

@property(nonnull,strong)AVCaptureVideoPreviewLayer * videoLayer;

@property(nonatomic,strong)dispatch_queue_t queue;

@property(nonatomic,assign)BOOL hasHandle;

@property(nonatomic,strong)UIView * faceView;

@end

@implementation FaceView

#pragma mark - Override

-(instancetype)init{

    self = [super init];

    if (self) {

        [self install];

    }

    return self;

}

-(instancetype)initWithFrame:(CGRect)frame{

    self = [super initWithFrame:frame];

    if (self) {

        [self install];

    }

    return self;

}

-(void)layoutSubviews{

    [super layoutSubviews];

    self.videoLayer.frame = self.bounds;

}

#pragma mark - InnerFunc

-(void)install{

    if (![UIImagePickerController isSourceTypeAvailable:UIImagePickerControllerSourceTypeCamera]) {

        NSLog(@"不支持");

        return;

    }

    self.queue = dispatch_queue_create(FACE_SCAN_QUEUE, NULL);

    [self.captureSession startRunning];

    AVAuthorizationStatus status = [AVCaptureDevice authorizationStatusForMediaType:AVMediaTypeVideo];

    if (status!=AVAuthorizationStatusAuthorized) {

        NSLog(@"需要权限");

        return;

    }

    self.videoLayer = [AVCaptureVideoPreviewLayer layerWithSession:self.captureSession];

    self.videoLayer.frame = CGRectZero;

    self.videoLayer.videoGravity = AVLayerVideoGravityResizeAspectFill;

    [self.layer addSublayer:self.videoLayer];

    [self addSubview:self.faceView];

    self.faceView.frame = CGRectMake(0, 0, self.frame.size.width, self.frame.size.height);

}

//将人脸特征点标记出来

-(void)renderReactWithInfo:(NSDictionary *)info{

    for (UIView * v in self.faceView.subviews) {

        [v removeFromSuperview];

    }

    NSArray * faceArray = info[FACE_HANDLE_INFO_FACE_ARRAY];

    for (int i = 0;i < faceArray.count; i++) {

        NSDictionary * face = faceArray[i];

        NSValue * faceValue = face[FACE_HANDLE_INFO_FACE_FRAME];

        if (faceValue) {

            CGRect faceR = [faceValue CGRectValue];

            UIView * faceView = [[UIView alloc]initWithFrame:faceR];

            faceView.backgroundColor = [UIColor clearColor];

            faceView.layer.borderColor = [UIColor redColor].CGColor;

            faceView.layer.borderWidth = 2;

            [self.faceView addSubview:faceView];

        }

        NSValue * leftEye = face[FACE_HANDLE_INFO_FACE_LEFT_EYE_FRAME];

        if (leftEye) {

            CGRect leftEyeR = [leftEye CGRectValue];

            UIView * eye = [[UIView alloc]initWithFrame:leftEyeR];

            eye.backgroundColor = [UIColor clearColor];

            eye.layer.borderColor = [UIColor greenColor].CGColor;

            eye.layer.borderWidth = 2;

            [self.faceView addSubview:eye];

        }

        NSValue * rightEye = face[FACE_HANDLE_INFO_FACE_RIGHT_EYE_FRAME];

        if (rightEye) {

            CGRect rightEyeR = [rightEye CGRectValue];

            UIView * eye = [[UIView alloc]initWithFrame:rightEyeR];

            eye.backgroundColor = [UIColor clearColor];

            eye.layer.borderColor = [UIColor greenColor].CGColor;

            eye.layer.borderWidth = 2;

            [self.faceView addSubview:eye];

        }

        NSValue * mouth = face[FACE_HANDLE_INFO_FACE_MOUTH_FRAME];

        if (mouth) {

            CGRect mouthR = [mouth CGRectValue];

            UIView * mouth = [[UIView alloc]initWithFrame:mouthR];

            mouth.backgroundColor = [UIColor clearColor];

            mouth.layer.borderColor = [UIColor orangeColor].CGColor;

            mouth.layer.borderWidth = 2;

            [self.faceView addSubview:mouth];

        }

    }

}

#pragma AVDelegate

//进行画面的捕获

-(void)captureOutput:(AVCaptureOutput *)output didOutputSampleBuffer:(CMSampleBufferRef)sampleBuffer fromConnection:(AVCaptureConnection *)connection{

    if (self.hasHandle) {

        return;

    }

    self.hasHandle = YES;

    CVImageBufferRef imageBuffer = CMSampleBufferGetImageBuffer(sampleBuffer);

    CVPixelBufferLockBaseAddress(imageBuffer,0);

    uint8_t *baseAddress = (uint8_t *)CVPixelBufferGetBaseAddress(imageBuffer);

    size_t bytesPerRow = CVPixelBufferGetBytesPerRow(imageBuffer);

    size_t width = CVPixelBufferGetWidth(imageBuffer);

    size_t height = CVPixelBufferGetHeight(imageBuffer);

    CGColorSpaceRef colorSpace = CGColorSpaceCreateDeviceRGB();

    CGContextRef newContext = CGBitmapContextCreate(baseAddress,width, height, 8, bytesPerRow, colorSpace,kCGBitmapByteOrder32Little | kCGImageAlphaPremultipliedFirst);

    CGImageRef newImage = CGBitmapContextCreateImage(newContext);

    CGContextRelease(newContext);

    CGColorSpaceRelease(colorSpace);

    UIImage *image= [UIImage imageWithCGImage:newImage scale:1.0 orientation:UIImageOrientationRight];

    CGImageRelease(newImage);

    //image

     //进行人脸识别的核心工具类

    [[FaceHandle sharedInstance] handleImage:image viewSize:self.frame.size completed:^(BOOL success, NSDictionary *info) {

        self.hasHandle  = NO;

        [self renderReactWithInfo:info];

    }];

    CVPixelBufferUnlockBaseAddress(imageBuffer,0);

}

#pragma mark - setter and getter

-(AVCaptureSession *)captureSession{

    if (!_captureSession) {

        _captureSession = [[AVCaptureSession alloc]init];

        [_captureSession addInput:self.captureInput];

        [_captureSession addOutput:self.captureOutput];

    }

    return _captureSession;

}

-(AVCaptureDeviceInput *)captureInput{

    if (!_captureInput) {

        _captureInput = [AVCaptureDeviceInput deviceInputWithDevice:[AVCaptureDevice defaultDeviceWithMediaType:AVMediaTypeVideo] error:nil];

    }

    return _captureInput;

}

-(AVCaptureVideoDataOutput *)captureOutput{

    if (!_captureOutput) {

        _captureOutput = [[AVCaptureVideoDataOutput alloc]init];

        _captureOutput.alwaysDiscardsLateVideoFrames = YES;

        [_captureOutput setSampleBufferDelegate:self queue:self.queue];

        _captureOutput.videoSettings = @{(__bridge NSString *)kCVPixelBufferPixelFormatTypeKey:@(kCVPixelFormatType_32BGRA)};

    }

    return _captureOutput;

}

-(UIView *)faceView{

    if (!_faceView) {

        _faceView = [[UIView alloc]init];

        _faceView.backgroundColor = [UIColor clearColor];

    }

    return _faceView;

}

@end
在真机上运行工程,通过摄像头可以将实时的画面捕获到屏幕上,下面实现核心的人脸识别代码:
创建继承于NSObject的FaceHandle类,如下:
.h文件
extern const NSString * FACE_HANDLE_INFO_FACE_ARRAY;

extern const NSString * FACE_HANDLE_INFO_FACE_FRAME;

extern const NSString * FACE_HANDLE_INFO_FACE_LEFT_EYE_FRAME;

extern const NSString * FACE_HANDLE_INFO_FACE_RIGHT_EYE_FRAME;

extern const NSString * FACE_HANDLE_INFO_FACE_MOUTH_FRAME;

extern const NSString * FACE_HANDLE_INFO_ERROR;

@interface FaceHandle : NSObject

+(instancetype)sharedInstance;

-(void)handleImage:(UIImage *)image viewSize:(CGSize )viewSize completed:(void(^)(BOOL  success,NSDictionary * info))completion;

@end
.m文件
#import "FaceHandle.h"

#define FACE_HANDLE_DISPATCH_QUEUE "FACE_HANDLE_DISPATCH_QUEUE"

const NSString * FACE_HANDLE_INFO_FACE_FRAME = @"FACE_HANDLE_INFO_FACE_FRAME";

const NSString * FACE_HANDLE_INFO_FACE_LEFT_EYE_FRAME = @"FACE_HANDLE_INFO_FACE_LEFT_EYE_FRAME";

const NSString * FACE_HANDLE_INFO_FACE_RIGHT_EYE_FRAME = @"FACE_HANDLE_INFO_FACE_RIGHT_EYE_FRAME";

const NSString * FACE_HANDLE_INFO_FACE_MOUTH_FRAME = @"FACE_HANDLE_INFO_FACE_MOUTH_FRAME";

const NSString * FACE_HANDLE_INFO_ERROR = @"FACE_HANDLE_INFO_ERROR";

const NSString * FACE_HANDLE_INFO_FACE_ARRAY = @"FACE_HANDLE_INFO_FACE_ARRAY";

@interface FaceHandle()

@property(nonatomic,strong)dispatch_queue_t workingQueue;

@end

@implementation FaceHandle

+(instancetype)sharedInstance{

    static dispatch_once_t onceToken;

    static FaceHandle * sharedInstance = nil;

    if (!sharedInstance) {

        dispatch_once(&onceToken, ^{

            sharedInstance = [[FaceHandle alloc] init];

        });

    }

    return sharedInstance;

}

#pragma mark - Override

-(instancetype)init{

    self = [super init];

    if (self) {

        self.workingQueue = dispatch_queue_create(FACE_HANDLE_DISPATCH_QUEUE, NULL);

    }

    return self;

}

#pragma mark - InnerFunc

-(void)handleImage:(UIImage *)image viewSize:(CGSize )viewSize completed:(void (^)(BOOL , NSDictionary *))completion{

    if (!image) {

        if (completion) {

            completion(NO,@{FACE_HANDLE_INFO_ERROR:@"图片捕获出错"});

        }

        return;

    }

    dispatch_async(self.workingQueue, ^{

        UIImage * newImage = [self strectImage:image withSize:viewSize];

        if (newImage) {

            NSArray * faceArray = [self analyseFaceImage:newImage];

            if (completion) {

                dispatch_async(dispatch_get_main_queue(), ^{

                    completion(YES,@{FACE_HANDLE_INFO_FACE_ARRAY:faceArray});

                });

            }

        }else{

            if (completion) {

                dispatch_async(dispatch_get_main_queue(), ^{

                    completion(NO,@{FACE_HANDLE_INFO_ERROR:@"图片识别出错"});

                });

            }

        }

    });

}

//图片放大处理

-(UIImage *)strectImage:(UIImage *)img withSize:(CGSize)size{

    UIGraphicsBeginImageContext(size);

    CGRect thumbnailRect = CGRectZero;

    thumbnailRect.origin = CGPointMake(0, 0);

    thumbnailRect.size.width  = size.width;

    thumbnailRect.size.height = size.height;

    [img drawInRect:thumbnailRect];

    UIImage * newImage = UIGraphicsGetImageFromCurrentImageContext();

    UIGraphicsEndImageContext();

    if (newImage) {

        return  newImage;

    }

    return nil;

}

-(NSArray *)analyseFaceImage:(UIImage *)image{

    NSMutableArray * dataArray = [NSMutableArray array];

    CIImage * cImage = [CIImage imageWithCGImage:image.CGImage];

    NSDictionary* opts = [NSDictionary dictionaryWithObject:

                          CIDetectorAccuracyHigh forKey:CIDetectorAccuracy];

    //进行分析

    CIDetector* detector = [CIDetector detectorOfType:CIDetectorTypeFace

                                              context:nil options:opts];

    //获取特征数组

    NSArray* features = [detector featuresInImage:cImage];

    CGSize inputImageSize = [cImage extent].size;

    CGAffineTransform  transform = CGAffineTransformIdentity;

    transform = CGAffineTransformScale(transform, 1, -1);

    transform = CGAffineTransformTranslate(transform, 0, -inputImageSize.height);

    for (CIFaceFeature *faceFeature in features){

        NSMutableDictionary * faceDic = [NSMutableDictionary dictionary];

        CGRect faceViewBounds = CGRectApplyAffineTransform(faceFeature.bounds, transform);

        [faceDic setValue:[NSValue valueWithCGRect:faceViewBounds] forKey:(NSString *)FACE_HANDLE_INFO_FACE_FRAME];

        CGFloat faceWidth = faceFeature.bounds.size.width;

        if(faceFeature.hasLeftEyePosition){

            CGPoint faceViewLeftPoint = CGPointApplyAffineTransform(faceFeature.leftEyePosition, transform);

            CGRect leftEyeBounds = CGRectMake(faceViewLeftPoint.x-faceWidth*0.1, faceViewLeftPoint.y-faceWidth*0.1, faceWidth*0.2, faceWidth*0.2);

            [faceDic setValue:[NSValue valueWithCGRect:leftEyeBounds] forKey:(NSString *)FACE_HANDLE_INFO_FACE_LEFT_EYE_FRAME];

        }

        if(faceFeature.hasRightEyePosition){

            //获取人右眼对应的point

            CGPoint faceViewRightPoint = CGPointApplyAffineTransform(faceFeature.rightEyePosition, transform);

            CGRect rightEyeBounds = CGRectMake(faceViewRightPoint.x-faceWidth*0.1, faceViewRightPoint.y-faceWidth*0.1, faceWidth*0.2, faceWidth*0.2);

            [faceDic setValue:[NSValue valueWithCGRect:rightEyeBounds] forKey:(NSString *)FACE_HANDLE_INFO_FACE_RIGHT_EYE_FRAME];

        }

        if(faceFeature.hasMouthPosition){

            //获取人嘴巴对应的point

            CGPoint faceViewMouthPoint = CGPointApplyAffineTransform(faceFeature.mouthPosition, transform);

            CGRect mouthBounds = CGRectMake(faceViewMouthPoint.x-faceWidth*0.2, faceViewMouthPoint.y-faceWidth*0.2, faceWidth*0.4, faceWidth*0.4);

            [faceDic setValue:[NSValue valueWithCGRect:mouthBounds] forKey:(NSString *)FACE_HANDLE_INFO_FACE_MOUTH_FRAME];

        }

        [dataArray addObject:faceDic];

    }

    return [dataArray copy];

}

@end
打开百度,随便搜索一些人脸图片进行识别,可以看到识别率还是很高,如下图:
三、CIImage中提供了其他图像识别功能
CIDetector除了可以用来进行人脸识别外,还支持进行二维码、矩形、文字等检测。
矩形区域识别,用来检测图像中的矩形边界,核心代码如下:
-(NSArray *)analyseRectImage:(UIImage *)image{

    NSMutableArray * dataArray = [NSMutableArray array];

    CIImage * cImage = [CIImage imageWithCGImage:image.CGImage];

    NSDictionary* opts = [NSDictionary dictionaryWithObject:

                          CIDetectorAccuracyHigh forKey:CIDetectorAccuracy];

    CIDetector* detector = [CIDetector detectorOfType:CIDetectorTypeRectangle

                                              context:nil options:opts];

    NSArray* features = [detector featuresInImage:cImage];

    CGSize inputImageSize = [cImage extent].size;

    CGAffineTransform  transform = CGAffineTransformIdentity;

    transform = CGAffineTransformScale(transform, 1, -1);

    transform = CGAffineTransformTranslate(transform, 0, -inputImageSize.height);

    for (CIRectangleFeature *feature in features){

        NSLog(@"%lu",features.count);

        NSMutableDictionary * dic = [NSMutableDictionary dictionary];

        CGRect viewBounds = CGRectApplyAffineTransform(feature.bounds, transform);

        [dic setValue:[NSValue valueWithCGRect:viewBounds] forKey:@"rectBounds"];

        CGPoint topLeft = CGPointApplyAffineTransform(feature.topLeft, transform);

        [dic setValue:[NSValue valueWithCGPoint:topLeft] forKey:@"topLeft"];

        CGPoint topRight = CGPointApplyAffineTransform(feature.topRight, transform);

        [dic setValue:[NSValue valueWithCGPoint:topRight] forKey:@"topRight"];

        CGPoint bottomLeft = CGPointApplyAffineTransform(feature.bottomLeft, transform);

        [dic setValue:[NSValue valueWithCGPoint:bottomLeft] forKey:@"bottomLeft"];

        CGPoint bottomRight = CGPointApplyAffineTransform(feature.bottomRight, transform);

        [dic setValue:[NSValue valueWithCGPoint:bottomRight] forKey:@"bottomRight"];

        [dataArray addObject:dic];

    }

    return [dataArray copy];

}
效果如下图所示:
二维码扫描不仅可以分析出图片中的二维码位置,还可以解析出二维码数据,核心代码如下:
-(NSArray *)analyseQRImage:(UIImage *)image{

    NSMutableArray * dataArray = [NSMutableArray array];

    CIImage * cImage = [CIImage imageWithCGImage:image.CGImage];

    NSDictionary* opts = [NSDictionary dictionaryWithObject:

                          CIDetectorAccuracyHigh forKey:CIDetectorAccuracy];

    CIDetector* detector = [CIDetector detectorOfType:CIDetectorTypeQRCode

                                              context:nil options:opts];

    NSArray* features = [detector featuresInImage:cImage];

    CGSize inputImageSize = [cImage extent].size;

    CGAffineTransform  transform = CGAffineTransformIdentity;

    transform = CGAffineTransformScale(transform, 1, -1);

    transform = CGAffineTransformTranslate(transform, 0, -inputImageSize.height);

    for (CIQRCodeFeature *feature in features){

        NSMutableDictionary * dic = [NSMutableDictionary dictionary];

        CGRect viewBounds = CGRectApplyAffineTransform(feature.bounds, transform);

        [dic setValue:[NSValue valueWithCGRect:viewBounds] forKey:@"rectBounds"];

        CGPoint topLeft = CGPointApplyAffineTransform(feature.topLeft, transform);

        [dic setValue:[NSValue valueWithCGPoint:topLeft] forKey:@"topLeft"];

        CGPoint topRight = CGPointApplyAffineTransform(feature.topRight, transform);

        [dic setValue:[NSValue valueWithCGPoint:topRight] forKey:@"topRight"];

        CGPoint bottomLeft = CGPointApplyAffineTransform(feature.bottomLeft, transform);

        [dic setValue:[NSValue valueWithCGPoint:bottomLeft] forKey:@"bottomLeft"];

        CGPoint bottomRight = CGPointApplyAffineTransform(feature.bottomRight, transform);

        [dic setValue:[NSValue valueWithCGPoint:bottomRight] forKey:@"bottomRight"];

        [dic setValue:feature.messageString forKey:@"content"];

        [dataArray addObject:dic];

    }

    return [dataArray copy];

}
CIImage框架中还支持对文本区域进行分析,核心代码如下:
-(NSArray *)analyseTextImage:(UIImage *)image{

    NSMutableArray * dataArray = [NSMutableArray array];

    CIImage * cImage = [CIImage imageWithCGImage:image.CGImage];

    NSDictionary* opts = [NSDictionary dictionaryWithObject:

                          CIDetectorAccuracyHigh forKey:CIDetectorAccuracy];

    CIDetector* detector = [CIDetector detectorOfType:CIDetectorTypeText

                                              context:nil options:nil];

    NSArray* features = [detector featuresInImage:cImage options:@{CIDetectorReturnSubFeatures:@YES}];

    CGSize inputImageSize = [cImage extent].size;

    CGAffineTransform  transform = CGAffineTransformIdentity;

    transform = CGAffineTransformScale(transform, 1, -1);

    transform = CGAffineTransformTranslate(transform, 0, -inputImageSize.height);

    for (CITextFeature *feature in features){

        NSLog(@"%@",feature.subFeatures);

        NSMutableDictionary * dic = [NSMutableDictionary dictionary];

        CGRect viewBounds = CGRectApplyAffineTransform(feature.bounds, transform);

        [dic setValue:[NSValue valueWithCGRect:viewBounds] forKey:@"rectBounds"];

        CGPoint topLeft = CGPointApplyAffineTransform(feature.topLeft, transform);

        [dic setValue:[NSValue valueWithCGPoint:topLeft] forKey:@"topLeft"];

        CGPoint topRight = CGPointApplyAffineTransform(feature.topRight, transform);

        [dic setValue:[NSValue valueWithCGPoint:topRight] forKey:@"topRight"];

        CGPoint bottomLeft = CGPointApplyAffineTransform(feature.bottomLeft, transform);

        [dic setValue:[NSValue valueWithCGPoint:bottomLeft] forKey:@"bottomLeft"];

        CGPoint bottomRight = CGPointApplyAffineTransform(feature.bottomRight, transform);

        [dic setValue:[NSValue valueWithCGPoint:bottomRight] forKey:@"bottomRight"];

        [dataArray addObject:dic];

    }

    return [dataArray copy];

}
效果如下图所示:
四、CoreImage中的相关核心类
1.CIColor类
CIColor类是CoreImage中描述色彩的类。
//通过CGColor创建CIColor

+ (instancetype)colorWithCGColor:(CGColorRef)c;

//构造方法

+ (instancetype)colorWithRed:(CGFloat)r green:(CGFloat)g blue:(CGFloat)b alpha:(CGFloat)a;

+ (instancetype)colorWithRed:(CGFloat)r green:(CGFloat)g blue:(CGFloat)b;

+ (nullable instancetype)colorWithRed:(CGFloat)r green:(CGFloat)g blue:(CGFloat)b alpha:(CGFloat)a colorSpace:(CGColorSpaceRef)colorSpace;

+ (nullable instancetype)colorWithRed:(CGFloat)r green:(CGFloat)g blue:(CGFloat)b colorSpace:(CGColorSpaceRef)colorSpace;

- (instancetype)initWithCGColor:(CGColorRef)c;

//通过字符串创建CIColor对象

+ (instancetype)colorWithString:(NSString *)representation;

- (instancetype)initWithRed:(CGFloat)r green:(CGFloat)g blue:(CGFloat)b alpha:(CGFloat)a;

- (instancetype)initWithRed:(CGFloat)r green:(CGFloat)g blue:(CGFloat)b;

- (nullable instancetype)initWithRed:(CGFloat)r green:(CGFloat)g blue:(CGFloat)b alpha:(CGFloat)a colorSpace:(CGColorSpaceRef)colorSpace;

- (nullable instancetype)initWithRed:(CGFloat)r green:(CGFloat)g blue:(CGFloat)b colorSpace:(CGColorSpaceRef)colorSpace;

//获取颜色分量个数

@property (readonly) size_t numberOfComponents;

//颜色分量

@property (readonly) const CGFloat *components;

//颜色透明度

@property (readonly) CGFloat alpha;

//色彩空间

@property (readonly) CGColorSpaceRef colorSpace;

//红绿蓝分量

@property (readonly) CGFloat red;

@property (readonly) CGFloat green;

@property (readonly) CGFloat blue;

//下面是定义的一些便捷的颜色变量

@property (class, strong, readonly) CIColor *blackColor  ;

@property (class, strong, readonly) CIColor *whiteColor  ;

@property (class, strong, readonly) CIColor *grayColor   ;

@property (class, strong, readonly) CIColor *redColor    ;

@property (class, strong, readonly) CIColor *greenColor  ;

@property (class, strong, readonly) CIColor *blueColor   ;

@property (class, strong, readonly) CIColor *cyanColor   ;

@property (class, strong, readonly) CIColor *magentaColor ;

@property (class, strong, readonly) CIColor *yellowColor  ;

@property (class, strong, readonly) CIColor *clearColor
2.CIImage类
CIImage是CoreImage中最核心的类,它描述了图像对象。
//创建一个新的CIImage实例

+ (CIImage *)imageWithCGImage:(CGImageRef)image;

//通过字典创建一个新的CIImage实例

/*

字典中的键

kCIImageColorSpace  设置颜色空间 为CGColorSpaceRef对象

kCIImageNearestSampling 是否临近采样  布尔值

kCIImageProperties    设置图片属性字典

kCIImageApplyOrientationProperty 布尔值 是否根据方向进行转换

kCIImageTextureTarget  NSNumber值 设置OpebGL目标纹理常数

kCIImageTextureFormat NSNumber值 设置OpebGL format

kCIImageAuxiliaryDepth 布尔值 是否返回深度图像

kCIImageAuxiliaryDisparity  布尔值 是否返回辅助时差图像

kCIImageAuxiliaryPortraitEffectsMatte  布尔值 是否返回肖像模板

*/

+ (CIImage *)imageWithCGImage:(CGImageRef)image

                      options:(nullable NSDictionary<CIImageOption, id> *)options;

//通过CALayer进行CIImage的创建

+ (CIImage *)imageWithCGLayer:(CGLayerRef)layer NS_DEPRECATED_MAC(10_4,10_11);

+ (CIImage *)imageWithCGLayer:(CGLayerRef)layer

                      options:(nullable NSDictionary<CIImageOption, id> *)options;

//使用bitmap数据创建CIImage

+ (CIImage *)imageWithBitmapData:(NSData *)data

                     bytesPerRow:(size_t)bytesPerRow

                            size:(CGSize)size

                          format:(CIFormat)format

                      colorSpace:(nullable CGColorSpaceRef)colorSpace;

//通过纹理创建CIImage

+ (CIImage *)imageWithTexture:(unsigned int)name

                         size:(CGSize)size

                      flipped:(BOOL)flipped

                   colorSpace:(nullable CGColorSpaceRef)colorSpace;

+ (CIImage *)imageWithTexture:(unsigned int)name

                         size:(CGSize)size

                      flipped:(BOOL)flipped

                      options:(nullable NSDictionary<CIImageOption, id> *)options;

+ (nullable CIImage *)imageWithMTLTexture:(id<MTLTexture>)texture

                                  options:(nullable NSDictionary<CIImageOption, id> *)options;

//通过url创建CIImage

+ (nullable CIImage *)imageWithContentsOfURL:(NSURL *)url;

+ (nullable CIImage *)imageWithContentsOfURL:(NSURL *)url

                                     options:(nullable NSDictionary<CIImageOption, id> *)options;

//通过NSDate创建CIImage

+ (nullable CIImage *)imageWithData:(NSData *)data;

+ (nullable CIImage *)imageWithData:(NSData *)data

                            options:(nullable NSDictionary<CIImageOption, id> *)options;

//通过CVImageBufferRef创建CIImage

+ (CIImage *)imageWithCVImageBuffer:(CVImageBufferRef)imageBuffer;

+ (CIImage *)imageWithCVImageBuffer:(CVImageBufferRef)imageBuffer

                            options:(nullable NSDictionary<CIImageOption, id> *)options;

//通过CVPixelBufferRef创建CIImage

+ (CIImage *)imageWithCVPixelBuffer:(CVPixelBufferRef)pixelBuffer;

+ (CIImage *)imageWithCVPixelBuffer:(CVPixelBufferRef)pixelBuffer

                            options:(nullable NSDictionary<CIImageOption, id> *)options;

//通过颜色创建CIImage

+ (CIImage *)imageWithColor:(CIColor *)color;

//创建空CIImage

+ (CIImage *)emptyImage;

//初始化方法

- (instancetype)initWithCGImage:(CGImageRef)image;

- (instancetype)initWithCGImage:(CGImageRef)image

                        options:(nullable NSDictionary<CIImageOption, id> *)options;

- (instancetype)initWithCGLayer:(CGLayerRef)layer);

- (instancetype)initWithCGLayer:(CGLayerRef)layer;

- (instancetype)initWithBitmapData:(NSData *)data

                       bytesPerRow:(size_t)bytesPerRow

                              size:(CGSize)size

                            format:(CIFormat)format

                        colorSpace:(nullable CGColorSpaceRef)colorSpace;

- (instancetype)initWithTexture:(unsigned int)name

                           size:(CGSize)size

                        flipped:(BOOL)flipped

                     colorSpace:(nullable CGColorSpaceRef)colorSpace;

- (instancetype)initWithTexture:(unsigned int)name

                           size:(CGSize)size

                        flipped:(BOOL)flipped

                        options:(nullable NSDictionary<CIImageOption, id> *)options;

- (nullable instancetype)initWithMTLTexture:(id<MTLTexture>)texture

                                    options:(nullable NSDictionary<CIImageOption, id> *)options;

- (nullable instancetype)initWithContentsOfURL:(NSURL *)url;

- (nullable instancetype)initWithContentsOfURL:(NSURL *)url

                                       options:(nullable NSDictionary<CIImageOption, id> *)options;

- (instancetype)initWithCVImageBuffer:(CVImageBufferRef)imageBuffer;

- (instancetype)initWithCVImageBuffer:(CVImageBufferRef)imageBuffer

                              options:(nullable NSDictionary<CIImageOption, id> *)options;

- (instancetype)initWithCVPixelBuffer:(CVPixelBufferRef)pixelBuffer;

- (instancetype)initWithCVPixelBuffer:(CVPixelBufferRef)pixelBuffer

                              options:(nullable NSDictionary<CIImageOption, id> *)options;

- (instancetype)initWithColor:(CIColor *)color;

//追加变换 返回结果CIImage对象

- (CIImage *)imageByApplyingTransform:(CGAffineTransform)matrix;

- (CIImage *)imageByApplyingOrientation:(int)orientation;

- (CIImage *)imageByApplyingCGOrientation:(CGImagePropertyOrientation)orientation;

//根据方向获取变换

- (CGAffineTransform)imageTransformForOrientation:(int)orientation;

- (CGAffineTransform)imageTransformForCGOrientation:(CGImagePropertyOrientation)orientation;

//进行混合

- (CIImage *)imageByCompositingOverImage:(CIImage *)dest;

//区域裁剪

- (CIImage *)imageByCroppingToRect:(CGRect)rect;

//返回图像边缘

- (CIImage *)imageByClampingToExtent;

//设置边缘 返回新图像对象

- (CIImage *)imageByClampingToRect:(CGRect)rect;

//用过滤器进行过滤

- (CIImage *)imageByApplyingFilter:(NSString *)filterName

               withInputParameters:(nullable NSDictionary<NSString *,id> *)params;

- (CIImage *)imageByApplyingFilter:(NSString *)filterName;

//图像边缘

@property (NS_NONATOMIC_IOSONLY, readonly) CGRect extent;

//属性字典

@property (atomic, readonly) NSDictionary<NSString *,id> *properties;

//通过URL创建的图像的URL

@property (atomic, readonly, nullable) NSURL *url;

//颜色空间

@property (atomic, readonly, nullable) CGColorSpaceRef colorSpace;

//通过CGImage创建的CGImage对象

@property (nonatomic, readonly, nullable) CGImageRef CGImage;
3.CIContext类
CIContext是CoreImage中的上下文对象,用来进行图片的渲染,已经转换为其他框架的图像对象。
//通过CGContextRef上下文创建CIContext上下文

/*

配置字典中可以进行配置的:

kCIContextOutputColorSpace   设置输出的颜色空间

kCIContextWorkingColorSpace  设置工作的颜色空间

kCIContextWorkingFormat      设置缓冲区数据格式

kCIContextHighQualityDownsample 布尔值

kCIContextOutputPremultiplied  设置输出是否带alpha通道

kCIContextCacheIntermediates  布尔值

kCIContextUseSoftwareRenderer 设置是否使用软件渲染

kCIContextPriorityRequestLow  是否低质量

*/

+ (CIContext *)contextWithCGContext:(CGContextRef)cgctx

                            options:(nullable NSDictionary<CIContextOption, id> *)options;

//创建上下文对象

+ (CIContext *)contextWithOptions:(nullable NSDictionary<CIContextOption, id> *)options;

+ (CIContext *)context;

- (instancetype)initWithOptions:(nullable NSDictionary<CIContextOption, id> *)options;

//使用指定的处理器创建CIContext

+ (CIContext *)contextWithMTLDevice:(id<MTLDevice>)device;

+ (CIContext *)contextWithMTLDevice:(id<MTLDevice>)device

                            options:(nullable NSDictionary<CIContextOption, id> *)options;

//工作的颜色空间

@property (nullable, nonatomic, readonly) CGColorSpaceRef workingColorSpace;

//缓冲区格式

@property (nonatomic, readonly) CIFormat workingFormat;

//进行CIImage图像的绘制

- (void)drawImage:(CIImage *)image

          atPoint:(CGPoint)atPoint

         fromRect:(CGRect)fromRect;

- (void)drawImage:(CIImage *)image

           inRect:(CGRect)inRect

         fromRect:(CGRect)fromRect;

//使用CIImage创建CGImageRef

- (nullable CGImageRef)createCGImage:(CIImage *)image;

                            fromRect:(CGRect)fromRect;

- (nullable CGImageRef)createCGImage:(CIImage *)image

                            fromRect:(CGRect)fromRect

                              format:(CIFormat)format

                          colorSpace:(nullable CGColorSpaceRef)colorSpace;

//创建CALayer

- (nullable CGLayerRef)createCGLayerWithSize:(CGSize)size

                                        info:(nullable CFDictionaryRef)info;

//将图片写入bitMap数据

- (void)render:(CIImage *)image

      toBitmap:(void *)data

      rowBytes:(ptrdiff_t)rowBytes

        bounds:(CGRect)bounds

        format:(CIFormat)format;

//将图片写入缓存

- (void)render:(CIImage *)image

toCVPixelBuffer:(CVPixelBufferRef)buffer

    colorSpace:(nullable CGColorSpaceRef)colorSpace;

- (void)render:(CIImage *)image

toCVPixelBuffer:(CVPixelBufferRef)buffer

        bounds:(CGRect)bounds

    colorSpace:(nullable CGColorSpaceRef)colorSpace;

//将图片写入纹理

- (void)render:(CIImage *)image

  toMTLTexture:(id<MTLTexture>)texture

 commandBuffer:(nullable id<MTLCommandBuffer>)commandBuffer

        bounds:(CGRect)bounds

    colorSpace:(CGColorSpaceRef)colorSpace;

//清除缓存

- (void)clearCaches;

//输入图像的最大尺寸

- (CGSize)inputImageMaximumSize;

//输出图像的最大尺寸

- (CGSize)outputImageMaximumSize;

//将CIImage写成TIFF数据

- (nullable NSData*) TIFFRepresentationOfImage:(CIImage*)image

                                        format:(CIFormat)format

                                    colorSpace:(CGColorSpaceRef)colorSpace

                                       options:(NSDictionary<CIImageRepresentationOption, id>*)options;

//将CIImage写成JPEG数据

- (nullable NSData*) JPEGRepresentationOfImage:(CIImage*)image

                                    colorSpace:(CGColorSpaceRef)colorSpace

                                       options:(NSDictionary<CIImageRepresentationOption, id>*)options;

//将CIImage写成HEIF数据

- (nullable NSData*) HEIFRepresentationOfImage:(CIImage*)image

                                        format:(CIFormat)format

                                    colorSpace:(CGColorSpaceRef)colorSpace

                                       options:(NSDictionary<CIImageRepresentationOption, id>*)options;

//将CIImage写成PNG数据

- (nullable NSData*) PNGRepresentationOfImage:(CIImage*)image

                                       format:(CIFormat)format

                                   colorSpace:(CGColorSpaceRef)colorSpace

                                      options:(NSDictionary<CIImageRepresentationOption, id>*)options;

//将CIImage写入TIFF文件

- (BOOL) writeTIFFRepresentationOfImage:(CIImage*)image

                                  toURL:(NSURL*)url

                                 format:(CIFormat)format

                             colorSpace:(CGColorSpaceRef)colorSpace

                                options:(NSDictionary<CIImageRepresentationOption, id>*)options

                                  error:(NSError **)errorPtr;

//将CIImage写入PNG文件

- (BOOL) writePNGRepresentationOfImage:(CIImage*)image

                                 toURL:(NSURL*)url

                                format:(CIFormat)format

                            colorSpace:(CGColorSpaceRef)colorSpace

                               options:(NSDictionary<CIImageRepresentationOption, id>*)options

                                 error:(NSError **)errorPtr;

//将CIImage写入JPEG文件

- (BOOL) writeJPEGRepresentationOfImage:(CIImage*)image

                                  toURL:(NSURL*)url

                             colorSpace:(CGColorSpaceRef)colorSpace

                                options:(NSDictionary<CIImageRepresentationOption, id>*)options

                                  error:(NSError **)errorPtr;

//将CIImage写HEIF文件

- (BOOL) writeHEIFRepresentationOfImage:(CIImage*)image

                                  toURL:(NSURL*)url

                                 format:(CIFormat)format

                             colorSpace:(CGColorSpaceRef)colorSpace

                                options:(NSDictionary<CIImageRepresentationOption, id>*)options

                                  error:(NSError **)errorPtr;
4.CIDetector类
前面有过CIDetector类的功能演示,这是CIImage框架中非常强大的一个类,使用它可以进行复杂的图片识别技术,解析如下:
//创建CIDetector实例

/*

type用来指定识别的类型

CIDetectorTypeFace  人脸识别模式

CIDetectorTypeRectangle 矩形检测模式

CIDetectorTypeText   文本区域检测模式

CIDetectorTypeQRCode 二维码扫描模式

option可以指定配置字典 可配置的键如下

CIDetectorAccuracy 设置检测精度 CIDetectorAccuracyLow 低 CIDetectorAccuracyHigh 高

CIDetectorTracking 设置是否跟踪特征

CIDetectorMinFeatureSize  设置特征最小尺寸 0-1之间 相对图片

CIDetectorMaxFeatureCount 设置最大特征数

CIDetectorImageOrientation 设置方向

CIDetectorEyeBlink  设置布尔值 是否提取面部表情 眨眼

CIDetectorSmile    设置布尔值 是否提取面部表情  微笑

CIDetectorFocalLength  设置焦距

CIDetectorAspectRatio 设置检测到矩形的宽高比

CIDetectorReturnSubFeatures 设置是否提取子特征

*/

+ (nullable CIDetector *)detectorOfType:(NSString*)type

                                context:(nullable CIContext *)context

                                options:(nullable NSDictionary<NSString *,id> *)options;

//进行图片分析 提取特征数组

- (NSArray<CIFeature *> *)featuresInImage:(CIImage *)image;

- (NSArray<CIFeature *> *)featuresInImage:(CIImage *)image

                                  options:(nullable NSDictionary<NSString *,id> *)options;
5.CIFeature相关类
CIFeature与其相关子类定义了特征数据模型。
@interface CIFeature : NSObject {}

//特征类型

/*

CIFeatureTypeFace

CIFeatureTypeRectangle

CIFeatureTypeQRCode

CIFeatureTypeText

*/

@property (readonly, retain) NSString *type;

//特征在图片中的bounds

@property (readonly, assign) CGRect bounds;

@end

//人脸特征对象

@interface CIFaceFeature : CIFeature

//位置尺寸

@property (readonly, assign) CGRect bounds;

//左眼位置

@property (readonly, assign) BOOL hasLeftEyePosition;

@property (readonly, assign) CGPoint leftEyePosition;

//是否有左眼特征

@property (readonly, assign) BOOL hasRightEyePosition;

//右眼位置

@property (readonly, assign) CGPoint rightEyePosition;

//是否有右眼特征

@property (readonly, assign) BOOL hasMouthPosition;

//口部特征

@property (readonly, assign) CGPoint mouthPosition;

//是否有跟踪特征ID

@property (readonly, assign) BOOL hasTrackingID;

//跟踪特征ID

@property (readonly, assign) int trackingID;

@property (readonly, assign) BOOL hasTrackingFrameCount;

@property (readonly, assign) int trackingFrameCount;

@property (readonly, assign) BOOL hasFaceAngle;

@property (readonly, assign) float faceAngle;

//是否微笑

@property (readonly, assign) BOOL hasSmile;

//左眼是否闭眼

@property (readonly, assign) BOOL leftEyeClosed;

//右眼是否闭眼

@property (readonly, assign) BOOL rightEyeClosed;

@end

//矩形特征对象

@interface CIRectangleFeature : CIFeature

//位置尺寸

@property (readonly) CGRect bounds;

@property (readonly) CGPoint topLeft;

@property (readonly) CGPoint topRight;

@property (readonly) CGPoint bottomLeft;

@property (readonly) CGPoint bottomRight;

@end

//二维码特征对象

@interface CIQRCodeFeature : CIFeature

//位置尺寸信息

@property (readonly) CGRect bounds;

@property (readonly) CGPoint topLeft;

@property (readonly) CGPoint topRight;

@property (readonly) CGPoint bottomLeft;

@property (readonly) CGPoint bottomRight;

//二维码内容

@property (nullable, readonly) NSString* messageString;

//二维码描述数据

@property (nullable, readonly) CIQRCodeDescriptor *symbolDescriptor NS_AVAILABLE(10_13, 11_0);

@end

//文本特征对象

@interface CITextFeature : CIFeature

//位置信息

@property (readonly) CGRect bounds;

@property (readonly) CGPoint topLeft;

@property (readonly) CGPoint topRight;

@property (readonly) CGPoint bottomLeft;

@property (readonly) CGPoint bottomRight;

//子特征

@property (nullable, readonly) NSArray *subFeatures;

@end
11 (OC)* CoreImage的更多相关文章
- iOS开发几年了,你清楚OC中的这些东西么1
前言 几年前笔者是使用Objective-C进行iOS开发, 不过在两年前Apple发布swift的时候,就开始了swift的学习, 在swift1.2发布后就正式并且一直都使用了swift进行iOS ...
- 我见过的几门语言中的hello world
1.Java public class hello { public static void main(String[] args){ System.out.println("hello w ...
- canvas时钟效果
话不多说,直接上代码 <!DOCTYPE html PUBLIC “-//W3C//DTD XHTML 1.0 Transitional//EN” “http://www.w3.org/TR/x ...
- 009.OpenShift管理及监控
一 资源限制 1.1 pod资源限制 pod可以包括资源请求和资源限制: 资源请求 用于调度,并控制pod不能在计算资源少于指定数量的情况下运行.调度程序试图找到一个具有足够计算资源的节点来满足pod ...
- 腾讯暑期 前后七面 + hr(已拿offer面经)
以下是时间线 魔方 魔术师工作室 3.19 一面(120mins) c++ struct和union区别? 指针和引用的区别? 左值和右值? 字节对齐的作用? 什么情况下需要自定义new? mallo ...
- 地区sql
/*Navicat MySQL Data Transfer Source Server : localhostSource Server Version : 50136Source Host : lo ...
- iOS 阶段学习第11天笔记(OC基础知识)
iOS学习(OC语言)知识点整理 一.OC基础知识 1)#import 用于导入头文件,预处理阶段加载引用,只加载一次. 2)OC 依赖于Foundation框架下的头文件Foundation.h, ...
- OC基础11:基本的C语言特性2
"OC基础"这个分类的文章是我在自学Stephen G.Kochan的<Objective-C程序设计第6版>过程中的笔记. 19.定义一个int类型的指针: int ...
- OC学习11——循环引用与@class
转载自 OC学习篇之---@class关键字的作用以及#include和#import的区别 一.#import和#include的区别 当我们在代码中使用两次#include的时候会报错:因为#in ...
随机推荐
- Tomcat源码分析 (八)----- HTTP请求处理过程(一)
终于进行到Connector的分析阶段了,这也是Tomcat里面最复杂的一块功能了.Connector中文名为连接器,既然是连接器,它肯定会连接某些东西,连接些什么呢? Connector用于接受请求 ...
- 【Node/JavaScript】论一个低配版Web实时通信库是如何实现的( WebSocket篇)
引论 simple-socket是我写的一个"低配版"的Web实时通信工具(相对于Socket.io),在参考了相关源码和资料的基础上,实现了前后端实时互通的基本功能 选用了Web ...
- vulnhub-XXE靶机渗透
下载链接:https://download.vulnhub.com/xxe/XXE.zip 0x01 确定目标IP 目标网络模式默认为net模式,无需修改 使用arp-scan或者netdisco ...
- Spring学习之旅(十二)--持久化框架
对于本职工作来说 JDBC 就可以很好的完成,但是当我们对持久化的需求变得更复杂时,如: 延迟加载 预先抓取 级联 JDBC 就不能满足了,我们需要使用 ORM框架 来实现这些需求. Spring 对 ...
- 深刻剖析spring三种注入方式以及使用注解的原理
概述 注释配置相对于 XML 配置具有很多的优势: 它可以充分利用 Java 的反射机制获取类结构信息,这些信息可以有效减少配置的工作.如使用 JPA 注释配置 ORM 映射时,我们就不需要指定 PO ...
- 约瑟夫环问题:有n个人围成一圈,顺序排号。从第一个人开始报数(从1到3报数),凡报到3的人退出圈子,问最后留下的是原来第几号的那位。
首先,我最大的学习来源不是百度而是我群友~~在这里表白一波我热爱学习的群友们!然后今天群里突然有人提出了题目的这个问题:有n个人围成一圈,顺序排号.从第一个人开始报数(从1到3报数),凡报到3的人退出 ...
- gym/102091
https://codeforces.com/gym/102091 2018-2019 ACM-ICPC, Asia Nakhon Pathom Regional Contest A Flying S ...
- Codeforces#398 &767C. Garland 树形求子节点的和
传送门 题意:在一个树上,问能否切两刀,使得三块的节点值的和相同. 思路: 由于这个总的节点和是不变的,每块的节点值和sum固定,dfs搜索,和等于sum/3,切.若不能分成三块(不能被3整除,-1) ...
- codeforces 808 E. Selling Souvenirs (dp+二分+思维)
题目链接:http://codeforces.com/contest/808/problem/E 题意:最多有100000个物品最大能放下300000的背包,每个物品都有权值和重量,为能够带的最大权值 ...
- Photon Server 服务端编程
Photon Server 和 Unity3D 数据交互: Photon Server 服务端编程 Unity3D 客户端编程 VS2017 之 MYSQL实体数据模 一:Photon Server的 ...