linux搭建harbor与使用
条件:安装docker&docker-compose
如未安装,请看:linux离线安装docker + docker-compose
harbor
1.下载
下载地址:https://github.com/goharbor/harbor/releases
2.安装
1.上传至服务器,并解压
tar -zxvf harbor-offline-installer-v1.10.6.tgz

2.配置Harbor(我的版本为yml格式,有一些为cfg格式)


# Configuration file of Harbor

# The IP address or hostname to access admin UI and registry service.

# DO NOT use localhost or 127.0.0.1, because Harbor needs to be accessed by external clients.

# hostname设置访问地址,可以使用ip、域名,不可以设置为127.0.0.1或localhost

hostname: 192.168.1.4 #这里需求修改为ip或者域名

# http related config

http:

  # port for http, default is 80. If https enabled, this port will redirect to https port

  port: 80

# https related config

#因为测试使用 HTTP 协议,故将 HTTPS 配置注释

#生产环境必须要使用 HTTPS,并且 HTTPS 需要额外的配置

#https:

  # https port for harbor, default is 443

#  port: 443

  # The path of cert and key files for nginx

#  certificate: /your/certificate/path

#  private_key: /your/private/key/path

# Uncomment external_url if you want to enable external proxy

# And when it enabled the hostname will no longer used

# external_url: https://reg.mydomain.com:8433

# The initial password of Harbor admin

# It only works in first time to install harbor

# Remember Change the admin password from UI after launching Harbor.

#harbor 系统管理员密码配置,账户admin,密码默认为Harbor12345

harbor_admin_password: Harbor12345

# Harbor DB configuration

#DB配置

database:

  # The password for the root user of Harbor DB. Change this before any production use.

  #密码默认为root123

  password: root123

  # The maximum number of connections in the idle connection pool. If it <=0, no idle connections are retained.

  max_idle_conns: 50

  # The maximum number of open connections to the database. If it <= 0, then there is no limit on the number of open connections.

  # Note: the default number of connections is 100 for postgres.

  max_open_conns: 100

# The default data volume

data_volume: /data

# Harbor Storage settings by default is using /data dir on local filesystem

# Uncomment storage_service setting If you want to using external storage

# storage_service:

#   # ca_bundle is the path to the custom root ca certificate, which will be injected into the truststore

#   # of registry's and chart repository's containers.  This is usually needed when the user hosts a internal storage with self signed certificate.

#   ca_bundle:

#   # storage backend, default is filesystem, options include filesystem, azure, gcs, s3, swift and oss

#   # for more info about this configuration please refer https://docs.docker.com/registry/configuration/

#   filesystem:

#     maxthreads: 100

#   # set disable to true when you want to disable registry redirect

#   redirect:

#     disabled: false

# Clair configuration

clair:

  # The interval of clair updaters, the unit is hour, set to 0 to disable the updaters.

  updaters_interval: 12

jobservice:

  # Maximum number of job workers in job service

  max_job_workers: 10

notification:

  # Maximum retry count for webhook job

  webhook_job_max_retry: 10

chart:

  # Change the value of absolute_url to enabled can enable absolute url in chart

  absolute_url: disabled

# Log configurations

log:

  # options are debug, info, warning, error, fatal

  level: info

  # configs for logs in local storage

  local:

    # Log files are rotated log_rotate_count times before being removed. If count is 0, old versions are removed rather than rotated.

    rotate_count: 50

    # Log files are rotated only if they grow bigger than log_rotate_size bytes. If size is followed by k, the size is assumed to be in kilobytes.

    # If the M is used, the size is in megabytes, and if G is used, the size is in gigabytes. So size 100, size 100k, size 100M and size 100G

    # are all valid.

    rotate_size: 200M

    # The directory on your host that store log

    location: /var/log/harbor

  # Uncomment following lines to enable external syslog endpoint.

  # external_endpoint:

  #   # protocol used to transmit log to external endpoint, options is tcp or udp

  #   protocol: tcp

  #   # The host of external endpoint

  #   host: localhost

  #   # Port of external endpoint

  #   port: 5140

#This attribute is for migrator to detect the version of the .cfg file, DO NOT MODIFY!

_version: 1.10.0

# Uncomment external_database if using external database.

# external_database:

#   harbor:

#     host: harbor_db_host

#     port: harbor_db_port

#     db_name: harbor_db_name

#     username: harbor_db_username

#     password: harbor_db_password

#     ssl_mode: disable

#     max_idle_conns: 2

#     max_open_conns: 0

#   clair:

#     host: clair_db_host

#     port: clair_db_port

#     db_name: clair_db_name

#     username: clair_db_username

#     password: clair_db_password

#     ssl_mode: disable

#   notary_signer:

#     host: notary_signer_db_host

#     port: notary_signer_db_port

#     db_name: notary_signer_db_name

#     username: notary_signer_db_username

#     password: notary_signer_db_password

#     ssl_mode: disable

#   notary_server:

#     host: notary_server_db_host

#     port: notary_server_db_port

#     db_name: notary_server_db_name

#     username: notary_server_db_username

#     password: notary_server_db_password

#     ssl_mode: disable

# Uncomment external_redis if using external Redis server

# external_redis:

#   host: redis

#   port: 6379

#   password:

#   # db_index 0 is for core, it's unchangeable

#   registry_db_index: 1

#   jobservice_db_index: 2

#   chartmuseum_db_index: 3

#   clair_db_index: 4

# Uncomment uaa for trusting the certificate of uaa instance that is hosted via self-signed cert.

# uaa:

#   ca_file: /path/to/ca

# Global proxy

# Config http proxy for components, e.g. http://my.proxy.com:3128

# Components doesn't need to connect to each others via http proxy.

# Remove component from `components` array if want disable proxy

# for it. If you want use proxy for replication, MUST enable proxy

# for core and jobservice, and set `http_proxy` and `https_proxy`.

# Add domain to the `no_proxy` field, when you want disable proxy

# for some special registry.

proxy:

  http_proxy:

  https_proxy:

  # no_proxy endpoints will appended to 127.0.0.1,localhost,.local,.internal,log,db,redis,nginx,core,portal,postgresql,jobservice,registry,registryctl,clair,chartmuseum,notary-server

  no_proxy:

  components:

    - core

    - jobservice

    - clair
3.启动Harbor
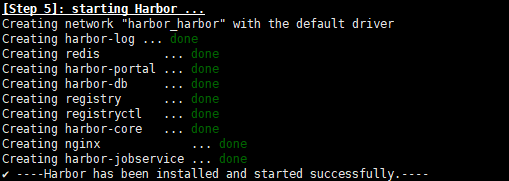
修改完配置文件后,在的当前目录执行./install.sh,Harbor服务就会根据当期目录下的docker-compose.yml开始下载依赖的镜像,检测并按照顺序依次启动各个服务
sudo ./install.sh
成功

3、Harbor仓库使用
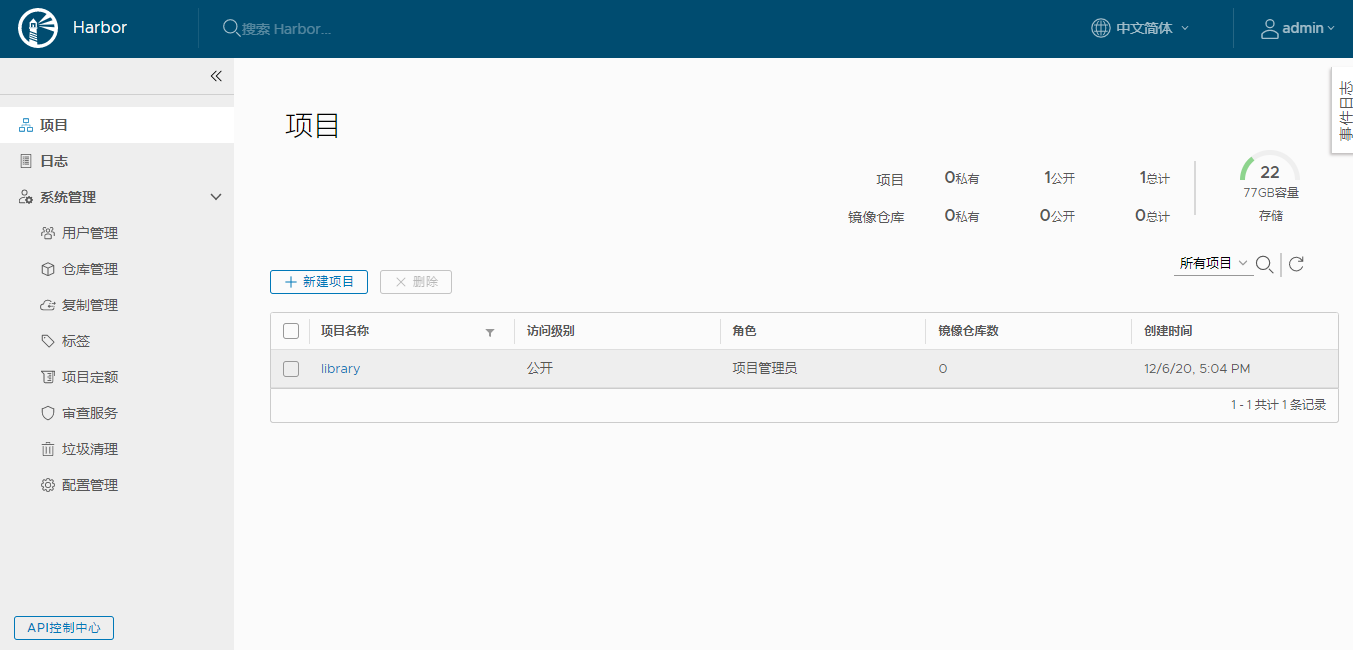
1)、登录Web Harbor

输入账户密码进入 默认账号/密码:admin/Harbor12345
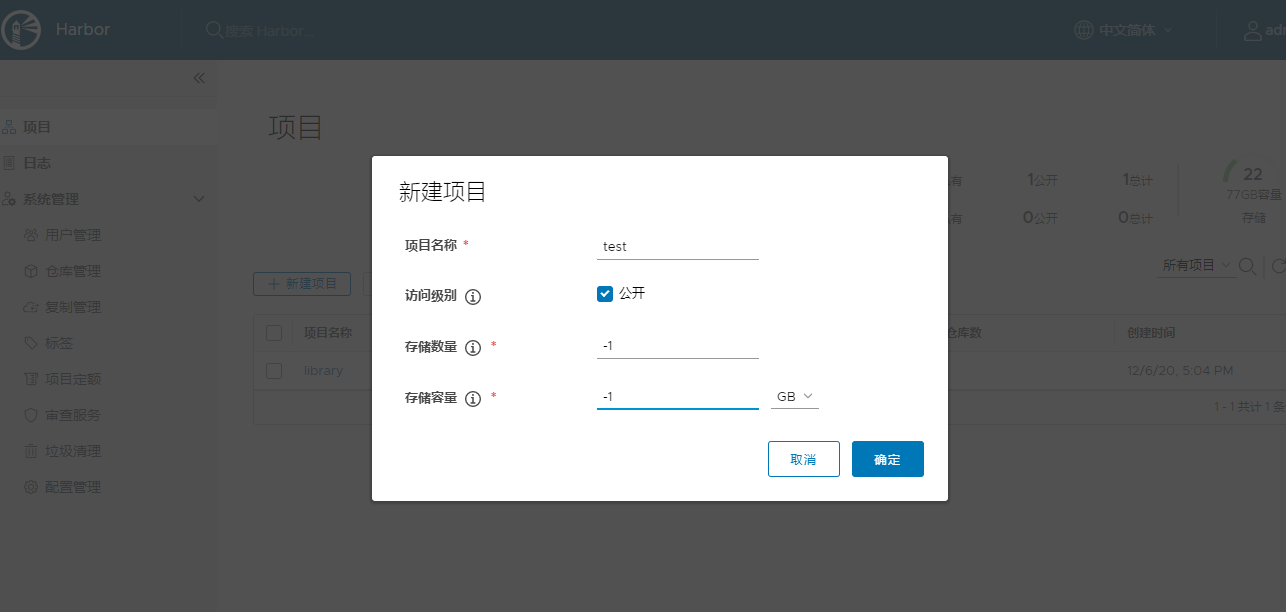
新建项目
4、Harbor的使用(上传下载镜像)
新建项目后,使用admin用户提交镜像到Harbor仓库
1、使用docker login
docker login 192.168.1.4
使用docker login出现如下问题:
原因:因为使用的是 HTTP协议故需要在客户端进行配置
Username: admin

Password:

Error response from daemon: Get https://192.168.1.4/v2/: dial tcp 192.168.1.4:443: connect: connection refused
解决方案:
1、修改/etc/docker/daemon.json文件,加入"insecure-registries" : 服务器i
sudo vi /etc/docker/daemon.json
#文件加入
"insecure-registries":[""]

2.修改后重启 Docker 服务
sudo systemctl restart docker
3、再次登录
登录成功

5、使用
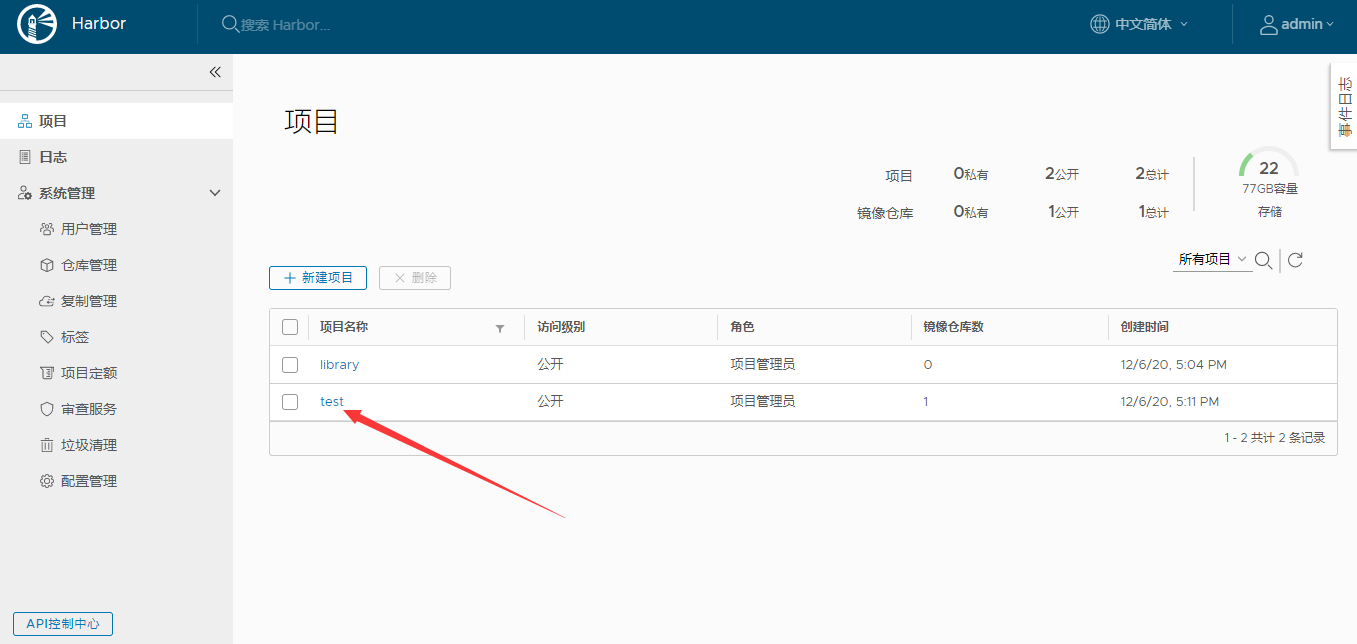
1、 给镜像打tag
进入刚刚创建的test
2、查看推送镜像的DOCKER命令

3、这里使用goharbor/nginx-photon为案例
docker tag goharbor/nginx-photon:v1.10.6 ip/test/harbor-nginx:v1.0.2

4、打完成后,查看
docker images

5、推送
docker push ip/test/harbor-nginx:v1.0.2

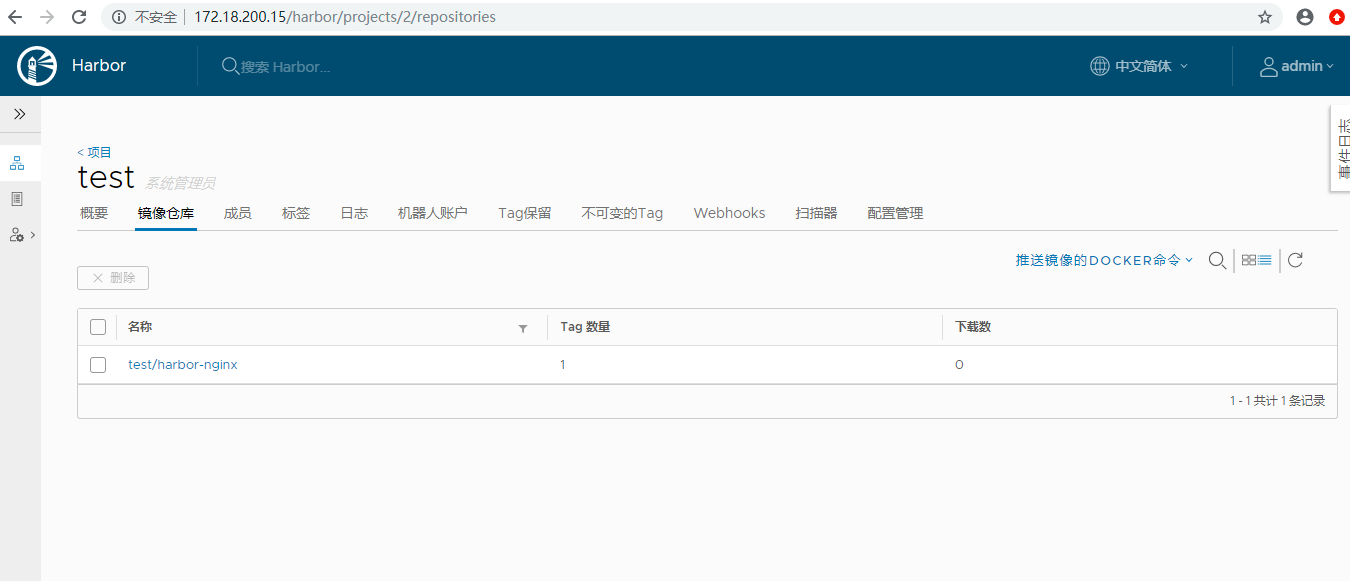
6、推送成功,查看
7、下载
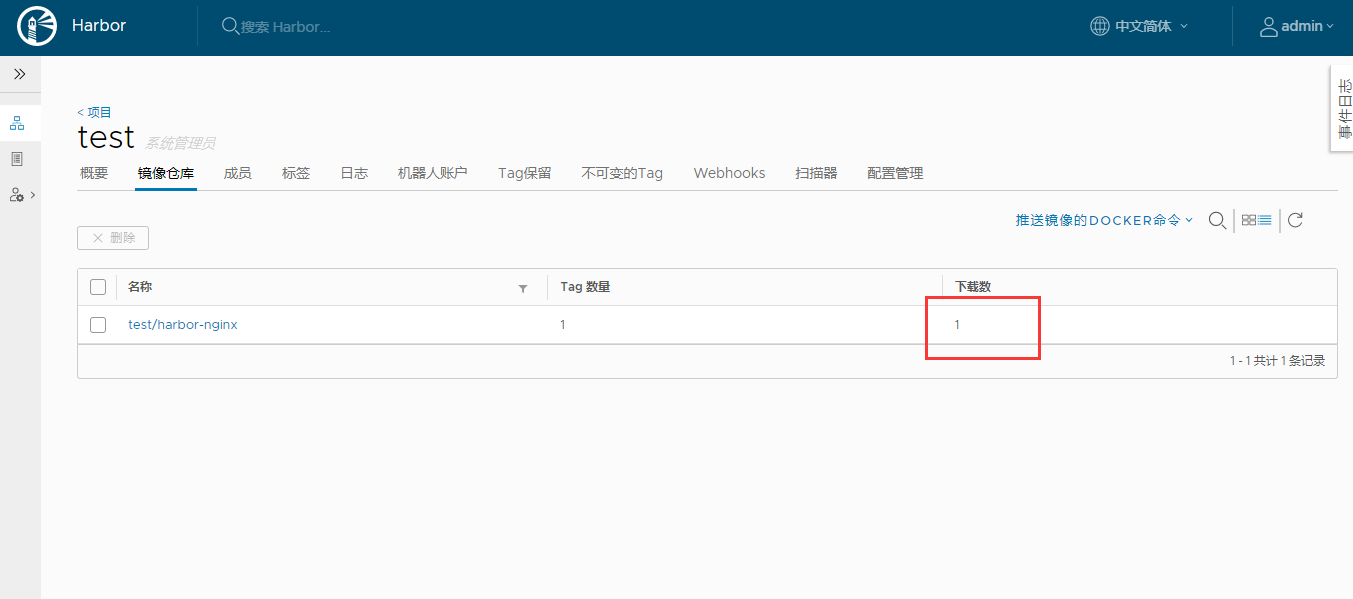
docker pull ip/test/harbor-nginx:v1.0.2

linux搭建harbor与使用的更多相关文章
- 搭建Harbor企业级docker仓库
搭建Harbor企业级docker仓库 一.Harbor简介 1.Harbor介绍 Harbor是一个用于存储和分发Docker镜像的企业级Registry服务器,通过添加一些企业必需的功能特性,例如 ...
- 搭建Harbor私有镜像仓库--v1.5.1
搭建Harbor私有镜像仓库--v1.5.1 1.介绍 Docker容器应用的开发和运行离不开可靠的镜像管理,虽然Docker官方也提供了公共的镜像仓库,但是从安全和效率等方面考虑,部署我们私有环境 ...
- Docker私服搭建--Harbor
Docker私服搭建--Harbor Harbor概述 Harbor的安全机制 Harbor的镜像同步 Harbor的镜像同步机制 Harbor的多级部署 一.安装 1.1 docker安装 1.2 ...
- Linux 搭建Nexus
Linux 安装Maven和nexus代理仓库 1 说明 环境:redhat Enterprise Linux Server5.3-x64. 版本:Maven 3.0.5 ,Nexus-2.5. ...
- Linux 搭建SVN 服务器(转)
一. SVN 简介 Subversion(SVN) 是一个开源的版本控制系統, 也就是说 Subversion 管理着随时间改变的数据. 这些数据放置在一个中央资料档案库 (repository) 中 ...
- 原 Linux搭建SVN 服务器2
原 Linux搭建SVN 服务器 发表于1年前(2014-08-05 17:55) 阅读(12257) | 评论(3) 31人收藏此文章, 我要收藏 赞3 摘要 Linux搭建SVN 服务器 目录 ...
- 原 Linux搭建SVN 服务器
原 Linux搭建SVN 服务器 发表于1年前(2014-08-05 17:55) 阅读(12257) | 评论(3) 31人收藏此文章, 我要收藏 赞3 摘要 Linux搭建SVN 服务器 目录 ...
- Linux搭建SVN 服务器
Linux搭建SVN 服务器 1 安装SVN 2 使用客户端连接 2.1 使用windows的客户端 2.2 使用Linux下的命令行 3 ...
- Linux 搭建SVN server
一. SVN 简单介绍 Subversion(SVN) 是一个开源的版本号控制系統, 也就是说 Subversion 管理着随时间改变的数据. 这些数据放置在一个中央资料档案库 (repository ...
随机推荐
- 使用 Xunit.DependencyInjection 改造测试项目
使用 Xunit.DependencyInjection 改造测试项目 Intro 这篇文章拖了很长时间没写,之前也有介绍过 Xunit.DependencyInjection 这个项目,这个项目是由 ...
- 经典c程序100例==41--50
[程序41] 题目:学习static定义静态变量的用法 1.程序分析: 2.程序源代码: #include "stdio.h" varfunc() { int var=0; sta ...
- 实现一个简易vue
vue主要的功能实现主要分为3部分: 数据劫持/数据代理:数据改变时通知相关函数进行更新操作 数据依赖收集:建立保存dom节点与数据的关联关系 模板与数据之间的绑定:接受到新数据时对dom节点进行更新 ...
- pycharm远程编译
1. 按照 https://www.cnblogs.com/xiongmao-cpp/p/7856596.html 完成配置 2. 使用步骤: (1)在本地新建代码文件或工程 (2)编写代码,完成后若 ...
- 【译】Arc 在 Rust 中是如何工作的
原文标题:How Arc works in Rust 原文链接:https://medium.com/@DylanKerler1/how-arc-works-in-rust-b06192acd0a6 ...
- 头秃了,二十三张图带你从源码了解Spring Boot 的启动流程~
持续原创输出,点击上方蓝字关注我 目录 前言 源码版本 从哪入手? 源码如何切分? 如何创建SpringApplication? 设置应用类型 设置初始化器(Initializer) 设置监听器(Li ...
- 怎样禁止Ceph OSD的自动挂载
前言 本篇来源于群里一个人的问题,有没有办法让ceph的磁盘不自动挂载,一般人的问题都是怎样让ceph能够自动挂载,在centos 7 平台下 ceph jewel版本以后都是有自动挂载的处理的,这个 ...
- 使用Actor模型管理Web Worker多线程
前端固有的编程思维是单线程,比如JavaScript语言的单线程.浏览器JS线程与UI线程互斥等等,Web Woker是HTML5新增的能力,为前端带来多线程能力.这篇文章简单记录一下搜狗地图WebG ...
- 基于物联网的O2O养猪平台
引言:随着生活水平的提高,人们会越来越重视食品安全问题.在城市里的人想养头猪,并想看着它快快乐乐长大.但是无奈于自己没时间和精力.而农户想养猪,可能又缺少启动资金,且不能承担大的风险.这时候我的美团式 ...
- .Net 开源项目 FreeRedis 实现思路之 - Redis 6.0 客户端缓存技术
写在开头 FreeRedis 是一款继 CSRedisCore 之后重写的 .NET redis 客户端开源组件,以 MIT 协议开源托管于 github,目前支持 .NET 5..NETCore 2 ...
