python——设计模式
设计模式是什么?
设计模式是经过总结、优化的,对我们经常会碰到的一些编程问题的可重用解决方案。一个设计模式并不像一个类或一个库那样能够直接作用于我们的代码。反之,设计模式更为高级,它是一种必须在特定情形下实现的一种方法模板。设计模式不会绑定具体的编程语言。一个好的设计模式应该能够用大部分编程语言实现(如果做不到全部的话,具体取决于语言特性)。最为重要的是,设计模式也是一把双刃剑,如果设计模式被用在不恰当的情形下将会造成灾难,进而带来无穷的麻烦。然而如果设计模式在正确的时间被用在正确地地方,它将是你的救星。
起初,你会认为“模式”就是为了解决一类特定问题而特别想出来的明智之举。说的没错,看起来的确是通过很多人一起工作,从不同的角度看待问题进而形成的一个最通用、最灵活的解决方案。也许这些问题你曾经见过或是曾经解决过,但是你的解决方案很可能没有模式这么完备。
虽然被称为“设计模式”,但是它们同“设计“领域并非紧密联系。设计模式同传统意义上的分析、设计与实现不同,事实上设计模式将一个完整的理念根植于程序中,所以它可能出现在分析阶段或是更高层的设计阶段。很有趣的是因为设计模式的具体体现是程序代码,因此可能会让你认为它不会在具体实现阶段之前出现(事实上在进入具体实现阶段之前你都没有意识到正在使用具体的设计模式)。
可以通过程序设计的基本概念来理解模式:增加一个抽象层。抽象一个事物就是隔离任何具体细节,这么做的目的是为了将那些不变的核心部分从其他细节中分离出来。当你发现你程序中的某些部分经常因为某些原因改动,而你不想让这些改动的部分引发其他部分的改动,这时候你就需要思考那些不会变动的设计方法了。这么做不仅会使代码可维护性更高,而且会让代码更易于理解,从而降低开发成本。
这里列举了三种最基本的设计模式:
- 创建模式,提供实例化的方法,为适合的状况提供相应的对象创建方法。
- 结构化模式,通常用来处理实体之间的关系,使得这些实体能够更好地协同工作。
- 行为模式,用于在不同的实体建进行通信,为实体之间的通信提供更容易,更灵活的通信方法。
创建型

1. Factory Method(工厂方法)

2. Abstract Factory(抽象工厂)

3. Builder(建造者)

4. Prototype(原型)

5. Singleton(单例)

结构型

6. Adapter Class/Object(适配器)

7. Bridge(桥接)

8. Composite(组合)

9. Decorator(装饰)

10. Facade(外观)

11. Flyweight(享元)

12. Proxy(代理)

行为型

13. Interpreter(解释器)

14. Template Method(模板方法)

15. Chain of Responsibility(责任链)

16. Command(命令)

17. Iterator(迭代器)

18. Mediator(中介者)

19. Memento(备忘录)

20. Observer(观察者)

21. State(状态)

22. Strategy(策略)

23. Visitor(访问者)
创建型
1.Factory Method(工厂方法)
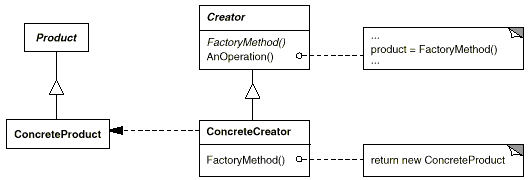
意图:
定义一个用于创建对象的接口,让子类决定实例化哪一个类。Factory Method 使一个类的实例化延迟到其子类。
适用性:
当一个类不知道它所必须创建的对象的类的时候。
当一个类希望由它的子类来指定它所创建的对象的时候。
当类将创建对象的职责委托给多个帮助子类中的某一个,并且你希望将哪一个帮助子类是代理者这一信息局部化的时候。
实现:
 !/usr/bin/python

 #coding:utf8

 '''

 Factory Method

 '''

 class ChinaGetter:

     """A simple localizer a la gettext"""

     def __init__(self):

         self.trans = dict(dog=u"小狗", cat=u"小猫")

     def get(self, msgid):

         """We'll punt if we don't have a translation"""

         try:

             return self.trans[msgid]

         except KeyError:

             return str(msgid)

 class EnglishGetter:

     """Simply echoes the msg ids"""

     def get(self, msgid):

         return str(msgid)

 def get_localizer(language="English"):

     """The factory method"""

     languages = dict(English=EnglishGetter, China=ChinaGetter)

     return languages[language]()

 # Create our localizers

 e, g = get_localizer("English"), get_localizer("China")

 # Localize some text

 for msgid in "dog parrot cat bear".split():

     print(e.get(msgid), g.get(msgid))
2. Abstract Factory(抽象工厂)
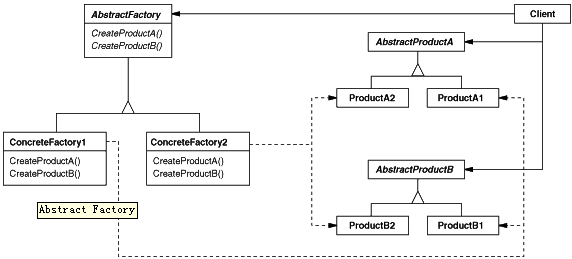
意图:
提供一个创建一系列相关或相互依赖对象的接口,而无需指定它们具体的类。
适用性:
一个系统要独立于它的产品的创建、组合和表示时。
一个系统要由多个产品系列中的一个来配置时。
当你要强调一系列相关的产品对象的设计以便进行联合使用时。
当你提供一个产品类库,而只想显示它们的接口而不是实现时。
实现:
 #!/usr/bin/python

 #coding:utf8

 '''

 Abstract Factory

 '''

 import random

 class PetShop:

     """A pet shop"""

     def __init__(self, animal_factory=None):

         """pet_factory is our abstract factory.

         We can set it at will."""

         self.pet_factory = animal_factory

     def show_pet(self):

         """Creates and shows a pet using the

         abstract factory"""

         pet = self.pet_factory.get_pet()

         print("This is a lovely", str(pet))

         print("It says", pet.speak())

         print("It eats", self.pet_factory.get_food())

 # Stuff that our factory makes

 class Dog:

     def speak(self):

         return "woof"

     def __str__(self):

         return "Dog"

 class Cat:

     def speak(self):

         return "meow"

     def __str__(self):

         return "Cat"

 # Factory classes

 class DogFactory:

     def get_pet(self):

         return Dog()

     def get_food(self):

         return "dog food"

 class CatFactory:

     def get_pet(self):

         return Cat()

     def get_food(self):

         return "cat food"

 # Create the proper family

 def get_factory():

     """Let's be dynamic!"""

     return random.choice([DogFactory, CatFactory])()

 # Show pets with various factories

 if __name__ == "__main__":

     shop = PetShop()

     for i in range(3):

         shop.pet_factory = get_factory()

         shop.show_pet()

         print("=" * 20)
3. Builder(建造者)
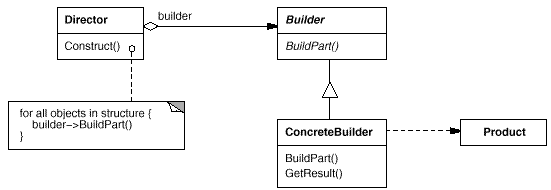
意图:
将一个复杂对象的构建与它的表示分离,使得同样的构建过程可以创建不同的表示。
适用性:
当创建复杂对象的算法应该独立于该对象的组成部分以及它们的装配方式时。
当构造过程必须允许被构造的对象有不同的表示时。
 #!/usr/bin/python

 #coding:utf8

 """

     Builder

 """

 # Director

 class Director(object):

     def __init__(self):

         self.builder = None

     def construct_building(self):

         self.builder.new_building()

         self.builder.build_floor()

         self.builder.build_size()

     def get_building(self):

         return self.builder.building

 # Abstract Builder

 class Builder(object):

     def __init__(self):

         self.building = None

     def new_building(self):

         self.building = Building()

 # Concrete Builder

 class BuilderHouse(Builder):

     def build_floor(self):

         self.building.floor = 'One'

     def build_size(self):

         self.building.size = 'Big'

 class BuilderFlat(Builder):

     def build_floor(self):

         self.building.floor = 'More than One'

     def build_size(self):

         self.building.size = 'Small'

 # Product

 class Building(object):

     def __init__(self):

         self.floor = None

         self.size = None

     def __repr__(self):

         return 'Floor: %s | Size: %s' % (self.floor, self.size)

 # Client

 if __name__ == "__main__":

     director = Director()

     director.builder = BuilderHouse()

     director.construct_building()

     building = director.get_building()

     print(building)

     director.builder = BuilderFlat()

     director.construct_building()

     building = director.get_building()

     print(building)
4. Prototype(原型)
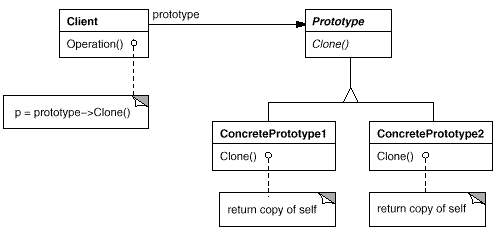
意图:
用原型实例指定创建对象的种类,并且通过拷贝这些原型创建新的对象。
适用性:
当要实例化的类是在运行时刻指定时,例如,通过动态装载;或者为了避免创建一个与产品类层次平行的工厂类层次时;或者当一个类的实例只能有几个不同状态组合中的一种时。建立相应数目的原型并克隆它们可能比每次用合适的状态手工实例化该类更方便一些。
 #!/usr/bin/python

 #coding:utf8

 '''

 Prototype

 '''

 import copy

 class Prototype:

     def __init__(self):

         self._objects = {}

     def register_object(self, name, obj):

         """Register an object"""

         self._objects[name] = obj

     def unregister_object(self, name):

         """Unregister an object"""

         del self._objects[name]

     def clone(self, name, **attr):

         """Clone a registered object and update inner attributes dictionary"""

         obj = copy.deepcopy(self._objects.get(name))

         obj.__dict__.update(attr)

         return obj

 def main():

     class A:

         def __str__(self):

             return "I am A"

     a = A()

     prototype = Prototype()

     prototype.register_object('a', a)

     b = prototype.clone('a', a=1, b=2, c=3)

     print(a)

     print(b.a, b.b, b.c)

 if __name__ == '__main__':

     main()
5. Singleton(单例)
意图:
保证一个类仅有一个实例,并提供一个访问它的全局访问点。
适用性:
当类只能有一个实例而且客户可以从一个众所周知的访问点访问它时。
当这个唯一实例应该是通过子类化可扩展的,并且客户应该无需更改代码就能使用一个扩展的实例时。
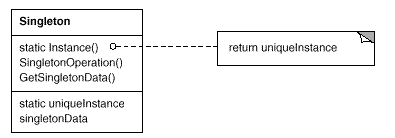
实现:
|
1
2
3
4
5
6
7
8
9
10
11
12
13
14
15
16
17
18
19
20
21
22
23
24
25
26
27
28
29
30
|
#!/usr/bin/python#coding:utf8'''Singleton'''class Singleton(object): ''''' A python style singleton ''' def __new__(cls, *args, **kw): if not hasattr(cls, '_instance'): org = super(Singleton, cls) cls._instance = org.__new__(cls, *args, **kw) return cls._instanceif __name__ == '__main__': class SingleSpam(Singleton): def __init__(self, s): self.s = s def __str__(self): return self.s s1 = SingleSpam('spam') print id(s1), s1 s2 = SingleSpam('spa') print id(s2), s2 print id(s1), s1 |
结构型
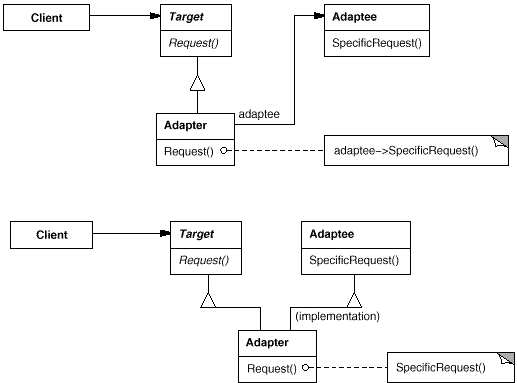
6. Adapter Class/Object(适配器)
意图:
将一个类的接口转换成客户希望的另外一个接口。Adapter 模式使得原本由于接口不兼容而不能一起工作的那些类可以一起工作。
适用性:
你想使用一个已经存在的类,而它的接口不符合你的需求。
你想创建一个可以复用的类,该类可以与其他不相关的类或不可预见的类(即那些接口可能不一定兼容的类)协同工作。
(仅适用于对象Adapter )你想使用一些已经存在的子类,但是不可能对每一个都进行子类化以匹配它们的接口。对象适配器可以适配它的父类接口。
|
1
2
3
4
5
6
7
8
9
10
11
12
13
14
15
16
17
18
19
20
21
22
23
24
25
26
27
28
29
30
31
32
33
34
35
36
37
38
39
40
41
42
43
44
45
46
47
48
49
50
51
52
53
54
55
56
57
58
59
60
61
62
63
64
65
66
67
68
69
70
71
72
73
74
75
76
|
#!/usr/bin/python#coding:utf8'''Adapter'''import osclass Dog(object): def __init__(self): self.name = "Dog" def bark(self): return "woof!"class Cat(object): def __init__(self): self.name = "Cat" def meow(self): return "meow!"class Human(object): def __init__(self): self.name = "Human" def speak(self): return "'hello'"class Car(object): def __init__(self): self.name = "Car" def make_noise(self, octane_level): return "vroom%s" % ("!" * octane_level)class Adapter(object): """ Adapts an object by replacing methods. Usage: dog = Dog dog = Adapter(dog, dict(make_noise=dog.bark)) """ def __init__(self, obj, adapted_methods): """We set the adapted methods in the object's dict""" self.obj = obj self.__dict__.update(adapted_methods) def __getattr__(self, attr): """All non-adapted calls are passed to the object""" return getattr(self.obj, attr)def main(): objects = [] dog = Dog() objects.append(Adapter(dog, dict(make_noise=dog.bark))) cat = Cat() objects.append(Adapter(cat, dict(make_noise=cat.meow))) human = Human() objects.append(Adapter(human, dict(make_noise=human.speak))) car = Car() car_noise = lambda: car.make_noise(3) objects.append(Adapter(car, dict(make_noise=car_noise))) for obj in objects: print "A", obj.name, "goes", obj.make_noise()if __name__ == "__main__": main() |
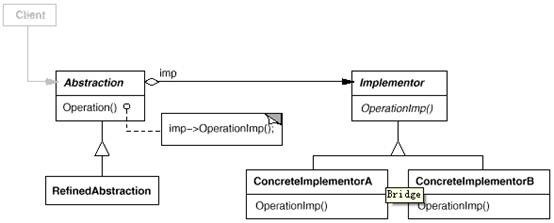
7. Bridge(桥接)
意图:
将抽象部分与它的实现部分分离,使它们都可以独立地变化。
适用性:
你不希望在抽象和它的实现部分之间有一个固定的绑定关系。例如这种情况可能是因为,在程序运行时刻实现部分应可以被选择或者切换。
类的抽象以及它的实现都应该可以通过生成子类的方法加以扩充。这时Bridge 模式使你可以对不同的抽象接口和实现部分进行组合,并分别对它们进行扩充。
对一个抽象的实现部分的修改应对客户不产生影响,即客户的代码不必重新编译。
(C++)你想对客户完全隐藏抽象的实现部分。在C++中,类的表示在类接口中是可见的。
有许多类要生成。这样一种类层次结构说明你必须将一个对象分解成两个部分。Rumbaugh 称这种类层次结构为“嵌套的普化”(nested generalizations )。
你想在多个对象间共享实现(可能使用引用计数),但同时要求客户并不知道这一点。一个简单的例子便是Coplien 的String 类[ Cop92 ],在这个类中多个对象可以共享同一个字符串表示(StringRep)。
|
1
2
3
4
5
6
7
8
9
10
11
12
13
14
15
16
17
18
19
20
21
22
23
24
25
26
27
28
29
30
31
32
33
34
35
36
37
38
39
40
41
42
43
44
45
46
47
48
49
|
#!/usr/bin/python#coding:utf8'''Bridge'''# ConcreteImplementor 1/2class DrawingAPI1(object): def draw_circle(self, x, y, radius): print('API1.circle at {}:{} radius {}'.format(x, y, radius))# ConcreteImplementor 2/2class DrawingAPI2(object): def draw_circle(self, x, y, radius): print('API2.circle at {}:{} radius {}'.format(x, y, radius))# Refined Abstractionclass CircleShape(object): def __init__(self, x, y, radius, drawing_api): self._x = x self._y = y self._radius = radius self._drawing_api = drawing_api # low-level i.e. Implementation specific def draw(self): self._drawing_api.draw_circle(self._x, self._y, self._radius) # high-level i.e. Abstraction specific def scale(self, pct): self._radius *= pctdef main(): shapes = ( CircleShape(1, 2, 3, DrawingAPI1()), CircleShape(5, 7, 11, DrawingAPI2()) ) for shape in shapes: shape.scale(2.5) shape.draw()if __name__ == '__main__': main() |
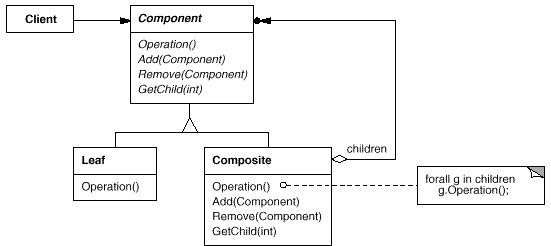
8. Composite(组合)
意图:
将对象组合成树形结构以表示“部分-整体”的层次结构。C o m p o s i t e 使得用户对单个对象和组合对象的使用具有一致性。
适用性:
你想表示对象的部分-整体层次结构。
你希望用户忽略组合对象与单个对象的不同,用户将统一地使用组合结构中的所有对象。
|
1
2
3
4
5
6
7
8
9
10
11
12
13
14
15
16
17
18
19
20
21
22
23
24
25
26
27
28
29
30
31
32
33
34
35
36
37
38
39
40
41
42
43
44
|
#!/usr/bin/python#coding:utf8"""Composite"""class Component: def __init__(self,strName): self.m_strName = strName def Add(self,com): pass def Display(self,nDepth): passclass Leaf(Component): def Add(self,com): print "leaf can't add" def Display(self,nDepth): strtemp = "-" * nDepth strtemp=strtemp+self.m_strName print strtempclass Composite(Component): def __init__(self,strName): self.m_strName = strName self.c = [] def Add(self,com): self.c.append(com) def Display(self,nDepth): strtemp = "-"*nDepth strtemp=strtemp+self.m_strName print strtemp for com in self.c: com.Display(nDepth+2)if __name__ == "__main__": p = Composite("Wong") p.Add(Leaf("Lee")) p.Add(Leaf("Zhao")) p1 = Composite("Wu") p1.Add(Leaf("San")) p.Add(p1) p.Display(1); |
9. Decorator(装饰)
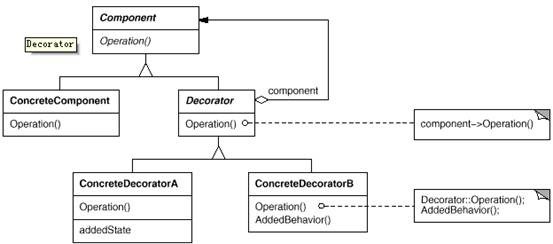
意图:
动态地给一个对象添加一些额外的职责。就增加功能来说,Decorator 模式相比生成子类更为灵活。
适用性:
在不影响其他对象的情况下,以动态、透明的方式给单个对象添加职责。
处理那些可以撤消的职责。
当不能采用生成子类的方法进行扩充时。一种情况是,可能有大量独立的扩展,为支持每一种组合将产生大量的子类,使得子类数目呈爆炸性增长。另一种情况可能是因为类定义被隐藏,或类定义不能用于生成子类。
|
1
2
3
4
5
6
7
8
9
10
11
12
13
14
15
16
17
18
19
20
21
22
23
24
25
26
27
28
29
|
#!/usr/bin/python#coding:utf8'''Decorator'''class foo(object): def f1(self): print("original f1") def f2(self): print("original f2")class foo_decorator(object): def __init__(self, decoratee): self._decoratee = decoratee def f1(self): print("decorated f1") self._decoratee.f1() def __getattr__(self, name): return getattr(self._decoratee, name)u = foo()v = foo_decorator(u)v.f1()v.f2() |
10. Facade(外观)
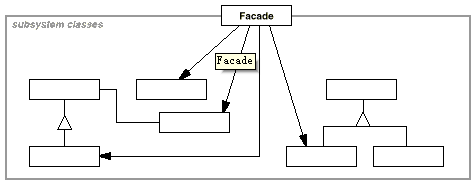
意图:
为子系统中的一组接口提供一个一致的界面,Facade模式定义了一个高层接口,这个接口使得这一子系统更加容易使用。
适用性:
当你要为一个复杂子系统提供一个简单接口时。子系统往往因为不断演化而变得越来越复杂。大多数模式使用时都会产生更多更小的类。这使得子系统更具可重用性,也更容易对子系统进行定制,但这也给那些不需要定制子系统的用户带来一些使用上的困难。Facade 可以提供一个简单的缺省视图,这一视图对大多数用户来说已经足够,而那些需要更多的可定制性的用户可以越过facade层。
客户程序与抽象类的实现部分之间存在着很大的依赖性。引入facade 将这个子系统与客户以及其他的子系统分离,可以提高子系统的独立性和可移植性。
当你需要构建一个层次结构的子系统时,使用facade模式定义子系统中每层的入口点。如果子系统之间是相互依赖的,你可以让它们仅通过facade进行通讯,从而简化了它们之间的依赖关系。
|
1
2
3
4
5
6
7
8
9
10
11
12
13
14
15
16
17
18
19
20
21
22
23
24
25
26
27
28
29
30
31
32
33
34
35
36
37
38
39
40
41
42
43
44
45
46
47
48
49
50
51
52
53
54
55
56
57
58
59
60
61
62
63
64
65
|
#!/usr/bin/python#coding:utf8'''Decorator'''import timeSLEEP = 0.5# Complex Partsclass TC1: def run(self): print("###### In Test 1 ######") time.sleep(SLEEP) print("Setting up") time.sleep(SLEEP) print("Running test") time.sleep(SLEEP) print("Tearing down") time.sleep(SLEEP) print("Test Finished\n")class TC2: def run(self): print("###### In Test 2 ######") time.sleep(SLEEP) print("Setting up") time.sleep(SLEEP) print("Running test") time.sleep(SLEEP) print("Tearing down") time.sleep(SLEEP) print("Test Finished\n")class TC3: def run(self): print("###### In Test 3 ######") time.sleep(SLEEP) print("Setting up") time.sleep(SLEEP) print("Running test") time.sleep(SLEEP) print("Tearing down") time.sleep(SLEEP) print("Test Finished\n")# Facadeclass TestRunner: def __init__(self): self.tc1 = TC1() self.tc2 = TC2() self.tc3 = TC3() self.tests = [i for i in (self.tc1, self.tc2, self.tc3)] def runAll(self): [i.run() for i in self.tests]# Clientif __name__ == '__main__': testrunner = TestRunner() testrunner.runAll() |
11. Flyweight(享元)

意图:
运用共享技术有效地支持大量细粒度的对象。
适用性:
一个应用程序使用了大量的对象。
完全由于使用大量的对象,造成很大的存储开销。
对象的大多数状态都可变为外部状态。
如果删除对象的外部状态,那么可以用相对较少的共享对象取代很多组对象。
应用程序不依赖于对象标识。由于Flyweight 对象可以被共享,对于概念上明显有别的对象,标识测试将返回真值。
|
1
2
3
4
5
6
7
8
9
10
11
12
13
14
15
16
17
18
19
20
21
22
23
24
25
26
27
28
29
30
31
32
33
34
35
36
37
|
#!/usr/bin/python#coding:utf8'''Flyweight'''import weakref class Card(object): """The object pool. Has builtin reference counting""" _CardPool = weakref.WeakValueDictionary() """Flyweight implementation. If the object exists in the pool just return it (instead of creating a new one)""" def __new__(cls, value, suit): obj = Card._CardPool.get(value + suit, None) if not obj: obj = object.__new__(cls) Card._CardPool[value + suit] = obj obj.value, obj.suit = value, suit return obj # def __init__(self, value, suit): # self.value, self.suit = value, suit def __repr__(self): return "<Card: %s%s>" % (self.value, self.suit) if __name__ == '__main__': # comment __new__ and uncomment __init__ to see the difference c1 = Card('9', 'h') c2 = Card('9', 'h') print(c1, c2) print(c1 == c2) print(id(c1), id(c2)) |
12. Proxy(代理)
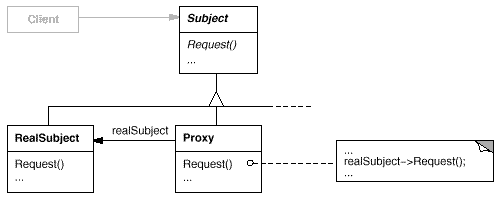
意图:
为其他对象提供一种代理以控制对这个对象的访问。
适用性:
在需要用比较通用和复杂的对象指针代替简单的指针的时候,使用Proxy模式。下面是一 些可以使用Proxy 模式常见情况:
1) 远程代理(Remote Proxy )为一个对象在不同的地址空间提供局部代表。 NEXTSTEP[Add94] 使用NXProxy 类实现了这一目的。Coplien[Cop92] 称这种代理为“大使” (Ambassador )。
2 )虚代理(Virtual Proxy )根据需要创建开销很大的对象。在动机一节描述的ImageProxy 就是这样一种代理的例子。
3) 保护代理(Protection Proxy )控制对原始对象的访问。保护代理用于对象应该有不同 的访问权限的时候。例如,在Choices 操作系统[ CIRM93]中KemelProxies为操作系统对象提供 了访问保护。
4 )智能指引(Smart Reference )取代了简单的指针,它在访问对象时执行一些附加操作。 它的典型用途包括:对指向实际对象的引用计数,这样当该对象没有引用时,可以自动释放它(也称为SmartPointers[Ede92 ] )。
当第一次引用一个持久对象时,将它装入内存。
在访问一个实际对象前,检查是否已经锁定了它,以确保其他对象不能改变它。
|
1
2
3
4
5
6
7
8
9
10
11
12
13
14
15
16
17
18
19
20
21
22
23
24
25
26
27
28
29
30
31
32
33
34
35
36
|
#!/usr/bin/python#coding:utf8'''Proxy'''import timeclass SalesManager: def work(self): print("Sales Manager working...") def talk(self): print("Sales Manager ready to talk")class Proxy: def __init__(self): self.busy = 'No' self.sales = None def work(self): print("Proxy checking for Sales Manager availability") if self.busy == 'No': self.sales = SalesManager() time.sleep(2) self.sales.talk() else: time.sleep(2) print("Sales Manager is busy")if __name__ == '__main__': p = Proxy() p.work() p.busy = 'Yes' p.work() |
行为型
13. Interpreter(解释器)
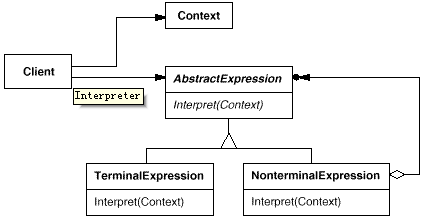
意图:
给定一个语言,定义它的文法的一种表示,并定义一个解释器,这个解释器使用该表示来解释语言中的句子。
适用性:
当有一个语言需要解释执行, 并且你可将该语言中的句子表示为一个抽象语法树时,可使用解释器模式。而当存在以下情况时该模式效果最好:
该文法简单对于复杂的文法, 文法的类层次变得庞大而无法管理。此时语法分析程序生成器这样的工具是更好的选择。它们无需构建抽象语法树即可解释表达式, 这样可以节省空间而且还可能节省时间。
效率不是一个关键问题最高效的解释器通常不是通过直接解释语法分析树实现的, 而是首先将它们转换成另一种形式。例如,正则表达式通常被转换成状态机。但即使在这种情况下, 转换器仍可用解释器模式实现, 该模式仍是有用的。
|
1
2
3
4
5
6
7
8
9
10
11
12
13
14
15
16
17
18
19
20
21
22
23
24
25
26
27
28
29
30
31
32
|
#!/usr/bin/python#coding:utf8'''Interpreter'''class Context: def __init__(self): self.input="" self.output=""class AbstractExpression: def Interpret(self,context): passclass Expression(AbstractExpression): def Interpret(self,context): print "terminal interpret"class NonterminalExpression(AbstractExpression): def Interpret(self,context): print "Nonterminal interpret"if __name__ == "__main__": context= "" c = [] c = c + [Expression()] c = c + [NonterminalExpression()] c = c + [Expression()] c = c + [Expression()] for a in c: a.Interpret(context) |
14. Template Method(模板方法)
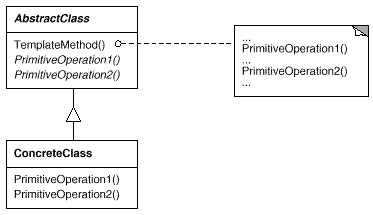
意图:
定义一个操作中的算法的骨架,而将一些步骤延迟到子类中。TemplateMethod 使得子类可以不改变一个算法的结构即可重定义该算法的某些特定步骤。
适用性:
一次性实现一个算法的不变的部分,并将可变的行为留给子类来实现。
各子类中公共的行为应被提取出来并集中到一个公共父类中以避免代码重复。这是Opdyke 和Johnson所描述过的“重分解以一般化”的一个很好的例子[ OJ93 ]。首先识别现有代码中的不同之处,并且将不同之处分离为新的操作。最后,用一个调用这些新的操作的模板方法来替换这些不同的代码。
控制子类扩展。模板方法只在特定点调用“hook ”操作(参见效果一节),这样就只允许在这些点进行扩展。
|
1
2
3
4
5
6
7
8
9
10
11
12
13
14
15
16
17
18
19
20
21
22
23
24
25
26
27
28
29
30
31
32
33
34
35
36
37
38
39
40
41
42
43
44
45
46
47
48
49
50
51
52
|
#!/usr/bin/python#coding:utf8'''Template Method'''ingredients = "spam eggs apple"line = '-' * 10# Skeletonsdef iter_elements(getter, action): """Template skeleton that iterates items""" for element in getter(): action(element) print(line) def rev_elements(getter, action): """Template skeleton that iterates items in reverse order""" for element in getter()[::-1]: action(element) print(line) # Gettersdef get_list(): return ingredients.split() def get_lists(): return [list(x) for x in ingredients.split()] # Actionsdef print_item(item): print(item) def reverse_item(item): print(item[::-1]) # Makes templatesdef make_template(skeleton, getter, action): """Instantiate a template method with getter and action""" def template(): skeleton(getter, action) return template # Create our template functionstemplates = [make_template(s, g, a) for g in (get_list, get_lists) for a in (print_item, reverse_item) for s in (iter_elements, rev_elements)] # Execute themfor template in templates: template() |
15. Chain of Responsibility(责任链)
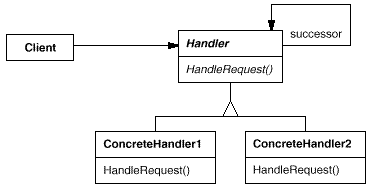
意图:
使多个对象都有机会处理请求,从而避免请求的发送者和接收者之间的耦合关系。将这些对象连成一条链,并沿着这条链传递该请求,直到有一个对象处理它为止。
适用性:
有多个的对象可以处理一个请求,哪个对象处理该请求运行时刻自动确定。
你想在不明确指定接收者的情况下,向多个对象中的一个提交一个请求。
可处理一个请求的对象集合应被动态指定。
|
1
2
3
4
5
6
7
8
9
10
11
12
13
14
15
16
17
18
19
20
21
22
23
24
25
26
27
28
29
30
31
32
33
34
35
36
37
38
39
40
41
42
43
44
45
46
|
#!/usr/bin/python#coding:utf8"""Chain"""class Handler: def successor(self, successor): self.successor = successorclass ConcreteHandler1(Handler): def handle(self, request): if request > 0 and request <= 10: print("in handler1") else: self.successor.handle(request)class ConcreteHandler2(Handler): def handle(self, request): if request > 10 and request <= 20: print("in handler2") else: self.successor.handle(request)class ConcreteHandler3(Handler): def handle(self, request): if request > 20 and request <= 30: print("in handler3") else: print('end of chain, no handler for {}'.format(request))class Client: def __init__(self): h1 = ConcreteHandler1() h2 = ConcreteHandler2() h3 = ConcreteHandler3() h1.successor(h2) h2.successor(h3) requests = [2, 5, 14, 22, 18, 3, 35, 27, 20] for request in requests: h1.handle(request)if __name__ == "__main__": client = Client() |
16. Command(命令)

意图:
将一个请求封装为一个对象,从而使你可用不同的请求对客户进行参数化;对请求排队或记录请求日志,以及支持可撤消的操作。
适用性:
抽象出待执行的动作以参数化某对象,你可用过程语言中的回调(call back)函数表达这种参数化机制。所谓回调函数是指函数先在某处注册,而它将在稍后某个需要的时候被调用。Command 模式是回调机制的一个面向对象的替代品。
在不同的时刻指定、排列和执行请求。一个Command对象可以有一个与初始请求无关的生存期。如果一个请求的接收者可用一种与地址空间无关的方式表达,那么就可将负责该请求的命令对象传送给另一个不同的进程并在那儿实现该请求。
支持取消操作。Command的Excute 操作可在实施操作前将状态存储起来,在取消操作时这个状态用来消除该操作的影响。Command 接口必须添加一个Unexecute操作,该操作取消上一次Execute调用的效果。执行的命令被存储在一个历史列表中。可通过向后和向前遍历这一列表并分别调用Unexecute和Execute来实现重数不限的“取消”和“重做”。
支持修改日志,这样当系统崩溃时,这些修改可以被重做一遍。在Command接口中添加装载操作和存储操作,可以用来保持变动的一个一致的修改日志。从崩溃中恢复的过程包括从磁盘中重新读入记录下来的命令并用Execute操作重新执行它们。
用构建在原语操作上的高层操作构造一个系统。这样一种结构在支持事务( transaction)的信息系统中很常见。一个事务封装了对数据的一组变动。Command模式提供了对事务进行建模的方法。Command有一个公共的接口,使得你可以用同一种方式调用所有的事务。同时使用该模式也易于添加新事务以扩展系统。
|
1
2
3
4
5
6
7
8
9
10
11
12
13
14
15
16
17
18
19
20
21
22
23
24
25
26
27
28
29
30
31
32
33
34
35
36
37
38
39
|
#!/usr/bin/python#coding:utf8"""Command"""import osclass MoveFileCommand(object): def __init__(self, src, dest): self.src = src self.dest = dest def execute(self): self() def __call__(self): print('renaming {} to {}'.format(self.src, self.dest)) os.rename(self.src, self.dest) def undo(self): print('renaming {} to {}'.format(self.dest, self.src)) os.rename(self.dest, self.src)if __name__ == "__main__": command_stack = [] # commands are just pushed into the command stack command_stack.append(MoveFileCommand('foo.txt', 'bar.txt')) command_stack.append(MoveFileCommand('bar.txt', 'baz.txt')) # they can be executed later on for cmd in command_stack: cmd.execute() # and can also be undone at will for cmd in reversed(command_stack): cmd.undo() |
17. Iterator(迭代器)
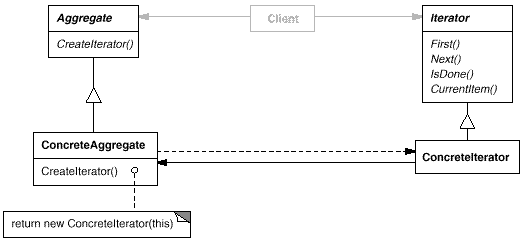
意图:
提供一种方法顺序访问一个聚合对象中各个元素, 而又不需暴露该对象的内部表示。
适用性:
访问一个聚合对象的内容而无需暴露它的内部表示。
支持对聚合对象的多种遍历。
为遍历不同的聚合结构提供一个统一的接口(即, 支持多态迭代)。
|
1
2
3
4
5
6
7
8
9
10
11
12
13
14
15
16
17
18
19
20
21
22
23
24
25
26
27
28
|
#!/usr/bin/python#coding:utf8'''Interator'''def count_to(count): """Counts by word numbers, up to a maximum of five""" numbers = ["one", "two", "three", "four", "five"] # enumerate() returns a tuple containing a count (from start which # defaults to 0) and the values obtained from iterating over sequence for pos, number in zip(range(count), numbers): yield number# Test the generatorcount_to_two = lambda: count_to(2)count_to_five = lambda: count_to(5)print('Counting to two...')for number in count_to_two(): print numberprint " "print('Counting to five...')for number in count_to_five(): print numberprint " " |
18. Mediator(中介者)

意图:
用一个中介对象来封装一系列的对象交互。中介者使各对象不需要显式地相互引用,从而使其耦合松散,而且可以独立地改变它们之间的交互。
适用性:
一组对象以定义良好但是复杂的方式进行通信。产生的相互依赖关系结构混乱且难以理解。
一个对象引用其他很多对象并且直接与这些对象通信,导致难以复用该对象。
想定制一个分布在多个类中的行为,而又不想生成太多的子类。
|
1
2
3
4
5
6
7
8
9
10
11
12
13
14
15
16
17
18
19
20
21
22
23
24
25
26
27
28
29
30
31
32
33
34
35
36
37
38
39
40
41
42
43
44
45
46
47
48
49
50
51
52
53
54
55
56
57
58
59
60
61
62
63
64
65
66
67
68
69
70
71
72
73
74
75
76
77
78
79
80
81
82
83
84
85
86
87
88
89
90
91
92
93
94
95
96
97
98
99
100
101
102
103
104
105
106
107
108
109
110
111
112
113
114
115
116
117
118
|
#!/usr/bin/python#coding:utf8'''Mediator'''"""http://dpip.testingperspective.com/?p=28"""import timeclass TC: def __init__(self): self._tm = tm self._bProblem = 0 def setup(self): print("Setting up the Test") time.sleep(1) self._tm.prepareReporting() def execute(self): if not self._bProblem: print("Executing the test") time.sleep(1) else: print("Problem in setup. Test not executed.") def tearDown(self): if not self._bProblem: print("Tearing down") time.sleep(1) self._tm.publishReport() else: print("Test not executed. No tear down required.") def setTM(self, TM): self._tm = tm def setProblem(self, value): self._bProblem = valueclass Reporter: def __init__(self): self._tm = None def prepare(self): print("Reporter Class is preparing to report the results") time.sleep(1) def report(self): print("Reporting the results of Test") time.sleep(1) def setTM(self, TM): self._tm = tmclass DB: def __init__(self): self._tm = None def insert(self): print("Inserting the execution begin status in the Database") time.sleep(1) #Following code is to simulate a communication from DB to TC import random if random.randrange(1, 4) == 3: return -1 def update(self): print("Updating the test results in Database") time.sleep(1) def setTM(self, TM): self._tm = tmclass TestManager: def __init__(self): self._reporter = None self._db = None self._tc = None def prepareReporting(self): rvalue = self._db.insert() if rvalue == -1: self._tc.setProblem(1) self._reporter.prepare() def setReporter(self, reporter): self._reporter = reporter def setDB(self, db): self._db = db def publishReport(self): self._db.update() rvalue = self._reporter.report() def setTC(self, tc): self._tc = tcif __name__ == '__main__': reporter = Reporter() db = DB() tm = TestManager() tm.setReporter(reporter) tm.setDB(db) reporter.setTM(tm) db.setTM(tm) # For simplification we are looping on the same test. # Practically, it could be about various unique test classes and their # objects while (True): tc = TC() tc.setTM(tm) tm.setTC(tc) tc.setup() tc.execute() tc.tearDown() |
19. Memento(备忘录)

意图:
在不破坏封装性的前提下,捕获一个对象的内部状态,并在该对象之外保存这个状态。这样以后就可将该对象恢复到原先保存的状态。
适用性:
必须保存一个对象在某一个时刻的(部分)状态, 这样以后需要时它才能恢复到先前的状态。
如果一个用接口来让其它对象直接得到这些状态,将会暴露对象的实现细节并破坏对象的封装性。
|
1
2
3
4
5
6
7
8
9
10
11
12
13
14
15
16
17
18
19
20
21
22
23
24
25
26
27
28
29
30
31
32
33
34
35
36
37
38
39
40
41
42
43
44
45
46
47
48
49
50
51
52
53
54
55
56
57
58
59
60
61
62
63
64
65
66
67
68
69
70
71
72
73
74
75
76
77
78
79
80
81
82
83
84
85
86
87
88
89
90
91
92
93
|
#!/usr/bin/python#coding:utf8'''Memento'''import copydef Memento(obj, deep=False): state = (copy.copy, copy.deepcopy)[bool(deep)](obj.__dict__) def Restore(): obj.__dict__.clear() obj.__dict__.update(state) return Restoreclass Transaction: """A transaction guard. This is really just syntactic suggar arount a memento closure. """ deep = False def __init__(self, *targets): self.targets = targets self.Commit() def Commit(self): self.states = [Memento(target, self.deep) for target in self.targets] def Rollback(self): for st in self.states: st()class transactional(object): """Adds transactional semantics to methods. Methods decorated with @transactional will rollback to entry state upon exceptions. """ def __init__(self, method): self.method = method def __get__(self, obj, T): def transaction(*args, **kwargs): state = Memento(obj) try: return self.method(obj, *args, **kwargs) except: state() raise return transactionclass NumObj(object): def __init__(self, value): self.value = value def __repr__(self): return '<%s: %r>' % (self.__class__.__name__, self.value) def Increment(self): self.value += 1 @transactional def DoStuff(self): self.value = '1111' # <- invalid value self.Increment() # <- will fail and rollbackif __name__ == '__main__': n = NumObj(-1) print(n) t = Transaction(n) try: for i in range(3): n.Increment() print(n) t.Commit() print('-- commited') for i in range(3): n.Increment() print(n) n.value += 'x' # will fail print(n) except: t.Rollback() print('-- rolled back') print(n) print('-- now doing stuff ...') try: n.DoStuff() except: print('-> doing stuff failed!') import traceback traceback.print_exc(0) pass print(n) |
20. Observer(观察者)
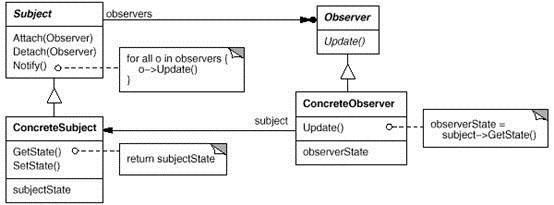
意图:
定义对象间的一种一对多的依赖关系,当一个对象的状态发生改变时, 所有依赖于它的对象都得到通知并被自动更新。
适用性:
当一个抽象模型有两个方面, 其中一个方面依赖于另一方面。将这二者封装在独立的对象中以使它们可以各自独立地改变和复用。
当对一个对象的改变需要同时改变其它对象, 而不知道具体有多少对象有待改变。
当一个对象必须通知其它对象,而它又不能假定其它对象是谁。换言之, 你不希望这些对象是紧密耦合的。
|
1
2
3
4
5
6
7
8
9
10
11
12
13
14
15
16
17
18
19
20
21
22
23
24
25
26
27
28
29
30
31
32
33
34
35
36
37
38
39
40
41
42
43
44
45
46
47
48
49
50
51
52
53
54
55
56
57
58
59
60
61
62
63
64
65
66
67
68
69
70
71
72
73
74
75
76
77
78
79
80
81
|
#!/usr/bin/python#coding:utf8'''Observer'''class Subject(object): def __init__(self): self._observers = [] def attach(self, observer): if not observer in self._observers: self._observers.append(observer) def detach(self, observer): try: self._observers.remove(observer) except ValueError: pass def notify(self, modifier=None): for observer in self._observers: if modifier != observer: observer.update(self)# Example usageclass Data(Subject): def __init__(self, name=''): Subject.__init__(self) self.name = name self._data = 0 @property def data(self): return self._data @data.setter def data(self, value): self._data = value self.notify()class HexViewer: def update(self, subject): print('HexViewer: Subject %s has data 0x%x' % (subject.name, subject.data))class DecimalViewer: def update(self, subject): print('DecimalViewer: Subject %s has data %d' % (subject.name, subject.data))# Example usage...def main(): data1 = Data('Data 1') data2 = Data('Data 2') view1 = DecimalViewer() view2 = HexViewer() data1.attach(view1) data1.attach(view2) data2.attach(view2) data2.attach(view1) print("Setting Data 1 = 10") data1.data = 10 print("Setting Data 2 = 15") data2.data = 15 print("Setting Data 1 = 3") data1.data = 3 print("Setting Data 2 = 5") data2.data = 5 print("Detach HexViewer from data1 and data2.") data1.detach(view2) data2.detach(view2) print("Setting Data 1 = 10") data1.data = 10 print("Setting Data 2 = 15") data2.data = 15if __name__ == '__main__': main() |
21. State(状态)

意图:
允许一个对象在其内部状态改变时改变它的行为。对象看起来似乎修改了它的类。
适用性:
一个对象的行为取决于它的状态, 并且它必须在运行时刻根据状态改变它的行为。
一个操作中含有庞大的多分支的条件语句,且这些分支依赖于该对象的状态。这个状态通常用一个或多个枚举常量表示。通常, 有多个操作包含这一相同的条件结构。State模式将每一个条件分支放入一个独立的类中。这使得你可以根据对象自身的情况将对象的状态作为一个对象,这一对象可以不依赖于其他对象而独立变化。
|
1
2
3
4
5
6
7
8
9
10
11
12
13
14
15
16
17
18
19
20
21
22
23
24
25
26
27
28
29
30
31
32
33
34
35
36
37
38
39
40
41
42
43
44
45
46
47
48
49
50
51
52
53
54
55
56
57
58
59
60
61
|
#!/usr/bin/python#coding:utf8'''State'''class State(object): """Base state. This is to share functionality""" def scan(self): """Scan the dial to the next station""" self.pos += 1 if self.pos == len(self.stations): self.pos = 0 print("Scanning... Station is", self.stations[self.pos], self.name)class AmState(State): def __init__(self, radio): self.radio = radio self.stations = ["1250", "1380", "1510"] self.pos = 0 self.name = "AM" def toggle_amfm(self): print("Switching to FM") self.radio.state = self.radio.fmstateclass FmState(State): def __init__(self, radio): self.radio = radio self.stations = ["81.3", "89.1", "103.9"] self.pos = 0 self.name = "FM" def toggle_amfm(self): print("Switching to AM") self.radio.state = self.radio.amstateclass Radio(object): """A radio. It has a scan button, and an AM/FM toggle switch.""" def __init__(self): """We have an AM state and an FM state""" self.amstate = AmState(self) self.fmstate = FmState(self) self.state = self.amstate def toggle_amfm(self): self.state.toggle_amfm() def scan(self): self.state.scan()# Test our radio outif __name__ == '__main__': radio = Radio() actions = [radio.scan] * 2 + [radio.toggle_amfm] + [radio.scan] * 2 actions = actions * 2 for action in actions: action() |
22. Strategy(策略)

意图:
定义一系列的算法,把它们一个个封装起来, 并且使它们可相互替换。本模式使得算法可独立于使用它的客户而变化。
适用性:
许多相关的类仅仅是行为有异。“策略”提供了一种用多个行为中的一个行为来配置一个类的方法。
需要使用一个算法的不同变体。例如,你可能会定义一些反映不同的空间/时间权衡的算法。当这些变体实现为一个算法的类层次时[H087] ,可以使用策略模式。
算法使用客户不应该知道的数据。可使用策略模式以避免暴露复杂的、与算法相关的数据结构。
一个类定义了多种行为, 并且这些行为在这个类的操作中以多个条件语句的形式出现。将相关的条件分支移入它们各自的Strategy类中以代替这些条件语句。
|
1
2
3
4
5
6
7
8
9
10
11
12
13
14
15
16
17
18
19
20
21
22
23
24
25
26
27
28
29
30
31
32
33
34
35
36
37
38
39
|
#!/usr/bin/python#coding:utf8"""StrategyIn most of other languages Strategy pattern is implemented via creating some base strategy interface/abstract class andsubclassing it with a number of concrete strategies (as we can see at http://en.wikipedia.org/wiki/Strategy_pattern),however Python supports higher-order functions and allows us to have only one class and inject functions into it'sinstances, as shown in this example."""import typesclass StrategyExample: def __init__(self, func=None): self.name = 'Strategy Example 0' if func is not None: self.execute = types.MethodType(func, self) def execute(self): print(self.name) def execute_replacement1(self): print(self.name + ' from execute 1') def execute_replacement2(self): print(self.name + ' from execute 2') if __name__ == '__main__': strat0 = StrategyExample() strat1 = StrategyExample(execute_replacement1) strat1.name = 'Strategy Example 1' strat2 = StrategyExample(execute_replacement2) strat2.name = 'Strategy Example 2' strat0.execute() strat1.execute() strat2.execute() |
23. Visitor(访问者)
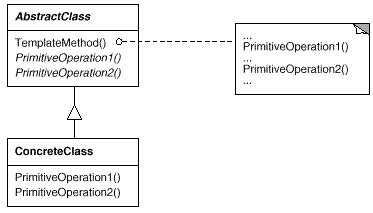
意图:
定义一个操作中的算法的骨架,而将一些步骤延迟到子类中。TemplateMethod 使得子类可以不改变一个算法的结构即可重定义该算法的某些特定步骤。
适用性:
一次性实现一个算法的不变的部分,并将可变的行为留给子类来实现。
各子类中公共的行为应被提取出来并集中到一个公共父类中以避免代码重复。这是Opdyke和Johnson所描述过的“重分解以一般化”的一个很好的例子[OJ93]。首先识别现有代码中的不同之处,并且将不同之处分离为新的操作。最后,用一个调用这些新的操作的模板方法来替换这些不同的代码。
控制子类扩展。模板方法只在特定点调用“hook ”操作(参见效果一节),这样就只允许在这些点进行扩展。
|
1
2
3
4
5
6
7
8
9
10
11
12
13
14
15
16
17
18
19
20
21
22
23
24
25
26
27
28
29
30
31
32
33
34
35
36
37
38
39
40
41
42
43
|
#!/usr/bin/python#coding:utf8'''Visitor'''class Node(object): passclass A(Node): passclass B(Node): passclass C(A, B): passclass Visitor(object): def visit(self, node, *args, **kwargs): meth = None for cls in node.__class__.__mro__: meth_name = 'visit_'+cls.__name__ meth = getattr(self, meth_name, None) if meth: break if not meth: meth = self.generic_visit return meth(node, *args, **kwargs) def generic_visit(self, node, *args, **kwargs): print('generic_visit '+node.__class__.__name__) def visit_B(self, node, *args, **kwargs): print('visit_B '+node.__class__.__name__)a = A()b = B()c = C()visitor = Visitor()visitor.visit(a)visitor.visit(b)visitor.visit(c) |
以上
参考文献:
《大话设计模式》——吴强
《Python设计模式》——pythontip.com
《23种设计模式》——http://www.cnblogs.com/beijiguangyong/
python——设计模式的更多相关文章
- python设计模式浅析
今天简单聊聊python的设计模式,GOF设计模式(c++)和Head first design pattern(Java)是两本设计模式的经典,基本可以照搬在python上面,但是你会发现pytho ...
- Python设计模式 - UML - 对象图(Object Diagram)
简介 对象图和类图的基本概念是类似的,可以看作类图在系统某一时刻的镜像,显示了该时刻系统中参与交互的各个对象以及它们之间的关系. 对象图的元素包括对象.链接.包,元素之间的关系和类图相似. 对象图建模 ...
- Python 设计模式之路
备注:本套笔记内容来源于互联网,只做学习使用,如有侵权请联系本笔记作者. 资料内容 Python 设计模式之路(一)——设计模式 初识 Python 设计模式之路(二)——简单工厂.工厂.抽象工厂模式 ...
- 最全36种python设计模式
设计模式(Design pattern)代表了最佳的实践,通常被有经验的面向对象的软件开发人员所采用.设计模式是软件开发人员在软件开发过程中面临的一般问题的解决方案.这些解决方案是众多软件开发人员经过 ...
- Python设计模式 - UML - 类图(Class Diagram)
简介 类图是面向对象分析和设计的核心,用来描述系统各个模块中类与类之间.接口与接口之间.类与接口之间的关系,以及每个类的属性.操作等特性,一般在详细设计过程中实施. 类图本身就是现实世界的抽象,是对系 ...
- Python设计模式 - 总览(更新中...)
最近打算重构部分python项目,有道是"工欲善其事,必先利其器",所以有必要梳理一下相关设计模式.每次回顾基本概念或底层实现时都会有一些新的收获,希望这次也不例外. 本系列打算先 ...
- python设计模式之门面模式
一.结构型设计模式 门面模式与单例模式,工厂模式不同,它是一种结构型模式. 结构型模式描述如何将对象和类组合成更大的结构 结构型模式是一种能够简化设计工作的模式,它能找出更简单的方法来认识或表示实体之 ...
- python设计模式之工厂模式
一.理解工厂模式 在面向对象编程中,术语“工厂”表示一个负责创建替他类型对象的类.通常情况下,作为一个工厂的类有一个对象以及与它关联的多个方法.客户端使用某些参数调用此方法,之后,工厂会据此创建所需类 ...
- python设计模式之内置装饰器使用(四)
前言 python内部有许多内建装饰器,它们都有特别的功能,下面对其归纳一下. 系列文章 python设计模式之单例模式(一) python设计模式之常用创建模式总结(二) python设计模式之装饰 ...
随机推荐
- linux kernel的cmdline参数解析原理分析【转】
转自:https://blog.csdn.net/skyflying2012/article/details/41142801 版权声明:本文为博主kerneler辛苦原创,未经允许不得转载. htt ...
- wget安装pip和pip3
pip的安装 1.1 pip下载 wget "https://pypi.python.org/packages/source/p/pip/pip-1.5.4.tar.gz#md5=834b2 ...
- R-TREE
原文地址:http://blog.csdn.net/sunmenggmail/article/details/8122743 1984年,加州大学伯克利分校的Guttman发表了一篇题为“R-tree ...
- IIS8.5 运行WCF
背景 这是一个项目给其它项目提供接口,其实现在哪有用WCF的了,都是restful.不过.net在这方面还是不错,比java强些,java竟然很多采用自己解析xml方式来做Web服务.难以理解. 但是 ...
- openwrt 分区
下面以ar9344 16M flash为例子: uboot启动时传递给内核的参数为: bootargs=console=ttyS0,115200 root=31:02 rootfstype=jffs2 ...
- Eclipse开发时出现HTTP 403 错误(禁止访问)的解决方法
1. 打开项目的页面如下: 可以从tomcat log中发现Connection has been abandoned PooledConnection和Too many connections. 2 ...
- Nodejs实现WebSocket通信demo
一.创建websocket.js文件 步骤: 1.创建websocket.js文件,复制如下代码: 2.安装nodejs-websocket依赖: 3.该文件夹下命令行执行 node websocke ...
- Java桌面程序打包成exe可执行文件
前言: 我们都知道Java可以将二进制程序打包成可执行jar文件,双击这个jar和双击exe效果是一样一样的,但感觉还是不同.其实将java程序打包成exe也需要这个可执行jar文件. 准备: ecl ...
- Vue.js+Koa2移动电商实战 笔记
地址:http://jspang.com/ https://github.com/shenghy/SmileVue 1.vant https://www.youzanyun.com/zanui/va ...
- 用jquery添加新元素很容易,面对jquery append 动态添加的元素事件on 不起作用我们该如何解决呢?
用jquery添加新元素很容易,面对jquery append 动态添加的元素事件on 不起作用我们该如何解决呢?on方法中要先找到原选择器(如例.info),再找到动态添加的选择器(如列.delet ...
