循环神经网络-LSTM进阶
基础的LSTM模型,单隐层,隐层单神经元,而实际中一般需要更为复杂的网络结构,
下面借用手写数字的经典案例构造比较复杂的LSTM模型,并用代码实现。
单隐层,隐层多神经元
# -*- coding:utf-8 -*-

import tensorflow as tf

from tensorflow.examples.tutorials.mnist import input_data

# 导入数据

mnist = input_data.read_data_sets('MNIST_data',one_hot = True)

training_iters = 50001

batch_size = 100          # 批量大小

n_inputs = 28

n_steps = 28             # 序列长度

n_hidden_number = 128    # 隐藏层神经元个数

n_outputs = 10           # 输出层神经元个数

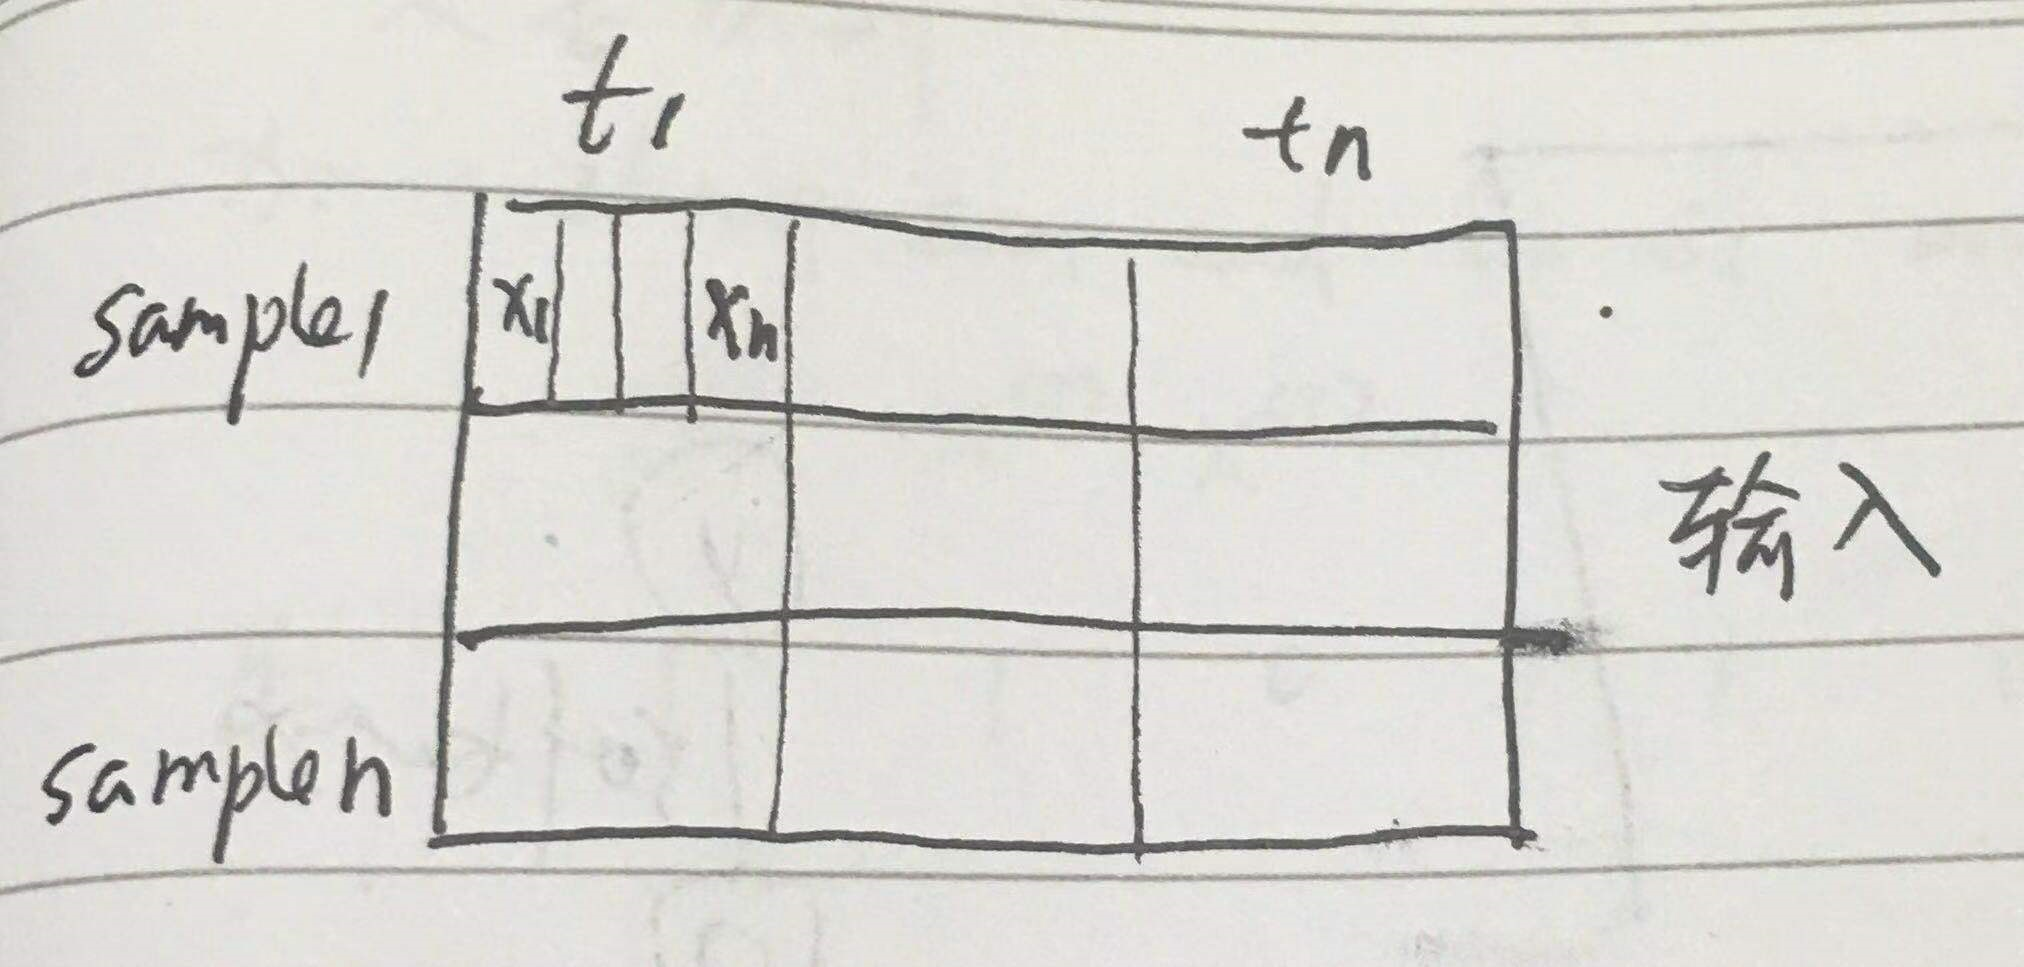
x = tf.placeholder(tf.float32,[None,n_steps,n_inputs])      # 输入3维  样本数*序列长度*每个元素长度

Y = tf.placeholder(tf.float32,[None,n_outputs])

weights = {

    # 权重设定同全连接,这是单步权重

    # 每步权重共享

    # shape = (28,128)

    'in':tf.Variable(tf.random_normal([n_inputs,n_hidden_number])),

    # shape = (128,10)

    'out':tf.Variable(tf.random_normal([n_hidden_number,n_outputs]))}

biases = {

    # shape = (128,)

    'in':tf.Variable(tf.constant(0.1,shape = [n_hidden_number,])),

    # shape = (10,)

    'out':tf.Variable(tf.constant(0.1,shape = [n_outputs,]))}

def RNN(X,weights,biases):

    """ 这里是整个RNN的网络

    1. 输入x是整个序列的,即 [x1,x2,..xt]*samples

    2. 隐层的输出包含了序列中每个时间的输出

    """

    ### 输入层到核运算 ###

    # X shape = (100batch,28steps,28inputs) ==> (100batch*28steps,28inputs)

    X = tf.reshape(X,[-1,n_inputs])     # 之所以转成2维,是要与weight相乘

    # X_in shape ==> (100batch*28steps,128hidden)

    X_in = tf.matmul(X,weights['in'])+biases['in']

    # 这是所有样本每个时序都乘以weight,每个时序都变成了hidden_num长度,结果是所有样本每个时序的hidden_num长,此时所有样本混在一起

    # X_in shape ==> (100batch,28steps,128hidden)

    # 然后要重新划分成样本,每个样本有n_steps个时序,每个时序是hidden_num长,按样本送给隐层

    X_in = tf.reshape(X_in,[-1,n_steps,n_hidden_number])

    ### cell核内运算 ###

    ## 构建单个rnn cell,单隐层,n_hidden_number个神经元,横向网络会根据输入(n_steps)自动构建

    lstm_cell = tf.nn.rnn_cell.BasicLSTMCell(n_hidden_number,forget_bias = 1.0)

    # LSTM cell is divided into two parts-->(c_state,m_state)

    # 初始化s

    init_state = lstm_cell.zero_state(batch_size,dtype=tf.float32)

    # outputs states 都是隐层的输出,整个RNN所有时序的输出,但只是h,还没到o  o=vh+c(c是bias,不同于states的c,这是记忆单元)

    # outputs 是以三维矩阵的形式记录了所有样本所有时序的所有隐层神经元的输出,shape为[batch_size, timestep_size, hidden_size]

    # states 是最后时刻的c 和 h,c是记忆,shape为 [batch_size, 2, hidden_size]

        # 当然通常顺序是这样的[2, batch_size, hidden_size]

    outputs,states = tf.nn.dynamic_rnn(lstm_cell,X_in,initial_state=init_state,time_major=False)

    ### 核内运算到输出层 ###

    # states[1]就是所有样本最后时刻的h, 实际上 states[1] == outputs[:,-1,:]

    result = tf.matmul(states[1],weights['out'])+biases['out']  # result就是o

    return  result

prediction = RNN(x,weights,biases)

### 后面所有的神经网络都大同小异

loss = tf.reduce_mean(tf.nn.softmax_cross_entropy_with_logits(labels=Y, logits=prediction))

train_step = tf.train.AdamOptimizer(1e-3).minimize(loss)

correct_prediction = tf.equal(tf.argmax(prediction,1), tf.argmax(Y,1))

accuracy = tf.reduce_mean(tf.cast(correct_prediction, tf.float32))

init = tf.global_variables_initializer()

with tf.Session() as sess:

    sess.run(init)

    step = 0

    while step*batch_size < training_iters:

        batch_xs,batch_ys = mnist.train.next_batch(batch_size)

        # batch_xs shape = [100,28,28]

        batch_xs = batch_xs.reshape([batch_size,n_steps,n_inputs])

        train_step.run(feed_dict={x:batch_xs,Y:batch_ys,})

        if step%50 == 0:

            train_accuracy = accuracy.eval(feed_dict={x:batch_xs,Y:batch_ys,})

            print("step", step, "training accuracy", train_accuracy)

        step += 1
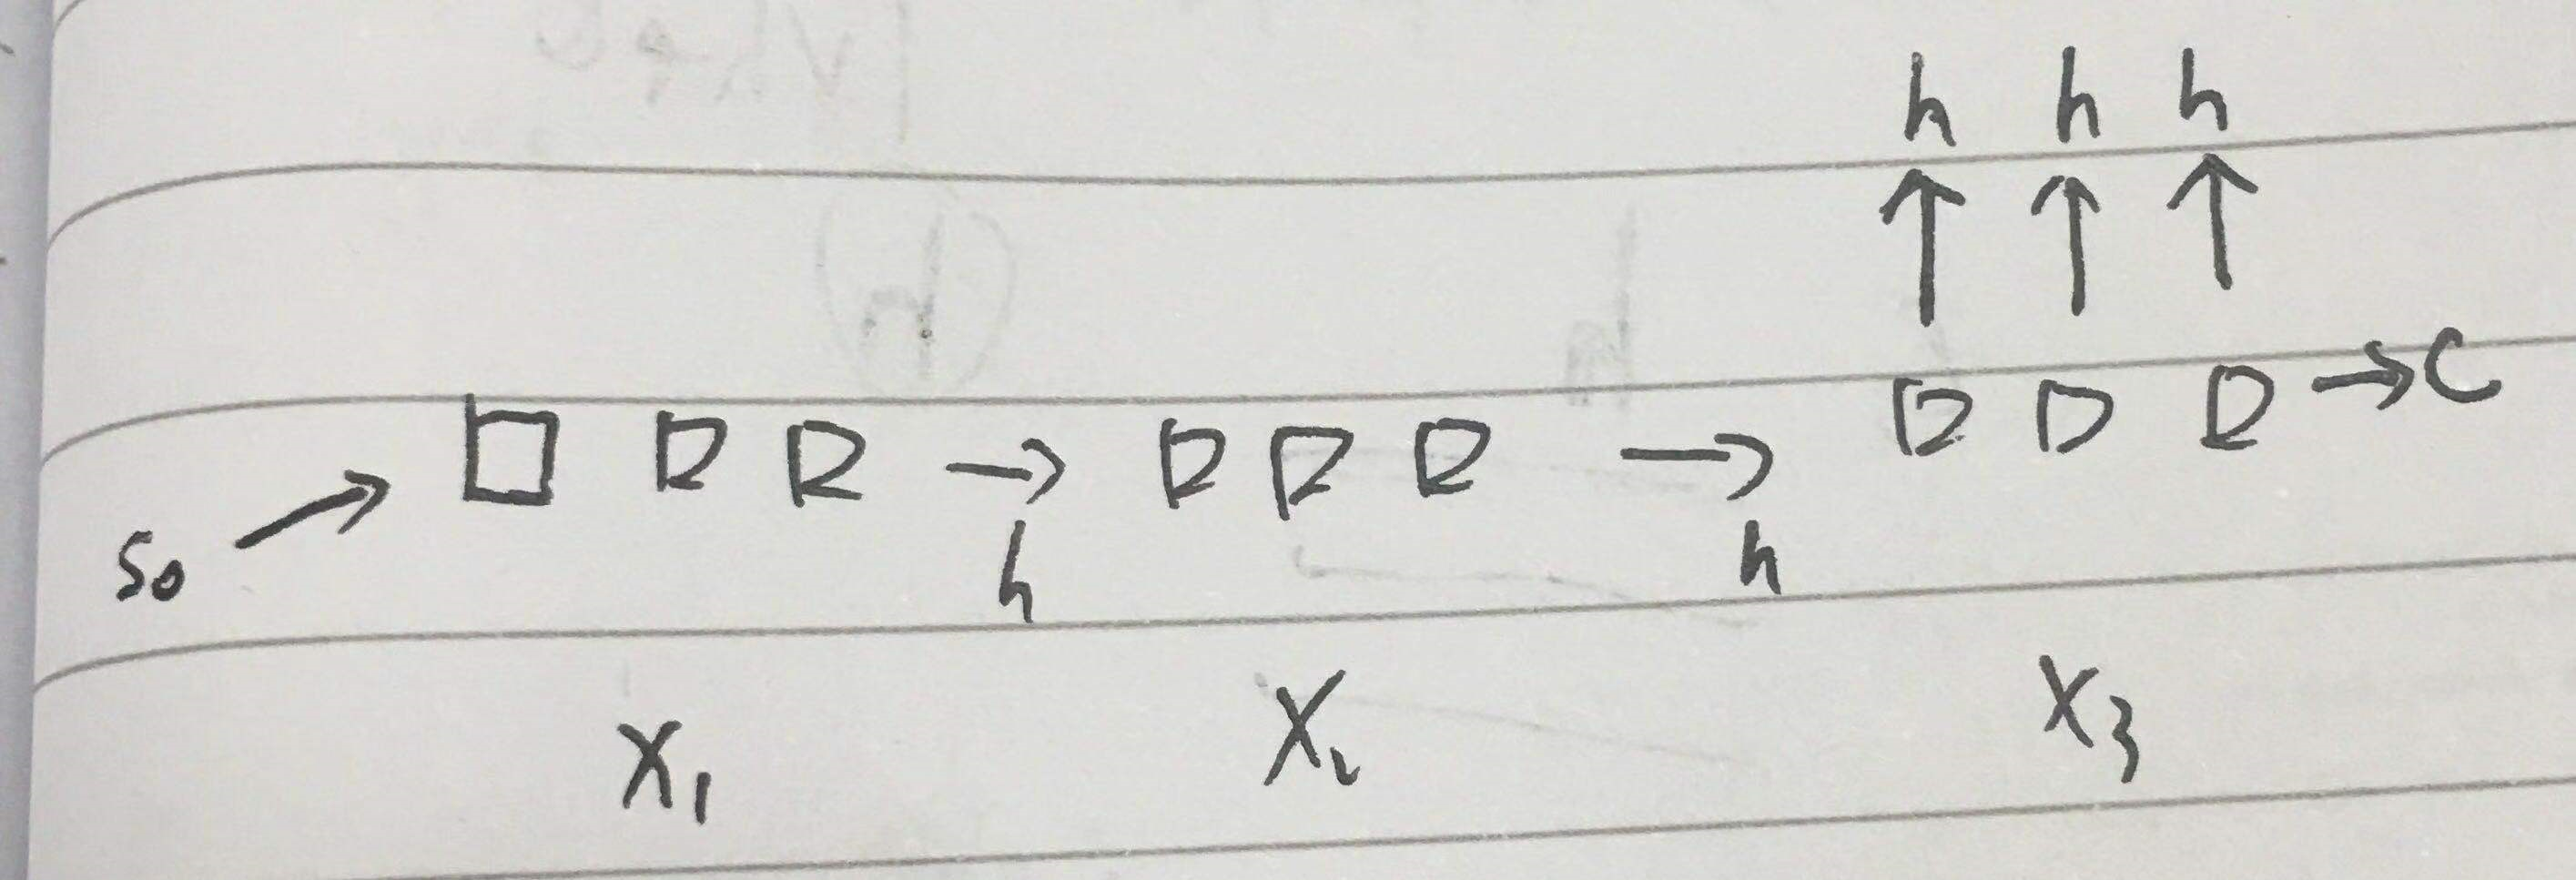
上面的网络大概是这样


x1 x2 其实应该是 xt1 xt2
多层隐层,隐层多节点
layer_num = 2  # 隐层数

def clstm():

    lstm_cell = tf.nn.rnn_cell.BasicLSTMCell(num_units=hidden_size, forget_bias=1.0, state_is_tuple=True)

    lstm_cell = rnn.DropoutWrapper(cell=lstm_cell, input_keep_prob=1.0, output_keep_prob=keep_prob)

    return lstm_cell

# 调用 MultiRNNCell 来实现多层 LSTM

mlstm_cell = rnn.MultiRNNCell([clstm() for i in range(layer_num)], state_is_tuple=True)

init_state = mlstm_cell.zero_state(batch_size, dtype=tf.float32)

outputs, state = tf.nn.dynamic_rnn(mlstm_cell, inputs=X, initial_state=init_state, time_major=False)

h_state = outputs[:, -1, :]
其他代码雷同
预测
看看rnn是如何预测的
import matplotlib.pyplot as plt

current_y= mnist.train.labels[5]

current_x=mnist.train.images[5]

print(current_y)


# 计算h

current_x.shape = [-1, 784]

current_y.shape = [-1, class_num]

current_outputs = np.array(sess.run(outputs, feed_dict={_X: current_x, y:current_y, keep_prob: 1.0, batch_size: 1}))

print(current_outputs.shape)        # (1, timesteps, hidden_size)

current_outputs.shape = [28, hidden_size]

# 计算出参数

h_W = sess.run(W, feed_dict={_X:current_x, y: current_y, keep_prob: 1.0, batch_size: 1})

h_bias = sess.run(bias, feed_dict={_X:current_x, y: current_y, keep_prob: 1.0, batch_size: 1})

h_bias.shape = [-1, 10]

bar_index = range(class_num)

# 识别过程

for i in range(current_outputs.shape[0]):   # current_outputs.shape[0] 是 squence_length

    plt.subplot(7, 4, i+1)

    current_h_shate = current_outputs[i, :].reshape([-1, hidden_size])  # 每个时刻的h

    current_formula=tf.nn.softmax(tf.matmul(current_h_shate, h_W) + h_bias) # 每个时刻的y

    pro = sess.run(current_formula)

    plt.bar(bar_index, pro[0], width=0.2 , align='center')

    plt.axis('off')

plt.show()

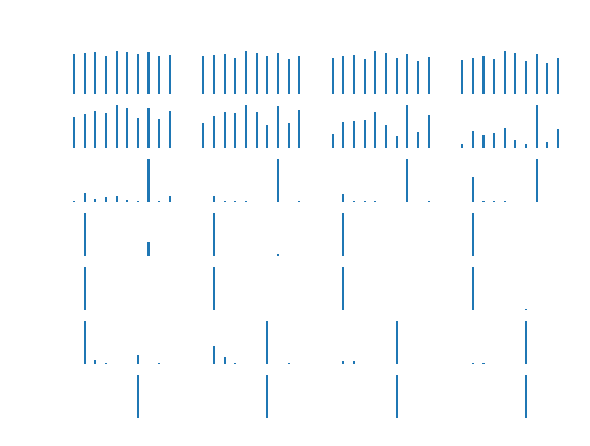
每一行显示了 4 个图,共有 7 行,每个图是一个y,表示了一行一行读取过程中,模型对字符的识别。
可以看到,在只看到前面的几行像素时,模型根本认不出来是什么字符,随着看到的像素越来越多,最后就基本确定了它是字符 4.
循环神经网络-LSTM进阶的更多相关文章
- 十 | 门控循环神经网络LSTM与GRU(附python演练)
欢迎大家关注我们的网站和系列教程:http://panchuang.net/ ,学习更多的机器学习.深度学习的知识! 目录: 门控循环神经网络简介 长短期记忆网络(LSTM) 门控制循环单元(GRU) ...
- 循环神经网络LSTM RNN回归:sin曲线预测
摘要:本篇文章将分享循环神经网络LSTM RNN如何实现回归预测. 本文分享自华为云社区<[Python人工智能] 十四.循环神经网络LSTM RNN回归案例之sin曲线预测 丨[百变AI秀]& ...
- Pytorch循环神经网络LSTM时间序列预测风速
#时间序列预测分析就是利用过去一段时间内某事件时间的特征来预测未来一段时间内该事件的特征.这是一类相对比较复杂的预测建模问题,和回归分析模型的预测不同,时间序列模型是依赖于事件发生的先后顺序的,同样大 ...
- 循环神经网络-RNN进阶
这部分许多内容要类比CNN来进行理解和解释,所以需要对CNN比较熟悉. RNN的特点 1. 权值共享 CNN权值共享,RNN也有权值共享,在入门篇可以看到RNN结构图中,权重使用的是同样的字母 为什么 ...
- 循环神经网络-LSTM
LSTM(Long Short-Term Memory)是长短期记忆网络,是一种时间递归神经网络,适合于处理和预测时间序列中间隔和延迟相对较长的重要事件. LSTM能够很大程度上缓解长期依赖的问题. ...
- 深度学习 循环神经网络 LSTM 示例
最近在网上找到了一个使用LSTM 网络解决 世界银行中各国 GDP预测的一个问题,感觉比较实用,毕竟这是找到的唯一一个可以正确运行的程序. #encoding:UTF-8 import pandas ...
- [ DLPytorch ] 循环神经网络进阶&拟合问题&梯度消失与爆炸
循环神经网络进阶 BPTT 反向传播过程中,训练模型通常需要模型参数的梯度. \[ \frac{\partial L}{\partial \boldsymbol{W}_{qh}} = \sum_{t= ...
- 循环神经网络之LSTM和GRU
看了一些LSTM的博客,都推荐看colah写的博客<Understanding LSTM Networks> 来学习LSTM,我也找来看了,写得还是比较好懂的,它把LSTM的工作流程从输入 ...
- 通过keras例子理解LSTM 循环神经网络(RNN)
博文的翻译和实践: Understanding Stateful LSTM Recurrent Neural Networks in Python with Keras 正文 一个强大而流行的循环神经 ...
随机推荐
- Exception:public class feign.codec.EncodeException feign.codec.EncodeException: 'Content-Type' cannot contain wildcard type '*'
一.异常出现的场景 Spring Cloud 服务A通过feign调用服务B;之前是好好的,但今天突然就不好了,抛以下异常===> 出现原因补充,Spring Boot默认的JSON方式 Ja ...
- synchronized相关用法简述
synchronized 锁,他是一个java 的关键字,能够保证同一线程只有一个线程访问或使用此修饰的代码块 用法 synchronized方法,synchronized块 synchronized ...
- android--------自定义控件 之 组合控件篇
上篇介绍了自定义控件的自定义属性篇,地址:http://www.cnblogs.com/zhangqie/p/8969163.html 这篇博文主要来说说 自定义控件的组合控件来提高布局的复用 使用自 ...
- Spring Batch 批量处理策略
为了帮助设计和实现批量处理系统,基本的批量应用是通过块和模式来构建的,同时也应该能够为程序开发人员和设计人员提供结构的样例和基础的批量处理程序. 当你开始设计一个批量作业任务的时候,商业逻辑应该被拆分 ...
- CF1114E Arithmetic Progression
给定一个打乱的等差数列,每次两种操作. 1.查询一个位置. 2.查询是否有比x大的数字. 一共60次操作. sol: 30次操作即可二分出首项. 剩下30次操作查询出30个位置然后两两做差取gcd即可 ...
- Javascript的常见数据类型以及相应操作
JavaScript概述 1 ECMAScript和JavaScript的关系 1996年11月,JavaScript的创造者--Netscape公司,决定将JavaScript提交给国际标准化组织E ...
- 并查集 牛客练习赛41 C抓捕盗窃犯
题目链接 :https://ac.nowcoder.com/acm/contest/373/C 题意,初始每一个城市都有一伙盗贼,没过一个时刻盗贼就会逃窜到另一个城市,你可以在m个城市设置监察站,会逮 ...
- Windows文件共享自动失效解决办法
右键共享文件夹>>高级共享>>权限>>添加Everyone 安全选项卡>>添加>>高级>>立即查找>>添加Every ...
- reflow 和 repaint
Reflow(渲染):对于DOM结构中的各个元素都有自己的盒模型,浏览器根据各种样式(浏览器的.开发人员定义的等)来计算,并根据计算结果将元素放到它该出现的位置,这个过程称之为reflow. refl ...
- python-flask-script定制manage命令
安装: pip3 install flask-script #!/usr/bin/env python # -*- coding:utf-8 -*- from flask_script import ...
