WPF 如何画一颗心
如何用WPF画一个心。
MainWindow.xaml
<Window x:Class="Heart.MainWindow"

        xmlns="http://schemas.microsoft.com/winfx/2006/xaml/presentation"

        xmlns:x="http://schemas.microsoft.com/winfx/2006/xaml"

        xmlns:d="http://schemas.microsoft.com/expression/blend/2008"

        xmlns:mc="http://schemas.openxmlformats.org/markup-compatibility/2006"

        xmlns:local="clr-namespace:Heart"

        mc:Ignorable="d"

        Title="MainWindow" Height="" Width="">

    <Grid>

        <Grid.RowDefinitions>

            <RowDefinition Height="66*"/>

            <RowDefinition Height="74*"/>

            <RowDefinition Height="77*"/>

            <RowDefinition Height="98*"/>

            <RowDefinition Height="69*"/>

            <RowDefinition Height="62*"/>

            <RowDefinition Height="72*"/>

            <RowDefinition Height="52*"/>

        </Grid.RowDefinitions>

        <Grid.ColumnDefinitions>

            <ColumnDefinition Width="134*"/>

            <ColumnDefinition Width="525*"/>

            <ColumnDefinition Width="134*"/>

        </Grid.ColumnDefinitions>

        <Button Content="画心" Grid.Column="" Grid.Row="" Click="ButtonStart_Click" Width=""></Button>

        <Canvas x:Name="canvas_Shape" HorizontalAlignment="Stretch" VerticalAlignment="Stretch" Width="" Margin="12,0" Grid.Column="" Grid.RowSpan=""/>

    </Grid>

</Window>
MainWindow.xaml.cs
using System;

using System.Collections.Generic;

using System.Windows;

using System.Windows.Controls;

using System.Windows.Media.Imaging;

using System.Drawing;

using System.Drawing.Drawing2D;

using System.Runtime.InteropServices;

using System.Threading;

namespace Heart

{

    /// <summary>

    /// MainWindow.xaml 的交互逻辑

    /// </summary>

    public partial class MainWindow : Window

    {

        public MainWindow()

        {

            InitializeComponent();

            imageList = new List<System.Windows.Controls.Image>();

            imageList1 = new List<System.Windows.Controls.Image>();

            CreateHeartLine(true);

            CreateHeartLine(false);

            m_iImageCount = imageList.Count;

        }

        private int maxStep = ;

        private double radius;

        private double centerPt;

        private Bitmap m_Snow;

        private Bitmap m_Snow1;

        private int m_iImageCount = ;

        private List<System.Windows.Controls.Image> imageList = null;

        private List<System.Windows.Controls.Image> imageList1 = null;

        [DllImport("gdi32")]

        static extern int DeleteObject(IntPtr o);

        private BitmapSource GetBitmapSource(Bitmap bitmap)

        {

            IntPtr inptr = bitmap.GetHbitmap();

            BitmapSource bitmapSource = System.Windows.Interop.Imaging.CreateBitmapSourceFromHBitmap(

                inptr, IntPtr.Zero, Int32Rect.Empty, BitmapSizeOptions.FromEmptyOptions());

            DeleteObject(inptr);

            return bitmapSource;

        }

        private void SetImageSoure(System.Windows.Controls.Image img , Bitmap mSnow)

        {

            BitmapSource bitmapSource = GetBitmapSource(mSnow);

            img.Source = bitmapSource;

        }

        private void CreateHeartLine(bool bShow)

        {

            centerPt = canvas_Shape.Width / ;

            radius = canvas_Shape.Width / ;

            for (int i = ; i < maxStep; i++)

            {

                System.Windows.Controls.Image img = new System.Windows.Controls.Image();

                BitmapSource bitmapSource;

                if (bShow)

                {

                    bitmapSource  = GetBitmapSource(Snow);

                    img.Source = bitmapSource;

                    img.Visibility = Visibility.Hidden;

                    imageList.Add(img);

                }

                else

                {

                    bitmapSource = GetBitmapSource(Snow1);

                    img.Source = bitmapSource;

                    imageList1.Add(img);

                }

                double angle =  * Math.PI / maxStep * i;

                double r =  * radius * ( - Math.Sin(angle));

                //桃形心

                double x = centerPt -  * (Math.Sin(angle) * Math.Sin(angle) * Math.Sin(angle)) * ;//

                double y = centerPt - ( * Math.Cos(angle) -  * Math.Cos( * angle) -  * Math.Cos( * angle) - Math.Cos( * angle)) * ;//

                Canvas.SetLeft(img, x);

                Canvas.SetTop(img, y);

                canvas_Shape.Children.Add(img);

            }

        }

        private Bitmap Snow

        {

            get

            {

                if (m_Snow == null)

                {

                    m_Snow = new Bitmap(, );

                    using (Graphics g = Graphics.FromImage(m_Snow))

                    {

                        g.SmoothingMode = SmoothingMode.AntiAlias;

                        g.Clear(System.Drawing.Color.Transparent);

                        g.TranslateTransform(, , MatrixOrder.Append);

                        System.Drawing.Color black = System.Drawing.Color.FromArgb(, , );

                        System.Drawing.Color white = System.Drawing.Color.FromArgb(, , );

                        DrawSnow(g, new SolidBrush(black), new System.Drawing.Pen(black, 3f));

                        DrawSnow(g, new SolidBrush(white), new System.Drawing.Pen(white, 2f));

                        g.Save();

                    }

                }

                return m_Snow;

            }

        }

        private Bitmap Snow1

        {

            get

            {

                if (m_Snow1 == null)

                {

                    m_Snow1 = new Bitmap(, );

                    using (Graphics g = Graphics.FromImage(m_Snow1))

                    {

                        g.SmoothingMode = SmoothingMode.AntiAlias;

                        g.Clear(System.Drawing.Color.Transparent);

                        g.TranslateTransform(, , MatrixOrder.Append);

                        System.Drawing.Color black = System.Drawing.Color.FromArgb(, , );

                        System.Drawing.Color white = System.Drawing.Color.FromArgb(, , );

                        DrawSnow(g, new SolidBrush(black), new System.Drawing.Pen(black, 3f));

                        DrawSnow(g, new SolidBrush(white), new System.Drawing.Pen(white, 2f));

                        g.Save();

                    }

                }

                return m_Snow1;

            }

        }

        private static void DrawSnow(Graphics g, System.Drawing.Brush b, System.Drawing.Pen p)

        {

            const int a = ;

            const int a2 = a + ;

            const int r = ;

            g.DrawLine(p, -a, -a, +a, +a);

            g.DrawLine(p, -a, +a, +a, -a);

            g.DrawLine(p, -a2, , +a2, );

            g.DrawLine(p, , -a2, , +a2);

            g.FillEllipse(b, -r, -r, r * , r * );

        }

        private void ButtonStart_Click(object sender, RoutedEventArgs e)

        {

            Thread thread = new Thread(ShowImageList);

            thread.SetApartmentState(ApartmentState.STA);

            thread.IsBackground = true;

            thread.Start();

        }

        private void ShowImageList()

        {

            while (true)

            {

                for (int i = ; i < imageList.Count; i++)

                {

                    this.Dispatcher.Invoke((Action)(() =>

                    {

                        ShowImageIndex(i);

                    }));

                    Thread.Sleep();

               }

            }

        }

        private void ShowImageIndex(int index)

        {

            if (imageList1[index].Visibility == Visibility.Visible)

            {

                imageList1[index].Visibility = Visibility.Hidden;

                imageList[index].Visibility = Visibility.Visible;

            }

            else

            {

                imageList1[index].Visibility = Visibility.Visible;

                imageList[index].Visibility = Visibility.Hidden;

            }

        }

    }

}
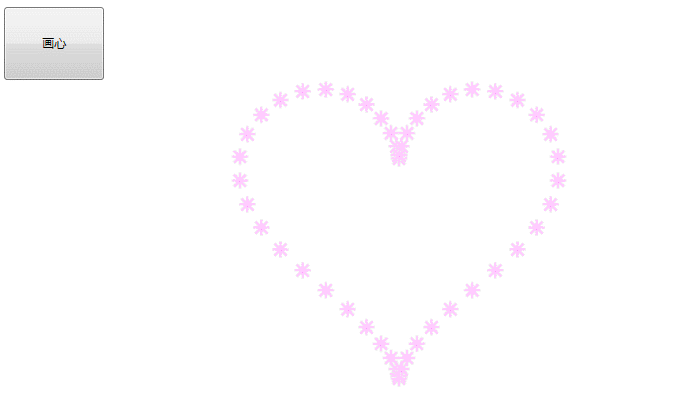
效果如下:
WPF 如何画一颗心的更多相关文章
- 从零开始学习PYTHON3讲义(十二)画一颗心送给你
(内容需要,本讲使用了大量在线公式,如果因为转帖网站不支持公式无法显示的情况,欢迎访问原始博客.) <从零开始PYTHON3>第十二讲 上一节课我们主要讲解了数值计算和符号计算.数值计算的 ...
- WPF中画虚线
原文:WPF中画虚线 在WPF中,画线的方法十分简单,只要声明一个Line然后添加到指定的位置就可以了,但Line并不仅仅只能画一条直线,还可以对直线进行修饰. 1.Line.StrokeDashAr ...
- 就算会用python画颗心,可你依然还是只单身狗
:) 标题是开玩笑的,千万别认真. 随着AI的飞速发展,有志于此行的码农也是急剧的增加,带来的就是大家对算法.数学的兴趣也格外升高. 本文的来历是这样,今天某老同事在朋友圈发了一张屏拍,求公式. 看了 ...
- 用Python画一颗特别的心送给她
import numpy as np import matplotlib.pyplot as plt x_coords = np.linspace(-100, 100, 500) y_coords = ...
- 基于微博数据用 Python 打造一颗“心”
一年一度的虐狗节刚过去不久,朋友圈各种晒,晒自拍,晒娃,晒美食,秀恩爱的.程序员在晒什么,程序员在加班.但是礼物还是少不了的,送什么好?作为程序员,我准备了一份特别的礼物,用以往发的微博数据打造一颗“ ...
- WPF 如何画出1像素的线
如何有人告诉你,请你画出1像素的线,是不是觉得很简单,实际上在 WPF 上还是比较难的. 本文告诉大家,如何让画出的线不模糊 画出线的第一个方法,创建一个 Canvas ,添加一个线 界面代码 < ...
- 利用python基于微博数据打造一颗“心”
一年一度的虐狗节将至,朋友圈各种晒,晒自拍,晒娃,晒美食,秀恩爱的.程序员在晒什么,程序员在加班.但是礼物还是少不了的,送什么好?作为程序员,我准备了一份特别的礼物,用以往发的微博数据打造一颗&quo ...
- 用Sklearn画一颗决策树
小伙伴们大家好~o( ̄▽ ̄)ブ,首先声明一下,我的开发环境是Jupyter lab,所用的库和版本大家参考: Python 3.7.1(你的版本至少要3.4以上 Scikit-learn 0.20.0 ...
- WPF设计の画刷(Brush)
一.什么是画刷 画刷是是一种渲染方式,用于填充图形形状,如矩形.椭圆.扇形.多边形和封闭路径.在GDI+中,画刷分为以下几种:SolidBrush,TextureBrush,HatchBrush,Li ...
随机推荐
- 架构师养成记--14.重入锁ReentrantLock 和 读写锁 ReentrantReadWriteLock
ReentrantLock 有嗅探锁定和多路分支等功能,其实就是synchronized,wait,notify的升级. this锁定当前对象不方便,于是就有了用new Object()来作为锁的解决 ...
- 5805 NanoApe Loves Sequence(想法题)
传送门 NanoApe Loves Sequence Time Limit: 2000/1000 MS (Java/Others) Memory Limit: 262144/131072 K ( ...
- 如何防止应用因获取IDFA被AppStore拒绝
由于Appstore禁止不使用广告而采集IDFA的app上架,友盟提供IDFA版和不含IDFA版两个SDK,两个SDK在数据上并没有差异,采集IDFA是为了防止今后因为苹果可能禁止目前使用的openu ...
- oracle--存储过程--bai
--1 无入参最简单的存储过程 create or replace procedure hello_proc as v_name varchar2(20); v_age number; begin v ...
- cookie---session
//以下文字摘自慕课网教程..... 设置cookie PHP设置Cookie最常用的方法就是使用setcookie函数,setcookie具有7个可选参数,我们常用到的为前5个: name( Coo ...
- js事件流
event:事件对象,当一个事件发生的时候,和当前这个对象发生的这个事件有关的一些详细的信息都会被临时保存在一个指定地方-event对象,供我们在需要调用.event对象必须是在一个事件调用的函数里 ...
- Jquery实现特效滑动菜单栏
<!DOCTYPE html PUBLIC "-//W3C//DTD XHTML 1.0 Transitional//EN" "http://www.w3.org/ ...
- ORA-01438: 值大于为此列指定的允许精度
Number的数据声明如下:表示 作用 说明Number(p, s) 声明一个定点数 p(precision)为精度,s(scale)表示小数点 ...
- asp.net反向代理
https://www.codeproject.com/Articles/18490/Reverse-Proxy-in-C-NET-v https://www.codeproject.com/Arti ...
- java创建文件和目录
java创建文件和目录 2013-09-04 12:56 99933人阅读 评论(7) 收藏 举报 分类: JAVA基础(10) 版权声明:本文为博主原创文章,未经博主允许不得转载. 创建文件和目 ...