IdentityServer4系列 | 混合模式
一、前言
在上一篇关于授权码模式中, 已经介绍了关于授权码的基本内容,认识到这是一个拥有更为安全的机制,但这个仍然存在局限,虽然在文中我们说到通过后端的方式去获取token,这种由web服务器和授权服务器直接通信,不需要经过用户的浏览器或者其他的地方,但是在这种模式中,授权码仍然是通过前端通道进行传递的,而且在访问资源的中,也会将访问令牌暴露给外界,就仍存在安全隐患。
快速回顾一下之前初识基础知识点中提到的,
IdentityServer4是OpenID Connect+OAuth2.0相结合的认证框架,用户身份认证和API的授权访问,两个结合一块,实现了认证和授权的结合。
在几篇关于授权模式篇章中,其中我们也使用了关于OpenID Connect 的简化流程,在简化流程中,所有令牌(身份令牌、访问令牌)都通过浏览器传输,这对于身份令牌(IdentityToken)来说是没有问题的,但是如果是访问令牌(AccessToken)直接通过浏览器传输,就增加了一定的安全问题。因为访问令牌比身份令牌更敏感,在非必须的情况下,我们不希望将它们暴露给外界。
所以我们就会考虑增加安全性,在OpenID Connect 包含一个名为“Hybrid(混合)”的流程,它为我们提供了两全其美的优势,身份令牌通过浏览器传输,因此客户端可以在进行任何更多工作之前对其进行验证。如果验证成功,客户端会通过令牌服务的以获取访问令牌。
二、初识
在认识混合模式(Hybrid Flow)时候,可以发现这里跟上一篇的授权码模式有很多相似的地方,具体可以查看授权码模式
查看使用OpenIDConnect时的安全性和隐私注意事项相关资料可以发现,
授权码模式和混合模式的流程步骤分别如下:
Authorization Code Flow Steps
The Authorization Code Flow goes through the following steps.
- Client prepares an Authentication Request containing the desired request parameters.
- Client sends the request to the Authorization Server.
- Authorization Server Authenticates the End-User.
- Authorization Server obtains End-User Consent/Authorization.
- Authorization Server sends the End-User back to the Client with an Authorization Code.
- Client requests a response using the Authorization Code at the Token Endpoint.
- Client receives a response that contains an ID Token and Access Token in the response body.
- Client validates the ID token and retrieves the End-User's Subject Identifier.
Hybrid Flow Steps
The Hybrid Flow follows the following steps:
- Client prepares an Authentication Request containing the desired request parameters.
- Client sends the request to the Authorization Server.
- Authorization Server Authenticates the End-User.
- Authorization Server obtains End-User Consent/Authorization.
- Authorization Server sends the End-User back to the Client with an Authorization Code and, depending on the Response Type, one or more additional parameters.
- Client requests a response using the Authorization Code at the Token Endpoint.
- Client receives a response that contains an ID Token and Access Token in the response body.
- Client validates the ID Token and retrieves the End-User's Subject Identifier.
由以上对比发现,code和hybrid一样都有8个步骤,大部分步骤也是相同的。最主要的区别在于第5步。
在授权码模式中,成功响应身份验证:
 HTTP/1.1 302 Found

  Location: https://client.example.org/cb?

    code=SplxlOBeZQQYbYS6WxSbIA

    &state=af0ifjsldkj
在混合模式中,成功响应身份验证:
HTTP/1.1 302 Found

  Location: https://client.example.org/cb#

    code=SplxlOBeZQQYbYS6WxSbIA

    &id_token=eyJ0 ... NiJ9.eyJ1c ... I6IjIifX0.DeWt4Qu ... ZXso

    &state=af0ifjsldkj
其中多了一个id_token
在使用这些模式的时候,成功的身份验证响应,存在指定的差异。这些授权端点的结果以不同的的依据返回。其中code是一定会返回的,access_token和id_token的返回依据 response_type 参数决定。
混合模式根据response_type的不同,authorization endpoint返回可以分为三种情况。
- response_type = code + id_token ,即包含Access Token和ID Token
- response_type = code + token ,即包含Authorization Code和Access Token
- response_type = code + id_token + token,即包含Authorization Code、identity Token和Access Token
三、实践
接着我们进行一些简单的实践,因为有了前面授权码模式代码的经验,编写混合模式也是很简单的。
(这里重复之前的代码,防止被爬抓后内容的缺失不完整)
在示例实践中,我们将创建一个授权访问服务,定义一个MVC客户端,MVC客户端通过IdentityServer上请求访问令牌,并使用它来访问API。
3.1 搭建 Authorization Server 服务
搭建认证授权服务
3.1.1 安装Nuget包
IdentityServer4程序包
3.1.2 配置内容
建立配置内容文件Config.cs
public static class Config

{

    public static IEnumerable<IdentityResource> IdentityResources =>

        new IdentityResource[]

    {

        new IdentityResources.OpenId(),

        new IdentityResources.Profile(),

    };

    public static IEnumerable<ApiScope> ApiScopes =>

        new ApiScope[]

    {

        new ApiScope("hybrid_scope1")

    };

    public static IEnumerable<ApiResource> ApiResources =>

        new ApiResource[]

    {

        new ApiResource("api1","api1")

        {

            Scopes={ "hybrid_scope1" },

            UserClaims={JwtClaimTypes.Role},  //添加Cliam 角色类型

            ApiSecrets={new Secret("apipwd".Sha256())}

        }

    };

    public static IEnumerable<Client> Clients =>

        new Client[]

    {

        new Client

        {

            ClientId = "hybrid_client",

            ClientName = "hybrid Auth",

			ClientSecrets = { new Secret("511536EF-F270-4058-80CA-1C89C192F69A".Sha256()) },

            AllowedGrantTypes = GrantTypes.Hybrid,

            RedirectUris ={

                "http://localhost:5002/signin-oidc", //跳转登录到的客户端的地址

            },

            // RedirectUris = {"http://localhost:5002/auth.html" }, //跳转登出到的客户端的地址

            PostLogoutRedirectUris ={

                "http://localhost:5002/signout-callback-oidc",

            },

            ClientSecrets = { new Secret("511536EF-F270-4058-80CA-1C89C192F69A".Sha256()) },

            AllowedScopes = {

                IdentityServerConstants.StandardScopes.OpenId,

                IdentityServerConstants.StandardScopes.Profile,

                "hybrid_scope1"

            },

            //允许将token通过浏览器传递

            AllowAccessTokensViaBrowser=true,

            // 是否需要同意授权 (默认是false)

            RequireConsent=true

        }

    };

}
RedirectUris: 登录成功回调处理的客户端地址,处理回调返回的数据,可以有多个。
PostLogoutRedirectUris:跳转登出到的客户端的地址。这两个都是配置的客户端的地址,且是identityserver4组件里面封装好的地址,作用分别是登录,注销的回调
因为是混合授权的方式,所以我们通过代码的方式来创建几个测试用户。
新建测试用户文件TestUsers.cs
    public class TestUsers

    {

        public static List<TestUser> Users

        {

            get

            {

                var address = new

                {

                    street_address = "One Hacker Way",

                    locality = "Heidelberg",

                    postal_code = 69118,

                    country = "Germany"

                };

                return new List<TestUser>

                {

                    new TestUser

                    {

                        SubjectId = "1",

                        Username = "i3yuan",

                        Password = "123456",

                        Claims =

                        {

                            new Claim(JwtClaimTypes.Name, "i3yuan Smith"),

                            new Claim(JwtClaimTypes.GivenName, "i3yuan"),

                            new Claim(JwtClaimTypes.FamilyName, "Smith"),

                            new Claim(JwtClaimTypes.Email, "i3yuan@email.com"),

                            new Claim(JwtClaimTypes.EmailVerified, "true", ClaimValueTypes.Boolean),

                            new Claim(JwtClaimTypes.WebSite, "http://i3yuan.top"),

                            new Claim(JwtClaimTypes.Address, JsonSerializer.Serialize(address), IdentityServerConstants.ClaimValueTypes.Json)

                        }

                    }

                };

            }

        }

    }
返回一个TestUser的集合。
通过以上添加好配置和测试用户后,我们需要将用户注册到IdentityServer4服务中,接下来继续介绍。
3.1.3 注册服务
在startup.cs中ConfigureServices方法添加如下代码:
        public void ConfigureServices(IServiceCollection services)

        {

            var builder = services.AddIdentityServer()

               .AddTestUsers(TestUsers.Users); //添加测试用户

            // in-memory, code config

            builder.AddInMemoryIdentityResources(Config.IdentityResources);

            builder.AddInMemoryApiScopes(Config.ApiScopes);

            builder.AddInMemoryApiResources(Config.ApiResources);

            builder.AddInMemoryClients(Config.Clients);

            // not recommended for production - you need to store your key material somewhere secure

            builder.AddDeveloperSigningCredential();

            services.ConfigureNonBreakingSameSiteCookies();

        }
3.1.4 配置管道
在startup.cs中Configure方法添加如下代码:
        public void Configure(IApplicationBuilder app, IWebHostEnvironment env)

        {

            if (env.IsDevelopment())

            {

                app.UseDeveloperExceptionPage();

            }

            app.UseStaticFiles();

            app.UseRouting();

            app.UseCookiePolicy();

            app.UseAuthentication();

            app.UseAuthorization();

            app.UseIdentityServer();

            app.UseEndpoints(endpoints =>

            {

                endpoints.MapDefaultControllerRoute();

            });

        }
以上内容是快速搭建简易IdentityServer项目服务的方式。
这搭建 Authorization Server 服务跟上一篇授权码模式有何不同之处呢?
- 在Config中配置客户端(client)中定义了一个
AllowedGrantTypes的属性,这个属性决定了Client可以被哪种模式被访问,GrantTypes.Hybrid为混合模式。所以在本文中我们需要添加一个Client用于支持授权码模式(Hybrid)。
3.2 搭建API资源
实现对API资源进行保护
3.2.1 快速搭建一个API项目
3.2.2 安装Nuget包
IdentityServer4.AccessTokenValidation 包
3.2.3 注册服务
在startup.cs中ConfigureServices方法添加如下代码:
    public void ConfigureServices(IServiceCollection services)

    {

        services.AddControllersWithViews();

        services.AddAuthentication(JwtBearerDefaults.AuthenticationScheme)

        services.AddAuthentication("Bearer")

          .AddIdentityServerAuthentication(options =>

          {

              options.Authority = "http://localhost:5001";

              options.RequireHttpsMetadata = false;

              options.ApiName = "api1";

              options.ApiSecret = "apipwd"; //对应ApiResources中的密钥

          });

    }
AddAuthentication把Bearer配置成默认模式,将身份认证服务添加到DI中。
AddIdentityServerAuthentication把IdentityServer的access token添加到DI中,供身份认证服务使用。
3.2.4 配置管道
在startup.cs中Configure方法添加如下代码:
        public void Configure(IApplicationBuilder app, IWebHostEnvironment env)

        {

            if (env.IsDevelopment())

            {

                app.UseDeveloperExceptionPage();

            }

            app.UseRouting();

            app.UseAuthentication();

            app.UseAuthorization();

            app.UseEndpoints(endpoints =>

            {

                endpoints.MapDefaultControllerRoute();

            });

        }
UseAuthentication将身份验证中间件添加到管道中;
UseAuthorization 将启动授权中间件添加到管道中,以便在每次调用主机时执行身份验证授权功能。
3.2.5 添加API资源接口
[Route("api/[Controller]")]

[ApiController]

public class IdentityController:ControllerBase

{

    [HttpGet("getUserClaims")]

    [Authorize]

    public IActionResult GetUserClaims()

    {

        return new JsonResult(from c in User.Claims select new { c.Type, c.Value });

    }

}
在IdentityController 控制器中添加 [Authorize] , 在进行请求资源的时候,需进行认证授权通过后,才能进行访问。
3.3 搭建MVC 客户端
实现对客户端认证授权访问资源
3.3.1 快速搭建一个MVC项目
3.3.2 安装Nuget包
IdentityServer4.AccessTokenValidation 包
3.3.3 注册服务
要将对 OpenID Connect 身份认证的支持添加到MVC应用程序中。
在startup.cs中ConfigureServices方法添加如下代码:
    public void ConfigureServices(IServiceCollection services)

    {

        services.AddControllersWithViews();

        services.AddAuthorization();

        services.AddAuthentication(options =>

            {

                options.DefaultScheme = "Cookies";

                options.DefaultChallengeScheme = "oidc";

            })

               .AddCookie("Cookies")  //使用Cookie作为验证用户的首选方式

              .AddOpenIdConnect("oidc", options =>

              {

                  options.Authority = "http://localhost:5001";  //授权服务器地址

                  options.RequireHttpsMetadata = false;  //暂时不用https

                  options.ClientId = "hybrid_client";

                  options.ClientSecret = "511536EF-F270-4058-80CA-1C89C192F69A";

                  options.ResponseType = "code id_token"; //代表

                  options.Scope.Add("hybrid_scope1"); //添加授权资源

                  options.SaveTokens = true; //表示把获取的Token存到Cookie中

                  options.GetClaimsFromUserInfoEndpoint = true;

              });

         services.ConfigureNonBreakingSameSiteCookies();

    }
AddAuthentication注入添加认证授权,当需要用户登录时,使用cookie来本地登录用户(通过“Cookies”作为DefaultScheme),并将DefaultChallengeScheme设置为“oidc”,- 使用
AddCookie添加可以处理 cookie 的处理程序。- 在
AddOpenIdConnect用于配置执行OpenID Connect协议的处理程序和相关参数。Authority表明之前搭建的 IdentityServer 授权服务地址。然后我们通过ClientId、ClientSecret,识别这个客户端。SaveTokens用于保存从IdentityServer获取的token至cookie,ture标识ASP.NETCore将会自动存储身份认证session的access和refresh token。- 我们在配置
ResponseType时需要使用Hybrid定义的三种情况之一,具体代码如上所述。
3.3.4 配置管道
然后要确保认证服务执行对每个请求的验证,加入UseAuthentication和UseAuthorization到Configure中,在startup.cs中Configure方法添加如下代码:
        public void Configure(IApplicationBuilder app, IWebHostEnvironment env)

        {

            if (env.IsDevelopment())

            {

                app.UseDeveloperExceptionPage();

            }

            else

            {

                app.UseExceptionHandler("/Home/Error");

            }

            app.UseStaticFiles();

            app.UseRouting();

            app.UseCookiePolicy();

            app.UseAuthentication();

            app.UseAuthorization();

            app.UseEndpoints(endpoints =>

            {

                endpoints.MapControllerRoute(

                    name: "default",

                    pattern: "{controller=Home}/{action=Index}/{id?}");

            });

        }
UseAuthentication将身份验证中间件添加到管道中;
UseAuthorization 将启动授权中间件添加到管道中,以便在每次调用主机时执行身份验证授权功能。
3.3.5 添加授权
在HomeController控制器并添加[Authorize]特性到其中一个方法。在进行请求的时候,需进行认证授权通过后,才能进行访问。
        [Authorize]

        public IActionResult Privacy()

        {

            ViewData["Message"] = "Secure page.";

            return View();

        }
还要修改主视图以显示用户的Claim以及cookie属性。
@using Microsoft.AspNetCore.Authentication

<h2>Claims</h2>

<dl>

    @foreach (var claim in User.Claims)

    {

        <dt>@claim.Type</dt>

        <dd>@claim.Value</dd>

    }

</dl>

<h2>Properties</h2>

<dl>

    @foreach (var prop in (await Context.AuthenticateAsync()).Properties.Items)

    {

        <dt>@prop.Key</dt>

        <dd>@prop.Value</dd>

    }

</dl>
访问 Privacy 页面,跳转到认证服务地址,进行账号密码登录,Logout 用于用户的注销操作。
3.3.6 添加资源访问
在HomeController控制器添加对API资源访问的接口方法。在进行请求的时候,访问API受保护资源。
        /// <summary>

        /// 测试请求API资源(api1)

        /// </summary>

        /// <returns></returns>

        public async Task<IActionResult> getApi()

        {

            var client = new HttpClient();

            var accessToken = await HttpContext.GetTokenAsync(OpenIdConnectParameterNames.AccessToken);

            if (string.IsNullOrEmpty(accessToken))

            {

                return Json(new { msg = "accesstoken 获取失败" });

            }

            client.DefaultRequestHeaders.Authorization = new AuthenticationHeaderValue("Bearer", accessToken);

            var httpResponse = await client.GetAsync("http://localhost:5003/api/identity/GetUserClaims");

            var result = await httpResponse.Content.ReadAsStringAsync();

            if (!httpResponse.IsSuccessStatusCode)

            {

                return Json(new { msg = "请求 api1 失败。", error = result });

            }

            return Json(new

            {

                msg = "成功",

                data = JsonConvert.DeserializeObject(result)

            });

        }
测试这里通过获取accessToken之后,设置client请求头的认证,访问API资源受保护的地址,获取资源。
3.4 效果
我们通过对比授权码模式与混合模式 可以发现,在大部分步骤是相同的,但也存在一些差异。
在整个过程中,我们使用抓取请求,可以看到在Authorization Endpoint中两者的区别如下:
授权码模式:
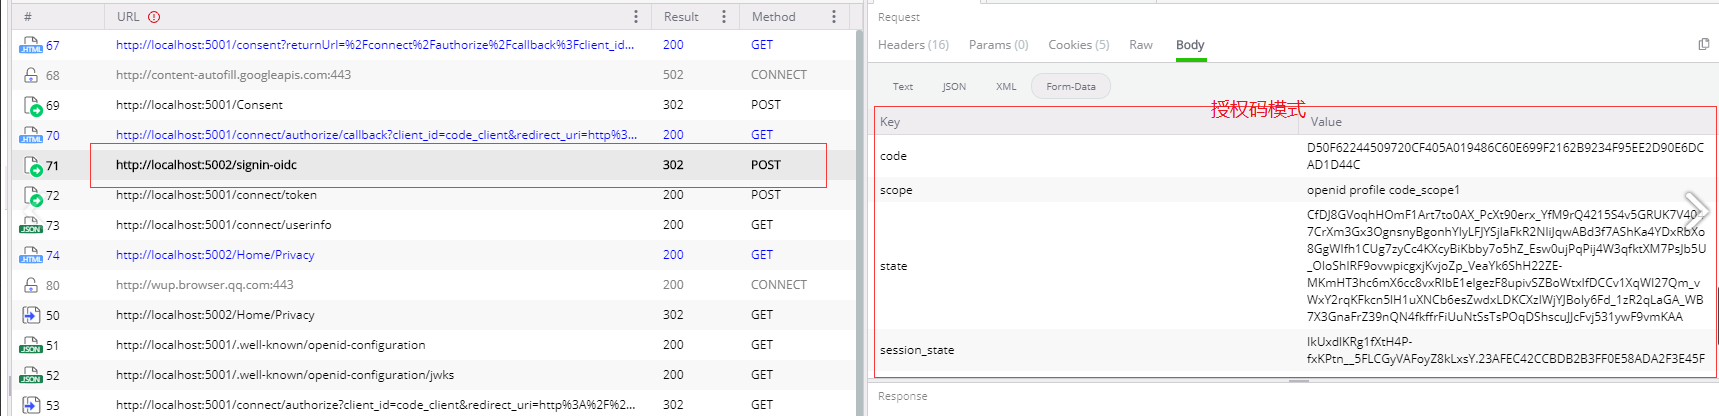
混合模式:

在Authorization EndPoint返回的Id_Token和Token EndPoint返回的id_Token中,可以看到两次值是可能不相同的,但是其中包含的用户信息都是一样的。

在使用Hybrid时我们看到授权终结点返回的Id Token中包含at_hash(Access Token的哈希值)和s_hash(State的哈希值),规范中定义了以下的一些检验规则。
- 两个id_token中的 iss 和 sub 必须相同。
- 如果任何一个 id token 中包含关于终端用户的声明,两个令牌中提供的值必须相同。
- 关于验证事件的声明必须都提供。
- at_hash 和 s_hash 声明可能会从 token 端点返回的令牌中忽略,即使从 authorize 端点返回的令牌中已经声明。
四、问题
4.1 设置RequirePkce
在指定基于授权码的令牌是否需要验证密钥,默认为true。
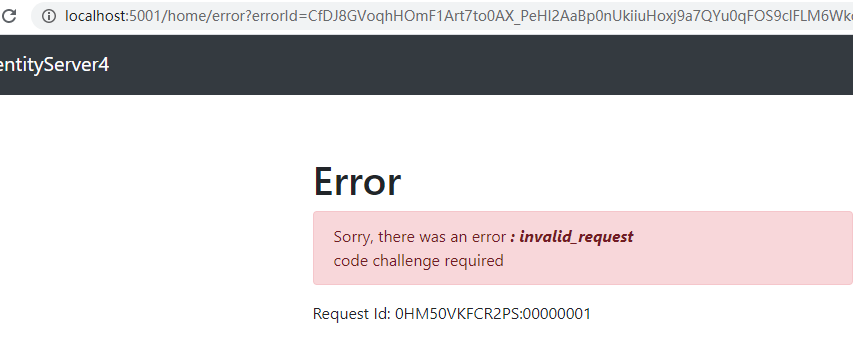
解决方法:
修改Config中的RequirePkce为false即可。这样服务端便不在需要客户端提供code challeng。
RequirePkce = false,//v4.x需要配置这个
4.2 设置ResponseType
在上文中提到的MVC客户端中配置ResponseType时可以使用Hybrid定义的三种情况。
而当设置为"code token", "code id_token token"中的一种,即只要包含token,都会报如下错误:
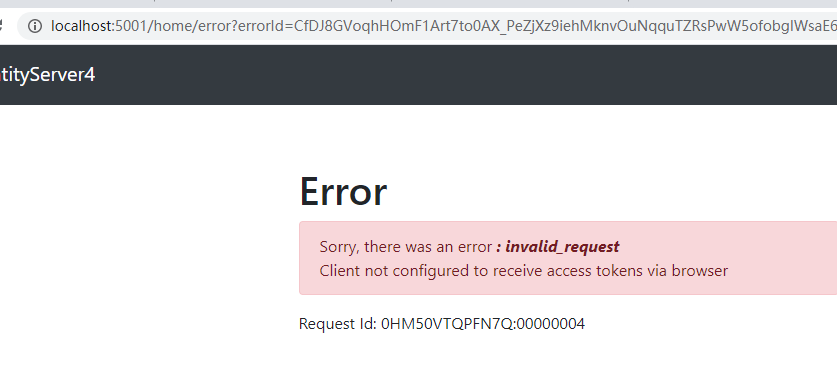
解决方法:
授权服务端中的Config中增加允许将token通过浏览器传递
AllowAccessTokensViaBrowser = true,
五、总结
由于令牌都通过浏览器传输,为了提高更好的安全性,我们不想暴露访问令牌,
OpenID Connect包含一个名为“Hybrid(混合)”的流程,它可以让身份令牌(id_token)通过前端浏览器通道传输,因此客户端可以在做更多的工作之前验证它。 如果验证成功,客户端会打开令牌服务的后端服务器通道来检索访问令牌(access_token)。在后续会对这方面进行介绍继续说明,数据库持久化问题,以及如何应用在API资源服务器中和配置在客户端中,会进一步说明。
如果有不对的或不理解的地方,希望大家可以多多指正,提出问题,一起讨论,不断学习,共同进步。
六、附加
IdentityServer4系列 | 混合模式的更多相关文章
- IdentityServer4系列之中文文档及实际项目经验分享
0.前言 原文:http://docs.identityserver.io/en/release/声明: 1.目录一至五章节根据IdentityServer英文文档翻译而来,有些内容会根据自己的理解来 ...
- IdentityServer4系列 | 初识基础知识点
前言 我们现在日常生活中,会使用各式各样的应用程序,层出不穷,其中有基于网页浏览方式的应用,有基于手机端的App,甚至有基于流行的公众号和小程序等等,这些应用,我们不仅要实现各个应用的功能之外,还要考 ...
- IdentityServer4系列 | 授权码模式
一.前言 在上一篇关于简化模式中,通过客户端以浏览器的形式请求IdentityServer服务获取访问令牌,从而请求获取受保护的资源,但由于token携带在url中,安全性方面不能保证.因此,我们可以 ...
- IdentityServer4系列 | 简化模式
一.前言 从上一篇关于资源密码凭证模式中,通过使用client_id和client_secret以及用户名密码通过应用Client(客户端)直接获取,从而请求获取受保护的资源,但是这种方式存在clie ...
- IdentityServer4系列 | 资源密码凭证模式
一.前言 从上一篇关于客户端凭证模式中,我们通过创建一个认证授权访问服务,定义一个API和要访问它的客户端,客户端通过IdentityServer上请求访问令牌,并使用它来控制访问API.其中,我们也 ...
- IdentityServer4系列 | 客户端凭证模式
一.前言 从上一篇关于 快速搭建简易项目中,通过手动或者官方模板的方式简易的实现了我们的IdentityServer授权服务器搭建,并做了相应的配置和UI配置,实现了获取Token方式. 而其中我们也 ...
- IdentityServer4系列 | 快速搭建简易项目
一 .前言 从上一篇关于 常见术语说明中,主要是对IdentityServer4的说明,以及其中涉及常见的术语的表述说明,包括对身份认证服务器.用户.客户端.资源以及各个令牌等进行对比区别说明. 而在 ...
- IdentityServer4系列 | 常见术语说明
一.前言 在上一篇中,我们IdentityServer4的说明,认识到是一个基于OpenID Connect协议标准的身份认证和授权程序,并简单的对基础知识的认识以及区别说明,从OAuth.OpenI ...
- IdentityServer4系列[6]授权码模式
授权码模式是一种混合模式,是目前功能最完整.流程最严密的授权模式.它主要分为两大步骤:认证和授权.其流程为: 用户访问客户端,客户端将用户导向Identity Server. 用户填写凭证信息向客户端 ...
随机推荐
- TP5框架中实现多条件登录(自写代码,密码未md5()加密)
HTML代码: <!DOCTYPE html> <html lang="en"> <head> <meta charset="U ...
- JS 实现排序算法
冒泡排序 比较相邻的元素.如果第一个比第二个大,就交换他们两个. 对每一对相邻元素做同样的工作,从开始第一对到结尾的最后一对.在这一点,最后的元素应该会是最大的数. 针对所有的元素重复以上的步骤,除了 ...
- C++移动语义 详细讲解【Cherno C++教程】
移动语义 本文是对<最好的C++教程>的整理,主要是移动语义部分,包含视频85p左值和右值.89p移动语义与90p stdmove和移动赋值操作符. 移动语义是C++11的新feature ...
- LGP6156题解
真·简单题 题目大意 给定 \(n\) 和 \(k\),求出这个柿子的值: \[\sum_{i=1}^n\sum_{j=1}^n(i+j)^k\mu^2(\gcd(i,j)gcd(i,j) \] 按照 ...
- ArcMap操作随记(15)
1.字段顺序的调整 [图层属性]→[字段]([高级排序]功能也在这里) 2.所谓热点地区: 本身是高值,邻居也是高值,才成为热点地区(这是操作中总结出的,但其实了解原理就很简单了,详细请查看空间自相关 ...
- k8s原来这么简单(一)核心组件与工作原理
k8s官方文档:https://kubernetes.io/zh/docs/home/ 前提 掌握容器技术:Docker,Containerd等 K8S优势 使用简单,少量人/小团队可以轻松维护大型 ...
- maven——使用阿里云镜像
1.在本地的仓库目录下找到settings.xml文件,添加 <mirrors> <mirror> <id>alimaven</id> <name ...
- springboot 踩坑之路之 Configuration Annotation Proessor not found in classpath
1.出现spring boot Configuration Annotation Proessor not found in classpath的提示是在用了@ConfigurationPropert ...
- Git-rebase使用原理
使用 Git 已经好几年了,却始终只是熟悉一些常用的操作.对于 Git Rebase 却很少用到,直到这一次,不得不用. 一.起因 上线构建的过程中扫了一眼代码变更,突然发现,commit 提交竟然多 ...
- C249: 'DATA': SEGMENT TOO LARGE“解决方法 | keilC51设置编译模式:SMALL,COMPACT,LARGE
"Keil Cx51编译器提供三条编译模式控制命令:SMALL,COMPACT,LARGE,它们对变量存储器空间的影响如下. SMALL:所有变量都被定义在8051单片机的片内RAM中,对这 ...