【Spring系列】自己手写一个 SpringMVC 框架
一、了解SpringMVC运行流程及九大组件
1.SpringMVC的运行流程
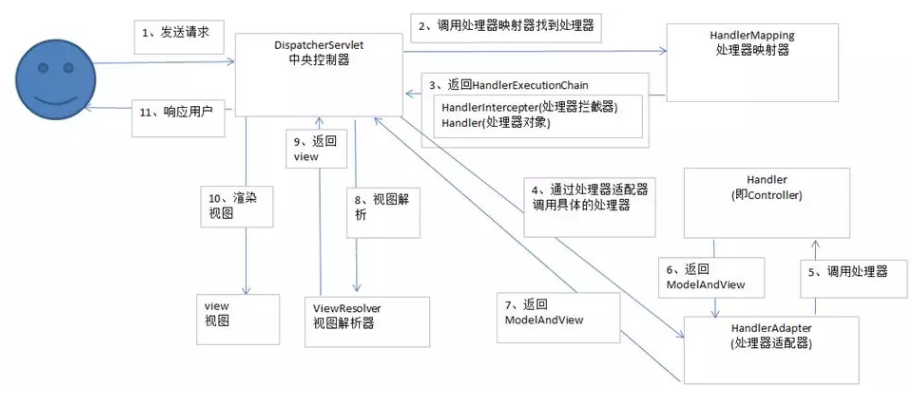
1)用户发送请求至前端控制器DispatcherServlet
2)DispatcherServlet收到请求调用HandlerMapping处理器映射器
3)处理器映射器根据请求url找到具体的处理器,生成处理器对象及处理器拦截器(如果有则生成)一并返回给DispatcherServlet
4)DispatcherServlet通过HandlerAdapter处理器适配器调用处理器
5)执行处理器(Controller,也叫后端控制器)
6)Controller执行完成返回ModelAndView
7)HandlerAdapter将controller执行结果ModelAndView返回给DispatcherServlet
8)DispatcgerServlet将ModelAndView传给ViewReslover视图解析器
9)ViewResolver解析后返回具体View
10)DispatcherServlet对View进行渲染视图(将模型数据填充至视图中)
11)DispatcherServlet响应用户
从上面可以看出,DispatcherServlet有接受请求、响应结果、转发等作用。有了DispatcherServlet之后,可以减少组件之间的耦合度。
2、Spring mvc的9大组件
protected void initStrategies(ApplicationContext context) {

//用于处理上传请求。处理方法是将普通的request包装成MultipartHttpServletRequest,后者可以直接调用getFile方法获取File.

initMultipartResolver(context);

//SpringMVC主要有两个地方用到了Locale:一是ViewResolver视图解析的时候;二是用到国际化资源或者主题的时候。

initLocaleResolver(context);

//用于解析主题。SpringMVC中一个主题对应一个properties文件,里面存放着跟当前主题相关的所有资源、

//如图片、css样式等。SpringMVC的主题也支持国际化,

initThemeResolver(context);

//用来查找Handler的。

initHandlerMappings(context);

//从名字上看,它就是一个适配器。Servlet需要的处理方法的结构却是固定的,都是以request和response为参数的方法。

//如何让固定的Servlet处理方法调用灵活的Handler来进行处理呢?这就是HandlerAdapter要做的事情

initHandlerAdapters(context);

//其它组件都是用来干活的。在干活的过程中难免会出现问题,出问题后怎么办呢?

//这就需要有一个专门的角色对异常情况进行处理,在SpringMVC中就是HandlerExceptionResolver。

initHandlerExceptionResolvers(context);

//有的Handler处理完后并没有设置View也没有设置ViewName,这时就需要从request获取ViewName了,

//如何从request中获取ViewName就是RequestToViewNameTranslator要做的事情了。

initRequestToViewNameTranslator(context);

//ViewResolver用来将String类型的视图名和Locale解析为View类型的视图。

//View是用来渲染页面的,也就是将程序返回的参数填入模板里,生成html(也可能是其它类型)文件。

initViewResolvers(context);

//用来管理FlashMap的,FlashMap主要用在redirect重定向中传递参数。

initFlashMapManager(context);

}
二、自己实现SpringMVC功能分析
以下主要实现SpringMVC的配置加载、实例化扫描的包、HandlerMapping的url映射到对应的Controller的method上,异常的拦截和动态调用后返回结果输出给浏览器的功能。
1、读取配置
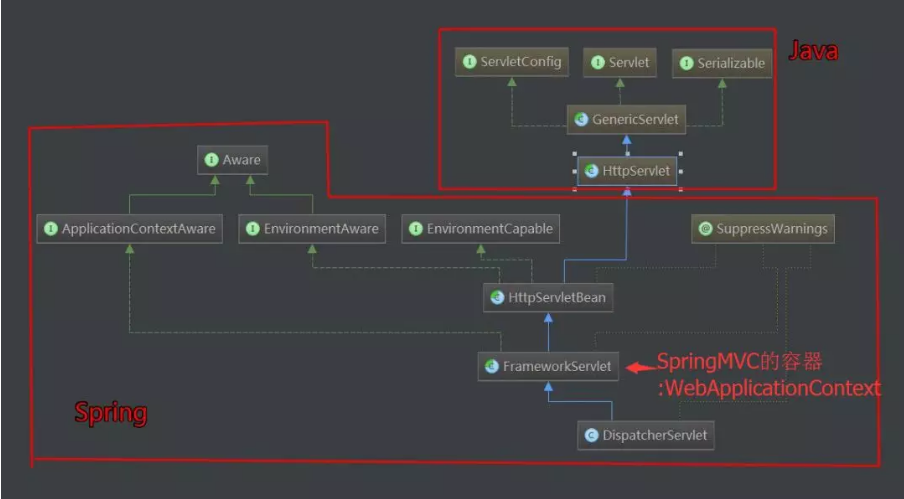
从图中可以看出,SpringMVC本质上是一个Servlet,这个Servlet继承自HttpServlet
FrameworkServlet负责初始化SpringMVC的容器,并将Spring容器设置为父容器。
为了读取web.xml中的配置,我们用到ServletConfig这个类,它代表当前Servlet在web.xml中的配置信息。通过web.xml中加载我们自己写的MyDispatcherServlet和读取配置文件。
2.初始化阶段
由上可知,DispatcherServlet的initStrategies方法会初始化9大组件,但是我们只实现最基本的组件而不是全部。
按顺序包括:
- 加载配置文件
- 扫描用户配置包下面所有的类
- 拿到扫描到的类,通过反射机制,实例化。并且放到ioc容器中(Map的键值对beanName-bean)beanname默认是首字母小写
- 初始化HandlerMapping,这里其实是把url和method对应起来放在一个k-v的Map中,在运行阶段取出
3、运行阶段
每一次请求将会调用doGet或doPost方法,所以统一运行阶段都放在doDispatcher方法里处理,它会根据url请求去HandlerMapping中匹配到对应的Method,然后利用反射机制调用Controller中的url对应的方法,并得到结果返回,按顺序包括如下功能:
- 异常的拦截
- 获取请求传入的参数并处理参数
- 通过初始化好的handlerMapping中拿出url对应的方法名,反射调用
三、写SpringMVC框架
建立maven工程
pom.xml
<project xmlns="http://maven.apache.org/POM/4.0.0" xmlns:xsi="http://www.w3.org/2001/XMLSchema-instance"

  xsi:schemaLocation="http://maven.apache.org/POM/4.0.0 http://maven.apache.org/maven-v4_0_0.xsd">

  <modelVersion>4.0.0</modelVersion>

  <groupId>com.slp</groupId>

  <artifactId>sanglpMVC</artifactId>

  <packaging>war</packaging>

  <version>1.0-SNAPSHOT</version>

  <name>sanglpMVC Maven Webapp</name>

  <url>http://maven.apache.org</url>

  <dependencyManagement>

     <dependencies>

       <dependency>

         <groupId>org.springframework.boot</groupId>

         <artifactId>spring-boot-dependencies</artifactId>

         <version>1.5.9.RELEASE</version>

       </dependency>

     </dependencies>

  </dependencyManagement>

  <dependencies>

    <dependency>

      <groupId>junit</groupId>

      <artifactId>junit</artifactId>

      <version>3.8.1</version>

      <scope>test</scope>

    </dependency>

    <!-- https://mvnrepository.com/artifact/org.springframework.boot/spring-boot-starter-web -->

    <dependency>

      <groupId>org.springframework.boot</groupId>

      <artifactId>spring-boot-starter-web</artifactId>

      <version>1.5.9.RELEASE</version>

    </dependency>

  </dependencies>

  <build>

    <finalName>sanglpMVC</finalName>

  </build>

</project>
web.xml
<!DOCTYPE web-app PUBLIC

 "-//Sun Microsystems, Inc.//DTD Web Application 2.3//EN"

 "http://java.sun.com/dtd/web-app_2_3.dtd" >

<web-app>

  <display-name>Archetype Created Web Application</display-name>

  <servlet>

    <servlet-name>MySpringMVC</servlet-name>

    <servlet-class>com.slp.servlet.MyDispatcherServlet</servlet-class>

    <init-param>

      <param-name>contextConfigLocation</param-name>

      <param-value>classpath:application.properties</param-value>

    </init-param>

  </servlet>

  <servlet-mapping>

    <servlet-name>MySpringMVC</servlet-name>

    <url-pattern>/*</url-pattern>

  </servlet-mapping>

</web-app>
application.properties
scanPackage=com.slp.core
注解:
package com.slp.annotation;

import java.lang.annotation.*;

/**

 * @author sanglp

 * @create 2018-03-16 14:18

 * @desc 自定义控制器注解

 **/

@Target(ElementType.TYPE)

@Retention(RetentionPolicy.RUNTIME)

@Documented

public @interface MyController {

    /**

     * 表示给controller注册别名

     * @return

     */

    String value() default "";

}
package com.slp.annotation;

import java.lang.annotation.*;

/**

 * @author sanglp

 * @create 2018-03-16 14:20

 * @desc 自定义映射注解,类和方法上

 **/

@Target({ElementType.TYPE,ElementType.METHOD})

@Retention(RetentionPolicy.RUNTIME)

@Documented

public @interface MyRequestMapping {

    /**

     * 表示该方法的url

     * @return

     */

    String value() default "";

}
package com.slp.annotation;

import java.lang.annotation.*;

/**

 * @author sanglp

 * @create 2018-03-16 14:20

 * @desc 自定义请求参数注解 只能在方法上

 **/

@Target({ElementType.PARAMETER})

@Retention(RetentionPolicy.RUNTIME)

@Documented

public @interface MyRequestParam {

    /**

     * 表示参数的别名 必填

     * @return

     */

    String value();

}
测试控制类
package com.slp.core.controller;

import com.slp.annotation.MyController;

import com.slp.annotation.MyRequestMapping;

import com.slp.annotation.MyRequestParam;

import javax.servlet.http.HttpServletRequest;

import javax.servlet.http.HttpServletResponse;

import java.io.IOException;

/**

 * @author sanglp

 * @create 2018-03-16 14:20

 * @desc 控制器测试

 **/

@MyController

@MyRequestMapping("/test")

public class TestController {

    @MyRequestMapping("/doTest")

    public void test1(HttpServletRequest request, HttpServletResponse response,

                      @MyRequestParam("param") String param){

        System.out.println(param);

        try {

            response.getWriter().write( "doTest method success! param:"+param);

        } catch (IOException e) {

            e.printStackTrace();

        }

    }

    @MyRequestMapping("/doTest2")

    public void test2(HttpServletRequest request, HttpServletResponse response){

        try {

            response.getWriter().println("doTest2 method success!");

        } catch (IOException e) {

            e.printStackTrace();

        }

    }

}
转发控制器:
package com.slp.servlet;

import com.slp.annotation.MyController;

import com.slp.annotation.MyRequestMapping;

import javax.servlet.ServletConfig;

import javax.servlet.ServletException;

import javax.servlet.http.HttpServlet;

import javax.servlet.http.HttpServletRequest;

import javax.servlet.http.HttpServletResponse;

import java.io.File;

import java.io.IOException;

import java.io.InputStream;

import java.lang.reflect.Method;

import java.net.URL;

import java.util.*;

/**

 * @author sanglp

 * @create 2018-03-16 14:19

 * @desc 自定义转发器

 **/

public class MyDispatcherServlet extends HttpServlet {

    private Properties properties = new Properties();

    private List<String> classNames = new ArrayList<String>();

    private Map<String, Object> ioc = new HashMap<String,Object>();

    private Map<String, Method> handlerMapping = new  HashMap<String, Method>();

    private Map<String, Object> controllerMap  =new HashMap<String, Object>();

    @Override

    public void init(ServletConfig config) throws ServletException{

        //1.加载配置文件

        System.out.println("configLocation:"+config.getInitParameter("contextConfigLocation"));

        //doLoadConfig(config.getInitParameter("contextConfigLocation"));

        doLoadConfig("application.properties");

        //2.初始化所有相关联的类,扫描用户设定的包下面所有的类

        doScanner(properties.getProperty("scanPackage"));

        //3.拿到扫描到的类,通过反射机制,实例化,并且放到ioc容器中(k-v  beanName-bean) beanName默认是首字母小写

        doInstance();

        //4.初始化HandlerMapping(将url和method对应上)

        initHandlerMapping();

    }

    @Override

    protected void doGet(HttpServletRequest req, HttpServletResponse resp) throws ServletException, IOException {

        this.doGet(req, resp);

    }

    @Override

    protected void doPost(HttpServletRequest req, HttpServletResponse resp) throws ServletException, IOException {

        //处理请求

        try {

            this.doDispatch(req,resp);

        } catch (Exception e) {

            e.printStackTrace();

        }

    }

    private void doDispatch(HttpServletRequest req, HttpServletResponse resp) throws Exception {

        if(handlerMapping.isEmpty()){

            return;

        }

        String url =req.getRequestURI();

        String contextPath = req.getContextPath();

        url=url.replace(contextPath, "").replaceAll("/+", "/");

        if(!this.handlerMapping.containsKey(url)){

            resp.getWriter().write("404 NOT FOUND!");

            return;

        }

        Method method =this.handlerMapping.get(url);

//获取方法的参数列表

        Class<?>[] parameterTypes = method.getParameterTypes();

//获取请求的参数

        Map<String, String[]> parameterMap = req.getParameterMap();

//保存参数值

        Object [] paramValues= new Object[parameterTypes.length];

//方法的参数列表

        for (int i = 0; i<parameterTypes.length; i++){

            //根据参数名称,做某些处理

            String requestParam = parameterTypes[i].getSimpleName();

            if (requestParam.equals("HttpServletRequest")){

                //参数类型已明确,这边强转类型

                paramValues[i]=req;

                continue;

            }

            if (requestParam.equals("HttpServletResponse")){

                paramValues[i]=resp;

                continue;

            }

            if(requestParam.equals("String")){

                for (Map.Entry<String, String[]> param : parameterMap.entrySet()) {

                    String value =Arrays.toString(param.getValue()).replaceAll("[|]", "").replaceAll(",s", ",");

                    paramValues[i]=value;

                }

            }

        }

//利用反射机制来调用

        try {

            method.invoke(this.controllerMap.get(url), paramValues);//obj是method所对应的实例 在ioc容器中

        } catch (Exception e) {

            e.printStackTrace();

        }

    }

    private void  doLoadConfig(String location){

//把web.xml中的contextConfigLocation对应value值的文件加载到留里面

        InputStream resourceAsStream = this.getClass().getClassLoader().getResourceAsStream(location);

        try {

//用Properties文件加载文件里的内容

            properties.load(resourceAsStream);

        } catch (IOException e) {

            e.printStackTrace();

        }finally {

//关流

            if(null!=resourceAsStream){

                try {

                    resourceAsStream.close();

                } catch (IOException e) {

                    e.printStackTrace();

                }

            }

        }

    }

    private void doScanner(String packageName) {

        System.out.println("packageName:"+packageName);

//把所有的.替换成/

        URL url  =this.getClass().getClassLoader().getResource("/"+packageName.replaceAll(".", "/"));

        System.out.println("url:"+url);

        File dir = new File(url.getFile());

        System.out.println("dir.listFiles():"+dir.exists() +" "+dir.getName()+" "+ dir.listFiles());

        for (File file : dir.listFiles()) {

            if(file.isDirectory()){

//递归读取包

                doScanner(packageName+"."+file.getName());

            }else{

                String className =packageName +"." +file.getName().replace(".class", "");

                classNames.add(className);

            }

        }

    }

    private void doInstance() {

        if (classNames.isEmpty()) {

            return;

        }

        for (String className : classNames) {

            try {

//把类搞出来,反射来实例化(只有加@MyController需要实例化)

                Class<?> clazz =Class.forName(className);

                if(clazz.isAnnotationPresent(MyController.class)){

                    ioc.put(toLowerFirstWord(clazz.getSimpleName()),clazz.newInstance());

                }else{

                    continue;

                }

            } catch (Exception e) {

                e.printStackTrace();

                continue;

            }

        }

    }

    private void initHandlerMapping(){

        if(ioc.isEmpty()){

            return;

        }

        try {

            for (Map.Entry<String, Object> entry: ioc.entrySet()) {

                Class<? extends Object> clazz = entry.getValue().getClass();

                if(!clazz.isAnnotationPresent(MyController.class)){

                    continue;

                }

//拼url时,是controller头的url拼上方法上的url

                String baseUrl ="";

                if(clazz.isAnnotationPresent(MyRequestMapping.class)){

                    MyRequestMapping annotation = clazz.getAnnotation(MyRequestMapping.class);

                    baseUrl=annotation.value();

                }

                Method[] methods = clazz.getMethods();

                for (Method method : methods) {

                    if(!method.isAnnotationPresent(MyRequestMapping.class)){

                        continue;

                    }

                    MyRequestMapping annotation = method.getAnnotation(MyRequestMapping.class);

                    String url = annotation.value();

                    url =(baseUrl+"/"+url).replaceAll("/+", "/");

                    handlerMapping.put(url,method);

                    controllerMap.put(url,clazz.newInstance());

                    System.out.println(url+","+method);

                }

            }

        } catch (Exception e) {

            e.printStackTrace();

        }

    }

    /**

     * 把字符串的首字母小写

     * @param name

     * @return

     */

    private String toLowerFirstWord(String name){

        char[] charArray = name.toCharArray();

        charArray[0] += 32;

        return String.valueOf(charArray);

    }

}
四、自定义注解
@Target({ElementType.METHOD,ElementType.TYPE})

@Retention(RetentionPolicy.RUNTIME)

@Inherited

@Documented

public @interface Description {

    String description();

    String author();

    int age() default 10;

}
首先这不是一个接口它是使用时@interface关键字定义的一个注解。然后我们看下面的几个方法:String description(),虽然他很类似于接口中的方法,其实它在注解里面只是一个成员变量(成员以无参无异常的方式声明),int age() default 10;(变量可以设定默认值)。
最后:成员类型是受限制的,合法的类型包括基本的数据类型以及String ,Class Annotation Enummeration等
如果注解只有一个成员,则成员名必须取名为value() 在使用时可以忽略成员名和赋值号
注解类可以没有成员,没有成员的注解称为标志注解
元注解:
@Target({ElementType.METHOD,ElementType.TYPE})

@Retention(RetentionPolicy.RUNTIME)

@Inherited

@Documented
@Target是这个注解的作用域,有
public enum ElementType {

    /** Class, interface (including annotation type), or enum declaration */

    TYPE,

    /** Field declaration (includes enum constants) */

    FIELD,

    /** Method declaration */

    METHOD,

    /** Formal parameter declaration */

    PARAMETER,

    /** Constructor declaration */

    CONSTRUCTOR,

    /** Local variable declaration */

    LOCAL_VARIABLE,

    /** Annotation type declaration */

    ANNOTATION_TYPE,

    /** Package declaration */

    PACKAGE,

    /**

     * Type parameter declaration

     *

     * @since 1.8

     */

    TYPE_PARAMETER,

    /**

     * Use of a type

     *

     * @since 1.8

     */

    TYPE_USE

}
@Retention是它的生命周期
public enum RetentionPolicy {

    /**

     * Annotations are to be discarded by the compiler.

     */

    SOURCE,

    /**

     * Annotations are to be recorded in the class file by the compiler

     * but need not be retained by the VM at run time.  This is the default

     * behavior.

     */

    CLASS,

    /**

     * Annotations are to be recorded in the class file by the compiler and

     * retained by the VM at run time, so they may be read reflectively.

     *

     * @see java.lang.reflect.AnnotatedElement

     */

    RUNTIME

}
@Inherited是标识性的元注解,它允许子注解继承他
@Documented,生成javadoc时会包含注解
/**

 * Indicates that annotations with a type are to be documented by javadoc

 * and similar tools by default.  This type should be used to annotate the

 * declarations of types whose annotations affect the use of annotated

 * elements by their clients.  If a type declaration is annotated with

 * Documented, its annotations become part of the public API

 * of the annotated elements.

 *

 * @author  Joshua Bloch

 * @since 1.5

 */

@Documented

@Retention(RetentionPolicy.RUNTIME)

@Target(ElementType.ANNOTATION_TYPE)

public @interface Documented {

}
【Spring系列】自己手写一个 SpringMVC 框架的更多相关文章
- Spring系列之手写一个SpringMVC
目录 Spring系列之IOC的原理及手动实现 Spring系列之DI的原理及手动实现 Spring系列之AOP的原理及手动实现 Spring系列之手写注解与配置文件的解析 引言 在前面的几个章节中我 ...
- 看年薪50W的架构师如何手写一个SpringMVC框架
前言 做 Java Web 开发的你,一定听说过SpringMVC的大名,作为现在运用最广泛的Java框架,它到目前为止依然保持着强大的活力和广泛的用户群. 本文介绍如何用eclipse一步一步搭建S ...
- 自己手写一个SpringMVC 框架
一.了解SpringMVC运行流程及九大组件 1.SpringMVC 的运行流程 · 用户发送请求至前端控制器DispatcherServlet · DispatcherServlet收到请求调用 ...
- 自己手写一个SpringMVC框架
前端框架很多,但没有一个框架称霸,后端框架现在Spring已经完成大一统.所以学习Spring是Java程序员的必修课. Spring框架对于Java后端程序员来说再熟悉不过了,以前只知道它用的反射实 ...
- 手写一个SpringMVC框架(转)
一:梳理SpringMVC的设计思路 本文只实现自己的@Controller.@RequestMapping.@RequestParam注解起作用,其余SpringMVC功能读者可以尝试自己实现. 1 ...
- 剖析手写Vue,你也可以手写一个MVVM框架
剖析手写Vue,你也可以手写一个MVVM框架# 邮箱:563995050@qq.com github: https://github.com/xiaoqiuxiong 作者:肖秋雄(eddy) 温馨提 ...
- 手写迷你SpringMVC框架
前言 学习如何使用Spring,SpringMVC是很快的,但是在往后使用的过程中难免会想探究一下框架背后的原理是什么,本文将通过讲解如何手写一个简单版的springMVC框架,直接从代码上看框架中请 ...
- 【Spring系列】- 手写模拟Spring框架
简单模拟Spring 生命不息,写作不止 继续踏上学习之路,学之分享笔记 总有一天我也能像各位大佬一样 一个有梦有戏的人 @怒放吧德德 分享学习心得,欢迎指正,大家一起学习成长! 前言 上次已经学习了 ...
- Spring系列之手写注解与配置文件的解析
目录 Spring系列之IOC的原理及手动实现 Spring系列之DI的原理及手动实现 Spring系列之AOP的原理及手动实现 引入 在前面我们已经完成了IOC,DI,AOP的实现,基本的功能都已经 ...
随机推荐
- 动态规划 POJ3616 Milking Time
#include <iostream> #include <cstdio> #include <algorithm> using namespace std; st ...
- hdu5863 cjj's string game
矩阵快速幂 #include<bits/stdc++.h> using namespace std; const int INF = 0x3f3f3f3f; const int MOD = ...
- CSS3 column属性
css3 column属性的应用 1.案例源码 <!DOCTYPE html><html lang="en"><head> <meta c ...
- JavaScript函数与对象
函数 函数的定义 JavaScript中的函数和Python中的非常类似,只是定义方式有点区别. // 普通函数定义 function f1() { console.log("Hello w ...
- 【BZOJ1030】文本生成器(AC自动机,动态规划)
[BZOJ1030]文本生成器(AC自动机,动态规划) 题面 BZOJ 题解 超级简单良心送分题 很明显是所有状态-不合法状态 合法状态就是\(26^m\) 不合法状态做一个\(dp\)就好 #inc ...
- [BZOJ2503][HAOI2006]均分数据
BZOJ Luogu sol 如果已经确定了一个序列,现要求把这个序列分成m个连续段作为答案,那么就可以用一个显而易见的DP DP显然可以得到当前序列下的最优解. 所以模拟退火瞎JB改一改序列每次DP ...
- Git知识总览(六) Git分支中的远程操作实践
前几篇博客陆陆续续的讲了好多关于Git操作的内容,本篇博客仍然也不例外,不过本篇博客的主题是关于git的远程操作的.依照之前博客的风格,我们依然依托于LearningGitBranch中的相关内容来探 ...
- iOS学习——UIPickerView的实现年月选择器
最近项目上需要用到一个选择器,选择器中的内容只有年和月,而在iOS系统自带的日期选择器UIDatePicker中却只有四个选项如下,分别是时间(时分秒).日期(年月日).日期+时间(年月日时分)以及倒 ...
- 28.Django cookie
概述 1.获取cookie request.COOKIES['key'] request.COOKIES.get('key') request.get_signed_cookie(key, defau ...
- MongoDB系列一(查询).
一.简述 MongoDB中使用find来进行查询.查询就是返回一个集合中文档的子集,子集合的范围从0个文档到整个集合.默认情况下,"_id"这个键总是被返回,即便是没有指定要返回这 ...