WMS—启动过程
基于Android 6.0源码, 分析WMS的启动过程。
一. 概述
- Surface:代表画布
- WMS: 添加window的过程主要功能是添加Surface,管理所有的Surface布局,以及Z轴排序问题;
- SurfaceFinger: 将Surface按次序混合并显示到物理屏幕上;
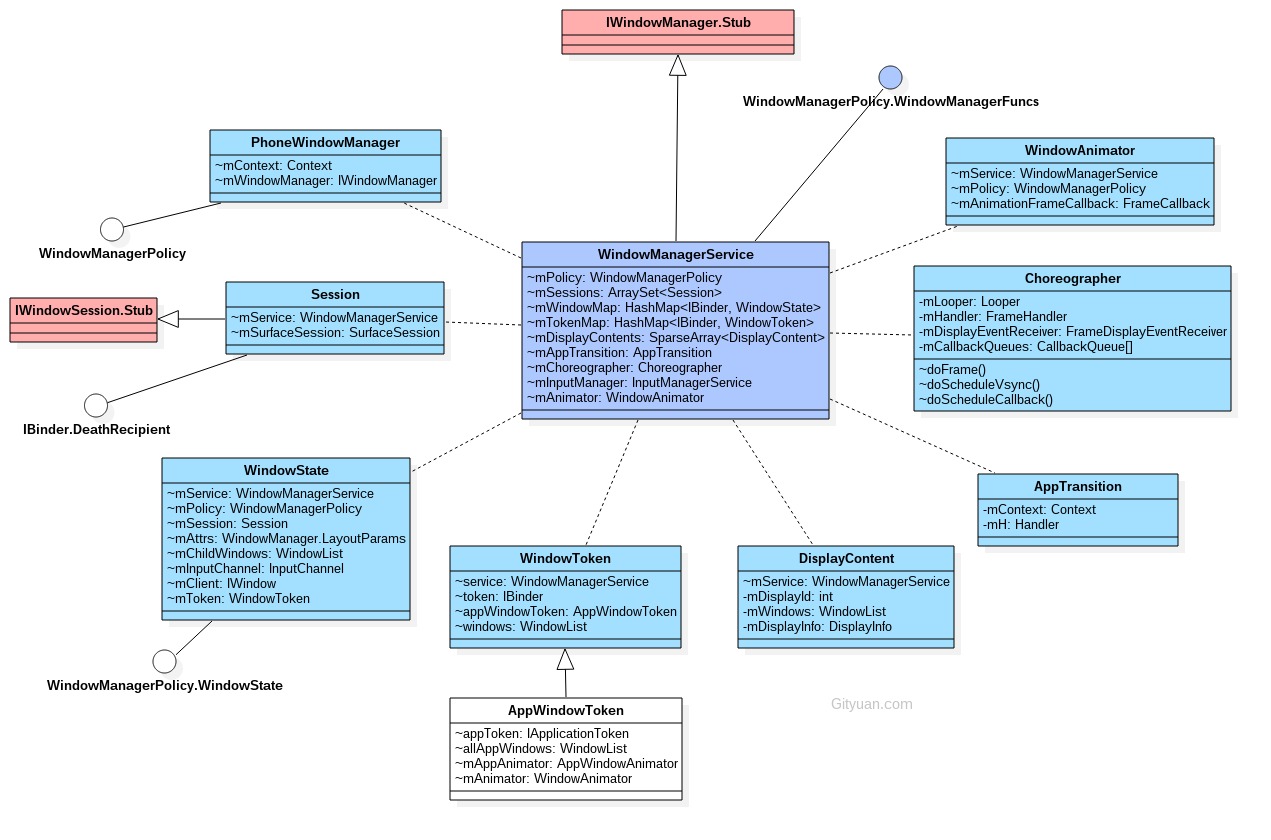
1.1 WMS全貌

- WMS继承于
IWindowManager.Stub, 作为Binder服务端; - WMS的成员变量mSessions保存着所有的Session对象,Session继承于
IWindowSession.Stub, 作为Binder服务端; - 成员变量mPolicy: 实例对象为PhoneWindowManager,用于实现各种窗口相关的策略;
- 成员变量mChoreographer: 用于控制窗口动画,屏幕旋转等操作;
- 成员变量mDisplayContents: 记录一组DisplayContent对象,这个跟多屏输出相关;
- 成员变量mTokenMap: 保存所有的WindowToken对象; 以IBinder为key,可以是IAppWindowToken或者其他Binder的Bp端;
- 另一端情况:ActivityRecord.Token extends IApplicationToken.Stub
- 成员变量mWindowMap: 保存所有的WindowState对象;以IBinder为key, 是IWindow的Bp端;
- 另一端情况: ViewRootImpl.W extends IWindow.Stub
- 一般地,每一个窗口都对应一个WindowState对象, 该对象的成员变量mClient用于跟应用端交互,成员变量mToken用于跟AMS交互.
二. 启动过程
private void startOtherServices() {

    ...

    // [见小节2.1]

    WindowManagerService wm = WindowManagerService.main(context, inputManager,

    mFactoryTestMode != FactoryTest.FACTORY_TEST_LOW_LEVEL,

    !mFirstBoot, mOnlyCore);

    wm.displayReady(); // [见小节2.5]

    ...

    wm.systemReady(); // [见小节2.6]

}
2.1 WMS.main
[-> WindowManagerService.java]
public static WindowManagerService main(final Context context, final InputManagerService im, final boolean haveInputMethods, final boolean showBootMsgs, final boolean onlyCore) {

    final WindowManagerService[] holder = new WindowManagerService[];

    DisplayThread.getHandler().runWithScissors(new Runnable() {

        public void run() {

            //运行在"android.display"线程[见小节2.2]

            holder[] = new WindowManagerService(context, im,

                    haveInputMethods, showBootMsgs, onlyCore);

        }

    }, );

    return holder[];

}
2.2 WindowManagerService
 private WindowManagerService(Context context, InputManagerService inputManager, boolean haveInputMethods, boolean showBootMsgs, boolean onlyCore) {

     mContext = context;

     mHaveInputMethods = haveInputMethods;

     mAllowBootMessages = showBootMsgs;

     mOnlyCore = onlyCore;

     ...

     mInputManager = inputManager;

     mDisplayManagerInternal = LocalServices.getService(DisplayManagerInternal.class);

     mDisplaySettings = new DisplaySettings();

     mDisplaySettings.readSettingsLocked();

     LocalServices.addService(WindowManagerPolicy.class, mPolicy);

     mPointerEventDispatcher = new PointerEventDispatcher(mInputManager.monitorInput(TAG));

     mFxSession = new SurfaceSession();

     mDisplayManager = (DisplayManager)context.getSystemService(Context.DISPLAY_SERVICE);

     mDisplays = mDisplayManager.getDisplays();

     for (Display display : mDisplays) {

         //创建DisplayContent[见小节2.2.1]

         createDisplayContentLocked(display);

     }

     mKeyguardDisableHandler = new KeyguardDisableHandler(mContext, mPolicy);

     ...

     mAppTransition = new AppTransition(context, mH);

     mAppTransition.registerListenerLocked(mActivityManagerAppTransitionNotifier);

     mActivityManager = ActivityManagerNative.getDefault();

     ...

     mAnimator = new WindowAnimator(this);

     LocalServices.addService(WindowManagerInternal.class, new LocalService());

     //初始化策略[见小节2.3]

     initPolicy();

     Watchdog.getInstance().addMonitor(this);

     SurfaceControl.openTransaction();

     try {

         createWatermarkInTransaction();

         mFocusedStackFrame = new FocusedStackFrame(

                 getDefaultDisplayContentLocked().getDisplay(), mFxSession);

     } finally {

         SurfaceControl.closeTransaction();

     }

     updateCircularDisplayMaskIfNeeded();

     showEmulatorDisplayOverlayIfNeeded();

 }
在“android.display”线程中执行WindowManagerService对象的初始化过程,其中final H mH = new H();此处H继承于Handler,无参初始化的过程,便会采用当前所在线程 的Looper。那就是说WindowManagerService.H.handleMessage()方法运行在“android.display”线程。
2.2.1 WMS.createDisplayContentLocked
public DisplayContent getDisplayContentLocked(final int displayId) {

    DisplayContent displayContent = mDisplayContents.get(displayId);

    if (displayContent == null) {

        final Display display = mDisplayManager.getDisplay(displayId);

        if (display != null) {

            displayContent = newDisplayContentLocked(display);

        }

    }

    return displayContent;

}
创建DisplayContent,用于支持多屏幕的功能.比如目前除了本身真实的屏幕之外,还有Wifi display虚拟屏幕.
2.3 WMS.initPolicy
rivate void initPolicy() {

    //运行在"android.ui"线程

    UiThread.getHandler().runWithScissors(new Runnable() {

        public void run() {

            WindowManagerPolicyThread.set(Thread.currentThread(), Looper.myLooper());

            //此处mPolicy为PhoneWindowManager.[见小节2.4]

            mPolicy.init(mContext, WindowManagerService.this, WindowManagerService.this);

        }

    }, );

}
2.3.1 Handler.runWithScissors
[-> Handler.java]
public final boolean runWithScissors(final Runnable r, long timeout) {

    //当前线程跟当前Handler都指向同一个Looper,则直接运行

    if (Looper.myLooper() == mLooper) {

        r.run();

        return true;

    }

    BlockingRunnable br = new BlockingRunnable(r);

    //[见小节2.3.2]

    return br.postAndWait(this, timeout);

}
2.3.2 postAndWait
[-> Handler.java ::BlockingRunnable]
 private static final class BlockingRunnable implements Runnable {

     private final Runnable mTask;

     private boolean mDone;

     public BlockingRunnable(Runnable task) {

         mTask = task;

     }

     public void run() {

         try {

             mTask.run();

         } finally {

             synchronized (this) {

                 mDone = true;

                 notifyAll();

             }

         }

     }

     public boolean postAndWait(Handler handler, long timeout) {

         if (!handler.post(this)) {

             return false;

         }

         synchronized (this) {

             if (timeout > ) {

                 final long expirationTime = SystemClock.uptimeMillis() + timeout;

                 while (!mDone) {

                     long delay = expirationTime - SystemClock.uptimeMillis();

                     if (delay <= ) {

                         return false; // timeout

                     }

                     try {

                         wait(delay);

                     } catch (InterruptedException ex) {

                     }

                 }

             } else {

                 while (!mDone) {

                     try {

                         wait();

                     } catch (InterruptedException ex) {

                     }

                 }

             }

         }

         return true;

     }

 }
由此可见, BlockingRunnable.postAndWait()方法是阻塞操作,就是先将消息放入Handler所指向的线程, 此处是指”android.ui”线程, 由于该方法本身运行在”android.display”线程. 也就意味着”android.display”线程会进入等待状态, 直到handler线程执行完成后再唤醒”android.display”线程. 那么PWM.init()便是运行在”android.ui”线程,属于同步阻塞操作.
2.4 PWM.init
[-> PhoneWindowManager.java]
 public void init(Context context, IWindowManager windowManager, WindowManagerFuncs windowManagerFuncs) {

     mContext = context;

     mWindowManager = windowManager;

     mWindowManagerFuncs = windowManagerFuncs;

     mWindowManagerInternal = LocalServices.getService(WindowManagerInternal.class);

     mActivityManagerInternal = LocalServices.getService(ActivityManagerInternal.class);

     mDreamManagerInternal = LocalServices.getService(DreamManagerInternal.class);

     mPowerManagerInternal = LocalServices.getService(PowerManagerInternal.class);

     mAppOpsManager = (AppOpsManager) mContext.getSystemService(Context.APP_OPS_SERVICE);

     ...

     mHandler = new PolicyHandler(); //运行在"android.ui"线程

     mWakeGestureListener = new MyWakeGestureListener(mContext, mHandler);

     mOrientationListener = new MyOrientationListener(mContext, mHandler);

     ...

     mPowerManager = (PowerManager)context.getSystemService(Context.POWER_SERVICE);

     mBroadcastWakeLock = mPowerManager.newWakeLock(PowerManager.PARTIAL_WAKE_LOCK,

             "PhoneWindowManager.mBroadcastWakeLock");

     mPowerKeyWakeLock = mPowerManager.newWakeLock(PowerManager.PARTIAL_WAKE_LOCK,

             "PhoneWindowManager.mPowerKeyWakeLock");

     ...

     mGlobalKeyManager = new GlobalKeyManager(mContext);

     ...

     if (!mPowerManager.isInteractive()) {

         startedGoingToSleep(WindowManagerPolicy.OFF_BECAUSE_OF_USER);

         finishedGoingToSleep(WindowManagerPolicy.OFF_BECAUSE_OF_USER);

     }

     mWindowManagerInternal.registerAppTransitionListener(

             mStatusBarController.getAppTransitionListener());

 }
前面小节[2.1 ~ 2.4]介绍了WMS.main()方法, 接下来便是开始执行WMS.displayReady().
2.5 WMS.displayReady
 public void displayReady() {

     for (Display display : mDisplays) {

         displayReady(display.getDisplayId());

     }

     synchronized(mWindowMap) {

         final DisplayContent displayContent = getDefaultDisplayContentLocked();

         readForcedDisplayPropertiesLocked(displayContent);

         mDisplayReady = true;

     }

     mActivityManager.updateConfiguration(null);

     synchronized(mWindowMap) {

         mIsTouchDevice = mContext.getPackageManager().hasSystemFeature(

                 PackageManager.FEATURE_TOUCHSCREEN);

         configureDisplayPolicyLocked(getDefaultDisplayContentLocked());

     }

     mActivityManager.updateConfiguration(null);

 }
2.6 WMS.systemReady
public void systemReady() {

    mPolicy.systemReady();

}
2.6.1 PWM.systemReady
[-> PhoneWindowManager.java]
 public void systemReady() {

     mKeyguardDelegate = new KeyguardServiceDelegate(mContext);

     mKeyguardDelegate.onSystemReady();

     readCameraLensCoverState();

     updateUiMode();

     boolean bindKeyguardNow;

     synchronized (mLock) {

         updateOrientationListenerLp();

         mSystemReady = true;

         mHandler.post(new Runnable() {

             public void run() {

                 updateSettings();

             }

         });

         bindKeyguardNow = mDeferBindKeyguard;

         if (bindKeyguardNow) {

             mDeferBindKeyguard = false;

         }

     }

     if (bindKeyguardNow) {

         mKeyguardDelegate.bindService(mContext);

         mKeyguardDelegate.onBootCompleted();

     }

     mSystemGestures.systemReady();

 }
三. 总结
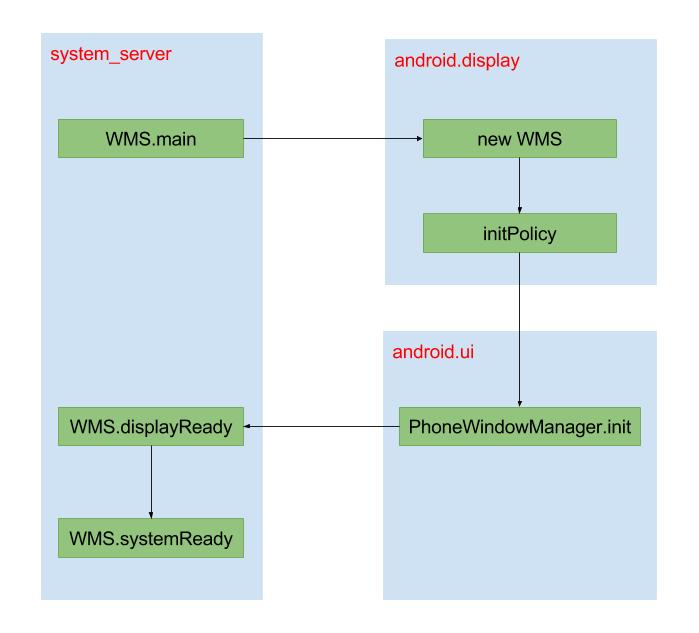
整个启动过程涉及3个线程: system_server主线程, “android.display”, “android.ui”, 整个过程是采用阻塞方式(利用Handler.runWithScissors)执行的. 其中WindowManagerService.mH的Looper运行在 “android.display”进程,也就意味着WMS.H.handleMessage()在该线程执行。 流程如下:

WMS—启动过程的更多相关文章
- Android10_原理机制系列_Window介绍及WMS的启动过程
简介 Window简介 Android中,Window是一个重要部分,用户看到的界面.触摸显示界面进行一系列操作都涉及到Window.但实际上,Window本身并不具备绘制功能. 该篇简单介绍下Win ...
- Android 启动过程简析
首先我们先来看android构架图: android系统是构建在linux系统上面的. 所以android设备启动经历3个过程. Boot Loader,Linux Kernel & Andr ...
- Zygote和System进程的启动过程
##init脚本的启动 +------------+ +-------+ +-----------+ |Linux Kernel+--> |init.rc+-> |app_process| ...
- Zygote和System进程的启动过程、Android应用进程启动过程
1.基本过程 init脚本的启动Zygote Zygote进程的启动 System进程的启动 Android应用进程启动过程 2.init脚本的启动 +------------+ +-------+ ...
- google 分屏 横屏模式 按home键界面错乱故障分析(二) 分屏的启动过程
google 进入分屏后在横屏模式按home键界面错乱(二) 你确定你了解分屏的整个流程? imageMogr2/auto-orient/strip%7CimageView2/2/w/1240&quo ...
- zookeeper源码分析之一服务端启动过程
zookeeper简介 zookeeper是为分布式应用提供分布式协作服务的开源软件.它提供了一组简单的原子操作,分布式应用可以基于这些原子操作来实现更高层次的同步服务,配置维护,组管理和命名.zoo ...
- [原] KVM 虚拟化原理探究(2)— QEMU启动过程
KVM 虚拟化原理探究- QEMU启动过程 标签(空格分隔): KVM [TOC] 虚拟机启动过程 第一步,获取到kvm句柄 kvmfd = open("/dev/kvm", O_ ...
- Openfire的启动过程与session管理
说明 本文源码基于Openfire4.0.2. Openfire的启动 Openfire的启动过程非常的简单,通过一个入口初始化lib目录下的openfire.jar包,并启动一个 ...
- 探索 Linux 系统的启动过程
引言 之所以想到写这些东西,那是因为我确实想让大家也和我一样,把 Linux 桌面系统打造成真真正正日常使用的工具,而不是安装之后试用几把再删掉.我是真的在日常生活和工作中都使用 Linux,比如在 ...
随机推荐
- MyEclipse2015上传项目到GitHub(很详细)
MyEclipse 2015 默认已经安装了git插件,在MyEclipse中上传项目到github的步骤如下: 1.github官网(https://github.com)申请开通账号(略) 1.1 ...
- Angular整合zTree
1 前提准备 1.1 新建一个angular4项目 参考博文:点击前往 1.2 去zTree官网下载zTree zTree官网:点击前往 三少使用的版本:点击前往 2 编程步骤 从打印出zTree对象 ...
- 我使用 Docker 部署 Celery 遇到的问题
问题1 - Sending due task 本机测试时没有问题的,但是在线上 docker 中,任务一直显示 "Sending due task".超时的任务是 Django O ...
- 2017广东工业大学程序设计竞赛初赛 题解&源码(A,水 B,数学 C,二分 D,枚举 E,dp F,思维题 G,字符串处理 H,枚举)
Problem A: An easy problem Description Peter Manson owned a small house in an obscure street. It was ...
- hihoCoder #1053 : 居民迁移(贪心,二分搜索,google在线技术笔试模拟)
#1053 : 居民迁移 时间限制:3000ms 单点时限:1000ms 内存限制:256MB 描述 公元2411年,人类开始在地球以外的行星建立居住点.在第1326号殖民星上,N个居住点分布在一条直 ...
- hdu_1754I Hate It(线段树)
hdu_1754I Hate It(线段树) 标签: 线段树 题目链接 题意: 中文题意...不多说了,线段树基础题 直接上代码: #include<cstdio> #include< ...
- Codeforces Round #331 (Div. 2) _A. Wilbur and Swimming Pool
A. Wilbur and Swimming Pool time limit per test 1 second memory limit per test 256 megabytes input s ...
- android新闻App源码、仿微信源码、地图音乐源码等
Android精选源码 一款实用的休闲类App,新闻视频和技术应有尽有. android实现交互式K线图表源码 android新闻客户端和服务器源码 android MatetialDesign设计 ...
- ehcachexml文件解释
怎么修改默认配置
- i++是否原子操作?并解释为什么?
都不是原子操作.理由: 1.i++分为三个阶段: 内存到寄存器寄存器自增写回内存这三个阶段中间都可以被中断分离开. 2.++i首先要看编译器是怎么编译的, 某些编译器比如VC在非优化版本中会编译为以 ...
