HWPushDemo【华为推送集成,基于2.6.1.301版本】
版权声明:本文为HaiyuKing原创文章,转载请注明出处!
前言
这个Demo只是记录华为推送的集成,不能运行。
另外,因为可能用到存储权限,所以还需要搭配运行时权限申请功能。
使用步骤
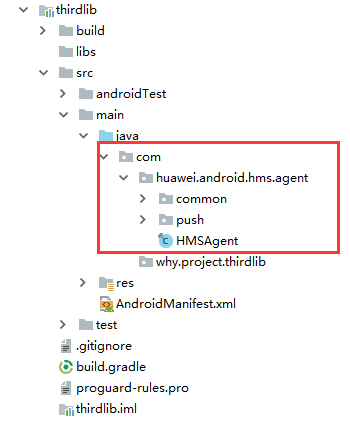
一、项目组织结构图
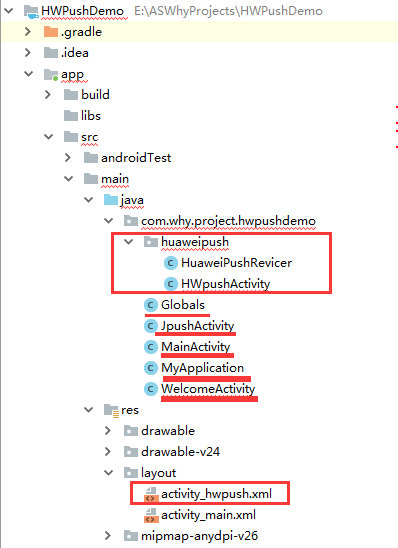
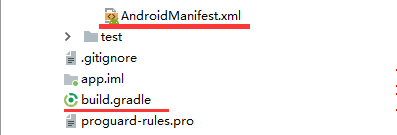
注意事项:
1、 导入类文件后需要change包名以及重新import R文件路径
2、 Values目录下的文件(strings.xml、dimens.xml、colors.xml等),如果项目中存在,则复制里面的内容,不要整个覆盖
二、导入步骤
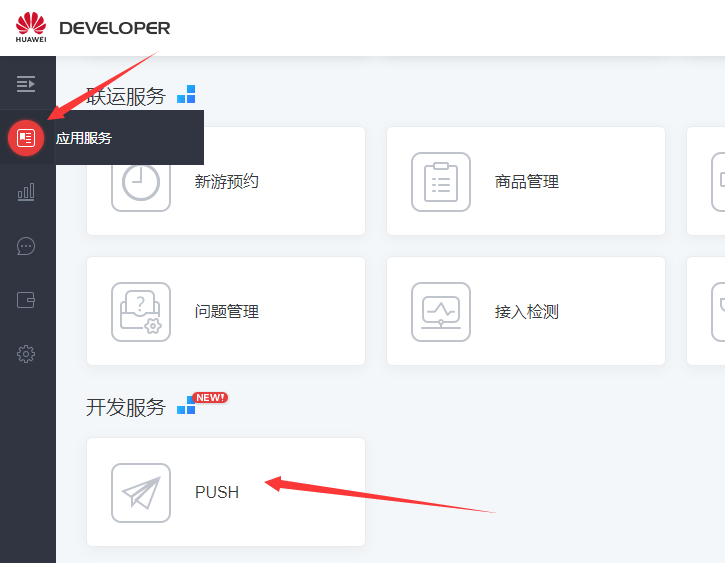
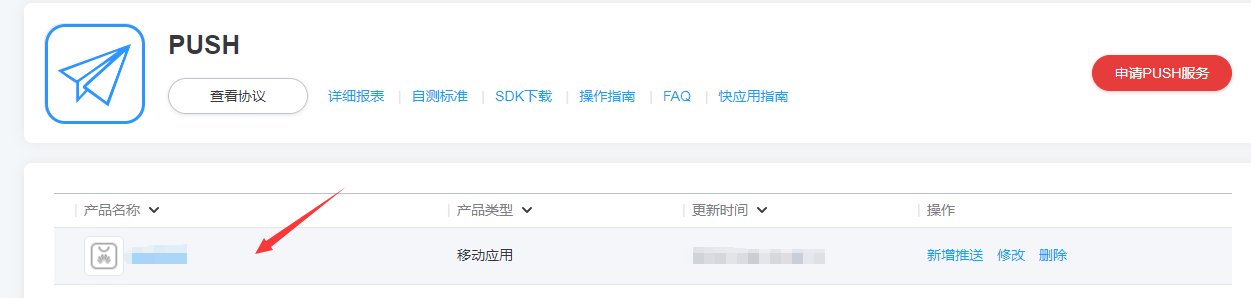
2.1、接入准备
参考官网《接入准备》
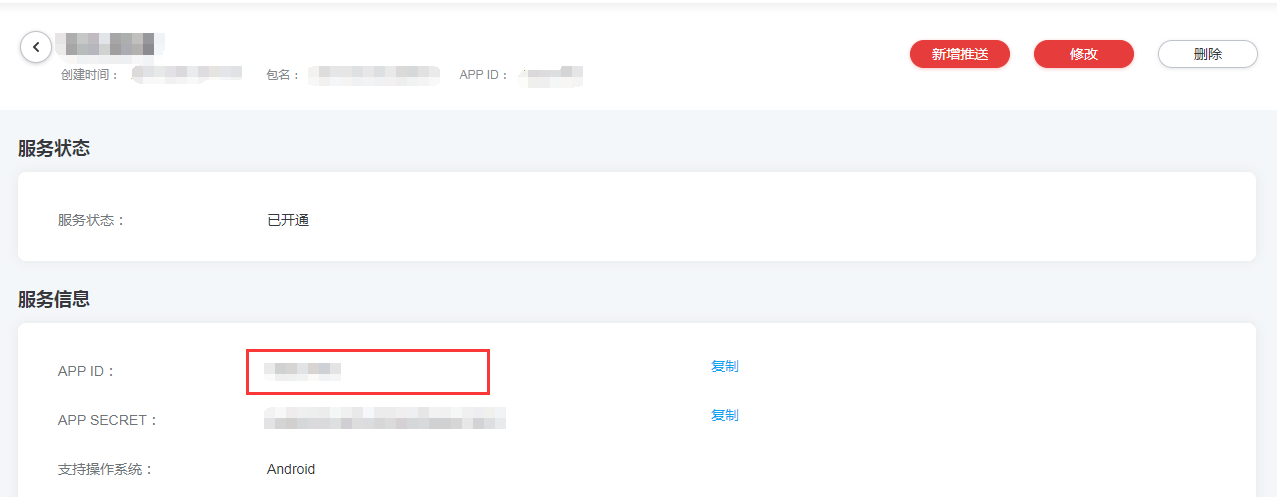
注册成为开发者——》创建应用——》获取PUSH服务参数
最终是要能获得appid值
2.2、下载SDK(HMS Agent套件 、HMS SDK两个)
(1)下载HMS Agent套件
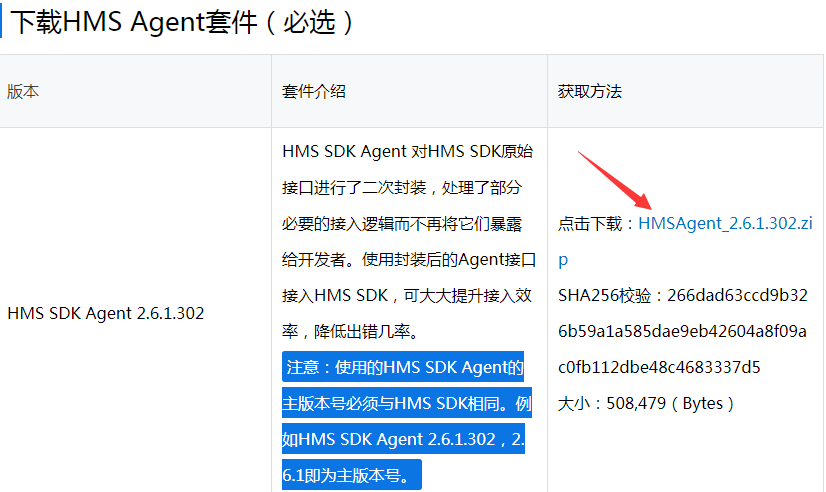
(2)下载HMS SDK
因为现在大部分是使用Android Studio开发环境,所以直接使用Gradle+maven集成方式。
2.3、先集成HMS SDK(集成HMS Agent套件在后面会讲到)
(1)配置maven仓
在项目的build.gradle文件中添加以下代码
// Top-level build file where you can add configuration options common to all sub-projects/modules.

buildscript {

    repositories {

        google()

        jcenter()

    }

    dependencies {

        classpath 'com.android.tools.build:gradle:3.2.1'

        // NOTE: Do not place your application dependencies here; they belong

        // in the individual module build.gradle files

    }

}

allprojects {

    repositories {

        google()

        jcenter()

        //<!-- ======================华为推送SDK====================== -->

        maven {url 'http://developer.huawei.com/repo/'}

    }

}

task clean(type: Delete) {

    delete rootProject.buildDir

}
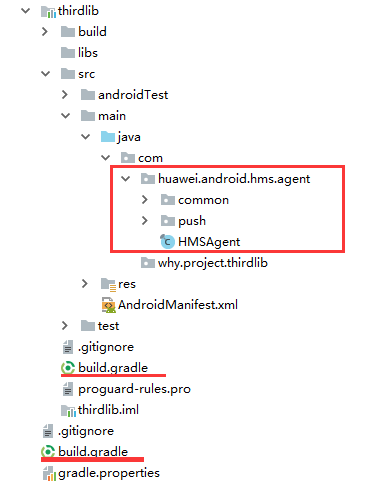
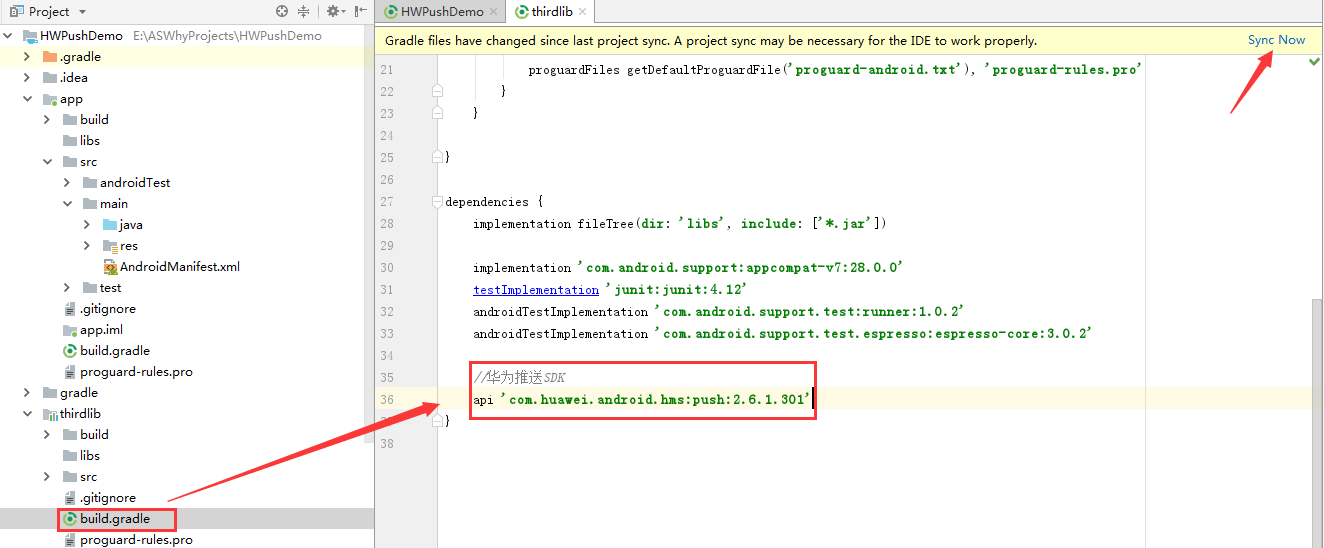
(2)在子工程(module)的build.gradle文件中添加依赖
为了便于统一管理,我在demo中新创建了一个ThirdLib的module,集成华为推送SDK都放到ThirdLib这个module中。
apply plugin: 'com.android.library'

android {

    compileSdkVersion 28

    defaultConfig {

        minSdkVersion 16

        targetSdkVersion 28

        versionCode 1

        versionName "1.0"

        testInstrumentationRunner "android.support.test.runner.AndroidJUnitRunner"

    }

    buildTypes {

        release {

            minifyEnabled false

            proguardFiles getDefaultProguardFile('proguard-android.txt'), 'proguard-rules.pro'

        }

    }

}

dependencies {

    implementation fileTree(dir: 'libs', include: ['*.jar'])

    implementation 'com.android.support:appcompat-v7:28.0.0'

    testImplementation 'junit:junit:4.12'

    androidTestImplementation 'com.android.support.test:runner:1.0.2'

    androidTestImplementation 'com.android.support.test.espresso:espresso-core:3.0.2'

    //华为推送SDK

    api 'com.huawei.android.hms:push:2.6.1.301'

}
(3)同步修改的文件
(4)还需要在app的build.gradle文件中依赖thirdlib这个module
apply plugin: 'com.android.application'

android {

    compileSdkVersion 28

    defaultConfig {

        applicationId "com.why.project.hwpushdemo"

        minSdkVersion 16

        targetSdkVersion 28

        versionCode 1

        versionName "1.0"

        testInstrumentationRunner "android.support.test.runner.AndroidJUnitRunner"

    }

    buildTypes {

        release {

            minifyEnabled false

            proguardFiles getDefaultProguardFile('proguard-android.txt'), 'proguard-rules.pro'

        }

    }

}

dependencies {

    implementation fileTree(dir: 'libs', include: ['*.jar'])

    implementation 'com.android.support:appcompat-v7:28.0.0'

    implementation 'com.android.support.constraint:constraint-layout:1.1.3'

    testImplementation 'junit:junit:4.12'

    androidTestImplementation 'com.android.support.test:runner:1.0.2'

    androidTestImplementation 'com.android.support.test.espresso:espresso-core:3.0.2'

    //thirdlib

    implementation project(':thirdlib')

}
2.4、集成HMS Agent套件
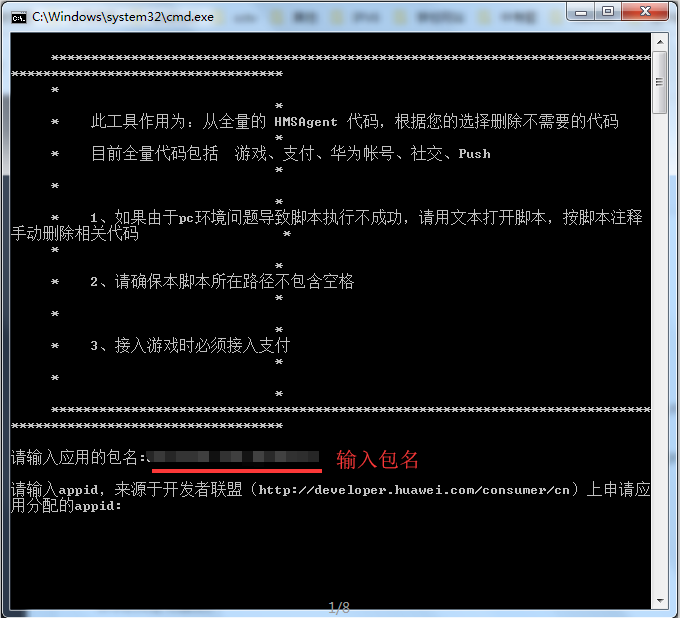
(1)解压包

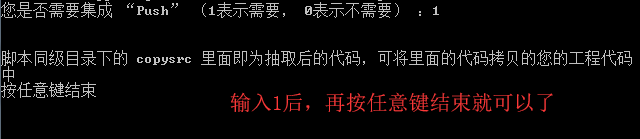
(2)执行GetHMSAgent_xx.bat生成copysrc的文件夹,里面是根据您选择需要集成HMS服务,抽取后的HMSAgent代码(java 文件夹)和manifest文件(AndroidManifest.xml)
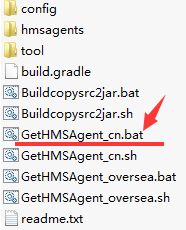
GetHMSAgent_cn.bat为中文脚本
GetHMSAgent_oversea.bat为英文脚本


此时,多了一个copysrc目录
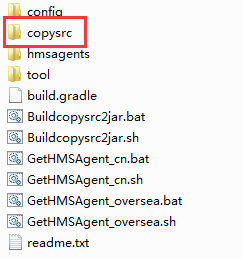
(3)拷贝copysrc/java里面的代码到您现有的工程。请保持HMSAgent代码的包的路径和结构不变
2.5、配置app这个module的AndroidManifest.xml
参考copysrc目录下的AppManifestConfig.xml文件中的相关代码和官网的资料!
注意,是app这个module,而不是thirdlib这个module!
<?xml version="1.0" encoding="utf-8"?>

<manifest xmlns:android="http://schemas.android.com/apk/res/android"

          package="com.why.project.hwpushdemo">

    <!-- ======================华为推送SDK====================== -->

    <!--HMS-SDK引导升级HMS功能,访问OTA服务器需要网络权限 | HMS-SDK upgrade HMS Feature, access to OTA server requires network privileges-->

    <uses-permission android:name="android.permission.INTERNET" />

    <!--HMS-SDK引导升级HMS功能,保存下载的升级包需要SD卡写权限 | HMS-SDK upgrade HMS Feature, save downloaded upgrade pack requires SD card Write permission-->

    <uses-permission android:name="android.permission.WRITE_EXTERNAL_STORAGE" />

    <!--检测网络状态 | Detecting Network status-->

    <uses-permission android:name="android.permission.ACCESS_NETWORK_STATE"/>

    <!--检测wifi状态 | Detecting WiFi status-->

    <uses-permission android:name="android.permission.ACCESS_WIFI_STATE"/>

    <!--获取用户手机的IMEI,用来唯一的标识设备。 | Gets the IMEI of the user's phone, used to uniquely identify the device.-->

    <uses-permission android:name="android.permission.READ_PHONE_STATE"/>

    <!--如果是安卓8.0,应用编译配置的targetSdkVersion>=26,请务必添加以下权限 -->

    <uses-permission android:name="android.permission.REQUEST_INSTALL_PACKAGES" />

    <!-- 接收PUSH TOKEN的广播以及PUSH消息需要定义该权限 ${PACKAGE_NAME} 要替换上您应用的包名 -->

    <permission

        android:name="${applicationId}.permission.PROCESS_PUSH_MSG"

        android:protectionLevel="signatureOrSystem"/>

    <!--接收PUSH TOKEN的广播以及PUSH消息需要定义该权限 ${PACKAGE_NAME} 要替换上您应用的包名 -->

    <uses-permission android:name="${applicationId}.permission.PROCESS_PUSH_MSG" />

    <application

        android:allowBackup="true"

        android:icon="@mipmap/ic_launcher"

        android:label="@string/app_name"

        android:roundIcon="@mipmap/ic_launcher_round"

        android:supportsRtl="true"

        android:theme="@style/AppTheme">

        <activity android:name=".MainActivity">

            <intent-filter>

                <action android:name="android.intent.action.MAIN"/>

                <category android:name="android.intent.category.LAUNCHER"/>

            </intent-filter>

        </activity>

        <!-- ======================华为推送SDK====================== -->

        <!-- 接入HMSSDK 需要注册的appid参数。value的值中“100222233444”用实际申请的appid替换,来源于开发者联盟网站应用的权益详情。

                    格式 android:value="appid=xxxxxx"

                    Access HMSSDK need to register AppID parameters. Value "100223344" is replaced with the actual application APPID, derived from the Developer affiliate website application.

                    Format android:value= "appid=xxxxxx"-->

        <meta-data

            android:name="com.huawei.hms.client.appid"

            android:value="appid=1000222233444"/>

        <!-- 接入HMSSDK 需要注册的activity | Access HMSSDK activity to be registered 定义了HMS-SDK中一些跳转所需要的透明页面-->

        <activity

            android:name="com.huawei.hms.activity.BridgeActivity"

            android:configChanges="orientation|locale|screenSize|layoutDirection|fontScale"

            android:excludeFromRecents="true"

            android:exported="false"

            android:hardwareAccelerated="true"

            android:theme="@android:style/Theme.Translucent" >

            <meta-data

                android:name="hwc-theme"

                android:value="androidhwext:style/Theme.Emui.Translucent" />

        </activity>

        <!-- 接入HMSSDK 需要注册的activity | Access HMSSDK activity to be registered 是应用自升级接口所需要使用的页面-->

        <activity

            android:name="com.huawei.updatesdk.service.otaupdate.AppUpdateActivity"

            android:configChanges="orientation|screenSize"

            android:exported="false"

            android:theme="@style/upsdkDlDialog" >

            <meta-data

                android:name="hwc-theme"

                android:value="androidhwext:style/Theme.Emui.Translucent.NoTitleBar" />

        </activity>

        <!-- 接入HMSSDK 需要注册的activity | Access HMSSDK activity to be registered 是应用自升级接口所需要使用的页面-->

        <activity

            android:name="com.huawei.updatesdk.support.pm.PackageInstallerActivity"

            android:configChanges="orientation|keyboardHidden|screenSize"

            android:exported="false"

            android:theme="@style/upsdkDlDialog" >

            <meta-data

                android:name="hwc-theme"

                android:value="androidhwext:style/Theme.Emui.Translucent" />

        </activity>

        <!-- 接入HMSSDK 需要注册的provider,authorities 一定不能与其他应用一样,所以这边 com.why.project.hwpushdemo 要替换上您应用的包名

            Access HMSSDK need to register provider,authorities must not be the same as other applications, so this side ${package_name} to replace the package name you applied

            用于应用自升级-->

        <provider

            android:name="com.huawei.updatesdk.fileprovider.UpdateSdkFileProvider"

            android:authorities="com.why.project.hwpushdemo.updateSdk.fileProvider"

            android:exported="false"

            android:grantUriPermissions="true">

        </provider>

        <!-- 接入HMSSDK 需要注册的应用下载服务 | Access HMSSDK need to register app download service

        用于应用自升级-->

        <service android:name="com.huawei.updatesdk.service.deamon.download.DownloadService"

                 android:exported="false"/>

        <!-- 使用 HMSAgent 代码接入HMSSDK 需要注册的activity | Use hmsagent code to access HMSSDK activity that requires registration-->

        <!--解决华为移动服务升级问题的透明界面(必须声明)-->

        <activity

            android:name="com.huawei.android.hms.agent.common.HMSAgentActivity"

            android:configChanges="orientation|locale|screenSize|layoutDirection|fontScale"

            android:excludeFromRecents="true"

            android:exported="false"

            android:hardwareAccelerated="true"

            android:theme="@android:style/Theme.Translucent" >

            <meta-data

                android:name="hwc-theme"

                android:value="androidhwext:style/Theme.Emui.Translucent" />

        </activity>

        <!-- 接入HMSSDK 需要注册的provider,authorities 一定不能与其他应用一样,所以这边 com.why.project.hwpushdemo 要替换上您应用的包名

           Access HMSSDK need to register provider,authorities must not be the same as other applications, so this side ${package_name} to replace the package name you applied

           用于HMS-SDK引导升级HMS,提供给系统安装器读取升级文件-->

        <provider

            android:name="com.huawei.hms.update.provider.UpdateProvider"

            android:authorities="com.why.project.hwpushdemo.hms.update.provider"

            android:exported="false"

            android:grantUriPermissions="true"/>

        <!-- 接入HMSSDK PUSH模块需要注册,第三方相关 :接收Push消息(注册、Push消息、Push连接状态)广播,

                此receiver类需要开发者自己创建并继承com.huawei.hms.support.api.push.PushReceiver类,

                参考示例代码中的类:com.huawei.hmsagent.HuaweiPushRevicer

            Access to the HMSSDK push module requires registration:

                Receive push message (registration, push message, push connection state) broadcast.

                This receiver class requires the developer to create and inherit the com.huawei.hms.support.api.push.PushReceiver class.

                Reference to class in sample code: Com.huawei.hmsagent.HuaweiPushRevicer-->

        <!--用来接收PUSH消息的receiver-->

        <!-- 接入HMSSDK PUSH模块需要注册,第三方相关 :接收Push消息(注册、Push消息、Push连接状态)广播,

                此receiver类需要开发者自己创建并继承com.huawei.hms.support.api.push.PushReceiver类,

                参考示例代码中的类:com.huawei.hmsagent.HuaweiPushRevicer

            Access to the HMSSDK push module requires registration:

                Receive push message (registration, push message, push connection state) broadcast.

                This receiver class requires the developer to create and inherit the com.huawei.hms.support.api.push.PushReceiver class.

                Reference to class in sample code: Com.huawei.hmsagent.HuaweiPushRevicer-->

        <receiver android:name="com.why.project.hwpushdemo.huaweipush.HuaweiPushRevicer" >

            <intent-filter>

                <!-- 必须,用于接收token | Must, for receiving token -->

                <action android:name="com.huawei.android.push.intent.REGISTRATION" />

                <!-- 必须,用于接收消息 | Must, used to receive messages-->

                <action android:name="com.huawei.android.push.intent.RECEIVE" />

                <!-- 可选,用于点击通知栏或通知栏上的按钮后触发onEvent回调 | Optional, click the button on the notification bar or the notification bar to trigger the onevent callback -->

                <action android:name="com.huawei.android.push.intent.CLICK" />

                <!-- 可选,查看push通道是否连接,不查看则不需要 | Optional, query whether the push channel is connected or not -->

                <action android:name="com.huawei.intent.action.PUSH_STATE" />

            </intent-filter>

        </receiver>

        <!-- 接入HMSSDK PUSH模块需要注册 :接收通道发来的通知栏消息 | The access HMSSDK push module needs to be registered: the notification bar message sent from the receiving channel -->

        <!--接收通道发来的通知栏消息-->

        <receiver android:name="com.huawei.hms.support.api.push.PushEventReceiver" >

            <intent-filter>

                <action android:name="com.huawei.intent.action.PUSH" />

            </intent-filter>

        </receiver>

        <!-- 华为推送自定义动作打开的界面【需要透明】,需要注意scheme必须设置唯一的,和手机上其他的APP使用的scheme不一样 -->

        <!--hwdemoscheme://{包名}/notify_detail?title={标题}&content={内容}-->

        <activity

            android:name="com.why.project.hwpushdemo.huaweipush.HWpushActivity"

            android:theme="@android:style/Theme.Translucent">

            <intent-filter>

                <action android:name="android.intent.action.VIEW"/>

                <category android:name="android.intent.category.DEFAULT"/>

                <data

                    android:host="${applicationId}"

                    android:path="/notify_detail"

                    android:scheme="hwdemoscheme"/>

            </intent-filter>

        </activity>

    </application>

</manifest>
1、appid需要换成自己的;
2、将黄色标记的代码中的包名(com.why.project.hwpushdemo)全部替换成自己的包名(如果是从copysrc的AppManifestConfig.xml文件复制的代码,直接是自己的包名);
3、HuaweiPushRevicer【华为推送的回调,比如获取token】的完整路径需要更换成真实的;
4、HWpushActivity【点击通知后打开的界面】的完整路径需要更换成真实的;
5、HWpushActivity下的host、path、scheme要换成自己项目的,另外这三个字段的值在推送的时候用的到;

2.6、将HuaweiPushRevicer、HWpushActivity添加到项目中

其中,HuaweiPushRevicer不用管,HWpushActivity需要根据实际情况修改下,activity_hwpush.xml文件不用管,就是个空布局。
package com.why.project.hwpushdemo.huaweipush; import android.app.Activity;
import android.content.Context;
import android.content.Intent;
import android.os.Bundle;
import android.util.Log; import com.why.project.hwpushdemo.R; import org.json.JSONObject; /**
* Created by HaiyuKing
* Used 华为推送自定义动作打开的界面【华为推送SDK】
* https://www.jianshu.com/p/3b0df1c976a5
* https://blog.csdn.net/gaoshang0304/article/details/80463246
* https://blog.csdn.net/nsacer/article/details/80346965
* https://blog.csdn.net/u013904672/article/details/71079278
*/
public class HWpushActivity extends Activity {
private static final String TAG = HWpushActivity.class.getSimpleName(); private Context mContext; @Override
protected void onCreate(Bundle savedInstanceState) {
super.onCreate(savedInstanceState);
setContentView(R.layout.activity_hwpush); mContext = this; //获取自定义动作的值
Intent intent = getIntent();
String intentUri = intent.toUri(Intent.URI_INTENT_SCHEME);
Log.e(TAG,"action是:" + intentUri);
//intent://com.why.project.hwpushdemo/notify_detail?title=测试标题&content=测试内容&exTraTitle=界面标题&url=http://www.baidu.com#Intent;scheme=hwdemoscheme;launchFlags=0x13000000;component=com.why.project.hwpushdemo/.huaweipush.HWpushActivity;end //关闭当前界面,跳转到指定的界面
try {
String title = getIntent().getData().getQueryParameter("title");
String content = getIntent().getData().getQueryParameter("content");
String exTraTitle = getIntent().getData().getQueryParameter("exTraTitle");
String url = getIntent().getData().getQueryParameter("url"); JSONObject extraJson = new JSONObject();
extraJson.put("exTraTitle",exTraTitle);
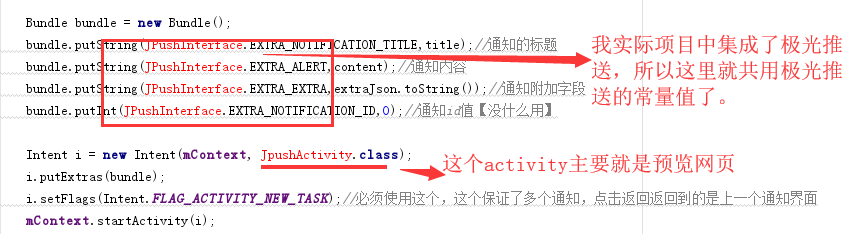
extraJson.put("url",url); Bundle bundle = new Bundle();
bundle.putString(JPushInterface.EXTRA_NOTIFICATION_TITLE,title);//通知的标题
bundle.putString(JPushInterface.EXTRA_ALERT,content);//通知内容
bundle.putString(JPushInterface.EXTRA_EXTRA,extraJson.toString());//通知附加字段
bundle.putInt(JPushInterface.EXTRA_NOTIFICATION_ID,0);//通知id值【没什么用】 Intent i = new Intent(mContext, JpushActivity.class);
i.putExtras(bundle);
i.setFlags(Intent.FLAG_ACTIVITY_NEW_TASK);//必须使用这个,这个保证了多个通知,点击返回返回到的是上一个通知界面
mContext.startActivity(i);
finish(); } catch (Exception e){
e.printStackTrace();
} }
}
这里稍微讲解下,这个activity的主要作用是下面两点:
1、获取自定义动作的值;
2、关闭当前界面,跳转到指定的界面(传值过去);
上面代码中跳转界面那里(橙色标记的代码),是需要根据实际情况修改的。
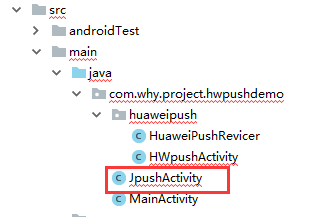
2.7、将JpushActivity添加到项目中(仅供参考)
package com.why.project.hwpushdemo;

import android.content.Context;

import android.content.Intent;

import android.content.res.Resources;

import android.os.Bundle;

import android.support.v7.app.AppCompatActivity;

import android.support.v7.widget.Toolbar;

import android.view.KeyEvent;

import android.view.View;

import android.widget.TextView;

import org.json.JSONException;

import org.json.JSONObject;

/**

 * Used 极光推送点开通知后打开的界面

 * 和WebViewPreviewActivity共用一个布局文件

 * 需要先检查是否已经登录,如果没有登录,直接登录即可,不需要返回到登录界面了

 * 极光推送SDK

 */

public class JpushActivity extends AppCompatActivity {

    private static final String TAG = JpushActivity.class.getSimpleName();

    /**从登录界面打开的标记(传递参数用)*/

    public static final String EXTRA_ONLOGIN = "onlogin";

    /*Jpush传递过来的参数*/

    private Bundle jPushBundle;

    /**通知标题*/

    private String jPushTitle;

    /**通知内容*/

    private String jPushContent;

    /**通知附加字段*/

    private String jPushExtraJson;

    /**通知id值*/

    private int jPushId;

    //展现在导航栏上的标题

    private String bundle_title;

    //网页url地址

    private String bundle_url;

    /**标记是否从登录界面打开的状态值*/

    private boolean bundle_onlogin = false;

    private Context mContext;

    private Toolbar mToolbar;

    private MyWebView myWebView;

    @Override

    protected void onCreate(Bundle savedInstanceState) {

        super.onCreate(savedInstanceState);

        setContentView(R.layout.activity_webviewpreview);

        mContext = this;

        //初始化控件

        initViews();

        //初始化数据

        initData();

        initToolBar();//初始化toolbar

    }

    @Override

    public void onDestroy()

    {

        //销毁webview控件

        myWebView.removeAllViews();

        myWebView.destroy();

        super.onDestroy();

    }

    /**

     * 初始化view

     */

    private void initViews() {

        myWebView = (MyWebView)findViewById(R.id.id_webView);

        myWebView.setCanBackPreviousPage(true,JpushActivity.this);//可以返回上一页

    }

    /**

     * 初始化数据【接收点击通知栏传过来的数据:通知、自定义消息两种(这里只需要处理通知的即可)】

     */

    private void initData() {

        Intent intent = getIntent();

        if (null != intent) {

            jPushBundle = getIntent().getExtras();

            jPushTitle = jPushBundle.getString(JPushInterface.EXTRA_NOTIFICATION_TITLE);//保存服务器推送下来的通知的标题

            jPushContent = jPushBundle.getString(JPushInterface.EXTRA_ALERT);//保存服务器推送下来的通知内容

            jPushExtraJson = jPushBundle.getString(JPushInterface.EXTRA_EXTRA);//保存服务器推送下来的附加字段。这是个 JSON 字符串

            jPushId = jPushBundle.getInt(JPushInterface.EXTRA_NOTIFICATION_ID);//SDK 1.3.5 以上版本支持,通知栏的Notification ID,可以用于清除Notification

            bundle_onlogin = jPushBundle.getBoolean(EXTRA_ONLOGIN);

        }

        if(!jPushExtraJson.equals("")){

            try {

                JSONObject extraJsonObj = new JSONObject(jPushExtraJson);

                if(extraJsonObj.has("from")){

                    extraJsonObj = new JSONObject(extraJsonObj.getString("from"));

                }

                if(!extraJsonObj.getString("exTraTitle").equals("")){

                    //获取标题

                    bundle_title = extraJsonObj.getString("exTraTitle");

                }

                if(!extraJsonObj.getString("url").equals("")){

                    //获取网页地址

                    bundle_url = extraJsonObj.getString("url");

                }

            } catch (Resources.NotFoundException e) {

                // TODO Auto-generated catch block

                e.printStackTrace();

            } catch (JSONException e) {

                // TODO Auto-generated catch block

                e.printStackTrace();

            }

        }

        if(! bundle_onlogin){//如果是从登录界面打开的话,那么不用验证了

            initCheckLoginState();//验证是否需要重新登录

        }else{

            loadWebUrl();//打开网页

        }

    }

    private void initToolBar() {

        mToolbar = findViewById(R.id.toolbar_base);

        mToolbar.setTitle("");//这样设置的话,自带的标题就不会显示

        //设置自定义的标题(居中)

        TextView toolBarTitle = mToolbar.findViewById(R.id.toolbarTitle);

        toolBarTitle.setText(bundle_title);

        setSupportActionBar(mToolbar);//由于toolbar只是一个普通控件,我们将ToolBar设置为ActionBar

        //设置导航图标要在setSupportActionBar方法之后

        mToolbar.setNavigationIcon(R.drawable.nav_back);//设置为空的话,就会不显示左侧的图标

        //对NavigationIcon添加点击

        mToolbar.setNavigationOnClickListener(new View.OnClickListener() {

            @Override

            public void onClick(View v) {

                //返回到首页界面(重新登录的情况下)或者直接关闭自己(不需要重新登录的情况下)

                backHomeOrFinish();

            }

        });

    }

    /**

     * 点击返回键

     * event.getRepeatCount() == 0:点后退键的时候,为了防止点得过快,触发两次后退事件,故做此设置。

     */

    @Override

    public boolean onKeyDown(int keyCode, KeyEvent event) {

        // TODO Auto-generated method stub

        if (keyCode == KeyEvent.KEYCODE_BACK && event.getRepeatCount() == 0) {

            //返回到首页界面(如果是从登录界面打开的)或者关闭自己(从通知打开的)

            backHomeOrFinish();

        }

        return super.onKeyDown(keyCode, event);

    }

    //返回功能

    private void backHomeOrFinish() {

        if (bundle_onlogin) {

            ActivityJump.NormalJumpAndFinish(JpushActivity.this, HomeActivity.class);

        } else {

            ActivityJump.Back(this);

        }

    }

    /**

     * 网络请求检查登录状态,主要判断是否在线

     */

    private void initCheckLoginState() {

        if(result.indexOf("alert(") != -1){

            //登陆身份失效,请重新登陆

            ActivityJump.BundleJumpAndFinish(JpushActivity.this, LoginActivity.class,jPushBundle);

        }

        else{

            loadWebUrl();//加载网页

        }

    }

    /**

     * 加载URL地址

     */

    private void loadWebUrl() {

        syncCookie(JpushActivity.this, ServerApi.SERVER_URL);

        if (!bundle_url.equals("")) {

            myWebView.loadWebUrl(ServerApi.SERVER_URL + bundle_url);

        } else {

            myWebView.loadUrl("about:blank");//加载一个空白页

        }

    }

    /**

     * Sync Cookie

     */

    public static void syncCookie(Context context, String url){

        //参考本博客的《okhttputils【 Android 一个改善的okHttp封装库】使用(二)》

    }

}
3、初始化Agent
在application的onCreate方法中初始化HMSAgent。如果没有自己的application类,请创建并在manifest文件中配置application节点的name属性。
package com.why.project.hwpushdemo;

import android.app.Application;

import com.huawei.android.hms.agent.HMSAgent;

/**

 * Created by HaiyuKing

 * Used

 */

public class MyApplication extends Application {

    @Override

    public void onCreate() {

        super.onCreate();

        //华为推送SDK

        initHuaWeiPush();

    }

    //华为推送SDK

    private void initHuaWeiPush(){

        HMSAgent.init(this);

    }

    @Override

    public void onTerminate() {

        super.onTerminate();

        //华为推送SDK

        HMSAgent.destroy();

    }

}
4、调用connect接口
建议在应用启动时调用Connect。在哪个Activity中调用,哪个Activity的alertDialog不弹出,返回软键点击后无响应。
package com.why.project.hwpushdemo;

import android.content.Context;

import android.content.Intent;

import android.os.Bundle;

import android.support.v7.app.AppCompatActivity;

import com.huawei.android.hms.agent.HMSAgent;

import com.huawei.android.hms.agent.common.handler.ConnectHandler;

import com.huawei.android.hms.agent.push.handler.GetTokenHandler;

import com.why.project.hwpushdemo.huaweipush.HuaweiPushRevicer;

import static com.why.project.hwpushdemo.huaweipush.HuaweiPushRevicer.ACTION_TOKEN;

import static com.why.project.hwpushdemo.huaweipush.HuaweiPushRevicer.ACTION_UPDATEUI;

/**

 * Created by HaiyuKing

 * Used

 */

public class WelcomeActivity extends AppCompatActivity implements HuaweiPushRevicer.IPushCallback{

    private static final String TAG = WelcomeActivity.class.getSimpleName();

    private Context mContext;

    @Override

    protected void onCreate(Bundle savedInstanceState) {

        super.onCreate(savedInstanceState);

        setContentView(R.layout.activity_welcome);

        mContext = this;

        /*====华为推送SDK相关=======*/

        HuaweiPushRevicer.registerPushCallback(this);

        /*========================华为推送SDK相关=======================*/

        HMSAgent.connect(this, new ConnectHandler() {

            @Override

            public void onConnect(int rst) {

                LogUtil.d(TAG,"HMS connect end:" + rst);

                //Push的Token会过期和失效,应用集成Push后,推荐在每次启动应用时调用getToken方法申请Token,该方法可以重复调用,在有效期内获得的Token值不会变化。

                //建议在应用的首个Activity的onCreate方法中,调用申请token接口。【为什么呢?因为如果在HomeActivity中调用的,alertDialog不弹出,返回软键点击后无响应】

                LogUtil.d(TAG,"get token: begin");

                HMSAgent.Push.getToken(new GetTokenHandler() {

                    @Override

                    public void onResult(int rtnCode) {

                        LogUtil.d(TAG,"get token: end code=" + rtnCode);

                    }

                });

            }

        });

        //检查应用升级,暂时用不到

        /*HMSAgent.checkUpdate(this, new CheckUpdateHandler() {

            @Override

            public void onResult(int rst) {

                LogUtil.d(TAG,"check app update end:" + rst);

            }

        });*/

    }

    @Override

    protected void onDestroy() {

        super.onDestroy();

        /*====华为推送SDK相关=======*/

        HuaweiPushRevicer.unRegisterPushCallback(this);

    }

    @Override

    public void onReceive(Intent intent) {

        //===============华为推送SDK相关===============

        //其实放在这里有个风险,那就是可能执行不到这里,因为时间短,还没有等到返回数据就执行onDestory方法了

        if (intent != null) {

            String action = intent.getAction();

            Bundle b = intent.getExtras();

            if (b != null && ACTION_TOKEN.equals(action)) {

                String hwToken = b.getString(ACTION_TOKEN);

                LogUtil.e(TAG,"hwToken="+hwToken);

                //保存数据,HomeActivity中用得到

                PreferencesUtils.putString(mContext,Globals.HWPUSH_TOKEN_KEY,hwToken);

            } else if (b != null && ACTION_UPDATEUI.equals(action)) {

                String log = b.getString("log");

                LogUtil.e(TAG,log);

            }

        }

    }

}
Globals.java文件
package com.why.project.hwpushdemo;

/**

 * Created by HaiyuKing

 * Used

 */

public class Globals {

    /*=======================================华为推送SDK相关=============================================*/

    //华为推送的token值

    public static final String HWPUSH_TOKEN_KEY = "HWPushToken";

}
5、申请Push token
package com.why.project.hwpushdemo;

import android.content.Context;

import android.os.Bundle;

import android.support.v7.app.AppCompatActivity;

public class MainActivity extends AppCompatActivity {

    private static final String TAG = WelcomeActivity.class.getSimpleName();

    private Context mContext;

    @Override

    protected void onCreate(Bundle savedInstanceState) {

        super.onCreate(savedInstanceState);

        setContentView(R.layout.activity_main);

        mContext = this;

        /*====华为推送SDK相关=======*/

        getToken();

    }

    /*========================华为推送SDK相关======start====================*/

    private void getToken(){

        String hwToken = PreferencesUtils.getString(mContext,Globals.HWPUSH_TOKEN_KEY,"");

        LogUtil.e(TAG,"hwToken="+hwToken);

        requestDeviceId(hwToken);//判断是请求接口还是弹出对话框

    }

   //请求接口存储设备id或者token的方法

    private void requestDeviceId(String regId) {

        //首要条件是设备id值或者token值不为空,否则下面的判断没有意义了

        //如果没有设置过别名,或者则需要设置别名

        //如果服务器上的deviceID值是空值,表明当前用户还没有绑定任何设备,则直接请求接口,不需要弹出对话框;

        //如果服务器上的deviceID值不为空,并且客户端获取的设备id值和服务器上的deviceID值相同,则不需要弹出对话框,直接请求接口(这个是卸载重新安装的情况)

        //如果服务器上的deviceid值不为空,并且客户端获取的设备id值和服务器上的deviceID值不同,则需要弹出对话框(这个是换设备的情况)

        //如果已经设置过别名(存储过了设备id值)了,但是当前的别名(设备id值)和服务器上的不一致,则需要重新设置别名(存储设备id值)(这个是其他设备上登录的情况)

    }

}
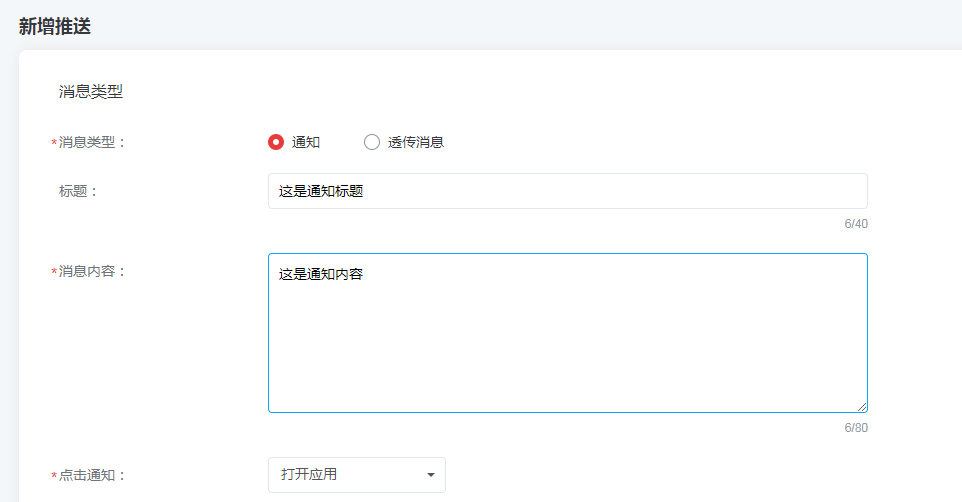
三、发送消息
参考官网《发送消息》


混淆配置
# Add project specific ProGuard rules here.

# You can control the set of applied configuration files using the

# proguardFiles setting in build.gradle.

#

# For more details, see

#   http://developer.android.com/guide/developing/tools/proguard.html

# If your project uses WebView with JS, uncomment the following

# and specify the fully qualified class name to the JavaScript interface

# class:

#-keepclassmembers class fqcn.of.javascript.interface.for.webview {

#   public *;

#}

# Uncomment this to preserve the line number information for

# debugging stack traces.

#-keepattributes SourceFile,LineNumberTable

# If you keep the line number information, uncomment this to

# hide the original source file name.

#-renamesourcefileattribute SourceFile

#=====================华为推送SDK=====================

#注意:不要混淆HMS SDK自带的资源文件。部分应用和游戏会混淆工程中的所有资源文件,请注意不要混淆HMS SDK的相关资源文件。

-ignorewarning

-keepattributes *Annotation*

-keepattributes Exceptions

-keepattributes InnerClasses

-keepattributes Signature

-keepattributes SourceFile,LineNumberTable

-keep class com.hianalytics.android.**{*;}

-keep class com.huawei.updatesdk.**{*;}

-keep class com.huawei.hms.**{*;}

-keep class com.huawei.android.hms.agent.**{*;}

-keep class com.huawei.gamebox.plugin.gameservice.**{*;}
参考资料
集成华为推送,华为手机App在活动点开推送重启App并且未进入到推送落地页
项目demo下载地址
链接:https://pan.baidu.com/s/13fw_2o4FGzdV9Q5-s-mxiw 提取码:qhk4
HWPushDemo【华为推送集成,基于2.6.1.301版本】的更多相关文章
- 华为推送 简介 集成 MD
Markdown版本笔记 我的GitHub首页 我的博客 我的微信 我的邮箱 MyAndroidBlogs baiqiantao baiqiantao bqt20094 baiqiantao@sina ...
- Android 推送集成华为,小米,友盟
公司的 app 一直使用的是极光推送,最近反馈比较多的是推送消息收不到,看来需要找新的推送服务了,在国内目前手机品牌占有率比较多的是华为和小米,且这两家都有自己的推送服务,同时一个合作的友商说他们使用 ...
- springboot+websocket+sockjs进行消息推送【基于STOMP协议】
springboot+websocket+sockjs进行消息推送[基于STOMP协议] WebSocket是在HTML5基础上单个TCP连接上进行全双工通讯的协议,只要浏览器和服务器进行一次握手,就 ...
- Android消息推送(二)--基于MQTT协议实现的推送功能
国内的Android设备,不能稳定的使用Google GCM(Google Cloud Messageing)消息推送服务. 1. 国内的Android设备,基本上从操作系统底层开始就去掉了Googl ...
- Android 华为推送库下载不了
问题:华为库下载不了,导致gradle同步失败 解决: 去掉华为推送在线下载相关代码,将在线下载修改为离线加载aar库 1.通过Maven 仓库离线包下载地址下载关于推送的包: http://deve ...
- XiaomiPushDemo【小米推送集成,基于V3.6.12版本】
版权声明:本文为HaiyuKing原创文章,转载请注明出处! 前言 这个Demo只是记录小米推送的集成,不能运行. 使用步骤 一.项目组织结构图 注意事项: 1. 导入类文件后需要change包名以 ...
- JPushDemo【极光推送集成,基于v3.1.8版本】
版权声明:本文为HaiyuKing原创文章,转载请注明出处! 前言 这个Demo只是记录极光推送的集成,不能运行. 使用步骤 一.项目组织结构图 注意事项: 1. 导入类文件后需要change包名以 ...
- Android 极光推送集成
集成Jpush 1.用Android Studio创建一个Demo 2.创建激光推送开发者账号,要创建极光推送开发者帐号,请访问极光推送官方网站https://www.jiguang.cn/push ...
- iOS极光推送集成步骤
1.下载SDK,导入Xcode 2.在苹果开发者中心建立AppId与bundleID进行关联,注意勾选推送功能 3.在苹果开发者中心建立推送证书 4.在极光后台建立应用且上传推送证书 5.建立描述文件 ...
随机推荐
- 从零开始的H5生活
作为一个新手,要从头学习Html编程语言,需要从最基础的开始.有耐心慢慢来,很容易就看懂了.我所使用的编程软件是Hbuilder. 1.Html文档结构 包括head和body两部分 <!DOC ...
- 【python进阶】深入理解系统进程1
前言 之前程序执⾏都是⼀条腿⾛路,甚⾄是⽤⼀杆枪来打天下. 通过系统编程的学习,会让⼤家有“多条腿”⼀起⾛路,就好⽐有了⼀把机关枪. 此篇为深入理解进程第一篇,下面开始今天的说明~~~ 进程 多任务的 ...
- 在Ubuntu系统安装Sencha CMD
Now type from the terminal prompt followed by Enter: 1 root@prompt:cd /java 1 root@prompt:tar zx ...
- manifold tangent classifier
The Manifold Tangent Classifier (MTC) Putting it all together, here is the high level summary of how ...
- CSS 静态进度条效果
今天学习到了实现一个静态进度条的方法,固写一篇笔记稳固一下自己的知识. 最终的效果如下,进度条放在一个框里,水平宽自适应. 现在就开始,首先写一个进度条先. .progress-bar{ /* 进度条 ...
- hadoop HA 详解
NameNode 高可用整体架构概述 在 Hadoop 1.0 时代,Hadoop 的两大核心组件 HDFS NameNode 和 JobTracker 都存在着单点问题,这其中以 NameNode ...
- Java RandomAccessFile用法 【转】
RandomAccessFile源地址:http://blog.csdn.net/akon_vm/article/details/7429245 RandomAccessFile是用来访问那些保存数据 ...
- JDK10都发布了,nio你了解多少?
前言 只有光头才能变强 回顾前面: 给女朋友讲解什么是代理模式 包装模式就是这么简单啦 本来我预想是先来回顾一下传统的IO模式的,将传统的IO模式的相关类理清楚(因为IO的类很多). 但是,发现在整理 ...
- UUID那些事
UUID那些事 UUID 是一个全局唯一的通用识别码.它使用某种规则,而不是某种中心化的自增方式,来保证这个识别码的全局唯一性.UUID 有非常多的使用场景,比如在分布式系统中,需要生成全局唯一 ID ...
- js基础进阶--关于setTimeout的思考
欢迎访问我的个人博客:http://www.xiaolongwu.cn 先热身 看看下面的额代码会打印出什么? for (var i = 0; i < 5; i++) { setTimeout( ...