03_springmvc整合mybatis
一.整合思路
springmvc+mybaits的系统架构:

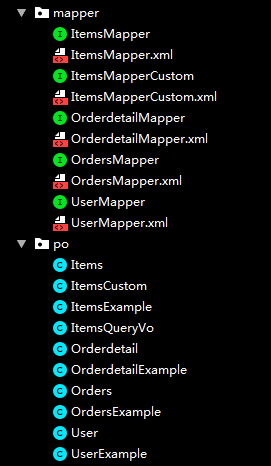
第一步整合dao层:mybatis和spring整合:通过spring管理mapper接口,使用mapper的扫描器自动扫描mapper接口在spring中注册。
第二步整合service层:通过spring管理service接口,通过配置方式将service接口配置在spring配置文件中,实现事务控制。注意:事务控制一般在service层。
第三步整合springmvc:由于springmvc是spring的模块,不需要配置。
二 .环境准备
mysql5.1、jdk1.8、idea、
所需要的jar包:
数据库驱动包、mybatis的jar、spring整合mybatis的jar、log4j、dbcp数据库连接池包、spring4.2的jar包、
三.整合dao(mapper)
1.配置sqlMapConfig.xml
<?xml version="1.0" encoding="UTF-8" ?>
<!DOCTYPE configuration
PUBLIC "-//mybatis.org//DTD Config 3.0//EN"
"http://mybatis.org/dtd/mybatis-3-config.dtd">
<configuration>
<!--配置延迟加载-->
<!-- <settings>
<setting name="logImpl" value="LOG4J"/>
打开延迟加载开关
<setting name="lazyLoadingEnabled" value="true"/>
将积极加载改为消极加载,需要的时候再继续加载
<setting name="aggressiveLazyLoading" value="false"/>
开启二级缓存
<setting name="cacheEnabled" value="true"/>
</settings>-->
<!--别名-->
<typeAliases>
<!--针对单个别名定义-->
<!--<typeAlias type="com.mybatis.po.User" alias="user"></typeAlias>-->
<!--批量别名定义
mybatis:自动扫描包中的po类,别名就是类名(首字母大写小写都可以)
-->
<package name="com.ssm.po"></package>
</typeAliases>
<!-- 和spring整合后 environments配置将废除-->
<!--<environments default="development">
<environment id="development">
<!– 使用jdbc事务管理–>
<transactionManager type="JDBC" />
<!– 数据库连接池,–>
<dataSource type="POOLED">
<property name="driver" value="${jdbc.driver}" />
<property name="url" value="${jdbc.url}" />
<property name="username" value="${jdbc.username}" />
<property name="password" value="${jdbc.password}" />
</dataSource>
</environment>
</environments>-->
<!--加载映射文件-->
<!--<mappers>-->
<!--<mapper resource="com/spring_mybatis/config/sqlmap/User.xml"></mapper>-->
<!--<mapper class="com.mybatis.mapper.UserMapper"></mapper>-->
<!--批量加载mapper映射文件 只能在mapper代理开发时这样写-->
<!--当使用mapper扫描时,spring整合,不需要配置-->
<!--<package name="com.spring_mybatis.mapper"/>-->
<!--</mappers>-->
</configuration>
2.applicationContext-dao.xml
配置数据源、事务管理、配置SqlSessionFactory、mapper扫描器、
<?xml version="1.0" encoding="UTF-8"?>
<beans xmlns:xsi="http://www.w3.org/2001/XMLSchema-instance"
xmlns="http://www.springframework.org/schema/beans"
xmlns:context="http://www.springframework.org/schema/context"
xmlns:aop="http://www.springframework.org/schema/aop"
xmlns:tx="http://www.springframework.org/schema/tx"
xsi:schemaLocation="http://www.springframework.org/schema/context
http://www.springframework.org/schema/context/spring-context-4.2.xsd
http://www.springframework.org/schema/aop http://www.springframework.org/schema/aop/spring-aop-4.2.xsd
http://www.springframework.org/schema/tx http://www.springframework.org/schema/tx/spring-tx-4.2.xsd
http://www.springframework.org/schema/beans http://www.springframework.org/schema/beans/spring-beans-4.2.xsd ">
<!--加载数据库文件-->
<context:property-placeholder location="classpath:config/db.properties"></context:property-placeholder>
<!--数据源配置dbcp-->
<bean id="dataSource" class="org.apache.commons.dbcp.BasicDataSource">
<property name="driverClassName" value="${jdbc.driver}"></property>
<property name="url" value="${jdbc.url}"></property>
<property name="username" value="${jdbc.username}"></property>
<property name="password" value="${jdbc.password}"></property>
<property name="maxActive" value="10"></property>
<property name="maxIdle" value="5"></property>
</bean>
<!--1.配置sqlSessionFactory 在整合包中寻找-->
<bean id="sqlSessionFactory" class="org.mybatis.spring.SqlSessionFactoryBean">
<!--加载mybatis配置文件-->
<property name="configLocation" value="classpath:config/mybatis/sqlMapConfig.xml"></property>
<!--配置数据源-->
<property name="dataSource" ref="dataSource"></property>
</bean>
<!--一。。。原始dao接口-->
<!--<bean id="userDao" class="com.spring_mybatis.dao.UserDaoImpl">-->
<!--<property name="sqlSessionFactory" ref="sqlSessionFactory"></property>-->
<!--</bean>-->
<!--二。。。。mapper的配置:MapperFactoryBean 根据接口生成代理对象 -->
<!--<bean id="userMapper" class="org.mybatis.spring.mapper.MapperFactoryBean">-->
<!--!–mapperInterface 指定mapper接口-->
<!--<property name="mapperInterface" value="com.spring_mybatis.mapper.UserMapper"></property>-->
<!--<property name="sqlSessionFactory" ref="sqlSessionFactory"></property>-->
<!--</bean>-->
<!--建议使用-->
<!--mapper批量扫描,从mapper包中扫描出mapper接口,自动创建代理对象并且在spring容器中创建
规范:mapper.java与mapper.xml映射文件 名称保持一致,且在一个目录中
自动扫描出来的bean的id为mapper类名(首字母小写)
如果要扫描多个包,每个包中间使用半角逗号分隔开
-->
<bean class="org.mybatis.spring.mapper.MapperScannerConfigurer">
<property name="basePackage" value="com.ssm.mapper"></property>
<property name="sqlSessionFactoryBeanName" value="sqlSessionFactory"></property>
</bean>
<!--mapper的配置:MapperFactoryBean 根据接口生成代理对象-->
<!--<bean id="itemsMapperCustom" class="org.mybatis.spring.mapper.MapperFactoryBean">-->
<!--mapperInterface 指定mapper接口-->
<!--<property name="mapperInterface" value="com.ssm.mapper.ItemsMapperCustom"></property>-->
<!--<property name="sqlSessionFactory" ref="sqlSessionFactory"></property>-->
<!--</bean>-->
</beans>
3.逆向工程生成po类和mapper(单表进行增删改查)

4.自定义mapper,配置mapper.xml和mapper.java
针对综合查询mapper,一般情况会有关联查询,建议自定义mapper
ItemsMapperCustom.xml
<?xml version="1.0" encoding="UTF-8" ?>

<!DOCTYPE mapper PUBLIC "-//mybatis.org//DTD Mapper 3.0//EN" "http://mybatis.org/dtd/mybatis-3-mapper.dtd" >

<mapper namespace="com.ssm.mapper.ItemsMapperCustom" >

  <!--商品的列表查询-->

  <!--定义商品信息的sql片段-->

  <sql id="queryItemsWhere">

    <if test="itemsCustom!=null">

        <if test="itemsCustom.name!=null and itemsCustom.name!=''">

          items.name like '%${itemsCustom.name}%'

        </if>

    </if>

  </sql>

  <select id="findItemsList" parameterType="com.ssm.po.ItemsQueryVo" resultType="com.ssm.po.ItemsCustom">

        select * from items

        <where>

          <include refid="queryItemsWhere"/>

        </where>

  </select>

</mapper>
ItemsMapperCustom.java
四.整合service
作用:1.service由spring管理
2.spring对service进行事务管理
1.定义service接口
package com.ssm.service;

import com.ssm.po.ItemsCustom;

import com.ssm.po.ItemsQueryVo;

import java.util.List;

/**

 * Description:ItemsService

 * User: jiatp

 * Date:2019/9/7 0007 下午 5:22

*/

public interface ItemsService {

    //商品查询

    public List<ItemsCustom> findItemsList(ItemsQueryVo itemsQueryVo)throws Exception;

    //根据id查询商品信息

    public ItemsCustom findItemsById(int id)throws Exception;

    //根据id修改商品信息

    public void updateItems(Integer id,ItemsCustom itemsCustom)throws Exception;

    //根据id删除商品信息

    public void deleteItems(Integer[] ids)throws Exception;

}
ItemsServiceImpl.java
package com.ssm.service;

import com.ssm.exception.CustomException;

import com.ssm.mapper.ItemsMapper;

import com.ssm.mapper.ItemsMapperCustom;

import com.ssm.po.Items;

import com.ssm.po.ItemsCustom;

import com.ssm.po.ItemsQueryVo;

import org.junit.Before;

import org.mybatis.spring.annotation.MapperScan;

import org.springframework.beans.BeanUtils;

import org.springframework.beans.factory.annotation.Autowired;

import org.springframework.beans.factory.annotation.Qualifier;

import org.springframework.context.ApplicationContext;

import org.springframework.context.support.ClassPathXmlApplicationContext;

import javax.annotation.Resource;

import java.util.List;

/**

 * Description:

 * User: jiatp

 * Date:2019/9/7 0007 下午 5:25

*/

public class ItemsServiceImpl implements ItemsService {

    @Autowired

    private ItemsMapperCustom itemsMapperCustom;

    @Autowired

    private ItemsMapper itemsMapper;

    @Override

    public List<ItemsCustom> findItemsList(ItemsQueryVo itemsQueryVo) throws Exception {

        //直接调用方法

        List<ItemsCustom> itemsList = itemsMapperCustom.findItemsList(itemsQueryVo);

        return itemsList;

    }

    @Override

    public ItemsCustom findItemsById(int id) throws Exception {

        Items items = itemsMapper.selectByPrimaryKey(id);

        if(items==null){

            throw new CustomException("修改商品信息不存在!--sevice");

        }

        //中间会进行业务处理。。。

        //返回的是itemsCustom

        ItemsCustom itemsCustom = null;

        if(items!=null){

            itemsCustom = new ItemsCustom();

            //将items内容拷贝到itemsCustom

            BeanUtils.copyProperties(items,itemsCustom);

        }

        return itemsCustom;

    }

    @Override

    public void updateItems(Integer id, ItemsCustom itemsCustom) throws Exception {

        //添加一些业务校验,通常在service中对关键参数进行校验

        //校验id是否为空,如果为空则抛出异常

        //更新商品信息  根据id更新items中所有字段,包括大文本

        itemsCustom.setId(id);

        itemsMapper.updateByPrimaryKeyWithBLOBs(itemsCustom);

    }

    @Override

    public void deleteItems(Integer[] ids) throws Exception {

        //这里进行删除

        if(ids!=null){

        //循环删除

            for(Integer id:ids) {

                itemsMapper.deleteByPrimaryKey(id);

            }

        }

    }

}
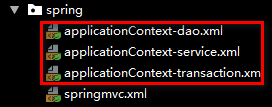
2.在spring中配置service接口(applicationContext-service.xml)
创建applicationContext-service.xml,文件中配置service
<?xml version="1.0" encoding="UTF-8"?>

<beans xmlns:xsi="http://www.w3.org/2001/XMLSchema-instance"

	   xmlns="http://www.springframework.org/schema/beans"

	   xmlns:context="http://www.springframework.org/schema/context"

	   xmlns:aop="http://www.springframework.org/schema/aop"

	   xmlns:tx="http://www.springframework.org/schema/tx"

	   xsi:schemaLocation="http://www.springframework.org/schema/context

	   http://www.springframework.org/schema/context/spring-context-4.2.xsd

	   http://www.springframework.org/schema/aop http://www.springframework.org/schema/aop/spring-aop-4.2.xsd

	   http://www.springframework.org/schema/tx http://www.springframework.org/schema/tx/spring-tx-4.2.xsd

	   http://www.springframework.org/schema/beans http://www.springframework.org/schema/beans/spring-beans-4.2.xsd ">

	<!--商品管理的service-->

<bean id="itemsService" class="com.ssm.service.ItemsServiceImpl"></bean>

</beans>
事务控制:applicationContext-transaction.xml
<?xml version="1.0" encoding="UTF-8"?>

<beans xmlns:xsi="http://www.w3.org/2001/XMLSchema-instance"

	   xmlns="http://www.springframework.org/schema/beans"

	   xmlns:context="http://www.springframework.org/schema/context"

	   xmlns:aop="http://www.springframework.org/schema/aop"

	   xmlns:tx="http://www.springframework.org/schema/tx"

	   xsi:schemaLocation="http://www.springframework.org/schema/context

	   http://www.springframework.org/schema/context/spring-context-4.2.xsd

	   http://www.springframework.org/schema/aop http://www.springframework.org/schema/aop/spring-aop-4.2.xsd

	   http://www.springframework.org/schema/tx http://www.springframework.org/schema/tx/spring-tx-4.2.xsd

	   http://www.springframework.org/schema/beans http://www.springframework.org/schema/beans/spring-beans-4.2.xsd ">

	<!--事务管理器

	对 mybatis操作数据库事务控制,spring使用jdbc的事务控制类

	-->

<bean id="transactionmanager" class="org.springframework.jdbc.datasource.DataSourceTransactionManager">

	<!--数据源的配置  在application中dao-->

	<property name="dataSource" ref="dataSource"></property>

</bean>

	<!--配置通知-->

	<tx:advice id="txAdvice" transaction-manager="transactionmanager">

		<tx:attributes>

			<tx:method name="save*"  propagation="REQUIRED"/>

			<tx:method name="delete*" propagation="REQUIRED"/>

			<tx:method name="insert*" propagation="REQUIRED"/>

			<tx:method name="update*" propagation="REQUIRED"/>

			<tx:method name="find*" propagation="SUPPORTS" read-only="true"/>

			<tx:method name="get*" propagation="SUPPORTS" read-only="true"/>

			<tx:method name="select*" propagation="SUPPORTS" read-only="true"/>

		</tx:attributes>

	</tx:advice>

	<!--谁去调用通知,就是aop	-->

	<aop:config>

		<aop:pointcut id="pc" expression="execution(* com.ssm.service.*ServiceImpl.*())"></aop:pointcut>

		<aop:advisor advice-ref="txAdvice" pointcut-ref="pc"></aop:advisor>

	</aop:config>

</beans>
五.整合springmvc
创建springmvc.xml文件,配置处理器映射器、适配器、视图解析器。
1.创建springmvc.xml文件
<?xml version="1.0" encoding="UTF-8"?>

<beans xmlns:xsi="http://www.w3.org/2001/XMLSchema-instance"

	   xmlns="http://www.springframework.org/schema/beans"

	   xmlns:context="http://www.springframework.org/schema/context"

	   xmlns:aop="http://www.springframework.org/schema/aop"

	   xmlns:tx="http://www.springframework.org/schema/tx"

	   xmlns:mvc="http://www.springframework.org/schema/mvc"

	   xsi:schemaLocation="http://www.springframework.org/schema/beans

	   http://www.springframework.org/schema/beans/spring-beans-4.2.xsd

	   http://www.springframework.org/schema/context

	   http://www.springframework.org/schema/context/spring-context-4.2.xsd

	   http://www.springframework.org/schema/aop

  	   http://www.springframework.org/schema/aop/spring-aop-4.2.xsd

	   http://www.springframework.org/schema/tx http://www.springframework.org/schema/tx/spring-tx-4.2.xsd

	   http://www.springframework.org/schema/mvc http://www.springframework.org/schema/mvc/spring-mvc-4.2.xsd ">

	<!--注解的handler配置-->

	<context:component-scan base-package="com.ssm.controller"/>

    <!--静态资源的解析-->

    <mvc:resources location="/js/" mapping="/js/**"/>

    <!--使用springmvc 注解驱动,代替上边注解的映射器和注解适配器-->

	<mvc:annotation-driven></mvc:annotation-driven>

	<!--配置视图解析器-->

	<!--配置解析js的视图解析器 默认使用jstl的包-->

	<bean class="org.springframework.web.servlet.view.InternalResourceViewResolver">

		<property name="prefix" value="/WEB-INF/jsp/"></property>

		<property name="suffix" value=".jsp"></property>

	</bean>

</beans>
2.配置前端控制器
<?xml version="1.0" encoding="UTF-8"?>

<web-app xmlns="http://xmlns.jcp.org/xml/ns/javaee"

         xmlns:xsi="http://www.w3.org/2001/XMLSchema-instance"

         xsi:schemaLocation="http://xmlns.jcp.org/xml/ns/javaee http://xmlns.jcp.org/xml/ns/javaee/web-app_3_1.xsd"

         version="3.1">

    <!--加载spring的容器-->

    <context-param>

        <param-name>contextConfigLocation</param-name>

        <param-value>/WEB-INF/classes/spring/applicationContext-*.xml</param-value>

    </context-param>

    <listener>

        <listener-class>org.springframework.web.context.ContextLoaderListener</listener-class>

    </listener>

    <!--配置前段控制器-->

    <servlet>

        <servlet-name>springmvc</servlet-name>

        <servlet-class>org.springframework.web.servlet.DispatcherServlet</servlet-class>

        <!--contextConfigLocation配置加载文件,(配置处理器,映射器,适配器等)-->

        <init-param>

            <param-name>contextConfigLocation</param-name>

            <param-value>classpath:config/spring/springmvc.xml</param-value>

        </init-param>

    </servlet>

    <!--1 *.action 访问.action结尾由DispatcherServle解析-->

    <!--2  / 所有访问的地址都有DispatcherServle解析,对于静态文件不需要DispatcherServle解析,不去寻找handler-->

    <!--使用此种方法可以实现RESTful风格的配置-->

    <!---->

    <!--3  /*  最终转发到一个jsp页面,仍然由DispatcherServle解析,不能根据jsp找到handler -->

    <servlet-mapping>

        <servlet-name>springmvc</servlet-name>

        <url-pattern>*.action</url-pattern>

    </servlet-mapping>

</web-app>
3.编写controller
package com.ssm.controller;

import com.ssm.exception.CustomException;

import com.ssm.po.ItemsCustom;

import com.ssm.po.ItemsQueryVo;

import com.ssm.service.ItemsService;

import com.ssm.validation.ValidGroup1;

import org.springframework.beans.factory.annotation.Autowired;

import org.springframework.http.HttpRequest;

import org.springframework.stereotype.Controller;

import org.springframework.ui.Model;

import org.springframework.validation.BindingResult;

import org.springframework.validation.ObjectError;

import org.springframework.validation.annotation.Validated;

import org.springframework.web.bind.annotation.*;

import org.springframework.web.multipart.MultipartFile;

import org.springframework.web.servlet.ModelAndView;

import javax.annotation.Resource;

import javax.servlet.annotation.MultipartConfig;

import javax.servlet.http.HttpServletRequest;

import java.io.File;

import java.util.*;

/**

 * Description:

 * User: jiatp

 * Date:2019/9/7 0007 下午 8:40

*/

@Controller

@RequestMapping("/items")

public class ItemsController {

    @Autowired

    private ItemsService itemsService;

    //商品信息查询

    @RequestMapping("/queryItems")

    public ModelAndView queryItems(HttpServletRequest request, ItemsQueryVo itemsQueryVo) throws Exception{

        String id = request.getParameter("id");

        System.out.println(id);

        //调用service查找数据库,查询商品列表,这里使用静态模拟

        List<ItemsCustom> itemsList = itemsService.findItemsList(itemsQueryVo);

        //返回ModelAndView

        ModelAndView modelAndView = new ModelAndView();

        modelAndView.addObject("itemsList",itemsList);//相当于request.setAtttributes

        modelAndView.setViewName("items/itemsList");//指定返回的视图

        return modelAndView;

    }

}
4.编写jsp
将从数据库中的数据查询出来,显示在页面。
<%@ page language="java" contentType="text/html; charset=UTF-8"

    pageEncoding="UTF-8"%>

<%@ taglib uri="http://java.sun.com/jsp/jstl/core" prefix="c" %>

<%@ taglib uri="http://java.sun.com/jsp/jstl/fmt"  prefix="fmt"%>

<!DOCTYPE html PUBLIC "-//W3C//DTD HTML 4.01 Transitional//EN" "http://www.w3.org/TR/html4/loose.dtd">

<html>

<head>

<meta http-equiv="Content-Type" content="text/html; charset=UTF-8">

<title>查询商品列表</title>

</head>

<body>

当前用户:${username}

<c:if test="${username!=null}">

	<a href="${pageContext.request.contextPath}/logout.action" >退出</a>

</c:if>

<form name="itemsForm" action="${pageContext.request.contextPath}/items/queryItems.action" method="post">

查询条件:

<table width="100%" border=1>

<tr>

<td>商品名称:<input name="itemsCustom.name"/>

	商品类型:

	<select name="itemtype">

		<c:forEach items="${itemtypes }" var="itemtype">

			<option value="${itemtype.key }">${itemtype.value }</option>

		</c:forEach>

	</select>

</td>

	<td><input type="button" value="查询" οnclick="queryItems()"/></td>

</tr>

</table>

商品列表:

<table width="100%" border=1>

<tr>

	<td>选择</td>

	<td>商品名称</td>

	<td>商品价格</td>

	<td>生产日期</td>

	<td>商品描述</td>

	<td>操作</td>

</tr>

<c:forEach items="${itemsList }" var="item">

<tr>

	<td><input type="checkbox" name="items_id" value="${item.id}"/></td>

	<td>${item.name }</td>

	<td>${item.price }</td>

	<td><fmt:formatDate value="${item.createtime}" pattern="yyyy-MM-dd HH:mm:ss"/></td>

	<td>${item.detail }</td>

	<td><a href="${pageContext.request.contextPath }/items/editItems.action?id=${item.id}">修改</a></td>

</tr>

</c:forEach>

</table>

</form>

</body>

</html>
5.加载spring容器
将mapper、service、controller加载到spring容器中。

建议使用通配符加载上边的配置文件。在web.xml中,添加spring容器监听器,加载spring容器。

测试:

03_springmvc整合mybatis的更多相关文章
- springboot使用之二:整合mybatis(xml方式)并添加PageHelper插件
整合mybatis实在前面项目的基础上进行的,前面项目具体整合请参照springboot使用之一. 一.整合mybatis 整合mybatis的时候可以从mybatis官网下载mybatis官网整合的 ...
- Spring学习总结(六)——Spring整合MyBatis完整示例
为了梳理前面学习的内容<Spring整合MyBatis(Maven+MySQL)一>与<Spring整合MyBatis(Maven+MySQL)二>,做一个完整的示例完成一个简 ...
- Spring学习总结(五)——Spring整合MyBatis(Maven+MySQL)二
接着上一篇博客<Spring整合MyBatis(Maven+MySQL)一>继续. Spring的开放性和扩张性在J2EE应用领域得到了充分的证明,与其他优秀框架无缝的集成是Spring最 ...
- SpringMVC入门二: 1规范结构, 2简单整合MyBatis
昨天拿springMVC写的helloworld结构不好, 这次先调整一下体系结构 , 然后简单整合一下MyBatis spring的配置还是以注解为主, 不过MyBatis的映射文件什么的还是拿xm ...
- 分析下为什么spring 整合mybatis后为啥用不上session缓存
因为一直用spring整合了mybatis,所以很少用到mybatis的session缓存. 习惯是本地缓存自己用map写或者引入第三方的本地缓存框架ehcache,Guava 所以提出来纠结下 实验 ...
- 2017年2月16日 分析下为什么spring 整合mybatis后为啥用不上session缓存
因为一直用spring整合了mybatis,所以很少用到mybatis的session缓存. 习惯是本地缓存自己用map写或者引入第三方的本地缓存框架ehcache,Guava 所以提出来纠结下 实验 ...
- Spring Boot 整合 MyBatis
前言 现在业界比较流行的数据操作层框架 MyBatis,下面就讲解下 Springboot 如何整合 MyBatis,这里使用的是xml配置SQL而不是用注解.主要是 SQL 和业务代码应该隔离,方便 ...
- SpringBoot整合Mybatis之项目结构、数据源
已经有好些日子没有总结了,不是变懒了,而是我一直在奋力学习springboot的路上,现在也算是完成了第一阶段的学习,今天给各位总结总结. 之前在网上找过不少关于springboot的教程,都是一些比 ...
- spring整合mybatis错误:class path resource [config/spring/springmvc.xml] cannot be opened because it does not exist
spring 整合Mybatis 运行环境:jdk1.7.0_17+tomcat 7 + spring:3.2.0 +mybatis:3.2.7+ eclipse 错误:class path reso ...
随机推荐
- Activiti学习笔记10 — 动态任务分配
动态任务分配使用的两种方式 一.通过特殊表达式,来获取任务信息 ,在流程 UserTask节点上设置 ${流程变量的Key} 1.流程定义 <?xml version="1.0&quo ...
- python中的OrderedDict
该类型存放顺序和添加顺序一致,比如逐个赋值,但和dict直接转化过去的顺序不一定一样. d1 = collections.OrderedDict() d1['b'] = 'B'd1['a'] = 'A ...
- java继承,多态
子类继承父类,用父类去接收子类,其实我觉得用父类,子类来形容继承关系是不恰当的,比如再发生多态的时候,Car c = new W();w是大众,你能说Car 和W是父子关系吗,我觉得用所属关系类描述可 ...
- thinkphp5+GatewayWorker+Workerman
项目地址 ttps://www.workerman.net/workerman-chat thinkphp5+GatewayWorker+Workerman聊天室,可以多人聊天,指定某个人进行聊天, ...
- 校园商铺-4店铺注册功能模块-8店铺注册之Controller层的改造
不合理的地方: 1. 并不需要将InputStream转换成File类型,直接将InputStream传进入交给CommonsMultipartfile去处理就可以了 如果做这样的转换,每次都需要生成 ...
- 廖雪峰Java16函数式编程-2Stream-5filter
1.filter简介 Stream.filter()是一个转换方法,把一个Stream转换为另一个Stream. 所谓filter操作,就是对一个Stream的所有元素进行测试,不满足条件的元素就被过 ...
- jquery高级编程学习
jquery高级编程 第1章.jQuery入门 类型检查 对象 类型检查表达式 String typeof object === "string" Number typeof ob ...
- luoguP1062 数列 [数学]
题目描述 给定一个正整数k(3≤k≤15),把所有k的方幂及所有有限个互不相等的k的方幂之和构成一个递增的序列,例如,当k=3时,这个序列是: 1,3,4,9,10,12,13,… (该序列实际上就是 ...
- bfs+dfs乱搞+类似拓扑排序——cf1182D
代码不知道上了多少补丁..终于过了 用类似拓扑排序的办法收缩整棵树得到x,然后找到x直连的最远的和最近的点 只有这三个点可能是根,依次判一下即可 另外题解的第一种方法时找直径,然后判两端点+重心+所有 ...
- js 实现 map 工具类
/* * MAP对象,实现MAP功能 * * 接口: * size() 获取MAP元素个数 * isEmpty() 判断MAP是否为空 * clear() 删除MAP所有元素 * put(key, v ...
