springboot jar文件打zip包运行linux环境中
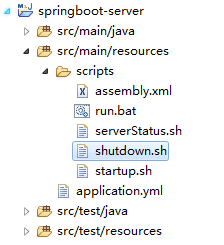
1.添加打包配置文件
1.1 assembly.xml
<assembly

    xmlns="http://maven.apache.org/plugins/maven-assembly-plugin/assembly/1.1.2"

    xmlns:xsi="http://www.w3.org/2001/XMLSchema-instance"

    xsi:schemaLocation="http://maven.apache.org/plugins/maven-assembly-plugin/assembly/1.1.2 http://maven.apache.org/xsd/assembly-1.1.2.xsd">

    <id>bin</id>

    <formats>

        <format>zip</format>

    </formats>

    <dependencySets>

        <dependencySet>

            <useProjectArtifact>true</useProjectArtifact>

            <outputDirectory>lib</outputDirectory>

        </dependencySet>

    </dependencySets>

    <fileSets>

        <fileSet>

            <directory>${project.build.directory}/bin</directory>

            <outputDirectory>/bin</outputDirectory>

            <fileMode>0777</fileMode>

        </fileSet>

        <fileSet>

            <directory>${project.build.directory}/conf</directory>

            <outputDirectory>/conf</outputDirectory>

            <fileMode>0644</fileMode>

        </fileSet>

    </fileSets>

</assembly>
1.2 serverStatus.sh
#!/bin/sh

if [ ! -n "$JAVA_HOME" ]; then

    export JAVA_HOME="/export/server/jdk1.8.0_141"

fi

APP_MAIN=${application.main.class}

PID=

getPID(){

    javaps=`$JAVA_HOME/bin/jps -l | grep $APP_MAIN`

    if [ -n "$javaps" ]; then

        PID=`echo $javaps | awk '{print $1}'`

    else

        PID=

    fi

}

getServerStatus(){

    getPID

    echo "================================================================================================================"

    if [ $PID -ne  ]; then

        echo "$APP_MAIN is running(PID=$PID)"

        echo "================================================================================================================"

    else

        echo "$APP_MAIN is not running"

        echo "================================================================================================================"

    fi

}

getServerStatus
1.3 shutdown.sh
#!/bin/sh

if [ ! -n "$JAVA_HOME" ]; then

    export JAVA_HOME="/export/server/jdk1.8.0_141"

fi

APP_MAIN=${application.main.class}

PID=

getPID(){

    javaps=`$JAVA_HOME/bin/jps -l | grep $APP_MAIN`

    if [ -n "$javaps" ]; then

        PID=`echo $javaps | awk '{print $1}'`

    else

        PID=

    fi

}

shutdown(){

    getPID

    echo "================================================================================================================"

    if [ $PID -ne  ]; then

        echo -n "Stopping $APP_MAIN(PID=$PID)..."

        kill - $PID

        if [ $? -eq  ]; then

            echo "[Success]"

            echo "================================================================================================================"

        else

            echo "[Failed]"

            echo "================================================================================================================"

        fi

        getPID

        if [ $PID -ne  ]; then

            shutdown

        fi

    else

        echo "$APP_MAIN is not running"

        echo "================================================================================================================"

    fi

}

shutdown
1.4 startup.sh
#!/bin/sh

#-------------------------------------------------------------------------------------------------------------

#该脚本的使用方式为-->[sh startup.sh]

#该脚本可在服务器上的任意目录下执行,不会影响到日志的输出位置等

#-------------------------------------------------------------------------------------------------------------

if [ ! -n "$JAVA_HOME" ]; then

    export JAVA_HOME="/export/server/jdk1.8.0_141"

fi

#-------------------------------------------------------------------------------------------------------------

#       系统运行参数

#-------------------------------------------------------------------------------------------------------------

DIR=$(cd "$(dirname "$")"; pwd)

APP_HOME=${DIR}/..

CLASSPATH=$APP_HOME/conf

APP_LOG=${APP_HOME}/logs

APP_CONFIG=${APP_HOME}/conf/application.yml

APP_MAIN=${application.main.class}

JAVA_OPTS="$JAVA_OPTS -server -Xms512m -Xmx512m -Xmn128m -XX:ParallelGCThreads=20 -XX:+UseConcMarkSweepGC -XX:MaxGCPauseMillis=850 -XX:+PrintGCDetails -Xloggc:$APP_LOG/gc.log -Dfile.encoding=UTF-8"

JAVA_OPTS="$JAVA_OPTS -DlogPath=$APP_LOG"

JAVA_OPTS="$JAVA_OPTS -Dconf.config=file:${APP_CONFIG}"

echo "JAVA_HOME="$JAVA_HOME

echo "CLASSPATH="$CLASSPATH

echo "JAVA_OPTS="$JAVA_OPTS

#-------------------------------------------------------------------------------------------------------------

#   程序开始

#-------------------------------------------------------------------------------------------------------------

for appJar in "$APP_HOME"/lib/*.jar;

do

   CLASSPATH="$CLASSPATH":"$appJar"

done

PID=0

getPID(){

    javaps=`$JAVA_HOME/bin/jps -l | grep $APP_MAIN`

    if [ -n "$javaps" ]; then

        PID=`echo $javaps | awk '{print $1}'`

    else

        PID=0

    fi

}

startup(){

    getPID

    echo "================================================================================================================"

    if [ $PID -ne 0 ]; then

        echo "$APP_MAIN already started(PID=$PID)"

        echo "================================================================================================================"

    else

        echo -n "Starting $APP_MAIN"

         if [ ! -d "$APP_LOG" ]; then

            mkdir "$APP_LOG"

         fi

        nohup $JAVA_HOME/bin/java $JAVA_OPTS -classpath $CLASSPATH $APP_MAIN &

        for i in $(seq 5)

        do

        sleep 0.8

        echo -e  ".\c"

        done

        getPID

        if [ $PID -ne 0 ]; then

            echo "(PID=$PID)...[Success]"

            echo "================================================================================================================"

        else

            echo "[Failed]"

            echo "================================================================================================================"

        fi

    fi

}

startup
1.5 run.bat
title face-server

@echo off

rem ##############设置延迟环境变量扩充,即感叹号间的值不会因跳出循环而为空值。################

setlocal enabledelayedexpansion

rem ###############java命令######################

set JAVA=%JAVA_HOME%\bin\java.exe

rem ###############jvm参数######################

set OPTS=-Xms512M -Xmx512M -XX:+AggressiveOpts -XX:+UseParallelGC -XX:NewSize=64M

rem ###############agent启动类参数######################

set serverMain=cn.micropattern.face.Application

echo JAVA: %JAVA%

echo CLASSPATH: %CP%

echo OPTS: %OPTS%

java %OPTS%  -cp "../lib/*;../conf" %serverMain%

PAUSE
1.6 pom.xml依赖
<?xml version="1.0" encoding="UTF-8"?>

<project xmlns="http://maven.apache.org/POM/4.0.0"

         xmlns:xsi="http://www.w3.org/2001/XMLSchema-instance"

         xsi:schemaLocation="http://maven.apache.org/POM/4.0.0 http://maven.apache.org/xsd/maven-4.0.0.xsd">

    <modelVersion>4.0.0</modelVersion>

    <groupId>com.test</groupId>

    <artifactId>springboot-zip</artifactId>

    <version>1.0-SNAPSHOT</version>

    <properties>

        <application.main.class>com.test.Application</application.main.class>

        <spring.boot.version>1.5.9.RELEASE</spring.boot.version>

    </properties>

    <dependencies>

        <dependency>

            <groupId>org.springframework.boot</groupId>

            <artifactId>spring-boot-starter-tomcat</artifactId>

            <version>${spring.boot.version}</version>

        </dependency>

        <dependency>

            <groupId>org.springframework.boot</groupId>

            <artifactId>spring-boot-starter-actuator</artifactId>

            <version>${spring.boot.version}</version>

        </dependency>

        <dependency>

            <groupId>org.springframework.boot</groupId>

            <artifactId>spring-boot-starter-web</artifactId>

            <version>${spring.boot.version}</version>

        </dependency>

        <dependency>

            <groupId>org.springframework.boot</groupId>

            <artifactId>spring-boot-starter-freemarker</artifactId>

            <version>${spring.boot.version}</version>

        </dependency>

    </dependencies>

    <build>

        <sourceDirectory>src/main/java</sourceDirectory>

        <resources>

            <resource>

                <directory>src/main/resources</directory>

                <filtering>true</filtering>

                <includes>

                    <include>*.properties</include>

                    <include>*.yml</include>

                    <include>*.xml</include>

                </includes>

            </resource>

            <resource>

                <directory>src/main/resources</directory>

                <filtering>false</filtering>

                <excludes>

                    <exclude>scripts/*</exclude>

                    <exclude>*.properties</exclude>

                    <exclude>*.yml</exclude>

                    <exclude>*.xml</exclude>

                </excludes>

            </resource>

            <!-- 收集运行脚本 -->

            <resource>

                <directory>src/main/resources/scripts</directory>

                <targetPath>${project.build.directory}/bin</targetPath>

                <filtering>true</filtering>

                <includes>

                    <include>*.sh</include>

                    <include>*.bat</include>

                </includes>

            </resource>

            <!-- 收集配置文件 -->

            <resource>

                <directory>src/main/resources</directory>

                <targetPath>${project.build.directory}/conf</targetPath>

                <filtering>true</filtering>

                <includes>

                    <include>*.properties</include>

                    <include>*.yml</include>

                    <include>*.xml</include>

                </includes>

            </resource>

            <!-- 收集手动导入的jar包 -->

            <resource>

                <directory>lib</directory>

                <targetPath>${project.build.directory}/lib</targetPath>

            </resource>

        </resources>

        <plugins>

            <!-- 1.用于编译的plugin -->

            <!-- <plugin> -->

            <!-- <groupId>org.apache.maven.plugins</groupId> -->

            <!-- <artifactId>maven-compiler-plugin</artifactId> -->

            <!-- <version>3.1</version> -->

            <!-- <configuration> -->

            <!-- <fork>true</fork> -->

            <!-- <source>1.8</source> -->

            <!-- <target>1.8</target> -->

            <!-- <encoding>UTF-8</encoding> -->

            <!-- </configuration> -->

            <!-- </plugin> -->

            <!-- 2.用于生成jar包的plugin -->

            <plugin>

                <groupId>org.apache.maven.plugins</groupId>

                <artifactId>maven-jar-plugin</artifactId>

                <version>2.6</version>

                <configuration>

                    <outputDirectory>${project.build.directory}/lib</outputDirectory>

                    <archive>

                        <manifest>

                            <addClasspath>true</addClasspath>

                            <classpathPrefix>lib/</classpathPrefix>

                        </manifest>

                    </archive>

                    <excludes>

                        <exclude>*.xml</exclude>

                        <exclude>*.yml</exclude>

                        <exclude>*.properties</exclude>

                    </excludes>

                </configuration>

            </plugin>

            <!-- 3.用于拷贝maven依赖(lib)的plugin -->

            <plugin>

                <groupId>org.apache.maven.plugins</groupId>

                <artifactId>maven-dependency-plugin</artifactId>

                <executions>

                    <execution>

                        <id>copy-dependencies</id>

                        <phase>package</phase>

                        <goals>

                            <goal>copy-dependencies</goal>

                        </goals>

                        <configuration>

                            <outputDirectory>${project.build.directory}/lib</outputDirectory>

                        </configuration>

                    </execution>

                </executions>

            </plugin>

            <!-- 4.用于拷贝resource文件夹 的plugin -->

            <!-- 5.配置生成源代码jar的plugin[这里的源代码是指java文件,不是class文件] -->

            <plugin>

                <artifactId>maven-source-plugin</artifactId>

                <version>2.4</version>

                <configuration>

                    <attach>true</attach>

                    <!-- 配置源代码jar文件的存放路径 -->

                    <outputDirectory>${project.build.directory}</outputDirectory>

                </configuration>

                <executions>

                    <execution>

                        <phase>compile</phase>

                        <goals>

                            <goal>jar</goal>

                        </goals>

                    </execution>

                </executions>

            </plugin>

            <!-- 打包zip -->

            <plugin>

                <groupId>org.apache.maven.plugins</groupId>

                <artifactId>maven-assembly-plugin</artifactId>

                <executions>

                    <execution>

                        <id>dfrp-portal</id>

                        <configuration>

                            <archive>

                                <manifest>

                                    <mainClass>${application.main.class}</mainClass>

                                </manifest>

                            </archive>

                            <descriptors>

                                <descriptor>src/main/resources/scripts/assembly.xml</descriptor>

                            </descriptors>

                            <!-- 将依赖jar包都包含在目标jar中 -->

                            <!-- <descriptorRefs> -->

                            <!-- <descriptorRef>jar-with-dependencies</descriptorRef> -->

                            <!-- </descriptorRefs> -->

                            <finalName>${project.name}-${version}</finalName>

                        </configuration>

                        <phase>package</phase>

                        <goals>

                            <goal>single</goal>

                        </goals>

                    </execution>

                </executions>

            </plugin>

        </plugins>

    </build>

</project>
1.7controller层
@RestController

public class TestController {

    @RequestMapping("/helloworld")

    public String hello(String name) {

        return "name" + name;

    }

}
1.8Application启动类
@SpringBootApplication

public class Application {

    private static final Logger LOG = LoggerFactory.getLogger(Application.class);

    public static void main(String[] args) {

        SpringApplication app = new SpringApplication(Application.class);

        app.setBannerMode(Banner.Mode.OFF);

        app.run(args);

        LOG.info("**************** Startup Success ****************");

    }

}
1.9application.yml
server:

  port: 7070

  session-timeout: 0

  context-path: /
2.打包 install -Dmaven.test.skip=true
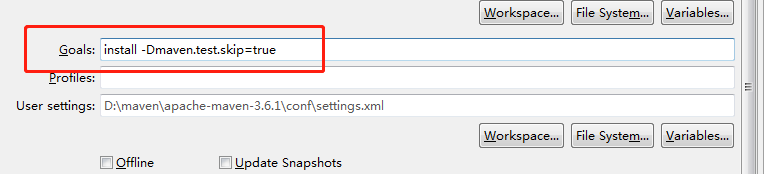
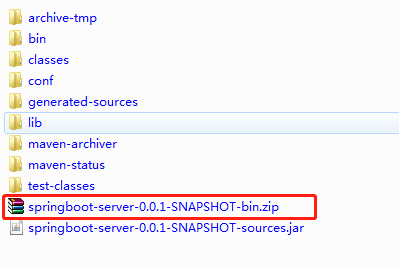
执行完命令后zip包在target文件路径下生成
3.linux启动服务
上传并解压zip包


启动成功
4.测试

测试成功
springboot jar文件打zip包运行linux环境中的更多相关文章
- Maven打包成Jar文件时依赖包的问题
我们项目中使用到第三方的库文件,这些jar库文件并没有放到Maven中央库上,导致我们需要在项目中自己配置使用.我们的两三个开发人员对Java都是很熟,因此在使用中遇到了一些问题,表现在:在本地中引入 ...
- mac终端命令加密压缩文件为zip包
mac终端命令加密压缩文件为zip包,命令如下: zip -e ~/desktop/a.zip b.doc c.txt d.sql 注释:a.zip为加密后的文件 b.doc c.txt d.sql为 ...
- java批量下载文件为zip包
批量下载文件为zip包的工具类 package com.meeno.trainsys.util; import javax.servlet.http.HttpServletRequest; impor ...
- 将jar文件加到Maven的local repository中
对于Maven项目来说,日常使用的多数第三方java库文件都可以从Maven的Central Repository中自动下载,但是如果我们需要的jar文件不在Central Repository中,那 ...
- 【Azure 应用服务】PHP应用部署在App Service for Linux环境中,上传文件大于1MB时,遇见了413 Request Entity Too Large 错误的解决方法
问题描述 在PHP项目部署在App Service后,上传文件如果大于1MB就会遇见 413 Request Entity Too Large 的问题. 问题解决 目前这个问题,首先需要分析应用所在的 ...
- 她娇羞道“不用这样细致认真的说啊~~”———详细图解在Linux环境中创建运行C程序
她娇羞说,不用这样细致认真的说啊———详细图解在Linux环境中创建运行C程序“不,这是对学习的负责”我认真说到 叮叮叮,停车,让我们看看如何在Linux虚拟机环境中,创建运行C程序 详细图解在Lin ...
- [软件测试]Linux环境中简单清爽的Google Test (GTest)测试环境搭建(初级使用)
本文将介绍单元测试工具google test(GTEST)在linux操作系统中测试环境的搭建方法.本文属于google test使用的基础教程.在linux中使用google test之前,需要对如 ...
- 【Azure 应用服务】NodeJS Express + MSAL 应用实现AAD集成登录并部署在App Service Linux环境中的实现步骤
问题描述 实现部署NodeJS Express应用在App Service Linux环境中,并且使用Microsoft Authentication Library(MSAL)来实现登录Azure ...
- Linux环境中Openfire安装指南
Linux环境中Openfire安装指南 安装环境: 安装软件:Openfire 4_1_0 http://download.igniterealtime.org/openfire/openfire_ ...
随机推荐
- 栈和队列----将单链表的每K个节点之间逆序
将单链表的每K个节点之间逆序 给定一个单链表的头节点head,实现一个调整链表的函数,使得每K 个节点之间逆序,如果最后剩下不够K 个节点,则不调整最后几个. 例如: 链表:1—>2—>3 ...
- openlayers 保存当前地图View为图片
/** * 保存地图为图片工具栏 */function addMapToolSavePicture() { var saveElement = document.createElement('a'); ...
- [LGR-054]洛谷10月月赛II
浏览器 结论popcnt(x^y)和popcnt(x)+popcnt(y)的奇偶性相同. 然后就是popcnt为奇数的乘为偶数的.预处理一下\(2^{16}\)次方以内的popcnt,直接\(O(1) ...
- 网络编程UDP、TCP详解
网络编程 网络编程主要用于解决计算机与计算机(手机.平板-)之间的数据传输问题. 1.InetAddress(IP类) 方法: 方法 描述 getLocalHost() 获取本机的IP地址对象 ...
- 题解 CF755A 【PolandBall and Hypothesis】
直接从1开始枚举不就行了... 思路如下: 1.先定义一个判断是不是质数的函数 int pd(int n) { if(n==1)return true; if(n==2)return false; f ...
- python+selenium自动化禅道登录测试
本文以禅道登录测试为例,思路主要分openBrowser.openUrl.findElement.sendVals.checkResult.ReadUserdate六部分 openBrowser de ...
- python面试的100题(21)
正则表达式 94.请写出一段代码用正则匹配出ip? ip地址的生成规则. IP地址,是由32位数字二进制转为四个十进制的字符串组成. 怎么转化?下面讲解: 二进制:111111111111111111 ...
- Your wechat account may be LIMITED to log in WEB wechat, error info: <error><ret>1203</ret><message>为了你的帐号安全,此微信号不能登录网页微信。你可以使用Windows微信或Mac微信在电脑端登录。Windows微信下载地址:WeChat for PC
转载:https://zhuanlan.zhihu.com/p/76180564 微信网页版限制登录或禁止登录将影响一大批使用itchat等Web Api方案的微信机器人 网页版微信 API 被封了, ...
- sql查询 —— 分页
-- 分页 -- limit -- limit start count (start 显示骑士值,单页数量) select *from student where gender=1 limit 6,3 ...
- shell 预定义变量
echo "上一次后台pid is $!"echo "当前进程pid is $$"echo "last command return code is ...