Egret入门了解
0.前言
这个星期没有什么事做,就想找点技术了解一下。前段时间看过Egret,用来开发HTML5小游戏。一开始以为很麻烦的,但是经过这两天了解了一下,如果用这个游戏引擎来开发一些简单的游戏,还是蛮方便的。为什么会了解这个,是因为有个同事是开发Android的,是开发那种普通APP,就是一些简单的界面,跟硬件收发一下数据,然后展现出来。总体开发没有难点的,就是用Android开发那种界面交互效果很差,好看一点的呢,开发效率又很低。我就跟他提出,可以用html5画一些界面和一些动画效果。经过这两天了解,发现基本的交互是可以的。就是不知道放到APP里面会不会效果不好。
基本原理是,用Egret开发一个小动画,带互动功能。Android端APP在里面使用WEB进行显示,类似于在APP中启动一个小型的HTTP服务器。具体我也不是很懂。然后APP和我用Egret开发的网页两者的通信就使用WebSocket进行通信,这一步都只是初步想法。具体没有进行实现,只是觉得利用WEB的开发效率来降低APP开发的复杂度还是不错的。
这一篇博客,不会讲很多知识,就是了解一下白鹭引擎Egret而已。
1.下载开发软件
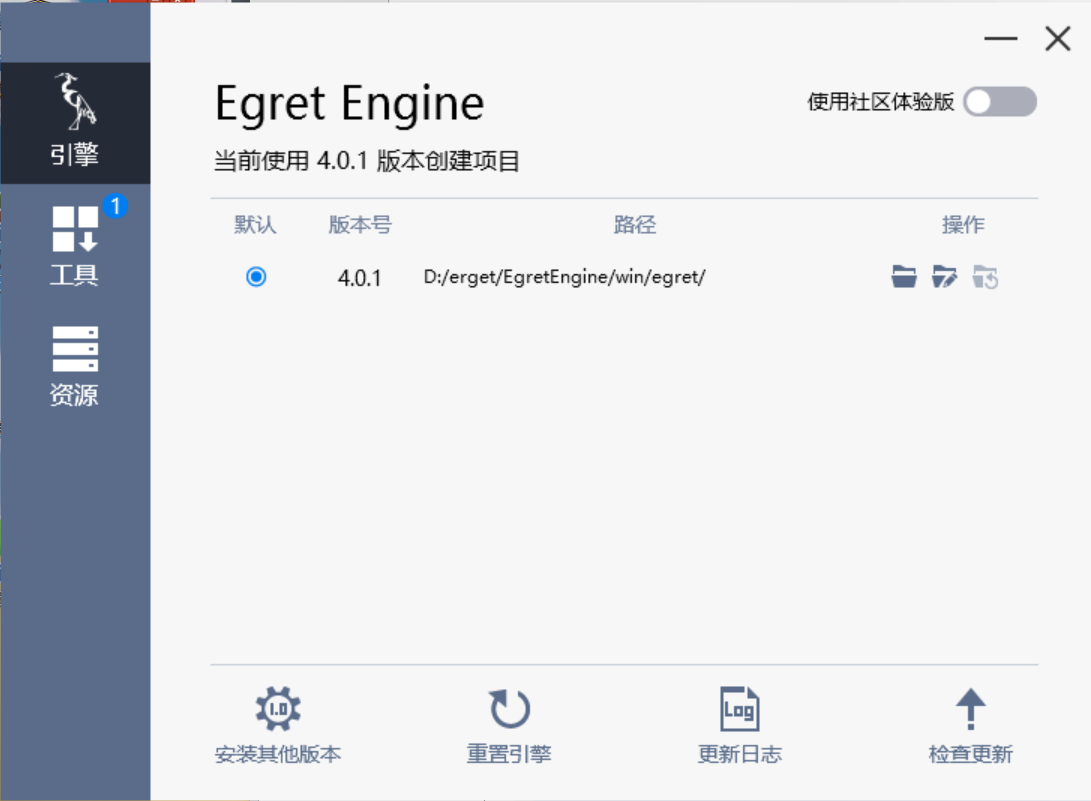
直接在这里进行下载,https://www.egret.com/products/engine.html 在这里下载最新版。

下载最新版后,在这个类似引擎商店进行下载,对与写个HelloWorld就使用EgretWing这个IDE就可以了,其他的暂时用不到,具体可以在官网进行了解。
2.新建工程
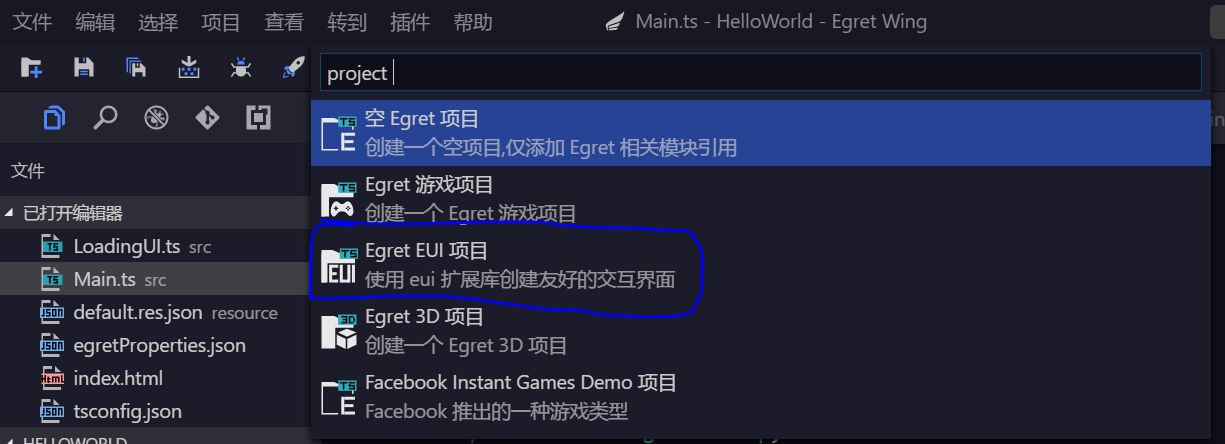
打开Egret Wing IDE,新建工程,文件->新建工程->新建EUI工程

创建完后,直接按F5运行,就可以看到效果了。其他的不用管,看src目录下Main.ts文件,这个就是源代码了。至于其他目录和其他配置文件这个就看官网介绍就可以了,这多说也没有什么意义的。
3.了解基本代码
具体的代码就下面这些了。用的是TypeScript语法 。
 class Main extends egret.DisplayObjectContainer {

     //一些全局变量

     private loadingView: LoadingUI;

     private car1: egret.Bitmap;

     private car2: egret.Bitmap;

     private start: egret.Bitmap;

     private pause: egret.Bitmap;

     private pause_start: egret.Bitmap;

     private stop: egret.Bitmap;

     private topMask: egret.Shape;

     private line: egret.Shape;

     private icon: egret.Bitmap;

     private colorLabel: egret.TextField;

     private textfield: egret.TextField;

     private left_mm: number;

     private right_mm: number;

     private run_left_1: egret.Bitmap;

     private run_left_2: egret.Bitmap;

     private run_right_1: egret.Bitmap;

     private run_right_2: egret.Bitmap;

     private speed: number;

     private isPause: boolean;

     public constructor() {

         super();

         this.addEventListener(egret.Event.ADDED_TO_STAGE, this.onAddToStage, this);

     }

     private onAddToStage(event: egret.Event) {

         //设置加载进度界面

         //Config to load process interface

         this.loadingView = new LoadingUI();

         this.stage.addChild(this.loadingView);

         //初始化Resource资源加载库

         //initiate Resource loading library

         RES.addEventListener(RES.ResourceEvent.CONFIG_COMPLETE, this.onConfigComplete, this);

         RES.loadConfig("resource/default.res.json", "resource/");

     }

     /**

      * 配置文件加载完成,开始预加载preload资源组。

      * configuration file loading is completed, start to pre-load the preload resource group

      */

     private onConfigComplete(event: RES.ResourceEvent): void {

         RES.removeEventListener(RES.ResourceEvent.CONFIG_COMPLETE, this.onConfigComplete, this);

         RES.addEventListener(RES.ResourceEvent.GROUP_COMPLETE, this.onResourceLoadComplete, this);

         RES.addEventListener(RES.ResourceEvent.GROUP_LOAD_ERROR, this.onResourceLoadError, this);

         RES.addEventListener(RES.ResourceEvent.GROUP_PROGRESS, this.onResourceProgress, this);

         RES.addEventListener(RES.ResourceEvent.ITEM_LOAD_ERROR, this.onItemLoadError, this);

         RES.loadGroup("preload");

     }

     /**

      * preload资源组加载完成

      * Preload resource group is loaded

      */

     private onResourceLoadComplete(event: RES.ResourceEvent) {

         if (event.groupName == "preload") {

             this.stage.removeChild(this.loadingView);

             RES.removeEventListener(RES.ResourceEvent.GROUP_COMPLETE, this.onResourceLoadComplete, this);

             RES.removeEventListener(RES.ResourceEvent.GROUP_LOAD_ERROR, this.onResourceLoadError, this);

             RES.removeEventListener(RES.ResourceEvent.GROUP_PROGRESS, this.onResourceProgress, this);

             RES.removeEventListener(RES.ResourceEvent.ITEM_LOAD_ERROR, this.onItemLoadError, this);

             this.createGameScene();

         }

     }

     /**

      * 资源组加载出错

      *  The resource group loading failed

      */

     private onItemLoadError(event: RES.ResourceEvent) {

         console.warn("Url:" + event.resItem.url + " has failed to load");

     }

     /**

      * 资源组加载出错

      *  The resource group loading failed

      */

     private onResourceLoadError(event: RES.ResourceEvent) {

         //TODO

         console.warn("Group:" + event.groupName + " has failed to load");

         //忽略加载失败的项目

         //Ignore the loading failed projects

         this.onResourceLoadComplete(event);

     }

     /**

      * preload资源组加载进度

      * Loading process of preload resource group

      */

     private onResourceProgress(event: RES.ResourceEvent) {

         if (event.groupName == "preload") {

             this.loadingView.setProgress(event.itemsLoaded, event.itemsTotal);

         }

     }

     /**

      * 创建游戏场景

      * Create a game scene

      */

     private createGameScene() {

         let sky = this.createBitmapByName("bg_png");

         this.addChild(sky);

         let stageW = this.stage.stageWidth;

         let stageH = this.stage.stageHeight;

         sky.width = stageW;

         sky.height = stageH;

         this.showMessage();

         //增加两辆车

         let car1 = this.createBitmapByName("car0_png");

         this.addChild(car1);

         car1.width = 40;

         car1.height = 80;

         car1.x = 90;

         car1.y = 400;

         this.car1 = car1;

         let car2 = this.createBitmapByName("car2_png");

         this.addChild(car2);

         car2.width = 40;

         car2.height = 80;

         car2.x = 240;

         car2.y = 400;

         this.car2 = car2;

         //增加开始按钮

         let start = this.createBitmapByName("startGameBtn_png");

         start.width = 160;

         start.height = 50;

         start.x = 100;

         start.y = 350;

         start.touchEnabled = true; //设置可以进行触摸

         this.start = start;

         this.addChild(start);

         let run_left_1 = this.createBitmapByName("runleft_png");

         let run_left_2 = this.createBitmapByName("runleft_png");

         let run_right_1 = this.createBitmapByName("runright_png");

         let run_right_2 = this.createBitmapByName("runright_png");

         this.run_left_1 = run_left_1;

         this.run_left_2 = run_left_2;

         this.run_right_1 = run_right_1;

         this.run_right_2 = run_right_2;

         run_left_1.width = 80;

         run_left_1.height = 480;

         run_left_2.width = 80;

         run_left_2.height = 480;

         run_left_1.x = 0;

         run_left_1.y = 0;

         run_left_2.x = 0;

         run_left_2.y = 480;

         run_right_1.width = 80;

         run_right_1.height = 480;

         run_right_2.width = 80;

         run_right_2.height = 480;

         run_right_1.x = 280;

         run_right_1.y = 0;

         run_right_2.x = 280;

         run_right_2.y = 480;

         this.addChild(this.run_left_1);

         this.addChild(this.run_left_2);

         this.addChild(this.run_right_1);

         this.addChild(this.run_right_2);

         this.run_left_1.visible = false;

         this.run_left_2.visible = false;

         this.run_right_1.visible = false;

         this.run_right_2.visible = false;

         //增加停止 暂停按钮

         //放在跑道上面

         let pause = this.createBitmapByName("pause_png");

         pause.width = 50;

         pause.height = 50;

         pause.x = 250;

         pause.y = 10;

         pause.touchEnabled = true; //设置可以进行触摸

         pause.visible = false;

         this.pause = pause;

         this.addChild(pause);

         let pause_start = this.createBitmapByName("start_png");

         pause_start.width = 50;

         pause_start.height = 50;

         pause_start.x = 250;

         pause_start.y = 10;

         pause_start.touchEnabled = true; //设置可以进行触摸

         pause_start.visible = false;

         this.pause_start = pause_start;

         this.addChild(pause_start);

         let stop = this.createBitmapByName("stop_png");

         stop.width = 50;

         stop.height = 50;

         stop.x = 300;

         stop.y = 10;

         stop.touchEnabled = true; //设置可以进行触摸

         stop.visible = false;

         this.stop = stop;

         this.addChild(stop);

         this.isPause = true;

         //初始化两个小车移动路程为0

         this.left_mm = 0;

         this.right_mm = 0;

         this.addEventListener(egret.TouchEvent.TOUCH_TAP, this.onClickStart, this);

         RES.getResAsync("description_json", this.startAnimation, this);

     }

     /**

      * 根据name关键字创建一个Bitmap对象。name属性请参考resources/resource.json配置文件的内容。

      * Create a Bitmap object according to name keyword.As for the property of name please refer to the configuration file of resources/resource.json.

      */

     private createBitmapByName(name: string) {

         let result = new egret.Bitmap();

         let texture: egret.Texture = RES.getRes(name);

         result.texture = texture;

         return result;

     }

     /**

      * 描述文件加载成功,开始播放动画

      * Description file loading is successful, start to play the animation

      */

     private startAnimation(result: string[]) {

         let parser = new egret.HtmlTextParser();

         let textflowArr = result.map(text => parser.parse(text));

         let textfield = this.textfield;

         let count = -1;

         let change = () => {

             count++;

             if (count >= textflowArr.length) {

                 count = 0;

             }

             let textFlow = textflowArr[count];

             // 切换描述内容

             // Switch to described content

             textfield.textFlow = textFlow;

             let tw = egret.Tween.get(textfield);

             tw.to({ "alpha": 1 }, 200);

             tw.wait(2000);

             tw.to({ "alpha": 0 }, 200);

             tw.call(change, this);

         };

         change();

     }

     /**

      * 定义公司产品信息

      */

     private showMessage(){

         let topMask = new egret.Shape();

         topMask.graphics.beginFill(0xFF0000, 0.5);

         topMask.graphics.drawRect(0, 0, this.stage.stageWidth, 172);

         topMask.graphics.endFill();

         topMask.y = 33;

         this.addChild(topMask);

         this.topMask = topMask;

         let icon = this.createBitmapByName("egret_icon_png");

         this.addChild(icon);

         icon.x = 26;

         icon.y = 33;

         this.icon = icon;

         let line = new egret.Shape();

         line.graphics.lineStyle(2, 0xffffff);

         line.graphics.moveTo(0, 0);

         line.graphics.lineTo(0, 117);

         line.graphics.endFill();

         line.x = 172;

         line.y = 61;

         this.addChild(line);

         this.line = line;

         let colorLabel = new egret.TextField();

         colorLabel.textColor = 0xffffff;

         colorLabel.width = this.stage.stageWidth - 172;

         colorLabel.textAlign = "center";

         colorLabel.text = "JL 蓝牙运动XXX";

         colorLabel.size = 24;

         colorLabel.x = 172;

         colorLabel.y = 80;

         this.addChild(colorLabel);

         this.colorLabel = colorLabel;

         let textfield = new egret.TextField();

         this.addChild(textfield);

         textfield.alpha = 0;

         textfield.width = this.stage.stageWidth - 172;

         textfield.textAlign = egret.HorizontalAlign.CENTER;

         textfield.size = 24;

         textfield.textColor = 0xffffff;

         textfield.x = 172;

         textfield.y = 135;

         this.textfield = textfield;

     }

     /**

      * 自定义一些事件 // 所有的触摸事件都会在这里进行捕获

      */

     private onClickStart(event: egret.Event) {

         //debugger;

         //console.log("click start" + event);

         if(event.target == this.start){

             //删除提示信息

             this.removeChild(this.topMask);

             this.removeChild(this.icon);

             this.removeChild(this.line);

             this.removeChild(this.colorLabel);

             this.removeChild(this.textfield);

             this.removeChild(this.start);

             this.run_left_1.visible = true;

             this.run_left_2.visible = true;

             this.run_right_1.visible = true;

             this.run_right_2.visible = true;

             this.pause.visible = true;

             this.stop.visible = true;

             this.speed = 5;

             this.isPause = false;

             this.removeEventListener(egret.Event.ENTER_FRAME, this.enterFrameHandler, this);

             this.addEventListener(egret.Event.ENTER_FRAME, this.enterFrameHandler, this);

         }else if(event.target == this.stop){

             console.log("stop");

             this.onClickStop();

         }else if(event.target == this.pause ||event.target == this.pause_start){

             console.log("pause");

             this.onClickPause();

         }

         //this.backGroud.start();

         //正中间显示时间

         //左右两边显示距离

         //left 接受事件,并处理小车运动

         //right 接受事件,并处理小车运动

         //通过websocket发送接收数据,然后画动画

         //http://www.cnblogs.com/yangxiao/p/4686729.html

     }

     /**

      * 逐帧运动

      */

     public enterFrameHandler(event: egret.Event) : void{

         var y = this.run_left_1.y;

         if(y >= 480){

             y = -460;

         }else{

             y = y + this.speed;

         }

         this.run_left_1.y = y;

         this.run_right_1.y = y;

         y = this.run_left_2.y;

         if(y >= 480){

             y = -460;

         }else{

             y = y + this.speed;

         }

         this.run_left_2.y = y;

         this.run_right_2.y = y;

     }

     /**

      * 停止

      */

     public onClickStop(): void{

         this.removeEventListener(egret.Event.ENTER_FRAME, this.enterFrameHandler, this);

         this.isPause = true;

         //this.speed = 0;

     }

     /**

      * 暂停

      */

     public onClickPause(): void{

         if(this.isPause == true){

             this.isPause = false;

             this.pause.visible = true;

             this.pause_start.visible = false;

             this.addEventListener(egret.Event.ENTER_FRAME, this.enterFrameHandler, this);

         }else{

             this.isPause = true;

             this.pause.visible = false;

             this.pause_start.visible = true;

             this.removeEventListener(egret.Event.ENTER_FRAME, this.enterFrameHandler, this);

         }

     }

 }
4. 代码解释
第3-22行 是一些简单的全局变量定义
loadingView 是默认的加载动画
car1 car2 是两辆小车
start pause pause_start stop 是一些按钮
topMask line icon colorLabel textfield 是开始前的一些提示信息
run_left_1 run_left_2 run_right_1 run_right_2 是背景中左右两边绿色道路的移动
speed 是速度
isPause 表示是否暂停
第24-27行 就是一个构造函数,并注册一个事件监听器,表示舞台开始的时候就调用onAddToStage函数
第29-98行 这些是默认提供的
第103-211行 是创建场景 依次 背景图片、两辆小车、开始按钮等图片信息
里面还有一些设置坐标信息, 舞台大小 480X360 然后各个坐标都是绝对坐标,具体项目可以设置为按比例设置坐标。
最后的 this.addEventListener(egret.TouchEvent.TOUCH_TAP, this.onClickStart, this); 这句就是加上触摸事件监听器,
该工程中所有的事件都在这里进行处理。
第307-346行 就是一些事件的处理
当按下开始按钮时,就启动egret.Event.ENTER_FRAME帧运动监听器事件,按下暂停就取消该事件。
小车的移动就是左右两边的绿色树木的相对后移而已。具体可以看第351行的enterFrameHandler函数。
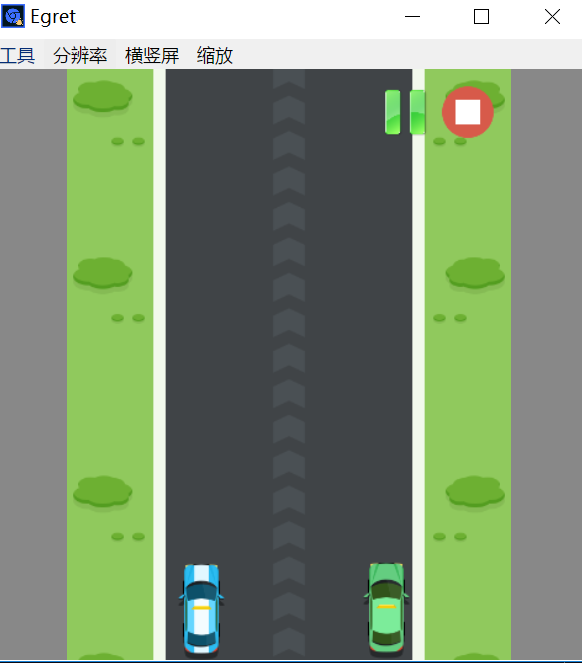
5.运行界面

这是一个会动的界面。可以通过点击右上角切换是否运动。
6.多说两句
其实啊,用这个开发效率还是很高的,运行效率的话就一般的,用Web的效率也就那样了,不过随着手机性能的提高,用这个开发一些中小型游戏还是没有问题的。egret的官方资料还是比较全面的,入门也简单,对于我有js基础,看了一下Demo和API基本一两天就可以进行实际开发了。
参考资料:
http://www.cnblogs.com/yangxiao/p/4686729.html
http://developer.egret.com/cn/github/egret-docs/Engine2D/getStarted/helloWorld/index.html
工程下载: http://files.cnblogs.com/files/wunaozai/EgretHelloWorld.zip
本文地址: http://www.cnblogs.com/wunaozai/p/6540474.html
Egret入门了解的更多相关文章
- Egret入门学习日记 --- 第二篇 (书籍的选择 && 书籍目录 && 书中 3.3 节 内容)
第二篇 (书籍的选择 && 书籍目录 && 书中 3.3 节 内容) 既然选好了Egret,那我就要想想怎么学了. 开始第一步,先加个Q群先,这不,拿到了一本<E ...
- Egret 入门
居然使用 TyptScript... 先贴手册地址:http://www.typescriptlang.org/docs/tutorial.html. 先要接受一个诡异的写法: private loa ...
- Egret入门(一)--简介
关于Egret 构建2D游戏,开源. TS + JS 完成打包后可以转换成HTML5的游戏(跨平台) Egret特点 1. 优秀的设计思想 2. 高效的渲染模块 3. 完善的配套工具 4. 灵活的工作 ...
- Egret入门(三)--创建HelloWorld项目(4.0-使用Egret Wing)
准备 编辑器: Egret Wing3(4.0.3) 需要下载安装 语言: TepyScript(JS的超集,参考手册http://bbs.egret.com/thread-1441-1-1.html ...
- Egret入门(二)--windows下环境搭建
准备材料 安装Node.js TypeScript编辑器 HTTP服务器(可选) Chorme(可选) Egret 安装Node.js 打开www.nodejs.org 下载安装(全部next,全默认 ...
- Egret入门学习日记 --- 第四篇
第四篇(学习篇) 好了,今天继续把昨天的问题解决了. 今天见鬼了. 现在界面又出来了.唯一我动过的地方,应该就是这里: 是的,我点了一下刷新.之后,不管我怎么创建新的EXML文件,放在src目录,还是 ...
- Egret入门学习日记 --- 第二十篇(书中 9.1~9.3 节 内容 组件篇)
第二十篇(书中 9.1~9.3 节 内容 组件篇) 第八章中的内容. 以上都是基本的Js知识,我就不录入了. 直接来看 第9章. 开始 9.1节. 以上内容告诉你,Egret官方舍弃了GUI,使用了E ...
- Egret入门学习日记 --- 第十九篇(书中 8.8~8.10 节 内容)
第十九篇(书中 8.8~8.10 节 内容) 开始 8.8节. 重点: 1.类型推断. 2.类型强制转换,使其拥有代码提示功能. 3.除了TS自带的类型判断,Egret官方也提供了类型判断的方法. 操 ...
- Egret入门学习日记 --- 第十八篇(书中 8.5~8.7 节 内容)
第十八篇(书中 8.5~8.7 节 内容) 其实语法篇,我感觉没必要写录入到日记里. 我也犹豫了好久,到底要不要录入. 这样,我先读一遍语法篇的所有内容,我觉得值得留下的,我就录入日记里. 不然像昨天 ...
随机推荐
- HOOK 底层键盘消息---WH_KEYBOARD_LL
代码:屏蔽三个全局快捷键 代码的作用是屏蔽掉凝视中的三个快捷键. LRESULT CALLBACK LowLevelKeyboardProc (INT nCode, WPARAM wParam, LP ...
- 网站PV、UV以及查看方法
网站PV.UV以及查看方法 一.名词解释 PV:PV 是Page Views的缩写,即页面浏览量,用户每一次对网站中的每个网页访问均被记录一次.注意,访客每刷新一次页面,pv就增加一次. UV:UV是 ...
- Textview文字监控(输入到某个字符后,进行操作)
以手机号充值为例,当用户输入最后一位数时候,进行汇率的变换. 1.首先给用户添加一个textchangedlistener 2.然后再写一个文字变化的监视器 mobile_et.add ...
- centos中执行apt-get命令提示apt-get command not found
先说结论: 在centos下用yum install xxx yum和apt-get的区别: 一般来说著名的linux系统基本上分两大类: RedHat系列:Redhat.Centos.Fedora ...
- 禁止logback输出状态信息
一.问题描述 22:18:07,299 |-INFO in ch.qos.logback.classic.LoggerContext[default] - Could NOT find resourc ...
- 【备份】使用mysqldump 实现rename database name(mysql数据库改名称)
需求:将jxl_credit改名为jxl_test;输入:jxl_credit输出: jxl_test; 实现方式:1).新建jxl_test,2).备份jxl_credit到本地,3).然后将备份数 ...
- 工作8年对技术学习过程的一些 总结 与 感悟 为什么有时迷茫、无奈 学习编程语言的最高境界最重要的是编程思想 T 字发展 学技术忌讳”什么都会“ 每天进步一点等式图 时间管理矩阵
工作这些年对技术学习过程的一些 总结 与 感悟(一) 引言 工作了8年,一路走来总有些感触时不时的浮现在脑海中.写下来留个痕迹,也顺便给大家一点参考.希望能给初学者一点帮助. 入门 进入计算机行业,起 ...
- 模拟器集成3DTouch-b
本文主要讲解3DTouch各种场景下的集成,开发主屏幕应用icon上的快捷选项标签(Home Screen Quick Actions),静态设置 UIApplicationShortcutItem ...
- Python读文本文件中文乱问题
file_object = open('thefile.txt')try: all_the_text = file_object.read().decode("gb2312")fi ...
- Transparent Huge Pages
在RHEL6中,透明大页功能是默认开启的. 开启该选项后,内核会尽可能地尝试分配大页,如果mmap区域是2mb,那么每个linux进程都会分配到2mb大小的页.如果大页不够用了(比如物理内存不够了), ...
