.14-浅析webpack源码之Watchpack模块
解决掉了最头疼的DirectoryWatcher内部实现,这一节可以结束NodeWatchFileSystem模块。
关于watch的应用场景,仔细思考了下,这不就是热重载的核心嘛。
首先是监视文件,触发文件change事件后收集变动文件信息,重新进行打包,更新JS后触发页面重新渲染,perfect!
首先重新回忆一下NodeWatchFileSystem模块:
"use strict";

const Watchpack = require("watchpack");

class NodeWatchFileSystem {

    constructor(inputFileSystem) {

        this.inputFileSystem = inputFileSystem;

        this.watcherOptions = {

            aggregateTimeout: 0

        };

        this.watcher = new Watchpack(this.watcherOptions);

    }

    watch(files, dirs, missing, startTime, options, callback, callbackUndelayed) {

        // ...

        const oldWatcher = this.watcher;

        this.watcher = new Watchpack(options);

        // 当新监视器生成时立即调用的函数

        if (callbackUndelayed)

            this.watcher.once("change", callbackUndelayed);

        // callback在这里调用

        this.watcher.once("aggregated", (changes, removals) => { /**/ });

        // 分别传入 文件目录数组 文件夹目录数组 时间标记

        this.watcher.watch(files.concat(missing), dirs.concat(missing), startTime);

        // 关闭旧监视器

        if (oldWatcher) {

            oldWatcher.close();

        }

        return {

            close: () => {

                if (this.watcher) {

                    this.watcher.close();

                    this.watcher = null;

                }

            },

            pause: () => {

                if (this.watcher) {

                    this.watcher.pause();

                }

            }

        };

    }

}

module.exports = NodeWatchFileSystem;
在构造函数中会初始化一个Watchpack实例赋给watcher,每一次调用watch方法会重新生成一个的watcher并同时关闭旧的watcher。
模块只有一个原型方法watch,参数解析如下:
1.files、dirs、missing为文件路径相关
2.options为初始化watchpack实例的参数
3.callback与callbackUndelayed为回调函数
这里有两个回调函数,一个在新监视器生成时立即调用,一个在监视器触发aggregated事件时调用。
返回的对象有两个方法,一个用来关闭监视器,一个用来暂停监视器。
下面看Watchpack模块源码,先从构造函数开始讲解:
class Watchpack {

    constructor(options) {

        EventEmitter.call(this);

        // 参数处理

        if (!options) options = {};

        // 设置定时器参数默认值

        if (!options.aggregateTimeout) options.aggregateTimeout = 200;

        this.options = options;

        this.watcherOptions = {

            ignored: options.ignored,

            poll: options.poll

        };

        // 文件监视器容器

        this.fileWatchers = [];

        // 文件夹监视器容器

        this.dirWatchers = [];

        // 指定文件修改时间容器

        this.mtimes = Object.create(null);

        // 暂停标记

        this.paused = false;

        // 定时器ID收集容器

        this.aggregatedChanges = [];

        this.aggregatedRemovals = [];

        // 本地定时器参数

        this.aggregateTimeout = 0;

        this._onTimeout = this._onTimeout.bind(this);

    };

    // prototype methods...

}
大体上可分为容器、标记、参数三部分。
容器包括文件与文件夹的监视器容器以及几个定时器ID相关的容器,标记只有一个暂停标记,参数为定时器的时间参数。
下面是核心方法watch,源码整理如下:
Watchpack.prototype.watch = function watch(files, directories, startTime) {

    // 暂停标记置false

    this.paused = false;

    // 取出旧的监视器

    var oldFileWatchers = this.fileWatchers;

    var oldDirWatchers = this.dirWatchers;

    // 分别调用watchFile与watchDirectory对文件与文件夹进行监视

    // 将监视器赋值给对应的容器

    this.fileWatchers = files.map(function(file) {

        return this._fileWatcher(file, watcherManager.watchFile(file, this.watcherOptions, startTime));

    }, this);

    this.dirWatchers = directories.map(function(dir) {

        return this._dirWatcher(dir, watcherManager.watchDirectory(dir, this.watcherOptions, startTime));

    }, this);

    // 关闭所有旧的监视器

    oldFileWatchers.forEach(function(w) {

        w.close();

    }, this);

    oldDirWatchers.forEach(function(w) {

        w.close();

    }, this);

};
过了watchManager模块后,这里就变得十分简单明了,分别取出数组的目录元素,分别进行监视操作,将返回的监视器数组赋值给容器。
同样,每一次调用watch会关闭所有旧的监视器。
接下里是关于file与dir的不同处理:
_fileWatcher
// 传入文件路径与watcher

Watchpack.prototype._fileWatcher = function _fileWatcher(file, watcher) {

    // 绑定change、remove事件的触发事件

    watcher.on("change", function(mtime, type) {

        this._onChange(file, mtime, file, type);

    }.bind(this));

    watcher.on("remove", function(type) {

        this._onRemove(file, file, type);

    }.bind(this));

    return watcher;

};
如果看了上一节会发现,DirectoryWatcher模块内部源码只有emit触发事件,并没有任何on来处理事件。
这里就是处理模块内部事件触发的地方,触发change调用本地的_onchange方法,触发remove调用本地的_onRemove方法,参数没有什么解释的。
_dirWatcher
Watchpack.prototype._dirWatcher = function _dirWatcher(item, watcher) {

    // 只是触发change事件

    watcher.on("change", function(file, mtime, type) {

        this._onChange(item, mtime, file, type);

    }.bind(this));

    return watcher;

};
文件夹只有增加和删除,一个change事件就足够了。
_onChange
// item、file都是文件路径

Watchpack.prototype._onChange = function _onChange(item, mtime, file) {

    file = file || item;

    // 新增或更新对应文件的修改时间

    this.mtimes[file] = mtime;

    // 暂停时不触发change事件

    if (this.paused) return;

    this.emit("change", file, mtime);

    // 清除本地定时器

    if (this.aggregateTimeout)

        clearTimeout(this.aggregateTimeout);

    // 变动文件

    if (this.aggregatedChanges.indexOf(item) < 0)

        this.aggregatedChanges.push(item);

    // 设置定时器

    this.aggregateTimeout = setTimeout(this._onTimeout, this.options.aggregateTimeout);

};
变动的文件信息会被加入到对应的容器,最后会调用一个定时器,定时器间隔为穿进来的参数。
_onRemove
Watchpack.prototype._onRemove = function _onRemove(item, file) {

    file = file || item;

    // 删除容器中对应的文件信息

    delete this.mtimes[item];

    if (this.paused) return;

    // 触发remove事件

    this.emit("remove", item);

    if (this.aggregateTimeout)

        clearTimeout(this.aggregateTimeout);

    // 删除文件的信息加入容器

    if (this.aggregatedRemovals.indexOf(item) < 0)

        this.aggregatedRemovals.push(item);

    // 触发aggregated事件

    this.aggregateTimeout = setTimeout(this._onTimeout, this.options.aggregateTimeout);

};
_onTimeout
Watchpack.prototype._onTimeout = function _onTimeout() {

    // 定时器ID置0

    this.aggregateTimeout = 0;

    // 变动与删除的文件信息数组

    var changes = this.aggregatedChanges;

    var removals = this.aggregatedRemovals;

    // 清空

    this.aggregatedChanges = [];

    this.aggregatedRemovals = [];

    // 触发aggregated事件

    this.emit("aggregated", changes, removals);

};
简单概括就是会在给定时间后调触发aggregated事件,将变动与删除的文件信息数组作为参数传递出去并清空数组。
总体来说,文件的增加与内容修改会触发change事件,删除会触发remove事件。文件夹只有change事件。无论是触发change还是remove,都会将对应的文件信息用aggregated事件传递出去。
调用pause方法时,所有的操作将不会触发任何事件,但是文件修改信息仍然会被收集。
值得注意的是,源码内部并没有任何继续监视的方法,虽然有一个resume函数,但是:
Watchpack.prototype.close = function resume() { /**/ }
看到没,假的,虽然名字叫resume,但是实际上关掉了监视。继续监视唯一的办法是重新调用watch方法,但是会清空所有watcher容器并重新生成一批新的。也就是说,pause相当于stop。
源码中还有个getTimes的原型方法,有兴趣自己去看,暂时不讲了。
最后来用小案例模拟这些模块的使用,目录如图:
测试代码如下:
// 模块引入

// 我都复制过来了!

const Watchpack = require('./lib/watchpack');

const fs = require('fs');

const path = require('path');

// 实例化一个Watchpack类 不传参

const el = new Watchpack();

// 需要监视的文件夹

const rootPath = path.join(process.cwd(), 'test');

fs.readdir(rootPath, (err, items) => {

    // 文件夹中的文件全部做监视

    items = items.map((v) => path.join(rootPath, v));

    // 对所有文件做监视

    el.watch(items, [], 1);

});

// 监视change事件

el.on('change', (...args) => {

    console.log('Detect file change\nthe filename is:' + args[0] + '\nthe filename mtime is:' + args[1]);

});

// 监视remove事件

el.on('remove', (...args) => {

    console.log('Detect file remove\nthe filename is:' + args[0]);

});
这里暂时先不对文件夹进行监视,遍历test文件夹,将所有文件路径包装成数组传入watch方法(第三个参数真不懂啥意思,传1反正没错)。
在node指令执行的时候,就会打印出一连串的信息:
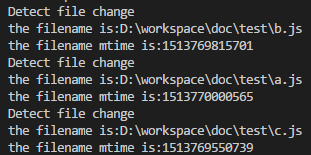
在初始化的时候,每一次生成一个监视器,就会先触发一次change事件,并初始化文件的mtime,触发的源码如下:
DirectoryWatcher.prototype.setFileTime = function setFileTime(filePath, mtime, initial, type) {

    // ...

    if (!old) {

        if (mtime) {

            //  watch方法会设置该属性

            if (this.watchers[withoutCase(filePath)]) {

                this.watchers[withoutCase(filePath)].forEach(function(w) {

                    if (!initial || w.checkStartTime(mtime, initial)) {

                        // 触发事件

                        w.emit("change", mtime, initial ? "initial" : type);

                    }

                });

            }

        }

    }

    // ...

}
这个地方的事件只会在初始化的时候被调用。
这里有一个小问题,在每一次初始化的时候会进行doInitScan扫描,扫描的文件信息会被填充到files容器中,即
// files

['D:\\workspace\\doc\\test\\a.js', 'D:\\workspace\\doc\\test\\b.js', 'D:\\workspace\\doc\\test\\c.js']
然后在watch方法有这么一段代码:
DirectoryWatcher.prototype.watch = function watch(filePath, startTime) {

    //...

    var data;

    if (filePath === this.path) { /**/ }

    // 获取文件

    else {

        data = this.files[filePath];

    }

    process.nextTick(function() {

        if (data) {

            var ts = data[0] === data[1] ? data[0] + FS_ACCURACY : data[0];

            // 这里的startTime为1 肯定能进去

            if (ts >= startTime)

                watcher.emit("change", data[1]);

        }

        // ...

    }.bind(this));

    return watcher;

};
watch方法会在后面会尝试获取容器中的文件信息并处罚change事件,理论上这里会触发两次change,然而实际上只有一次。
原因就在初始化扫描时候使用了async模块的方法,即:
fs.readdir(this.path, function(err, items) {

    // 扫描文件并将信息填入容器中

    async.forEach(items, function(item, callback) {

        // ...

    })

});
该模块的方法全是异步调用,所以在watch方法调用的第一时刻,此时初始化扫描还在进行中,files容器仍然为空,在watch与doInitScan方法中加log,可以发现:

在watch方法完成后,扫描才开始。
扫描开始后,进程挂起等待文件操作行为,这里分别对文件进行各种操作:
修改文件内容

触发了change事件。
删除文件


触发了remove事件。
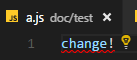
修改文件名

这里仅仅触发了remove事件。
原因在于,这个操作被系统认为是删除一个文件再增加一个文件,但是文件增加在监视文件时是不会触发任何事件的,也不会生成该文件的watcher,只会将该文件信息收集进files容器中,这个在之前讲过。
注意,顺序是先删后增,这里可以简单的log一下,因为在setFileTime中传了对应的事件类型,虽然没有用上,这里测试可以用用:

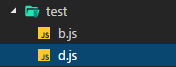
改名后,打印:
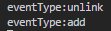
过程为,先触发了触发unlink事件,将文件删除,然后将新文件的信息加入到files容器中,然后触发文件的change事件。
接下来是文件夹监视操作,测试代码如下:
// 模块引入

// 我都复制过来了!

const Watchpack = require('./lib/watchpack');

const fs = require('fs');

const path = require('path');

// 实例化一个Watchpack类 不传参

const el = new Watchpack();

// 需要监视的文件夹

const directory = path.join(process.cwd(), 'test');

el.watch([], [directory], 1);

// 监视change事件

el.on('change', (...args) => {

    console.log('change: ' + args.join(','));

});
注意,文件夹无论怎样都只会触发change事件。这里搞两张图片特别累,所以直接展示传过来的参数。
新建文件

文件路径与修改时间。
删除文件

只有文件路径,因为文件被删了。
文件改名

这个地方事就多了,这三处触发全部来源于setFileTime方法中:
DirectoryWatcher.prototype.setFileTime = function setFileTime(filePath, mtime, initial, type) {

    // ...

    if (this.watchers[withoutCase(this.path)]) {

        this.watchers[withoutCase(this.path)].forEach(function(w) {

            if (!initial || w.checkStartTime(mtime, initial)) {

                w.emit("change", filePath, mtime, initial ? "initial" : type);

            }

        });

    }

};

DirectoryWatcher.prototype.watch = function watch(filePath, startTime) {

    this.watchers[withoutCase(filePath)] = this.watchers[withoutCase(filePath)] || [];

    var watcher = new Watcher(this, filePath, startTime);

    this.watchers[withoutCase(filePath)].push(watcher);

    // ...

}
因为watch的是一个文件夹,所以在watcher容器中会有对应的键,所以任何文件的变动都会触发文件夹的change事件。
这里改文件名会涉及:删除文件触发一次,增加文件触发一次,change事件触发一次。
至此,基本上该watch模块的内容基本处理完毕,撒花!
.14-浅析webpack源码之Watchpack模块的更多相关文章
- .9-浅析webpack源码之NodeEnvironmentPlugin模块总览
介绍Compiler的构造比较无趣,不如先过后面的,在用到compiler的时候再做讲解. 这一节主要讲这行代码: // 不管这里 compiler = new Compiler(); compile ...
- .13-浅析webpack源码之WatcherManager模块
从模块流可以看出,这个NodeWatchFileSystem模块非常深,这里暂时不会深入到chokidar模块,有点太偏离本系列文章了,从WatcherManager开始讲解. 流程如图: 源码非常简 ...
- .12-浅析webpack源码之NodeWatchFileSystem模块总览
剩下一个watch模块,这个模块比较深,先大概过一下整体涉及内容再分部讲解. 流程图如下: NodeWatchFileSystem const Watchpack = require("wa ...
- .6-浅析webpack源码之validateSchema模块
validateSchema模块 首先来看错误检测: const webpackOptionsValidationErrors = validateSchema(webpackOptionsSchem ...
- .4-浅析webpack源码之convert-argv模块
上一节看了一眼预编译的总体代码,这一节分析convert-argv模块. 这个模块主要是对命令参数的解析,也是yargs框架的核心用处. 生成默认配置文件名数组 module.exports = fu ...
- .15-浅析webpack源码之WebpackOptionsApply模块-plugin事件流总览
总体过了一下后面的流程,发现Compiler模块确实不适合单独讲解,这里继续讲解后面的代码: compiler.options = new WebpackOptionsApply().process( ...
- .11-浅析webpack源码之Storage模块
至此已完成NodeJsInputFileSysten模块的讲解,下一步就是实际实用的模块: compiler.inputFileSystem = new CachedInputFileSystem(n ...
- .10-浅析webpack源码之graceful-fs模块
在cachedInput.output.watch三大文件系统中,output非常简单,没有必要讲,其余两个模块依赖于input模块,而input主要是引用了graceful-fs的部分API,所以这 ...
- .7-浅析webpack源码之WebpackOptionsDefaulter模块
WebpackOptionsDefaulter模块 通过参数检测后,会根据单/多配置进行处理,本文基于单配置,所以会进行到如下代码: if (Array.isArray(options)) { com ...
随机推荐
- xbeePROS1发送的数据在802.15.4网络中有多大时延?
完整的计算过程请参考Digi官方网站的文章:Sending data through an 802.15.4 network latency timing. Digi的S1模块可以跑802.15.4固 ...
- 别人的Linux私房菜(10)vim程序编辑器
很多软件的编辑接口会主动调用vi vi分一般命令模式.编辑模式.命令行模式. 使用vi :/bin/vi welcome.txt 下下端显示文本有多少行,多少字符, 一般命令模式: 上下左右移动光标k ...
- urlrewrite的rule怎么写
一.正则表达式教程 常用正则如下: . 换行符以外的所有字符 \w 匹配字母或数字或下划线或汉字 \s 匹配任意的空白符 \d ...
- python基本数据类型之整型和浮点型
python基本数据类型之数字与浮点型 在python3中,整数的数据类型为int,而浮点数的数据类型为float.python2中整数可以是int和long(长整型)两种类型,python3只保留了 ...
- Python简介及环境安装
Python 官网传送门 Python是一种面向对象的解释性计算机程序设计语言. Python 2.7将于2020年1月1日终止支持,本笔记基于Python3. pip pip 是一个现代的,通用的 ...
- consul服务注册与发现
using System; using System.Collections.Generic; using System.Linq; using System.Text; using System.T ...
- Apache Drill - join HBase and RDBMs
HBase作为Nosql的常用系统之一,在很多大数据应用/平台中广泛使用.例如通过Spark统计后将结果存放到HBase中.通常统计结果还需要进一步和元数据或者字典表关联从而得到最终结果显示,这意味着 ...
- ASP.NET Core 统一异常处理和返回
业务场景: 业务需求要求,需要对 ASP.NET Core 异常进行统一处理和返回,比如出现 500 错误和业务服务错误进行不同的处理和返回. 具体实现: using Microsoft.AspNet ...
- 201621123018《java程序设计》第14周作业总结
1. 本周学习总结 1.1 以你喜欢的方式(思维导图或其他)归纳总结与数据库相关内容. 2. 使用数据库技术改造你的系统 2.1 简述如何使用数据库技术改造你的系统.要建立什么表?截图你的表设计. 将 ...
- Go语言运算符
目录 算术运算符 注意事项 赋值运算符 逻辑运算符 短路与和短路或 关系运算符 位运算符 其他运算符 运算符优先级 运算符用于在程序运行时执行数学或逻辑运算. Go 语言内置的运算符有:算术运算符.赋 ...