Ubuntu16.04.1上搭建分布式的Redis集群
为什么要集群:
通常为了,提高网站的响应速度,总是把一些经常用到的数据放到内存中,而不是放到数据库中,Redis是一个很好的Cache工具,当然了还有Memcached,这里只讲Redis。在我们的电商系统中,热点数据量往往巨大,比如单点登录、用户浏览商品的信息、用户信息、用户收藏的商品信息、短息提醒数据等等,也都用到了redis,如何使redis可以横向可伸缩扩展,这需要由多台机器协同提供服务,一台挂掉了,另一台马上顶上去,即分布式的redis集群,就对系统的性能非常重要。
Redis集群的几个重要特征:
(1).Redis 集群的分片特征在于将键空间分拆了个槽位,每一个节点负责其中一些槽位。
(2).Redis提供一定程度的可用性,可以在某个节点宕机或者不可达的情况下继续处理命令.
(3).Redis 集群中不存在中心(central)节点或者代理(proxy)节点, 集群的其中一个主要设计目标是达到线性可扩展性(linear scalability)。
(4).Redis集群要想正常工作,必须要三个主节点,在我搭建的集群环境中,三个主节点都需要有一个从节点,所以一共六个节点,通俗来讲也就是需要开启6个redis服务。
一、安装Redis
关于如何在Linux上安装Redis,可以参考我的这篇博客,里面有详细的安装步骤,注意在搭建Redis的集群环境我使用的Redis版本为4.0.1《Redis的安装以及在项目中使用Redis的一些总结和体会》。
整体结构:
二、进群环境的配置
(1)在这里我就开启三台Ubuntu16.04.1,因为电脑8G的内存不够用,如果你电脑内存大可以开启4台或者更多。在这三台中我都安装好了最新版本的Redis。

(2)集群配置文件的修改
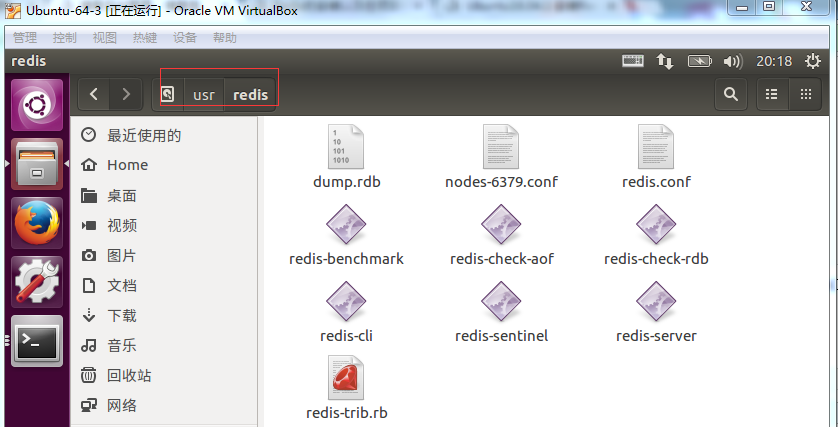
第一台配置文件的修改:首先在usr/redis目录下,把上面安装好的的redis文件放到该目录下面,具体哪些文件可参考下图。
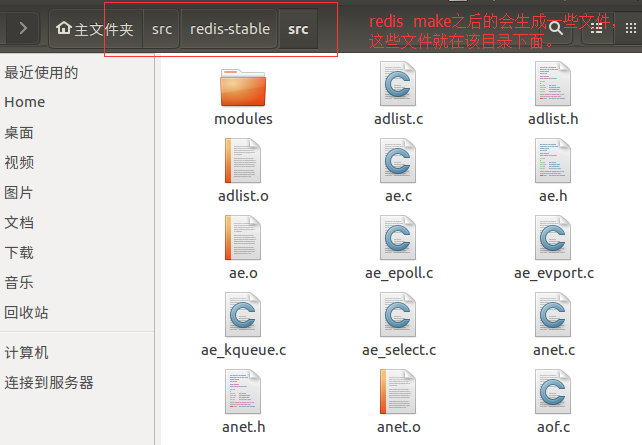
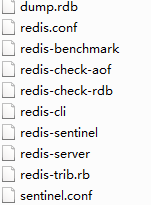
需要的文件有:
然后通过下面的命令把上面的文件复制到usr/redis/目录下面:
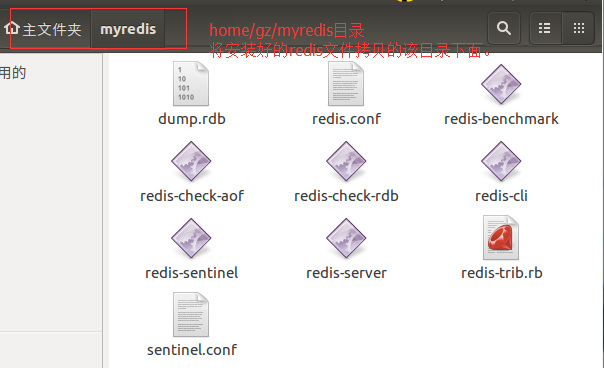
首先在usr目录下面创建一个redis和s2目录:sudo mkdir redis; sudo mkdir s2
目录创建好后,到上面图中的目录下面,打开终端,执行:cp redis* /usr/redis/,上面图中的文件就会到usr/redis/目录下面,最后到usr/redis/目录下面,打开终端,执行sudo cp redis* /usr/redis/s2/,这是该目录下面也就会有相同的文件了。

修改redis.conf文件中Cluster的配置,修改如下:
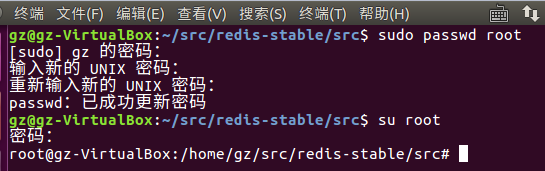
首先由于权限的问题,我们先要切换到root身份:sudo passwd root命令,先修改root的密码,修改之后,再执行su root 接着输入你设置的root密码就可以切换到root身份,如下:
最后在root身份执行下图中的命令就可修改redis.conf文件:

这里只贴出来修改的代码:(红色标注的部分为修改部分)
# ~~~~~~~~~~~~~~~~~~~~~~~~~~~~~~~~~~~~~~~~~~~~~~~~~~~~~~~~~~~~~~~~~~~~~~~~

# bind 127.0.0.1  //注释掉

# Protected mode is a layer of security protection, in order to avoid that

# Redis instances left open on the internet are accessed and exploited.

#

# When protected mode is on and if:

#

# ) The server is not binding explicitly to a set of addresses using the

#    "bind" directive.

# ) No password is configured.

#

# The server only accepts connections from clients connecting from the

# IPv4 and IPv6 loopback addresses 127.0.0.1 and ::, and from Unix domain

# sockets.

#

# By default protected mode is enabled. You should disable it only if

# you are sure you want clients from other hosts to connect to Redis

# even if no authentication is configured, nor a specific set of interfaces

# are explicitly listed using the "bind" directive.

protected-mode no   //yes该为no

# Accept connections on the specified port, default is  (IANA #).

# If port  is specified Redis will not listen on a TCP socket.

port

# TCP listen() backlog.

#

# In high requests-per-second environments you need an high backlog in order

# to avoid slow clients connections issues. Note that the Linux kernel

# will silently truncate it to the value of /proc/sys/net/core/somaxconn so

# make sure to raise both the value of somaxconn and tcp_max_syn_backlog

# in order to get the desired effect.

tcp-backlog

# Unix socket.

#

# Specify the path for the Unix socket that will be used to listen for

# incoming connections. There is no default, so Redis will not listen

# on a unix socket when not specified.

#

# unixsocket /tmp/redis.sock

# unixsocketperm

# Close the connection after a client is idle for N seconds ( to disable)

timeout

# TCP keepalive.

#

# If non-zero, use SO_KEEPALIVE to send TCP ACKs to clients in absence

# of communication. This is useful for two reasons:

#

# ) Detect dead peers.

# ) Take the connection alive from the point of view of network

#    equipment in the middle.

#

# On Linux, the specified value (in seconds) is the period used to send ACKs.

# Note that to close the connection the double of the time is needed.

# On other kernels the period depends on the kernel configuration.

#

# A reasonable value for this option is  seconds, which is the new

# Redis default starting with Redis 3.2..

tcp-keepalive

################################ REDIS CLUSTER  ###############################

#

# ++++++++++++++++++++++++++++++++++++++++++++++++++++++++++++++++++++++++++++

# WARNING EXPERIMENTAL: Redis Cluster is considered to be stable code, however

# in order to mark it as "mature" we need to wait for a non trivial percentage

# of users to deploy it in production.

# ++++++++++++++++++++++++++++++++++++++++++++++++++++++++++++++++++++++++++++

#

# Normal Redis instances can't be part of a Redis Cluster; only nodes that are

# started as cluster nodes can. In order to start a Redis instance as a

# cluster node enable the cluster support uncommenting the following:

#

cluster-enabled yes

# Every cluster node has a cluster configuration file. This file is not

# intended to be edited by hand. It is created and updated by Redis nodes.

# Every Redis Cluster node requires a different cluster configuration file.

# Make sure that instances running in the same system do not have

# overlapping cluster configuration file names.

#

cluster-config-file nodes-6379.conf

# Cluster node timeout is the amount of milliseconds a node must be unreachable

# for it to be considered in failure state.

# Most other internal time limits are multiple of the node timeout.

#

# cluster-node-timeout

# A slave of a failing master will avoid to start a failover if its data

# looks too old.

#

# There is no simple way for a slave to actually have an exact measure of

# its "data age", so the following two checks are performed:

#

# ) If there are multiple slaves able to failover, they exchange messages

#    in order to try to give an advantage to the slave with the best

#    replication offset (more data from the master processed).

#    Slaves will try to get their rank by offset, and apply to the start

#    of the failover a delay proportional to their rank.

#

# ) Every single slave computes the time of the last interaction with

#    its master. This can be the last ping or command received (if the master

#    is still in the "connected" state), or the time that elapsed since the

#    disconnection with the master (if the replication link is currently down).

#    If the last interaction is too old, the slave will not try to failover

#    at all.

#

# The point "" can be tuned by user. Specifically a slave will not perform

# the failover if, since the last interaction with the master, the time

# elapsed is greater than:

#

#   (node-timeout * slave-validity-factor) + repl-ping-slave-period

#

# So for example if node-timeout is  seconds, and the slave-validity-factor

# is , and assuming a default repl-ping-slave-period of  seconds, the

# slave will not try to failover if it was not able to talk with the master

# for longer than  seconds.

#

# A large slave-validity-factor may allow slaves with too old data to failover

# a master, while a too small value may prevent the cluster from being able to

# elect a slave at all.

#

# For maximum availability, it is possible to set the slave-validity-factor

# to a value of , which means, that slaves will always try to failover the

# master regardless of the last time they interacted with the master.

# (However they'll always try to apply a delay proportional to their

# offset rank).

#

# Zero is the only value able to guarantee that when all the partitions heal

# the cluster will always be able to continue.

#

# cluster-slave-validity-factor

# Cluster slaves are able to migrate to orphaned masters, that are masters

# that are left without working slaves. This improves the cluster ability

# to resist to failures as otherwise an orphaned master can't be failed over

# in case of failure if it has no working slaves.

#

# Slaves migrate to orphaned masters only if there are still at least a

# given number of other working slaves for their old master. This number

# is the "migration barrier". A migration barrier of  means that a slave

# will migrate only if there is at least  other working slave for its master

# and so forth. It usually reflects the number of slaves you want for every

# master in your cluster.

#

# Default is  (slaves migrate only if their masters remain with at least

# one slave). To disable migration just set it to a very large value.

# A value of  can be set but is useful only for debugging and dangerous

# in production.

#

# cluster-migration-barrier

# By default Redis Cluster nodes stop accepting queries if they detect there

# is at least an hash slot uncovered (no available node is serving it).

# This way if the cluster is partially down (for example a range of hash slots

# are no longer covered) all the cluster becomes, eventually, unavailable.

# It automatically returns available as soon as all the slots are covered again.

#

# However sometimes you want the subset of the cluster which is working,

# to continue to accept queries for the part of the key space that is still

# covered. In order to do so, just set the cluster-require-full-coverage

# option to no.

#

# cluster-require-full-coverage yes

# In order to setup your cluster make sure to read the documentation

# available at http://redis.io web site.
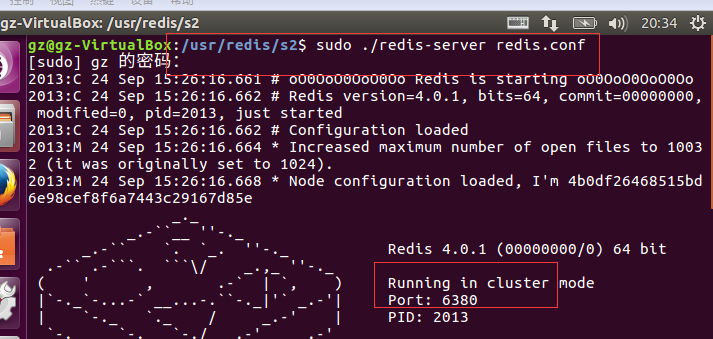
修改完之后 按下ESC 键,再按下 :wq!保存突出。同理,s2中的redis也是这样修改的但是,需要修改一下端口号,不能喝上面的端口号重复,s2中的端口号为6390。
使用相同的方式修改第二台上redis的配置:只不过在该台机器上只有一个redis服务(节点)
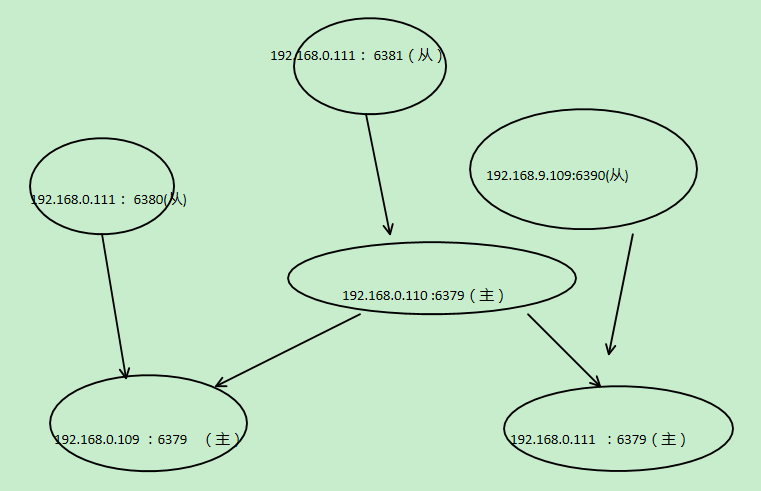
上面这两台服务器中的三个redis服务地址分别为:192.168.0.109:6379 192.168.0.109:6390 192.168.0.111:6379,在进行第三部的时候要用到。
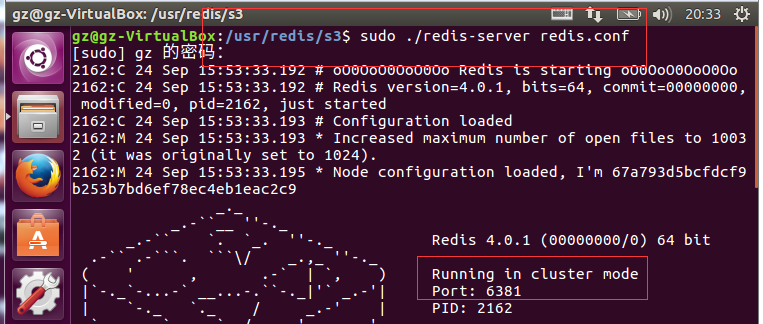
(3)第三台机器的配置
上面的两步中我们共开起了三台主redis节点,所以在第三台服务器上我们也要开启三台从节点,结果如下:
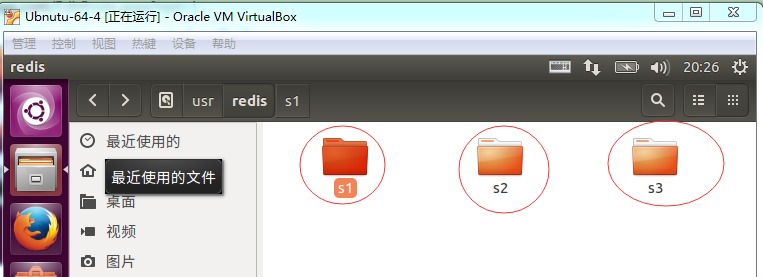
其中s1、s2、s3中文件和上面的一样,即三台从的redis节点。我们需要一个一个安装上面的配置修改redis.conf文件,只不过需要注意,三个节点的端口号是不一样的。s1、s2、s3的端口号分别是:6379 6380 6381
到现在个个redis节点的配置文件也修改好了,下面我们要分别启动s1 s2 s3 和上面的三个主redis服务了~~~~~~
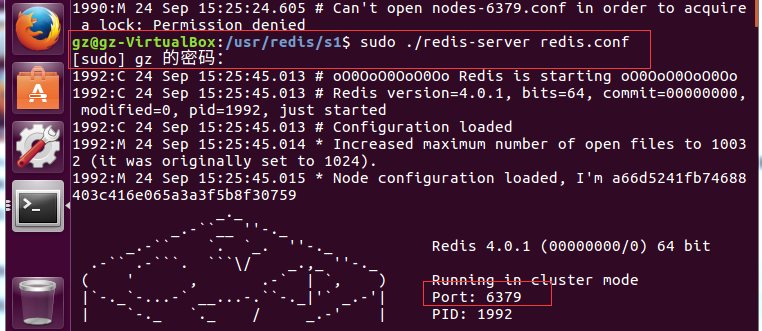
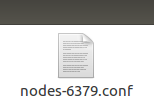
接下来,这三个服务都会生产一个这样的文件:
因为redis-trib.rb是ruby写的,不信可以打开看看。而在我们的Ubuntu16.04.1上是有ruby的环境的,但是还是强烈建议执行以下下面的指令 安装ruby,同时还要安装 ruby的Redis库,不过没关系,我们可以按照下面的步骤安装。
- 安装Redis-Cluster的依赖库(可能在安装依赖库的时候特别慢,可以使用加速器,我就不在这里说了,你懂的)
安装Ruby
sudo apt-get install ruby
安装Redis.gem
sudo gem intall redis
耐心等待,因为很慢的(#^.^#)。安装好之后,执行下面图中划的命令:
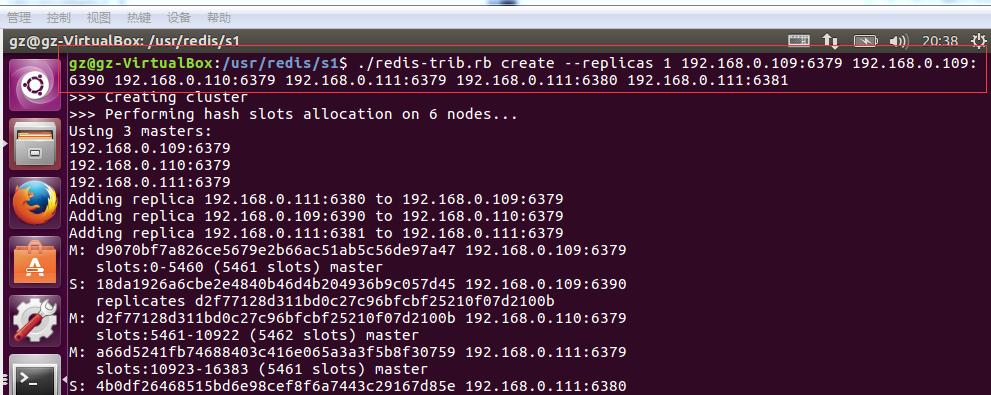
解释:./redis-trib.rb create --replicas 1 192.168.0.109:6379 192.168.0.109:6390 192.168.0.110:6379 192.168.0.111:6379 192.168.0.111:6380 192.168.0.111:6381
这些IP都是上面redis服务的IP,注意他们之间是有空格分开的。
如果出现上面的信息说明安装成功了!!!
其中:192.168.0.109:6379、192.168.0.110:6379/192.168.0.111:6379是主,192.168.0.111:6380/192.168.0.109:6390、192.168.0.111:6381是从的。
(4)测试是否成功
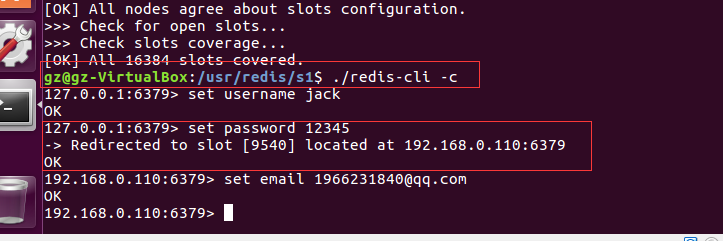
在到192.168.0.110:6379中看看有没有值:
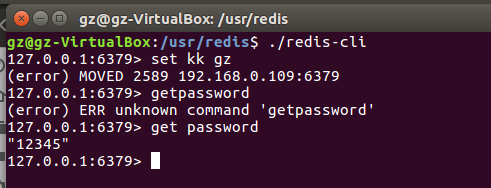
看到没,值同步过来了!!!!
三、面对Redis-ClusterC#该如何操作
step1:使用VS2017新建一个控制台程序
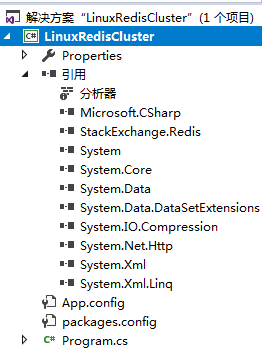
step2: Install-Package StackExchange.Redis
step3:编写代码:
 using StackExchange.Redis;

 using System;

 using System.Collections.Generic;

 using System.Linq;

 using System.Text;

 using System.Threading.Tasks;

 namespace LinuxRedisCluster

 {

     class Program

     {

         static void Main(string[] args)

         {

             using (ConnectionMultiplexer redis = ConnectionMultiplexer.Connect("192.168.0.109:6379,192.168.0.109:6390,192.168.0.110:6379,192.168.0.111:6379,192.168.0.111:6380,192.168.0.111:6381"))

             {

                 IDatabase db = redis.GetDatabase();

                 for (int i = ; i < ; i++)

                 {

                     db.StringSet("name"+i, "guozheng"+i);

                 }

                 //var myname = db.StringGet("name");

                // Console.WriteLine(myname);

             }

             Console.ReadKey();

         }

     }

 }
step4:查看结果:

四、总结:
关于redis如何集群的详细信息,可以参考Redis手册:集群教程
也可以参考下面这些博客:
http://www.cnblogs.com/huangxincheng/p/5615037.html
http://www.cnblogs.com/piscesLoveCc/p/5779795.html
觉得可以的话,希望点下推荐哈~你们的推荐是我的动力。
基础篇
.Neter玩转Linux系列之二:Linux下的文件目录及文件目录的权限
.Neter玩转Linux系列之四:Linux下shell介绍以及TCP、IP基础
.Neter玩转Linux系列之五:crontab使用详解和Linux的进程管理以及网络状态监控
.Neter玩转Linux系列之六:Linux下MySQL的安装、配置、使用
实战篇
Ubuntu16.04.1上搭建分布式的Redis集群,并使用C#操作
作者:郭峥
出处:http://www.cnblogs.com/runningsmallguo/
本文版权归作者和博客园共有,欢迎转载,但未经作者同意必须保留此段声明,且在文章页面明显位置给出原文链接。
Ubuntu16.04.1上搭建分布式的Redis集群的更多相关文章
- Ubuntu16.04.1上搭建分布式的Redis集群,并使用C#操作
为什么要集群: 通常为了,提高网站的响应速度,总是把一些经常用到的数据放到内存中,而不是放到数据库中,Redis是一个很好的Cache工具,当然了还有Memcached,这里只讲Redis.在我们的电 ...
- 分布式缓存 Redis 集群搭建
Redis 集群简介 Redis Cluster 即 Redis 集群,是 Redis 官方在 3.0 版本推出的一套分布式存储方案.完全去中心化,由多个节点组成,所有节点彼此互联.Redis 客户端 ...
- 在linux环境下安装redis并且搭建自己的redis集群
此文档主要介绍在linux环境下安装redis并且搭建自己的redis集群 搭建环境: ubuntun 16.04 + redis-3.0.6 本文章分为三个部分:redis安装.搭建redis集群 ...
- 带你自行搭建虚拟机和Redis集群环境,值得收藏!
前言: 我们看到分析 Redis 使用或原理的文章不少,但是完整搭建一套独立的 redis 集群环境的介绍,并不是很多或者说还不够详细. 那么,本文会手把手带着大家搭建一套 Redis 集群环境,Re ...
- 使用三台云服务器搭建真正的Redis集群
三台云服务器搭建redis集群# 今天花了一天的时间弄集群redis:遇到了很多坑,从头开始吧 环境讲解: 两台配置:1核2G,另一台:1核1G: 操作系统:Centos 7.6 Redis:3.2. ...
- 分布式缓存Redis集群搭建
redis安装 1.下载tar包至/opt/redis 2.解压tar包 tar -xvf redis-4.0.14.tar.gz 3. cd redis-4.0.14 make一下. 单节点的red ...
- Ubuntu 16.04上搭建CDH5.16.1集群
本文参考自:<Ubuntu16.04上搭建CDH5.14集群> 1.准备三台(CDH默认配置为三台)安装Ubuntu 16.04.4 LTS系统的服务器,假设ip地址分布为 192.168 ...
- Linux上搭建Hadoop2.6.3集群以及WIN7通过Eclipse开发MapReduce的demo
近期为了分析国内航空旅游业常见安全漏洞,想到了用大数据来分析,其实数据也不大,只是生产项目没有使用Hadoop,因此这里实际使用一次. 先看一下通过hadoop分析后的结果吧,最终通过hadoop分析 ...
- 在 Linux 服务器上搭建和配置 Hadoop 集群
实验条件:3台centos服务器,jdk版本1.8.0,Hadoop 版本2.8.0 注:hadoop安装和搭建过程中都是在用户lb的home目录下,master的主机名为host98,slave的主 ...
随机推荐
- 程序猿表白练级之Hello World
程序猿表白练级之Hello World ... 推荐一个优秀的编程网站:Hello World http://www.he11oworld.com/ The Hello World Collectio ...
- Visual Studio 编译使用FLTK库
FLTK介绍 FLTK (Fast Light Tool Kit 发音为fulltick) 是一种使用C++开发的GUI工具包,它可以应用于Unix,Linux,MS-Windows95/98/NT/ ...
- texlive、
0.1 卸载 texlive2007 如果系统没有安装过texlive,则跳过第0步. 可以在终端中使用如下命令查询本机已经安装的tex和latex版本: [She@She LaTex_test]$ ...
- JavaScript入门(四)
一.数组 1.数组的基本概念 数组是在内存空间中连续存储的一组有序数据的集合.元素在数组中的顺序,称为下标.可以使用下标访问数组的每个元素. 2.如何声明一个数组 ①使用字面量声明:var arr = ...
- ASP.NET Core 运行原理解剖[4]:进入HttpContext的世界
HttpContext是ASP.NET中的核心对象,每一个请求都会创建一个对应的HttpContext对象,我们的应用程序便是通过HttpContext对象来获取请求信息,最终生成响应,写回到Http ...
- C# 异步编程1 APM模式异步程序开发
C#已有10多年历史,单从微软2年一版的更新进度来看活力异常旺盛,C#中的异步编程也经历了多个版本的演化,从今天起着手写一个系列博文,记录一下C#中的异步编程的发展历程.广告一下:喜欢我文章的朋友,请 ...
- 红黑树的插入Java实现
package practice; public class TestMain { public static void main(String[] args) { int[] ao = {5, 1, ...
- spring mvc:Error scanning entry module-info.class from jar错误
项目从jdk1.6升级到jdk1.8,启动的时候出现如下错误: java.lang.RuntimeException: Error scanning entry module-info.class f ...
- stylus选中hover元素的兄弟元素下的子元素
stylus设置兄弟元素样式:鼠标浮动在 .video-li 元素上时,.video-li 兄弟中 .video-info 下的 .word 显示. .video-li &:hover ~ . ...
- js函数防抖、节流实现
防抖 Debounce 函数防抖就是,延迟一段时间再执行函数,如果这段时间内又触发了该函数,则延迟重新计算: // 简单实现 function debounce(fn, wait) { let t r ...