【重点突破】—— Echarts图表的介绍和使用
前言:百度Echarts是一个基于Canvas的纯Javascript图表库,提供直观、生动、可交互、可个性化定制的数据可视化图表。官网地址:http://echarts.baidu.com/index.html
一、Echarts基础
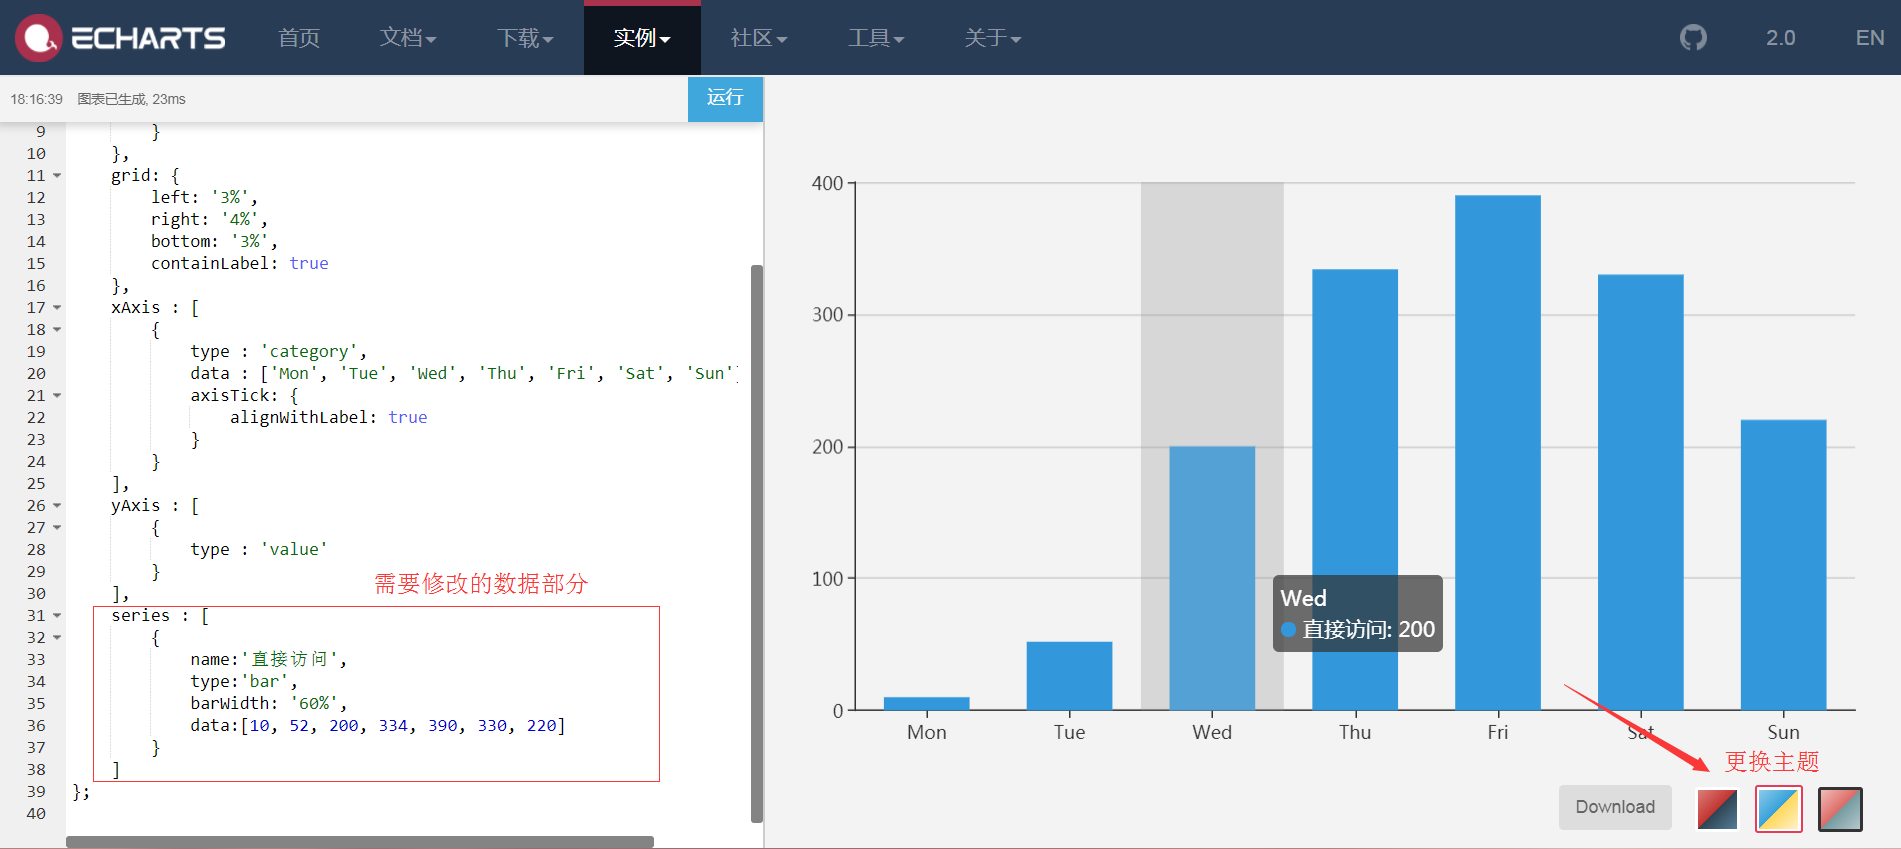
- 实例Demo:http://echarts.baidu.com/examples/

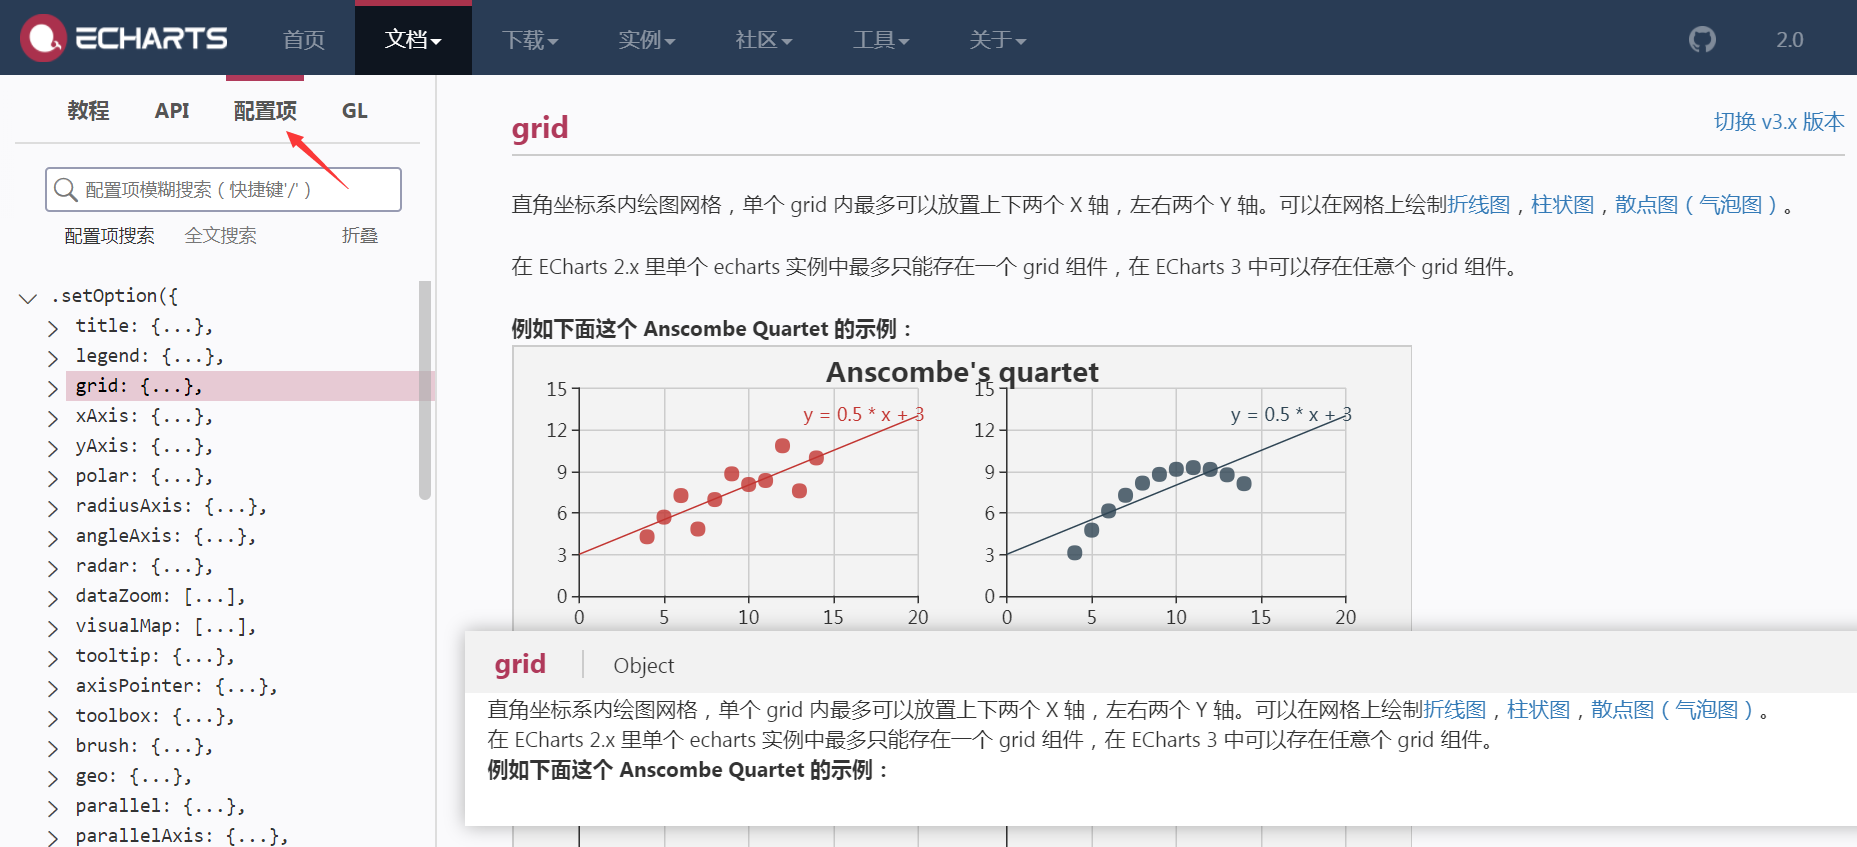
文档教程:http://www.echartsjs.com/option.html#title
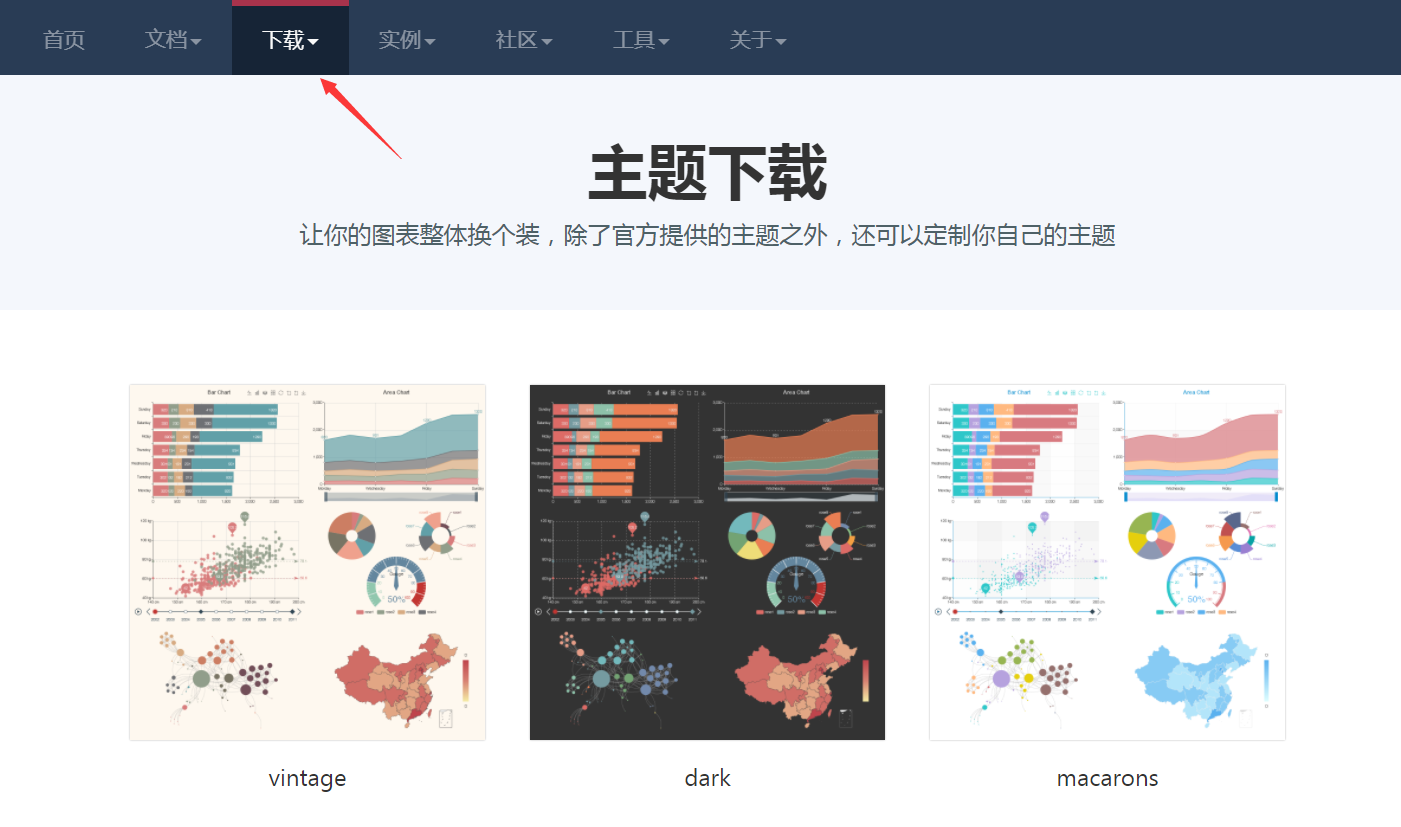
主题下载/定制主题:http://www.echartsjs.com/download-theme.html
React组件化theme变量应用主题
echarts->echartTheme.js
export default {

    "color": [

        "#f9c700",

        "#ff5400",

        "#6699cc",

        "#9cb3c5",

        "#e0e6ec",

        "#666666",

        "#787464",

        "#cc7e63",

        "#724e58",

        "#4b565b"

    ],

    "backgroundColor": "#ffffff",

    "textStyle": {},

    "title": {

        "textStyle": {

            "color": "#cccccc"

        },

        "subtextStyle": {

            "color": "#cccccc"

        }

    },

    "line": {

        "itemStyle": {

            "normal": {

                "borderWidth": 1

            }

        },

        "lineStyle": {

            "normal": {

                "width": 2

            }

        },

        "symbolSize": "10",

        "symbol": "emptyCircle",

        "smooth": false

    },

    "pie": {

        "itemStyle": {

            "normal": {

                "borderWidth": 0,

                "borderColor": "#ccc"

            },

            "emphasis": {

                "borderWidth": 0,

                "borderColor": "#ccc"

            }

        }

    },

    "categoryAxis": {

        "axisLine": {

            "show": true,

            "lineStyle": {

                "color": "#f1f3f5"

            }

        },

        "axisTick": {

            "show": true,

            "lineStyle": {

                "color": "#f1f3f5"

            }

        },

        "axisLabel": {

            "show": true,

            "textStyle": {

                "color": "#999999",

                "fontSize": "14"

            }

        },

        "splitLine": {

            "show": true,

            "lineStyle": {

                "color": [

                    "#f1f3f5"

                ]

            }

        },

        "splitArea": {

            "show": false,

            "areaStyle": {

                "color": [

                    "rgba(250,250,250,0.3)",

                    "rgba(200,200,200,0.3)"

                ]

            }

        }

    },

    "valueAxis": {

        "axisLine": {

            "show": true,

            "lineStyle": {

                "color": "#f1f3f5"

            }

        },

        "axisTick": {

            "show": true,

            "lineStyle": {

                "color": "#f1f3f5"

            }

        },

        "axisLabel": {

            "show": true,

            "textStyle": {

                "color": "#999999",

                "fontSize": "14"

            }

        },

        "splitLine": {

            "show": true,

            "lineStyle": {

                "color": [

                    "#f1f3f5"

                ]

            }

        },

        "splitArea": {

            "show": false,

            "areaStyle": {

                "color": [

                    "rgba(250,250,250,0.3)",

                    "rgba(200,200,200,0.3)"

                ]

            }

        }

    },

    "toolbox": {

        "iconStyle": {

            "normal": {

                "borderColor": "#999999"

            },

            "emphasis": {

                "borderColor": "#666666"

            }

        }

    },

    "legend": {

        "textStyle": {

            "color": "#333333"

        }

    },

    "tooltip": {

        "axisPointer": {

            "lineStyle": {

                "color": "#cccccc",

                "width": 1

            },

            "crossStyle": {

                "color": "#cccccc",

                "width": 1

            }

        }

    },

    "timeline": {

        "lineStyle": {

            "color": "#293c55",

            "width": 1

        },

        "itemStyle": {

            "normal": {

                "color": "#293c55",

                "borderWidth": 1

            },

            "emphasis": {

                "color": "#a9334c"

            }

        },

        "controlStyle": {

            "normal": {

                "color": "#293c55",

                "borderColor": "#293c55",

                "borderWidth": 0.5

            },

            "emphasis": {

                "color": "#293c55",

                "borderColor": "#293c55",

                "borderWidth": 0.5

            }

        },

        "checkpointStyle": {

            "color": "#e43c59",

            "borderColor": "rgba(194,53,49,0.5)"

        },

        "label": {

            "normal": {

                "textStyle": {

                    "color": "#293c55"

                }

            },

            "emphasis": {

                "textStyle": {

                    "color": "#293c55"

                }

            }

        }

    },

    "markPoint": {

        "label": {

            "normal": {

                "textStyle": {

                    "color": "#ffffff"

                }

            },

            "emphasis": {

                "textStyle": {

                    "color": "#ffffff"

                }

            }

        }

    }

}
echarts->themeLight.js
var colorPalette = [

    '#C1232B',

    '#27727B',

    '#FCCE10',

    '#E87C25',

    '#B5C334',

    '#FE8463',

    '#9BCA63',

    '#FAD860',

    '#F3A43B',

    '#60C0DD',

    '#D7504B',

    '#C6E579',

    '#F4E001',

    '#F0805A',

    '#26C0C0'

];

export default {

    color: colorPalette,

    title: {

        textStyle: {

            fontWeight: 'normal',

            color: '#27727B'

        }

    },

    visualMap: {

        color: ['#C1232B', '#FCCE10']

    },

    toolbox: {

        iconStyle: {

            normal: {

                borderColor: colorPalette[0]

            }

        }

    },

    tooltip: {

        backgroundColor: 'rgba(50,50,50,0.5)',

        axisPointer: {

            type: 'line',

            lineStyle: {

                color: '#27727B',

                type: 'dashed'

            },

            crossStyle: {

                color: '#27727B'

            },

            shadowStyle: {

                color: 'rgba(200,200,200,0.3)'

            }

        }

    },

    dataZoom: {

        dataBackgroundColor: 'rgba(181,195,52,0.3)',

        fillerColor: 'rgba(181,195,52,0.2)',

        handleColor: '#27727B'

    },

    categoryAxis: {

        axisLine: {

            lineStyle: {

                color: '#27727B'

            }

        },

        splitLine: {

            show: false

        }

    },

    valueAxis: {

        axisLine: {

            show: false

        },

        splitArea: {

            show: false

        },

        splitLine: {

            lineStyle: {

                color: ['#ccc'],

                type: 'dashed'

            }

        }

    },

    timeline: {

        lineStyle: {

            color: '#27727B'

        },

        controlStyle: {

            normal: {

                color: '#27727B',

                borderColor: '#27727B'

            }

        },

        symbol: 'emptyCircle',

        symbolSize: 3

    },

    line: {

        itemStyle: {

            normal: {

                borderWidth: 2,

                borderColor: '#fff',

                lineStyle: {

                    width: 3

                }

            },

            emphasis: {

                borderWidth: 0

            }

        },

        symbol: 'circle',

        symbolSize: 3.5

    },

    candlestick: {

        itemStyle: {

            normal: {

                color: '#C1232B',

                color0: '#B5C334',

                lineStyle: {

                    width: 1,

                    color: '#C1232B',

                    color0: '#B5C334'

                }

            }

        }

    },

    graph: {

        color: colorPalette

    },

    map: {

        label: {

            normal: {

                textStyle: {

                    color: '#C1232B'

                }

            },

            emphasis: {

                textStyle: {

                    color: 'rgb(100,0,0)'

                }

            }

        },

        itemStyle: {

            normal: {

                areaColor: '#ddd',

                borderColor: '#eee'

            },

            emphasis: {

                areaColor: '#fe994e'

            }

        }

    },

    gauge: {

        axisLine: {

            lineStyle: {

                color: [

                    [

                        0.2, '#B5C334'

                    ],

                    [

                        0.8, '#27727B'

                    ],

                    [1, '#C1232B']

                ]

            }

        },

        axisTick: {

            splitNumber: 2,

            length: 5,

            lineStyle: {

                color: '#fff'

            }

        },

        axisLabel: {

            textStyle: {

                color: '#fff'

            }

        },

        splitLine: {

            length: '5%',

            lineStyle: {

                color: '#fff'

            }

        },

        title: {

            offsetCenter: [0, -20]

        }

    }

}- 引用主题
//导入主题

import echartTheme from './../echartTheme'

import themeLight from './../themeLight' - componentWillMount()中注册主题
componentWillMount(){

        echarts.registerTheme('Default', echartTheme);

        echarts.registerTheme('Light', themeLight);

}
ReactEcharts组件中使用主题
<ReactEcharts theme="Default"/>

<ReactEcharts theme="Light"/>
React单页面应用中安装echarts、echarts-for-react(常用)
npm install echarts echarts-for-react --save

//或

yarn add echarts echarts-for-react --save
引用echarts
方法一:加载全部echarts包(少用)
//加载全部echarts

import echarts from 'echarts'
方法二:按需加载(常用)
//按需加载

import echarts from 'echarts/lib/echarts'

//必需基础组件

import 'echarts/lib/component/tooltip'

import 'echarts/lib/component/title'

import 'echarts/lib/component/legend'

import 'echarts/lib/component/markPoint'

//导入矩形图

import 'echarts/lib/chart/bar'
引用并初始化ReactEcharts:组件化开发,避免通过new对象的形式实现
import ReactEcharts from 'echarts-for-react'

//render echarts options

<ReactEcharts option={this.getOption()} theme="Default"/>
二、柱形图功能实现
- echarts->bar->index.js:对应路由/admin/charts/bar
- 基本柱形图表
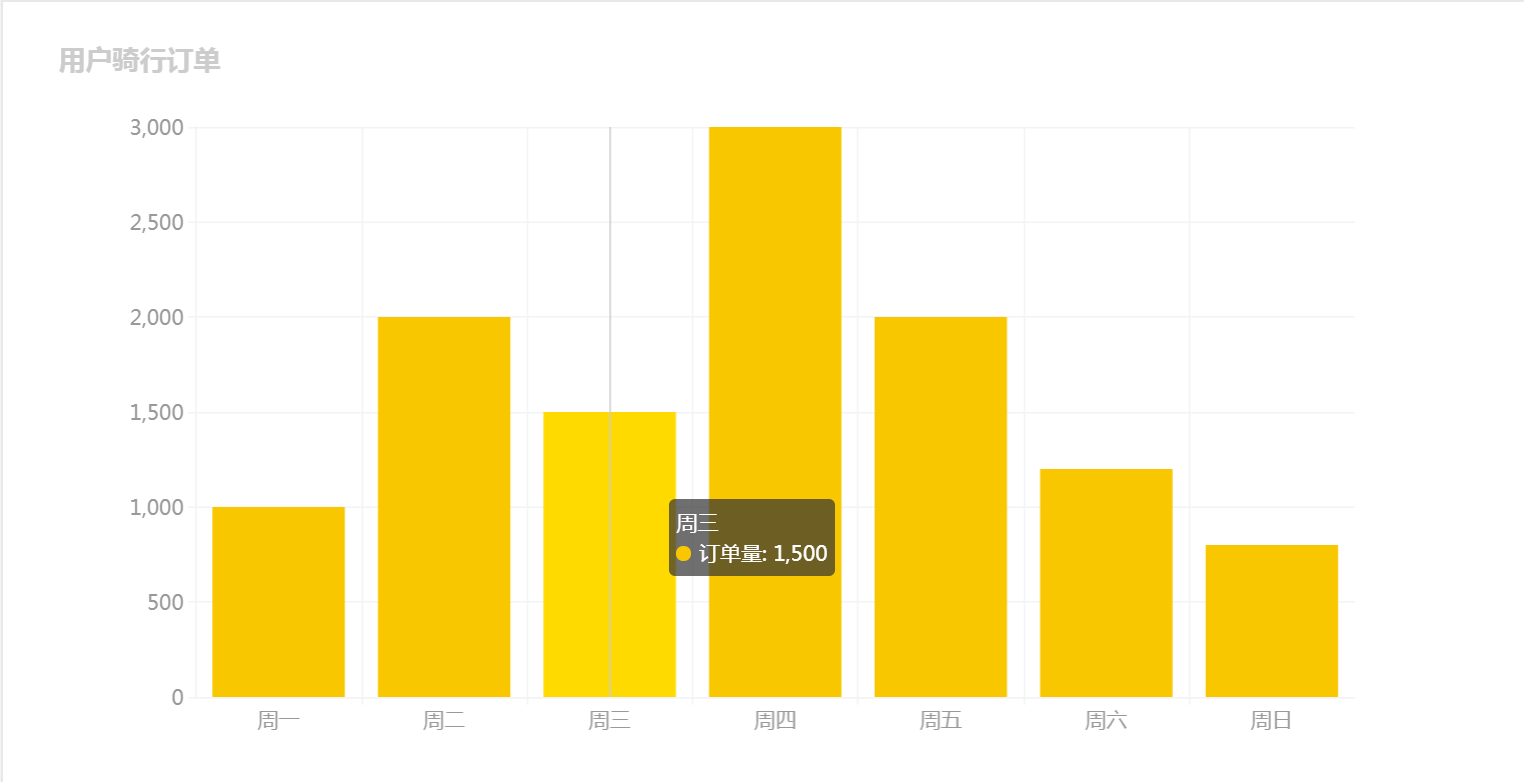
初始化ReactEcharts
<Card title="基本柱形图表">

      <ReactEcharts option={this.getOption()} theme="Default" style={{height: 500}}/>

</Card>
getOption()渲染数据:series为核心整体数据源,type为'bar'
getOption = () => {

        let option = {

            title: {

                text: '用户骑行订单'

            },

            tooltip: {//提示条

                trigger: 'axis'

            },

            xAxis: {  //X轴

                data: ['周一','周二','周三','周四','周五','周六','周日']

            },

            yAxis: {  //Y轴

                type: 'value'

            },

            series: [ //整体数据源

                {

                    name: '订单量',

                    type: 'bar',

                    data: [1000, 2000, 1500, 3000, 2000, 1200, 800]

                }

            ]

        }

        return option;

}
对比柱形图表
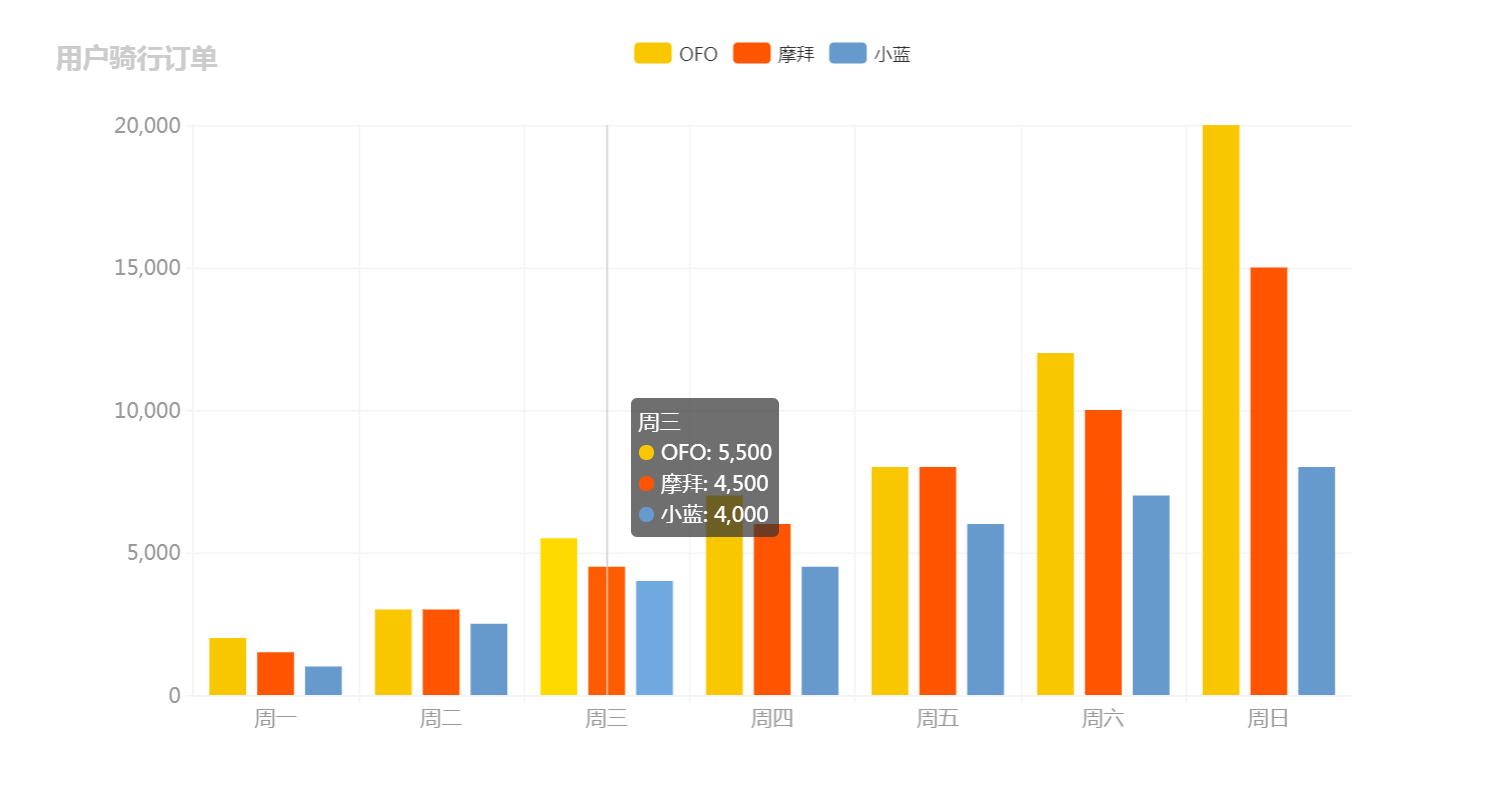
初始化ReactEcharts
<Card title="对比柱形图表">

          <ReactEcharts option={this.getOption2()} theme="Default" style={{height: 500}}/>

</Card>
getOption2()渲染数据
getOption2 = () => {

        let option = {

            title: {

                text: '用户骑行订单'

            },

            legend: { //可过滤父标题

                data: ['OFO','摩拜','小蓝']

            },

            tooltip: {

                trigger: 'axis'

            },

            xAxis: {

                data: ['周一','周二','周三','周四','周五','周六','周日']

            },

            yAxis: {

                type: 'value'

            },

            series: [ //整体数据源

                {

                    name: 'OFO',

                    type: 'bar',

                    data: [2000, 3000, 5500, 7000, 8000, 12000, 20000]

                },

                {

                    name: '摩拜',

                    type: 'bar',

                    data: [1500, 3000, 4500, 6000, 8000, 10000, 15000]

                },

                {

                    name: '小蓝',

                    type: 'bar',

                    data: [1000, 2500, 4000, 4500, 6000, 7000, 8000]

                }

            ]

        }

        return option;

}
三、饼形图功能实现
- echarts->pie->index.js:对应路由/admin/charts/pie
- 按需加载导入饼图
//导入饼图

import 'echarts/lib/chart/pie'
饼形图表
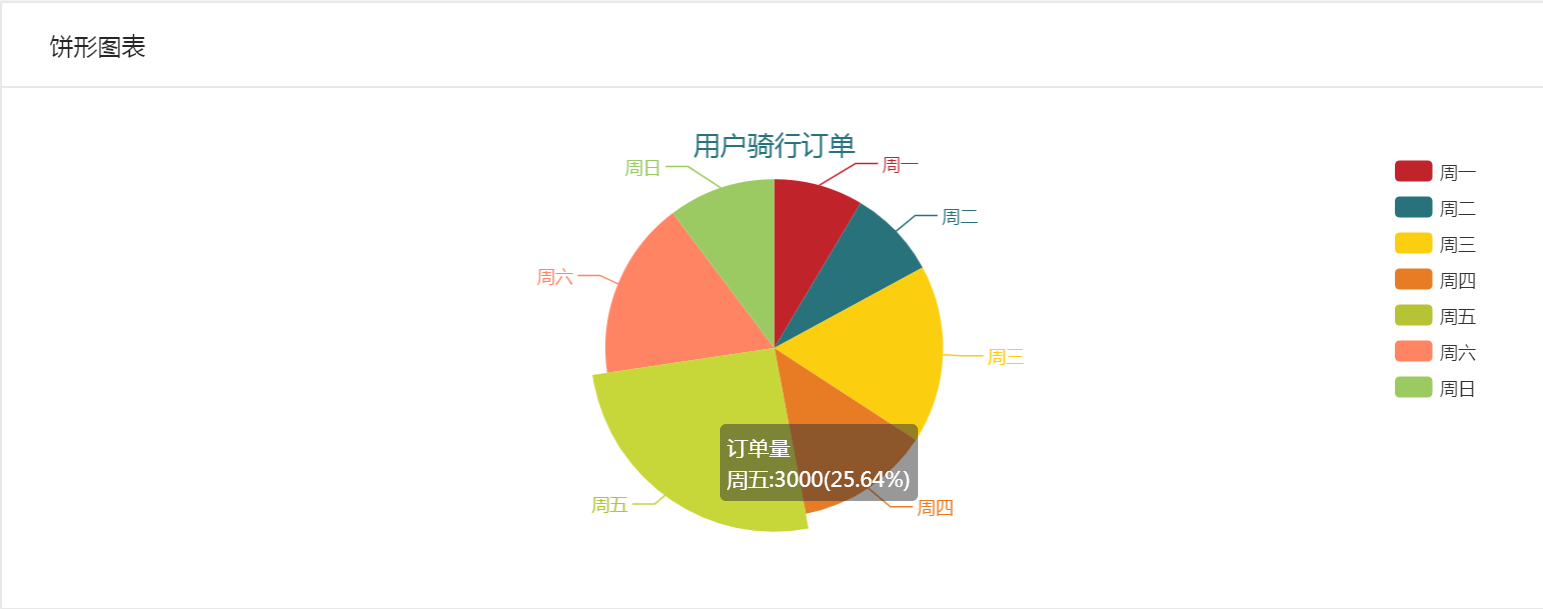
初始化ReactEcharts
<Card title="饼形图表">

      <ReactEcharts option={this.getOption()} theme="Light"/>

</Card>
getOption():关键在于option不同,type为'pie',data数组元素为对象
getOption = () => {

        let option = {

            title: {

                text: '用户骑行订单',

                x: 'center'  //水平方向居中

            },

            legend: {

                orient: 'vertical', //垂直方向排列

                right: 10,          //绝对定位位置

                top: 20,

                bottom: 20,

                data: ['周一','周二','周三','周四','周五','周六','周日']

            },

            tooltip:{

                trigger: 'item',

                formatter: '{a}<br/>{b}:{c}({d}%)' //格式化提示项

            },

            series: [

                {

                    name: '订单量',

                    type: 'pie',

                    data: [

                        {

                            value: 1000,

                            name: '周一'

                        },

                        {

                            value: 1000,

                            name: '周二'

                        },

                        {

                            value: 2000,

                            name: '周三'

                        },

                        {

                            value: 1500,

                            name: '周四'

                        },

                        {

                            value: 3000,

                            name: '周五'

                        },

                        {

                            value: 2000,

                            name: '周六'

                        },

                        {

                            value: 1200,

                            name: '周日'

                        }

                    ]

                }

            ]

        }

        return option;

}
- 环形图表

初始化ReactEcharts
 <Card title="环形图表">

           <ReactEcharts option={this.getOption2()} theme="Light"/>

</Card>
getOption2():radius属性设置内环外环大小
getOption2 = () => {

        let option = {

            title: {

                text: '用户骑行订单',

                x: 'center'  //水平方向居中

            },

            legend: {

                orient: 'vertical', //垂直方向排列

                right: 10,          //绝对定位位置

                top: 20,

                bottom: 20,

                data: ['周一','周二','周三','周四','周五','周六','周日']

            },

            tooltip:{

                trigger: 'item',

                formatter: '{a}<br/>{b}:{c}({d}%)' //格式化提示项

            },

            series: [

                {

                    name: '订单量',

                    type: 'pie',

                    radius: ['50%','80%'], //内环外环大小

                    // center: ['30%','60%'], //x轴y轴位置

                    data: [

                        {

                            value: 1000,

                            name: '周一'

                        },

                        {

                            value: 1000,

                            name: '周二'

                        },

                        {

                            value: 2000,

                            name: '周三'

                        },

                        {

                            value: 1500,

                            name: '周四'

                        },

                        {

                            value: 3000,

                            name: '周五'

                        },

                        {

                            value: 2000,

                            name: '周六'

                        },

                        {

                            value: 1200,

                            name: '周日'

                        }

                    ]

                }

            ]

        }

        return option;

}
南丁格尔图表:表格按数据大小排序、半径或区域随数据递增
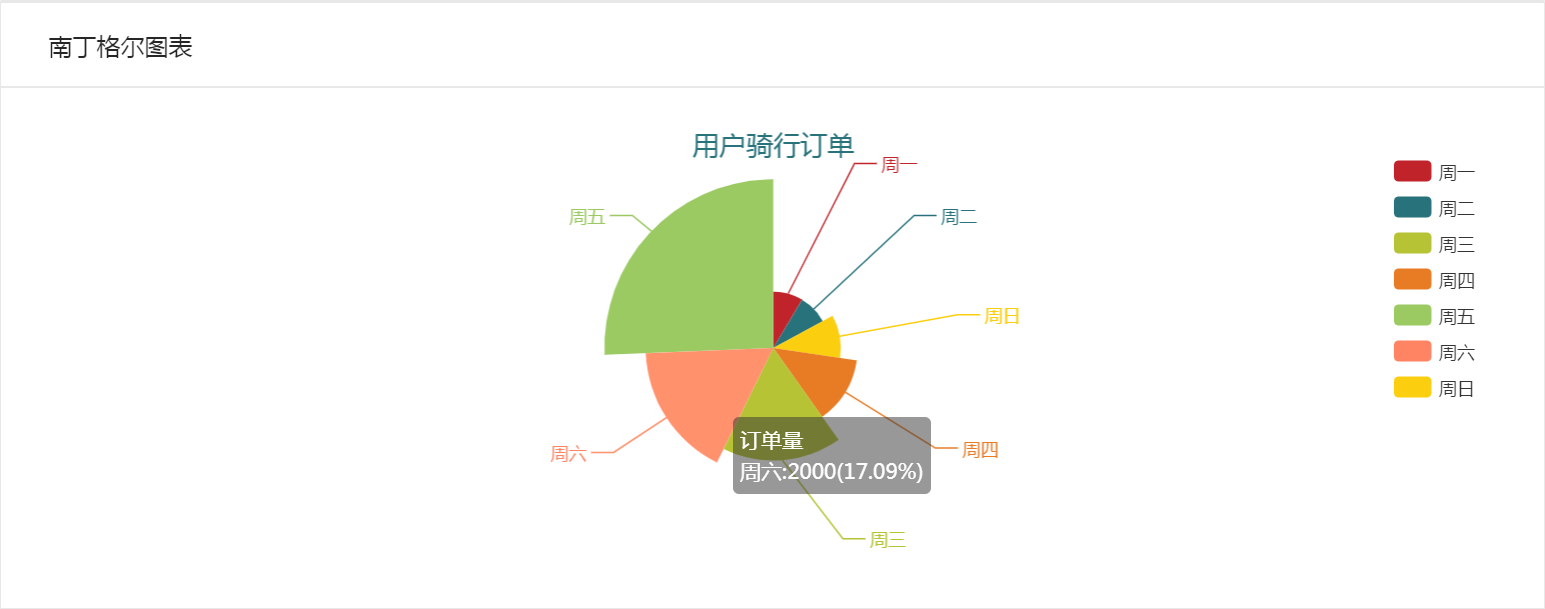
初始化ReactEcharts
<Card title="南丁格尔图表">

      <ReactEcharts option={this.getOption3()} theme="Light"/>

</Card>
getOption3():roseType属性指定半径radius或区域area
getOption3 = () => {

        let option = {

            title: {

                text: '用户骑行订单',

                x: 'center'  //水平方向居中

            },

            legend: {

                orient: 'vertical', //垂直方向排列

                right: 10,          //绝对定位位置

                top: 20,

                bottom: 20,

                data: ['周一','周二','周三','周四','周五','周六','周日']

            },

            tooltip:{

                trigger: 'item',

                formatter: '{a}<br/>{b}:{c}({d}%)' //格式化提示项

            },

            series: [

                {

                    name: '订单量',

                    type: 'pie',

                    data: [

                        {

                            value: 1000,

                            name: '周一'

                        },

                        {

                            value: 1000,

                            name: '周二'

                        },

                        {

                            value: 2000,

                            name: '周三'

                        },

                        {

                            value: 1500,

                            name: '周四'

                        },

                        {

                            value: 3000,

                            name: '周五'

                        },

                        {

                            value: 2000,

                            name: '周六'

                        },

                        {

                            value: 1200,

                            name: '周日'

                        }

                    ].sort((a,b) => {  //数据排序

                        return a.value - b.value;

                    }),

                    roseType:'radius', //数据大、半径大

                }

            ]

        }

        return option;

}
四、折线图功能实现
- echarts->pie->index.js:对应路由/admin/charts/pie
- 按需加载导入折线图
//导入饼图

import 'echarts/lib/chart/line'
基本折线图表

初始化ReactEcharts
<Card title="基本折线图">

          <ReactEcharts option={this.getOption()} theme="Default" style={{height: 500}}/>

</Card>
getOption():指定xAxis和yAxis的数据,series中通过data存储趋势点
getOption = () => {

        let option = {

            title: {

                text: '用户骑行订单'

            },

            tooltip: {

                trigger: 'axis'

            },

            xAxis: {

                data: [

                    '周一','周二','周三','周四','周五','周六','周日'

                ]

            },

            yAxis: {

                type: 'value'

            },

            series: [

                {

                    name: '订单量',

                    type: 'line',

                    data: [1000,2000,1500,3000,2000,1200,800] //趋势点

                }

            ]

        }

        return option;

}
对比折线图表
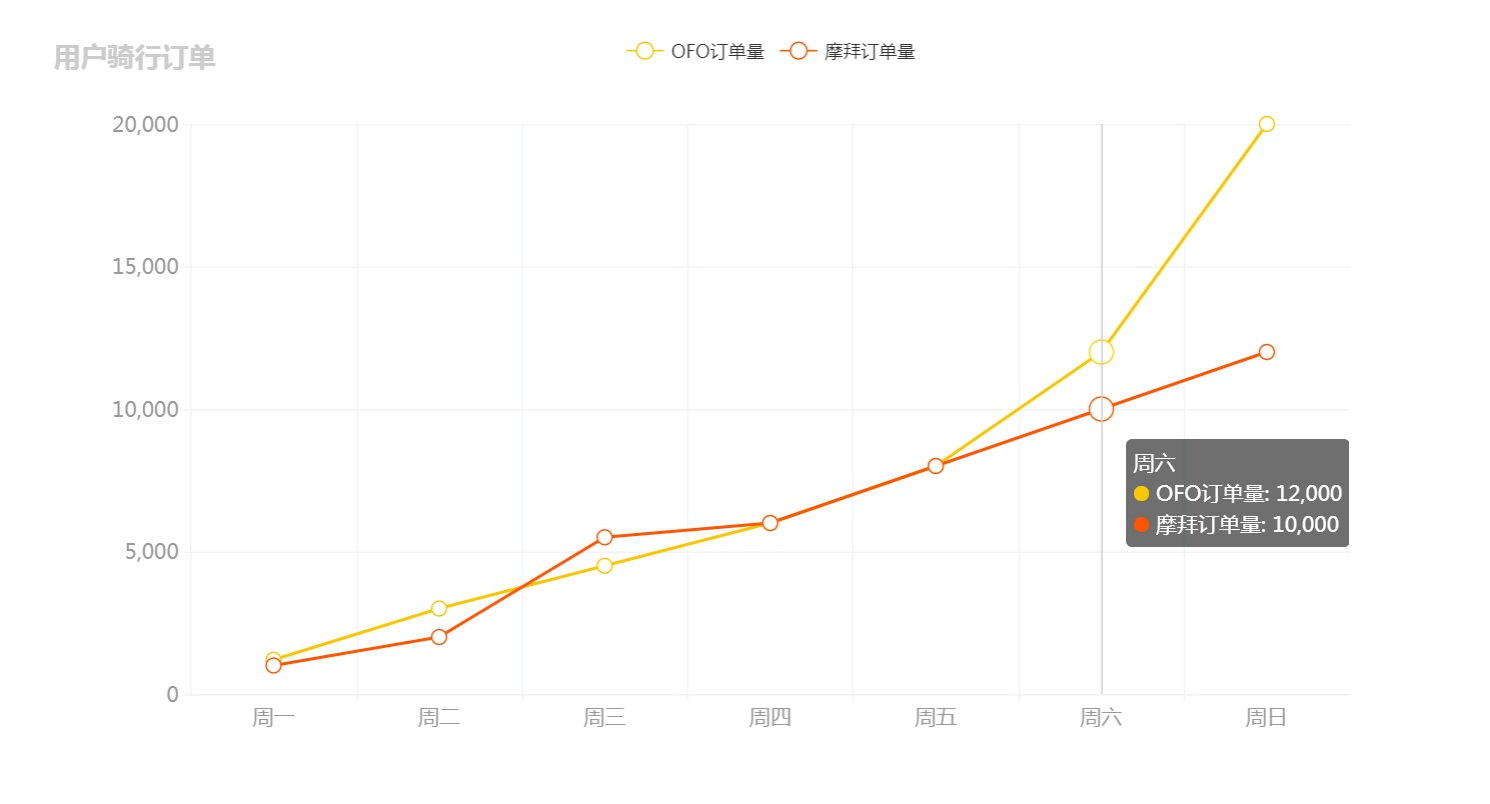
初始化ReactCharts
<Card title="对比折线图">

         <ReactEcharts option={this.getOption2()} theme="Default" style={{height: 500}}/>

</Card>
getOptions2():series整体数据源中多个数据对象对比
getOption2 = () => {

        let option = {

            title: {

                text: '用户骑行订单'

            },

            tooltip: {

                trigger: 'axis'

            },

            legend: {

                data: ['OFO订单量','摩拜订单量']

            },

            xAxis: {

                data: [

                    '周一','周二','周三','周四','周五','周六','周日'

                ]

            },

            yAxis: {

                type: 'value'

            },

            series: [

                {

                    name: 'OFO订单量',

                    type: 'line',

                    data: [1200,3000,4500,6000,8000,12000,20000] //趋势点

                },

                {

                    name: '摩拜订单量',

                    type: 'line',

                    data: [1000,2000,5500,6000,8000,10000,12000] //趋势点

                }

            ]

        }

        return option;

}
区域折线图表

初始化ReactEcharts
<Card title="区域折线图">

        <ReactEcharts option={this.getOption3()} theme="Default" style={{height: 500}}/>

</Card>
getOption3():boundaryGap属性指定坐标轴从0开始,areaStyle属性指定区域填充样式
getOption3 = () => {

        let option = {

            title: {

                text: '用户骑行订单'

            },

            tooltip: {

                trigger: 'axis'

            },

            xAxis: {

                boundaryGap: false, //坐标轴从起点开始,true时在中间

                data: ['周一','周二','周三','周四','周五','周六','周日']

            },

            yAxis: {

                type: 'value'

            },

            series: [

                {

                    name: '订单量',

                    type: 'line',

                    data: [1000,2000,1500,3000,2000,1200,800], //趋势点

                    areaStyle: {} //区域填充颜色

                }

            ]

        }

        return option;

}
注:转载请注明出处
【重点突破】—— Echarts图表的介绍和使用的更多相关文章
- 【重点突破】—— fetch()方法介绍
前言:ant-design-pro的技术组成主要是react+redux+dva+antd+fetch+roadhog,dva在源码包index.js里面导出了fetch,但是如果不想使用fetch库 ...
- ***ECharts图表入门和最佳实践
ECharts数据图表系统? 5分钟上手! [ECharts简介] ECharts开源来自百度商业前端数据可视化团队,基于html5 Canvas,是一个纯Javascript图表库,提供直观,生动, ...
- 【可视化】DataV接入ECharts图表库 可视化利器强强联手
DataV接入ECharts图表库 可视化利器强强联手 摘要: 两个扛把子级产品的结合,而且文末有彩蛋. DataV 数据可视化是搭建每年天猫双十一作战大屏的幕后功臣,ECharts 是广受数据可视化 ...
- 转:ECharts图表组件之简单关系图:如何轻松实现另类站点地图且扩展节点属性实现点击节点页面跳转
站点地图不外乎就是罗列一个网站的层次结构,提炼地讲就是一个关系结构图.那么我们如何巧用ECharts图表组件内的简单关系结构图来实现一个站点的地图结构呢?另外如何点击某个节点的时候实现页面跳转呢? 针 ...
- vue如何循环同一个echarts图表
因为我们知道echarts图表需要一个ID节点,所以我们循环echarts同一个图表时要考虑ID节点变化问题.废话不多说,直接上demo效果. 这里有一位分析师在不同的模拟组合,这时需求要在dialo ...
- Echarts图表插件(4.x版本)使用(二、带分类筛选的多个图表/实例化多个ECharts,以关系图/force为例)
导读 如果想在一个页面里实例化带分类筛选的多个Echarts该怎么做呢? 曾探讨了带分类选择的关系图显示为自定义图片的需求实现,传送门ECharts图表插件(4.x版本)使用(一.关系图force节点 ...
- ECharts图表插件(4.x版本)使用(一、关系图force节点显示为自定义图像/图片,带分类选择)
导读 ECharts,一个使用 JavaScript 实现的开源可视化库,可以流畅的运行在 PC 和移动设备上,兼容当前绝大部分浏览器(IE8/9/10/11,Chrome,Firefox,Safar ...
- echarts图表的封装
其实echarts官网有个快速上手的教程,一般人看一遍也知道是怎么回事,先给个传送门吧--五分钟上手 引入方式多种多样就自己去官网看了--这里简单介绍echarts怎么用,下方的封装函数比较重要 1. ...
- echarts图表第一个案例
1.action中获取到数据 @Override public String execute() throws Exception { List<Student> find = echar ...
随机推荐
- For Path
/****** Script for SelectTopNRows command from SSMS ******/ DECLARE @table TABLE (姓名 VARCHAR(10),课程 ...
- BZOJ 2199: [Usaco2011 Jan]奶牛议会
2199: [Usaco2011 Jan]奶牛议会 Time Limit: 10 Sec Memory Limit: 259 MBSubmit: 375 Solved: 241[Submit][S ...
- HDU RPG的错排 【错排&&组合】
RPG的错排 Time Limit: 1000/1000 MS (Java/Others) Memory Limit: 32768/32768 K (Java/Others)Total Subm ...
- Poj 2096 Collecting Bugs (概率DP求期望)
C - Collecting Bugs Time Limit:10000MS Memory Limit:64000KB 64bit IO Format:%I64d & %I64 ...
- Linux进程管理与调度-之-目录导航【转】
转自:http://blog.csdn.net/gatieme/article/details/51456569 版权声明:本文为博主原创文章 && 转载请著名出处 @ http:// ...
- UVA 10940 Throwing cards away II
题意略: 先暴力打表发现规律 N=1 ans=1N=2 ans=2N=3 ans=2N=4 ans=4N=5 ans=2N=6 ans=4N=7 ans=6N=8 ans=8N=9 ans=2N=10 ...
- windwos grpc 编译
此文档是windwos grpc c++ 编译 ,基于 vs2015 编译完成 获取gRPC源码 gRPC是开源框架,项目代码在github上,所以首先要安装github.github安装后,在指定文 ...
- mysq 中 information_schema 库
information_schema这个库,这个在mysql安装时就有了,提供了访问数据库元数据的方式.那什么是元数据库呢?元数据是关于数据的数据,如数据库名或表名,列的数据类型,或访问权限等.有些时 ...
- ubuntu默认用户分析
harvey@ubuntu:/etc$ cat -b passwd root:x:::root:/root:/bin/bash daemon:x:::daemon:/usr/sbin:/bin/sh ...
- 在C#中将金额转换成中文大写金额
具体代码如下: /// <summary> /// 金额转换成中文大写金额 /// </summary> /// <param name="LowerMoney ...
