docker--linux network namespace
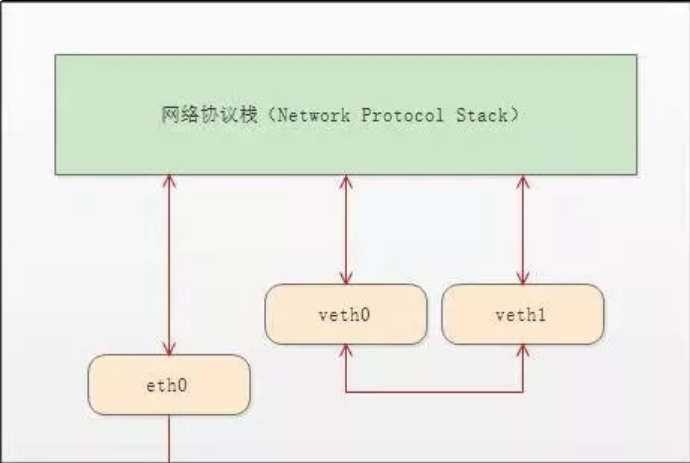
docker container的namespace使用 的是一种虚拟网络设备 veth-pair。顾名思义,veth-pair 就是一对的虚拟设备接口,和 tap/tun 设备不同的是,它都是成对出现的。一端连着协议栈,一端彼此相连着。如下图所示:
接下来做一番测试:
[root@localhost ~]# ip netns list #查看当前存在的namespace

test1

[root@localhost ~]# ip netns delete test1 #删除namespace

[root@localhost ~]# ip netns list

[root@localhost ~]# ipnetns add test1

bash: ipnetns: command not found...

[root@localhost ~]# ip netns add test1 #增加test1

[root@localhost ~]# ip netns add test2 #增加test2

[root@localhost ~]# ip netns list

test2

test1

[root@localhost ~]# ip netns exec test1 ip a #查看test1的IP地址,exec test1 表示在test1里面执行 ip a 这个命令,发现只有一个lo回环口,状态是DOWN,而且没有127.0.0.1这个IP地址

: lo: <LOOPBACK> mtu  qdisc noop state DOWN qlen

    link/loopback ::::: brd :::::

[root@localhost ~]# ip netns exec test2 ip a #查看test2的IP地址,结果和test1一样

: lo: <LOOPBACK> mtu  qdisc noop state DOWN qlen

    link/loopback ::::: brd :::::

[root@localhost ~]#
通过ip link命令可以查看namespace有多少个link,并且可以up link
[root@localhost ~]# ip link #查看本地link

: lo: <LOOPBACK,UP,LOWER_UP> mtu  qdisc noqueue state UNKNOWN mode DEFAULT qlen

    link/loopback ::::: brd :::::

: ens33: <BROADCAST,MULTICAST,UP,LOWER_UP> mtu  qdisc pfifo_fast state UP mode DEFAULT qlen

    link/ether :0c:::e1:eb brd ff:ff:ff:ff:ff:ff

: virbr0: <NO-CARRIER,BROADCAST,MULTICAST,UP> mtu  qdisc noqueue state DOWN mode DEFAULT qlen

    link/ether ::::5a:be brd ff:ff:ff:ff:ff:ff

: virbr0-nic: <BROADCAST,MULTICAST> mtu  qdisc pfifo_fast master virbr0 state DOWN mode DEFAULT qlen

    link/ether ::::5a:be brd ff:ff:ff:ff:ff:ff

: docker0: <BROADCAST,MULTICAST,UP,LOWER_UP> mtu  qdisc noqueue state UP mode DEFAULT

    link/ether ::e8::c7:6c brd ff:ff:ff:ff:ff:ff

: vethd03ae3e@if6: <BROADCAST,MULTICAST,UP,LOWER_UP> mtu  qdisc noqueue master docker0 state UP mode DEFAULT

    link/ether 9e:f7:f6:f6:fe: brd ff:ff:ff:ff:ff:ff link-netnsid

: vethbb1dfcd@if8: <BROADCAST,MULTICAST,UP,LOWER_UP> mtu  qdisc noqueue master docker0 state UP mode DEFAULT

    link/ether b2:::9f:e5: brd ff:ff:ff:ff:ff:ff link-netnsid

[root@localhost ~]# ip netns exec test1 ip link #查看test1 link

: lo: <LOOPBACK> mtu  qdisc noop state DOWN mode DEFAULT qlen

    link/loopback ::::: brd :::::

[root@localhost ~]# ip netns exec test1 ip link set dev lo up #up test1 的lo回环口。

[root@localhost ~]# ip netns exec test1 ip link #发现state 是 UNKNOWN ,和本地lo状态一样。 因为端口要up起来,需要满足条件,它需要两端是连起来的,就像ens33需要和MAC虚拟化的一个端口连起来,单个端口无法up,必须是一对

: lo: <LOOPBACK,UP,LOWER_UP> mtu  qdisc noqueue state UNKNOWN mode DEFAULT qlen

    link/loopback ::::: brd :::::

[root@localhost ~]#
在本地添加一对veth-pair
[root@localhost ~]# ip link add veth-test1 type veth peer name veth-test2 #在本地link一对veth-pair

[root@localhost ~]# ip link

: lo: <LOOPBACK,UP,LOWER_UP> mtu  qdisc noqueue state UNKNOWN mode DEFAULT qlen

    link/loopback ::::: brd :::::

: ens33: <BROADCAST,MULTICAST,UP,LOWER_UP> mtu  qdisc pfifo_fast state UP mode DEFAULT qlen

    link/ether :0c:::e1:eb brd ff:ff:ff:ff:ff:ff

: virbr0: <NO-CARRIER,BROADCAST,MULTICAST,UP> mtu  qdisc noqueue state DOWN mode DEFAULT qlen

    link/ether ::::5a:be brd ff:ff:ff:ff:ff:ff

: virbr0-nic: <BROADCAST,MULTICAST> mtu  qdisc pfifo_fast master virbr0 state DOWN mode DEFAULT qlen

    link/ether ::::5a:be brd ff:ff:ff:ff:ff:ff

: docker0: <BROADCAST,MULTICAST,UP,LOWER_UP> mtu  qdisc noqueue state UP mode DEFAULT

    link/ether ::e8::c7:6c brd ff:ff:ff:ff:ff:ff

: vethd03ae3e@if6: <BROADCAST,MULTICAST,UP,LOWER_UP> mtu  qdisc noqueue master docker0 state UP mode DEFAULT

    link/ether 9e:f7:f6:f6:fe: brd ff:ff:ff:ff:ff:ff link-netnsid

: vethbb1dfcd@if8: <BROADCAST,MULTICAST,UP,LOWER_UP> mtu  qdisc noqueue master docker0 state UP mode DEFAULT #新增的link 有mac地址,state DOWN

    link/ether b2:::9f:e5: brd ff:ff:ff:ff:ff:ff link-netnsid

: veth-test2@veth-test1: <BROADCAST,MULTICAST,M-DOWN> mtu  qdisc noop state DOWN mode DEFAULT qlen

    link/ether ::bb:4a:fc: brd ff:ff:ff:ff:ff:ff

: veth-test1@veth-test2: <BROADCAST,MULTICAST,M-DOWN> mtu  qdisc noop state DOWN mode DEFAULT qlen

    link/ether 4a:0c:::: brd ff:ff:ff:ff:ff:ff
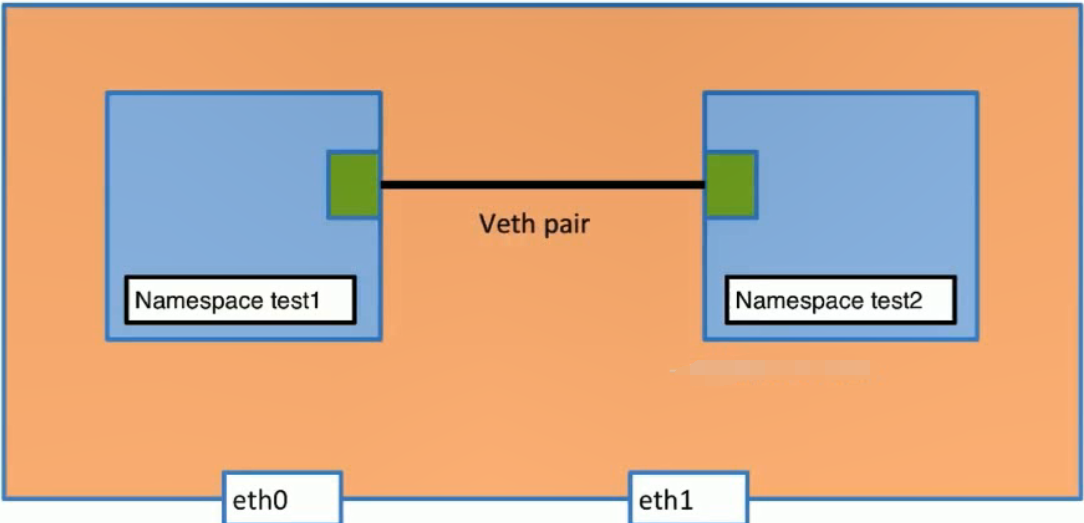
把一对veth-pair分别添加到两个namespace中
[root@localhost ~]# ip link set v

vethbb1dfcd  vethd03ae3e  veth-test1   veth-test2   virbr0       virbr0-nic

[root@localhost ~]# ip link set v

vethbb1dfcd  vethd03ae3e  veth-test1   veth-test2   virbr0       virbr0-nic

[root@localhost ~]# ip link set veth-test1 n

name   netns

[root@localhost ~]# ip link set veth-test1 netns test1 #把本地veth-test1 link添加到namespace test1中

[root@localhost ~]# ip link set veth-test2 netns test2 #把本地veth-test2 link添加到namespace test2中

[root@localhost ~]# ip link #查看本地link发现veth-test1和veth-test2已经消失

: lo: <LOOPBACK,UP,LOWER_UP> mtu  qdisc noqueue state UNKNOWN mode DEFAULT qlen

    link/loopback ::::: brd :::::

: ens33: <BROADCAST,MULTICAST,UP,LOWER_UP> mtu  qdisc pfifo_fast state UP mode DEFAULT qlen

    link/ether :0c:::e1:eb brd ff:ff:ff:ff:ff:ff

: virbr0: <NO-CARRIER,BROADCAST,MULTICAST,UP> mtu  qdisc noqueue state DOWN mode DEFAULT qlen

    link/ether ::::5a:be brd ff:ff:ff:ff:ff:ff

: virbr0-nic: <BROADCAST,MULTICAST> mtu  qdisc pfifo_fast master virbr0 state DOWN mode DEFAULT qlen

    link/ether ::::5a:be brd ff:ff:ff:ff:ff:ff

: docker0: <BROADCAST,MULTICAST,UP,LOWER_UP> mtu  qdisc noqueue state UP mode DEFAULT

    link/ether ::e8::c7:6c brd ff:ff:ff:ff:ff:ff

: vethd03ae3e@if6: <BROADCAST,MULTICAST,UP,LOWER_UP> mtu  qdisc noqueue master docker0 state UP mode DEFAULT

    link/ether 9e:f7:f6:f6:fe: brd ff:ff:ff:ff:ff:ff link-netnsid

: vethbb1dfcd@if8: <BROADCAST,MULTICAST,UP,LOWER_UP> mtu  qdisc noqueue master docker0 state UP mode DEFAULT

    link/ether b2:::9f:e5: brd ff:ff:ff:ff:ff:ff link-netnsid

[root@localhost ~]# ip netns exec  test1 ip link #查看namespace test1 link,已经添加veth-test1,state down 没IP地址

: lo: <LOOPBACK,UP,LOWER_UP> mtu  qdisc noqueue state UNKNOWN mode DEFAULT qlen

    link/loopback ::::: brd :::::

: veth-test1@if10: <BROADCAST,MULTICAST> mtu  qdisc noop state DOWN mode DEFAULT qlen

    link/ether 4a:0c:::: brd ff:ff:ff:ff:ff:ff link-netnsid

[root@localhost ~]# ip netns exec  test2 ip link #查看namespace test2 link,已经添加veth-test2,state down 没IP地址

: lo: <LOOPBACK> mtu  qdisc noop state DOWN mode DEFAULT qlen

    link/loopback ::::: brd :::::

: veth-test2@if11: <BROADCAST,MULTICAST> mtu  qdisc noop state DOWN mode DEFAULT qlen

    link/ether ::bb:4a:fc: brd ff:ff:ff:ff:ff:ff link-netnsid

[root@localhost ~]#
给两个namespace的veth-test1 2 分配IP地址
[root@localhost ~]# ip netns exec test1 ip addr add 192.168.1.1/ dev veth-test1 #给veth-test1添加IP地址

[root@localhost ~]# ip netns exec test2 ip addr add 192.168.1.2/ dev veth-test2 #给veth-testg2添加IP地址

[root@localhost ~]# ip netns exec test1 ip link #状态是down,需要up

: lo: <LOOPBACK,UP,LOWER_UP> mtu  qdisc noqueue state UNKNOWN mode DEFAULT qlen

    link/loopback ::::: brd :::::

: veth-test1@if10: <BROADCAST,MULTICAST> mtu  qdisc noop state DOWN mode DEFAULT qlen

    link/ether 4a:0c:::: brd ff:ff:ff:ff:ff:ff link-netnsid

[root@localhost ~]# ip netns exec test2 ip link #状态是down,需要up

: lo: <LOOPBACK> mtu  qdisc noop state DOWN mode DEFAULT qlen

    link/loopback ::::: brd :::::

: veth-test2@if11: <BROADCAST,MULTICAST> mtu  qdisc noop state DOWN mode DEFAULT qlen

    link/ether ::bb:4a:fc: brd ff:ff:ff:ff:ff:ff link-netnsid

[root@localhost ~]#
up veth-test1 和 veth-test2
[root@localhost ~]# ip netns exec test1 ip link set dev veth-test1 up #up veth-test1

[root@localhost ~]# ip netns exec test2 ip link set dev veth-test2 up #up veth-test2

[root@localhost ~]# ip netns exec test1 ip link #查看link状态

: lo: <LOOPBACK,UP,LOWER_UP> mtu  qdisc noqueue state UNKNOWN mode DEFAULT qlen

    link/loopback ::::: brd :::::

: veth-test1@if10: <BROADCAST,MULTICAST,UP,LOWER_UP> mtu  qdisc noqueue state UP mode DEFAULT qlen

    link/ether 4a:0c:::: brd ff:ff:ff:ff:ff:ff link-netnsid

[root@localhost ~]# ip netns exec test2 ip link

: lo: <LOOPBACK> mtu  qdisc noop state DOWN mode DEFAULT qlen

    link/loopback ::::: brd :::::

: veth-test2@if11: <BROADCAST,MULTICAST,UP,LOWER_UP> mtu  qdisc noqueue state UP mode DEFAULT qlen

    link/ether ::bb:4a:fc: brd ff:ff:ff:ff:ff:ff link-netnsid

[root@localhost ~]# ip netns exec test2 ip a #查看是否有IP

: lo: <LOOPBACK> mtu  qdisc noop state DOWN qlen

    link/loopback ::::: brd :::::

: veth-test2@if11: <BROADCAST,MULTICAST,UP,LOWER_UP> mtu  qdisc noqueue state UP qlen

    link/ether ::bb:4a:fc: brd ff:ff:ff:ff:ff:ff link-netnsid

    inet 192.168.1.2/ scope global veth-test2

       valid_lft forever preferred_lft forever

    inet6 fe80:::bbff:fe4a:fc76/ scope link

       valid_lft forever preferred_lft forever

[root@localhost ~]# ip netns exec test1 ip a #查看是否有IP

: lo: <LOOPBACK,UP,LOWER_UP> mtu  qdisc noqueue state UNKNOWN qlen

    link/loopback ::::: brd :::::

    inet 127.0.0.1/ scope host lo

       valid_lft forever preferred_lft forever

    inet6 ::/ scope host

       valid_lft forever preferred_lft forever

: veth-test1@if10: <BROADCAST,MULTICAST,UP,LOWER_UP> mtu  qdisc noqueue state UP qlen

    link/ether 4a:0c:::: brd ff:ff:ff:ff:ff:ff link-netnsid

    inet 192.168.1.1/ scope global veth-test1

       valid_lft forever preferred_lft forever

    inet6 fe80::480c:80ff:fe98:/ scope link

       valid_lft forever preferred_lft forever

[root@localhost ~]#
测试两个namespace直接是否能ping通
[root@localhost ~]# ip netns exec test1 ping 192.168.1.2

PING 192.168.1.2 (192.168.1.2) () bytes of data.

 bytes from 192.168.1.2: icmp_seq= ttl= time=0.050 ms

 bytes from 192.168.1.2: icmp_seq= ttl= time=0.080 ms

 bytes from 192.168.1.2: icmp_seq= ttl= time=0.078 ms

 bytes from 192.168.1.2: icmp_seq= ttl= time=0.080 ms

^C

--- 192.168.1.2 ping statistics ---

 packets transmitted,  received, % packet loss, time 2999ms

rtt min/avg/max/mdev = 0.050/0.072/0.080/0.012 ms

[root@localhost ~]# ip netns exec test2 ping 192.168.1.1

PING 192.168.1.1 (192.168.1.1) () bytes of data.

 bytes from 192.168.1.1: icmp_seq= ttl= time=0.037 ms

 bytes from 192.168.1.1: icmp_seq= ttl= time=0.036 ms

 bytes from 192.168.1.1: icmp_seq= ttl= time=0.034 ms

 bytes from 192.168.1.1: icmp_seq= ttl= time=0.034 ms

^C

--- 192.168.1.1 ping statistics ---

 packets transmitted,  received, % packet loss, time 2999ms

rtt min/avg/max/mdev = 0.034/0.035/0.037/0.004 ms

[root@localhost ~]#
docker使用image busybox 为例:
[root@localhost ~]# docker pull busybox

Using default tag: latest

latest: Pulling from library/busybox

8e674ad76dce: Pull complete

Digest: sha256:c94cf1b87ccb80f2e6414ef913c748b105060debda482058d2b8d0fce39f11b9

Status: Downloaded newer image for busybox:latest
创建两个在后台运行的container test1 和test2
docker run -d --name test1 busybox /bin/sh -c "while true;do sleep 3600;done"
docker run -d --name test2 busybox /bin/sh -c "while true;do sleep 3600;done"
[root@localhost ~]# docker image ls

REPOSITORY          TAG                 IMAGE ID            CREATED             SIZE

ubuntu              latest              4c108a37151f         weeks ago         .2MB

busybox             latest              e4db68de4ff2         weeks ago         .22MB

ubuntu              14.04               2c5e00d77a67         months ago        188MB

centos              latest              9f38484d220f         months ago        202MB

[root@localhost ~]# docker container ls

CONTAINER ID        IMAGE               COMMAND                  CREATED             STATUS              PORTS               NAMES

811f815caa94        busybox             "/bin/sh -c 'while t…"    hours ago         Up  hours                              test2

18bd8b5f3841        busybox             "/bin/sh -c 'while t…"    hours ago         Up  hours                              test1

[root@localhost ~]# docker exec test1 ip a

: lo: <LOOPBACK,UP,LOWER_UP> mtu  qdisc noqueue qlen

    link/loopback ::::: brd :::::

    inet 127.0.0.1/ scope host lo

       valid_lft forever preferred_lft forever

: eth0@if7: <BROADCAST,MULTICAST,UP,LOWER_UP,M-DOWN> mtu  qdisc noqueue

    link/ether ::ac::: brd ff:ff:ff:ff:ff:ff

    inet 172.17.0.2/ brd 172.17.255.255 scope global eth0

       valid_lft forever preferred_lft forever

[root@localhost ~]# docker exec test2 ip a

: lo: <LOOPBACK,UP,LOWER_UP> mtu  qdisc noqueue qlen

    link/loopback ::::: brd :::::

    inet 127.0.0.1/ scope host lo

       valid_lft forever preferred_lft forever

: eth0@if9: <BROADCAST,MULTICAST,UP,LOWER_UP,M-DOWN> mtu  qdisc noqueue

    link/ether ::ac::: brd ff:ff:ff:ff:ff:ff

    inet 172.17.0.3/ brd 172.17.255.255 scope global eth0

       valid_lft forever preferred_lft forever

[root@localhost ~]# docker exec test2 ping 172.17.0.3

PING 172.17.0.3 (172.17.0.3):  data bytes

 bytes from 172.17.0.3: seq= ttl= time=0.045 ms

 bytes from 172.17.0.3: seq= ttl= time=0.104 ms

 bytes from 172.17.0.3: seq= ttl= time=0.112 ms

^C

[root@localhost ~]# docker exec test1 ping 172.17.0.2

PING 172.17.0.2 (172.17.0.2):  data bytes

 bytes from 172.17.0.2: seq= ttl= time=0.043 ms

 bytes from 172.17.0.2: seq= ttl= time=0.103 ms

 bytes from 172.17.0.2: seq= ttl= time=0.105 ms

^C

[root@localhost ~]#
docker使用的namespace原因和 linux network namespace一样。
docker--linux network namespace的更多相关文章
- 【转】理解Docker容器网络之Linux Network Namespace
原文:理解Docker容器网络之Linux Network Namespace 由于2016年年中调换工作的原因,对容器网络的研究中断过一段时间.随着当前项目对Kubernetes应用的深入,我感觉之 ...
- Netruon 理解(11):使用 NAT 将 Linux network namespace 连接外网
学习 Neutron 系列文章: (1)Neutron 所实现的虚拟化网络 (2)Neutron OpenvSwitch + VLAN 虚拟网络 (3)Neutron OpenvSwitch + GR ...
- Netruon 理解(12):使用 Linux bridge 将 Linux network namespace 连接外网
学习 Neutron 系列文章: (1)Neutron 所实现的虚拟化网络 (2)Neutron OpenvSwitch + VLAN 虚拟网络 (3)Neutron OpenvSwitch + GR ...
- 一文搞懂 Linux network namespace
本文首发于我的公众号 Linux云计算网络(id: cloud_dev),专注于干货分享,号内有 10T 书籍和视频资源,后台回复「1024」即可领取,欢迎大家关注,二维码文末可以扫. 本文通过 IP ...
- 【转】linux network namespace 学习
原文地址:https://segmentfault.com/a/1190000004059167 介绍 在专业的网络世界中,经常使用到Virtual Routing and Forwarding(VR ...
- Linux Network Namespace
Linux Network Namespaces Linux kernel在2.6.29中加入了namespaces,用于支持网络的隔离,我们看一下namespace是如何使用的 创建与配置 创建一个 ...
- Linux network namespace源码分析
一.network namespace的创建 在对iproute2的源码进行分析后,我们可以知道,当我们调用命令`ip netns add ns1`时,本质上就是调用`unshare(CLONE_NE ...
- linux network name space
linux network namespace概念类似于网络中的 VRF (virtual routing and forwarding).但是,你不知道VRF的概念也没关系,下面我们通过一个简单的介 ...
- linux 网络虚拟化: network namespace 简介
linux 网络虚拟化: network namespace 简介 network namespace 是实现网络虚拟化的重要功能,它能创建多个隔离的网络空间,它们有独自的网络栈信息.不管是虚拟机还是 ...
随机推荐
- MapReduce的序列化机制
MapReduce自己实现了一套序列化机制,通过实现Writable接口, 重写DateInput和DateOutPut方法,实现数据的序列化和反序列化, 相比于JDK自带的序列化,MapReduce ...
- elasticsearch 基础 —— ReIndex
Reindex会将一个索引的数据复制到另一个已存在的索引,但是并不会复制原索引的mapping(映射).shard(分片).replicas(副本)等配置信息. 一.reindex的常用操作 1.re ...
- Windows 下 MySQL 备份脚本
@title MySQL备份脚本 @echo off @echo root@127.0.0.1:3306 set host=127.0.0.1 set port=3306 set user=root ...
- python数字图像处理(四) 频率域滤波
import matplotlib.pyplot as plt import numpy as np import cv2 %matplotlib inline 首先读入这次需要使用的图像 img = ...
- Sass:Opacity函数-alpha()、opacity()函数
alphpa() 和 opacity() 函数很简单,与前面介绍的 red(),green() 等函数很类似.这个函数的主要功能是用来获取一个颜色的透明度值.如果颜色没有特别指定透明度,那么这两个函数 ...
- C++ KMP文本匹配
代码如下: 环境为VC #include <iostream> #include <algorithm> #include <string> #include &l ...
- extjs6.0 treepanel设置展开和设置选中
var treePanel = { id: "treeUrl", xtype: "treepanel", useArrows: true, // 节点展开+,- ...
- NOIP2018系列
1.初赛退役 退役失败了啊qwq update:11.09 2.复赛啦 呜啊怎么这么快就复赛了呢.我还有好多东西没有学会呢呜呜呜. 一年里学了不少稀奇古怪的算法.认识了许多可爱的oier. 感谢一路上 ...
- 关于touch-action
在项目中发现 ,Android下列表页的滚动加载失效. 原因: css中设定了html{ touch:none } 解决方法:移除该样式. touch:none // 当触控事件发生在元素上是时,不进 ...
- CentOS7.5 开启Samba服务
安装 yum install samba 其依赖关系包samba-client samba-common会自动安装上去 查看状态 service smb status 重启服务systemctl re ...