Heartbeat+Haproxy实现负载均衡高可用
环境说明:
| 主机名 | 角色 | IP地址 |
| mylinux1.contoso.com | heartbeat+haproxy |
eth0:192.168.100.121 eth1:172.16.100.121 |
| mylinux2.contoso.com | heartbeat+haproxy |
eth0:192.168.100.122 eth1:172.16.100.122 |
| mylinux3.contoso.com | web server 1 | eth0:192.168.100.181 |
| mylinux4.contoso.com | web server 2 | eth0:192.168.100.182 |
一、环境准备
在mylinux1和mylinux2上安装heartbeat,可以手动安装,当然也可以使用前面发布的一篇heartbeat脚本的博文,里面有heartbeat快速安装脚本。
然后在mylinux2上安装haproxy,并将mylinux1上的haproxy配置文件和启停脚本都拷贝到mylinux2上。
要保证mylinux1和mylinux2的heartbeat+haproxy环境一致。
|
1
2
3
4
5
6
7
8
9
10
11
12
|
[root@mylinux1 ~]# scp /etc/init.d/haproxy mylinux2:/etc/init.d/
root@mylinux2's password: Permission denied, please try again.root@mylinux2's password: haproxy 100% 1567 1.5KB/s 00:00
[root@mylinux1 ~]# scp /usr/local/haproxy/conf/haproxy.cfg mylinux2:/usr/local/haproxy/conf/haproxy.cfg
root@mylinux2's password: haproxy.cfg 100% 1194 1.2KB/s 00:00
[root@mylinux2 haproxy]# ll /etc/init.d/haproxy
-rwxr-xr-x 1 root root 1567 Oct 1 02:11 /etc/init.d/haproxy
[root@mylinux2 haproxy]# ll /usr/local/haproxy/conf/haproxy.cfg
-rw-r--r-- 1 root root 1194 Oct 1 02:13 /usr/local/haproxy/conf/haproxy.cfg
|
二、修改heartbeat的资源文件
|
1
2
3
4
|
[root@mylinux1 ~]# tail -1 /etc/ha.d/haresources
mylinux1.contoso.com IPaddr::192.168.100.120/24/eth0 haproxy
[root@mylinux2 haproxy]# tail -1 /etc/ha.d/haresources
mylinux1.contoso.com IPaddr::192.168.100.120/24/eth0 haproxy
|
这里还是贴出两个heartbeat节点的ha.cf配置,如下:
|
1
2
3
4
5
6
7
8
9
10
11
12
13
14
15
16
17
18
19
20
21
22
23
24
25
26
27
28
|
[root@mylinux1 ~]# egrep -v "#|^$" /etc/ha.d/ha.cf
debugfile /var/log/ha-debug
logfile/var/log/ha-log
logfacilitylocal1keepalive 2deadtime 30warntime 10initdead 120udpport694mcast eth1 225.0.0.1 694 1 0auto_failback onnodemylinux1.contoso.comnodemylinux2.contoso.comrespawn hacluster /usr/lib64/heartbeat/ipfail
[root@mylinux2 haproxy]# egrep -v "#|^$" /etc/ha.d/ha.cf
debugfile /var/log/ha-debug
logfile/var/log/ha-log
logfacilitylocal1keepalive 2deadtime 30warntime 10initdead 120udpport694mcast eth1 225.0.0.1 694 1 0auto_failback onnode mylinux1.contoso.comnode mylinux2.contoso.comrespawn hacluster /usr/lib64/heartbeat/ipfail
|
三、启动heartbeat服务
1、首先在mylinux1和mylinux2上先关闭haproxy服务
|
1
2
3
4
|
[root@mylinux1 ~]# service haproxy stop
Stop haproxy successful.[root@mylinux2 haproxy]# service haproxy stop
Haproxy is not running. Stop haproxy failed! |
2、依次启动mylinux1和mylinux2上的heartbeat服务
|
1
2
3
4
5
6
|
[root@mylinux1 ~]# /etc/init.d/heartbeat start
Starting High-Availability services: INFO: Resource is stoppedDone.[root@mylinux2 haproxy]# /etc/init.d/heartbeat start
Starting High-Availability services: INFO: Resource is stoppedDone. |
四、测试haproxy的高可用
1、首先,检查mylinux1的状态
|
1
2
3
4
|
[root@mylinux1 ~]# ip a|grep 192.168.100.120
inet 192.168.100.120/24 brd 192.168.100.255 scope global secondary eth0
[root@mylinux1 ~]# service haproxy status
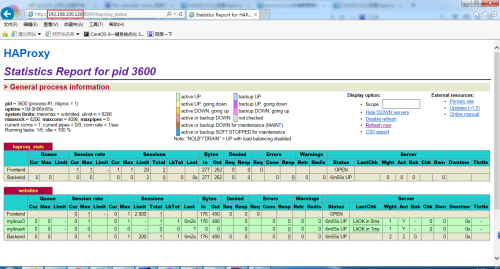
Haproxy (pid 3600) is running... |
2、其次,检查mylinux2的状态
|
1
2
3
|
[root@mylinux2 haproxy]# ip a |grep 192.168.100.120
[root@mylinux2 haproxy]# service haproxy status
Haproxy is stopped. |
3、查看监控界面

五、测试故障切换
1、停止mylinux1上的heartbeat服务
|
1
2
|
[root@mylinux1 ~]# /etc/init.d/heartbeat stop
Stopping High-Availability services: Done. |
2、检查mylinux1和mylinux2的状态
|
1
2
3
4
5
6
7
|
[root@mylinux1 ~]# ip a |grep 192.168.100.120
[root@mylinux1 ~]# service haproxy status
Haproxy is stopped.[root@mylinux2 haproxy]# ip a |grep 192.168.100.120
inet 192.168.100.120/24 brd 192.168.100.255 scope global secondary eth0
[root@mylinux2 haproxy]# service haproxy status
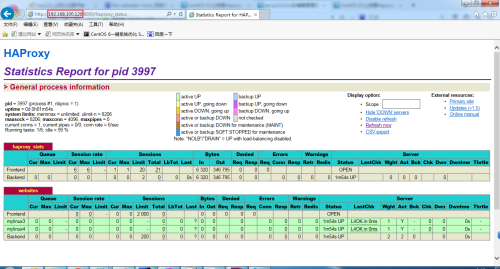
Haproxy (pid 3997) is running... |
3、查看监控页面

4、查看mylinux2上的heartbeat日志
[root@mylinux2 ~]# >/var/log/ha-log
[root@mylinux2 ~]# tail -f /var/log/ha-log
Oct 01 02:44:31 mylinux2.contoso.com heartbeat: [3534]: info: Received shutdown notice from 'mylinux1.contoso.com'.
Oct 01 02:44:31 mylinux2.contoso.com heartbeat: [3534]: info: Resources being acquired from mylinux1.contoso.com.
Oct 01 02:44:31 mylinux2.contoso.com heartbeat: [3655]: info: acquire local HA resources (standby).
Oct 01 02:44:31 mylinux2.contoso.com heartbeat: [3656]: info: No local resources [/usr/share/heartbeat/ResourceManager listkeys mylinux2.contoso.com] to acquire.
Oct 01 02:44:31 mylinux2.contoso.com heartbeat: [3655]: info: local HA resource acquisition completed (standby).
Oct 01 02:44:31 mylinux2.contoso.com heartbeat: [3534]: info: Standby resource acquisition done [all].
harc(default)[3681]:2016/10/01_02:44:31 info: Running /etc/ha.d//rc.d/status status
mach_down(default)[3698]:2016/10/01_02:44:31 info: Taking over resource group IPaddr::192.168.100.120/24/eth0
ResourceManager(default)[3725]:2016/10/01_02:44:31 info: Acquiring resource group: mylinux1.contoso.com IPaddr::192.168.100.120/24/eth0 haproxy
/usr/lib/ocf/resource.d//heartbeat/IPaddr(IPaddr_192.168.100.120)[3753]: 2016/10/01_02:44:31 INFO: Resource is stopped
ResourceManager(default)[3725]:2016/10/01_02:44:31 info: Running /etc/ha.d/resource.d/IPaddr 192.168.100.120/24/eth0 start
IPaddr(IPaddr_192.168.100.120)[3878]:2016/10/01_02:44:32 INFO: Adding inet address 192.168.100.120/24 with broadcast address 192.168.100.255 to device eth0
IPaddr(IPaddr_192.168.100.120)[3878]:2016/10/01_02:44:32 INFO: Bringing device eth0 up
IPaddr(IPaddr_192.168.100.120)[3878]:2016/10/01_02:44:32 INFO: /usr/libexec/heartbeat/send_arp -i 200 -r 5 -p /var/run/resource-agents/send_arp-192.168.100.120 eth0 192.168.100.120 auto not_used not_used
/usr/lib/ocf/resource.d//heartbeat/IPaddr(IPaddr_192.168.100.120)[3852]: 2016/10/01_02:44:32 INFO: Success
ResourceManager(default)[3725]:2016/10/01_02:44:32 info: Running /etc/init.d/haproxy start
mach_down(default)[3698]:2016/10/01_02:44:32 info: /usr/share/heartbeat/mach_down: nice_failback: foreign resources acquired
mach_down(default)[3698]:2016/10/01_02:44:32 info: mach_down takeover complete for node mylinux1.contoso.com.
Oct 01 02:44:32 mylinux2.contoso.com heartbeat: [3534]: info: mach_down takeover complete.
Oct 01 02:45:02 mylinux2.contoso.com heartbeat: [3534]: WARN: node mylinux1.contoso.com: is dead
Oct 01 02:45:02 mylinux2.contoso.com heartbeat: [3534]: info: Dead node mylinux1.contoso.com gave up resources.
Oct 01 02:45:02 mylinux2.contoso.com heartbeat: [3534]: info: Link mylinux1.contoso.com:eth1 dead.
Oct 01 02:45:02 mylinux2.contoso.com ipfail: [3543]: info: Status update: Node mylinux1.contoso.com now has status dead
Oct 01 02:45:03 mylinux2.contoso.com ipfail: [3543]: info: NS: We are dead. :<
Oct 01 02:45:03 mylinux2.contoso.com ipfail: [3543]: info: Link Status update: Link mylinux1.contoso.com/eth1 now has status dead
Oct 01 02:45:04 mylinux2.contoso.com ipfail: [3543]: info: We are dead. :<
Oct 01 02:45:04 mylinux2.contoso.com ipfail: [3543]: info: Asking other side for ping node count.
Heartbeat+Haproxy实现负载均衡高可用的更多相关文章
- 实现基于Haproxy+Keepalived负载均衡高可用架构
1.项目介绍: 上上期我们实现了keepalived主从高可用集群网站架构,随着公司业务的发展,公司负载均衡服务已经实现四层负载均衡,但业务的复杂程度提升,公司要求把mobile手机站点作为单独的服务 ...
- Linux下"负载均衡+高可用"集群的考虑点 以及 高可用方案说明(Keepalive/Heartbeat)
当下Linux运维技术越来越受到企业的关注和追捧, 在某些企业, 尤其是牵涉到电子商务和电子广告类的网站,通常会要求作负载均衡和高可用的Linux集群方案.那么如何实施Llinux集群架构,才能既有效 ...
- HAProxy实现slave负载均衡[高可用]
下面要执行的是HAProxy部分 这是一个集群,其他的部分在: mysql-cluster 7.3.5安装部署 mysql主备部署[高可用] mysql主备切换[高可用] mysql读写分离[高可用] ...
- linux系统下对网站实施负载均衡+高可用集群需要考虑的几点
随着linux系统的成熟和广泛普及,linux运维技术越来越受到企业的关注和追捧.在一些中小企业,尤其是牵涉到电子商务和电子广告类的网站,通常会要求作负载均衡和高可用的Linux集群方案. 那么如何实 ...
- Lvs+keepAlived实现负载均衡高可用集群(DR实现)
第1章 LVS 简介 1.1 LVS介绍 LVS是Linux Virtual Server的简写,意为Linux虚拟服务器,是虚拟的服务器集群系统,可在UNIX/LINUX平台下实现负载均衡集群功能. ...
- Nginx+Keepalived负载均衡高可用
Nginx+Keepalived负载均衡高可用方案: Nginx 使用平台:unix.linux.windows. 功能: A.www web服务 http 80 b.负载均衡(方向代理proxy) ...
- JAVAEE——宜立方商城03:Nginx负载均衡高可用、Keepalived+Nginx实现主备
1 nginx负载均衡高可用 1.1 什么是负载均衡高可用 nginx作为负载均衡器,所有请求都到了nginx,可见nginx处于非常重点的位置,如果nginx服务器宕机后端web服务将无法提供服务, ...
- Nginx负载均衡高可用
1. Nginx负载均衡高可用 首先介绍一下Keepalived,它是一个高性能的服务器高可用或热备解决方案,Keepalived主要来防止服务器单点故障的发生问题,可以通过其与Nginx的配合实 ...
- Keepalived+Nginx实现负载均衡高可用
一.负载均衡高可用 Nginx作为负载均衡器,所有请求都到了Nginx,可见Nginx处于非常重点的位置,如果Nginx服务器宕机后端web服务将无法提供服务,影响严重. 为了避免负载均衡服务器的宕机 ...
随机推荐
- 【php】面向对象(一)
1. 学习面向对象的目标: a) 语法的学习: b) 编程思想的学习: i. 过程化: ii. 面向对象:2. 比较(有对象和没对象的区别) a) 没对象: i. 我饿了 自己做饭 ii. 我渴了 自 ...
- js实现表单的隔行换色、鼠标高亮出来等相关内容以及相关事件的作用
主要是使用的onload().onmouseover和onmouseout的相关应用,满足此次的相关操作. 具体的相关的两个代码如下: <!DOCTYPE html> <html&g ...
- Java并发之显式锁和隐式锁的区别
Java并发之显式锁和隐式锁的区别 在面试的过程中有可能会问到:在Java并发编程中,锁有两种实现:使用隐式锁和使用显示锁分别是什么?两者的区别是什么?所谓的显式锁和隐式锁的区别也就是说说Synchr ...
- CVE-2020-1938:Apache-Tomcat-Ajp漏洞-复现
0x00 漏洞简介 Apache与Tomcat都是Apache开源组织开发的用于处理HTTP服务的项目,两者都是免费的,都可以做为独立的Web服务器运行. Apache Tomcat服务器存在文件包含 ...
- git以及gitHub的使用说明书
一.使用说明 1.Git与github的功能: Git是世界上最先进的分布式版本控制系统,也就是用来记录你的项目代码历史变更信息的工具:github就是用来存储你的代码以及变更信息的云端平台: 2.优 ...
- 2020不平凡的90天,Python分析三个月微博热搜数据带你回顾
前言 文的文字及图片来源于网络,仅供学习.交流使用,不具有任何商业用途,版权归原作者所有,如有问题请及时联系我们以作处理. 作者:刘早起早起 PS:如有需要Python学习资料的小伙伴可以加点击下方链 ...
- re模块语法—python正则表达式
用字符串匹配实现 对于简单的匹配查找,可以通过字符串匹配实现,比如:查找以”hello”开头的字符串 此时就可以正确查找出以start开始的字符串了 python中的正则表达式模块 在python中为 ...
- Everything信息泄露
Everything漏洞描述 [Everything]一款搜索文件非常快的工具,其速度之快令人震惊!它还有一个可以通过HTTP 或 FTP 分享搜索结果 的功能.它可以让用户在本地或局域网上的其他电脑 ...
- SQL Server 之T-SQL基本语句 (2)
接下来继续用上述例子来总结知识点. 用通配符进行过滤 LIKE操作符 //用来选择与条件一样或部分相似的数据 select name from person where name like 'chen ...
- Redis来限制用户 ------------IP某个时间段内访问的次数
$redis = new Redis(); $redis->connect('127.0.0.1', 6379); //获取客户端真实ip地址 function get_real_ip(){ s ...
