使用kubeadm安装kubernetes1.12.1
kubeadm是kubernetes官方用来自动化高效安装kubernetes的工具,手动安装,特别麻烦。
使用kubeadm安装无疑是一种不错的选择。
1、环境准备
1.1系统配置
系统是CentOS Linux release 7.5
[root@k8s-master ~]# tail - /etc/hosts

10.0.0.11 k8s-master

10.0.0.12 k8s-node1

10.0.0.13 k8s-node3
禁用防火墙和selinux
添加内核参数文件 /etc/sysctl.d/k8s.conf
net.bridge.bridge-nf-call-ip6tables =

net.bridge.bridge-nf-call-iptables =

net.ipv4.ip_forward = 1

vm.swappiness = 0
执行命令使修改生效
modprobe br_netfilter

sysctl -p /etc/sysctl.d/k8s.conf
1.2安装Docker(所有节点)
yum install -y yum-utils device-mapper-persistent-data lvm2
wget https://mirrors.aliyun.com/docker-ce/linux/centos/docker-ce.repo -O /etc/yum.repos.d/docker.repo
查看可下载的版本
[root@k8s-master ~]# yum list docker-ce.x86_64  --showduplicates |sort -r

Repository base is listed more than once in the configuration

Repository updates is listed more than once in the configuration

Repository extras is listed more than once in the configuration

Repository centosplus is listed more than once in the configuration

 * updates: mirrors.nju.edu.cn

Loading mirror speeds from cached hostfile

Loaded plugins: fastestmirror, langpacks

 * extras: mirrors.njupt.edu.cn

 * epel: mirror01.idc.hinet.net

docker-ce.x86_64            18.06..ce-.el7                    docker-ce-stable

docker-ce.x86_64            18.06..ce-.el7                    docker-ce-stable

docker-ce.x86_64            18.03..ce-.el7.centos             docker-ce-stable

docker-ce.x86_64            18.03..ce-.el7.centos             docker-ce-stable

docker-ce.x86_64            17.12..ce-.el7.centos             docker-ce-stable

docker-ce.x86_64            17.12..ce-.el7.centos             docker-ce-stable

docker-ce.x86_64            17.09..ce-.el7.centos             docker-ce-stable

docker-ce.x86_64            17.09..ce-.el7.centos             docker-ce-stable

docker-ce.x86_64            17.06..ce-.el7.centos             docker-ce-stable

docker-ce.x86_64            17.06..ce-.el7.centos             docker-ce-stable

docker-ce.x86_64            17.06..ce-.el7.centos             docker-ce-stable

docker-ce.x86_64            17.03..ce-.el7                    docker-ce-stable

docker-ce.x86_64            17.03..ce-.el7.centos             docker-ce-stable

docker-ce.x86_64            17.03..ce-.el7.centos             docker-ce-stable

docker-ce.x86_64            17.03..ce-.el7.centos             docker-ce-stable
# yum makecache fast
# yum install docker-ce -y
[root@k8s-node1 ~]# docker -v

Docker version 18.06.-ce, build e68fc7a
[root@k8s-node1 ~]# systemctl start docker ;systemctl enable docker
2.使用kubeadm部署Kubernetes
2.1安装kubelet 和 kubeadm
生成kubernetes的yum仓库配置文件/etc/yum.repos.d/kubernetes.repo,内容如下:
[kubernetes]

name=Kubernetes

baseurl=https://mirrors.aliyun.com/kubernetes/yum/repos/kubernetes-el7-x86_64/

gpgcheck=

gpgkey=https://mirrors.aliyun.com/kubernetes/yum/doc/rpm-package-key.gpg

enabled=
yum makecache fast

yum install -y kubelet kubeadm kubectl
关闭swap功能
[root@k8s-node1 yum.repos.d]# swapoff  -a

[root@k8s-node1 yum.repos.d]# sysctl -p /etc/sysctl.d/k8s.conf
注释掉 、/etc/fstab 中swap的条目

mount -a
echo "KUBELET_EXTRA_ARGS=--fail-swap-on=false" > /etc/sysconfig/kubelet
2.2 使用kubeadm init初始化集群
在各节点开机启动kubelet服务:
systemctl enable kubelet.service
使用kubeadm初始化集群,会发生一下错误,这是由于初始化时,先从本地查找 有没有kubenetes组件的相关镜像如果找不到就从谷歌镜像站下载,如果你不翻墙就只能让本地存在这些镜像。
我们可以从docker镜像站下载kubernetes相关组件的镜像然后给他重新打tag
[root@k8s-master yum.repos.d]# kubeadm init --kubernetes-version=v1.12.1 --pod-network-cidr=10.244.0.0/16 --apiserver-advertise-address=10.0.0.11
[init] using Kubernetes version: v1.12.1
[preflight] running pre-flight checks
[WARNING Service-Docker]: docker service is not enabled, please run 'systemctl enable docker.service'
[preflight/images] Pulling images required for setting up a Kubernetes cluster
[preflight/images] This might take a minute or two, depending on the speed of your internet connection
[preflight/images] You can also perform this action in beforehand using 'kubeadm config images pull'
[preflight] Some fatal errors occurred:
[ERROR ImagePull]: failed to pull image k8s.gcr.io/kube-apiserver:v1.12.1: output: Error response from daemon: Get https://k8s.gcr.io/v2/: EOF
, error: exit status 1
[ERROR ImagePull]: failed to pull image k8s.gcr.io/kube-controller-manager:v1.12.1: output: Error response from daemon: Get https://k8s.gcr.io/v2/: EOF
, error: exit status 1
[ERROR ImagePull]: failed to pull image k8s.gcr.io/kube-scheduler:v1.12.1: output: Error response from daemon: Get https://k8s.gcr.io/v2/: EOF
, error: exit status 1
[ERROR ImagePull]: failed to pull image k8s.gcr.io/kube-proxy:v1.12.1: output: Error response from daemon: Get https://k8s.gcr.io/v2/: EOF
, error: exit status 1
[ERROR ImagePull]: failed to pull image k8s.gcr.io/pause:3.1: output: Error response from daemon: Get https://k8s.gcr.io/v2/: EOF
, error: exit status 1
[ERROR ImagePull]: failed to pull image k8s.gcr.io/etcd:3.2.24: output: Error response from daemon: Get https://k8s.gcr.io/v2/: EOF
, error: exit status 1
[ERROR ImagePull]: failed to pull image k8s.gcr.io/coredns:1.2.2: output: Error response from daemon: Get https://k8s.gcr.io/v2/: EOF
, error: exit status 1
[preflight] If you know what you are doing, you can make a check non-fatal with `--ignore-preflight-errors=...`
执行脚本
[root@k8s-master ~]# cat k8s.sh

docker pull mirrorgooglecontainers/kube-apiserver:v1.12.1

docker pull mirrorgooglecontainers/kube-controller-manager:v1.12.1

docker pull mirrorgooglecontainers/kube-scheduler:v1.12.1

docker pull mirrorgooglecontainers/kube-proxy:v1.12.1

docker pull mirrorgooglecontainers/pause:3.1

docker pull mirrorgooglecontainers/etcd:3.2.

docker pull coredns/coredns:1.2.

docker tag mirrorgooglecontainers/kube-proxy:v1.12.1  k8s.gcr.io/kube-proxy:v1.12.1

docker tag mirrorgooglecontainers/kube-scheduler:v1.12.1 k8s.gcr.io/kube-scheduler:v1.12.1

docker tag mirrorgooglecontainers/kube-apiserver:v1.12.1 k8s.gcr.io/kube-apiserver:v1.12.1

docker tag mirrorgooglecontainers/kube-controller-manager:v1.12.1 k8s.gcr.io/kube-controller-manager:v1.12.1

docker tag mirrorgooglecontainers/etcd:3.2.  k8s.gcr.io/etcd:3.2.

docker tag coredns/coredns:1.2. k8s.gcr.io/coredns:1.2.

docker tag mirrorgooglecontainers/pause:3.1  k8s.gcr.io/pause:3.1

docker rmi mirrorgooglecontainers/kube-apiserver:v1.12.1

docker rmi mirrorgooglecontainers/kube-controller-manager:v1.12.1

docker rmi mirrorgooglecontainers/kube-scheduler:v1.12.1

docker rmi mirrorgooglecontainers/kube-proxy:v1.12.1

docker rmi mirrorgooglecontainers/pause:3.1

docker rmi mirrorgooglecontainers/etcd:3.2.

docker rmi coredns/coredns:1.2.
bash k8s.sh
[root@k8s-master ~]# docker images

REPOSITORY                           TAG                 IMAGE ID            CREATED             SIZE

k8s.gcr.io/kube-proxy                v1.12.1             61afff57f010         days ago         .6MB

k8s.gcr.io/kube-apiserver            v1.12.1             dcb029b5e3ad         days ago         194MB

k8s.gcr.io/kube-controller-manager   v1.12.1             aa2dd57c7329         days ago         164MB

k8s.gcr.io/kube-scheduler            v1.12.1             d773ad20fd80         days ago         .3MB

k8s.gcr.io/etcd                      3.2.              3cab8e1b9802         weeks ago         220MB

k8s.gcr.io/coredns                   1.2.               367cdc8433a4         weeks ago         .2MB

k8s.gcr.io/pause                     3.1                 da86e6ba6ca1         months ago       742kB
具体操作如下:
查看kubernetes的版本
[root@k8s-master yum.repos.d]# kubeadm version

kubeadm version: &version.Info{Major:"", Minor:"", GitVersion:"v1.12.1", GitCommit:"4ed3216f3ec431b140b1d899130a69fc671678f4", GitTreeState:"clean", BuildDate:"2018-10-05T16:43:08Z", GoVersion:"go1.10.4", Compiler:"gc", Platform:"linux/amd64"}
再次在master节点上执行初始化
kubeadm init --kubernetes-version=v1.12.1 --pod-network-cidr=10.244.0.0/ --apiserver-advertise-address=10.0.0.11
输出信息如下:
[root@k8s-master ~]# kubeadm init --kubernetes-version=v1.12.1 --pod-network-cidr=10.244.0.0/ --apiserver-advertise-address=10.0.0.11

[init] using Kubernetes version: v1.12.1

[preflight] running pre-flight checks

[preflight/images] Pulling images required for setting up a Kubernetes cluster

[preflight/images] This might take a minute or two, depending on the speed of your internet connection

[preflight/images] You can also perform this action in beforehand using 'kubeadm config images pull'

[kubelet] Writing kubelet environment file with flags to file "/var/lib/kubelet/kubeadm-flags.env"

[kubelet] Writing kubelet configuration to file "/var/lib/kubelet/config.yaml"

[preflight] Activating the kubelet service

[certificates] Using the existing apiserver-etcd-client certificate and key.

[certificates] Using the existing etcd/server certificate and key.

[certificates] Using the existing etcd/healthcheck-client certificate and key.

[certificates] Using the existing etcd/peer certificate and key.

[certificates] Using the existing apiserver certificate and key.

[certificates] Using the existing apiserver-kubelet-client certificate and key.

[certificates] Using the existing front-proxy-client certificate and key.

[certificates] valid certificates and keys now exist in "/etc/kubernetes/pki"

[certificates] Using the existing sa key.

[kubeconfig] Using existing up-to-date KubeConfig file: "/etc/kubernetes/admin.conf"

[kubeconfig] Using existing up-to-date KubeConfig file: "/etc/kubernetes/kubelet.conf"

[kubeconfig] Using existing up-to-date KubeConfig file: "/etc/kubernetes/controller-manager.conf"

[kubeconfig] Using existing up-to-date KubeConfig file: "/etc/kubernetes/scheduler.conf"

[controlplane] wrote Static Pod manifest for component kube-apiserver to "/etc/kubernetes/manifests/kube-apiserver.yaml"

[controlplane] wrote Static Pod manifest for component kube-controller-manager to "/etc/kubernetes/manifests/kube-controller-manager.yaml"

[controlplane] wrote Static Pod manifest for component kube-scheduler to "/etc/kubernetes/manifests/kube-scheduler.yaml"

[etcd] Wrote Static Pod manifest for a local etcd instance to "/etc/kubernetes/manifests/etcd.yaml"

[init] waiting for the kubelet to boot up the control plane as Static Pods from directory "/etc/kubernetes/manifests"

[init] this might take a minute or longer if the control plane images have to be pulled

[apiclient] All control plane components are healthy after 18.503179 seconds

[uploadconfig] storing the configuration used in ConfigMap "kubeadm-config" in the "kube-system" Namespace

[kubelet] Creating a ConfigMap "kubelet-config-1.12" in namespace kube-system with the configuration for the kubelets in the cluster

[markmaster] Marking the node k8s-master as master by adding the label "node-role.kubernetes.io/master=''"

[markmaster] Marking the node k8s-master as master by adding the taints [node-role.kubernetes.io/master:NoSchedule]

[patchnode] Uploading the CRI Socket information "/var/run/dockershim.sock" to the Node API object "k8s-master" as an annotation

[bootstraptoken] using token: o3ha14.vdjveh35zz0coqzz

[bootstraptoken] configured RBAC rules to allow Node Bootstrap tokens to post CSRs in order for nodes to get long term certificate credentials

[bootstraptoken] configured RBAC rules to allow the csrapprover controller automatically approve CSRs from a Node Bootstrap Token

[bootstraptoken] configured RBAC rules to allow certificate rotation for all node client certificates in the cluster

[bootstraptoken] creating the "cluster-info" ConfigMap in the "kube-public" namespace

[addons] Applied essential addon: CoreDNS

[addons] Applied essential addon: kube-proxy

Your Kubernetes master has initialized successfully!

To start using your cluster, you need to run the following as a regular user:

  mkdir -p $HOME/.kube

  sudo cp -i /etc/kubernetes/admin.conf $HOME/.kube/config

  sudo chown $(id -u):$(id -g) $HOME/.kube/config

You should now deploy a pod network to the cluster.

Run "kubectl apply -f [podnetwork].yaml" with one of the options listed at:

  https://kubernetes.io/docs/concepts/cluster-administration/addons/

You can now join any number of machines by running the following on each node

as root:

  kubeadm join 10.0.0.11: --token o3ha14.vdjveh35zz0coqzz --discovery-token-ca-cert-hash sha256:334ee25422b82ba08a5f4341e1b65f23abf2fdd486a0f471cf3ad0824b258e13
按照上面输出提示进行操作
[root@k8s-master ~]# mkdir -p $HOME/.kube

[root@k8s-master ~]# sudo cp -i /etc/kubernetes/admin.conf $HOME/.kube/config

[root@k8s-master ~]# sudo chown $(id -u):$(id -g) $HOME/.kube/config
mkdir -p ~/k8s/ && cd ~/k8s
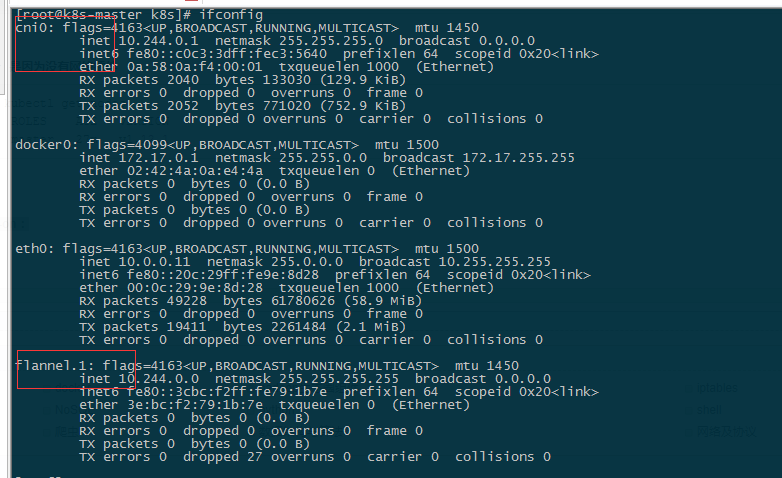
[root@k8s-master k8s]# wget https://raw.githubusercontent.com/coreos/flannel/master/Documentation/kube-flannel.yml
#这里改成自己的网卡
# vim kube-flannel.yml

   args:

        - --ip-masq

        - --kube-subnet-mgr

        - --iface=eth0

# kubectl apply -f kube-flannel.yml
查看集群状态

集群初始化如果遇到问题,可以使用下面的命令进行清理:
kubeadm reset

ifconfig cni0 down

ip link delete cni0

ifconfig flannel. down

ip link delete flannel.

rm -rf /var/lib/cni/
2.3 安装Pod Network
#这时master状态为notready 是因为没有网络插件
[root@k8s-master k8s]# kubectl get nodes

NAME         STATUS     ROLES    AGE   VERSION

k8s-master   NotReady   master   27m   v1.12.1
接下来安装flannel network add-on:
获取组件健康状态
[root@k8s-master k8s]# kubectl get cs

NAME                 STATUS    MESSAGE              ERROR

scheduler            Healthy   ok

controller-manager   Healthy   ok

etcd-               Healthy   {"health": "true"}
[root@k8s-master k8s]# kubectl describe node k8s-master

Name:               k8s-master

Roles:              master

Labels:             beta.kubernetes.io/arch=amd64

                    beta.kubernetes.io/os=linux

                    kubernetes.io/hostname=k8s-master

                    node-role.kubernetes.io/master=

Annotations:        kubeadm.alpha.kubernetes.io/cri-socket: /var/run/dockershim.sock

                    node.alpha.kubernetes.io/ttl:

                    volumes.kubernetes.io/controller-managed-attach-detach: true

CreationTimestamp:  Wed,  Oct  :: +

Taints:             node-role.kubernetes.io/master:NoSchedule

                    node.kubernetes.io/not-ready:NoSchedule

Unschedulable:      false
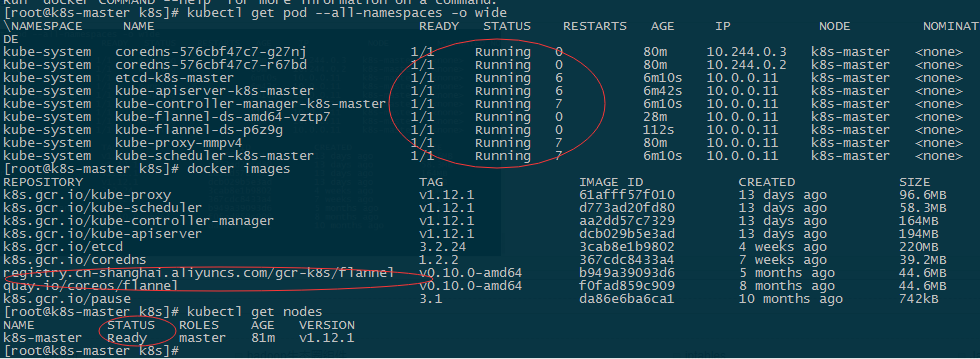
上面输出显示首先会下载一个flannel镜像,namespace全部为running状态, master为ready
2.4master参与工作负载
出于安全考虑Pod不会被调度到Master Node上,也就是说Master Node不参与工作负载。这是因为当前的master节点node1被打上了node-role.kubernetes.io/master:NoSchedule的污点:
[root@k8s-master k8s]# kubectl describe node k8s-master | grep Taint

Taints:             node-role.kubernetes.io/master:NoSchedule
# 如果需要改回来不想让master节点参与到工作负载
kubectl taint node k8s-master node-role.kubernetes.io/master="":NoSchedule
去除污点使k8s-master参与负载
[root@k8s-master k8s]# kubectl taint nodes k8s-master node-role.kubernetes.io/master-
node/k8s-master untainted
[root@k8s-master k8s]# kubectl describe node k8s-master | grep Taint
Taints: <none>
2.5测试DNS
kubectl run curl --image=radial/busyboxplus:curl -it


2.6 向Kubernetes集群中添加Node节点
下面我们将node1 node2这个主机添加到Kubernetes集群中, 在node1和node2上执行:
[root@k8s-node1 ~]# kubeadm join 10.0.0.11: --token i4us8x.pw2f3botcnipng8e --discovery-token-ca-cert-hash sha256:d16ac747c2312ae829aa29a3596f733f920ca3d372d9f1b34d33c938be067e51
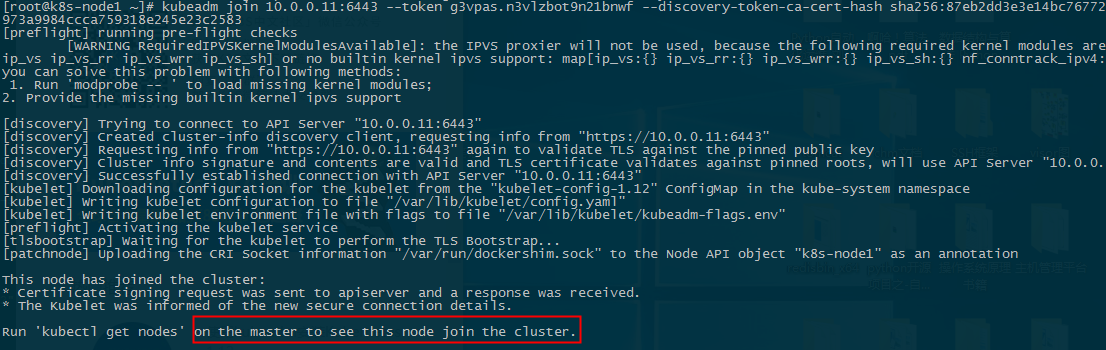
查看节点,

原因是节点k8-node1也要获取镜像,执行以上的获取镜像的脚本即可,两个节点分别重置集群,kubeadm reset,然后重新初始化。

从master节点如果需要移出这个node1节点
在master节点上执行:
kubectl drain k8s-node1 --delete-local-data --force --ignore-daemonsets

kubectl delete node k8s-node1

使用kubeadm安装kubernetes1.12.1的更多相关文章
- 使用kubeadm安装kubernetes1.12.2版本脚本
Master节点脚本: #!/bin/sh#使用系统的PATH环境export PATH=`echo $PATH` #停止firewall防火墙,并禁止开机自启动 systemctl stop fir ...
- 使用kubeadm安装kubernetes1.12.2版本脚本【h】
Master节点脚本: #!/bin/sh#使用系统的PATH环境export PATH=`echo $PATH` #停止firewall防火墙,并禁止开机自启动 systemctl stop fir ...
- CentOS7.3利用kubeadm安装kubernetes1.7.3完整版(官方文档填坑篇)
安装前记: 近来容器对企业来说已经不是什么陌生的概念,Kubernetes作为Google开源的容器运行平台,受到了大家的热捧.搭建一套完整的kubernetes平台,也成为试用这套平台必须迈过的坎儿 ...
- Kubeadm部署安装kubernetes1.12.1
1.环境准备(这里是master) CentOS 7.6 两台配置如下,自己更改主机名,加入hosts, master和node 名字不能一样 # hostname master # hostname ...
- kubeadm安装kubernetes1.18.5
前言 尝试安装helm3,kubernetes1.18,istio1.6是否支持现有集群平滑迁移 版本 Centos7.6 升级内核4.x kubernetes:v1.18.5 helm:v3.2.4 ...
- kubeadm部署kubernetes-1.12.0 HA集群-ipvs
一.概述 主要介绍搭建流程及使用注意事项,如果线上使用的话,请务必做好相关测试及压测. 1.基础环境准备 系统:ubuntu TLS 16.04 5台 docker-ce:17.06.2 kubea ...
- kubeadm 安装kubernetes1.6.2
准备工作 安装依赖 yum install -y wget vim net-tools epel-release 修改内核参数 cat <<EOF > /etc/sysctl.d/k ...
- 使用kubeadm 安装 kubernetes 1.15.1
简介: Kubernetes作为Google开源的容器运行平台,受到了大家的热捧.搭建一套完整的kubernetes平台,也成为试用这套平台必须迈过的坎儿.kubernetes1.5版本以及之前,安装 ...
- 使用kubeadm安装Kubernetes 1.12
使用kubeadm安装Kubernetes 1.12 https://blog.frognew.com/2018/10/kubeadm-install-kubernetes-1.12.html 测试环 ...
随机推荐
- Delphi 7学习开发控件(续)
继上次我们学习开发一个简单的画线控件后,基本的制作控件步骤已经清楚了,这次我们继续加深学习控件的制作.我们打开Delphi 7创建一个应用程序,拖动LineTo控件到窗体上,仔细看左边的对象设计器,可 ...
- [Leetcode] Linked list cycle ii 判断链表是否有环
Given a linked list, return the node where the cycle begins. If there is no cycle, returnnull. Follo ...
- BZOJ3533 [Sdoi2014]向量集 【线段树 + 凸包 + 三分】
题目链接 BZOJ3533 题解 我们设询问的向量为\((x_0,y_0)\),参与乘积的向量为\((x,y)\) 则有 \[ \begin{aligned} ans &= x_0x + y_ ...
- git使用笔记(八)团队协作
By francis_hao Nov 24,2016 本文由 刘英皓 创作,采用 知识共享 署名-非商业性使用-相同方式共享 3.0 中国大陆 许可协议进行许可.欢迎转载,请注明出处 ...
- taotao单点登录的用户Controller、service(注册、登录、验证是否登录方法)
接口文档: 1.1. 注册接口 1.1.1. 检查数据是否可用 请求方法 GET URL http://sso.taotao.com/user/check/{param}/{type} 参数说明 格式 ...
- Intellij Idea debug 远程部署的的tomcat项目
web项目部署到tomcat上之后,有时需要打断点单步调试,如果用的是Intellij idea,可以通过如下方法实现: 开启debug端口,启动tomcat 以tomcat7.0.75为例,打开bi ...
- POJ 2398 Toy Storage 二分+叉积
Description Mom and dad have a problem: their child, Reza, never puts his toys away when he is finis ...
- 用JSR的@Inject代替@Autowired完成自动装配
从spring3.0开始spring支持JSR-330 的标准注解.主要是javax.inject这个包下的: 下面的例子用@Inject代替@Autowired.完成自动装配: MovieFinde ...
- jrebel插件激活
不管用的哪个工具都可以通过下面的教程获取注册码,激活你的开发工具 原文出自:http://www.gezila.com/tutorials/11476.html 首先打开Myeclipse,点击“he ...
- 使用jQuery发送POST,Ajax请求返回JSON格式数据
问题: 使用jQuery POST提交数据到PHP文件, PHP返回的json_encode后的数组数据,但jQuery接收到的数据不能解析为JSON对象,而是字符串{"code" ...