Python之路Day15--CSS补充以及JavaScript(一)
一、上节作业问题:
上节作业问题:

    1、css重用

        <style>

            如果整个页面的宽度 > 900px时:

            {

                .c{

                   共有

                }

                .c1{

                    独有

                }

            }

                .c2{

                独有

            }

        </style>

        <div class='c c1'></div>

        <div class='c c2'></div>

    2、自适应 和 改变大小变形

        左右滚动条的出现

        宽度,百分比

        页面最外层:像素的宽度 => 最外层设置绝对宽度

        自适应:media

    3、默认img标签,有一个1px的边框

        img{

            border: 0;

        }

    4、作业中的数量输入框

上节内容回顾

    1、块级和行内

    2、form标签

            <form action='http://sssss' methed='GET' enctype='multi'>

                <div>asdfasdf</div>

                <input type='text' name='q' />

                <input type='text' name='b' />

                # 上传文件

                <input type='file' name='f' />

                <input type='submit' />

            </form>

            GET: http://sssss?q=用户输入的值

                 http://sssss?q=用户输入的值&b=用户输入的内容

            POST:

                请求头

                请求内容

    3、display: block;inline;inline-block

    4、float:

        <div>

            <div style='float:left;'>f</div>

            <div style='clear:both;'></div>

        </div>

    5、margin: 0 auto;

    6、padding, ---> 自身发生变化
上节作业问题
回顾
让IE有自动加上的外边框消失
<!DOCTYPE html>

<html lang="en">

<head>

    <meta charset="UTF-8">

    <title>Title</title>

    <style>

        img{

            border: 0;

        }

    </style>

    <!--将图片边框变为零-->

</head>

<body>

    <a href="http://www.baidu.com">

        <img src="data:image/1.png" title="phto" style="width: 200px;height: 300px;border: 0">

    </a>

</body>

</html>
让IE自动加上的边框消失默认1px
二、本节内容
(一)CSS补充
(二) JS
&&&&&&&&&&&&&&&&&&&&&&&&&&&&&&&&&&&&&&&&&&&&&&&&&&&&&&&&&&&&&&&&&&&&&&&&&&&&&
(一) CSS补充
1.position
a. fiexd ==>固定在页面的某个位置
<!DOCTYPE html>

<html lang="en">

<head>

    <meta charset="UTF-8">

    <title>Title</title>

</head>

<body>

    <div onclick="GoTop();" style="width:50px; height:50px;background-color:black;color: white;

    position: fixed;

    bottom: 20px;

    right: 20px;

   ">返回顶部</div>

    <div style="height:5000px;background-color: #dddddd">

    </div>

    <script>

        function GoTop(){

            document.body.scrollTop = 0;

        }

    </script>

</body>

</html>
<!DOCTYPE html>

<html lang="en">

<head>

    <meta charset="UTF-8">

    <title>Title</title>

    <style>

        .pg-header{

            height: 48px;

            background-color: black;

            color: #dddddd;

            position: fixed;

            top: 0;

            right: 0;

            left: 0;

      }

        .pg-body{

            height: 5000px;

            background-color: #dddddd;

            margin-top: 50px;

        }

    </style>

</head>

<body>

    <div class="pg-header">头部</div>

    <div class="pg-body">内容</div>

</body>

</html>
将菜单永远置顶
效果:

b.absolute + relative
<!DOCTYPE html>
<html lang="en">
<head>
<meta charset="UTF-8">
<title>Title</title>
</head>
<body>
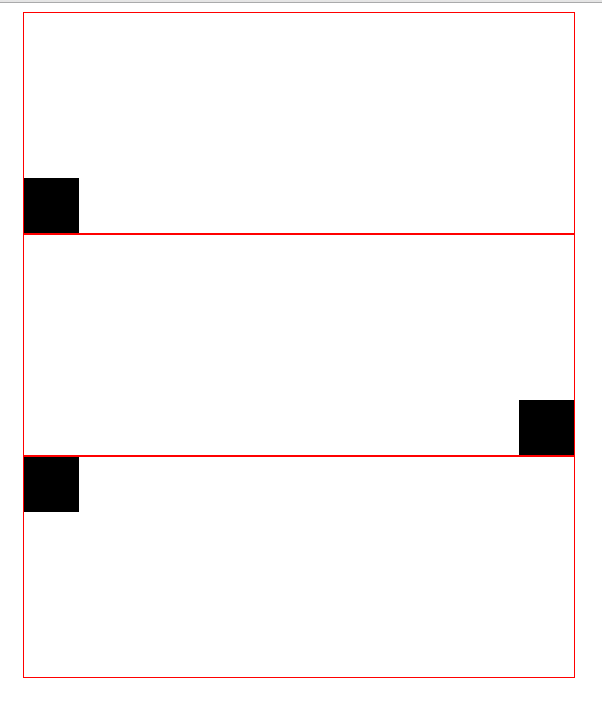
<div style="position: relative;height: 200px;width: 500px;border: 1px solid red; margin: 0 auto">
<div style="position: absolute;left: 0;bottom: 0;width: 50px;height: 50px;background-color: black"></div>
</div>
<div style="position: relative;height: 200px;width: 500px;border: 1px solid red; margin: 0 auto">
<div style="position: absolute;right: 0;bottom: 0;width: 50px;height: 50px;background-color: black"></div>
</div>
<div style="position: relative;height: 200px;width: 500px;border: 1px solid red; margin: 0 auto">
<div style="position: absolute;left: 0;top: 0;width: 50px;height: 50px;background-color: black"></div>
</div>
</body>
</html>
relative+absolutw
效果:
2.opcity 透明度
3.z-index 层级顺序
范例:
<!DOCTYPE html>

<html lang="en">

<head>

    <meta charset="UTF-8">

    <title>Title</title>

</head>

<body>

    <div style=" display:none;margin:0 auto;z-index:10;position: fixed;top:50%;left:50%;

     margin-left: -250px ; margin-top:-200px;background-color: white;height:400px;width: 500px; ">

           <input type="text" />

           <input type="text" />

           <input type="text" />

    </div>

    <div style="display:none;z-index:9;position: fixed;background-color: black;

    top:0;

     bottom: 0;

     right: 0;

     left: 0;

     opacity: 0.5

       "></div>

    <div style="height: 500px;background-color: green;">

        rcvbrcvghb

    </div>

</body>

</html>
三层范例
4.overflow
范例
<!DOCTYPE html>

<html lang="en">

<head>

    <meta charset="UTF-8">

    <title>Title</title>

</head>

<body>

   <div style="height: 200px;width: 300px;overflow: auto"> .

       <img src="data:image/1.png">

   </div>

   <div style="height: 200px;width: 300px;overflow: hidden"> .

       <img src="data:image/1.jpg">

   </div>

</body>

</html>
范例
效果:
5.hover 伪类
实例:
<!DOCTYPE html>

<html lang="en">

<head>

    <meta charset="UTF-8">

    <title>Title</title>

    <style>

        .pg-header{

            position: fixed;

            right: 0;

            left:0;

            top:0;

            height:48px;

            background-color: #2459a2;

            line-height: 48px;

        }

        .pg-body{

            margin-top: 50px;

        }

        .w{

            width: 980px ;

            margin: 0 auto;

        }

        .pg-header .menu{

            display: inline-block;

            padding:0  10px 0 10px;

            color: white;

        }

        /*当鼠标移动到当前标签上时,当前标签才生效*/

         .pg-header .menu:hover{

             background-color: blue;

         }

    </style>

</head>

<body>

      <div class="pg-header">

          <div class="w">

               <a class="logo">LOGO</a>

               <a class="menu">全部</a>

               <a class="menu">42区</a>

               <a class="menu">段子</a>

               <a class="menu">挨踢1024</a>

               <a class="menu">你问我答</a>

          </div>

      </div>

      <div class="pg-body">

          <div class="w">正文</div>

      </div>

</body>

</html>
效果:

6.background-image 背景图片
<!DOCTYPE html>

<html lang="en">

<head>

    <meta charset="UTF-8">

    <title>Title</title>

</head>

<body>

    <div style="height: 100px"></div>

    <div style="background-image: url('image/2.png');background-repeat: no-repeat;height: 20px;width: 20px;border: 1px solid red;"></div>

<-- backgroud-repeat:no-repeat 表示不重复  还有repeat-x表示横着堆叠 repeat-y表示竖着堆叠-->
<--backgroud-opsition-x:10px; backgroud-position-y:10px;表示往哪个方向移动  还可以使用上右下左的方式写-->
</body>

</html>
效果
课堂小练习--->输入框加头像
代码:
<!DOCTYPE html>

<html lang="en">

<head>

    <meta charset="UTF-8">

    <title>Title</title>

</head>

<body>

    <div style="height: 35px;width: 400px;position: relative;">

        <input type="text" style="height: 35px;width: 370px;padding-right:30px ;">

        <sapn style=" position:absolute;

        right:0;

        top:10px;

        background-image: url(image/i_name.jpg);

        height: 16px;

        width: 16px;

        display: inline-block;"></sapn>

    </div>

</body>

</html>
效果:

Python之路Day15--CSS补充以及JavaScript(一)的更多相关文章
- Python之路,Day15 - Django适当进阶篇
Python之路,Day15 - Django适当进阶篇 本节内容 学员管理系统练习 Django ORM操作进阶 用户认证 Django练习小项目:学员管理系统设计开发 带着项目需求学习是最有趣 ...
- CSS补充与JavaScript基础
一.CSS补充 position 1.fiexd 固定在页面的某个位置; 示例将顶部菜单始终固定在页面顶部 position: fixed; 将标签固定在某个位置 right: 0; 距离右边0像素 ...
- css补充、JavaScript、Dom
css补充: position: fixed:可以将标签固定在页面的某个位置 absolute+relative:通过两者的结合可以让标签在一个相对的位置 代码例子:(通过fixed标签将某些内容固定 ...
- Python之路day13 web 前端(JavaScript,DOM操作)
参考链接:http://www.cnblogs.com/wupeiqi/articles/5433893.html day13 1. CSS示例 2. JavaScript 3. DOM操作 上节内容 ...
- 百万年薪python之路 -- 前端CSS样式
CSS样式 控制高度和宽度 width宽度 height高度 块级标签能设置高度和宽度,而内联标签不能设置高度和宽度,内联标签的高度宽度由标签内部的内容来决定. 示例: <!DOCTYPE ht ...
- Python之路Day15
主要内容:WEB框架.Django基础 WEB框架 Web请求流程 -- 原始Web框架 -- 自定义Web框架 -- MVC 和 MTV # Models Views Controllers # 模 ...
- python之路--前端CSS
一.CSS介绍 CSS(Cascading Style Sheet,层叠样式表)定义了如何显示HTML元素,给HTML设置样式,让他更加美观. 当浏览器读到这个样式表, 他就会按照这个样式来对文档进行 ...
- 百万年薪python之路 -- 前端CSS基础介绍
一. CSS介绍 CSS定义 CSS(Cascading Style Sheet,层叠样式表)定义如何显示HTML元素,给HTML设置样式,让它更加美观. 语法结构 div{ color: green ...
- python之路之css
方式三 方式四 <style type="text/css"> a:link{ color: red; } a:visited { color: blue; } a:h ...
- python之路--进程内容补充
一. 进程的其他方法 进程id, 进程名字, 查看进程是否活着(is_alive()), terminate()发送结束进程的信号 import time import os from multipr ...
随机推荐
- Windows 网络编程
网络编程 API ,失败返回 -,错误代码 WSASYSNOTREADY 表示基础网络子系统没有准备好网络通行,WSAVERNOTSUPPORTED 表示 Socket 版本不支持,WSAEINPRO ...
- Echarts 3.19 制作常用的图形 非静态
最近阿里内部使用的 图表也向外开放了 而百度就好像更有良心一点,Echarts 早就开放了 . 自己学Echarts的时候走了很多的弯路,毕竟谁让自己菜呢,多撞几次南墙才晓得疼 才知道学习方法,新手上 ...
- centos 7 配置iptables
环境:阿里云ECS.centos 7 一.防火墙配置 不知道为什么,云主机没有开启firewall 或iptables,记录一下配置iptables防火墙的步骤 1.检测并关闭firewall sys ...
- 第一次使用UML的感觉
刚开始接触的时候,其实我内心是拒绝的,因为感觉这种软件之前接触过,觉得就是相当于思维导图那种的. 可当自己使用的时候,觉得大纲总体上是类似是规划方向的,可是细节却让人深思,用什么图标,特别是用什么线, ...
- mysql 慢查询的小结
MySQL优化的第一步应该做的就是排查问题,找出瓶颈,而通常情况下的瓶颈和问题都需要通过观察MySQL的运行情况来进行分析,而对于大多数的程序员来说,最容易发现并解决的问题就是MySQL的慢查询或者没 ...
- js中substr,substring,slice。截取字符串的区别
substr(n1,n2) n1:起始位置(可以为负数) n2:截取长度(不可以为0,不可以为负数,可以为空) 当n1为正数时,从字符串的n1下标处截取字符串(起始位置),长度为n2. 当n1为负数时 ...
- 14.linux按键驱动程序(一)
按键驱动程序 本文学习主要包含按键硬件的实现.中断分层管理.按键定时器去抖.阻塞性驱动程序设计.这里面需要使用到混杂设备驱动和中断处理程序的内容. 一.创建按键混杂设备驱动模型 int key_ope ...
- 【My Life】写在年末, 我的2013
[My Life]写在年末, 我的2013 SkySeraph Dec. 30 2013 Email:skyseraph00@163.com 好久没写博客了, 遗忘的历史,遗忘了自我... 岁月拾回 ...
- Drools 查询学习
Drools 查询学习查询以 query 关键字开始,以 end 关键字结束,在 package 当中一个查询要有唯一的名称,查询的内容就是查询的条件部分,条件部分内容的写法与规则的 LHS 部分写法 ...
- 自定义RatingBar的一个问题(只显示显示一个星星)
问题一: 在自定义RatingBar时在设置了numStars属性后只显示一张图(一个星星) 解答: 注意准备的替换图片千万不要使用.9PNG格式的图片,要不之后显示一张图(一个星星)! 问题二: 设 ...