Azure 部署K8S(二)
在"China Azure中部署Kubernetes(K8S)集群"一文中,我们使用的ACS Version及Kubernete Version版本都比较低,ACS Version为0.8.0,Kubernete Version为1.6。随着ACS版本及Kubernete版本的不断跟新,我们会尽可能的采用新的version部署我们的集群服务。本文将使用 ACS Version为0.18.8,Kubernete Version为1.10.4 进行部署,同时Kubernetes.json的配置文件也加入了多个限制条件,详情操作见下:
1.查看Ubuntu 机器Version
root@hlmubu1604n1ma:~# lsb_release -a

No LSB modules are available.

Distributor ID:    Ubuntu

Description:    Ubuntu 16.04. LTS

Release:    16.04

Codename:    xenial
2.在该Ubuntu机器上安装CLI 2.0
root@hlmubu1604n1ma:~# az

     /\

    /  \    _____   _ _  ___ _

   / /\ \  |_  / | | | \'__/ _\

  / ____ \  / /| |_| | | |  __/

 /_/    \_\/___|\__,_|_|  \___|

Welcome to the cool new Azure CLI!

Use `az --version` to display the current version.

Here are the base commands:
3.下载并安装 Azure 容器服务引擎(acs-engine)
wget https://github.com/Azure/acs-engine/releases/download/v0.18.8/acs-engine-v0.18.8-linux-amd64.tar.gz

tar zxvf acs-engine-v0.18.8-linux-amd64.tar.gz

cd acs-engine-v0.18.8-linux-amd64/

root@hlmubu1604n1ma:~/acs-engine-v0.18.8-linux-amd64# ./acs-engine version

Version: v0.18.8

GitCommit: 71d88da

GitTreeState: clean
4.创建资源组并获取服务主体身份(service principal)
root@hlmubu1604n1ma:~# az cloud set -n AzureChinaCloud

root@hlmubu1604n1ma:~# az login -u "***@***.onmschina.cn"

Password:

[

  {

    "cloudName": "AzureChinaCloud",

    "id": "***",

    "isDefault": true,

    "name": "He Liming (anitay)",

    "state": "Enabled",

    "tenantId": "***",

    "user": {

      "name": "***",

      "type": "user"

    }

  }

]

root@hlmubu1604n1ma:~# az account set --subscription  "***"

root@hlmubu1604n1ma:~# az group create -n hlmk8srgt1 -l chinanorth

{

  "id": "/subscriptions/***/resourceGroups/hlmk8srgt1",

  "location": "chinanorth",

  "managedBy": null,

  "name": "hlmk8srgt1",

  "properties": {

    "provisioningState": "Succeeded"

  },

  "tags": null

}


root@hlmubu1604n1ma:~# az ad sp create-for-rbac --role="Contributor" --scopes="/subscriptions/***/resourceGroups/hlmk8srgt1"
Retrying role assignment creation: /
Retrying role assignment creation: /
Retrying role assignment creation: /
Retrying role assignment creation: /
Retrying role assignment creation: /
Retrying role assignment creation: /
{
"appId": "***",
"displayName": "azure-cli-2018-09-18-07-49-05",
"name": "http://azure-cli-2018-09-18-07-49-05",
"password": "***", "tenant": "***"
}

备注:记录appId及password的值以备后续使用
5.创建一个kubernets.json模板文件
{

   "apiVersion": "vlabs",

   "location": "chinanorth",

   "properties" :   {

      "orchestratorProfile" : {

         "orchestratorType" : "Kubernetes",

         "kubernetesConfig" : {

            "schedulerConfig" : {

               "--profiling" : "false"

            },

            "enableRbac":false,

            "apiServerConfig" : {

               "--audit-log-path" : "/var/log/audit.log",

               "--audit-log-maxage": "",

               "--audit-log-maxsize": "",

               "--audit-log-maxbackup": "",

               "--anonymous-auth":"false",

               "--profiling":"false"

            },

           "addons": [

               {

                 "name":"tiller",

                 "enabled":false

               },

               {

                "name":"kubernetes-dashboard",

                  "enabled":false

               },

               {

                  "name":"cluster-autoscaler",

                  "config":                  {

                     "maxNodes":"",

                     "minNodes":""

                  },

                  "enabled":true

               }

            ],

            "dnsServiceIP" : "10.2.0.240",

            "networkPolicy": "calico",

            "kubeletConfig" :  {

              "--make-iptables-util-chains":"true",

               "--allow-privileged":"false",

               "--keep-terminated-pod-volumes":"false",

               "--read-only-port": "",

               "--event-qps": "",

               "--cadvisor-port": ""

            },

            "serviceCidr": "10.2.0.0/24",

            "controllerManagerConfig": {

               "--terminated-pod-gc-threshold": "",

               "--profiling":"false"

            }

          },

         "orchestratorVersion": "1.10.4"

      },

      "agentPoolProfiles": [

         {

            "storageProfile": "ManagedDisks",

            "name": "macsetupdeve",

            "count": ,

            "osType": "Linux",

            "vnetSubnetId": "/subscriptions/***/resourceGroups/hlmk8st1/providers/Microsoft.Network/virtualNetworks/hlmk8svnet/subnets/default",

            "vmSize": "Standard_A2_v2",

            "availabilityProfile": "VirtualMachineScaleSets"

         }

      ],

      "servicePrincipalProfile": {

         "clientId": "***",

         "secret": "***"

      },

      "linuxProfile": {

         "adminUsername": "stone",

         "ssh": {

            "publicKeys": [

               {

                  "keyData": "ssh-rsa *** root@hlmubu1604n1ma"

               }

            ]

         }

      },

      "masterProfile": {

         "firstConsecutiveStaticIP": "10.2.0.100",

         "storageProfile": "ManagedDisks",

         "count": ,

         "dnsPrefix": "hlmk8s-mstr000",

         "vnetSubnetId": "/subscriptions/***/resourceGroups/hlmk8st1/providers/Microsoft.Network/virtualNetworks/hlmk8svnet/subnets/default",

         "vmSize": "Standard_A2_v2"

      }

   }

}

备注:

clientId为之前记录的appId; secret为之前记录的password; keyData为登陆机器所需的公钥(需要使用ssh-keygen命令生成)
6.生成Azure模板文件
root@hlmubu1604n1ma:~/acs-engine-v0.18.8-linux-amd64# ./acs-engine generate kubernetes.json

INFO[] Generating assets into _output/hlmk8s-mstr001...

root@hlmubu1604n1ma:~/acs-engine-v0.18.8-linux-amd64# ls

acs-engine  kubernetes.json  kubernetes.json.bak  kubernetes.json.bak1  kubernetes.json.bak2  LICENSE  _output  README.md  translations

root@hlmubu1604n1ma:~/acs-engine-v0.18.8-linux-amd64# cd _output/

root@hlmubu1604n1ma:~/acs-engine-v0.18.8-linux-amd64/_output# ls

hlmk8s-mstr000  hlmk8s-mstr001

root@hlmubu1604n1ma:~/acs-engine-v0.18.8-linux-amd64/_output# cd hlmk8s-mstr001/

root@hlmubu1604n1ma:~/acs-engine-v0.18.8-linux-amd64/_output/hlmk8s-mstr001# ls

apimodel.json  apiserver.key     azuredeploy.parameters.json  ca.key      client.key      etcdclient.key  etcdpeer0.key   etcdserver.key  kubectlClient.crt

apiserver.crt  azuredeploy.json  ca.crt                       client.crt  etcdclient.crt  etcdpeer0.crt   etcdserver.crt  kubeconfig      kubectlClient.key
7.部署Kubernetes集群,该过程大约需要20分钟左右
备注:使用较新的ACS生成的"azuredeploy.parameters.json"文件,不需要修改URL,直接就可以运行
root@hlmubu1604n1ma:~/acs-engine-v0.18.8-linux-amd64/_output/hlmk8s-mstr001# az group deployment create --resource-group hlmk8srgt1 --template-file azuredeploy.json --parameters azuredeploy.parameters.json
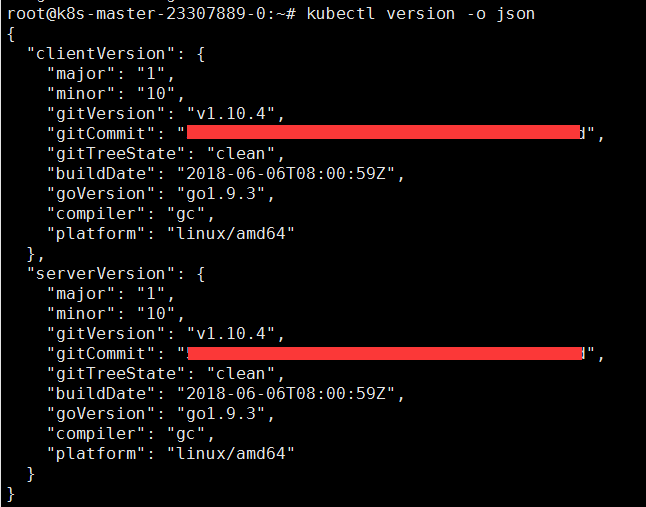
8.使用Kubectl工具,并查看集群节点状态

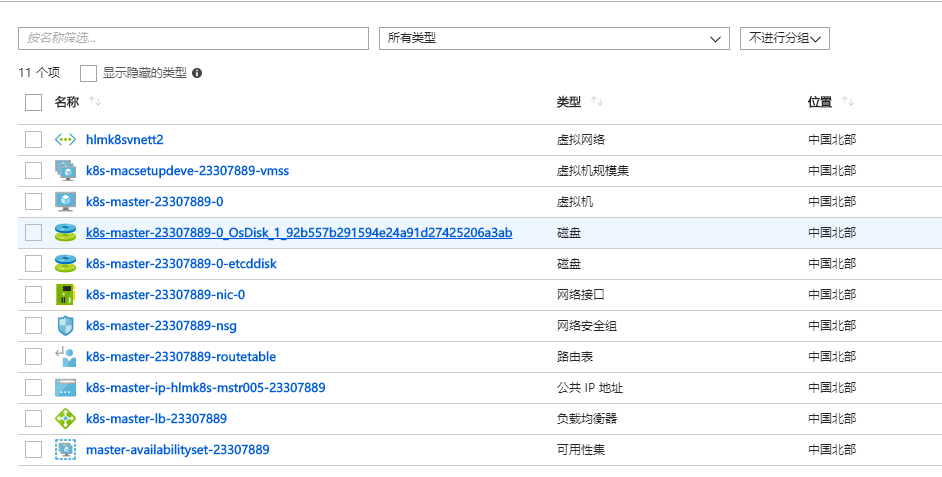
备注:Azure Portal界面显示如下
Azure 部署K8S(二)的更多相关文章
- ansible一键部署k8s单机环境
一.虚拟机准备 干净的Centsot7.4.4G内存.2个CPU 最小化安装,最好带虚拟化 二.执行初始化脚本 注意:脚本中配置静态网卡根据实际网卡名称配置,我用的是ens33 可以用 sed -i ...
- 使用saltstack自动部署K8S
使用saltstack自动部署K8S 一.环境准备 1.1 规划 1. 操作系统 CentOS-7.x-x86_64. 2. 关闭 iptables 和 SELinux. 3. 所有节点的主机名和 I ...
- 使用kubeadm部署k8s
k8s组件 master,node master中包括apiserver,scheduler,controller.etcd apiserver:负责接收用户请求,并且保存至etcd中. schedu ...
- 二进制部署k8s
一.二进制部署 k8s集群 1)参考文章 博客: https://blog.qikqiak.com 文章: https://www.qikqiak.com/post/manual-install-hi ...
- 解决阿里云ECS下kubeadm部署k8s无法指定公网IP
背景 一般情况下,"kubeadm"部署集群时指定"--apiserver-advertise-address=<public_ip>"参数,即可在 ...
- lvs+keepalived部署k8s v1.16.4高可用集群
一.部署环境 1.1 主机列表 主机名 Centos版本 ip docker version flannel version Keepalived version 主机配置 备注 lvs-keepal ...
- Centos7.6部署k8s v1.16.4高可用集群(主备模式)
一.部署环境 主机列表: 主机名 Centos版本 ip docker version flannel version Keepalived version 主机配置 备注 master01 7.6. ...
- 使用RKE快速部署k8s集群
一.环境准备 1.1环境信息 IP地址 角色 部署软件 10.10.100.5 K8s Master Etcd.Control 10.10.100.17 K8s Worker1 Worker 10.1 ...
- 使用kubeadm部署k8s集群[v1.18.0]
使用kubeadm部署k8s集群 环境 IP地址 主机名 节点 10.0.0.63 k8s-master1 master1 10.0.0.63 k8s-master2 master2 10.0.0.6 ...
随机推荐
- java开发操作系统内核:由实模式进入保护模式之32位寻址
- Python 入门学习(贰)文件/文件夹正则表达式批量重命名工具
基于 Udacity 的 Python 入门课程 Programming Foundations with Python 基于 Python 2.7 思路 Project 2 是一个去除文件名中所有数 ...
- ios 7.1企业证书无线安装
ios升级到7.1时,企业证书http服务器发布无线安装不能使用,需要使用https服务器. 测试了几种方式 1.测试时自签名https证书测试无效,提示不能连接到服务器 2.使用dropbox共享连 ...
- 二叉树叶子顺序遍历 · binary tree leaves order traversal
[抄题]: 给定一个二叉树,像这样收集树节点:收集并移除所有叶子,重复,直到树为空. 给出一个二叉树: 1 / \ 2 3 / \ 4 5 返回 [[4, 5, 3], [2], [1]]. [暴力解 ...
- Python爬虫进阶五之多线程的用法
前言 我们之前写的爬虫都是单个线程的?这怎么够?一旦一个地方卡到不动了,那不就永远等待下去了?为此我们可以使用多线程或者多进程来处理. 首先声明一点! 多线程和多进程是不一样的!一个是 thread ...
- null与not null
.not null CREATE TABLE `test` ( `col1` VARCHAR( ) CHARACTER SET utf8 COLLATE utf8_general_ci NOT NUL ...
- 【git使用】Failed to connect to 127.0.0.1 port 1080: Connection refused
查询是否使用代理:git config --global http.proxy 取消代理:git config --global --unset http.proxy
- jquery相对定位(包含find的使用 find相当于后代选择器)$("选择器1","选择器2")
- Java程序设计10——与运行环境交互
本部分介绍一些与运行环境相关的类 Sun为Java提供了丰富的基础类库,Java SE有三千多个基础类,要多敲代码,多练. 1.main()方法解析 如果一个程序总是按规定的流程运行,无需处理用户动作 ...
- 获取iPod library中的媒体文件
[获取iPod library中的媒体文件] The Media Player framework provides facilities for playing movie, music, audi ...