利用WCF创建简单的RESTFul Service
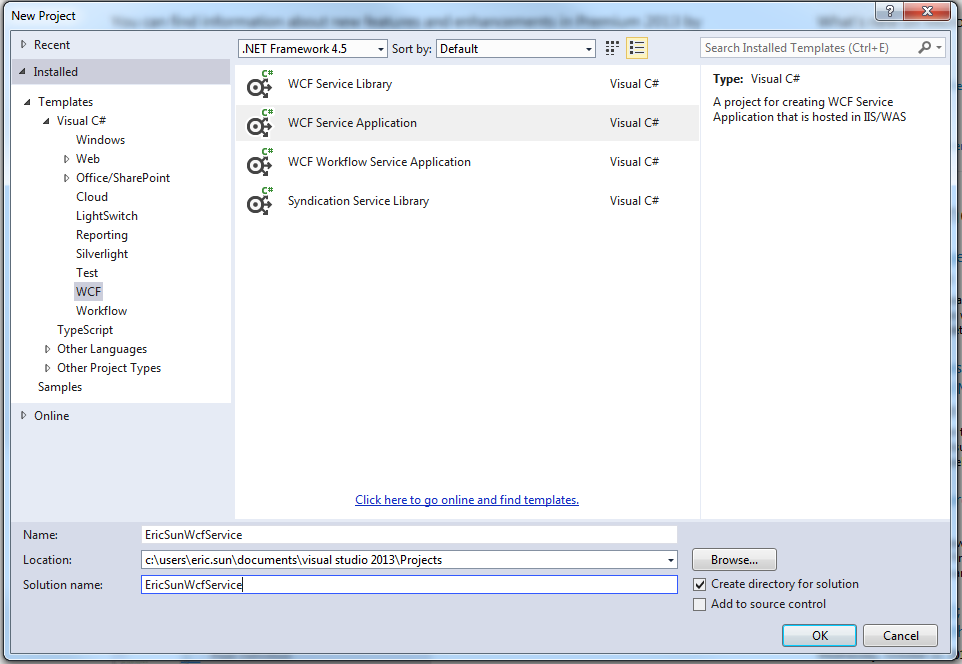
1):用VS2013创建一个WCF的工程,如下图所示:
2):我们来看一下默认状态下的config文件内容,这里的内容我们会再后续的步骤中进行修改
<?xml version="1.0"?>

<configuration>

  <appSettings>

    <add key="aspnet:UseTaskFriendlySynchronizationContext" value="true" />

  </appSettings>

  <system.web>

    <compilation debug="true" targetFramework="4.5" />

    <httpRuntime targetFramework="4.5"/>

  </system.web>

  <system.serviceModel>

    <behaviors>

      <serviceBehaviors>

        <behavior>

          <!-- To avoid disclosing metadata information, set the values below to false before deployment -->

          <serviceMetadata httpGetEnabled="true" httpsGetEnabled="true"/>

          <!-- To receive exception details in faults for debugging purposes, set the value below to true.  Set to false before deployment to avoid disclosing exception information -->

          <serviceDebug includeExceptionDetailInFaults="false"/>

        </behavior>

      </serviceBehaviors>

    </behaviors>

    <protocolMapping>

        <add binding="basicHttpsBinding" scheme="https" />

    </protocolMapping>

    <serviceHostingEnvironment aspNetCompatibilityEnabled="true" multipleSiteBindingsEnabled="true" />

  </system.serviceModel>

  <system.webServer>

    <modules runAllManagedModulesForAllRequests="true"/>

    <!--

        To browse web app root directory during debugging, set the value below to true.

        Set to false before deployment to avoid disclosing web app folder information.

      -->

    <directoryBrowse enabled="true"/>

  </system.webServer>

</configuration>
3):我们对工程文件及其内容做一下修改,具体代码如下所示:
3.1):UserData class
using System;

using System.Collections.Generic;

using System.Linq;

using System.Runtime.Serialization;

using System.Web;

namespace EricSunWcfService

{

    [DataContract]

    public class UserData

    {

        [DataMember]

        public string Name { get; set; }

        [DataMember]

        public string Password { get; set; }

        [DataMember]

        public string Email { get; set; }

    }

}
3.2):IDataService,这个接口是从默认的IService1修改而来,并且这里提供了两种方法,一个是GET,另外是POST,都是简单的返回UserData对象的Json字符串
using System;

using System.Collections.Generic;

using System.Linq;

using System.Runtime.Serialization;

using System.ServiceModel;

using System.ServiceModel.Web;

using System.Text;

namespace EricSunWcfService

{

    // NOTE: You can use the "Rename" command on the "Refactor" menu to change the interface name "IService1" in both code and config file together.

    [ServiceContract]

    public interface IUserService

    {

        [OperationContract]

        [WebInvoke(Method = "GET", UriTemplate = "getuser/{name}", RequestFormat = WebMessageFormat.Json, ResponseFormat = WebMessageFormat.Json)]

        UserData GetUserData(string name);

        [OperationContract]

        [WebInvoke(Method = "POST", UriTemplate = "checkuser", RequestFormat = WebMessageFormat.Json, ResponseFormat = WebMessageFormat.Json)]

        UserData CheckUserData(UserData user);

    }

}
3.3):UserService,这个文件名是从默认的Service1修改过来的
using System;

using System.Collections.Generic;

using System.Linq;

using System.Runtime.Serialization;

using System.ServiceModel;

using System.ServiceModel.Web;

using System.Text;

namespace EricSunWcfService

{

    // NOTE: You can use the "Rename" command on the "Refactor" menu to change the class name "Service1" in code, svc and config file together.

    // NOTE: In order to launch WCF Test Client for testing this service, please select Service1.svc or Service1.svc.cs at the Solution Explorer and start debugging.

    public class UserService : IUserService

    {

        public UserData GetUserData(string name)

        {

            UserData user = new UserData();

            user.Name = name;

            user.Email = "test@123.com";

            return user;

        }

        public UserData CheckUserData(UserData user)

        {

            user.Name += "-test";

            return user;

        }

    }

}
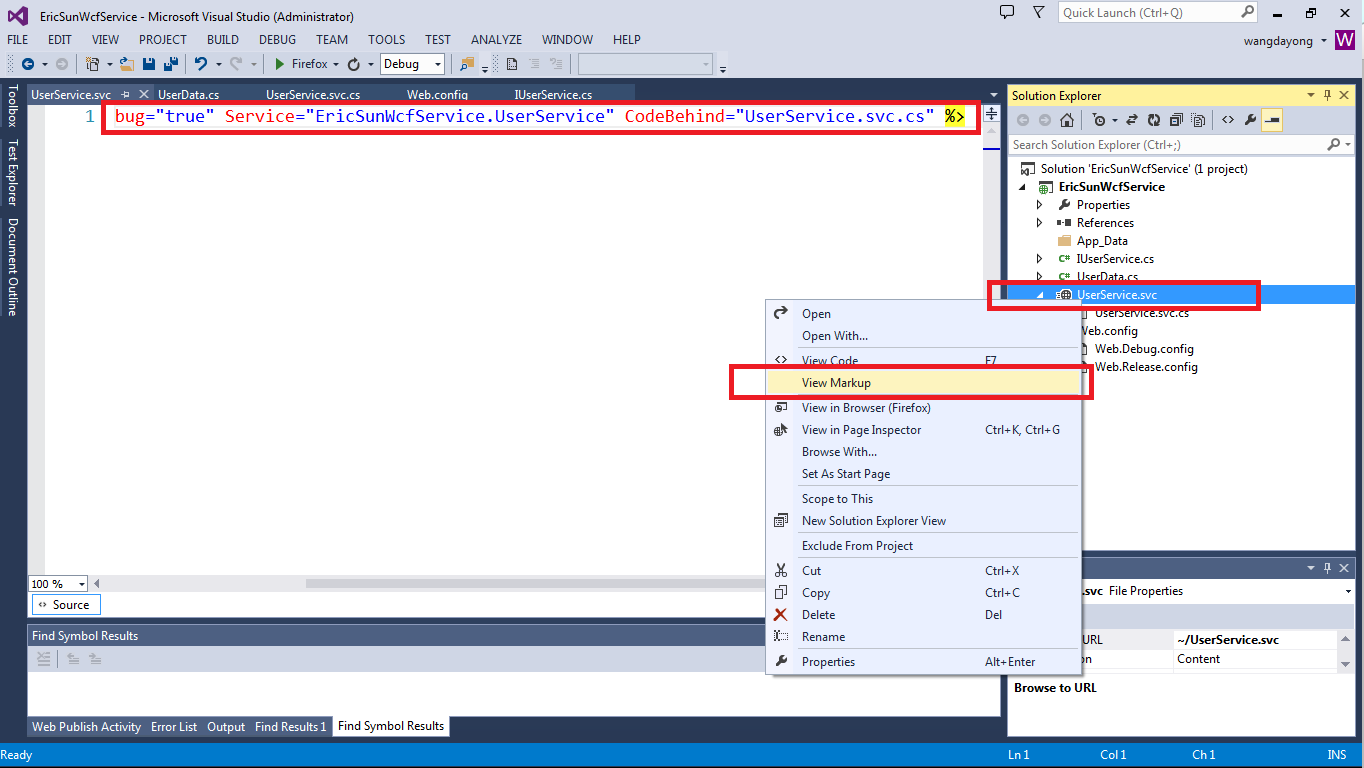
3.4):我们可以点击对应的Service的‘View Markup’来修改ServiceHost的信息,如下图所示
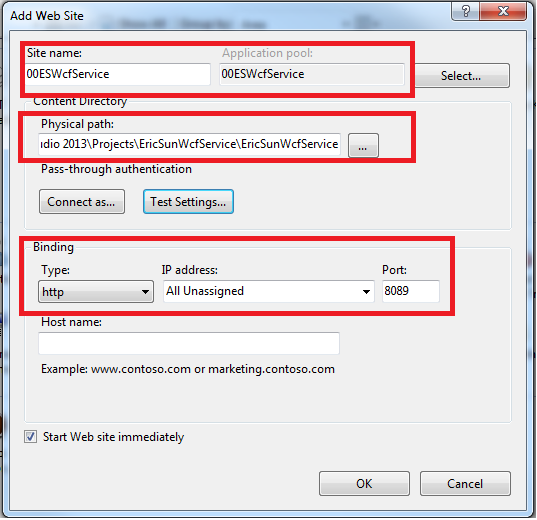
4):我们在IIS中创建一个Site来Host我们所提供的WCF Service,用http协议并且将端口绑定为8089,与此同时制定好Physical path,如下图所示
【注:请将创建的Application Pool的.Net Framework Version修改成为4.0】
5):在目前这种状态下还不能成功的访问对应的WCF Service的,我们需要对web.config进行修改
<?xml version="1.0"?>

<configuration>

  <appSettings>

    <add key="aspnet:UseTaskFriendlySynchronizationContext" value="true" />

  </appSettings>

  <system.web>

    <compilation debug="true" targetFramework="4.5" />

    <httpRuntime targetFramework="4.5"/>

  </system.web>

  <system.serviceModel>

    <services>

        <service name="EricSunWcfService.UserService" behaviorConfiguration="RESTBehaviour">

          <endpoint address=""

                    binding="webHttpBinding"

                    contract="EricSunWcfService.IUserService"

                    behaviorConfiguration="ESEndPointBehavior"/>

        </service>

      </services>

    <behaviors>

      <serviceBehaviors>

        <behavior name="RESTBehaviour">

          <serviceMetadata httpGetEnabled="true"/>

          <serviceDebug includeExceptionDetailInFaults="true"/>

        </behavior>

        <behavior>

          <!-- To avoid disclosing metadata information, set the values below to false before deployment -->

          <serviceMetadata httpGetEnabled="true" httpsGetEnabled="true"/>

          <!-- To receive exception details in faults for debugging purposes, set the value below to true.  Set to false before deployment to avoid disclosing exception information -->

          <serviceDebug includeExceptionDetailInFaults="false"/>

        </behavior>

      </serviceBehaviors>

      <endpointBehaviors>

        <behavior name="ESEndPointBehavior">

          <webHttp/>

        </behavior>

      </endpointBehaviors>

    </behaviors>

    <protocolMapping>

        <add binding="basicHttpsBinding" scheme="https" />

    </protocolMapping>

    <serviceHostingEnvironment aspNetCompatibilityEnabled="true" multipleSiteBindingsEnabled="true" />

  </system.serviceModel>

  <system.webServer>

    <!--

      To browse web app root directory during debugging, set the value below to true.

      Set to false before deployment to avoid disclosing web app folder information.

    -->

    <directoryBrowse enabled="true"/>

    <modules runAllManagedModulesForAllRequests="true"/>

  </system.webServer>

</configuration>
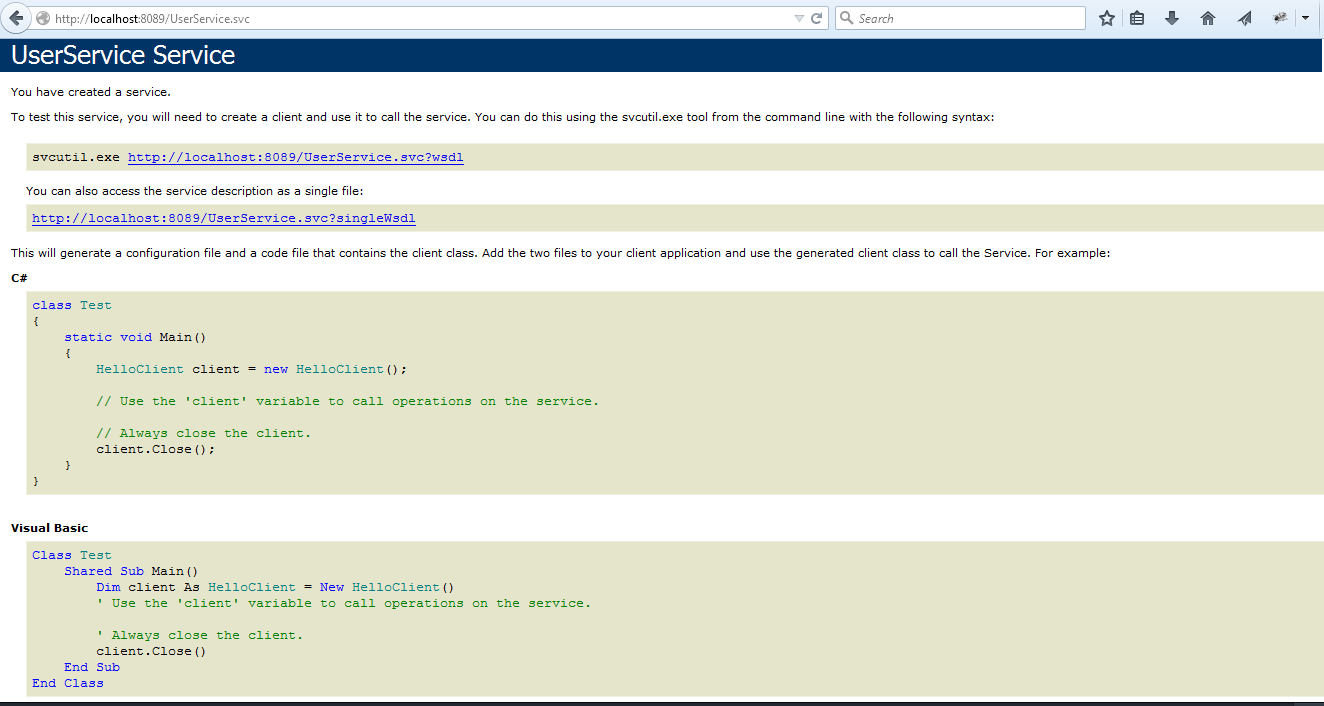
6):config文件配置完毕后,我们就可访问此URL:http://localhost:8089/UserService.svc 来判断我们Service提供的正确与否,若是看到下面的截图则表明Service无误
7):若在访问 http://localhost:8089/UserService.svc 的时候出现500.19【HTTP Error 500.19 - Internal Server Error】错误请参考如下链接解决
http://www.cnblogs.com/mingmingruyuedlut/archive/2011/11/04/2235630.html
8):访问GET方法我们可以直接在浏览器地址栏中输入对应的service地址即可访问
例如输入 http://localhost:8089/UserService.svc/getuser/eric
会给我们返回: {"Email":"test@123.com","Name":"eric","Password":null}
9):若是访问POST方法,单纯的在浏览器中输入地址则无法完成正确的调用,这里我们使用浏览器的插件poster (https://addons.mozilla.org/en-US/firefox/addon/poster/)
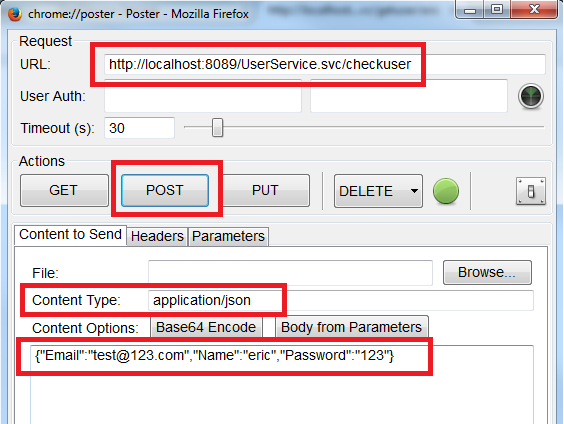
如上图所示,在poster中填入正确的配置信息,并且传入Json的参数值{"Email":"test@123.com","Name":"eric","Password":"123"}
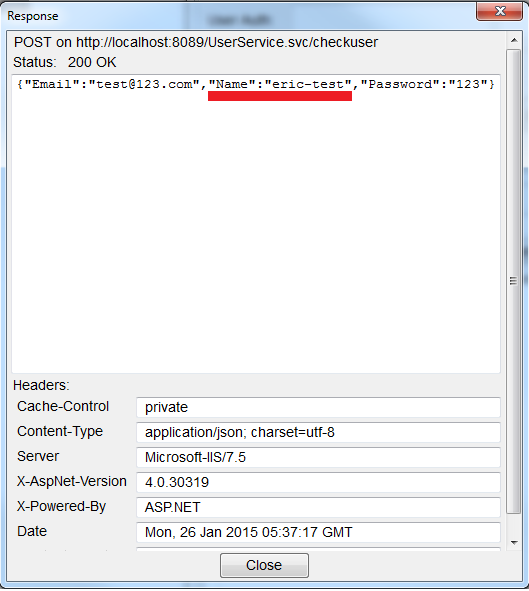
点击POST按钮之后变回得到如下返回结果:
10):若是我们发现在调用PUT或者DELETE方法时出现Status:405 Method Not Allowed的问题,请在web.config文件中的system.webServer节点中添加如下配置
    <modules runAllManagedModulesForAllRequests="true">

      <remove name="WebDAVModule" />

    </modules>

    <handlers>

      <remove name="WebDAV" />

    </handlers>
至此我们就可以通过WCF向外提供REST的Service了~~
如何配置来完成HTTPS的访问请看如下链接:
http://www.cnblogs.com/mingmingruyuedlut/p/4236035.html
利用WCF创建简单的RESTFul Service的更多相关文章
- WCF创建简单程序
1. 新建立空白解决方案,并在解决方案中新建项目,项目类型为:WCF服务应用程序.建立完成后如下图所示: 2.删除系统生成的两个文件IService1.cs与Service1.svc,当然你也可以直接 ...
- Eclipse下利用Maven创建SpringBoot的Restful风格程序
参考文章:https://spring.io/guides/gs/rest-service/ 中文翻译:https://blog.dubby.cn/detail.html?id=9040 1.目标是什 ...
- SpringBoot IntelliJ创建简单的Restful接口
使用SpringBoot快速建服务,和NodeJS使用express几乎一模一样,主要分为以下: 1.添加和安装依赖 2.添加路由(即接口) 3.对路由事件进行处理 同样坑的地方就是,祖国的防火墙太 ...
- 利用HttpListener创建简单的HTTP服务
using System; using System.Collections.Generic; using System.IO; using System.IO.Compression; using ...
- WCF Restful Service
对 Web Services.WCF 和 Restful 的扫盲可参见:https://www.cnblogs.com/scy251147/p/3382436.html 关于之前对 WCF 的学习,可 ...
- 基于.Net FrameWork的 RestFul Service
关于本文 这篇文章的目的就是向大家阐述如何在.net framework 4.0中创建RestFul Service并且使用它. 什么是web Services,什么是WCF 首先讲到的是web Se ...
- [转]使用WCF 4.0 构建 REST Service
本文转自:http://www.cnblogs.com/lanvige/archive/2010/12/03/set_up_rest_service_with_wcf_4.html 用过一段时间的Ru ...
- 用 C# 实现一个简单的 Rest Service 供外部调用
用 C# 实现一个简单的 Restful Service 供外部调用,大体总结为4点: The service contract (the methods it offers). How do yo ...
- Wcf Restful Service服务搭建
目的 使用Wcf(C#)搭建一个Restful Service 背景 最近接到一个项目,客户要求使用Restful 方式接收到数据,并对数据提供对数据的统计显示功能,简单是简单,但必须要使用Restf ...
随机推荐
- 【原创】自己动手写工具----签到器[Beta 1.0]
一.写在前面 最近公司没有什么项目,想通过项目练练手的机会也没有,只能自己学习了,因此空下来的时间也挺多的,就打开网页看看吧,哎,一打开就让签到(像什么百度知道啊.百度云盘啊之类的),我签到的目的是获 ...
- yii2 session的使用方法
yii2打开session use yii\web\Session; $session = Yii::$app->session; // check if a session is alread ...
- C++箴言:理解typename的两个含义
C++箴言:理解typename的两个含义 问题:在下面的 template declarations(模板声明)中 class 和 typename 有什么不同? template<class ...
- strace追踪未开始或者来不及捕获pid的进程(译)
我的个人博客网站最近被攻击了,被用来发送一些垃圾邮件.但是我不知道这个进程是怎么来的,用top查看发现一个不知道干什么的perl脚本,决定给用strace查看一下. strace可以追踪一个进程的系统 ...
- 条件编译#if #ifdef
近期由于一些莫名其妙的原因开始学c++,我觉得我哪天要是挂了也是被自己给折腾死的,算了,反正不是折腾死就是被淘汰,当是没事打发时间了,废话不多说,开始今天的主题. 之前接触的注释就是注释,条件语句就是 ...
- Shader 学习笔记
Shader "Custom/Diffuse Texture" { // Shader的开始,双引号内饰该Shader的名字 Properties { _MainTex (&quo ...
- ACCESS应用笔记<五>——慢慢要学会做项目管理·
综上 第一次写access学习笔记是8月19号的事情,现在已经10月31号 以下是之前的笔记目录: <一> http://www.cnblogs.com/weibaar/p/3923466 ...
- Java开发规范摘录
对于规范的 JAVA 派生类,尽量用 eclipse工具来生成文件格式,避免用手写的头文件/实现文件. 尽量避免一行的长度超过 200 个字符,因为很多终端和工具不能很好处理之.缩进8格 ,impor ...
- AJAX工作原理及其优缺点
1.什么是AJAX?AJAX全称为"Asynchronous JavaScript and XML"(异步JavaScript和XML),是一种创建交互式网页应用的网页开发技术.它 ...
- 【转】Java读取matlab的.mat数据文件
参考:Java读取mat文件 下载链接:ujmp jmatio 下载完两个.jar文件之后,如何引用到java项目当中?项目名称->右键->Property->Java Build ...