tqdm学习-一个快速,可扩展的Python和CLI进度条
参考:https://pypi.org/project/tqdm/
1.安装:
(base) userdeMacBook-Pro:~ user$ conda activate deeplearning

(deeplearning) userdeMacBook-Pro:~ user$ conda install -c conda-forge tqdm

Collecting package metadata: done

Solving environment: done

## Package Plan ##

  environment location: /anaconda3/envs/deeplearning

  added / updated specs:

    - tqdm

...

Downloading and Extracting Packages

python-1.6           | 3.7 MB    | ##################################### | %

tqdm-4.35.          |  KB     | ##################################### | %

decorator-4.4.      |  KB     | ##################################### | %

ca-certificates- |  KB    | ##################################### | %

openssl-1.1.1c       | 1.9 MB    | ##################################### | %

Preparing transaction: done

Verifying transaction: done

Executing transaction: done
使用这个方法安装好像将我conda的环境的python版本换成了1.6版本,不好:
(deeplearning) userdeMBP:bin user$ jupyter notebook

Traceback (most recent call last):

  File "/anaconda3/envs/deeplearning/bin/jupyter", line , in <module>

    from jupyter_core.command import main

ModuleNotFoundError: No module named 'jupyter_core'
解决,回到原来的状态:
(deeplearning) userdeMBP:bin user$ conda uninstall tqdm

Collecting package metadata: done

Solving environment: done

## Package Plan ##

  environment location: /anaconda3/envs/deeplearning

  removed specs:

    - tqdm

The following packages will be REMOVED:

  tqdm-4.35.-py_0

Proceed ([y]/n)? y

Preparing transaction: done

Verifying transaction: done

Executing transaction: done

(deeplearning) userdeMBP:bin user$ conda update python
The following packages will be UPDATED:

  certifi                pkgs/main::certifi-2019.3.9-py36_0 --> conda-forge::certifi-2019.9.11-py37_0
  python                                              1.6-0 --> 3.7.3-h93065d6_1
  readline               pkgs/main::readline-7.0-h1de35cc_5 --> conda-forge::readline-8.0-hcfe32e1_0
  sqlite                pkgs/main::sqlite-3.27.2-ha441bb4_0 --> conda-forge::sqlite-3.29.0-hb7d70f7_1
  tk                         pkgs/main::tk-8.6.8-ha441bb4_0 --> conda-forge::tk-8.6.9-h2573ce8_1003
  wheel              anaconda/pkgs/main::wheel-0.33.1-py36~ --> conda-forge::wheel-0.33.6-py37_0
在anaconda上重新安装下jupyter notebook即可
换成了下面的下载方法:
(base) userdembp:bin user$ conda activate deeplearning3.

(deeplearning3.) userdembp:bin user$ pip install -e git+https://github.com/tqdm/tqdm.git@master#egg=tqdm

Obtaining tqdm from git+https://github.com/tqdm/tqdm.git@master#egg=tqdm

  Cloning https://github.com/tqdm/tqdm.git (to revision master) to ./src/tqdm

Installing collected packages: tqdm

  Running setup.py develop for tqdm

Successfully installed tqdm

You are using pip version 19.0., however version 19.2. is available.

You should consider upgrading via the 'pip install --upgrade pip' command.
2.使用
tqdm是通用的,能以很多种方式使用。下面给出主要的三种方式:
1)基于迭代器的方法:
即将tqdm封装在任意迭代器中
# conding:utf-

from tqdm import tqdm

import time

text = ""

for char in tqdm(["a", "b", "c", "d"]):

    time.sleep(0.25)

    text = text + char
print(text)
运行返回:
/anaconda3/envs/deeplearning3./bin/python3. /Users/user/PycharmProjects/new/learning.py

 %|███████▌  | / [:<:,  .97it/s]abcd

%|██████████| / [:<:,  .96it/s]

Process finished with exit code
tqdm(range(i))可以使用trange(i)替换:
# conding:utf-

from tqdm import tqdm

import time

text =

for i in tqdm(range()):

    time.sleep(0.25)

    text += i

print(text)
返回:
/anaconda3/envs/deeplearning3./bin/python3. /Users/user/PycharmProjects/new/learning.py

%|██████████| / [:<:,  .96it/s]

Process finished with exit code
等价于:
# conding:utf-

from tqdm import trange

import time

text =

for i in trange():

    time.sleep(0.25)

    text += i

print(text)
返回:
/anaconda3/envs/deeplearning3./bin/python3. /Users/user/PycharmProjects/new/learning.py

 %|█████████ | / [:<:,  .96it/s]

%|██████████| / [:<:,  .96it/s]

Process finished with exit code
在循环外面实例化能够实现tqdm()的手动控制:
# conding:utf-

from tqdm import tqdm

import time

pbar = tqdm(["a", "b", "c", "d"])

for char in pbar:

    time.sleep(0.25)

    pbar.set_description("processing %s" % char)
返回:
/anaconda3/envs/deeplearning3./bin/python3. /Users/user/PycharmProjects/new/learning.py

processing d: %|██████████| / [:<:,  .95it/s]

Process finished with exit code
前四步是processing a,processing b,processing c
2)手动控制
通过使用with语句来实现tqdm()的手动控制:
# conding:utf-

from tqdm import tqdm

import time

with tqdm(total=) as pbar:

    for i in range():

        time.sleep(0.1)

        pbar.update()
返回:
/anaconda3/envs/deeplearning3./bin/python3. /Users/user/PycharmProjects/new/learning.py

%|██████████| / [:<:, .06it/s]

Process finished with exit code
如果提供了可选变量total(或者如len()的可迭代函数),就会显示预测状态
with语句也是可选的(你也可以直接赋值tqdm()到一个变量上,重点就在于你不要忘记了在最后的时候手动del或closr()它),使用with的好处就是它会在最后自动关闭
# conding:utf-

from tqdm import tqdm

import time

pbar = tqdm(total=)

for i in range():

    time.sleep(0.1)

    pbar.update()

pbar.close()
返回:
/anaconda3/envs/deeplearning3./bin/python3. /Users/user/PycharmProjects/new/learning.py

%|██████████| / [:<:, .40it/s]

Process finished with exit code
3)模块
可能tqdm最优美的使用就是在脚本或命令行中。简单在管道中插入tqdm(或者命令python -m tqdm),这样在打印过程到stderr时将传递所有stdin到stdout
下面的例子阐述了在当前目录中计算所有python文件中的行数的例子,并且包含这相应的记时信息:
(deeplearning3.) userdembp:new user$ time find . -name '*.py' -type f -exec cat \{} \; | wc -l

real    0m0.015s

user    0m0.004s

sys     0m0.009s

(deeplearning3.) userdembp:new user$ time find . -name '*.py' -type f -exec cat \{} \; | tqdm | wc -l

9it [:, .33it/s]

real    0m0.273s

user    0m0.207s

sys     0m0.053s

(deeplearning3.) userdembp:new user$
此时该目录下就只有一个learning.py文件,里面的代码为:
# conding:utf-

from tqdm import tqdm

import time

pbar = tqdm(total=)

for i in range():

    time.sleep(0.1)

    pbar.update()

pbar.close()
可见除去空行的确是8行
注意tqdm通常使用的参数也能够指定:
(deeplearning3.) userdembp:new user$ time find . -name '*.py' -type f -exec cat \{} \; | tqdm -unit loc --unit_scale --total  >> out.log

.00loc [:, .6kloc/s]

real    0m0.383s

user    0m0.218s

sys     0m0.076s

(deeplearning3.) userdembp:new user$ ls

learning.py     out.log

(deeplearning3.) userdembp:new user$ cat out.log

# conding:utf-

from tqdm import tqdm

import time

pbar = tqdm(total=)

for i in range():

    time.sleep(0.1)

    pbar.update()

pbar.close()
这里即将单位换成loc,然后将得到的内容输入到out.log文件夹中
4)文档
class tqdm():

  """

  装饰一个迭代器对象,返回一个表现得就像原来可迭代的迭代器;但是在每次值被请求时就打印一个动态的更新进度条

  """

  def __init__(self, iterable=None, desc=None, total=None, leave=True,

               file=None, ncols=None, mininterval=0.1,

               maxinterval=10.0, miniters=None, ascii=None, disable=False,

               unit='it', unit_scale=False, dynamic_ncols=False,

               smoothing=0.3, bar_format=None, initial=, position=None,

               postfix=None, unit_divisor=):
参数:
- iterable : iterable, optional:使用一个进度条可迭代地去装饰。留下空白去手动处理更新
- desc : str, optional:进度条的前缀
- total : int, optional:期待的迭代数。如果不指定的话,就等价于len(iterable)。如果设置为float("inf")或者万不得已时,只有基本的进程统计会展示出来(无ETA,也无进度条)。如果gui=True,且该参数需要子序列去更新,指定一个初始的大的随机正整数即可,如int(9e9)
- leave : bool, optional:默认为True,即在迭代的最后保持进度条的所有踪迹,简单来说就是会把进度条的最终形态保留下来。如果为None,则仅在position=0时保留下来,即保留第一个
- file : io.TextIOWrapper or io.StringIO, optional:指定输出进程信息的地方,默认为sys.stderr。使用file.write(str)和file.flush()方法。对于encoding编码,可见write_bytes
- ncols : int, optional:整个输出信息的宽度。如果指定,将在动态地重新设置进度条的大小来将其保留在这样的边界中。如果没有指定,就会尝试去使用环境设置的宽度。回退的计量宽度为10,计数器和统计数据的大小没有限制
- mininterval : float, optional:显示更新间隔[默认值:0.1]秒的最小进度,即更新时间
- maxinterval : float, optional:显示更新间隔[默认值:10]秒的最大进度。经过长时间的显示更新滞后时会自动调整miniters参数来对应mininterval参数。只有在设置dynamic_miniters=True或显示线程开启时才工作
- miniters : int, optional:即在迭代中显示更新间隔的最小进度,即更新周期。如果设置为0或dynamic_miniters=True时就会自动调整和mininterval一样大(CPU效率更高,适合紧凑的循环)。如果设置>0,将跳过特定迭代数的显示。能够通过调整这个和mininterval参数去获得高效的循环。如果你的进度不稳定,迭代速度有快有慢(网络、跳过项目等),您应该将miniter设置为1。如果设置了该值,mininterval则会自动设为0
- ascii : bool or str, optional:如果没有指定或者设置为False,将会使用unicode编码(光滑的块)去填补计量。回退使用的是ASCII字符 ” 123456789#”
- disable : bool, optional:是否不使用整个进度条的封装,默认为False,即使用封装。如果设置为None,则在non-TTY时不使用
- unit : str, optional:用来定义每个迭代单元的字符串。默认为
"it",表示每个迭代;在下载或解压时,设为"B",代表每个“块”。
- unit_scale : bool or int or float, optional:如果设置为1或者True,迭代数量就会被自动减少或者重置,且将在国际单位制标准后面添加一个度量前缀(kilo、mega等)[默认:False],其实就是如果迭代数过大,它就会自动在后面加上M、k等字符来表示迭代进度等,比如,在下载进度条的例子中,如果为
False,数据大小是按照字节显示,设为True之后转换为Kb、Mb。
- dynamic_ncols : bool, optional:如果设置了,就会不断地更换环境的ncols参数(允许用于窗口大小重置),默认为False
- smoothing : float, optional:速度估计的指数移动平均平滑因子(在GUI模式中忽略)。范围从0(平均速度)到1(当前/瞬时速度)[默认值:0.3]。
- bar_format : str, optional:指定自定义进度栏字符串格式。可能会影响性能。(默认值: ‘{l_bar}{bar}{r_bar}’), l_bar = ’{desc}: {percentage:3.0f}%|’和r_bar = ’| {n_fmt}/{total_fmt} [{elapsed}<{remaining}, ‘ ‘{rate_fmt}{postfix}]’ 可能的var为: l_bar, bar, r_bar, n, n_fmt, total, total_fmt, percentage, rate, rate_fmt, rate_noinv, rate_noinv_fmt, rate_inv, rate_inv_fmt, elapsed, elapsed_s, remaining, remaining_s, desc, postfix, unit。注意,如果{desc}后面是空的,那么其后面的“:”将自动删除。
- initial : int, optional:初始计数器值。在重新启动进度条时有用[默认值:0]。
- position : int, optional:如果未指定,请指定要自动打印此栏的行偏移量(从0开始)。对于一次管理多个进度条是有用的(如线程)。
- postfix : dict or *, optional:指定要在进度栏末显示的其他统计信息。如果可能(dict),调用set_postfix(**postfix) 。
- unit_divisor : float, optional:默认为1000,如果unit_scale=True,则忽略它
- write_bytes : bool, optional:如果为默认值None和file未指定时,字节将会被写在python2中。如果设置为True,也是写成字节。在其他的情况下则默认写成unicode格式
- 额外的CLI可选项:
- delim : chr, optional:分隔字符[默认值:' n ']。使用“0”表示null。注意::在Windows系统中,Python将“n”转换为“rn”。
- buf_size : int, optional:指定delim时使用的以字节为单位的字符串缓冲区大小[默认值:256]。
- bytes : bool, optional:如果为真,将计数字节,忽略delim参数,并默认unit_scale为真,unit_divisor为1024,unit为' B '。
- manpath : str, optional:安装tqdm手册页的目录。
- log : str, optional:打印的日志信息类别,CRITICAL|FATAL|ERROR|WARN(ING)|[default: ‘INFO’]|DEBUG|NOTSET,默认为INFO
- 返回:
- 装饰后的迭代器
class tqdm():

  def update(self, n=):

      """

      手动更新进度条,对流streams有用,比如读文件

      E.g.:

      >>> t = tqdm(total=filesize) # Initialise

      >>> for current_buffer in stream:

      ...    ...

      ...    t.update(len(current_buffer))

      >>> t.close()

      最后一行高度推荐使用,但是如果``t.update()`` 是在``filesize``即将完全到达和打印时调用的话可能就不需要

      Parameters

      ----------

      n  : int, optional

            添加到迭代内部计数器的增长数[default: ]

      """

  def close(self):

      """清除(if leave=False)和关闭进度条"""

  def clear(self, nomove=False):

      """清除当前的进度条显示."""

  def refresh(self):

      """强迫更新该进度条的显示Force refresh the display of this bar."""

  def unpause(self):

      """从最新运行时间重启tqdm计时器"""

  def reset(self, total=None):

      """

      为了重复使用,重设为第0次迭代。考虑和``leave=True``设置一起使用

      Parameters

      ----------

      total  : int, optional. 用于新进度条的次数.

      """

  def set_description(self, desc=None, refresh=True):

      """

      设置/修改进度条的描述格式

      Parameters

      ----------

      desc  : str, optional

      refresh  : bool, optional

          Forces refresh [default: True].

      """

  def set_postfix(self, ordered_dict=None, refresh=True, **kwargs):

      """

      设置/修改后缀(additional stats)

      with automatic formatting based on datatype.

      Parameters

      ----------

      ordered_dict  : dict or OrderedDict, optional

      refresh  : bool, optional

          Forces refresh [default: True].

      kwargs  : dict, optional

      """

  @classmethod

  def write(cls, s, file=sys.stdout, end="\n"):

      """通过tqdm打印信息(不覆盖进度条)."""

  @property

  def format_dict(self):

      """给只读权限人员访问的公用API"""

  def display(self, msg=None, pos=None):

      """

      使用``self.sp`` 去展示指定``pos``中的``msg``.

      当继承使用时,要考虑重载该函数 e.g.:

      ``self.some_frontend(**self.format_dict)`` instead of ``self.sp``.

      Parameters

      ----------

      msg  : str, optional. What to display (default: ``repr(self)``).

      pos  : int, optional. Position to ``moveto``

        (default: ``abs(self.pos)``).

      """

def trange(*args, **kwargs):

    """

    tqdm(xrange(*args), **kwargs)函数的缩写

    Python3+版本中使用 range来替换 xrange.

    """

class tqdm_gui(tqdm):

    """Experimental GUI version"""

def tgrange(*args, **kwargs):

    """Experimental GUI version of trange"""

class tqdm_notebook(tqdm):

    """Experimental IPython/Jupyter Notebook widget"""

def tnrange(*args, **kwargs):

    """Experimental IPython/Jupyter Notebook widget version of trange"""
"""

# Simple tqdm examples and profiling

# Benchmark

for i in _range(int(1e8)):

    pass

# Basic demo

import tqdm

for i in tqdm.trange(int(1e8)):

    pass

# Some decorations

import tqdm

for i in tqdm.trange(int(1e8), miniters=int(1e6), ascii=True,

                     desc="cool", dynamic_ncols=True):

    pass

# Nested bars

from tqdm import trange

for i in trange():

    for j in trange(int(1e7), leave=False, unit_scale=True):

        pass

# Experimental GUI demo

import tqdm

for i in tqdm.tgrange(int(1e8)):

    pass

# Comparison to https://code.google.com/p/python-progressbar/

try:

    from progressbar.progressbar import ProgressBar

except ImportError:

    pass

else:

    for i in ProgressBar()(_range(int(1e8))):

        pass

# Dynamic miniters benchmark

from tqdm import trange

for i in trange(int(1e8), miniters=None, mininterval=0.1, smoothing=):

    pass

# Fixed miniters benchmark

from tqdm import trange

for i in trange(int(1e8), miniters=, mininterval=0.1, smoothing=):

    pass

"""

from time import sleep

from timeit import timeit

import re

# Simple demo

from tqdm import trange

for i in trange(, leave=True):

    sleep(0.1)

# Profiling/overhead tests

stmts = filter(None, re.split(r'\n\s*#.*?\n', __doc__))

for s in stmts:

    print(s.replace('import tqdm\n', ''))

    print(timeit(stmt='try:\n\t_range = xrange'

                 '\nexcept:\n\t_range = range\n' + s, number=), 'seconds')
一个个分析:
"""

# Simple tqdm examples and profiling

# Benchmark

for i in _range(int(1e8)):

    pass

"""

from time import sleep

from timeit import timeit

import re

# Simple demo

from tqdm import trange

for i in trange(, leave=True):

    sleep(0.1)

# Profiling/overhead tests

stmts = filter(None, re.split(r'\n\s*#.*?\n', __doc__))

for s in stmts:

    print(s.replace('import tqdm\n', ''))

    print(timeit(stmt='try:\n\t_range = xrange'

                 '\nexcept:\n\t_range = range\n' + s, number=), 'seconds')
返回:
%|██████████| / [:<:,  .59it/s]

# Benchmark

for i in _range(int(1e8)):

    pass

2.328720851000071 seconds
下面都一样,仅运行一个来分析学习
1)
"""

# Simple tqdm examples and profiling

# Basic demo

import tqdm

for i in tqdm.trange(int(1e8)):

    pass

"""
返回:
%|██████████| / [:<:,  .65it/s]

  %|          | / [:<:, .69it/s]

# Basic demo

for i in tqdm.trange(int(1e8)):

    pass

%|██████████| / [:<:, .99it/s]

18.4932925789999 seconds
2)
"""

# Simple tqdm examples and profiling

# Some decorations

import tqdm

for i in tqdm.trange(int(1e8), miniters=int(1e6), ascii=True,

                     desc="cool", dynamic_ncols=True):

    pass

"""
中间:

返回:
%|██████████| / [:<:,  .71it/s]

cool:   %|          | / [:<?, ?it/s]

# Some decorations

for i in tqdm.trange(int(1e8), miniters=int(1e6), ascii=True,

                     desc="cool", dynamic_ncols=True):

    pass

cool: %|##########| / [:<:, .97it/s]

17.699349756000174 seconds
3)
"""

# Simple tqdm examples and profiling

# Nested bars

from tqdm import trange

for i in trange():

    for j in trange(int(1e7), leave=False, unit_scale=True):

        pass

"""
返回:
%|██████████| / [:<:,  .76it/s]

  %|          | / [:<?, ?it/s]

  %|          | 0.00/10.0M [:<?, ?it/s]

  %|▎         | 327k/10.0M [:<:, .27Mit/s]

# Nested bars

from tqdm import trange

for i in trange():

    for j in trange(int(1e7), leave=False, unit_scale=True):

        pass

  %|▋         | 667k/10.0M [:<:, .31Mit/s]

 %|█         | 1.04M/10.0M [:<:, .43Mit/s]

 %|█▎        | 1.34M/10.0M [:<:, .27Mit/s]

 %|█▋        | 1.70M/10.0M [:<:, .38Mit/s]

 %|██        | 2.11M/10.0M [:<:, .56Mit/s]

 %|██▌       | 2.55M/10.0M [:<:, .77Mit/s]

 %|██▉       | 2.99M/10.0M [:<:, .93Mit/s]

 %|███▍      | 3.44M/10.0M [:<:, .11Mit/s]

 %|███▉      | 3.91M/10.0M [:<:, .27Mit/s]

 %|████▍     | 4.39M/10.0M [:<:, .41Mit/s]

 %|████▉     | 4.88M/10.0M [:<:, .54Mit/s]

 %|█████▍    | 5.38M/10.0M [:<:, .67Mit/s]

 %|█████▊    | 5.87M/10.0M [:<:, .74Mit/s]

 %|██████▎   | 6.35M/10.0M [:<:, .77Mit/s]

 %|██████▊   | 6.83M/10.0M [:<:, .76Mit/s]

 %|███████▎  | 7.31M/10.0M [:<:, .64Mit/s]

 %|███████▊  | 7.77M/10.0M [:<:, .48Mit/s]

 %|████████▏ | 8.22M/10.0M [:<:, .44Mit/s]

 %|████████▋ | 8.71M/10.0M [:<:, .55Mit/s]

 %|█████████▏| 9.20M/10.0M [:<:, .67Mit/s]

 %|█████████▋| 9.68M/10.0M [:<:, .69Mit/s]

 %|█████     | / [:<:,  .30s/it]

  %|          | 0.00/10.0M [:<?, ?it/s]

  %|▎         | 296k/10.0M [:<:, .96Mit/s]

  %|▌         | 586k/10.0M [:<:, .94Mit/s]

  %|▉         | 896k/10.0M [:<:, .99Mit/s]

 %|█▏        | 1.24M/10.0M [:<:, .10Mit/s]

 %|█▌        | 1.59M/10.0M [:<:, .21Mit/s]

 %|█▉        | 1.94M/10.0M [:<:, .31Mit/s]

 %|██▎       | 2.33M/10.0M [:<:, .46Mit/s]

 %|██▋       | 2.71M/10.0M [:<:, .57Mit/s]

 %|███       | 3.12M/10.0M [:<:, .69Mit/s]

 %|███▌      | 3.53M/10.0M [:<:, .81Mit/s]

 %|███▉      | 3.93M/10.0M [:<:, .88Mit/s]

 %|████▍     | 4.40M/10.0M [:<:, .08Mit/s]

 %|████▉     | 4.88M/10.0M [:<:, .27Mit/s]

 %|█████▍    | 5.38M/10.0M [:<:, .48Mit/s]

 %|█████▊    | 5.87M/10.0M [:<:, .60Mit/s]

 %|██████▍   | 6.38M/10.0M [:<:, .72Mit/s]

 %|██████▉   | 6.90M/10.0M [:<:, .85Mit/s]

 %|███████▍  | 7.41M/10.0M [:<:, .93Mit/s]

 %|███████▉  | 7.92M/10.0M [:<:, .98Mit/s]

 %|████████▍ | 8.42M/10.0M [:<:, .74Mit/s]

 %|████████▉ | 8.90M/10.0M [:<:, .77Mit/s]

 %|█████████▍| 9.40M/10.0M [:<:, .84Mit/s]

 %|█████████▉| 9.93M/10.0M [:<:, .95Mit/s]

%|██████████| / [:<:,  .32s/it]

4.642330375000256 seconds
⚠️这里返回[00:00<00:03, 2.96Mit/s]中前面的00:表示已用时间,以秒为单位,所以在1秒前都为0,<后面的00:表示剩余需要花的时间,2.96Mit/s表示速度
删掉参数unit_scale=True:
返回可见设置时使用M单位简化数字:
%|██████████| / [:<:,  .64it/s]

  %|          | / [:<?, ?it/s]

  %|          | / [:<?, ?it/s]

  %|▎         | / [:<:, .22it/s]

# Nested bars

from tqdm import trange

for i in trange():

    for j in trange(int(1e7), leave=False):

        pass

  %|▌         | / [:<:, .65it/s]

  %|▉         | / [:<:, .56it/s]

 %|█▎        | / [:<:, .50it/s]

 %|█▋        | / [:<:, .99it/s]

 %|██        | / [:<:, .69it/s]

 %|██▌       | / [:<:, .29it/s]

 %|███       | / [:<:, .94it/s]

 %|███▌      | / [:<:, .87it/s]

 %|███▉      | / [:<:, .05it/s]

 %|████▍     | / [:<:, .81it/s]

 %|████▉     | / [:<:, .51it/s]

 %|█████▍    | / [:<:, .67it/s]

 %|█████▉    | / [:<:, .55it/s]

 %|██████▍   | / [:<:, .19it/s]

 %|██████▉   | / [:<:, .17it/s]

 %|███████▎  | / [:<:, .71it/s]

 %|███████▊  | / [:<:, .26it/s]

 %|████████▎ | / [:<:, .91it/s]

 %|████████▊ | / [:<:, .14it/s]

 %|█████████▎| / [:<:, .70it/s]

 %|█████████▊| / [:<:, .49it/s]

%|██████████| / [:<:,  .26s/it]

2.264081185000123 seconds
设置leave=True,返回:
%|██████████| / [:<:,  .66it/s]

  %|          | / [:<?, ?it/s]

  %|          | / [:<?, ?it/s]

  %|▎         | / [:<:, .00it/s]

# Nested bars

from tqdm import trange

for i in trange():

    for j in trange(int(1e7), leave=True):

        pass

  %|▋         | / [:<:, .10it/s]

 %|█         | / [:<:, .52it/s]

 %|█▍        | / [:<:, .15it/s]

 %|█▊        | / [:<:, .82it/s]

 %|██▏       | / [:<:, .55it/s]

 %|██▋       | / [:<:, .54it/s]

 %|███▏      | / [:<:, .06it/s]

 %|███▋      | / [:<:, .38it/s]

 %|████      | / [:<:, .17it/s]

 %|████▌     | / [:<:, .02it/s]

 %|█████     | / [:<:, .98it/s]

 %|█████▌    | / [:<:, .54it/s]

 %|██████    | / [:<:, .12it/s]

 %|██████▌   | / [:<:, .67it/s]

 %|███████   | / [:<:, .69it/s]

 %|███████▌  | / [:<:, .48it/s]

 %|████████  | / [:<:, .33it/s]

 %|████████▌ | / [:<:, .39it/s]

 %|█████████ | / [:<:, .82it/s]

%|██████████| / [:<:, .40it/s][A

%|██████████| / [:<:,  .20s/it]

2.2038861539999743 seconds
不同在于内部迭代保存最终的结果,即:
%|██████████| / [:<:, .40it/s]
4)
"""

# Simple tqdm examples and profiling

# Experimental GUI demo

import tqdm

for i in tqdm.tgrange(int(1e8)):

    pass

"""
返回:
%|██████████| / [:<:,  .69it/s]

# Experimental GUI demo

for i in tqdm.tgrange(int(1e8)):

    pass
19.253753004999908 seconds
图为:
5)
"""

# Simple tqdm examples and profiling

# Comparison to https://code.google.com/p/python-progressbar/

try:

    from progressbar.progressbar import ProgressBar

except ImportError:

    pass

else:

    for i in ProgressBar()(_range(int(1e8))):

        pass

"""
返回:
%|██████████| / [:<:,  .64it/s]

# Comparison to https://code.google.com/p/python-progressbar/

try:

    from progressbar.progressbar import ProgressBar

except ImportError:

    pass

else:

    for i in ProgressBar()(_range(int(1e8))):

        pass

0.0015016719999039196 seconds
6)
"""

# Simple tqdm examples and profiling

# Dynamic miniters benchmark

from tqdm import trange

for i in trange(int(1e8), miniters=None, mininterval=0.1, smoothing=):

    pass

"""
最终:
%|██████████| / [:<:,  .65it/s]

  %|          | / [:<:, .22it/s]

# Dynamic miniters benchmark

from tqdm import trange

for i in trange(int(1e8), miniters=None, mininterval=0.1, smoothing=):

    pass

%|██████████| / [:<:, .94it/s]

16.779653078000138 seconds
即mininterval=0.1秒后更新进度栏中的进度
如果设置为miniters=2, mininterval=:
"""

# Simple tqdm examples and profiling

# Dynamic miniters benchmark

from tqdm import trange

for i in trange(int(1e8), miniters=, mininterval=):

    pass

"""
返回为:
 %|          | / [:<?, ?it/s]

  %|          | / [:<:, .76it/s]

  %|          | / [:<::, .36it/s]

  %|          | / [:<::, .97it/s]

  %|          | / [:<::, .82it/s]

...
可见每两个迭代就更新一次
如果同时设置了这两个参数miniters=2, mininterval=1,以大的设置的时间为主。如下面的这个设置miniters仅为2,花的时间少,mininterval为1秒,所以以1秒间隔显示为主,忽略miniters设置:
  %|          | / [:<?, ?it/s]

# Dynamic miniters benchmark

from tqdm import trange

for i in trange(int(1e8), miniters=, mininterval=):

    pass

  %|▎         | / [:<:, .00it/s]

  %|▌         | / [:<:, .96it/s]

  %|▉         | / [:<:, .08it/s]

 %|█▏        | / [:<:, .20it/s]

...
注意:返回[00:01<00:30, 3127793.00it/s]中的00:表示1秒
如果设置为miniters=4500000, mininterval=0.1,4500000个间隔花的时间更长,所以以迭代数为主:
  %|          | / [:<?, ?it/s]

# Fixed miniters benchmark

from tqdm import trange

for i in trange(int(1e8), miniters=, mininterval=0.1, smoothing=):

    pass

  %|▍         | / [:<:, .42it/s]

  %|▉         | / [:<:, .93it/s]

 %|█▎        | / [:<:, .34it/s]

 %|█▊        | / [:<:, .70it/s]

 %|██▎       | / [:<:, .82it/s]

 %|██▋       | / [:<:, .27it/s]

 %|███▏      | / [:<:, .28it/s]

 %|███▌      | / [:<:, .45it/s]

 %|████      | / [:<:, .41it/s]

 %|████▌     | / [:<:, .08it/s]
...
Description and additional stats
定制信息可以通过设置desc和postfix参数来动态显示和更新在tqdm进度栏上:
from tqdm import trange

from random import random, randint

from time import sleep

with trange() as t:

    for i in t:

        # 描述将显示在左边

        t.set_description('GEN %i' % i)

        # 后缀将显示在右边,根据参数的数据类型自动格式化

        t.set_postfix(loss=random(), gen=randint(,), str='h',

                      lst=[, ])

        sleep(0.1)

with tqdm(total=, bar_format="{postfix[0]} {postfix[1][value]:>8.2g}",

          postfix=["Batch", dict(value=)]) as t:

    for i in range():

        sleep(0.1)

        t.postfix[]["value"] = i /

        t.update()
返回:
GEN : %|██████████| / [:<:,  .42it/s, gen=, loss=0.806, lst=[, ], str=h]

Batch      4.5
记得在bar_format字符串中使用{postfix[...]}来指向:
- postfix需要在兼容格式中作为初始参数传递
- 如果postfix是类字典对象,将自动转换为一个字符串。为了防止该行为,在字典中键不是字符串的地方加入一个额外的项,即上面postfix=["Batch", dict(value=0)]中的value=
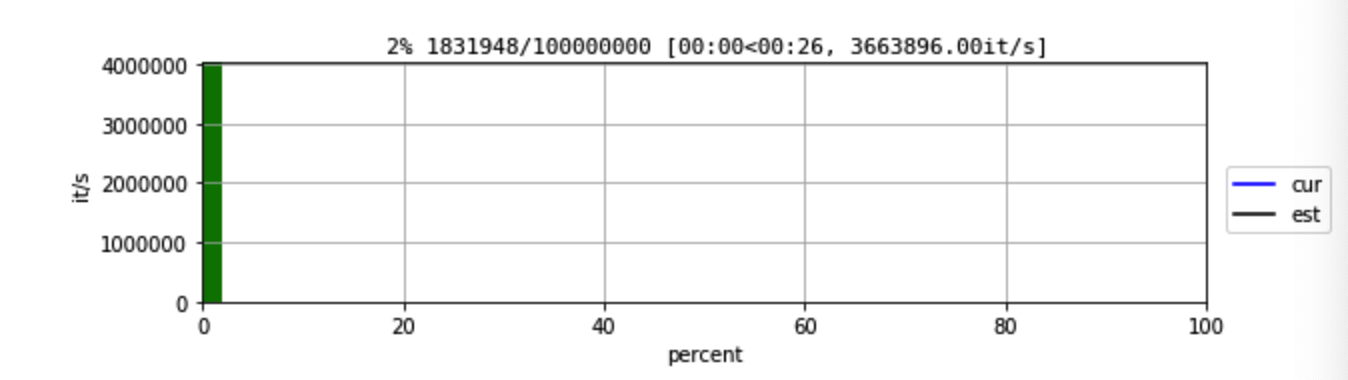
额外的bar_format参数也能够通过复写format_dict参数来定义,进度栏本身可以用ascii码修改:
from tqdm import tqdm

class TqdmExtraFormat(tqdm):

    """Provides a `total_time` format parameter"""

    @property

    def format_dict(self):

        d = super(TqdmExtraFormat, self).format_dict
        #d["total"]表示总迭代数,d["n"]表示当前为第几轮迭代

        print(d["elapsed"], d["total"], d["n"])

        total_time = d["elapsed"] * (d["total"] or ) / max(d["n"], )

        d.update(total_time=self.format_interval(total_time) + " in total")

        return d

for i in TqdmExtraFormat(

      range(), ascii=" .oO0",

      bar_format="{total_time}: {percentage:.0f}%|{bar}{r_bar}"):

    sleep(0.25)

    print(i)
返回:
: in total: %|          | / [:<?, ?it/s]

: in total: %|         | / [:<:,  .92it/s]

0.2551310062408447

: in total: %|        | / [:<:,  .92it/s]

0.5111739635467529

: in total: %|       | / [:<:,  .91it/s]

0.7674551010131836

: in total: %|      | / [:<:,  .92it/s]

1.0219080448150635

: in total: %|     | / [:<:,  .93it/s]

1.2738640308380127

: in total: %|    | / [:<:,  .94it/s]

1.525794267654419

: in total: %|   | / [:<:,  .94it/s]

1.7809131145477295

: in total: %|  | / [:<:,  .94it/s]

2.035114049911499

: in total: %| | / [:<:,  .93it/s]

2.2901201248168945

: in total: %|| / [:<:,  .93it/s]

2.543692111968994

2.544473886489868
参数ascii=" .oO0"指定使用0来填补进度条
参数bar_format="{total_time}: {percentage:.0f}%|{bar}{r_bar}"定义的值total_time即覆写format_dict中定义的total_time值,即输出的00:00 in total;{percentage:.0f}%即表示进度的百分比,小数位值不显示,设为0;所以l_bar = {total_time}: {percentage:.0f}%|,{bar}{r_bar}没有定义,即表示使用默认定义
注意{bar}还支持格式说明符[width][type]
- width:
- 未指定(默认值):自动填充ncols
- 设置的是整数且int >= 0: 即覆盖ncols逻辑的固定宽度
- 设置的是整数且int < 0: 则使用默认值减去该值
- type:
- a : ascii (覆写即等价于ascii=True)
- u : unicode(覆写 ascii=False)
- b : blank(覆写 ascii=" ")
这意味着可以使用以下方法创建具有右对齐文本的固定栏:bar_format="{l_bar}{bar:10}|{bar:-10b}right-justified"
Nested progress bars
tqdm支持嵌套的进度条。这里有一个例子:
from tqdm import trange

from time import sleep

for i in trange(, desc='1st loop'):

    for j in trange(, desc='2nd loop'):

        for k in trange(, desc='3nd loop', leave=False):

            sleep(0.01)
返回:
1st loop:   %|          | / [:<?, ?it/s]

2nd loop:   %|          | / [:<?, ?it/s]

3nd loop:   %|          | / [:<?, ?it/s]

3nd loop:  %|█████     | / [:<:, .89it/s]

3nd loop:  %|█████████▌| / [:<:, .62it/s]

2nd loop:  %|██        | / [:<:,  .39it/s]

3nd loop:   %|          | / [:<?, ?it/s]

3nd loop:  %|████▌     | / [:<:, .21it/s]

3nd loop:  %|█████████ | / [:<:, .41it/s]

2nd loop:  %|████      | / [:<:,  .29it/s]

3nd loop:   %|          | / [:<?, ?it/s]

3nd loop:  %|█████     | / [:<:, .65it/s]

3nd loop:  %|█████████▌| / [:<:, .32it/s]

2nd loop:  %|██████    | / [:<:,  .31it/s]

3nd loop:   %|          | / [:<?, ?it/s]

3nd loop:  %|█████     | / [:<:, .64it/s]

3nd loop:  %|█████████▌| / [:<:, .18it/s]

2nd loop:  %|████████  | / [:<:,  .32it/s]

3nd loop:   %|          | / [:<?, ?it/s]

3nd loop:  %|█████     | / [:<:, .50it/s]

3nd loop:  %|█████████▌| / [:<:, .41it/s]

2nd loop: %|██████████| / [:<:,  .27it/s]

1st loop:  %|██▌       | / [:<:,  .17s/it]

2nd loop:   %|          | / [:<?, ?it/s]

3nd loop:   %|          | / [:<?, ?it/s]

3nd loop:  %|█████     | / [:<:, .59it/s]

3nd loop:  %|█████████▌| / [:<:, .93it/s]

2nd loop:  %|██        | / [:<:,  .33it/s]

3nd loop:   %|          | / [:<?, ?it/s]

3nd loop:  %|█████     | / [:<:, .40it/s]

3nd loop:  %|█████████▌| / [:<:, .54it/s]

2nd loop:  %|████      | / [:<:,  .32it/s]

3nd loop:   %|          | / [:<?, ?it/s]

3nd loop:  %|█████     | / [:<:, .82it/s]

3nd loop:  %|█████████▌| / [:<:, .93it/s]

2nd loop:  %|██████    | / [:<:,  .34it/s]

3nd loop:   %|          | / [:<?, ?it/s]

3nd loop:  %|█████     | / [:<:, .33it/s]

3nd loop: %|██████████| / [:<:, .51it/s]

2nd loop:  %|████████  | / [:<:,  .37it/s]

3nd loop:   %|          | / [:<?, ?it/s]

3nd loop:  %|█████     | / [:<:, .01it/s]

3nd loop: %|██████████| / [:<:, .52it/s]

2nd loop: %|██████████| / [:<:,  .36it/s]

1st loop:  %|█████     | / [:<:,  .17s/it]

2nd loop:   %|          | / [:<?, ?it/s]

3nd loop:   %|          | / [:<?, ?it/s]

3nd loop:  %|█████     | / [:<:, .09it/s]

3nd loop:  %|█████████▌| / [:<:, .62it/s]

2nd loop:  %|██        | / [:<:,  .33it/s]

3nd loop:   %|          | / [:<?, ?it/s]

3nd loop:  %|█████     | / [:<:, .28it/s]

3nd loop:  %|█████████▌| / [:<:, .40it/s]

2nd loop:  %|████      | / [:<:,  .31it/s]

3nd loop:   %|          | / [:<?, ?it/s]

3nd loop:  %|█████     | / [:<:, .83it/s]

3nd loop:  %|█████████▌| / [:<:, .97it/s]

2nd loop:  %|██████    | / [:<:,  .32it/s]

3nd loop:   %|          | / [:<?, ?it/s]

3nd loop:  %|█████     | / [:<:, .53it/s]

3nd loop:  %|█████████▌| / [:<:, .02it/s]

2nd loop:  %|████████  | / [:<:,  .33it/s]

3nd loop:   %|          | / [:<?, ?it/s]

3nd loop:  %|█████     | / [:<:, .51it/s]

3nd loop:  %|█████████▌| / [:<:, .57it/s]

2nd loop: %|██████████| / [:<:,  .29it/s]

1st loop:  %|███████▌  | / [:<:,  .17s/it]

2nd loop:   %|          | / [:<?, ?it/s]

3nd loop:   %|          | / [:<?, ?it/s]

3nd loop:  %|█████     | / [:<:, .66it/s]

3nd loop:  %|█████████▌| / [:<:, .52it/s]

2nd loop:  %|██        | / [:<:,  .41it/s]

3nd loop:   %|          | / [:<?, ?it/s]

3nd loop:  %|████▌     | / [:<:, .28it/s]

3nd loop:  %|█████████▌| / [:<:, .91it/s]

2nd loop:  %|████      | / [:<:,  .36it/s]

3nd loop:   %|          | / [:<?, ?it/s]

3nd loop:  %|████▌     | / [:<:, .31it/s]

3nd loop:  %|█████████ | / [:<:, .96it/s]

2nd loop:  %|██████    | / [:<:,  .31it/s]

3nd loop:   %|          | / [:<?, ?it/s]

3nd loop:  %|████▌     | / [:<:, .50it/s]

3nd loop:  %|█████████ | / [:<:, .95it/s]

2nd loop:  %|████████  | / [:<:,  .27it/s]

3nd loop:   %|          | / [:<?, ?it/s]

3nd loop:  %|█████     | / [:<:, .30it/s]

3nd loop: %|██████████| / [:<:, .61it/s]

2nd loop: %|██████████| / [:<:,  .26it/s]

1st loop: %|██████████| / [:<:,  .17s/it]
参数desc='3nd loop'指定输出的l_bar的内容,即前缀
在Windows上,如果可以的话,colorama将用于保持嵌套条在各自的行上。
对于手动控制定位(例如多线程使用),可以指定位置=n,其中最外层的栏位n=0,下一栏位n=1,以此类推:
from time import sleep

from tqdm import trange, tqdm

from multiprocessing import Pool, freeze_support, RLock

L = list(range())

def progresser(n):

    interval = 0.001 / (n + )

    total =

    # {:<04.2}表示左对齐,数字总共4位,其中小数两位

    text = "#{}, est. {:<04.2}s".format(n, interval * total)

    for i in trange(total, desc=text, position=n):

        sleep(interval)

if __name__ == '__main__':

    freeze_support()  # for Windows support

    p = Pool(len(L), # 同时开启3个进程

             # again, for Windows support

             initializer=tqdm.set_lock, initargs=(RLock(),))

    p.map(progresser, L)

    print("\n" * (len(L) - )) #换行
返回:
#, est. .50s:   %|          | / [:<?, ?it/s]

#, est. .70s:   %|          | / [:<?, ?it/s]

#, est. .50s:   %|▎         | / [:<:, .72it/s]

#, est. .70s:   %|▌         | / [:<:, .38it/s]

#, est. .50s:   %|▋         | / [:<:, .96it/s]

#, est. .70s:  %|█         | / [:<:, .19it/s]

#, est. .50s:  %|█         | / [:<:, .89it/s]

#, est. .70s:  %|█▍        | / [:<:, .84it/s]

#, est. .50s:  %|█▎        | / [:<:, .16it/s]

#, est. .70s:  %|█▉        | / [:<:, .48it/s]

#, est. .50s:  %|█▋        | / [:<:, .39it/s]]

#, est. .70s:  %|██▍       | / [:<:, .36it/s]

#, est. .50s:  %|██        | / [:<:, .94it/s]

#, est. .70s:  %|██▊       | / [:<:, .71it/s]

#, est. .50s:  %|██▍       | / [:<:, .67it/s]

#, est. .70s:  %|███▎      | / [:<:, .13it/s]

#, est. .50s:  %|██▋       | / [:<:, .61it/s]

#, est. .70s:  %|███▊      | / [:<:, .64it/s]

#, est. .50s:  %|███       | / [:<:, .89it/s]

#, est. .70s:  %|████▎     | / [:<:, .28it/s]

#, est. .50s:  %|███▍      | / [:<:, .18it/s]

#, est. .70s:  %|████▊     | / [:<:, .33it/s]

#, est. .50s:  %|███▊      | / [:<:, .82it/s]

#, est. .70s:  %|█████▎    | / [:<:, .09it/s]

#, est. .50s:  %|████      | / [:<:, .67it/s]

#, est. .70s:  %|█████▋    | / [:<:, .26it/s]

#, est. .50s:  %|████▍     | / [:<:, .14it/s]

#, est. .70s:  %|██████▏   | / [:<:, .52it/s]

#, est. .50s:  %|████▊     | / [:<:, .96it/s]

#, est. .70s:  %|██████▋   | / [:<:, .88it/s]

#, est. .50s:  %|█████▏    | / [:<:, .43it/s]

#, est. .70s:  %|███████▏  | / [:<:, .95it/s]

#, est. .50s:  %|█████▍    | / [:<:, .05it/s]

#, est. .70s:  %|███████▋  | / [:<:, .33it/s]

#, est. .20s: %|██████████| / [:<:, .41it/s]

#, est. .50s:  %|█████▊    | / [:<:, .95it/s]

#, est. .50s:  %|██████▏   | / [:<:, .59it/s]

#, est. .50s:  %|██████▍   | / [:<:, .35it/s]

#, est. .50s:  %|██████▊   | / [:<:, .56it/s]

#, est. .50s:  %|███████▏  | / [:<:, .84it/s]

#, est. .70s: %|██████████| / [:<:, .49it/s]

#, est. .50s: %|██████████| / [:<:, .28it/s]
Hooks and callbacks
tqdm可以很容易地支持回调/钩子和手动更新。下面是urllib的一个例子:
urllib.urlretrieve documentation
如果存在,钩子函数将在网络连接建立时调用一次,之后在读取每个块之后调用一次。
钩子将传递三个参数:到目前为止传输的块数、块大小(以字节为单位)和文件的总大小。
报错:
module 'urllib' has no attribute 'urlretrieve'
原因是python2 与python3的urllib不同在与python3要加上.request,更改后为:
import urllib, os

from tqdm import tqdm

class TqdmUpTo(tqdm):

    """Provides `update_to(n)` which uses `tqdm.update(delta_n)`."""

    def update_to(self, b=, bsize=, tsize=None):

        """

        b  : int, optional

            Number of blocks transferred so far [default: ].

        bsize  : int, optional

            Size of each block (in tqdm units) [default: ].

        tsize  : int, optional

            Total size (in tqdm units). If [default: None] remains unchanged.

        """

        if tsize is not None:

            self.total = tsize

        self.update(b * bsize - self.n)  # will also set self.n = b * bsize

eg_link = "https://caspersci.uk.to/matryoshka.zip"

with TqdmUpTo(unit='B', unit_scale=True, miniters=,

              desc=eg_link.split('/')[-]) as t:  # all optional kwargs

    urllib.request.urlretrieve(eg_link, filename=os.devnull,

                       reporthook=t.update_to, data=None)
最终为:
matryoshka.zip: 262kB [:, .4kB/s]
灵感来自 twine#242。对examples/tqdm_wget.py进行函数替代。
当迭代速度存在较大差异时,建议使用miniter =1(例如,通过不完整的连接下载文件)。
Pandas Integration
受广大要求求,我们增加了对panda的支持——下面是DataFrame.progress_apply和DataFrameGroupBy.progress_apply的一个例子:
出错:
ModuleNotFoundError: No module named 'pandas'
解决:
(deeplearning) userdeMacBook-Pro:~ user$ conda install -n deeplearning pandas
更改后例子:
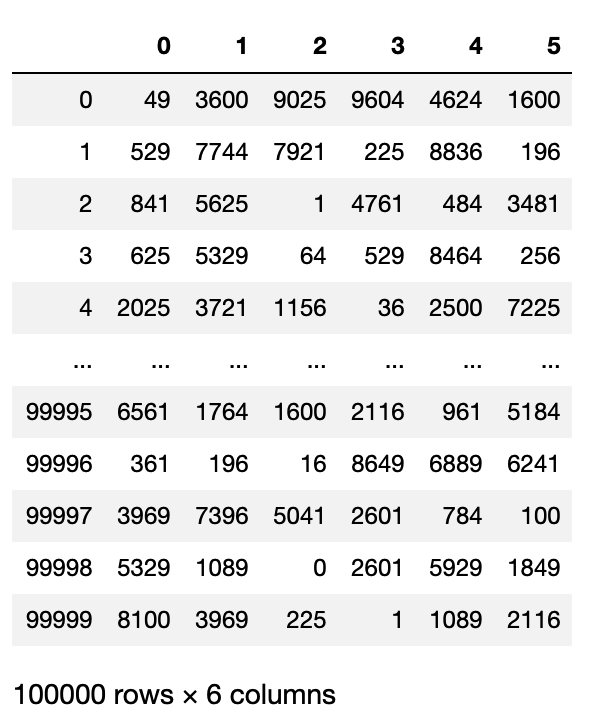
import pandas as pd

import numpy as np

from tqdm import tqdm

df = pd.DataFrame(np.random.randint(, , (, )))

# Register `pandas.progress_apply` and `pandas.Series.map_apply` with `tqdm`

# (can use `tqdm_gui`, `tqdm_notebook`, optional kwargs, etc.)

tqdm.pandas(desc="my bar!")

# Now you can use `progress_apply` instead of `apply`

# and `progress_map` instead of `map`

df.progress_apply(lambda x: x**)

# can also groupby:

# df.groupby().progress_apply(lambda x: x**)
返回:
/anaconda3/envs/deeplearning/bin/src/tqdm/tqdm/_tqdm.py:: FutureWarning: The Panel class is removed from pandas. Accessing it from the top-level namespace will also be removed in the next version

  from pandas import Panel

my bar!: %|██████████| / [:<:, .34it/s]
数据大小为(100000, 6),从[0,100)中随机取值对其赋初值,然后求平方:
如果您对它的工作原理(以及如何为您自己的回调修改它)感兴趣,请参阅examples文件夹或导入模块并运行help()。
IPython/Jupyter Integration
IPython/Jupyter通过tqdm_notebook子模块支持:
出错:
IntProgress not found. Please update jupyter and ipywidgets.
解决参考https://ipywidgets.readthedocs.io/en/stable/user_install.html
我的操作为:
(deeplearning) userdeMacBook-Pro:~ user$ conda install -n deeplearning ipywidgets
例子:
from tqdm import tnrange, tqdm_notebook

from time import sleep

for i in tnrange(, desc='1st loop'):

    for j in tqdm_notebook(range(), desc='2nd loop'):

        sleep(0.01)
返回:
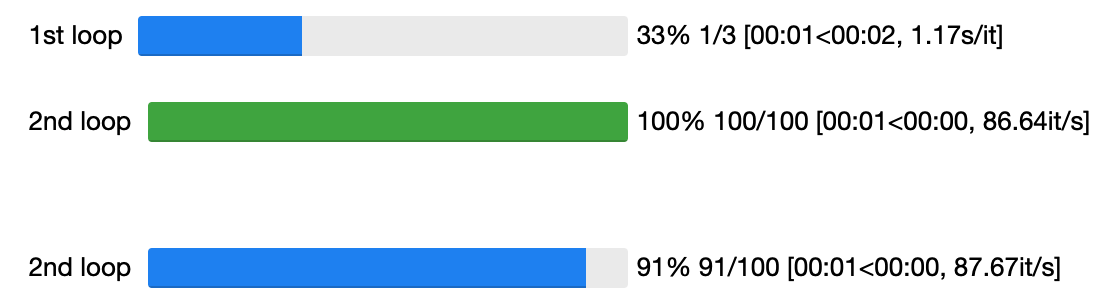
除了tqdm特性外,子模块还提供了一个本机Jupyter小部件(兼容IPython v1-v4和Jupyter),完全工作的嵌套条和颜色提示(蓝色:normal、绿色:completed、红色:error/interrupt、淡蓝色:no ETA);如下显示
from tqdm import tnrange, tqdm_notebook

from time import sleep

for i in tqdm_notebook(range(), desc='1st loop'):

    for j in tqdm_notebook(range(), desc='2nd loop'):

        sleep(0.01)
过程为:
最终为:
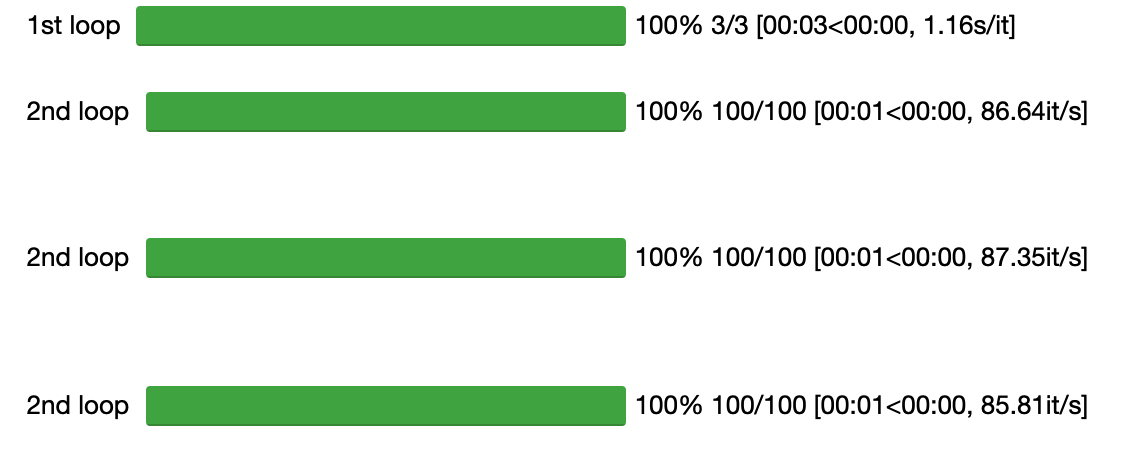
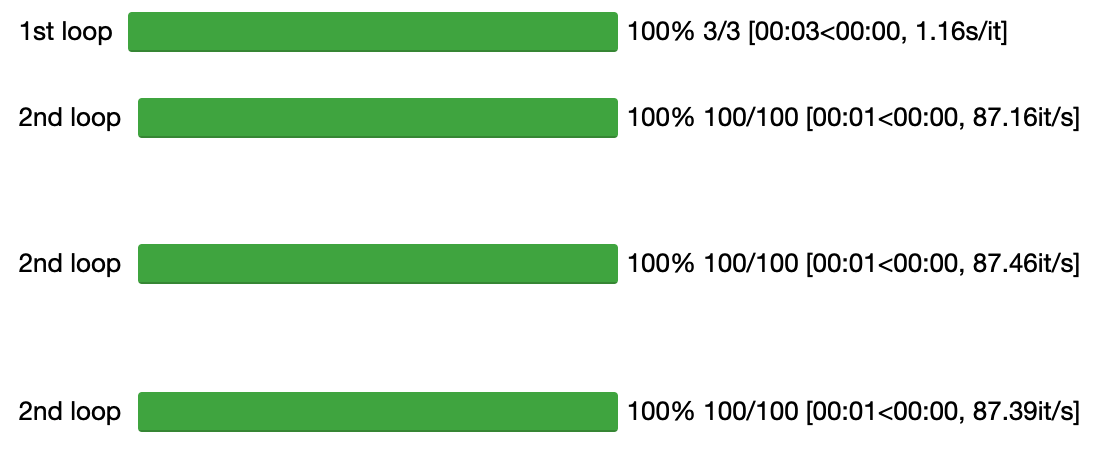
如果添加参数leave=True:
from tqdm import tnrange, tqdm_notebook

from time import sleep

for i in tqdm_notebook(range(), desc='1st loop'):

    for j in tqdm_notebook(range(), desc='2nd loop', leave=False):

        sleep(0.01)
则最后只会留下外层嵌套的结果:

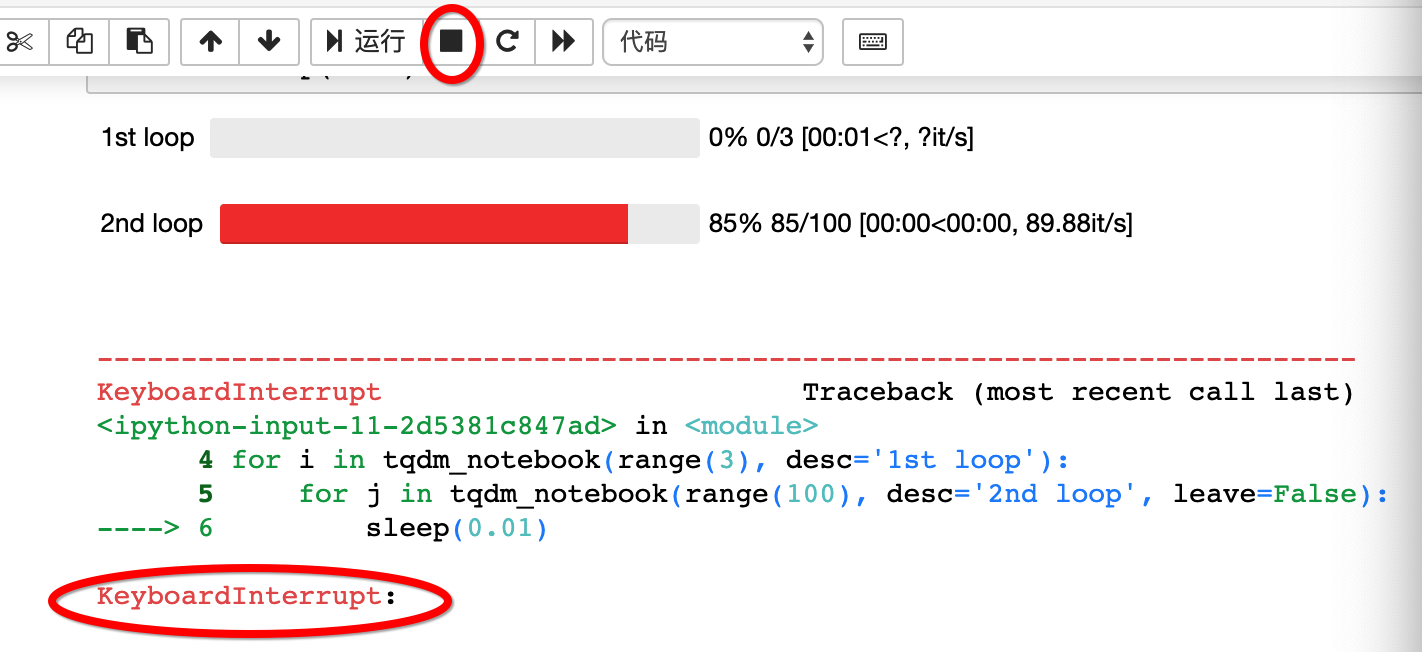
如果中间点击停止按钮,则标明红色:
tqdm也可以通过使用autonotebook子模块自动选择控制台或笔记本版本:
from tqdm.autonotebook import tqdm

tqdm.pandas()
返回:
/anaconda3/envs/deeplearning/bin/src/tqdm/tqdm/autonotebook/__init__.py:: TqdmExperimentalWarning: Using `tqdm.autonotebook.tqdm` in notebook mode. Use `tqdm.tqdm` instead to force console mode (e.g. in jupyter console)

  " (e.g. in jupyter console)", TqdmExperimentalWarning)
注意,如果运行在一个笔记本上,这将发出tqdmexperimental警告,因为其不可能区分jupyter notebook和jupyter console。使用auto而不是autonotebook来抑制这个警告。
Custom Integration
可以继承tqdm来创建自定义回调(如上面的TqdmUpTo示例)或自定义前端(例如GUIs,如笔记本或绘图包)。在后一种情况下要做的有:
- 在def __init__()中调用super().__init__(..., gui=True)来要禁用终端status_printer创建。
- 重定义close(), clear(), display()三个函数
考虑重载display()来使用self.frontend(** .format_dict)而不是self.sp(repr(self))。
Dynamic Monitor/Meter
你可以用tqdm作为一个非单调增长的meter。这可能是因为n减少(例如CPU使用监视器)或total更改。
一个例子是递归搜索文件。total是目前找到的对象数量,n是文件(而不是文件夹)的对象数量:
from tqdm import tqdm

import os.path

def find_files_recursively(path, show_progress=True):

    files = []

    # total= assumes `path` is a file

    t = tqdm(total=, unit="file", disable=not show_progress)

    if not os.path.exists(path):

        raise IOError("Cannot find:" + path)

    def append_found_file(f):

        files.append(f)

        t.update()

    def list_found_dir(path):

        """returns os.listdir(path) assuming os.path.isdir(path)"""

        listing = os.listdir(path)

        # subtract  since a "file" we found was actually this directory

        t.total += len(listing) -

        # fancy way to give info without forcing a refresh

        t.set_postfix(dir=path[-:], refresh=False)

        t.update()  # may trigger a refresh

        return listing

    def recursively_search(path):

        if os.path.isdir(path):

            for f in list_found_dir(path):

                recursively_search(os.path.join(path, f))

        else:

            append_found_file(path)

    recursively_search(path)

    t.set_postfix(dir=path)

    t.close()

    return files
使用update(0)是让tqdm决定何时触发显示刷新以避免控制台垃圾信息的一种简便方法。
Writing messages
这是一项正在进行的工作(见#737)。
由于tqdm使用简单的打印机制来显示进度条,所以在打开进度条时,不应该在终端中使用print()编写任何消息。
为了在终端中写入消息而不与tqdm bar显示发生冲突,提供了.write()方法:
from tqdm import tqdm, trange

from time import sleep

bar = trange()

for i in bar:

    # Print using tqdm class method .write()

    sleep(0.1)

    if not (i % ):

        tqdm.write("Done task %i" % i)

    # Can also use bar.write()
返回:
 %|██        | / [:<:,  .48it/s]

Done task

 %|█████     | / [:<:,  .53it/s]

Done task

 %|████████  | / [:<:,  .50it/s]

Done task

%|██████████| / [:<:,  .56it/s]

Done task
默认情况下,这将打印到标准输出sys.stdout。但是您可以使用file参数指定任何类似文件的对象。例如,这可以用于将写入的消息重定向到日志文件或类。
Redirecting writing
如果使用一个可以将消息打印到控制台的库,那么用tqdm.write()替换print()来编辑库可能是不可取的。在这种情况下,重定向sys.stdout到tqdm.write()是一个选择。
重定向sys.stdout,创建一个类似于文件的类,该类将向tqdm.write()写入任何输入字符串,并提供参数file=sys.stdout, dynamic_ncols = True。
一个可重用的规范示例如下:
from time import sleep

import contextlib

import sys

from tqdm import tqdm

class DummyTqdmFile(object):

    """Dummy file-like that will write to tqdm"""

    file = None

    def __init__(self, file):

        self.file = file

    def write(self, x):

        # Avoid print() second call (useless \n)

        if len(x.rstrip()) > :

            tqdm.write(x, file=self.file)

    def flush(self):

        return getattr(self.file, "flush", lambda: None)()

@contextlib.contextmanager

def std_out_err_redirect_tqdm():

    orig_out_err = sys.stdout, sys.stderr

    try:

        sys.stdout, sys.stderr = map(DummyTqdmFile, orig_out_err)

        yield orig_out_err[]

    # Relay exceptions

    except Exception as exc:

        raise exc

    # Always restore sys.stdout/err if necessary

    finally:

        sys.stdout, sys.stderr = orig_out_err

def some_fun(i):

    print("Fee, fi, fo,".split()[i])

# Redirect stdout to tqdm.write() (don't forget the `as save_stdout`)

with std_out_err_redirect_tqdm() as orig_stdout:

    # tqdm needs the original stdout

    # and dynamic_ncols=True to autodetect console width

    for i in tqdm(range(), file=orig_stdout, dynamic_ncols=True):

        sleep(.)

        some_fun(i)

# After the `with`, printing is restored

print("Done!")
返回:
Fee,

fi,

fo,

%|██████████| / [:<:,  .97it/s]

Done!
Monitoring thread, intervals and miniters
tqdm实现了一些技巧来提高效率和减少开销。
- 避免不必要的频繁刷新:mininterval定义每次刷新之间要等待多长时间。tqdm总是在后台更新,但它只显示每分钟一次。
- 减少检查系统时钟/时间的次数。
- mininterval比miniter更易于配置。一个聪明的调整系统dynamic_miniter将自动调整miniter到适合时间mininterval的迭代量。本质上,tqdm将在没有实际检查时间的情况下检查是否需要打印。这种行为仍然可以通过手动设置miniter来绕过。
然而,考虑一个结合了快速和缓慢迭代的案例。经过几次快速迭代之后,dynamic_miniter将把miniter设置为一个很大的数字。当迭代速率随后减慢时,miniter将保持较大的值,从而降低显示更新频率。为了解决这个问题:
- maxinterval定义显示刷新之间的最大时间间隔。并发监视线程检查过期的更新,并在必要时强制执行更新。
监视线程不应该有明显的开销,并且默认情况下保证至少每10秒更新一次。可以通过设置任何tqdm实例的monitor_interval(即t = tqdm.tqdm(…); t.monitor_interval = 2)直接更改此值。通过设置tqdm.tqdm.monitor_interval = 0可以在实例化任何tqdm bar之前在应用程序范围内禁用监视器线程。
tqdm学习-一个快速,可扩展的Python和CLI进度条的更多相关文章
- 【笔记】论文阅读:《Gorilla: 一个快速, 可扩展的, 内存式时序数据库》
英文:Gorilla: A fast, scalable, in-memory time series database 中文:Gorilla: 一个快速, 可扩展的, 内存式时序数据库
- 一个利用 Parallel.For 并行处理任务,带有进度条(ProgressBar)的 WinForm 实例(下)
接着上一篇:一个利用 Parallel.For 并行处理任务,带有进度条(ProgressBar)的 WinForm 实例(上) 直接贴代码了: using System; using System. ...
- #Python绘制 文本进度条,带刷新、时间暂缓的
#Python绘制 文本进度条,带刷新.时间暂缓的 #文本进度条 import time as T st=T.perf_counter() print('-'*6,'执行开始','-'*6) maxx ...
- python计算π及进度条显示
今天老师布置了一个课后作业,去尽可能的准确计算π的值,还要显示时间和进度条,对于python小白的我,当然是综合书上和网上的知识,自己做了一个小程序,代码如下: 一.写代码的准备工作:用pip下载第三 ...
- Python展示文件下载进度条
前言 大家在用Python写一些小程序的时候,经常都会用到文件下载,对于一些较小的文件,大家可能不太在乎文件的下载进度,因为一会就下载完毕了. 但是当文件较大,比如下载chromedriver的时候, ...
- Python中关于进度条的6个实用技巧
1 简介 费老师我在几年前写过的一篇文章(https://www.cnblogs.com/feffery/p/13392024.html)中,介绍过tqdm这个在当下Python圈子中已然非常流行的进 ...
- Python 计算π及进度条显示
一,首先打开命令提示符找到Python路径,输入pip install tqdm下载第三方库tpdm. 二,写程序 法一 from math import * from tqdm import tqd ...
- 用python进行有进度条的圆周率计算
一.安装tqdm函数库 tqdm是一个强大的终端进度条工具,我利用pip获取tqdm函数库. 1.打开运行,输入“cmd” 2.2:输入pip install 你要安装的库(如 pip insta ...
- Python中利用进度条求圆周率
从祖冲之到现在,圆周率的发展越来越丰富,求法也是越来越快其中: 1.求圆周率的方法: (1)蒙特卡罗法 这是基于“随机数”的算法,通过计算落在单位圆内的点与正方形内的比值来求圆周率PI. 如果一共投入 ...
随机推荐
- angularcli 第七篇(service 服务)
在组件中定义的信息是固定的,假设另外一个组件也需要用到这些信息,这时候就用到服务,实现 共享数据 和 方法 组件不应该直接获取或保存数据,它们不应该了解是否在展示假数据. 它们应该聚焦于展示数据,而把 ...
- jquery 插入节点
往某个元素内部的结尾添加 append() appendTo() append() <body> <button id="bt1">点击通过jQuery的a ...
- 【Herding HDU - 4709 】【数学(利用叉乘计算三角形面积)】
题意:给出n个点的坐标,问取出其中任意点围成的区域的最小值! 很明显,找到一个合适的三角形即可. #include<iostream> #include<cstdio> #in ...
- 大数据JavaWeb之java基础巩固----Junit&反射&注解
最近打算从0开始学学大数据,目前的主业是Android开发,但是当年毕业之后其实是搞J2EE的,所以打算没事又来拓展一下后台的技能,扩宽一下自己的知识体系对于自己的未来也能够多一些可能,另外大数据的一 ...
- 深度学习Keras框架笔记之激活函数详解
激活函数也是神经网络中一个很重的部分.每一层的网络输出都要经过激活函数.比较常用的有linear,sigmoid,tanh,softmax等.Keras内置提供了很全的激活函数,包括像LeakyReL ...
- 用Queue控制python多线程并发数量
python多线程如果不进行并发数量控制,在启动线程数量多到一定程度后,会造成线程无法启动的错误. 下面介绍用Queue控制多线程并发数量的方法(python3). # -*- coding: utf ...
- 微信小程序——通讯录
WXML: <view class="flex box box-lr"> <scroll-view class="flex groups box box ...
- 吉首大学2019年程序设计竞赛(重现赛)D - 数列求和(嘤雄难度)
链接:https://ac.nowcoder.com/acm/contest/992/D $a_{i}=\dfrac {3a_{i-1}-a_{i-2}}{2}+i+1$ 移项再化一下 $a_{i}- ...
- I2C 连接 12864 OLED 屏幕
http://ardui.co/archives/738 我是潘,曾经是个工程师.这是为 Ardui.Co 制作的 “Arduino 公开课” 系列的入门教程.上一课介绍了I2C 协议连接1602 L ...
- 事件类型(onload)
<!DOCTYPE html> <html lang="en"> <head> <meta charset="UTF-8&quo ...