iOS开发UI篇—xib的简单使用
iOS开发UI篇—xib的简单使用
一、简单介绍
xib和storyboard的比较,一个轻量级一个重量级。
共同点:
都用来描述软件界面
都用Interface Builder工具来编辑
不同点:
Xib是轻量级的,用来描述局部的UI界面
Storyboard是重量级的,用来描述整个软件的多个界面,并且能展示多个界面之间的跳转关系
二、xib的简单使用
1.建立xib文件
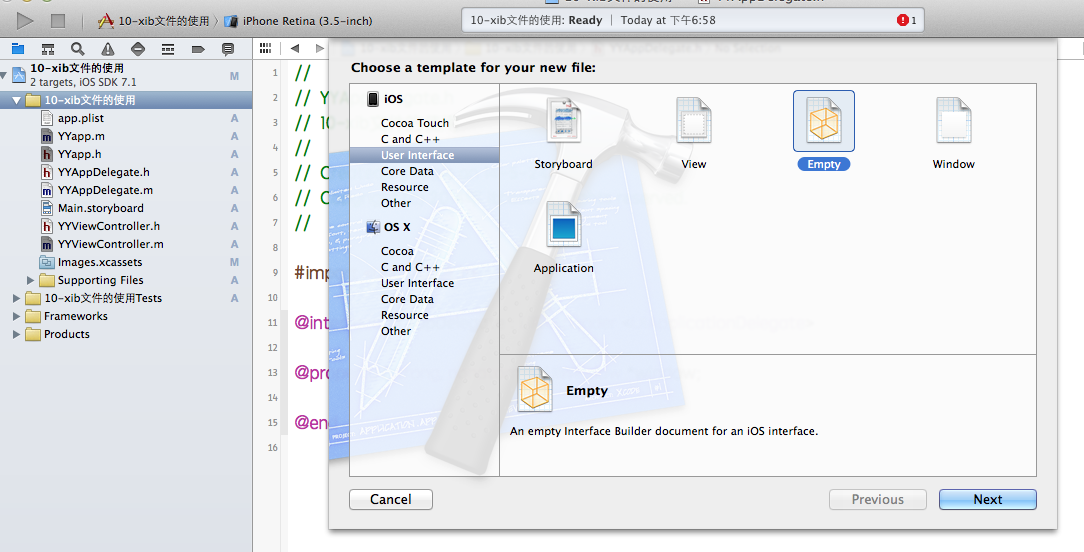
建立的xib文件命名为appxib.xib

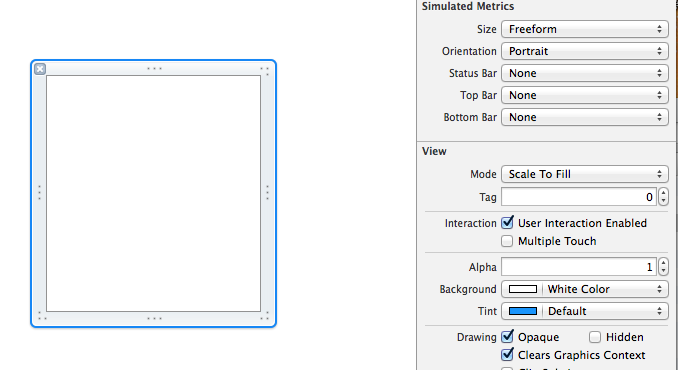
2.对xib进行设置
根据程序的需要,这里把view调整为自由布局
建立view模型(设置长宽等参数)
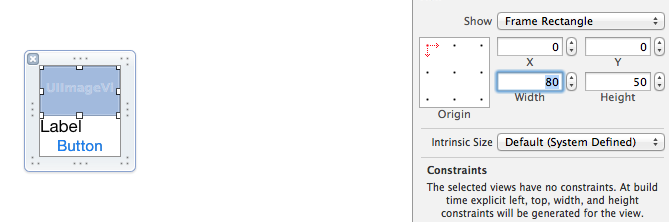
调整布局和内部的控件
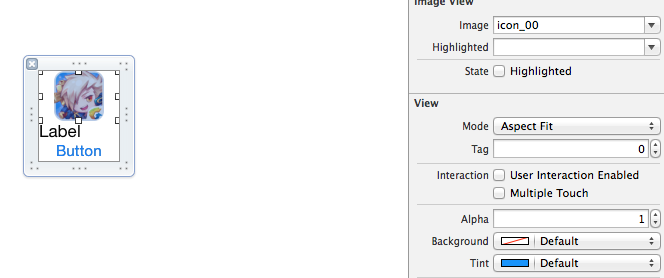
完成后的单个view

3.使用xib文件的代码示例
YYViewController.m文件代码如下:
 //

 //  YYViewController.m

 //  10-xib文件的使用

 //

 //  Created by apple on 14-5-24.

 //  Copyright (c) 2014年 itcase. All rights reserved.

 //

 #import "YYViewController.h"

 #import "YYapp.h"

 @interface YYViewController ()

 @property(nonatomic,strong)NSArray *app;

 @end

 @implementation YYViewController

 //1.加载数据信息

 -(NSArray *)app

 {

     if (!_app) {

         NSString *path=[[NSBundle mainBundle]pathForResource:@"app.plist" ofType:nil];

         NSArray *temparray=[NSArray arrayWithContentsOfFile:path];

         //字典转模型

         NSMutableArray *arrayM=[NSMutableArray array ];

         for (NSDictionary *dict in temparray) {

             [arrayM addObject:[YYapp appWithDict:dict]];

         }

         _app=arrayM;

     }

     return _app;

 }

 //创建界面原型

 - (void)viewDidLoad

 {

     [super viewDidLoad];

     NSLog(@"%d",self.app.count);

     //九宫格布局

     int totalloc=;

     CGFloat appviewW=;

     CGFloat appviewH=;

     CGFloat margin=(self.view.frame.size.width-totalloc*appviewW)/(totalloc+);

     int count=self.app.count;

     for (int i=; i<count; i++) {

         int row=i/totalloc;

         int loc=i%totalloc;

         CGFloat appviewX=margin + (margin +appviewW)*loc;

         CGFloat appviewY=margin + (margin +appviewH)*row;

         YYapp *app=self.app[i];

         //拿出xib视图

        NSArray  *apparray= [[NSBundle mainBundle]loadNibNamed:@"appxib" owner:nil options:nil];

         UIView *appview=[apparray firstObject];

         //加载视图

         appview.frame=CGRectMake(appviewX, appviewY, appviewW, appviewH);

         UIImageView *appviewImg=(UIImageView *)[appview viewWithTag:];

         appviewImg.image=app.image;

         UILabel *appviewlab=(UILabel *)[appview viewWithTag:];

         appviewlab.text=app.name;

         UIButton *appviewbtn=(UIButton *)[appview viewWithTag:];

         [appviewbtn addTarget:self action:@selector(appviewbtnClick:) forControlEvents:UIControlEventTouchUpInside];

         appviewbtn.tag=i;

         [self.view addSubview:appview];

     }

 }

 /**按钮的点击事件*/

 -(void)appviewbtnClick:(UIButton *)btn

 {

     YYapp *apps=self.app[btn.tag];

     UILabel *showlab=[[UILabel alloc]initWithFrame:CGRectMake(, , , )];

     [showlab setText:[NSString stringWithFormat: @"%@下载成功",apps.name]];

     [showlab setBackgroundColor:[UIColor lightGrayColor]];

     [self.view addSubview:showlab];

     showlab.alpha=1.0;

     //简单的动画效果

     [UIView animateWithDuration:2.0 animations:^{

         showlab.alpha=;

     } completion:^(BOOL finished) {

         [showlab removeFromSuperview];

     }];

 }

 @end
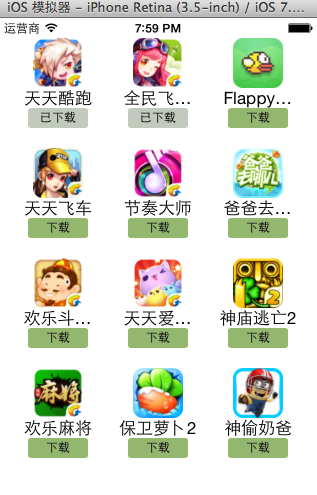
运行效果:
三、对xib进行连线示例
1.连线示例
新建一个xib对应的视图类,继承自Uiview

在xib界面右上角与新建的视图类进行关联

把xib和视图类进行连线
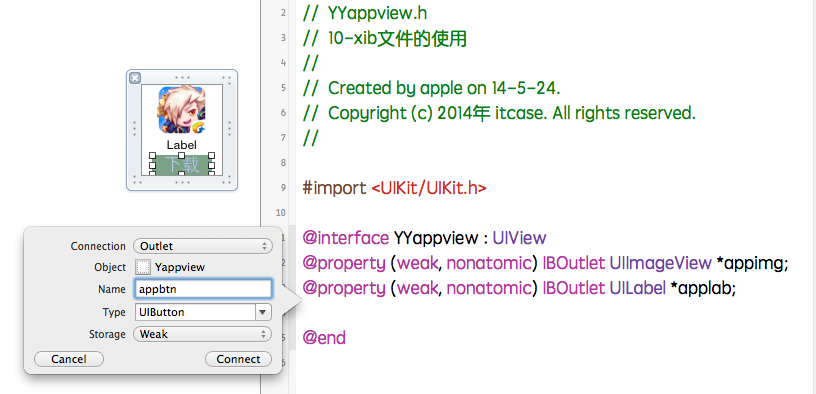
注意:在使用中把weak改成为强引用。否则...
2.连线后的代码示例
YYViewController.m文件代码如下:
 //

 //  YYViewController.m

 //  10-xib文件的使用

 //

 //  Created by apple on 14-5-24.

 //  Copyright (c) 2014年 itcase. All rights reserved.

 //

 #import "YYViewController.h"

 #import "YYapp.h"

 #import "YYappview.h"

 @interface YYViewController ()

 @property(nonatomic,strong)NSArray *app;

 @end

 @implementation YYViewController

 //1.加载数据信息

 -(NSArray *)app

 {

     if (!_app) {

         NSString *path=[[NSBundle mainBundle]pathForResource:@"app.plist" ofType:nil];

         NSArray *temparray=[NSArray arrayWithContentsOfFile:path];

         //字典转模型

         NSMutableArray *arrayM=[NSMutableArray array ];

         for (NSDictionary *dict in temparray) {

             [arrayM addObject:[YYapp appWithDict:dict]];

         }

         _app=arrayM;

     }

     return _app;

 }

 //创建界面原型

 - (void)viewDidLoad

 {

     [super viewDidLoad];

     NSLog(@"%d",self.app.count);

     //九宫格布局

     int totalloc=;

     CGFloat appviewW=;

     CGFloat appviewH=;

     CGFloat margin=(self.view.frame.size.width-totalloc*appviewW)/(totalloc+);

     int count=self.app.count;

     for (int i=; i<count; i++) {

         int row=i/totalloc;

         int loc=i%totalloc;

         CGFloat appviewX=margin + (margin +appviewW)*loc;

         CGFloat appviewY=margin + (margin +appviewH)*row;

         YYapp *app=self.app[i];

         //拿出xib视图

        NSArray  *apparray= [[NSBundle mainBundle]loadNibNamed:@"appxib" owner:nil options:nil];

         //注意这里的类型名!

         //UIView *appview=[apparray firstObject];

         YYappview  *appview=[apparray firstObject];

         //加载视图

         appview.frame=CGRectMake(appviewX, appviewY, appviewW, appviewH);

           [self.view addSubview:appview];

         appview.appimg.image=app.image;

         appview.applab.text=app.name;

         appview.appbtn.tag=i;

         [ appview.appbtn addTarget:self action:@selector(appviewbtnClick:) forControlEvents:UIControlEventTouchUpInside];

     }

 }

 /**按钮的点击事件*/

 -(void)appviewbtnClick:(UIButton *)btn

 {

     YYapp *apps=self.app[btn.tag];

     UILabel *showlab=[[UILabel alloc]initWithFrame:CGRectMake(, , , )];

     [showlab setText:[NSString stringWithFormat: @"%@下载成功",apps.name]];

     [showlab setBackgroundColor:[UIColor lightGrayColor]];

     [self.view addSubview:showlab];

     showlab.alpha=1.0;

     //简单的动画效果

     [UIView animateWithDuration:2.0 animations:^{

         showlab.alpha=;

     } completion:^(BOOL finished) {

         [showlab removeFromSuperview];

     }];

 }

 @end
YYappview.h文件代码(已经连线)
#import <UIKit/UIKit.h>

@interface YYappview : UIView

@property (strong, nonatomic) IBOutlet UIImageView *appimg;

@property (strong, nonatomic) IBOutlet UILabel *applab;

@property (strong, nonatomic) IBOutlet UIButton *appbtn;

@end
iOS开发UI篇—xib的简单使用的更多相关文章
- iOS开发UI篇—使用xib自定义UItableviewcell实现一个简单的团购应用界面布局
iOS开发UI篇—使用xib自定义UItableviewcell实现一个简单的团购应用界面布局 一.项目文件结构和plist文件 二.实现效果 三.代码示例 1.没有使用配套的类,而是直接使用xib文 ...
- ios开发UI篇—使用纯代码自定义UItableviewcell实现一个简单的微博界面布局
本文转自 :http://www.cnblogs.com/wendingding/p/3761730.html ios开发UI篇—使用纯代码自定义UItableviewcell实现一个简单的微博界面布 ...
- iOS开发UI篇—多控制器和导航控制器简单介绍
iOS开发UI篇—多控制器和导航控制器简单介绍 一.多控制器 一个iOS的app很少只由一个控制器组成,除非这个app极其简单.当app中有多个控制器的时候,我们就需要对这些控制器进行管理 有多个vi ...
- iOS开发UI篇—Quartz2D简单使用(三)
iOS开发UI篇—Quartz2D简单使用(三) 一.通过slider控制圆的缩放 1.实现过程 新建一个项目,新建一个继承自UIview的类,并和storyboard中自定义的view进行关联. 界 ...
- iOS开发UI篇—UITabBarController简单介绍
iOS开发UI篇—UITabBarController简单介绍 一.简单介绍 UITabBarController和UINavigationController类似,UITabBarControlle ...
- iOS开发UI篇—Modal简单介绍
iOS开发UI篇—Modal简单介绍 一.简单介绍 除了push之外,还有另外一种控制器的切换方式,那就是Modal 任何控制器都能通过Modal的形式展⽰出来 Modal的默认效果:新控制器从屏幕的 ...
- iOS开发UI篇—简单的浏览器查看程序
iOS开发UI篇—简单的浏览器查看程序 一.程序实现要求 1.要求 2. 界面分析 (1) 需要读取或修改属性的控件需要设置属性 序号标签 图片 图片描述 左边按钮 右边按钮 (2) 需要监听响应事件 ...
- iOS开发UI篇—Kvc简单介绍
ios开发UI篇—Kvc简单介绍 一.KVC简单介绍 KVC key valued coding 键值编码 KVC通过键值间接编码 补充: 与KVC相对的时KVO,即key valued observ ...
- iOS开发UI篇—iOS开发中三种简单的动画设置
iOS开发UI篇—iOS开发中三种简单的动画设置 [在ios开发中,动画是廉价的] 一.首尾式动画 代码示例: // beginAnimations表示此后的代码要“参与到”动画中 [UIView b ...
随机推荐
- js中获取当前时间
var d = new Date();var date = d.getFullYear() + "年" +(d.getMonth() + 1) + "月" + ...
- ANDROID——仿360手机卫士的旋转打分控件
转载请注明本文出自大苞米的博客(http://blog.csdn.net/a396901990),谢谢支持! 简介 灵感源自360手机卫,主要功能就是实现显示评分或等级的效果.并稍微改良了一下,有更好 ...
- listener.ora增加监听端口
一个简单的listener.ora # listener.ora Network Configuration File: d:\app\zyd\product\11.2.0\dbhome_1\netw ...
- 深入理解为什么Java中方法内定义的内部类可以访问方法中的局部变量
好文转载:http://blog.csdn.net/zhangjg_blog/article/details/19996629 开篇 在我的上一篇博客 深入理解Java中为什么内部类可以访问外部类的成 ...
- CSS之盒子模型及常见布局
盒子模型的综合应用 CSS提高1 Div ul li 的综合应用很多的网页布局现在都用到这种模式 <!DOCTYPE HTML PUBLIC "-//W3C//DTD HTM ...
- Android中插件开发篇之----动态加载Activity(免安装运行程序)
一.前言 又到周末了,时间过的很快,今天我们来看一下Android中插件开发篇的最后一篇文章的内容:动态加载Activity(免安装运行程序),在上一篇文章中说道了,如何动态加载资源(应用换肤原理解析 ...
- C#获取文件时间
在NTFS下,文件的创建及修改时间可以精确到毫秒,以下是测试过程. DirectoryInfo diSource = new DirectoryInfo(@"C:\Users\不告诉你\De ...
- Java中byte与16进制字符串的互相转换
* Convert byte[] to hex string.这里我们可以将byte转换成int,然后利用Integer.toHexString(int)来转换成16进制字符串. * @param s ...
- 关于无法把程序(Adobe Fireworks CS5)添加到打开方式的解决办法
关于无法把程序(Adobe Fireworks CS5)添加到打开方式的解决办法 最近换了新版的Adobe Fireworks CS5,发现打开图片文件时在右键“打开方式”里仍然是以前的Firewor ...
- JPA入门案例详解(附源码)
1.新建JavaEE Persistence项目