Spring学习总结(一)——Spring实现IoC的多种方式
一、Spring框架概述
Spring是一个开源免费的框架,为了解决企业应用开发的复杂性而创建。Spring框架是一个轻量级的解决方案,可以一站式地构建企业级应用。Spring是模块化的,所以可以只使用其中需要的部分。可以在任何web框架上使用控制反转(IoC),也可以只使用Hibernate集成代码或JDBC抽象层。它支持声明式事务管理、通过RMI或web服务实现远程访问,并可以使用多种方式持久化数据。它提供了功能全面的MVC框架,可以透明地集成AOP到软件中。

Spring被设计为非侵入式的,这意味着你的域逻辑代码通常不会依赖于框架本身。在集成层(比如数据访问层),会存在一些依赖同时依赖于数据访问技术和Spring,但是这些依赖可以很容易地从代码库中分离出来。
Spring框架是基于Java平台的,它为开发Java应用提供了全方位的基础设施支持,并且它很好地处理了这些基础设施,所以你只需要关注你的应用本身即可。
Spring可以使用POJO(普通的Java对象,plain old java objects)创建应用,并且可以将企业服务非侵入式地应用到POJO。这项功能适用于Java SE编程模型以及全部或部分的Java EE。
那么,做为开发者可以从Spring获得哪些好处呢?
不用关心事务API就可以执行数据库事务;
不用关心远程API就可以使用远程操作;
不用关心JMX API就可以进行管理操作;
不用关心JMS API就可以进行消息处理。
①JMX,Java Management eXtension,Java管理扩展,是一个为应用程序、设备、系统等植入管理功能的框架。JMX可以跨越一系列异构操作系统平台、系统体系结构和网络传输协议,灵活的开发无缝集成的系统、网络和服务管理应用。
②JMS,Java Message Service,Java消息服务,是Java平台上有关面向消息中间件(MOM)的技术规范,它便于消息系统中的Java应用程序进行消息交换,并且通过提供标准的产生、发送、接收消息的接口简化企业应用的开发。
一句话概括:Spring是一个轻量级的控制反转(IoC)和面向切面(AOP)的容器(框架)。
1.1、资源
官网: http://spring.io
文档: https://docs.spring.io/spring/docs/current/spring-framework-reference/、 https://github.com/waylau/spring-framework-4-reference
中文帮助: http://spring.cndocs.ml/
框架下载地址: http://repo.springsource.org/libs-release-local/org/springframework/spring/
教程: http://www.yiibai.com/spring
Git: https://github.com/spring-projects
源码: https://github.com/spring-projects/spring-framework
Jar包: https://github.com/spring-projects/spring-framework/releases
1.2、Spring历史
2002年,Rod Jahnson在《Expert One-on-One J2EE Design and Development》书中首次推出了Spring框架雏形interface21框架。
2004年3月24日,Spring框架以interface21框架为基础,经过重新设计,发布了1.0正式版。
从2004年3月到现在,已经经历了1.0、1.1、1.2、2.0、2.5、3.0、3.1几个主要的版本
3.2.0版发布 2013年5月5日13:53
3.2.10版发布 2014年7月15日23:58
3.2.9版发布 2014年5月20日12:22
4.0.0版发布 2013年12月12日07:50
4.0.1版发布 2014年1月28日20:55
4.1.6版发布 2015年3月25日16:40
4.2.2版发布 2015年10月15日12:57
4.2.5版发布 2016年2月25日09:28
4.3.5版发布 2016年12月21日11:34
4.3.6版发布 2017年1月25日14:05
4.3.8版发布 2017年4月18日13:49
4.3.9版发布 2017年6月7日19:29
5.0.0版发布 2017年9月28日11:28
5.0.1版发布 2017年10月24日15:14
1.3、框架特征与功能
轻量:从大小与开销两方面而言Spring都是轻量的。完整的Spring框架可以在一个大小只有1MB多的JAR文件里发布。并且Spring所需的处理开销也是微不足道的。此外,Spring是非侵入式的:典型地,Spring应用中的对象不依赖于Spring的特定类。
控制反转Ioc:Spring通过一种称作控制反转(IoC)的技术促进了低耦合。当应用了IoC,一个对象依赖的其它对象会通过被动的方式传递进来,而不是这个对象自己创建或者查找依赖对象。你可以认为IoC与JNDI相反——不是对象从容器中查找依赖,而是容器在对象初始化时不等对象请求就主动将依赖传递给它。
面向切面Aop:Spring提供了面向切面编程的丰富支持,允许通过分离应用的业务逻辑与系统级服务(例如审计(auditing)和事务(transaction)管理)进行内聚性的开发。应用对象只实现它们应该做的——完成业务逻辑——仅此而已。它们并不负责(甚至是意识)其它的系统级关注点,例如日志或事务支持。

容器:Spring包含并管理应用对象的配置和生命周期,在这个意义上它是一种容器,你可以配置你的每个bean如何被创建——基于一个可配置原型(prototype),你的bean可以创建一个单独的实例或者每次需要时都生成一个新的实例——以及它们是如何相互关联的。然而,Spring不应该被混同于传统的重量级的EJB容器,它们经常是庞大与笨重的,难以使用。
框架:Spring可以将简单的组件配置、组合成为复杂的应用。在Spring中,应用对象被声明式地组合,典型地是在一个XML文件里。Spring也提供了很多基础功能(事务管理、持久化框架集成等等),将应用逻辑的开发留给了你。
MVC:Spring的作用是整合,但不仅仅限于整合,Spring 框架可以被看做是一个企业解决方案级别的框架,Spring MVC是一个非常受欢迎的轻量级Web框架。
所有Spring的这些特征使你能够编写更干净、更可管理、并且更易于测试的代码。它们也为Spring中的各种模块提供了基础支持。
1.4、Spring组成
Spring 框架是一个分层架构,由 7 个定义良好的模块组成。Spring 模块构建在核心容器之上,核心容器定义了创建、配置和管理 bean 的方式

组成 Spring 框架的每个模块(或组件)都可以单独存在,或者与其他一个或多个模块联合实现。每个模块的功能如下:
- 核心容器:核心容器提供 Spring 框架的基本功能。核心容器的主要组件是
BeanFactory,它是工厂模式的实现。BeanFactory使用控制反转(IOC) 模式将应用程序的配置和依赖性规范与实际的应用程序代码分开。 - Spring 上下文:Spring 上下文是一个配置文件,向 Spring 框架提供上下文信息。Spring 上下文包括企业服务,例如 JNDI、EJB、电子邮件、国际化、校验和调度功能。
- Spring AOP:通过配置管理特性,Spring AOP 模块直接将面向方面的编程功能集成到了 Spring 框架中。所以,可以很容易地使 Spring 框架管理的任何对象支持 AOP。Spring AOP 模块为基于 Spring 的应用程序中的对象提供了事务管理服务。通过使用 Spring AOP,不用依赖 EJB 组件,就可以将声明性事务管理集成到应用程序中。
- Spring DAO:JDBC DAO 抽象层提供了有意义的异常层次结构,可用该结构来管理异常处理和不同数据库供应商抛出的错误消息。异常层次结构简化了错误处理,并且极大地降低了需要编写的异常代码数量(例如打开和关闭连接)。Spring DAO 的面向 JDBC 的异常遵从通用的 DAO 异常层次结构。
- Spring ORM:Spring 框架插入了若干个 ORM 框架,从而提供了 ORM 的对象关系工具,其中包括 JDO、Hibernate 和 iBatis SQL Map。所有这些都遵从 Spring 的通用事务和 DAO 异常层次结构。
- Spring Web 模块:Web 上下文模块建立在应用程序上下文模块之上,为基于 Web 的应用程序提供了上下文。所以,Spring 框架支持与 Jakarta Struts 的集成。Web 模块还简化了处理多部分请求以及将请求参数绑定到域对象的工作。
- Spring MVC 框架:MVC 框架是一个全功能的构建 Web 应用程序的 MVC 实现。通过策略接口,MVC 框架变成为高度可配置的,MVC 容纳了大量视图技术,其中包括 JSP、Velocity、Tiles、iText 和 POI。
Spring 框架的功能可以用在任何 J2EE 服务器中,大多数功能也适用于不受管理的环境。Spring 的核心要点是:支持不绑定到特定 J2EE 服务的可重用业务和数据访问对象。毫无疑问,这样的对象可以在不同 J2EE 环境 (Web 或 EJB)、独立应用程序、测试环境之间重用。

Spring是一个开源的框架,现在的Spring框架构成了一个体系平台,通过Spring的官方网站http://www.springsource.org可以了解到,围绕着Spring框架本身,还有许多其他优秀的项目:
SpringFramework(Core):核心项目
Spring Web Flow:工作流项目
Spring Security:安全项目
Spring Batch:批量数据处理项目
Spring Android:Android系统支持项目
Spring Social:社交项目
1.5、Spring Boot与Spring Cloud
Spring Boot 是 Spring 的一套快速配置脚手架,可以基于Spring Boot 快速开发单个微服务,Spring Cloud是一个基于Spring Boot实现的云应用开发工具;Spring Boot专注于快速、方便集成的单个微服务个体,Spring Cloud关注全局的服务治理框架;Spring Boot使用了约束优于配置的理念,很多集成方案已经帮你选择好了,能不配置就不配置,Spring Cloud很大的一部分是基于Spring Boot来实现,Spring Boot可以离开Spring Cloud独立使用开发项目,但是Spring Cloud离不开Spring Boot,属于依赖的关系。
SpringBoot在SpringClound中起到了承上启下的作用,如果你要学习SpringCloud必须要学习SpringBoot。

二、IoC基础
控制反转IoC(Inversion of Control),是一种设计思想,DI(依赖注入)是实现IoC的一种方法,也有人认为DI只是IoC的另一种说法。没有IoC的程序中我们使用面向对象编程对象的创建与对象间的依赖关系完全硬编码在程序中,对象的创建由程序自己控制,控制反转后将对象的创建转移给第三方,个人认为所谓控制反转就是:获得依赖对象的方式反转了。

IoC是Spring框架的核心内容,使用多种方式完美的实现了IoC,可以使用XML配置,也可以使用注解,新版本的Spring也可以零配置实现IoC。Spring容器在初始化时先读取配置文件,根据配置文件或元数据创建与组织对象存入容器中,程序使用时再从Ioc容器中取出需要的对象。
采用XML方式配置Bean的时候,Bean的定义信息是和实现分离的,而采用注解的方式可以把两者合为一体,Bean的定义信息直接以注解的形式定义在实现类中,从而达到了零配置的目的。
控制反转是一种通过描述(XML或注解)并通过第三方去生产或获取特定对象的方式。在Spring中实现控制反转的是IoC容器,其实现方法是依赖注入(Dependency Injection,DI)。
三、使用XML配置的方式实现IOC
假设项目中需要完成对图书的数据访问服务,我们定义好了IBookDAO接口与BookDAO实现类
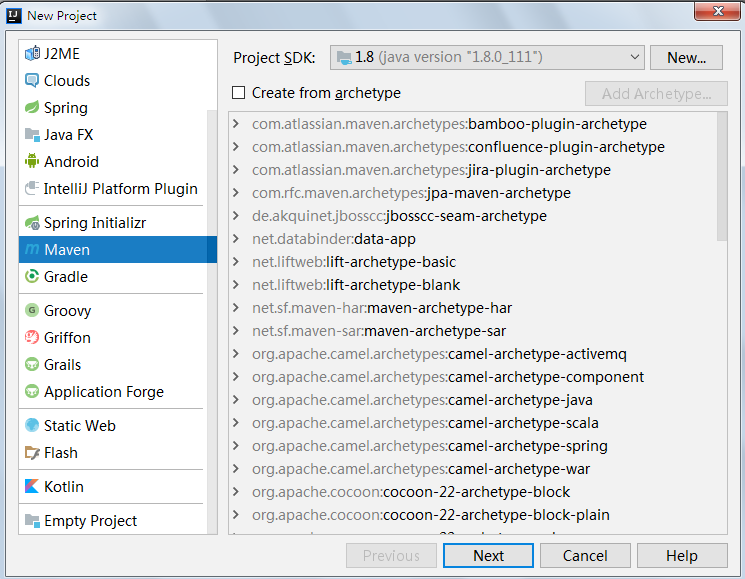
创建maven项目:
IBookDAO接口如下:
package com.zhangguo.Spring051.ioc01;

/**

 * 图书数据访问接口

 */

public interface IBookDAO {

    /**

     * 添加图书

     */

    public String addBook(String bookname);

}
BookDAO实现类如下:
package com.zhangguo.Spring051.ioc01;

/**

 * 图书数据访问实现类

 */

public class BookDAO implements IBookDAO {

    public String addBook(String bookname) {

        return "添加图书"+bookname+"成功!";

    }

}
Maven项目的pom.xml如下:
<project xmlns="http://maven.apache.org/POM/4.0.0" xmlns:xsi="http://www.w3.org/2001/XMLSchema-instance"

  xsi:schemaLocation="http://maven.apache.org/POM/4.0.0 http://maven.apache.org/xsd/maven-4.0.0.xsd">

  <modelVersion>4.0.0</modelVersion>

  <groupId>com.zhangguo</groupId>

  <artifactId>Spring051</artifactId>

  <version>0.0.1-SNAPSHOT</version>

  <packaging>jar</packaging>

  <name>Spring051</name>

  <url>http://maven.apache.org</url>

<properties>

        <project.build.sourceEncoding>UTF-8</project.build.sourceEncoding>

        <spring.version>4.3.0.RELEASE</spring.version>

    </properties>

    <dependencies>

        <dependency>

            <groupId>junit</groupId>

            <artifactId>junit</artifactId>

            <scope>test</scope>

            <version>4.10</version>

        </dependency>

        <dependency>

            <groupId>org.springframework</groupId>

            <artifactId>spring-context</artifactId>

            <version>${spring.version}</version>

        </dependency>

        <dependency>

            <groupId>org.aspectj</groupId>

            <artifactId>aspectjweaver</artifactId>

            <version>1.8.9</version>

        </dependency>

        <dependency>

            <groupId>cglib</groupId>

            <artifactId>cglib</artifactId>

            <version>3.2.4</version>

        </dependency>

    </dependencies>

</project>
业务类BookService如下:
package com.zhangguo.Spring051.ioc01;

import org.springframework.context.ApplicationContext;

import org.springframework.context.support.ClassPathXmlApplicationContext;

/**

 * 图书业务类

 */

public class BookService {

    IBookDAO bookDAO;

    public BookService() {

        //容器

        ApplicationContext ctx=new ClassPathXmlApplicationContext("IOCBeans01.xml");

        //从容器中获得id为bookdao的bean

        bookDAO=(IBookDAO)ctx.getBean("bookdao");

    }

    public void storeBook(String bookname){

        System.out.println("图书上货");

        String result=bookDAO.addBook(bookname);

        System.out.println(result);

    }

}
容器的配置文件IOCBeans01.xml如下:
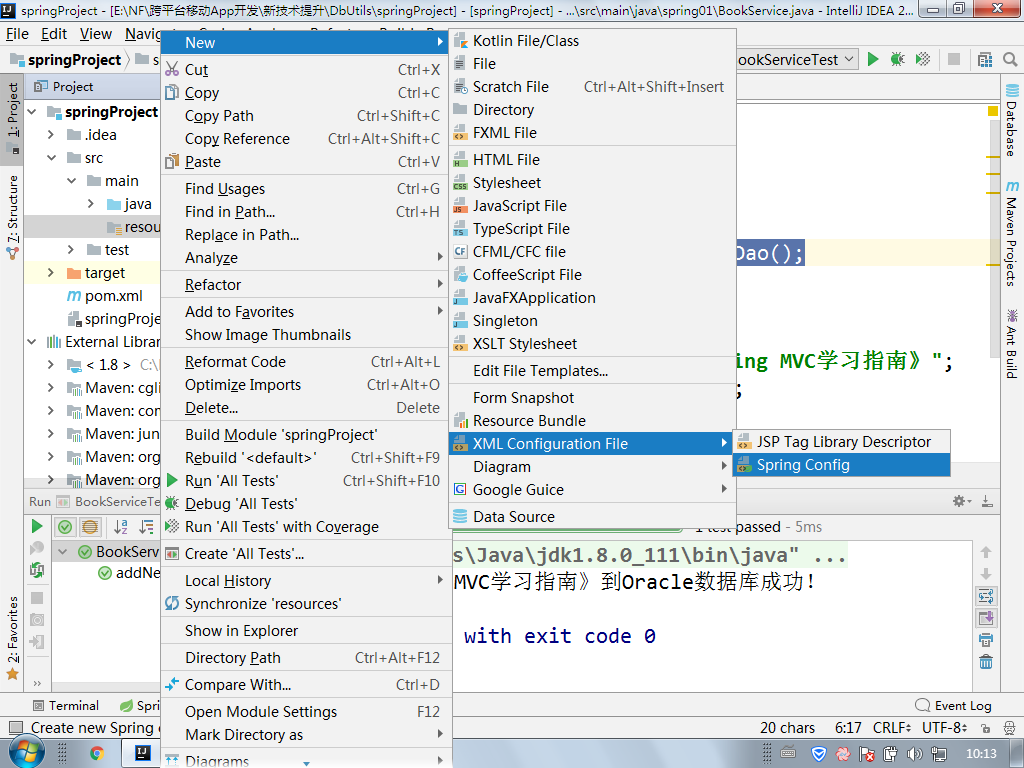
<?xml version="1.0" encoding="UTF-8"?>

<beans xmlns="http://www.springframework.org/schema/beans"

    xmlns:xsi="http://www.w3.org/2001/XMLSchema-instance"

    xmlns:p="http://www.springframework.org/schema/p"

    xsi:schemaLocation="http://www.springframework.org/schema/beans

        http://www.springframework.org/schema/beans/spring-beans.xsd">

    <bean id="bookdao" class="com.zhangguo.Spring051.ioc01.BookDAO"></bean>

</beans>
测试类Test如下:
package com.zhangguo.Spring051.ioc01;

public class Test {

    @org.junit.Test

    public void testStoreBook()

    {

        BookService bookservice=new BookService();

        bookservice.storeBook("《Spring MVC权威指南 第一版》");

    }

}
运行结果:

3.1、使用无参构造方法创建对象
如下所示,则上下文会使用无参构造方法创建对象
<?xml version="1.0" encoding="UTF-8"?>

<beans xmlns="http://www.springframework.org/schema/beans"

       xmlns:xsi="http://www.w3.org/2001/XMLSchema-instance"

       xsi:schemaLocation="http://www.springframework.org/schema/beans http://www.springframework.org/schema/beans/spring-beans.xsd">

    <bean id="tom" class="spring02.Student"></bean>

</beans>
3.2、使用有参构造方法创建对象
Person.java
package spring02;

/**人*/

public abstract class Person {

    public String name;

}
Student.java
package spring02;

/**学生*/

public class Student extends Person {

    /**身高*/

    public int height;

    /**有参构造方法*/

    public Student(String name,int height){

        this.name=name;

        this.height=height;

    }

    @Override

    public String toString() {

        return "Student{" + "height=" + height+",name="+name +'}';

    }

}
School.java
package spring02;

import org.springframework.context.ApplicationContext;

import org.springframework.context.support.ClassPathXmlApplicationContext;

public class School {

    public static void main(String[] args) {

        //IoC容器

        ApplicationContext ctx=

                new ClassPathXmlApplicationContext("bookbean01.xml","beans02.xml");

        //从容器中获取对象

        Person tom=ctx.getBean("tom",Person.class);

        System.out.println(tom);

    }

}
配置文件beans02.xml
<?xml version="1.0" encoding="UTF-8"?>

<beans xmlns="http://www.springframework.org/schema/beans"

       xmlns:xsi="http://www.w3.org/2001/XMLSchema-instance"

       xsi:schemaLocation="http://www.springframework.org/schema/beans http://www.springframework.org/schema/beans/spring-beans.xsd">

    <bean id="tom" class="spring02.Student">

        <constructor-arg name="name" value="张柏川"></constructor-arg>

        <constructor-arg name="height" value="195"></constructor-arg>

    </bean>

</beans>
运行结果:
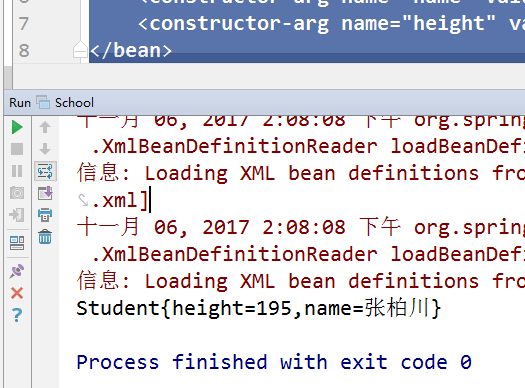
注意:如果在使用构造方法时不想通过参数名称指定参数则可以直接使用索引,如:
    <bean id="rose" class="spring02.Student">

        <constructor-arg index="0" value="张柏芝"></constructor-arg>

        <constructor-arg index="1" value="196"></constructor-arg>

    </bean>
3.3、通过属性赋值

Address地址类:
package spring02;

/**地址*/

public class Address {

    /**国家*/

    private String country;

    /**城市*/

    private String city;

    public Address() {

    }

    public Address(String country, String city) {

        this.country = country;

        this.city = city;

    }

    @Override

    public String toString() {

        return "Address{" +

                "country='" + country + '\'' +

                ", city='" + city + '\'' +

                '}';

    }

    public String getCountry() {

        return country;

    }

    public void setCountry(String country) {

        this.country = country;

    }

    public String getCity() {

        return city;

    }

    public void setCity(String city) {

        this.city = city;

    }

}
配置文件beans02.xml:
    <bean name="zhuhai" class="spring02.Address">

        <property name="country" value="中国"></property>

        <property name="city" value="珠海"></property>

    </bean>
测试代码:
package spring02;

import org.springframework.context.ApplicationContext;

import org.springframework.context.support.ClassPathXmlApplicationContext;

public class School {

    public static void main(String[] args) {

        //IoC容器

        ApplicationContext ctx=

                new ClassPathXmlApplicationContext("bookbean01.xml","beans02.xml");

        //从容器中获取对象

        Person tom=ctx.getBean("rose",Person.class);

        Address zhuhai=ctx.getBean("zhuhai",Address.class);

        System.out.println(zhuhai);

    }

}
运行结果:

便捷方式:
<?xml version="1.0" encoding="UTF-8"?>

<beans xmlns="http://www.springframework.org/schema/beans"

       xmlns:xsi="http://www.w3.org/2001/XMLSchema-instance"

       xmlns:p="http://www.springframework.org/schema/p"

       xsi:schemaLocation="http://www.springframework.org/schema/beans

        http://www.springframework.org/schema/beans/spring-beans.xsd">

    <bean id="mark" class="entities.Person" p:height="100" p:name="mark">

    </bean>

</beans>
3.4、对象引用
你可以使用id 或(和) name 属性来指定bean的标识符
Person
package spring02;

/**人*/

public abstract class Person {

    /**姓名*/

    public String name;

    /**地址*/

    public Address address;

    public String getName() {

        return name;

    }

    public void setName(String name) {

        this.name = name;

    }

    public Address getAddress() {

        return address;

    }

    public void setAddress(Address address) {

        this.address = address;

    }

}
Student
package spring02;

/**学生*/

public class Student extends Person {

    /**身高*/

    public int height;

    /**有参构造方法*/

    public Student(String name,int height){

        this.name=name;

        this.height=height;

    }

    /**有参构造方法*/

    public Student(String name,int height,Address address){

        this.name=name;

        this.height=height;

        this.address=address;

    }

    @Override

    public String toString() {

        return "Student{" + "height=" + height+",name="+name +'}'+address;

    }

}
配置文件
<?xml version="1.0" encoding="UTF-8"?>

<beans xmlns="http://www.springframework.org/schema/beans"

       xmlns:xsi="http://www.w3.org/2001/XMLSchema-instance"

       xsi:schemaLocation="http://www.springframework.org/schema/beans http://www.springframework.org/schema/beans/spring-beans.xsd">

    <bean name="zhuhai" class="spring02.Address">

        <property name="country" value="中国"></property>

        <property name="city" value="珠海"></property>

    </bean>

    <bean id="tom" class="spring02.Student">

        <constructor-arg name="name" value="张柏川"></constructor-arg>

        <constructor-arg name="height" value="195"></constructor-arg>

        <constructor-arg name="address" ref="zhuhai"></constructor-arg>

    </bean>

    <bean id="rose" class="spring02.Student">

        <constructor-arg index="0" value="张柏芝"></constructor-arg>

        <constructor-arg index="1" value="196"></constructor-arg>

        <constructor-arg index="2" ref="zhuhai"></constructor-arg>

    </bean>

</beans>
测试代码:
package spring02;

import org.springframework.context.ApplicationContext;

import org.springframework.context.support.ClassPathXmlApplicationContext;

public class School {

    public static void main(String[] args) {

        //IoC容器

        ApplicationContext ctx=

                new ClassPathXmlApplicationContext("bookbean01.xml","beans02.xml");

        //从容器中获取对象

        Person tom=ctx.getBean("tom",Person.class);

        Person rose=ctx.getBean("rose",Person.class);

        //Address zhuhai=ctx.getBean("zhuhai",Address.class);

        System.out.println(tom);

        System.out.println(rose);

    }

}
运行结果: 
3.5、对象作用域
从容器中取回的对象默认是单例的:
        Person roseA=ctx.getBean("rose",Person.class);

        Person roseB=ctx.getBean("rose",Person.class);

        //Address zhuhai=ctx.getBean("zhuhai",Address.class);

        System.out.println(tom);

        System.out.println(roseA==roseB);
运行结果:

使用scope属性可以指定作用域
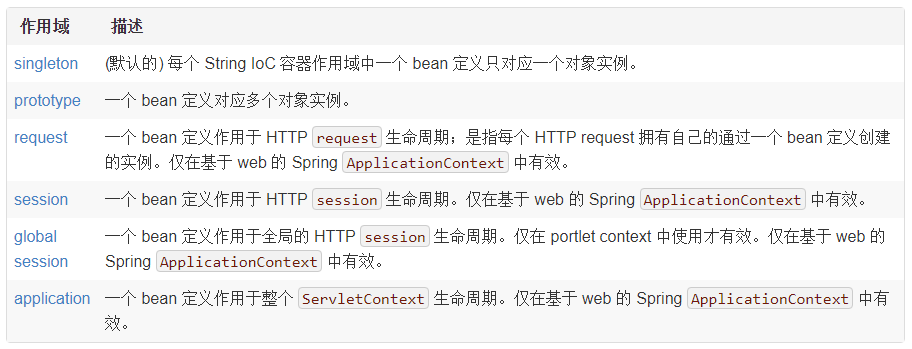
    <bean id="rose" class="spring02.Student" scope="prototype">

        <constructor-arg index="0" value="张柏芝"></constructor-arg>

        <constructor-arg index="1" value="196"></constructor-arg>

        <constructor-arg index="2" ref="zhuhai"></constructor-arg>

    </bean>
测试代码:
        //从容器中获取对象

        Person tom=ctx.getBean("tom",Person.class);

        Person roseA=ctx.getBean("rose",Person.class);

        Person roseB=ctx.getBean("rose",Person.class);

        //Address zhuhai=ctx.getBean("zhuhai",Address.class);

        System.out.println(tom);

        System.out.println(roseA==roseB);
运行结果:

3.6、延迟初始化bean
ApplicationContext实现的默认行为就是再启动时将所有 singleton bean提前进行实例化。 通常这样的提前实例化方式是好事,因为配置中或者运行环境的错误就会被立刻发现,否则可能要花几个小时甚至几天。如果你不想 这样,你可以将单例bean定义为延迟加载防止它提前实例化。延迟初始化bean会告诉Ioc容器在第一次需要的时候才实例化而不是在容器启动时就实例化。
在XML配置文件中,延迟初始化通过<bean/>元素的lazy-init属性进行控制,比如:
<bean id="lazy" class="com.foo.ExpensiveToCreateBean" lazy-init="true"/>

<bean name="not.lazy" class="com.foo.AnotherBean"/>
XML:
    <bean id="mark" class="entities.Person" lazy-init="true" scope="prototype">

        <property name="name" value="mark"></property>

        <property name="height" value="185"></property>

    </bean>
用例:
    @Test

    public void testMethod3() throws Exception {

        //通过spring配置文件初始化一个容器

        ApplicationContext ctx=new ClassPathXmlApplicationContext("springCfg.xml");

        Thread.sleep(2000);

        Person mark1=ctx.getBean("mark",Person.class);

        Thread.sleep(2000);

        Person mark2=ctx.getBean("mark",Person.class);

        System.out.println(mark1==mark2);

    }
结果:

3.7、回调方法
3.7.1、初始化回调函数
配置文件:
    <bean id="tom" class="spring02.Student" init-method="init" destroy-method="over">

        <constructor-arg name="name" value="张柏川"></constructor-arg>

        <constructor-arg name="height" value="195"></constructor-arg>

        <constructor-arg name="address" ref="zhuhai"></constructor-arg>

    </bean>
Student类:
package spring02;

import java.io.File;

/**学生*/

public class Student extends Person {

    /**身高*/

    public int height;

    /**有参构造方法*/

    public Student(String name,int height){

        this.name=name;

        this.height=height;

    }

    /**有参构造方法*/

    public Student(String name,int height,Address address){

        this.name=name;

        this.height=height;

        this.address=address;

    }

    @Override

    public String toString() {

        return "Student{" + "height=" + height+",name="+name +'}'+address;

    }

    public void init(){

        System.out.println("对象被创建");

    }

    public void over(){

        System.out.println("对象被回收");

    }

}
运行结果:

3.7.2、析构回调函数
实现 org.springframework.beans.factory.DisposableBean 接口,允许一个bean当容器需要其销毁时获得一次回调。 DisposableBean 接口也只规定了一个方法:
void destroy() throws Exception;
建议不使用 DisposableBean 回调接口,因为会与Spring耦合。使用@PreDestroy 注解或者指定一个普通的方法,但能由bean定义支持。基于XML配置的元数据,使用 <bean/> 的 destroy-method 属性。例如,下面的定义:
<bean id="exampleInitBean" class="examples.ExampleBean" destroy-method="cleanup"/>
示例
public class ExampleBean {

public void cleanup() {

   // do some destruction work (like releasing pooled connections)

  }

}
与下面效果相同:
<bean id="exampleInitBean" class="examples.AnotherExampleBean"/>
示例:
public class AnotherExampleBean implements DisposableBean {

  public void destroy() {

  // do some destruction work (like releasing pooled connections)

  }

}
但是不与Spring耦合。
四、使用Spring注解配置IOC
上一个示例是使用传统的xml配置完成IOC的,如果内容比较多则配置需花费很多时间,通过注解可以减轻工作量,但注解后修改要麻烦一些,偶合度会增加,应该根据需要选择合适的方法。
4.1、修改BookDAO
package com.zhangguo.Spring051.ioc02;

import org.springframework.stereotype.Component;

import org.springframework.stereotype.Repository;

/**

 * 图书数据访问实现类

 */

@Component("bookdaoObj")

public class BookDAO implements IBookDAO {

    public String addBook(String bookname) {

        return "添加图书"+bookname+"成功!";

    }

}
在类上增加了一个注解Component,在类的开头使用了@Component注解,它可以被Spring容器识别,启动Spring后,会自动把它转成容器管理的Bean。
除了@Component外,Spring提供了3个功能基本和@Component等效的注解,分别对应于用于对DAO,Service,和Controller进行注解。
1:@Repository 用于对DAO实现类进行注解。
2:@Service 用于对业务层注解,但是目前该功能与 @Component 相同。
3:@Constroller用于对控制层注解,但是目前该功能与 @Component 相同。
4.2、修改BookService
package com.zhangguo.Spring051.ioc02;

import org.springframework.context.ApplicationContext;

import org.springframework.context.support.ClassPathXmlApplicationContext;

import org.springframework.stereotype.Component;

import org.springframework.stereotype.Service;

/**

 * 图书业务类

 */

@Component

public class BookService {

    IBookDAO bookDAO;

    public void storeBook(String bookname){

        //容器

        ApplicationContext ctx=new ClassPathXmlApplicationContext("IOCBeans02.xml");

        //从容器中获得id为bookdao的bean

        bookDAO=(IBookDAO)ctx.getBean("bookdaoObj");

        System.out.println("图书上货");

        String result=bookDAO.addBook(bookname);

        System.out.println(result);

    }

}
将构造方法中的代码直接写在了storeBook方法中,避免循环加载的问题。
4.3、修改IOC配置文件IOCBeans02.xml
<?xml version="1.0" encoding="UTF-8"?>

<beans xmlns="http://www.springframework.org/schema/beans"

    xmlns:xsi="http://www.w3.org/2001/XMLSchema-instance"

    xmlns:p="http://www.springframework.org/schema/p"

    xmlns:context="http://www.springframework.org/schema/context"

    xsi:schemaLocation="http://www.springframework.org/schema/beans

        http://www.springframework.org/schema/beans/spring-beans.xsd

        http://www.springframework.org/schema/context

        http://www.springframework.org/schema/context/spring-context-4.3.xsd">

        <context:component-scan base-package="com.zhangguo.Spring051.ioc02"></context:component-scan>

</beans>
粗体字是新增的xml命名空间与模式约束文件位置。增加了注解扫描的范围,指定了一个包,可以通过属性设置更加精确的范围如:
<context>标记常用属性配置:
resource-pattern:对指定的基包下面的子包进行选取
<context>子标记:
include-filter:指定需要包含的包
exclude-filter:指定需要排除的包
<!-- 自动扫描com.zhangguo.anno.bo中的类进行扫描 -->
<context:component-scan base-package="com.zhangguo.anno" resource-pattern="bo/*.class" />
<context:component-scan base-package="com.zhangguo.anno" >
<context:include-filter type="aspectj“ expression="com.zhangguo.anno.dao.*.*"/>
<context:exclude-filter type=“aspectj” expression=“com.zhangguo.anno.entity.*.*”/>
</context:component-scan>
include-filter表示需要包含的目标类型,exclude-filter表示需要排除的目标类型,type表示采的过滤类型,共有如下5种类型:
| Filter Type | Examples Expression | Description |
| annotation | org.example.SomeAnnotation | 注解了SomeAnnotation的类 |
| assignable | org.example.SomeClass | 所有扩展或者实现SomeClass的类 |
| aspectj | org.example..*Service+ | AspectJ语法表示org.example包下所有包含Service的类及其子类 |
| regex | org\.example\.Default.* | Regelar Expression,正则表达式 |
| custom | org.example.MyTypeFilter | 通过代码过滤,实现org.springframework.core.type.TypeFilter接口 |
expression表示过滤的表达式。
    <!-- 1、如果仅希望扫描特定的类而非基包下的所有类,可使用resource-pattern属性过滤特定的类 -->

    <context:component-scan base-package="com.zhangguo.Spring051"

        resource-pattern="ioc04/A*.class">

    </context:component-scan>
只扫描com.zhangguo.Spring051.ioc04下所有名称以A开始的类。
    <!--2、扫描注解了org.springframework.stereotype.Repository的类

     exclude-filter表示排除,include-filter表示包含,可以有多个-->

    <context:component-scan base-package="com.zhangguo.Spring051.ioc04">

        <context:exclude-filter type="annotation" expression="org.springframework.stereotype.Repository" />

        <context:include-filter type="annotation" expression="org.springframework.stereotype.Service"/>

    </context:component-scan>
   <!--3、aspectj类型,扫描dao下所有的类,排除entity下所有的类-->

  <context:component-scan base-package="com.zhangguo.anno" >

  <context:include-filter type="aspectj" expression="com.zhangguo.anno.dao.*.*"/>

  <context:exclude-filter type="aspectj" expression="com.zhangguo.anno.entity.*.*"/>

</context:component-scan>
测试类
package com.zhangguo.Spring051.ioc02;

import org.springframework.context.ApplicationContext;

import org.springframework.context.support.ClassPathXmlApplicationContext;

public class Test {

    @org.junit.Test

    public void testStoreBook()

    {

        //容器

        ApplicationContext ctx=new ClassPathXmlApplicationContext("IOCBeans02.xml");

        BookService bookservice=ctx.getBean(BookService.class);

        bookservice.storeBook("《Spring MVC权威指南 第二版》");

    }

}
运行结果:

4.4、简单示例
IBookDao接口
package spring11;

public interface IBookDao {

    void add();

}
BookDao实现类
package spring11;

import org.springframework.stereotype.Component;

@Component("bookdao")

public class BookDao implements IBookDao {

    public void add() {

        System.out.println("新增图书成功!");

    }

}
MSBookDao实现类
package spring11;

import org.springframework.stereotype.Component;

@Component("bookdao")

public class MSBookDao implements IBookDao {

    public void add() {

        System.out.println("新增图书到SQLServer成功!");

    }

}
BookService测试类:
package spring11;

import org.springframework.context.ApplicationContext;

import org.springframework.context.support.ClassPathXmlApplicationContext;

public class BookService {

    public static void main(String[] args) {

        //容器

        ApplicationContext ctx=

                new ClassPathXmlApplicationContext(new String[]{"bookbean11.xml"});

        //从容器中获得对象

        IBookDao dao=ctx.getBean("bookdao",IBookDao.class);

        dao.add();

    }

}
XML配置:
<?xml version="1.0" encoding="UTF-8"?>

<beans xmlns="http://www.springframework.org/schema/beans"

       xmlns:xsi="http://www.w3.org/2001/XMLSchema-instance"

       xmlns:p="http://www.springframework.org/schema/p"

       xmlns:context="http://www.springframework.org/schema/context"

       xsi:schemaLocation="http://www.springframework.org/schema/beans

        http://www.springframework.org/schema/beans/spring-beans.xsd

        http://www.springframework.org/schema/context

        http://www.springframework.org/schema/context/spring-context-4.3.xsd">

    <bean name="tom" class="spring02.Student" p:name="tom" p:height="224"/>

    <!--指定要扫描的包,如果有多个可以用逗号隔开-->

    <context:component-scan base-package="spring11">

        <!--使用正则排除以B开头的类-->

        <context:exclude-filter type="regex" expression="spring11\.B.*"></context:exclude-filter>

    </context:component-scan>

</beans>
运行结果:

指定两个bookdao是不正确的,重名了,但是因为在组件扫描中我们排除了一个所有也可以正确运行。
4.5、作用域用scope来指定
默认容器中的bean是单例的:
        //从容器中获得对象

        IBookDao dao1=ctx.getBean("bookdao",IBookDao.class);

        IBookDao dao2=ctx.getBean("bookdao",IBookDao.class);

        System.out.println(dao1==dao2);
结果:

修改成原型
package spring11;

import org.springframework.context.annotation.Scope;

import org.springframework.stereotype.Component;

@Component("bookdao")

@Scope("prototype")

public class MSBookDao implements IBookDao {

    public void add() {

        System.out.println("新增图书到SQLServer成功!");

    }

}
结果:

用来指定bean的作用域
singleton---单例 只创建一个对象。
prototype---原型 想创建多少个就创建多少了。
request---针对Web项目,不同的请求创建单独的Bean对象,同一个请求共享一个Bean。
session---针对Web项目,不同的会话创建单独的Bean对象,同一个会话共享一个Bean。
4.5 、Lazy延迟初始化Bean
默认情况下Spring IoC容器在初始化时将Bean创建好存放到容器中:
测试:
    @Test

    public void testMethod6() throws Exception {

        //通过spring配置文件初始化一个容器

        ApplicationContext ctx=new ClassPathXmlApplicationContext("springCfg2.xml");

        Thread.sleep(6000);

        IBookDao dao=ctx.getBean("mssql",IBookDao.class);

        dao.add("<<Java EE>>");

    }
结果:
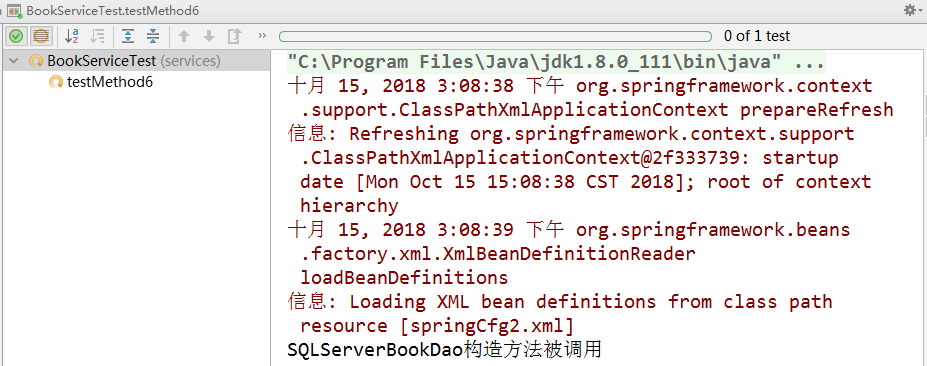
此处等待6秒...
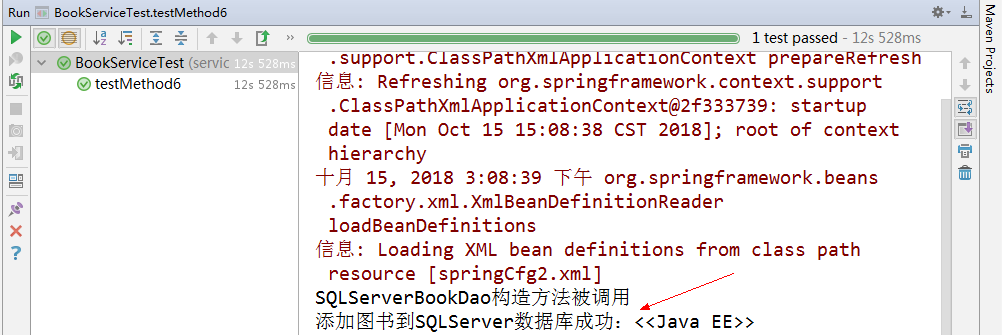
增加注解修改成延迟初始化bean
package dao;

import org.springframework.context.annotation.Lazy;

import org.springframework.stereotype.Repository;

@Repository("mssql")

@Lazy

public class SQLServerBookDao implements IBookDao {

    public SQLServerBookDao() {

        System.out.println("SQLServerBookDao构造方法被调用");

    }

    /**

     * 添加图书

     *

     * @param name

     */

    public void add(String name) {

        System.out.println("添加图书到SQLServer数据库成功:"+name);

    }

}
再次测试结果:
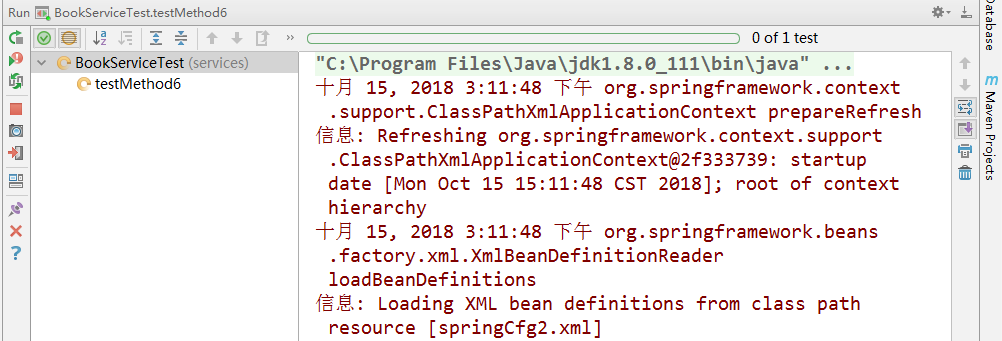
然后
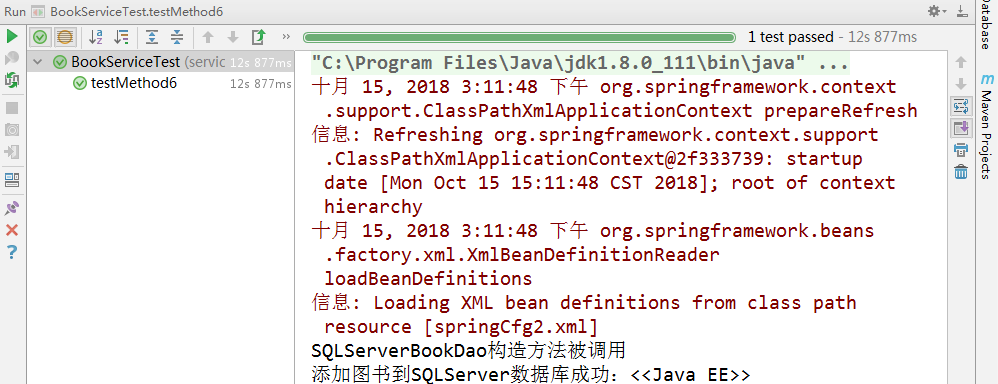
4.6、初始化回调注解与销毁回调注解
4.6.1、@PostConstruct
@PostConstruct 初始化方法的注解方式 等同与在XML中声明init-method=init
package dao;

import org.springframework.context.annotation.Lazy;

import org.springframework.stereotype.Repository;

import javax.annotation.PostConstruct;

@Repository("mssql")

@Lazy

public class SQLServerBookDao implements IBookDao {

    public SQLServerBookDao() {

        System.out.println("SQLServerBookDao构造方法被调用");

    }

    /**

     * 添加图书

     *

     * @param name

     */

    public void add(String name) {

        System.out.println("添加图书到SQLServer数据库成功:"+name);

    }

    //init-method callback

    @PostConstruct

    public void init(){

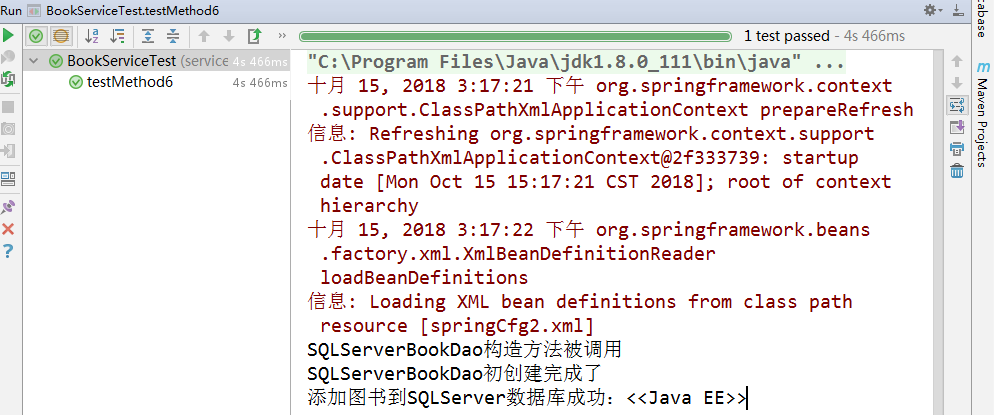
        System.out.println("SQLServerBookDao初创建完成了");

    }

}
结果
4.6.2、@PreDestroy
@PreDestroy 销毁方法的注解方式 等同于在XML中声明destory-method=destory
package dao;

import org.springframework.context.annotation.Lazy;

import org.springframework.stereotype.Repository;

import javax.annotation.PostConstruct;

import javax.annotation.PreDestroy;

@Repository("mssql")

@Lazy

public class SQLServerBookDao implements IBookDao {

    public SQLServerBookDao() {

        System.out.println("SQLServerBookDao构造方法被调用");

    }

    /**

     * 添加图书

     *

     * @param name

     */

    public void add(String name) {

        System.out.println("添加图书到SQLServer数据库成功:"+name);

    }

    //init-method callback

    @PostConstruct

    public void init(){

        System.out.println("SQLServerBookDao初创建完成了");

    }

    //destory-method callback

    @PreDestroy

    public void destory(){

        System.out.println("SQLServerBookDao准备销毁了");

    }

}
4.7、默认名称
如果使用Compont注解时不指定名称,基于@Componet及其扩展(如@Servic和自定义等)标注和classpath-scan定义的Bean,注解有一个value属性,如果提供了,那么就此Bean的名字。如果不提供。就会使用Spring默认的命名机制,即简单类名且第一个字母小写
package spring11;

import org.springframework.context.annotation.Scope;

import org.springframework.stereotype.Component;

@Component()  //未指定名称

@Scope("prototype")

public class MSBookDao implements IBookDao {

    public void add() {

        System.out.println("新增图书到SQLServer成功!");

    }

}
测试:
package spring11;

import org.springframework.context.ApplicationContext;

import org.springframework.context.support.ClassPathXmlApplicationContext;

public class BookService {

    public static void main(String[] args) {

        //容器

        ApplicationContext ctx=

                new ClassPathXmlApplicationContext(new String[]{"bookbean11.xml"});

        //从容器中获得对象

        IBookDao dao1=ctx.getBean("MSBookDao",IBookDao.class);

        IBookDao dao2=ctx.getBean("MSBookDao",IBookDao.class);

        System.out.println(dao1==dao2);

        dao1.add();

    }

}
结果:

在基于XML的配置中bean标签还有很多属性,如scope、Lazy、init-method、depends-on、Qualifier等。
从容器中获取实例时也可以直接根据类型获取
package spring12;

import org.springframework.beans.factory.annotation.Autowired;

import org.springframework.context.ApplicationContext;

import org.springframework.context.support.ClassPathXmlApplicationContext;

import org.springframework.stereotype.Component;

@Component

public class BookStore {

    @Autowired

    BookService service;

    public static void main(String[] args) {

        ApplicationContext ctx = new ClassPathXmlApplicationContext("bookbean12.xml");

        BookStore store =ctx.getBean(BookStore.class);

        store.service.addNewBook();

        A a=ctx.getBean("a",A.class);

        System.out.println(a);

    }

}

@Component

class A{

}

@Component

class B extends A{

}
结果:

默认名称时需要将首字母小写,Camel命名规范:
package dao;

import org.springframework.context.annotation.Scope;

import org.springframework.stereotype.Component;

import org.springframework.stereotype.Controller;

import org.springframework.stereotype.Repository;

import org.springframework.stereotype.Service;

@Component

public class MySqlBookDao implements IBookDao {

    /**

     * 添加图书

     *

     * @param name

     */

    public void add(String name) {

        System.out.println("添加图书到MySQL数据库成功:"+name);

    }

}
测试:
    @Test

    public void testMethod5() throws Exception {

        //通过spring配置文件初始化一个容器

        ApplicationContext ctx=new ClassPathXmlApplicationContext("springCfg2.xml");

        IBookDao bookDao=ctx.getBean("mySqlBookDao",IBookDao.class);

        bookDao.add("《Spring从入门到精通》");

    }
结果:

4.6、小结
从配置文件中我们可以看出我们并没有声明bookdaoObj与BookService类型的对象,但还是从容器中获得了实例并成功运行了,原因是:在类的开头使用了@Component注解,它可以被Spring容器识别,启动Spring后,会自动把它转成容器管理的Bean。
五、自动装配
从上一个示例中可以看出有两个位置都使用了ApplicationContext初始化容器后获得需要的Bean,可以通过自动装配简化。
5.1、修改BookDAO
package com.zhangguo.Spring051.ioc03;

import org.springframework.stereotype.Component;

import org.springframework.stereotype.Repository;

/**

 * 图书数据访问实现类

 */

@Repository

public class BookDAO implements IBookDAO {

    public String addBook(String bookname) {

        return "添加图书"+bookname+"成功!";

    }

}
把注解修改成了Repository,比Component更贴切一些,非必要。
5.2、修改BookService
package com.zhangguo.Spring051.ioc03;

import org.springframework.beans.factory.annotation.Autowired;

import org.springframework.context.ApplicationContext;

import org.springframework.context.support.ClassPathXmlApplicationContext;

import org.springframework.stereotype.Service;

/**

 * 图书业务类

 */

@Service

public class BookService {

    @Autowired

    IBookDAO bookDAO;

    public void storeBook(String bookname){

        System.out.println("图书上货");

        String result=bookDAO.addBook(bookname);

        System.out.println(result);

    }

}
将类BookService上的注解替换成了Service;在bookDao成员变量上增加了一个注解@Autowired,该注解的作用是:可以对成员变量、方法和构造函数进行注解,来完成自动装配的工作,通俗来说就是会根据类型从容器中自动查到到一个Bean给bookDAO字段。@Autowired是根据类型进行自动装配的,如果需要按名称进行装配,则需要配合@Qualifier。另外可以使用其它注解,@ Resource :等同于@Qualifier,@Inject:等同于@ Autowired。
@Service用于注解业务层组件(我们通常定义的service层就用这个)
@Controller用于注解控制层组件(如struts中的action)
@Repository用于注解数据访问组件,即DAO组件
@Component泛指组件,当组件不好归类的时候,我们可以使用这个注解进行注解。
装配注解主要有:@Autowired、@Qualifier、@Resource,它们的特点是:
1、@Resource默认是按照名称来装配注入的,只有当找不到与名称匹配的bean才会按照类型来装配注入;
2、@Autowired默认是按照类型装配注入的,如果想按照名称来转配注入,则需要结合@Qualifier一起使用;
3、@Resource注解是又J2EE提供,而@Autowired是由spring提供,故减少系统对spring的依赖建议使用@Resource的方式;如果Maven项目是1.5的JRE则需换成更高版本的。
4、@Resource和@Autowired都可以书写注解在字段或者该字段的setter方法之上
5、@Autowired 可以对成员变量、方法以及构造函数进行注释,而 @Qualifier 的注解对象是成员变量、方法入参、构造函数入参。
6、@Qualifier("XXX") 中的 XX是 Bean 的名称,所以 @Autowired 和 @Qualifier 结合使用时,自动注入的策略就从 byType 转变成 byName 了。
7、@Autowired 注释进行自动注入时,Spring 容器中匹配的候选 Bean 数目必须有且仅有一个,通过属性required可以设置非必要。
8、@Resource装配顺序
8.1. 如果同时指定了name和type,则从Spring上下文中找到唯一匹配的bean进行装配,找不到则抛出异常
8.2. 如果指定了name,则从上下文中查找名称(id)匹配的bean进行装配,找不到则抛出异常
8.3. 如果指定了type,则从上下文中找到类型匹配的唯一bean进行装配,找不到或者找到多个,都会抛出异常
8.4. 如果既没有指定name,又没有指定type,则自动按照byName方式进行装配;如果没有匹配,则回退为一个原始类型进行匹配,如果匹配则自动装配;
package com.zhangguo.Spring051.ioc05;

import javax.annotation.Resource;

import org.springframework.beans.factory.annotation.Autowired;

import org.springframework.beans.factory.annotation.Qualifier;

import org.springframework.context.ApplicationContext;

import org.springframework.context.support.ClassPathXmlApplicationContext;

import org.springframework.stereotype.Service;

/**

 * 图书业务类

 */

@Service

public class BookService {

    public IBookDAO getDaoofbook() {

        return daoofbook;

    }

    /*

    @Autowired

    @Qualifier("bookdao02")

    public void setDaoofbook(IBookDAO daoofbook) {

        this.daoofbook = daoofbook;

    }*/

    @Resource(name="bookdao02")

    public void setDaoofbook(IBookDAO daoofbook) {

        this.daoofbook = daoofbook;

    }

    /*

    @Autowired

    @Qualifier("bookdao02")

    */

    IBookDAO daoofbook;

    /*

    public BookService(@Qualifier("bookdao02") IBookDAO daoofbook) {

        this.daoofbook=daoofbook;

    }*/

    public void storeBook(String bookname){

        System.out.println("图书上货");

        String result=daoofbook.addBook(bookname);

        System.out.println(result);

    }

}
测试运行
package com.zhangguo.Spring051.ioc03;

import org.springframework.context.ApplicationContext;

import org.springframework.context.support.ClassPathXmlApplicationContext;

public class Test {

    @org.junit.Test

    public void testStoreBook()

    {

        //容器

        ApplicationContext ctx=new ClassPathXmlApplicationContext("IOCBeans03.xml");

        BookService bookservice=ctx.getBean(BookService.class);

        bookservice.storeBook("《Spring MVC权威指南 第三版》");

    }

}
运行结果:

5.3、简单示例
IBookDao
package spring12;

/**图书数据访问接口*/

public interface IBookDao {

    /**添加新书*/

    void save(String name);

}
BookDao
package spring12;

import org.springframework.stereotype.Repository;

/**

 * 完成图书数据访问

 */

@Repository

public class BookDao implements IBookDao {

    public void save(String name) {

        System.out.println("添加图书" + name + "到数据库成功!");

    }

}
BookService
package spring12;

import org.springframework.beans.factory.annotation.Autowired;

import org.springframework.stereotype.Service;

@Service

public class BookService {

    @Autowired

    IBookDao bookDao;

    /**新增一本书*/

    public void addNewBook(){

        String bookname="《Spring MVC学习指南》";

        bookDao.save(bookname);

    }

}
配置bookbean12.xml
<?xml version="1.0" encoding="UTF-8"?>

<beans xmlns="http://www.springframework.org/schema/beans"

       xmlns:xsi="http://www.w3.org/2001/XMLSchema-instance"

       xmlns:p="http://www.springframework.org/schema/p"

       xmlns:context="http://www.springframework.org/schema/context"

       xsi:schemaLocation="http://www.springframework.org/schema/beans

        http://www.springframework.org/schema/beans/spring-beans.xsd

        http://www.springframework.org/schema/context

        http://www.springframework.org/schema/context/spring-context-4.3.xsd">

    <!--指定要扫描的包,如果有多个可以用逗号隔开-->

    <context:component-scan base-package="spring12">

    </context:component-scan>

</beans>
BookStore
package spring12;

import org.springframework.beans.factory.annotation.Autowired;

import org.springframework.context.ApplicationContext;

import org.springframework.context.support.ClassPathXmlApplicationContext;

import org.springframework.stereotype.Component;

@Component

public class BookStore {

    @Autowired

    BookService service;

    public static void main(String[] args) {

        ApplicationContext ctx = new ClassPathXmlApplicationContext("bookbean12.xml");

        BookStore store =ctx.getBean(BookStore.class);

        store.service.addNewBook();

    }

}
测试结果:

5.4、@Qualifier指定名称
@Qualifier("XXX") 中的 XX是 Bean 的名称,所以 @Autowired 和 @Qualifier 结合使用时,自动注入的策略就从 byType 转变成 byName 了。qualifier的意思是合格者,通过这个标示,表明了哪个实现类才是我们所需要的
先看下面这个示例:
package spring13;

import org.springframework.beans.factory.annotation.Autowired;

import org.springframework.context.ApplicationContext;

import org.springframework.context.support.ClassPathXmlApplicationContext;

import org.springframework.stereotype.Component;

import org.springframework.stereotype.Repository;

import org.springframework.stereotype.Service;

@Service

public class QualifierTest {

    @Autowired

    IBookDao dao;

    public static void main(String[] args) {

        ApplicationContext ctx =

                new ClassPathXmlApplicationContext("bookbean13.xml");

        QualifierTest obj = ctx.getBean(QualifierTest.class);

        System.out.println(obj.dao);

    }

}

interface IBookDao {

}

@Repository

class BookDaoA implements IBookDao {

}

@Repository

class BookDaoB implements IBookDao {

}
运行结果:

这样报错的原因是找到了多个Bean,Spring不知道选择那一个。使用Qualifier指定名称
package spring13;

import org.springframework.beans.factory.annotation.Autowired;

import org.springframework.beans.factory.annotation.Qualifier;

import org.springframework.context.ApplicationContext;

import org.springframework.context.support.ClassPathXmlApplicationContext;

import org.springframework.stereotype.Component;

import org.springframework.stereotype.Repository;

import org.springframework.stereotype.Service;

@Service

public class QualifierTest {

    @Autowired

    @Qualifier("daoA")

    IBookDao dao;

    public static void main(String[] args) {

        ApplicationContext ctx =

                new ClassPathXmlApplicationContext("bookbean13.xml");

        QualifierTest obj = ctx.getBean(QualifierTest.class);

        System.out.println(obj.dao);

    }

}

interface IBookDao {

}


@Repository("daoA")

class BookDaoA implements IBookDao {

}

@Repository("daoB")

class BookDaoB implements IBookDao {

}
结果:

5.5、@Resource
@Resource装配顺序
如果同时指定了name和type,则从Spring上下文中找到唯一匹配的bean进行装配,找不到则抛出异常
如果指定了name,则从上下文中查找名称(id)匹配的bean进行装配,找不到则抛出异常
如果指定了type,则从上下文中找到类型匹配的唯一bean进行装配,找不到或者找到多个,都会抛出异常
如果既没有指定name,又没有指定type,则自动按照byName方式进行装配;如果没有匹配,则回退为一个原始类型进行匹配,如果匹配则自动装配;
package spring13;

import org.springframework.context.ApplicationContext;

import org.springframework.context.support.ClassPathXmlApplicationContext;

import org.springframework.stereotype.Repository;

import org.springframework.stereotype.Service;

import javax.annotation.Resource;

@Service

public class ResourceTest {

    @Resource(name = "carB")

    ICarDao dao;

    public static void main(String[] args) {

        ApplicationContext ctx =

                new ClassPathXmlApplicationContext("bookbean13.xml");

        ResourceTest obj = ctx.getBean(ResourceTest.class);

        System.out.println(obj.dao);

    }

}

interface ICarDao {

}

@Repository("carA")

class CarDaoA implements ICarDao {

}

@Repository("carB")

class CarDaoB implements ICarDao {

}

/*

@Resource装配顺序

如果同时指定了name和type,则从Spring上下文中找到唯一匹配的bean进行装配,找不到则抛出异常

如果指定了name,则从上下文中查找名称(id)匹配的bean进行装配,找不到则抛出异常

如果指定了type,则从上下文中找到类型匹配的唯一bean进行装配,找不到或者找到多个,都会抛出异常

如果既没有指定name,又没有指定type,则自动按照byName方式进行装配;如果没有匹配,则回退为一个原始类型进行匹配,如果匹配则自动装配;

*/
运行结果:

5.6、多种注入方式
示例:
package spring13;

import org.springframework.beans.factory.annotation.Autowired;

import org.springframework.context.ApplicationContext;

import org.springframework.context.annotation.Scope;

import org.springframework.context.support.ClassPathXmlApplicationContext;

import org.springframework.stereotype.Repository;

import org.springframework.stereotype.Service;

import javax.annotation.Resource;

@Service

public class InjectTest {

    //注入给构造方法

    @Autowired

    public InjectTest(IUserDao dao2) {

        this.dao2=dao2;

    }

    //注入给成员变量,字段

    @Resource

    IUserDao dao1;

    IUserDao dao2;

    IUserDao dao3;

    IUserDao dao4;

    //注入给属性

    @Autowired

    public void setDao3(IUserDao dao3) {

        this.dao3 = dao3;

    }

    //注入给方法参数

    @Autowired

    public void injectDao4(IUserDao dao4, IUserDao dao5) {

        this.dao4 = dao4;

        System.out.println(dao5);

    }

    public static void main(String[] args) {

        ApplicationContext ctx =

                new ClassPathXmlApplicationContext("bookbean13.xml");

        InjectTest obj = ctx.getBean(InjectTest.class);

        System.out.println(obj.dao1);

        System.out.println(obj.dao2);

        System.out.println(obj.dao3);

        System.out.println(obj.dao4);

    }

}

interface IUserDao {

}

@Scope("prototype")

@Repository

class UserDao implements IUserDao {

}
结果:

六、零配置实现IOC
6.1、综合示例
所谓的零配置就是不再使用xml文件来初始化容器,使用一个类型来替代,
IBookDAO代码如下:
package com.zhangguo.Spring051.ioc06;

/**

 * 图书数据访问接口

 */

public interface IBookDAO {

    /**

     * 添加图书

     */

    public String addBook(String bookname);

}
IBookDAO的实现类BookDAO代码如下:
package com.zhangguo.Spring051.ioc06;

import org.springframework.stereotype.Component;

import org.springframework.stereotype.Repository;

/**

 * 图书数据访问实现类

 */

@Repository

public class BookDAO implements IBookDAO {

    public String addBook(String bookname) {

        return "添加图书"+bookname+"成功!";

    }

}
在BookDAO类上注解了@Repository当初始化时该类将被容器管理会生成一个Bean,可以通过构造方法测试。
业务层BookService代码如下:
package com.zhangguo.Spring051.ioc06;

import javax.annotation.Resource;

import org.springframework.stereotype.Service;

/**

 * 图书业务类

 */

@Service

public class BookService {

    @Resource

    IBookDAO bookDAO;

    public void storeBook(String bookname){

        System.out.println("图书上货");

        String result=bookDAO.addBook(bookname);

        System.out.println(result);

    }

}
类BookService将对容器管理因为注解了@Service,初始化时会生成一个单例的Bean,类型为BookService。在字段bookDAO上注解了@Resource,用于自动装配,Resource默认是按照名称来装配注入的,只有当找不到与名称匹配的bean才会按照类型来装配注入。
新增一个用于替代原xml配置文件的ApplicationCfg类,代码如下:
package com.zhangguo.Spring051.ioc06;

import org.springframework.context.annotation.Bean;

import org.springframework.context.annotation.ComponentScan;

import org.springframework.context.annotation.Configuration;

/**

 * 容器的配置类

 */

@Configuration

@ComponentScan(basePackages="com.zhangguo.Spring051.ioc06")

public class ApplicationCfg {

    @Bean

    public User getUser(){

        return new User("成功");

    }

}
@Configuration相当于配置文件中的<beans/>,ComponentScan相当于配置文件中的context:component-scan,属性也一样设置
,@Bean相当于<bean/>,只能注解在方法和注解上,一般在方法上使用,源码中描述:@Target({ElementType.METHOD, ElementType.ANNOTATION_TYPE}),方法名相当于id。中间使用到了User,User类的代码如下:
package com.zhangguo.Spring051.ioc06;

import org.springframework.stereotype.Component;

@Component("user1")

public class User {

    public User() {

        System.out.println("创建User对象");

    }

    public User(String msg) {

        System.out.println("创建User对象"+msg);

    }

    public void show(){

        System.out.println("一个学生对象!");

    }

}
初始化容器的代码与以前有一些不一样,具体如下:
package com.zhangguo.Spring051.ioc06;

import org.springframework.context.ApplicationContext;

import org.springframework.context.annotation.AnnotationConfigApplicationContext;

public class Test {

    @org.junit.Test

    public void testStoreBook()

    {

        //容器,注解配置应用程序容器,Spring通过反射ApplicationCfg.class初始化容器

        ApplicationContext ctx=new AnnotationConfigApplicationContext(ApplicationCfg.class);

        BookService bookservice=ctx.getBean(BookService.class);

        bookservice.storeBook("《Spring MVC权威指南 第四版》");

        User user1=ctx.getBean("user1",User.class);

        user1.show();

        User getUser=ctx.getBean("getUser",User.class);

        getUser.show();

    }

}
容器的初始化通过一个类型完成,Spring通过反射ApplicationCfg.class初始化容器,中间user1与getUser是否为相同的Bean呢?
答案是否定的,因为在ApplicationCfg中声明的方法getUser当相于在xml文件中定义了一个<bean id="getUser" class="..."/>,在User类上注解@Component("user1")相当于另一个<bean id="user1" class="..."/>。
运行结果:

小结:使用零配置和注解虽然方便,不需要编写麻烦的xml文件,但并非为了取代xml,应该根据实例需要选择,或二者结合使用,毕竟使用一个类作为容器的配置信息是硬编码的,不好在发布后修改。
6.2、零配置,由注解指定实例
package spring14;

import org.springframework.context.ApplicationContext;

import org.springframework.context.annotation.AnnotationConfigApplicationContext;

import org.springframework.context.annotation.Bean;

import org.springframework.context.annotation.ComponentScan;

import org.springframework.context.annotation.Configuration;

import org.springframework.stereotype.Repository;

public class NoXMLIoC {

    public static void main(String[] args) {

        //基于类型的配置

        ApplicationContext ctx=new AnnotationConfigApplicationContext(AppCfg.class);

        ICarDao dao1=ctx.getBean(ICarDao.class);

        dao1.add("Spring Pro");

    }

}

interface ICarDao{

    void add(String name);

}

@Repository

class CarDao implements ICarDao{

    public void add(String name) {

        System.out.println("添加"+name+"成功!");

    }

}

@Configuration

@ComponentScan(basePackages = "spring14")

class AppCfg{

}
运行结果:

6.3、零配置,由方法指定实例
package spring14;

import org.springframework.context.ApplicationContext;

import org.springframework.context.annotation.AnnotationConfigApplicationContext;

import org.springframework.context.annotation.Bean;

import org.springframework.context.annotation.ComponentScan;

import org.springframework.context.annotation.Configuration;

import org.springframework.stereotype.Repository;

public class NoXMLIoC {

    public static void main(String[] args) {

        //基于类型的配置

        ApplicationContext ctx=new AnnotationConfigApplicationContext(AppCfg.class);

        ICarDao dao2=ctx.getBean("mysqlDao",ICarDao.class);

        dao2.add("Spring Pro");

    }

}

interface ICarDao{

    void add(String name);

}

class CarDao implements ICarDao{

    public void add(String name) {

        System.out.println("添加"+name+"成功!");

    }

}

@Configuration

@ComponentScan(basePackages = "spring14")

class AppCfg{

    @Bean

    ICarDao mysqlDao(){  //方法名就是bean的name

        return new CarDao();

    }

}
运行结果:

package spring14;

import org.springframework.context.ApplicationContext;

import org.springframework.context.annotation.AnnotationConfigApplicationContext;

import org.springframework.context.annotation.Bean;

import org.springframework.context.annotation.ComponentScan;

import org.springframework.context.annotation.Configuration;

import org.springframework.stereotype.Repository;

public class NoXMLIoC {

    public static void main(String[] args) {

        //基于类型的配置

        ApplicationContext ctx=new AnnotationConfigApplicationContext(AppCfg.class);

        ICarDao dao1=ctx.getBean("oracleDao",ICarDao.class);

        dao1.add("Spring Pro Oracle");

        ICarDao dao2=ctx.getBean("mysqlDao",ICarDao.class);

        dao2.add("Spring Pro MySQL");

        System.out.println(dao1==dao2);

    }

}

interface ICarDao{

    void add(String name);

}

@Repository("oracleDao")

class CarDao implements ICarDao{

    public void add(String name) {

        System.out.println("添加"+name+"成功!");

    }

}

@Configuration

@ComponentScan(basePackages = "spring14")

class AppCfg{

    @Bean

    ICarDao mysqlDao(){  //方法名就是bean的name

        return new CarDao();

    }

}
运行结果:

七、通过注解@Value获取properties配置
@value注解可以实现为对象赋值,可以直接指定值也可以从properties文件中获取,这里主要讲解两种方式:
7.1、使用XML实现
1、在resource目录下创建一个properties文件,如db.properties:

2、在Spring配置文件中导入资源文件
<?xml version="1.0" encoding="UTF-8"?>

<beans xmlns="http://www.springframework.org/schema/beans"

       xmlns:p="http://www.springframework.org/schema/p"

       xmlns:context="http://www.springframework.org/schema/context"

       xmlns:aop="http://www.springframework.org/schema/aop"

       xmlns:xsi="http://www.w3.org/2001/XMLSchema-instance"

       xsi:schemaLocation="

       http://www.springframework.org/schema/beans

       http://www.springframework.org/schema/beans/spring-beans.xsd

        http://www.springframework.org/schema/aop

        http://www.springframework.org/schema/aop/spring-aop-4.3.xsd

        http://www.springframework.org/schema/context

        http://www.springframework.org/schema/context/spring-context-4.3.xsd

       ">

    <context:component-scan base-package="com.zhangguo.spring03.demo.v32"></context:component-scan>

    <!--属性点位,location用于指定资源位置,ignore-unresolvable忽视不能解析的内容-->

    <context:property-placeholder location="db.properties" ignore-unresolvable="true"></context:property-placeholder>

</beans>
3、通过@Value引用资源文件中的内容
package com.zhangguo.spring03.demo.v32;

import org.springframework.beans.factory.annotation.Value;

import org.springframework.stereotype.Component;

import org.springframework.stereotype.Repository;

@Component

public class DbUtils {

    @Value("com.jdbc.driver.Oracle")

    private String driver;

    @Value("${URL}")

    private String location;

    @Value("${userName}")

    private String uid;

    @Value("${password}")

    private String pwd;

    @Override

    public String toString() {

        return "DbUtils{" +

                "driver='" + driver + '\'' +

                ", location='" + location + '\'' +

                ", uid='" + uid + '\'' +

                ", pwd='" + pwd + '\'' +

                '}';

    }

    public String getDriver() {

        return driver;

    }

    public void setDriver(String driver) {

        this.driver = driver;

    }

    public String getLocation() {

        return location;

    }

    public void setLocation(String location) {

        this.location = location;

    }

    public String getUid() {

        return uid;

    }

    public void setUid(String uid) {

        this.uid = uid;

    }

    public String getPwd() {

        return pwd;

    }

    public void setPwd(String pwd) {

        this.pwd = pwd;

    }

}
4、测试
package com.zhangguo.spring03.demo.v32;

import org.springframework.context.ApplicationContext;

import org.springframework.context.support.ClassPathXmlApplicationContext;

public class Client32 {

    public static void main(String[] args) {

        ApplicationContext ctx=new ClassPathXmlApplicationContext("springCfg32.xml");

        UserDao dao=ctx.getBean(UserDao.class);

        System.out.println(dao.dbUtils);

    }

}
5、结果

7.2、使用零配置注解方式实现
1、创建配置类
package com.zhangguo.spring03.demo.v33;

import org.springframework.context.annotation.ComponentScan;

import org.springframework.context.annotation.Configuration;

import org.springframework.context.annotation.ImportResource;

import org.springframework.context.annotation.PropertySource;

@Configuration

@ComponentScan("com.zhangguo.spring03.demo.v33")

@PropertySource("db.properties")

public class SpringCfg {

}
使用@ImportResource可能会产生的异常(前言中不允许有内容):
"C:\Program Files\Java\jdk1.8.0_111\bin\java" "-javaagent:C:\Program Files\JetBrains\IntelliJ IDEA 2017.2.1\lib\idea_rt.jar=5997:C:\Program Files\JetBrains\IntelliJ IDEA 2017.2.1\bin" -Dfile.encoding=UTF-8 -classpath "C:\Program Files\Java\jdk1.8.0_111\jre\lib\charsets.jar;C:\Program Files\Java\jdk1.8.0_111\jre\lib\deploy.jar;C:\Program Files\Java\jdk1.8.0_111\jre\lib\ext\access-bridge-64.jar;C:\Program Files\Java\jdk1.8.0_111\jre\lib\ext\cldrdata.jar;C:\Program Files\Java\jdk1.8.0_111\jre\lib\ext\dnsns.jar;C:\Program Files\Java\jdk1.8.0_111\jre\lib\ext\jaccess.jar;C:\Program Files\Java\jdk1.8.0_111\jre\lib\ext\jfxrt.jar;C:\Program Files\Java\jdk1.8.0_111\jre\lib\ext\localedata.jar;C:\Program Files\Java\jdk1.8.0_111\jre\lib\ext\nashorn.jar;C:\Program Files\Java\jdk1.8.0_111\jre\lib\ext\sunec.jar;C:\Program Files\Java\jdk1.8.0_111\jre\lib\ext\sunjce_provider.jar;C:\Program Files\Java\jdk1.8.0_111\jre\lib\ext\sunmscapi.jar;C:\Program Files\Java\jdk1.8.0_111\jre\lib\ext\sunpkcs11.jar;C:\Program Files\Java\jdk1.8.0_111\jre\lib\ext\zipfs.jar;C:\Program Files\Java\jdk1.8.0_111\jre\lib\javaws.jar;C:\Program Files\Java\jdk1.8.0_111\jre\lib\jce.jar;C:\Program Files\Java\jdk1.8.0_111\jre\lib\jfr.jar;C:\Program Files\Java\jdk1.8.0_111\jre\lib\jfxswt.jar;C:\Program Files\Java\jdk1.8.0_111\jre\lib\jsse.jar;C:\Program Files\Java\jdk1.8.0_111\jre\lib\management-agent.jar;C:\Program Files\Java\jdk1.8.0_111\jre\lib\plugin.jar;C:\Program Files\Java\jdk1.8.0_111\jre\lib\resources.jar;C:\Program Files\Java\jdk1.8.0_111\jre\lib\rt.jar;C:\Users\Administrator\Desktop\mybatis-generator-gui-0.8.4\Spring02\target\classes;H:\InstallFiles\javaKit\mavenRes\junit\junit\4.12\junit-4.12.jar;H:\InstallFiles\javaKit\mavenRes\org\hamcrest\hamcrest-core\1.3\hamcrest-core-1.3.jar;H:\InstallFiles\javaKit\mavenRes\cglib\cglib\3.2.4\cglib-3.2.4.jar;H:\InstallFiles\javaKit\mavenRes\org\ow2\asm\asm\5.1\asm-5.1.jar;H:\InstallFiles\javaKit\mavenRes\org\apache\ant\ant\1.9.6\ant-1.9.6.jar;H:\InstallFiles\javaKit\mavenRes\org\apache\ant\ant-launcher\1.9.6\ant-launcher-1.9.6.jar;H:\InstallFiles\javaKit\mavenRes\org\springframework\spring-context\4.3.0.RELEASE\spring-context-4.3.0.RELEASE.jar;H:\InstallFiles\javaKit\mavenRes\org\springframework\spring-aop\4.3.0.RELEASE\spring-aop-4.3.0.RELEASE.jar;H:\InstallFiles\javaKit\mavenRes\org\springframework\spring-beans\4.3.0.RELEASE\spring-beans-4.3.0.RELEASE.jar;H:\InstallFiles\javaKit\mavenRes\org\springframework\spring-core\4.3.0.RELEASE\spring-core-4.3.0.RELEASE.jar;H:\InstallFiles\javaKit\mavenRes\commons-logging\commons-logging\1.2\commons-logging-1.2.jar;H:\InstallFiles\javaKit\mavenRes\org\springframework\spring-expression\4.3.0.RELEASE\spring-expression-4.3.0.RELEASE.jar;H:\InstallFiles\javaKit\mavenRes\org\aspectj\aspectjweaver\1.8.9\aspectjweaver-1.8.9.jar" com.zhangguo.spring03.demo.v33.Client33

十月 22, 2018 11:30:15 上午 org.springframework.context.annotation.AnnotationConfigApplicationContext prepareRefresh

信息: Refreshing org.springframework.context.annotation.AnnotationConfigApplicationContext@685f4c2e: startup date [Mon Oct 22 11:30:15 CST 2018]; root of context hierarchy

十月 22, 2018 11:30:17 上午 org.springframework.beans.factory.xml.XmlBeanDefinitionReader loadBeanDefinitions

信息: Loading XML bean definitions from class path resource [db.properties]

十月 22, 2018 11:30:17 上午 org.springframework.context.annotation.AnnotationConfigApplicationContext refresh

警告: Exception encountered during context initialization - cancelling refresh attempt: org.springframework.beans.factory.xml.XmlBeanDefinitionStoreException: Line 1 in XML document from class path resource [db.properties] is invalid; nested exception is org.xml.sax.SAXParseException; lineNumber: 1; columnNumber: 1; 前言中不允许有内容。

Exception in thread "main" org.springframework.beans.factory.xml.XmlBeanDefinitionStoreException: Line 1 in XML document from class path resource [db.properties] is invalid; nested exception is org.xml.sax.SAXParseException; lineNumber: 1; columnNumber: 1; 前言中不允许有内容。

    at org.springframework.beans.factory.xml.XmlBeanDefinitionReader.doLoadBeanDefinitions(XmlBeanDefinitionReader.java:399)

    at org.springframework.beans.factory.xml.XmlBeanDefinitionReader.loadBeanDefinitions(XmlBeanDefinitionReader.java:336)

    at org.springframework.beans.factory.xml.XmlBeanDefinitionReader.loadBeanDefinitions(XmlBeanDefinitionReader.java:304)

    at org.springframework.beans.factory.support.AbstractBeanDefinitionReader.loadBeanDefinitions(AbstractBeanDefinitionReader.java:181)

    at org.springframework.beans.factory.support.AbstractBeanDefinitionReader.loadBeanDefinitions(AbstractBeanDefinitionReader.java:217)

    at org.springframework.beans.factory.support.AbstractBeanDefinitionReader.loadBeanDefinitions(AbstractBeanDefinitionReader.java:188)

    at org.springframework.context.annotation.ConfigurationClassBeanDefinitionReader.loadBeanDefinitionsFromImportedResources(ConfigurationClassBeanDefinitionReader.java:346)

    at org.springframework.context.annotation.ConfigurationClassBeanDefinitionReader.loadBeanDefinitionsForConfigurationClass(ConfigurationClassBeanDefinitionReader.java:142)

    at org.springframework.context.annotation.ConfigurationClassBeanDefinitionReader.loadBeanDefinitions(ConfigurationClassBeanDefinitionReader.java:116)

    at org.springframework.context.annotation.ConfigurationClassPostProcessor.processConfigBeanDefinitions(ConfigurationClassPostProcessor.java:333)

    at org.springframework.context.annotation.ConfigurationClassPostProcessor.postProcessBeanDefinitionRegistry(ConfigurationClassPostProcessor.java:243)

    at org.springframework.context.support.PostProcessorRegistrationDelegate.invokeBeanDefinitionRegistryPostProcessors(PostProcessorRegistrationDelegate.java:273)

    at org.springframework.context.support.PostProcessorRegistrationDelegate.invokeBeanFactoryPostProcessors(PostProcessorRegistrationDelegate.java:98)

    at org.springframework.context.support.AbstractApplicationContext.invokeBeanFactoryPostProcessors(AbstractApplicationContext.java:681)

    at org.springframework.context.support.AbstractApplicationContext.refresh(AbstractApplicationContext.java:523)

    at org.springframework.context.annotation.AnnotationConfigApplicationContext.<init>(AnnotationConfigApplicationContext.java:84)

    at com.zhangguo.spring03.demo.v33.Client33.main(Client33.java:9)

Caused by: org.xml.sax.SAXParseException; lineNumber: 1; columnNumber: 1; 前言中不允许有内容。

    at com.sun.org.apache.xerces.internal.util.ErrorHandlerWrapper.createSAXParseException(ErrorHandlerWrapper.java:203)

    at com.sun.org.apache.xerces.internal.util.ErrorHandlerWrapper.fatalError(ErrorHandlerWrapper.java:177)

    at com.sun.org.apache.xerces.internal.impl.XMLErrorReporter.reportError(XMLErrorReporter.java:400)

    at com.sun.org.apache.xerces.internal.impl.XMLErrorReporter.reportError(XMLErrorReporter.java:327)

    at com.sun.org.apache.xerces.internal.impl.XMLScanner.reportFatalError(XMLScanner.java:1472)

    at com.sun.org.apache.xerces.internal.impl.XMLDocumentScannerImpl$PrologDriver.next(XMLDocumentScannerImpl.java:994)

    at com.sun.org.apache.xerces.internal.impl.XMLDocumentScannerImpl.next(XMLDocumentScannerImpl.java:602)

    at com.sun.org.apache.xerces.internal.impl.XMLNSDocumentScannerImpl.next(XMLNSDocumentScannerImpl.java:112)

    at com.sun.org.apache.xerces.internal.impl.XMLDocumentFragmentScannerImpl.scanDocument(XMLDocumentFragmentScannerImpl.java:505)

    at com.sun.org.apache.xerces.internal.parsers.XML11Configuration.parse(XML11Configuration.java:841)

    at com.sun.org.apache.xerces.internal.parsers.XML11Configuration.parse(XML11Configuration.java:770)

    at com.sun.org.apache.xerces.internal.parsers.XMLParser.parse(XMLParser.java:141)

    at com.sun.org.apache.xerces.internal.parsers.DOMParser.parse(DOMParser.java:243)

    at com.sun.org.apache.xerces.internal.jaxp.DocumentBuilderImpl.parse(DocumentBuilderImpl.java:339)

    at org.springframework.beans.factory.xml.DefaultDocumentLoader.loadDocument(DefaultDocumentLoader.java:76)

    at org.springframework.beans.factory.xml.XmlBeanDefinitionReader.doLoadDocument(XmlBeanDefinitionReader.java:429)

    at org.springframework.beans.factory.xml.XmlBeanDefinitionReader.doLoadBeanDefinitions(XmlBeanDefinitionReader.java:391)

    ... 16 more

Process finished with exit code 1
2、测试
package com.zhangguo.spring03.demo.v33;

import org.springframework.context.ApplicationContext;

import org.springframework.context.annotation.AnnotationConfigApplicationContext;

import org.springframework.context.support.ClassPathXmlApplicationContext;

public class Client33 {

    public static void main(String[] args) {

        ApplicationContext ctx=new AnnotationConfigApplicationContext(SpringCfg.class);

        UserDao dao=ctx.getBean(UserDao.class);

        System.out.println(dao.dbUtils);

    }

}
3、结果

7.3、其它方式
假如有以下属性文件dev.properties, 需要注入下面的tag
tag=123
通过PropertyPlaceholderConfigurer
<bean class="org.springframework.beans.factory.config.PropertyPlaceholderConfigurer">

<property name="location" value="dev.properties" />

</bean>
代码
@Value("${tag}")

private String tag;
通过PreferencesPlaceholderConfigurer
<bean id="appConfig" class="org.springframework.beans.factory.config.PreferencesPlaceholderConfigurer">

<property name="location" value="dev.properties" />

</bean>
代码:
@Value("${tag}")

private String tag;
通过PropertiesFactoryBean
<bean id="config" class="org.springframework.beans.factory.config.PropertiesFactoryBean">

<property name="location" value="dev.properties" />

</bean>
代码:
@Value("#{config['tag']}")

private String tag;
通过util:properties
效果同PropertiesFactoryBean一样
代码:
@Value("#{config['tag']}")

private String tag;
八、示例下载
https://git.coding.net/zhangguo5/Spring.git
九、视频
https://www.bilibili.com/video/av16071354/
十、作业
第一次作业
1.1、请完成所有基于XML配置Ioc上课示例。
1.2、请学会使用帮助文档
1.3、请定义一个Animal动物类(名称name,重量weight),定义两个Animal子类猫Cat(品种type)与狗Dog(颜色color)
1.4、以Animal、Cat、Dog为基础练习3.1-3.6的所有知识点
1.5、请写一个微型的Ioc框架(MiniIoc),实现最基础的控制反转功能(选做)
第二次作业
2.1、请完成所有基于注解、自动装配的Ioc上课示例。
2.2、请定义一个Animal动物类(名称name,重量weight),定义两个Animal子类猫Cat(品种type)与狗Dog(颜色color)
2.3、以Animal、Cat、Dog为基础练习基于注解与自动装配所有知识点,这里使用XML作为配置文件
第三次作业
3.1、请完成所有基于零配置实现Ioc上课示例。
3.3、以Animal、Cat、Dog为基础练习基于注解、自动装配与零配置的综合示例,尽量贯穿所有知识点,这里不使用XML作为配置文件
十一、总结
@Compent 要求Spring容器管理,被Spring扫描,应用于不确定的功能(宽泛)
@Repository 应用于数据访问层 DAO
@Service 应用于业务层
@Controller 应用于控制层
注解要被Spring容器管理的类 -> 配置文件指定要扫描的包 ->初始化容器,获得bean
@Autowired 自动装配,字段(成员变量)、方法、属性、构造, 不支持指定名称,配合@Qualifier
@Resource 自动装配,指定名称,指定类型,不属于Spring javax
@Qualifier 在自动装配时指定对象的名称,避免多个不唯一的实例
@Autowired()
@Qualifier("z")
X x;
@Resource(name="z")
X x;
X
@Compent("y")
Y:X
@Compent("z")
Z:X
Spring学习总结(一)——Spring实现IoC的多种方式的更多相关文章
- Spring学习1:Spring基本特性
http://longliqiang88.github.io/2015/08/14/Spring%E5%AD%A6%E4%B9%A01%EF%BC%9ASpring%E5%9F%BA%E6%9C%AC ...
- Spring实现Ioc的多种方式--控制反转、依赖注入、xml配置的方式实现IoC、对象作用域
Spring实现Ioc的多种方式 一.IoC基础 1.1.概念: 1.IoC 控制反转(Inversion of Control) IoC是一种设计思想. 2.DI 依赖注入 依赖注入是实现IoC的一 ...
- 【Spring学习笔记-MVC-4】SpringMVC返回Json数据-方式2
<Spring学习笔记-MVC>系列文章,讲解返回json数据的文章共有3篇,分别为: [Spring学习笔记-MVC-3]SpringMVC返回Json数据-方式1:http://www ...
- 【Spring学习笔记-MVC-3】SpringMVC返回Json数据-方式1
<Spring学习笔记-MVC>系列文章,讲解返回json数据的文章共有3篇,分别为: [Spring学习笔记-MVC-3]SpringMVC返回Json数据-方式1:http://www ...
- Spring学习笔记(5)——IoC再度学习
学习过Spring框架的人一定都会听过Spring的IoC(控制反转) .DI(依赖注入)这两个概念,对于初学Spring的人来说,总觉得IoC .DI这两个概念是模糊不清的,是很难理解的,今天和大家 ...
- Spring学习笔记之基础、IOC、DI(1)
0.0 Spring基本特性 Spring是一个开源框架:是基于Core来架构多层JavaEE系统 1.0 IOC 控制反转:把对象的创建过程交给spring容器来做. 1.1 application ...
- Spring学习总结(1)- IOC
一.Spring框架概述 Spring是一个开源免费的框架,为了解决企业应用开发的复杂性而创建.Spring框架是一个轻量级的解决方案,可以一站式地构建企业级应用.Spring是模块化的,所以可以只使 ...
- Spring学习笔记之 Spring IOC容器(二) 之注入参数值,自动组件扫描方式,控制Bean实例化方式,使用注解方式
本节主要内容: 1. 给MessageBean注入参数值 2. 测试Spring自动组件扫描方式 3. 如何控制ExampleBean实例化方式 4. 使用注解方式重构Jdb ...
- Spring学习笔记之 Spring IOC容器(一)之 实例化容器,创建JavaBean对象,控制Bean实例化,setter方式注入,依赖属性的注入,自动装配功能实现自动属性注入
本节主要内容: 1.实例化Spring容器示例 2.利用Spring容器创建JavaBean对象 3.如何控制Bean实例化 4.利用Spring实现bean属性sett ...
随机推荐
- android 编译代码注意事项
1 安装openjdk1.7 sudo add-apt-repository ppa:openjdk-r/ppa sudo apt-apt update sudo apt-get install op ...
- 用CSS3的transform来做一个立方体
有一次上数据结构课老师布置了一个用队列的思想通过js和Html来做一个“跳舞配对”的网页,当时那个跳舞的部分用了css3里面transform的相关属性做了个个让图片无限翻转的效果,可能正是由于这个效 ...
- python之raise、assert、with/as环境管理器
要故意出发异常,可以使用raise语句,形式如下: raise <name> #manually trigger an exception raise<name>,<v ...
- JAVA学习博客---2015-7
@Updata 2015.7.17 开始熟悉API.WPS首字母自动大写,有的没有加#编号的,其实方法首字母不是大写例如Char charAt 实际上是char charAt.当然骆驼写法charA ...
- BI先特技软件 Analyzer安装时的部分问题
废话不多,先看第一个问题,我先运行了 Analyzer.3.0.2357b.64.exe 然后就是傻瓜式地下一步 好的,现在问题来了,当我运行安装完毕的Analyzer时,页面给了我这样的提示“ HT ...
- innodb buffer pool相关特性
背景 innodb buffer pool作为innodb最重要的缓存,其缓存命中率的高低会直接影响数据库的性能.因此在数据库发生变更,比如重启.主备切换实例迁移等等,innodb buffer po ...
- Ubuntu全新安装firefox最新版本
Ubuntu默认安装firefox,但是自带的软件仓库是不会随firefox更新的,我在使用中老是提示flash插件需要激活,提示中可选的解决方式有三种 1.更新flash插件,但是跳转到adobe的 ...
- 【吉光片羽】之 Web API
1.在asp项目中直接添加apiController,需要新增Global.asax文件.再增加一个webapiConfig,如果需要访问方式为"api/{controller}/{acti ...
- [.net 面向对象编程基础] (12) 面向对象三大特性——继承
[.net 面向对象编程基础] (12) 面向对象三大特性——继承 上节我们说了面向对象的三大特性之一的封装,解决了将对同一对象所能操作的所有信息放在一起,实现统一对外调用,实现了同一对象的复用,降低 ...
- 基础调试命令 - wt (watch and trace)
本文介绍windbg动态调试过程中一个非常有用的命令,wt的用法. wt命令 wt命令之所以称为wt是因为它是watch and trace的简称,即用来观察和跟踪的命令.这个命令一般用在动态调试而不 ...
