WPF 入门笔记之布局
一、布局原则:
1. 不应显示的设定元素的尺寸,反而元素可以改变它的尺寸,并适应它们的内容
2. 不应使用平布的坐标,指定元素的位置。
3. 布局容器和它的子元素是共享可以使用的空间
4. 可以嵌套的使用布局容器
二、布局容器
2.1 StackPanel:堆栈面板
堆栈面板的Orientation="Vertical"属性和子元素HorizontalAlignment属性一起使用,反之Orientation="Vertical"属性和子元素HorizontalAlignment一起使用

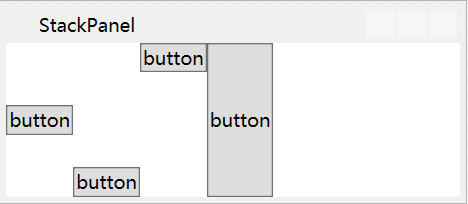
前者Orientation="Vertical"垂直排列,后者Orientation="Horizontal"水平排列
<Window x:Class="Haos.WPF.Case.Layout.StackPanelWindow"

        xmlns="http://schemas.microsoft.com/winfx/2006/xaml/presentation"

        xmlns:x="http://schemas.microsoft.com/winfx/2006/xaml"

        xmlns:d="http://schemas.microsoft.com/expression/blend/2008"

        xmlns:mc="http://schemas.openxmlformats.org/markup-compatibility/2006"

        xmlns:local="clr-namespace:Haos.WPF.Case.Layout"

        mc:Ignorable="d"

        Title="堆栈面板" Height="120" Width="300">

    <!--Orientation="Horizontal"-->

    <StackPanel Height="auto" Orientation="Vertical">

        <Button Content="button" Name="btn_1" HorizontalAlignment="Left"></Button>

        <Button Content="button" Name="btn_2" HorizontalAlignment="Center"></Button>

        <Button Content="button" Name="btn_3" HorizontalAlignment="Right"></Button>

        <Button Content="button" Name="btn_4" HorizontalAlignment="Stretch"></Button>

    </StackPanel>

</Window>
2.2 WrapPanel:一行或一列进行排列
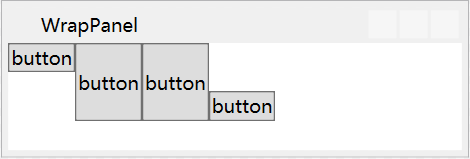
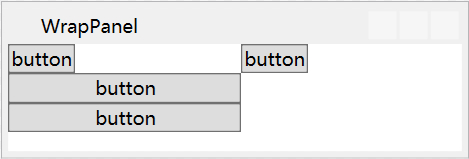
前者Orientation="Horizontal"水平排列,后者Orientation="Vertical"垂直排列.
<Window x:Class="Haos.WPF.Case.Layout.WrapPanelWindow"

        xmlns="http://schemas.microsoft.com/winfx/2006/xaml/presentation"

        xmlns:x="http://schemas.microsoft.com/winfx/2006/xaml"

        xmlns:d="http://schemas.microsoft.com/expression/blend/2008"

        xmlns:mc="http://schemas.openxmlformats.org/markup-compatibility/2006"

        xmlns:local="clr-namespace:Haos.WPF.Case.Layout"

        mc:Ignorable="d"

        Title="WrapPanel" Height="300" Width="300">

    <!--Orientation="Vertical"-->

    <WrapPanel Orientation="Horizontal">

        <!--HorizontalAlignment="Left"-->

        <Button Content="button" Name="btn_1" VerticalAlignment="Top"></Button>

        <Button Content="button" Height="100" Name="btn_2" VerticalAlignment="Center"></Button>

        <Button Content="button" Name="btn_3" VerticalAlignment="Stretch"></Button>

        <Button Content="button" Name="btn_4" VerticalAlignment="Bottom"></Button>

    </WrapPanel>

</Window>
2.3 DockPanel:顺着外边缘来拉伸所包含的控件
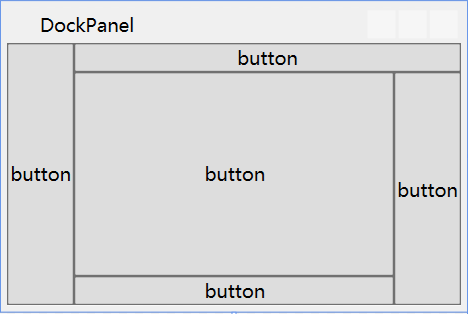
LastChildFill = "True"表示最后一个子元素是否填充满剩余区域
<Window x:Class="Haos.WPF.Case.Layout.DockPanelWindow"

        xmlns="http://schemas.microsoft.com/winfx/2006/xaml/presentation"

        xmlns:x="http://schemas.microsoft.com/winfx/2006/xaml"

        xmlns:d="http://schemas.microsoft.com/expression/blend/2008"

        xmlns:mc="http://schemas.openxmlformats.org/markup-compatibility/2006"

        xmlns:local="clr-namespace:Haos.WPF.Case.Layout"

        mc:Ignorable="d"

        Title="DockPanel" Height="200" Width="300">

    <DockPanel LastChildFill="True">

        <Button Content="button" Name="btn_1" DockPanel.Dock="Left"></Button>

        <Button Content="button" Name="btn_2" DockPanel.Dock="Top"></Button>

        <Button Content="button" Name="btn_3" DockPanel.Dock="Right"></Button>

        <Button Content="button" Name="btn_4" DockPanel.Dock="Bottom"></Button>

        <Button Content="button" Name="btn_5"></Button>

    </DockPanel>

</Window>
2.4 Grid:网格布局(WPF中功能最强大的布局容器)
2.4.1 Grid 的使用
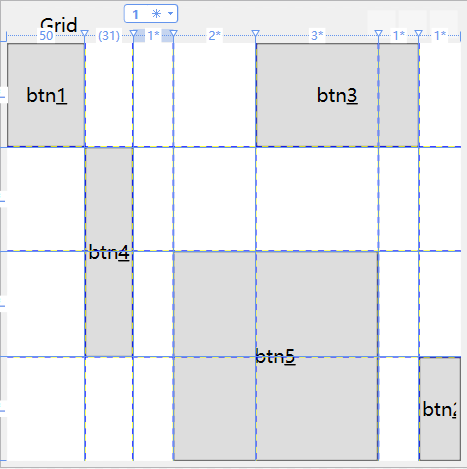
ShowGridLines="True" 开启Grid的分格线
Grid.Row="0" 设置子元素在那一行
Grid.Column="4" 设置子元素在那一列
Grid.RowSpan="2" 设置子元素占用几行
Grid.ColumnSpan="2" 设置子元素占用几列
UseLayoutRounding="True 布局舍入,当在网络放入一个图片,如果不是一个整数像素的宽度,图形边缘会变的模糊。开启布局舍入可以解决这个问题
SharedSizeGroup:共享尺寸组
<Window x:Class="Haos.WPF.Case.Layout.GridPanelWindow"

        xmlns="http://schemas.microsoft.com/winfx/2006/xaml/presentation"

        xmlns:x="http://schemas.microsoft.com/winfx/2006/xaml"

        xmlns:d="http://schemas.microsoft.com/expression/blend/2008"

        xmlns:mc="http://schemas.openxmlformats.org/markup-compatibility/2006"

        xmlns:local="clr-namespace:Haos.WPF.Case.Layout"

        mc:Ignorable="d"

        Title="Grid" Height="300" Width="300">

    <!--ShowGridLines="True" 开启Grid的分格线-->

    <!--UseLayoutRounding="True 布局舍入-->

    <Grid ShowGridLines="True" UseLayoutRounding="True">

        <!--分行-->

        <Grid.RowDefinitions>

            <RowDefinition></RowDefinition>

            <RowDefinition></RowDefinition>

            <RowDefinition></RowDefinition>

            <RowDefinition></RowDefinition>

        </Grid.RowDefinitions>

        <!--分列-->

        <Grid.ColumnDefinitions>

            <!--设置列宽的方法-->

            <ColumnDefinition Width="50"></ColumnDefinition>

            <ColumnDefinition Width="Auto"></ColumnDefinition>

            <ColumnDefinition Width="*"></ColumnDefinition>

            <ColumnDefinition Width="2*"></ColumnDefinition>

            <ColumnDefinition Width="3*"></ColumnDefinition>

            <ColumnDefinition></ColumnDefinition>

            <ColumnDefinition></ColumnDefinition>

        </Grid.ColumnDefinitions>

        <!--把子元素这只指定网格中 Grid.Row="0" Grid.Column="0"-->

        <Button Content="btn_1" Name="btn_1" Grid.Row="0" Grid.Column="0"></Button>

        <Button Content="btn_2" Name="btn_2" Grid.Row="3" Grid.Column="6"></Button>

        <!--设置子元素占用多个网络  Grid.Column="4" Grid.ColumnSpan="2"-->

        <Button Content="btn_3" Name="btn_3" Grid.Row="0" Grid.Column="4" Grid.ColumnSpan="2"></Button>

        <Button Content="btn_4" Name="btn_4" Grid.Row="1" Grid.Column="1" Grid.RowSpan="2"></Button>

        <Button Content="btn_5" Name="btn_5" Grid.Row="2" Grid.Column="3" Grid.RowSpan="2" Grid.ColumnSpan="2"></Button>

    </Grid>

</Window>
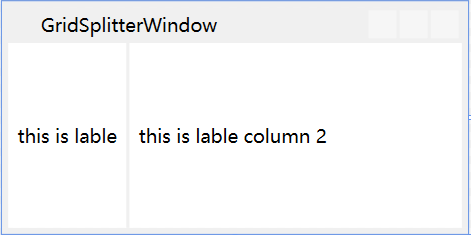
2.4.2 GridSplitter:分割线
<Window x:Class="Haos.WPF.Case.Layout.GridSplitterWindow"

        xmlns="http://schemas.microsoft.com/winfx/2006/xaml/presentation"

        xmlns:x="http://schemas.microsoft.com/winfx/2006/xaml"

        xmlns:d="http://schemas.microsoft.com/expression/blend/2008"

        xmlns:mc="http://schemas.openxmlformats.org/markup-compatibility/2006"

        xmlns:local="clr-namespace:Haos.WPF.Case.Layout"

        mc:Ignorable="d"

        Title="GridSplitterWindow" Height="150" Width="300">

    <Grid>

        <Grid.RowDefinitions>

            <RowDefinition></RowDefinition>

        </Grid.RowDefinitions>

        <Grid.ColumnDefinitions>

            <ColumnDefinition Width="auto"></ColumnDefinition>

            <ColumnDefinition Width="auto"></ColumnDefinition>

            <ColumnDefinition Width="auto"></ColumnDefinition>

        </Grid.ColumnDefinitions>

        <Label Content="this is lable" HorizontalContentAlignment="Center" VerticalContentAlignment="Center" Grid.Column="0"></Label>

        <Label Content="this is lable column 2" HorizontalContentAlignment="Center" VerticalContentAlignment="Center" Grid.Column="2"></Label>

        <GridSplitter Grid.Column="1" Width="2"></GridSplitter>

    </Grid>

</Window>
2.5 布局控件常和Border控件一起使用
a.Background:背景色
b.BorderBrush:前景色(边框颜色)
c.BorderThickness:边框大小
d.CornerRadius:圆角角度

<Border Background="AliceBlue" BorderBrush="Red" BorderThickness="1" CornerRadius="25" Padding="5">

        <StackPanel Height="auto" Orientation="Vertical">

            <!--VerticalAlignment="Center"-->

            <Button Content="button" Name="btn_2" HorizontalAlignment="Center"></Button>

            <Button Content="button" Name="btn_1" HorizontalAlignment="Left"></Button>

            <Button Content="button" Name="btn_3" HorizontalAlignment="Right"></Button>

            <Button Content="button" Name="btn_4" HorizontalAlignment="Stretch"></Button>

        </StackPanel>

</Border>
2.6 共有常用属性
Margin:0,0,0,0 外边距分别(左,上,右,下)
Padding:0,0,0,0 内边距分别(左,上,右,下)
子元素->HorizontalAlignment:父布局容器垂直排列时,子元素位置
子元素->VerticalAlignment:父布局容器水平排列时,子元素位置
WPF 入门笔记之布局的更多相关文章
- WPF 入门笔记之控件内容控件
一.控件类 在WPF中和用户交互的元素,或者说.能够接受焦点,并且接收键盘鼠标输入的元素所有的控件都继承于Control类. 1. 常用属性: 1.1 Foreground:前景画刷/前景色(文本颜色 ...
- WPF 入门笔记之事件
一.事件路由 1. 直接路由事件 起源于一个元素,并且不能传递给其他元素 MouserEnter 和MouserLeave 就是直接事件路由 2. 冒泡路由事件 在包含层次中向上传递,首先由引发的元素 ...
- WPF 入门笔记之基础
一.创建WPF程序 1. App.xaml 相当于窗体的配置文件 2. xmlns:xml名称空间的缩写 xmlns="http://schemas.microsoft.com/winfx/ ...
- WPF学习笔记02_布局
布局原则 WPF窗口只能包含单个元素.如果要放置多个元素,需要放置一个容器,然后在容器中添加元素. 不应显示的设定元素的尺寸 不应该使用屏幕坐标指定元素的位置 布局容器的子元素"共享&quo ...
- dotnet 读 WPF 源代码笔记 布局时 Arrange 如何影响元素渲染坐标
大家是否好奇,在 WPF 里面,对 UIElement 重写 OnRender 方法进行渲染的内容,是如何受到上层容器控件的布局而进行坐标偏移.如有两个放入到 StackPanel 的自定义 UIEl ...
- WPF入门:数据绑定
上一篇我们将XAML大概做了个了解 ,这篇将继续学习WPF数据绑定的相关内容 数据源与控件的Binding Binding作为数据传送UI的通道,通过INotityPropertyChanged接口的 ...
- 每天成长一点---WEB前端学习入门笔记
WEB前端学习入门笔记 从今天开始,本人就要学习WEB前端了. 经过老师的建议,说到他每天都会记录下来新的知识点,每天都是在围绕着这些问题来度过,很有必要每天抽出半个小时来写一个知识总结,及时对一天工 ...
- WPF入门教程系列二十三——DataGrid示例(三)
DataGrid的选择模式 默认情况下,DataGrid 的选择模式为“全行选择”,并且可以同时选择多行(如下图所示),我们可以通过SelectionMode 和SelectionUnit 属性来修改 ...
- React.js入门笔记
# React.js入门笔记 核心提示 这是本人学习react.js的第一篇入门笔记,估计也会是该系列涵盖内容最多的笔记,主要内容来自英文官方文档的快速上手部分和阮一峰博客教程.当然,还有我自己尝试的 ...
随机推荐
- C#高性能大容量SOCKET并发(五):粘包、分包、解包
原文:C#高性能大容量SOCKET并发(五):粘包.分包.解包 粘包 使用TCP长连接就会引入粘包的问题,粘包是指发送方发送的若干包数据到接收方接收时粘成一包,从接收缓冲区看,后一包数据的头紧接着前一 ...
- HOLLOW_BRUSH等价于NULL_BRUSH,都代表透明化刷
NULL_BRUSH 或HOLLOW_BRUSH和GetStockObject函数 备注:HOLLOW_BRUSH等价于NULL_BRUSH,都代表透明化刷 HGDIOBJ GetStockObjec ...
- FireUI live Preview使用方法-Berlin
这是可以让开发者事先预览 mobile 画面的作法 1.先确定 Berlin IDE Tools\Option\Form Designer 中 FireUI live Preview broad ...
- Play Framework 模板里使用注入访问数据层
从Play2.4开始,推荐使用依赖注入替代静态控制器.因此我们不能像play2.3那样,在模板里直接调用object访问数据层.是的,我们还是可以使用常规方式,通过传参到模板里.不过这样很多时候不方便 ...
- Qt之获取本机网络信息(超详细)
经常使用命令行来查看一些计算机的配置信息. 1.首先按住键盘上的“开始键+R键”,然后在弹出的对话框中输入“CMD”,回车 另外,还可以依次点击 开始>所有程序>附件>命令提示符 2 ...
- Delphi驱动开发研究第一篇--实现原理
Delphi能不能开发Windows的驱动程序(这里的驱动程序当然不是指VxD了^_^)一直是广大Delphi fans关注的问题.姑且先不说能或者不能,我们先来看看用Delphi开发驱动程序需要解决 ...
- 文件文件夹混合多选对话框(修改GWL_WNDPROC)
/******************************************************************** created: 2008/07/22 created: 2 ...
- ansible(三)
一.setup模块(收集信息 ) 1.ansible中的setup模块可以收集到的信息 ansible web -m setup ansible_all_ipv4_addresses # ipv4的所 ...
- 简洁的描述SpringMVC工作流程
1.客户端发送来的请求 经过前端控制器(springDispatcherServlet)调用映射器(HandlerMapping)来找到对应的执行链(HandlerExecutionChain)对象, ...
- Kali Linux Web渗透测试手册(第二版) - 1.0 - 渗透测试环境搭建
一.配置KALI Linux和渗透测试环境 在这一章,我们将覆盖以下内容: 在Windows和Linux上安装VirtualBox 创建一个Kali Linux虚拟机 更新和升级Kali Linux ...