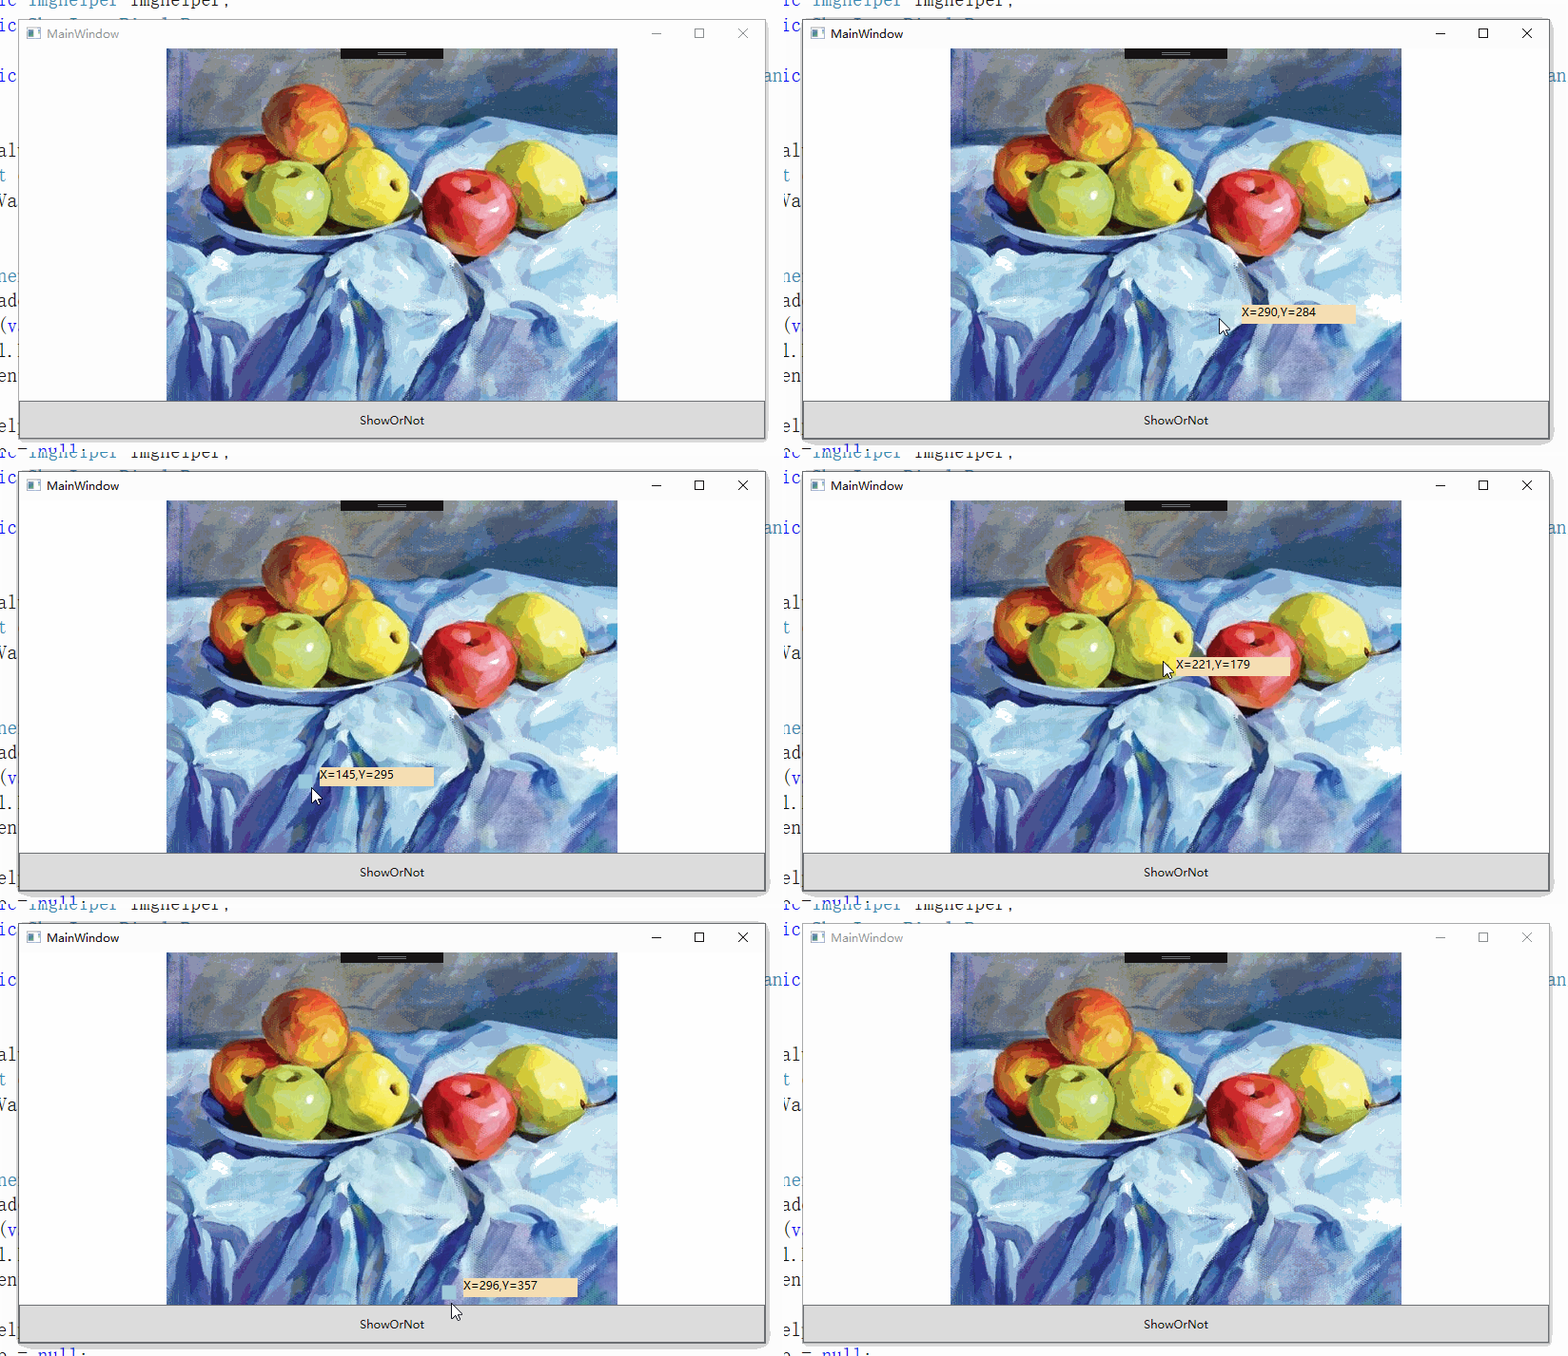
WPF Adorner 简易图片取色器
回答MSDN问题所写。
使用Adorner+附加属性

图片类(来自这位博主的博客)
  /// <summary>

    /// 用于获取位图像素的类

    /// </summary>

    public class Imghelper

    {

        /// <summary>

        /// 位图宽度

        /// </summary>

        public int Width { get; protected set; }

        /// <summary>

        /// 位图高度

        /// </summary>

        public int Height { get; protected set; }

        /// <summary>

        /// 像素

        /// </summary>

        public Color[][] Pixels { get; protected set; }

        /// <summary>

        /// 根据指定的位图生成BitmapPixelHelper类的新实例。

        /// </summary>

        /// <param name="bitmap">指定的位图</param>

        public Imghelper(BitmapSource bitmap)

        {

            FormatConvertedBitmap newBitmap = new FormatConvertedBitmap(bitmap, PixelFormats.Bgra32, BitmapPalettes.WebPaletteTransparent, );

            const int bytesPerPixel = ;

            Height = newBitmap.PixelHeight;

            Width = newBitmap.PixelWidth;

            byte[] data = new byte[Height * Width * bytesPerPixel];

            newBitmap.CopyPixels(data, Width * bytesPerPixel, );

            Pixels = new Color[Height][];

            for (int i = ; i < Height; ++i)

            {

                Pixels[i] = new Color[Width];

                for (int j = ; j < Width; ++j)

                {

                    Pixels[i][j] = Color.FromArgb(

                        data[(i * Width + j) * bytesPerPixel + ],

                        data[(i * Width + j) * bytesPerPixel + ],

                        data[(i * Width + j) * bytesPerPixel + ],

                        data[(i * Width + j) * bytesPerPixel + ]);

                }

            }

        }

        /// <summary>

        /// 获取图片的平均色

        /// </summary>

        public Color GetAverageColor()

        {

            int a = , r = , g = , b = ;

            for (int i = ; i < Height; ++i)

            {

                for (int j = ; j < Width; ++j)

                {

                    a += Pixels[i][j].A;

                    r += Pixels[i][j].R;

                    g += Pixels[i][j].G;

                    b += Pixels[i][j].B;

                }

            }

            a = a / Height / Width;

            r = r / Height / Width;

            g = g / Height / Width;

            b = b / Height / Width;

            return Color.FromArgb((byte)a, (byte)r, (byte)g, (byte)b);

        }

    }
adorner代码
public class ShowImagePixelsPopup : Adorner

    {

        private TextBlock GetTextBlock;

        private VisualCollection collection;

        private UIElement _UIElement;

        private Border GetBorder;

        public ShowImagePixelsPopup(UIElement adornedElement) : base(adornedElement)

        {

            collection = new VisualCollection(this);

            GetTextBlock = new TextBlock();

            GetTextBlock.Height = ;

            GetTextBlock.Width = ;

            GetTextBlock.Background = new SolidColorBrush(Colors.Wheat);

            GetTextBlock.HorizontalAlignment = HorizontalAlignment.Left;

            GetTextBlock.VerticalAlignment = VerticalAlignment.Top;

            GetBorder = new Border();

            GetBorder.Height = ;

            GetBorder.Width = ;

            GetBorder.HorizontalAlignment = HorizontalAlignment.Left;

            GetBorder.VerticalAlignment = VerticalAlignment.Top;

            collection.Add(GetTextBlock);

            collection.Add(GetBorder);

            _UIElement = adornedElement;

        }

        protected override int VisualChildrenCount => collection.Count;

        protected override Visual GetVisualChild(int index) => collection[index];

        protected override Size MeasureOverride(Size constraint) => base.MeasureOverride(constraint);

        public void SetData(Point MousePoint, String Pixels,Color color)

        {

            GetTextBlock.Margin = new Thickness(MousePoint.X+7.5, MousePoint.Y-, ,);

            GetBorder.Margin = new Thickness(MousePoint.X-7.5 , MousePoint.Y-7.5 , , );

            GetBorder.Background = new SolidColorBrush(color);

            GetTextBlock.Text = Pixels;

        }

        protected override Size ArrangeOverride(Size finalSize)

        {

            GetTextBlock.Arrange(new Rect(finalSize));

            GetBorder.Arrange(new Rect(finalSize));

            return base.ArrangeOverride(finalSize);

        }

    }
附加属性类
public class IsShowImagePixels

    {

        public static readonly DependencyProperty IsShowImagePixelsProperty = DependencyProperty.RegisterAttached("IsShowImagePixels", typeof(bool), typeof(IsShowImagePixels), new PropertyMetadata(false, new PropertyChangedCallback(OnIsShowImagePixelsChanged)));

        public static void SetIsShowImagePixels(DependencyObject d, bool value) => d.SetValue(IsShowImagePixelsProperty, value);

        public static bool GetIsShowImagePixels(DependencyObject d) => (bool)d.GetValue(IsShowImagePixelsProperty);

        public static readonly DependencyProperty ShowImagePixelsPointProperty = DependencyProperty.RegisterAttached("ShowImagePixelsPoint", typeof(Point), typeof(IsShowImagePixels), new PropertyMetadata(new Point(, ),new PropertyChangedCallback(OnShowImagePixelsPointChanged)));

        public static void SetIsShowImagePixelsPoint(DependencyObject d, Point value) => d.SetValue(ShowImagePixelsPointProperty, value);

        public static Point GetShowImagePixelsPoint(DependencyObject d) => (Point)d.GetValue(ShowImagePixelsPointProperty);

        private static void OnShowImagePixelsPointChanged(DependencyObject d, DependencyPropertyChangedEventArgs e)

        {

            var c =(Point)e.NewValue;

            popup.SetData(c, $"X={(((int)c.X ) < 0 ? 0 : (int)c.X )},Y={(((int)c.Y ) < 0 ? 0 : (int)c.Y )}", imghelper.Pixels[((int)c.Y - ) <  ?  : (int)c.Y - ][((int)c.X - ) <  ?  : (int)c.X - ]);

        }

        private static AdornerLayer layer;

        private static Imghelper imghelper;

        private static ShowImagePixelsPopup popup;

        private static void OnIsShowImagePixelsChanged(DependencyObject d, DependencyPropertyChangedEventArgs e)

        {

            var NewValue = (bool)e.NewValue;

            UIElement element = d as UIElement;

            if (!NewValue)

            {

                AdornerLayer l = AdornerLayer.GetAdornerLayer(element);

                var ado = l.GetAdorners(element);

                for (var o = ; o < ado.Length; o++)

                    l.Remove(ado[o]);

                element.MouseMove -= Element_MouseMove;

                imghelper = null;

                popup = null;

                layer = null;

                element = null;

            }

            if (element == null)

                return;

            layer = AdornerLayer.GetAdornerLayer(element);

            popup = new ShowImagePixelsPopup(element);

            layer.Add(popup);

            imghelper = new Imghelper((element as Image).Source as BitmapSource);

            //显示鼠标位置

            element.MouseMove += Element_MouseMove;

        }

        private static void Element_MouseMove(object sender, System.Windows.Input.MouseEventArgs e)

        {

            var c = e.GetPosition(sender as FrameworkElement);

            //此处只是用了鼠标位置,也可以用ShowImagePixelsPoint直接指定位置

            popup.SetData(c, $"X={(((int)c.X - 1) < 0 ? 0 : (int)c.X - 1)},Y={(((int)c.Y - 1) < 0 ? 0 : (int)c.Y - 1)}", imghelper.Pixels[((int)c.Y - ) <  ?  : (int)c.Y - ][((int)c.X - ) <  ?  : (int)c.X - ]);

        }

    }
xaml代码
<Grid>

        <Grid.RowDefinitions>

            <RowDefinition Height="*"/>

            <RowDefinition Height="auto"/>

        </Grid.RowDefinitions>

        <AdornerDecorator Grid.Row="">

            <Image x:Name="img"  />

        </AdornerDecorator>

        <Button Click="Button_Click" Grid.Row="" Height="" Content="ShowOrNot"/>

    </Grid>
cs页面代码
  public partial class MainWindow : Window

    {

        public MainWindow()

        {

            InitializeComponent();

            var b = new BitmapImage(new Uri("timg.jpg", UriKind.RelativeOrAbsolute));

            Imghelper imghelper = new Imghelper(b);

            img.Source = b;

            img.SetValue(IsShowImagePixels.IsShowImagePixelsProperty, true);

            Set = true;

        }

        private bool Set = false;

        private void Button_Click(object sender, RoutedEventArgs e)

        {

            if (Set)

                Set = false;

            else

                Set = true;

            img.SetValue(IsShowImagePixels.IsShowImagePixelsProperty, Set);

            return;

        }

    }
WPF Adorner 简易图片取色器的更多相关文章
- wpf 仿QQ图片查看器
参考博客 WPF下的仿QQ图片查看器 wpf图片查看器,支持鼠标滚动缩放拖拽 实现效果 主要参考的WPF下的仿QQ图片查看器,原博主只给出了部分代码. 没有完成的部分 1.右下角缩略图是原图不是缩略图 ...
- Qt 简易图片播放器
一.前言 使用 Qt 制作了一个简单的图片播放器,点击 "浏览按钮" 浏览图片所在目录,目录中的所有图片缩小图标和名称会显示在左侧的图片列表中,点击列表中的图片项,可以在右侧区域的 ...
- 简易音乐播放器主界面设计 - .NET CORE(C#) WPF开发
微信公众号:Dotnet9,网站:Dotnet9,问题或建议:请网站留言, 如果对您有所帮助:欢迎赞赏. 简易音乐播放器主界面设计 - .NET CORE(C#) WPF开发 阅读导航 本文背景 代码 ...
- wpf图片查看器,支持鼠标滚动缩放拖拽
最近项目需要,要用到一个图片查看器,类似于windows自带的图片查看器那样,鼠标滚动可以缩放,可以拖拽图片,于是就写了这个简单的图片查看器. 前台代码: <Window x:Class=&qu ...
- WPF技术触屏上的应用系列(四): 3D效果图片播放器(图片立体轮放、图片立体轮播、图片倒影立体滚动)效果实现
原文:WPF技术触屏上的应用系列(四): 3D效果图片播放器(图片立体轮放.图片立体轮播.图片倒影立体滚动)效果实现 去年某客户单位要做个大屏触屏应用,要对档案资源进行展示之用.客户端是Window7 ...
- powerpoint取色器有什么用|ppt取色器使用教程
在使用powerpoint过程中常常发现一些功能我们很少用到,其实是自己不会用的原因,关于powerpoint取色器有什么用呢?接下来我们一起来学一下ppt取色器使用教程. powerpoint取色器 ...
- TakeColor 屏幕取色器 8.0 中文绿色版
软件名称: TakeColor 屏幕取色器软件语言: 简体中文授权方式: 免费软件运行环境: Win8 / Win7 / Vista / WinXP软件大小: 210KB图片预览: 软件简介:使用方便 ...
- Arava: 用 swing 写一个取色器
备哥以前发我了一个小工具,TakeColor 取色器.来复刻一个吧. 分析一下:顶部是菜单,左侧框显示当前鼠标所在的颜色(下面显示当前坐标和颜色值,默认RGB),中间框显示鼠标周围区域,右侧显示取色的 ...
- wpf下的图片放大缩小
WPF下实现图片的放大缩小移动 在windows 7里面有自带的图片查看器,这个软件可以打开一张图片然后以鼠标在图片中的焦点为原点来进行缩放,并且放大后可以随意拖动.下面我们在WPF中实现这个功能 ...
随机推荐
- -ffast-math编译选项作用
https://stackoverflow.com/questions/7420665/what-does-gccs-ffast-math-actually-do
- vue-路由-显示名称
显示名称 方式1: <div id="app"> <!-- 分析: --> <!-- 1. 我们要监听到 文本框数据的改变,这样才能知道 什么时候去拼 ...
- Linux网络——配置防火墙的相关命令
Linux网络——配置防火墙的相关命令 摘要:本文主要学习了如何在Linux系统中配置防火墙. iptables命令 iptables准确来讲并不是防火墙,真正的防火墙是运行于系统内核中的netfil ...
- LinuxShell脚本——选择结构
LinuxShell脚本——选择结构 摘要:本文主要学习了Shell脚本中的选择结构. if-else语句 基本语法 最简单的用法就是只使用if语句,它的语法格式为: if 条件 then 命令 fi ...
- Java生鲜电商平台-订单中心服务架构与异常订单逻辑
Java生鲜电商平台-订单中心服务架构与异常订单逻辑 订单架构实战中阐述了订单系统的重要性,并从订单系统的信息架构和流程上对订单系统有了总体认知,同时还穿插着一些常见的订单业务规则和逻辑.上文写到订单 ...
- java核心技术第三篇之JDBC第一篇
01.JDBC_两个重要的概念: 1).什么是数据库驱动程序:由数据库厂商提供,面向某种特定的编程语言所开发的一套访问本数据库的类库. 驱动包一般由两种语言组成,前端是:面向某种特定编程语言的语言:后 ...
- Windows Store可以下载安装Windows Terminal (Preview)
Windows Terminal (Preview)已经可以在Windows Store下载安装. Windows Terminal (Preview)运行要求为: Windows 10 版本 183 ...
- 使用element-ui的el-menu导航选中后刷新页面保持当前选中
<el-menu :default-active=‘$route.path‘ :router=‘true‘ :unique-opened=‘true‘ :default-openeds=&quo ...
- .NET能开发出什么样的APP?盘点通过Smobiler开发的APP
.NET程序员一定最熟悉所见即所得式开发,亲切的Visual Studio开发界面,敲了无数个日夜的C#代码. Smobiler也是因为具备这样的特性,使开发人员,可以在VisualStudio上,像 ...
- [Php] windows下使用composer出现SHA384 is not supported by your openssl extension
composer的版本太低了,需要更新composerwindows的安装使用https://getcomposer.org/Composer-Setup.exe报这个错Failed to decod ...
