手把手教你看懂并理解Arduino PID控制库——引子
介绍
本文主要依托于Brett Beauregard大神针对Arduino平台撰写的PID控制库Arduino PID Library及其对应的帮助博客Improving the Beginner’s PID。在没有Brett Beauregard帮助之前,也尝试过按照PID控制基本理论写过PID控制程序,并成功应用于工业设备中,但从未深入考虑过将其写成适合工业控制的通用库。根据Brett Beauregard的理念,此PID库主要想为以下两类人服务:
- 想要从事Arduino PID控制的同志,提供一个快速入门的方法
- 已经拥有自己的PID控制算法,想要从中获取到一些新点子的同志。
本文在上述基础上,主要有以下几方面工作:
- 对Brett Beauregard的PID控制库代码进行必要的说明
- 对其博客教程核心思想进行必要的说明
- 对其依托PID控制库改进的autoPID控制库进行必要的说明。
背景
接触过PID控制的工程师应当都会对下面的公式印象深刻:
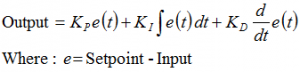
上述公式的具体说明就不加以说明了,请各位参考维基百科的PID controller。大部分同志可能会写出如下代码(或者类似),包括我自己
/*working variables*/

unsigned long lastTime;

double Input, Output, Setpoint;

double errSum, lastErr;

double kp, ki, kd;

void Compute()

{

   /*How long since we last calculated*/

   unsigned long now = millis();

   double timeChange = (double)(now - lastTime);

   /*Compute all the working error variables*/

   double error = Setpoint - Input;

   errSum += (error * timeChange);

   double dErr = (error - lastErr) / timeChange;

   /*Compute PID Output*/

   Output = kp * error + ki * errSum + kd * dErr;

   /*Remember some variables for next time*/

   lastErr = error;

   lastTime = now;

}

void SetTunings(double Kp, double Ki, double Kd)

{

   kp = Kp;

   ki = Ki;

   kd = Kd;

}
其中,Compute() 在需要进行PID控制量计算的任何时候被调用,在这样的代码支持下,PID控制可以工作得很好。但是,如果是一个性能较强的工业控制器,还需要考虑一下几个问题:
- 采样时间——改变采样时间会带来怎样的后果
- 微分项的影响——突然改变设定值或者微分时间,如何避免冲击
- PID参数改变——PID控制参数的突然改变,如何避免突变
- 积分参数——突然改变I参数,如何便面冲击
- 开关——在控制过程中,PID调节开关突然的开启及关闭
- 初始化——PID运行一段时候后关闭,经过一段时间再次开启,如何避免突变
- 调节的方向——这个不是大问题,仅仅是为了保证系统超预计的方向运行
如果上述几个问题没有太多的理解,没关系,先看一下PID库中代码是如何写的(如果仅想看上述7个问题的解决方案请跳过下一章节)。
代码注释
头文件
#ifndef PID_v1_h

#define PID_v1_h

#define LIBRARY_VERSION	1.1.1

class PID

{

public:

	//Constants used in some of the functions below

	// 这里定义的两个变量分别指代两种工作模式:AUTOMATIC 对应 PID控制开启; MANUAL 对应PID控制关闭

	#define AUTOMATIC	1

	#define MANUAL	0

	// 这里定义两个变量分别指代控制量与被控量方向:DIRECT 对应两者同向; REVERSE 对应两者反向

	// 其中同向指: 如果控制量增大,那么被控量也会增大;反之亦然。

	// 其中反向指: 如果控制量增大,那么被控量缺减小;反之亦然。

	#define DIRECT  0

	#define REVERSE  1

	//commonly used functions **************************************************************************

	//构造函数

	PID(double*, double*, double*,        // * constructor.  links the PID to the Input, Output, and

		double, double, double, int);     //   Setpoint.  Initial tuning parameters are also set here

	// 设置自动模式还是手动模式,两者区别目前还未清楚

	void SetMode(int Mode);               // * sets PID to either Manual (0) or Auto (non-0)

	// 计算PID, 在每个计算周期都应当调用 ,计算频率和是否计算可以在setMode和SetSampleTime中指定

	bool Compute();                       // * performs the PID calculation.  it should be

										  //   called every time loop() cycles. ON/OFF and

										  //   calculation frequency can be set using SetMode

										  //   SetSampleTime respectively

	//指定输出的范围,其中0-255,表示可限制的输出范围

	void SetOutputLimits(double, double); //clamps the output to a specific range. 0-255 by default, but

										  //it's likely the user will want to change this depending on

										  //the application

	//available but not commonly used functions ********************************************************

	// 设定P、I、D参数,可以在运行的时间周期内,指定运行需要的参数

	void SetTunings(double, double,       // * While most users will set the tunings once in the

		double);         	  //   constructor, this function gives the user the option

							  //   of changing tunings during runtime for Adaptive control

	// 设定控制器的方向,限制输出的正反向,仅需要在开始的时候设置一次

	void SetControllerDirection(int);	  // * Sets the Direction, or "Action" of the controller. DIRECT

										  //   means the output will increase when error is positive. REVERSE

										  //   means the opposite.  it's very unlikely that this will be needed

										  //   once it is set in the constructor.

	// 采样周期,以毫秒作为设置单位,默认为10

	void SetSampleTime(int);              // * sets the frequency, in Milliseconds, with which

										  //   the PID calculation is performed.  default is 100

	 //Display functions ****************************************************************

	// 获取PID运行参数

	double GetKp();						  // These functions query the pid for interal values.

	double GetKi();						  //  they were created mainly for the pid front-end,

	double GetKd();						  // where it's important to know what is actually

	// 获取运行模式

	int GetMode();						  //  inside the PID.

	//获取PID 方向

	int GetDirection();					  //

private:

	// 此函数初始化,还不知什么用,需要参考CPP

	void Initialize();

	double dispKp;				// * we'll hold on to the tuning parameters in user-entered

	double dispKi;				//   format for display purposes

	double dispKd;				//

	double kp;                  // * (P)roportional Tuning Parameter

	double ki;                  // * (I)ntegral Tuning Parameter

	double kd;                  // * (D)erivative Tuning Parameter

	int controllerDirection;

	// 其中包含了INput、 OUTput以及setPoint

	double *myInput;              // * Pointers to the Input, Output, and Setpoint variables

	double *myOutput;             //   This creates a hard link between the variables and the

	double *mySetpoint;           //   PID, freeing the user from having to constantly tell us

								  //   what these values are.  with pointers we'll just know.

	// 此3个参数需要参考CPP才知道

	unsigned long lastTime;

	double ITerm, lastInput;

	unsigned long SampleTime;

	double outMin, outMax;

	// 是否自动参数的标志

	bool inAuto;

};

#endif
源文件
/**********************************************************************************************

 * Arduino PID Library - Version 1.1.1

 * by Brett Beauregard <br3ttb@gmail.com> brettbeauregard.com

 * This Library is licensed under a GPLv3 License

 **********************************************************************************************/

#include "PID_v1.h"

/*Constructor (...)*********************************************************

 *    The parameters specified here are those for for which we can't set up

 *    reliable defaults, so we need to have the user set them.

 ***************************************************************************/

PID::PID(double* Input, double* Output, double* Setpoint,

        double Kp, double Ki, double Kd, int ControllerDirection)

{

	// 赋值控制量、被控量及设定值初始地址,注意这里是地址

    myOutput = Output;

    myInput = Input;

    mySetpoint = Setpoint;

	// 初始化auto模式为false

	inAuto = false;

	// 默认控制量限制在0到255,此函数可以根据实际系统需要修改控制量输出限制范围

	PID::SetOutputLimits(0, 255);				//default output limit corresponds to

												//the arduino pwm limits

	// 默认采样周期为100ms,同样可以根据需求修改

    SampleTime = 100;							//default Controller Sample Time is 0.1 seconds

	// 设置输出的方向

    PID::SetControllerDirection(ControllerDirection);

	// 设置PID 控制参数

    PID::SetTunings(Kp, Ki, Kd);

	// 用于存储PID构造时,对应的系统运行时间

	// millis()作用是获取当前系统运行时间(单位ms),此函数针对arduino;移植到别的系统,可以其他类似作用函数替代

	// 这里减去SampleTime是为了保证在构造后能力马上进行PID控制,而不需要等待到下一个SampleTime周期

    lastTime = millis()-SampleTime;

}

/* Compute() **********************************************************************

 *     This, as they say, is where the magic happens.  this function should be called

 *   every time "void loop()" executes.  the function will decide for itself whether a new

 *   pid Output needs to be computed.  returns true when the output is computed,

 *   false when nothing has been done.

 *   此函数用于PID控制量计算,函数可以频繁的在进程中被调用。

 **********************************************************************************/

bool PID::Compute()

{

	// 如果没有开启PID返回 计算失败,退出;控制量不变,仍为上一次控制量

   if(!inAuto) return false;

   // 获取当前系统运行时间并求出相对上一次计算时间间隔

   unsigned long now = millis();

   unsigned long timeChange = (now - lastTime);

   // 如果时间间隔大于或者等于采样时间,那么则计算,否则不满足采样条件,计算失败,退出;

   if(timeChange>=SampleTime)

   {

      /*Compute all the working error variables*/

	   // 保存当前被控量,如果是一个实时控制系统,此时被控量可能与构造时的被控量不一致

	  double input = *myInput;

	  // 求出设定值与当前被控量之间的偏差

      double error = *mySetpoint - input;

	  // 计算积分项 此处积分项和标准PID控制方程略微有差距

      ITerm+= (ki * error);

	  // 如果 积分项超过最大限制,那么设置积分项为最大限制;同样,最小限制也做同样处理

	  // 此处为何这么做一句两句说不清楚,主要是为了PID 控制量长时间超限后,突然降低设定值,能够让系统马上反应而不会产生一个时间滞后。

      if(ITerm > outMax) ITerm= outMax;

      else if(ITerm < outMin) ITerm= outMin;

	  // 求出两个被控量之间偏差,也就是在计算周期(这里不用采用周期是因为计算周期可能会超过采样周期)被控量的变化。

	  // 其实就是微分项的 因子,但是看起来和标准表达式也不一样啊!!!

	  // 。。。。一两句也说不清楚,总的来说是为了防止控制量和被控量突变

      double dInput = (input - lastInput);

      /*Compute PID Output*/

	  // PID 调节算式,这就不需要说明了

      double output = kp * error + ITerm- kd * dInput;

      // 这里做限制和ITerm做限制的作用是一样的。。

	  if(output > outMax) output = outMax;

      else if(output < outMin) output = outMin;

	  *myOutput = output;

      /*Remember some variables for next time*/

      lastInput = input;

      lastTime = now;

	  return true;

   }

   else return false;

}

/* SetTunings(...)*************************************************************

 * This function allows the controller's dynamic performance to be adjusted.

 * it's called automatically from the constructor, but tunings can also

 * be adjusted on the fly during normal operation

 * 此函数用于设定PID调节参数

 ******************************************************************************/

void PID::SetTunings(double Kp, double Ki, double Kd)

{

	// 如果PID参数中有小于0的参数,那么设定失败,直接退出,仍然沿用原来的参数

   if (Kp<0 || Ki<0 || Kd<0) return;

	// 仅做显示用。

   dispKp = Kp; dispKi = Ki; dispKd = Kd;

   // 获取采样时间,由ms转为s

   double SampleTimeInSec = ((double)SampleTime)/1000;

   // 调整PID参数, I 和 D 参数的调节主要是为了满足采样周期改变带导致的影响,

   // 主要是 积分项和 微分项是和时间有关的参数,所以采样周期改变会导致这两项需要重新计算,这里为了减少这些工作,将采样周期变换转换我I D参数变化

   // 至于为什么可以这么做,是因为前面做了特殊处理,修改了PID标准表达式,使每一次计算对历史依赖较小

   kp = Kp;

   ki = Ki * SampleTimeInSec;

   kd = Kd / SampleTimeInSec;

	//  设定PID调节方向

  if(controllerDirection ==REVERSE)

   {

      kp = (0 - kp);

      ki = (0 - ki);

      kd = (0 - kd);

   }

}

/* SetSampleTime(...) *********************************************************

 * sets the period, in Milliseconds, at which the calculation is performed

 ******************************************************************************/

//更新新的采样时间,同时按照比例更新ID参数

void PID::SetSampleTime(int NewSampleTime)

{

   if (NewSampleTime > 0)

   {

      double ratio  = (double)NewSampleTime

                      / (double)SampleTime;

      ki *= ratio;

      kd /= ratio;

      SampleTime = (unsigned long)NewSampleTime;

   }

}

/* SetOutputLimits(...)****************************************************

 *     This function will be used far more often than SetInputLimits.  while

 *  the input to the controller will generally be in the 0-1023 range (which is

 *  the default already,)  the output will be a little different.  maybe they'll

 *  be doing a time window and will need 0-8000 or something.  or maybe they'll

 *  want to clamp it from 0-125.  who knows.  at any rate, that can all be done

 *  here.

 * 此函数容易产生控制量的突变,在运行过程中,尽量不要缩小范围

 **************************************************************************/

void PID::SetOutputLimits(double Min, double Max)

{

	// 赋值限制

   if(Min >= Max) return;

   outMin = Min;

   outMax = Max;

   if(inAuto)

   {

	   if(*myOutput > outMax) *myOutput = outMax;

	   else if(*myOutput < outMin) *myOutput = outMin;

	   if(ITerm > outMax) ITerm= outMax;

	   else if(ITerm < outMin) ITerm= outMin;

   }

}

/* SetMode(...)****************************************************************

 * Allows the controller Mode to be set to manual (0) or Automatic (non-zero)

 * when the transition from manual to auto occurs, the controller is

 * automatically initialized

 ******************************************************************************/

void PID::SetMode(int Mode)

{

    bool newAuto = (Mode == AUTOMATIC);

	// 如果模式不一样,那么则重新初始化

    if(newAuto == !inAuto)

    {  /*we just went from manual to auto*/

        PID::Initialize();

    }

    inAuto = newAuto;

}

/* Initialize()****************************************************************

 *	does all the things that need to happen to ensure a bumpless transfer

 *  from manual to automatic mode.

 ******************************************************************************/

void PID::Initialize()

{

   ITerm = *myOutput;

   lastInput = *myInput;

   if(ITerm > outMax) ITerm = outMax;

   else if(ITerm < outMin) ITerm = outMin;

}

/* SetControllerDirection(...)*************************************************

 * The PID will either be connected to a DIRECT acting process (+Output leads

 * to +Input) or a REVERSE acting process(+Output leads to -Input.)  we need to

 * know which one, because otherwise we may increase the output when we should

 * be decreasing.  This is called from the constructor.

 ******************************************************************************/

void PID::SetControllerDirection(int Direction)

{

   if(inAuto && Direction !=controllerDirection)

   {

	  kp = (0 - kp);

      ki = (0 - ki);

      kd = (0 - kd);

   }

   controllerDirection = Direction;

}

/* Status Funcions*************************************************************

 * Just because you set the Kp=-1 doesn't mean it actually happened.  these

 * functions query the internal state of the PID.  they're here for display

 * purposes.  this are the functions the PID Front-end uses for example

 ******************************************************************************/

double PID::GetKp(){ return  dispKp; }

double PID::GetKi(){ return  dispKi;}

double PID::GetKd(){ return  dispKd;}

int PID::GetMode(){ return  inAuto ? AUTOMATIC : MANUAL;}

int PID::GetDirection(){ return controllerDirection;}
(这里代码过长,提供下载地址)。
上述代码提供对PID库的必要注释,其中有些注释无法一两句话就能说清,特别是针对上述7个问题的解决方案,具体的代码分析,请参考下一章节。
如有不足之处请告知,^.^
下一章节将分析采样时间变化对PID控制的影响
PS:转载请注明出处:欧阳天华
手把手教你看懂并理解Arduino PID控制库——引子的更多相关文章
- 手把手教你看KEGG通路图!
手把手教你看KEGG通路图! 亲爱的小伙伴们,是不是正关注代谢通路研究?或者你正面对数据,绞尽脑汁?小编当然不能让亲们这么辛苦,今天就跟大家分享KEGG代谢通路图的正确解读方法,还在迷糊中的小伙伴赶紧 ...
- 教你看懂Code128条形码
首 页 条码控件 条码技术 条码新闻 合作伙伴 联系我们 常见问题 电话:010-84827961 当前位置:条形码控件网 > 条形码控件技术文章 > >正文 教你看懂C ...
- 手把手教你看MySQL官方文档
前言: 在学习和使用MySQL的过程中,难免会遇到各种问题.不知道当你遇到相关问题时会怎么做,我在工作或写文章的过程中,遇到不懂或需要求证的问题时通常会去查阅官方文档.慢慢的,阅读文档也有了一些经验, ...
- emmm 深入浅出教你看懂现代金融游戏
3303只信仰公平[网易陕西省西安网友]1 比特币是骗人的.你们都被“现代帼家纸币”概念茜脑了,而且茜的很彻底,所以你们看不透比特币的骗局.简单来说,现代纸币是“空气纸”,比特币是“空气币(空气数据) ...
- 手把手教你调试Linux C++ 代码(一步到位包含静态库和动态库调试)
手把手教你调试Linux C++ 代码 软件调试本身就是一项相对复杂的活动,他不仅要求调试者有着清晰的思路,而且对调试者本身的技能也有很高的要求.Windows下Visual Studio为我们做了很 ...
- 教你看懂Docker和K8S!
转载于 https://my.oschina.net/jamesview/blog/2994112 2010年,几个搞IT的年轻人,在美国旧金山成立了一家名叫“dotCloud”的公司. 这家公司主要 ...
- 教你看懂 OpenStack 日志 - 每天5分钟玩转 OpenStack(29)
instance 从创建到删除的整个生命周期都是由 Nova 管理的. 后面各小节我们以 instance 生命周期中的不同操作场景为例,详细分析 Nova 不同组件如何协调工作,并通过日志分析加深大 ...
- 教你看懂网上流传的60行JavaScript代码俄罗斯方块游戏
早就听说网上有人仅仅用60行JavaScript代码写出了一个俄罗斯方块游戏,最近看了看,今天在这篇文章里面我把我做的分析整理一下(主要是以注释的形式). 我用C写一个功能基本齐全的俄罗斯方块的话,大 ...
- 一篇教你看懂spring bean工厂和aop
这篇文章为spring回顾总结的第二篇,本篇主要分为两个部分,分别是spring的bean工厂的实现.spring的aop实现原理,这两部分也是面试当中问的比较多的. spring的bean工厂的实现 ...
随机推荐
- 64位手机部署centos
在64位处理器的手机上部署centos会有下面的困难. 1. 没有现成的aarch64的rootfs. 2. termux没有rpm2cpio进行部署. 3. armv8*不会被centos识别为aa ...
- eNSP仿真软件之配置Trunk口
实验原理 在以太网中,通过划分VLAN来隔离广播域和增强网络通信的安全性.以太网通常由多台交换机组成,为了使VLAN的数据帧跨越多台交换机传递,交换机之间互连的链路需要配置为干道链路(Trunk Li ...
- PostGIS mysql_fdw安装(Linux)
##本人在安装过程中,可能因为系统环境因素或是其他原因,参考网上的文章没有一篇是非常顺利的,所以自己总结一下. ##安装过程中非常坎坷,有些地方反复了好几次,弄的有点模糊,但模糊的地方在文中我会指出. ...
- RNN-LSTM讲解-基于tensorflow实现
cnn卷积神经网络在前面已经有所了解了,目前博主也使用它进行了一个图像分类问题,基于kaggle里面的food-101进行的图像识别,识别率有点感人,基于数据集的关系,大致来说还可行.下面我就继续学习 ...
- SSH 免密登录服务器
本文详解如何以多种方法实现ssh免密码登陆远程服务器 阅读须知: 1.以下方法操作时请不要随意切换目录. 2.xxx为私钥,xxx.pub是公钥(默认一般文件名为id_rsa和id_rsa.pub,可 ...
- 2019-9-11:渗透测试,基础学习,ubuntu搭建LAMP
一,apache web服务器安装 1,sudo apt-get install apache2 2,systemctl status apache2,检查apache2是否开启 #开启.关闭和重启a ...
- webpackd学习的意义
高速发展的前端技术,与浏览器支持的不相匹配.导致前端必须把前端比较先进的技术进行一层编码从而使得浏览器可以加载. 比如前端框架Vue,Angular,React.Less,Sass.TypeScrip ...
- scss--函数 (Functions)--unit
(Sass::Script::Value::String) unit($number) Returns the unit(s) associated with a number. Complex un ...
- Java基础面试题及答案(五)
Java Web 64. jsp 和 servlet 有什么区别? jsp经编译后就变成了Servlet.(JSP的本质就是Servlet,JVM只能识别java的类,不能识别JSP的代码,Web容器 ...
- Prometheus PromQL 简单用法
目录 说明 CPU 内存 磁盘监控 磁盘空间利用率百分比 预计饱和 说明 基于上一篇文章的基础,这里做一些关于 CPU.内存.磁盘的一些基础查询语句. CPU 通过查询 metric值为 node_c ...