Android实现图片一边的三角形边框
在每一个图片的某一侧都可以展示出一个三角形的边框视图,就是咱们的三角形标签视图。这个视图在电商类APP当中比较常用,使用过ebay的同学应该都还记得有些商品的左上角或者右上角都会显示一个三角形的边框,用于给人一个直观的商品正在促销,或者刚刚上线的直观感受。我们可以看看实现后的效果如下:
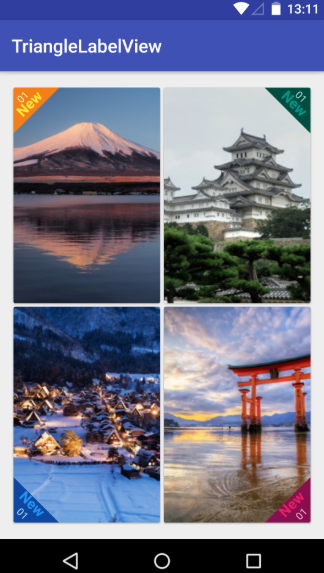
在真实的APP当中,我们还会加上一个SrcollView控件,这样子才可以进行不断地上下浏览。我们这里主要是为了让大家明白这个视图是该如何实现的,就不演示SrcollView控件下的做法了,直接在线性布局下做一个简单的说明。由于在线性布局上面一共具有四张图,因此咱们可以先单独编写每一个imageview的自定义view,然后<include>的语法将他们组合起来,这样可以提高UI开发的效率,进行协同工作与开发。首先咱们先实现左上角和右上角的triangle view.
在build.gradle文件当中相应地方添加如下代码,导入相应的maven库:
allprojects {

        repositories {

            ...

            maven { url "https://jitpack.io" }

        }

}
之后在另一个build.gradle文件当中添加库:
dependencies {

            implementation 'com.github.shts:TriangleLabelView:1.1.2'

    }
咱们的前期工作就这样做好啦,现在就开始正式编写咱们的每一个三角形边框视图啦,首先是第一个位于左上角的视图
一.card_left_top.xml:
<?xml version="1.0" encoding="utf-8"?>

<android.support.v7.widget.CardView xmlns:android="http://schemas.android.com/apk/res/android"

    xmlns:app="http://schemas.android.com/apk/res-auto"

    android:layout_width="match_parent"

    android:layout_height="match_parent">

    <RelativeLayout

        android:layout_width="match_parent"

        android:layout_height="match_parent">

        <ImageView

            android:id="@+id/image"

            android:scaleType="centerCrop"

            android:src="@drawable/s_image_2"

            android:layout_width="match_parent"

            android:layout_height="match_parent" />

        <jp.shts.android.library.TriangleLabelView

            android:layout_width="match_parent"

            android:layout_height="match_parent"

            android:layout_alignParentLeft="true"

            android:layout_alignParentTop="true"

            app:backgroundColor="@color/yellow_900"

            app:corner="leftTop"

            app:labelBottomPadding="5dp"

            app:labelCenterPadding="0dp"

            app:labelTopPadding="10dp"

            app:primaryText="New"

            app:primaryTextColor="@color/yellow_500"

            app:primaryTextSize="16sp"

            app:secondaryText="01"

            app:secondaryTextColor="@color/yellow_100"

            app:secondaryTextSize="11sp" />

    </RelativeLayout>

</android.support.v7.widget.CardView>
编写好后在preview当中显示如下:

下面是位于右上角的视图
二.card_right_top.xml:
<?xml version="1.0" encoding="utf-8"?>

<android.support.v7.widget.CardView xmlns:android="http://schemas.android.com/apk/res/android"

    xmlns:app="http://schemas.android.com/apk/res-auto"

    android:layout_width="match_parent"

    android:layout_height="match_parent">

    <RelativeLayout

        android:layout_width="match_parent"

        android:layout_height="match_parent">

        <ImageView

            android:id="@+id/image"

            android:scaleType="centerCrop"

            android:src="@drawable/s_image_4"

            android:layout_width="match_parent"

            android:layout_height="match_parent" />

        <jp.shts.android.library.TriangleLabelView

            android:layout_width="match_parent"

            android:layout_height="match_parent"

            android:layout_alignParentRight="true"

            android:layout_alignParentTop="true"

            app:backgroundColor="@color/teal_900"

            app:corner="rightTop"

            app:labelBottomPadding="5dp"

            app:labelCenterPadding="0dp"

            app:labelTopPadding="10dp"

            app:primaryText="New"

            app:primaryTextColor="@color/teal_500"

            app:primaryTextSize="16sp"

            app:secondaryText="01"

            app:secondaryTextColor="@color/teal_100"

            app:secondaryTextSize="11sp" />

    </RelativeLayout>

</android.support.v7.widget.CardView>
三.card_right_buttom.xml:
<?xml version="1.0" encoding="utf-8"?>

<android.support.v7.widget.CardView xmlns:android="http://schemas.android.com/apk/res/android"

    xmlns:app="http://schemas.android.com/apk/res-auto"

    android:layout_width="match_parent"

    android:layout_height="match_parent">

    <RelativeLayout

        android:layout_width="match_parent"

        android:layout_height="match_parent">

        <ImageView

            android:id="@+id/image"

            android:scaleType="centerCrop"

            android:src="@drawable/s_image_3"

            android:layout_width="match_parent"

            android:layout_height="match_parent" />

        <jp.shts.android.library.TriangleLabelView

            android:layout_width="match_parent"

            android:layout_height="match_parent"

            android:layout_alignParentRight="true"

            android:layout_alignParentBottom="true"

            app:backgroundColor="@color/pink_900"

            app:corner="rightBottom"

            app:labelTopPadding="10dp"

            app:labelCenterPadding="5dp"

            app:labelBottomPadding="0dp"

            app:primaryText="New"

            app:primaryTextColor="@color/pink_500"

            app:primaryTextSize="16sp"

            app:secondaryText="01"

            app:secondaryTextColor="@color/pink_100"

            app:secondaryTextSize="11sp" />

    </RelativeLayout>

</android.support.v7.widget.CardView>
四.card_left_buttom.xml:
<?xml version="1.0" encoding="utf-8"?>

<android.support.v7.widget.CardView xmlns:android="http://schemas.android.com/apk/res/android"

    xmlns:app="http://schemas.android.com/apk/res-auto"

    android:layout_width="match_parent"

    android:layout_height="match_parent">

    <RelativeLayout

        android:layout_width="match_parent"

        android:layout_height="match_parent">

        <ImageView

            android:id="@+id/image"

            android:src="@drawable/s_image_1"

            android:scaleType="centerCrop"

            android:layout_width="match_parent"

            android:layout_height="match_parent" />

        <jp.shts.android.library.TriangleLabelView

            android:layout_width="match_parent"

            android:layout_height="match_parent"

            android:layout_alignParentLeft="true"

            android:layout_alignParentBottom="true"

            app:backgroundColor="@color/blue_900"

            app:corner="leftBottom"

            app:labelTopPadding="10dp"

            app:labelCenterPadding="5dp"

            app:labelBottomPadding="0dp"

            app:primaryText="New"

            app:primaryTextColor="@color/blue_500"

            app:primaryTextSize="16sp"

            app:secondaryText="01"

            app:secondaryTextColor="@color/blue_100"

            app:secondaryTextSize="11sp" />

    </RelativeLayout>
最后咱们整合一下就OK啦!整合后的主活动的代码为:
五.activity_main.xml:
<?xml version="1.0" encoding="utf-8"?>

<LinearLayout xmlns:android="http://schemas.android.com/apk/res/android"

    xmlns:tools="http://schemas.android.com/tools"

    xmlns:app="http://schemas.android.com/apk/res-auto"

    android:layout_width="match_parent"

    android:layout_height="match_parent"

    android:orientation="vertical"

    tools:context=".Fragment2">

 <LinearLayout

        android:layout_width="match_parent"

        android:layout_height="0dp"

        android:layout_weight="1"

        android:orientation="horizontal">

        <include android:layout_width="0dp"

            android:layout_height="match_parent"

            android:layout_weight="1"

            android:layout_margin="2dp"

            android:id="@+id/left_top" layout="@layout/card_left_top" />

        <include android:layout_width="0dp"

            android:layout_height="match_parent"

            android:layout_weight="1"

            android:layout_margin="2dp"

            android:id="@+id/right_top" layout="@layout/card_right_top" />

    </LinearLayout>

    <LinearLayout

        android:layout_width="match_parent"

        android:layout_height="0dp"

        android:layout_weight="1"

        android:orientation="horizontal">

        <include android:layout_width="0dp"

            android:layout_height="match_parent"

            android:layout_weight="1"

            android:layout_margin="2dp"

            android:id="@+id/left_bottom" layout="@layout/card_left_bottom" />

        <include android:layout_width="0dp"

            android:layout_height="match_parent"

            android:layout_weight="1"

            android:layout_margin="2dp"

            android:id="@+id/right_bottom" layout="@layout/card_right_bottom" />

    </LinearLayout>

</LinearLayout>
完事儿!github源码可以在https://github.com/shts/TriangleLabelView处进行阅读!!!
帅照:
Android实现图片一边的三角形边框的更多相关文章
- Android 给图片 加边框
图片处理时,有时需要为图片加一些边框,下面介绍一种为图片添加简单边框的方法. 基本思路是:将边框图片裁剪成八张小图片(图片大小最好一致,不然后面处理会很麻烦),分别对应左上角,左边,左下角,下边,右下 ...
- Android 给图片加边框
图片处理时,有时需要为图片加一些边框,下面介绍一种为图片添加简单边框的方法. 基本思路是:将边框图片裁剪成八张小图片(图片大小最好一致,不然后面处理会很麻烦),分别对应左上角,左边,左下角,下边,右下 ...
- Android ImageView图片自适应 (转)
网络上下载下来的图片自适应:android:adjustViewBounds="true"(其详细解释在下面)<ImageView android:id=" ...
- Android ImageView图片自适应
网络上下载下来的图片自适应:android:adjustViewBounds="true"(其详细解释在下面) <ImageView android:id=" ...
- Android圆形图片自定义控件
Android圆形图片控件效果图如下: 代码如下: RoundImageView.java package com.dxd.roundimageview; import android.content ...
- Android Imageview 图片居左居右,自定义圆角
android:scaleType="fitStart" 图片靠左不变形显示, android:scaleType=”fitEnd” 图片靠右显示,不变形. 半透明andr ...
- Android圆形图片--自己定义控件
Android圆形图片控件效果图例如以下: 代码例如以下: RoundImageView.java package com.dxd.roundimageview; import android.con ...
- Android压缩图片到100K以下并保持不失真的高效方法
前言:目前一般手机的相机都能达到800万像素,像我的Galaxy Nexus才500万像素,拍摄的照片也有1.5M左右.这么大的照片上传到服务器,不仅浪费流量,同时还浪费时间. 在开发Android企 ...
- 仿优酷Android客户端图片左右滑动(自动滑动)
最终效果: 页面布局main.xml: <?xml version="1.0" encoding="utf-8"?> <LinearLayou ...
随机推荐
- scss新手使用指南
还在用死的css写样式吗?那可太麻烦了,各种长串选择器不说,还有各种继承权重有时候还有可能不生效 我的小程序项目也结束了,是时候总结一下scss语法了,毕竟用起来更加方便而且还能精简一点代码,好处多多 ...
- m101 真*sb($\huge 全场最瞎$)
不想说这场考试,T1全场切,但是我: T3全场30,但是: 鬼知道我为什么敲的是p*p啊(而且还炸精了!) kuku----! $\huge 全场最瞎$
- 『题解』UVa11324 The Largest Clique
原文地址 Problem Portal Portal1:UVa Portal2:Luogu Portal3:Vjudge Description Given a directed graph \(\t ...
- 误删tree命令如何恢复
误删tree命令如何恢复 考察rpm,yum的用法 一.删除tree命令,tree命令不可用 [root@centos7 ~]# which tree /usr/bin/tree [root@cent ...
- ChickenLegend Image
- C++中对C的扩展学习新增语法——引用
引用 引用的好处: 1.引用的好处 C++使用结构体,不需要再使用 typedef. 2.值传递是将实参进行拷贝,赋值给形参,如果对象比较大,每次拷贝效率比较低,并且函数内部无法修改外部变量的值,能力 ...
- 2019年PHP最新面试题(含答案)
1. 数据库设计经验,为什么进行分表?分库?一般多少数据量开始分表?分库?分库分表的目的?什么是数据库垂直拆分?水平拆分?分区等等 一:为什么要分表 当一张表的数据达到几百万时,你查询一次所花的时间会 ...
- PHP Laravel 中使用简单的方法跟踪用户是否在线
今天,我的任务是,在 Laravel 应用程序用户个人资料页面上,用户名旁边添加一个绿点,表示他们是否在线.我首先想到的是,我们将需要启动一个 node.js 服务器并跟踪每个用户的活动套接字连接.然 ...
- [高效工作软件] Capslock+的使用笔记 (快捷键)
1.下载https://cjkis.me/capslock+/#%E4%B8%8B%E8%BD%BD,双击即可安装,中文路径也可: 2.这个软件的代码开源了的,以后java学成之后,可以去看看源码: ...
- Spark性能优化指南——基础篇(转)
[转]Spark性能优化指南——基础篇 http://mp.weixin.qq.com/s?__biz=MjM5NDMwNjMzNA==&mid=2651805828&idx=1&am ...