Spring——依赖注入(DI)详解
声明:本博客仅仅是一个初学者的学习记录、心得总结,其中肯定有许多错误,不具有参考价值,欢迎大佬指正,谢谢!想和我交流、一起学习、一起进步的朋友可以加我微信Liu__66666666
这是简单学习一遍之后的记录,后期还会修改。
一、概念引入
我们通过前文Spring——IOC已经知道怎么创建一个空白的实例对象,但是这个实例对象是没有进行任何成员变量设置的,都是默认值,例如int类型默认为0、引用类型默认为null。
那我们如果想创建带有特定属性的对象,那现在有个Computer类,他有属性”型号“。所以出厂的时候这个属性就是早被设定好了,那代码中的工厂如何去设置这个属性呢?其实依赖注入(DI,Dependency Injection)所做的工作就是为Spring中的Bean设置属性(成员变量的值)。
百度百科概念:所谓依赖注入,是指程序运行过程中,如果需要调用另一个对象协助时,无须在代码中创建被调用者,而是依赖于外部的注入。Spring的依赖注入对调用者和被调用者几乎没有任何要求,完全支持对POJO之间依赖关系的管理。
二、依赖注入方式
依赖注入常见的有三种:
	- 通过构造方法注入

	- setter方法注入

	- 接口注入
现在有苹果电脑公司的“MacBook pro 2019”型号的电脑都是“macOS Mojave”系统,那该怎么设置型号和操作系统这两个属性呢?下面我们就以这个电脑为例探讨一下!
首先建好项目并导入jar包,创建好applicationContext.xml文件,操作步骤参考Spring——IOC
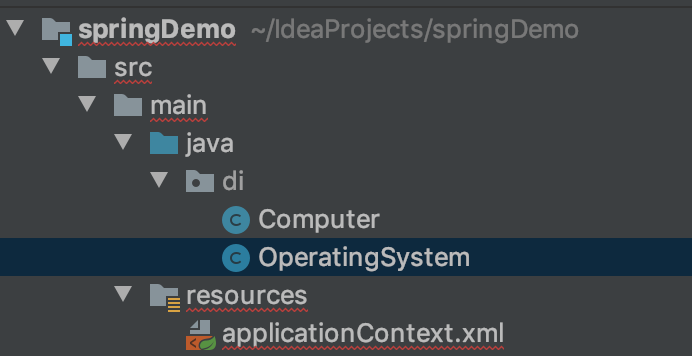
项目目录结构如下:

Computer类:
public class Computer {

    private String type;//电脑型号

    private OperatingSystem operatingSystem;//操作系统

    public Computer() {}

    public Computer(String type, OperatingSystem operatingSystem) {

        this.type = type;

        this.operatingSystem = operatingSystem;

    }

//此处略去getter setter toString方法

}
OperatingSystem类(这是Computer的一个属性:操作系统)
public class OperatingSystem {

    private String name;//操作系统名字,例如Windows、macOS

  //操作系统版本,例如,当name为Windows,version为10的时候,就是win10

    private String version;

  	public OperatingSystem(){}

    public OperatingSystem(String name, String version) {

        this.name = name;

        this.version = version;

    }

//此处略去getter setter toString方法

}
1.构造方法注入(一定要写对应的构造方法!)
此方式使用的是bean标签内部的标签进行依赖注入。
以如下构造方法为例
public Computer(String type, OperatingSystem operatingSystem) {

    this.type = type;

    this.operatingSystem = operatingSystem;

}
- 写法1(不推荐,不常用):
<!--macOS mojave-->

<bean id="operatingSystem" class="di.OperatingSystem">

    <constructor-arg index="0" value="macOS"/>

    <constructor-arg index="1" value="Mojave"/>

</bean>

<bean id="computer" class="di.Computer">

    <constructor-arg index="0" value="MacBook Pro 2019"/>

    <constructor-arg index="1" ref="operatingSystem"/>

</bean>
标签的写法还是和之前一样,唯一不同的是有了标签体,标签体内部就是用来进行属性设置(依赖注入)的。
每个constructor-arg标签代表构造方法中的一个参数;
属性index代表参数的顺序,从0开始,index=“0”代表的是构造方法的String type这个参数,index=“1”代表的是OperatingSystem这个参数;
属性value代表的是这个参数要传入的值,例如type这个参数对应的是macOS,version是Mojave,一般来说,基本类型和String类型要用value属性来传值。
由于在Computer类中我们引用了OperatingSystem这个对象,所以需要先定义好OperatingSystem这个bean,以供我们将其注入到computer这个bean中,其实OperatingSystem就是Computer的一个依赖。而在第二个bean中,有一个ref属性,这个用来传value传不了的值,ref在本例中的值为operatingSystem这个bean的id。
- 写法2(推荐写法,但不常用):
<!--macOS mojave-->

<bean id="operatingSystem" class="di.OperatingSystem">

    <constructor-arg name="name" value="macOS"/>

    <constructor-arg name="version" value="Mojave"/>

</bean>

<bean id="computer" class="di.Computer">

    <constructor-arg name="type" value="MacBook Pro 2019"/>

    <constructor-arg name="operatingSystem" ref="operatingSystem"/>

</bean>
其他地方与写法1一样,唯一区别就是将写法1中的index属性换成了name属性,这样直接通过参数名来确定,清晰明了,不容易出错。
2.setter方法注入(一定要写好空参构造和所有属性的setter方法!!!)
此方式使用的是bean标签内部的属性进行依赖注入。
以如下构造方法为例
public Computer(String type, OperatingSystem operatingSystem) {

    this.type = type;

    this.operatingSystem = operatingSystem;

}
注入:
<!--macOS mojave-->

<bean id="operatingSystem" class="di.OperatingSystem">

    <property name="name" value="macOS"/>

    <property name="version" value="Mojave"/>

</bean>

<bean id="computer" class="di.Computer">

    <property name="type" value="MacBook Pro 2019"/>

    <property name="operatingSystem" ref="operatingSystem"/>

</bean>
其实与构造函数注入的第二种方式差不多,只不过是把换成了
3.接口注入(没用,不说了)
三、集合注入
注意:下文中的value标签,当需要设的值是自己定义的bean时,要用将标签替换。
为Computer类新增属性keys,表示键盘上的键的集合。
1.数组与List(可互相替换)
其实Spring中将Array和List等同起来了。
写法1(constructor-arg + array):
<bean id="computer" class="di.Computer">

    <constructor-arg name="keys">

        <array>

            <value>a</value>

            <value>b</value>

            <value>c</value>

        </array>

    </constructor-arg>

</bean>
写法2(constructor-arg + list):
<bean id="computer" class="di.Computer">

    <constructor-arg name="keys">

            <list>

                <value>a</value>

                <value>b</value>

            </list>

    </constructor-arg>

</bean>
写法3(property + array):
<bean id="computer" class="di.Computer">

    <property name="keys">

            <array>

                <value>a</value>

                <value>b</value>

            </array>

    </property>

</bean>
写法4(property + list):
<bean id="computer" class="di.Computer">

    <property name="keys">

            <list>

                <value>a</value>

                <value>b</value>

            </list>

    </property>

</bean>
2.Set
写法1(constructor-arg):
<bean id="computer" class="di.Computer">

    <constructor-arg name="keys">

            <set>

                <value>a</value>

                <value>b</value>

            </set>

    </constructor-arg>

</bean>
写法2(property):
<bean id="computer" class="di.Computer">

    <property name="keys">

            <set>

                <value>a</value>

                <value>b</value>

            </set>

    </property>

</bean>
3.Map
为Computer类新增属性map<String,String> sofewares,key表示软件,value表示软件安装目录
为Computer类新增属性map<String,Singer> songs,key表示歌曲名,value表示歌手对象
写法1(property):
<bean id="singerEdSheeran" class="di.Singer">

    <property name="name" value="Ed Sheeran"/>

</bean>

<bean id="computer" class="di.Computer">

    <property name="softwares">

            <map>

                <entry key="WeChat" value="/Users/...."/>

                <entry key="Intellij Idea" value="/usr/local/...."/>

            </map>

    </property>

    <property name="songs">

        <map>

            <entry key="Shape of You" value-ref="singerEdSheeran"/>

            <entry key="I dont care" value-ref="singerEdSheeran"/>

        </map>

    </property>

</bean>
写法2(将写法1的property换成constructor-arg即可)
注意,如果key或value要引用其他bean,那么对应地需要将换成或将换成
Spring——依赖注入(DI)详解的更多相关文章
- Spring 依赖注入方式详解
平常的Java开发中,程序员在某个类中需要依赖其它类的方法. 通常是new一个依赖类再调用类实例的方法,这种开发存在的问题是new的类实例不好统一管理. Spring提出了依赖注入的思想,即依赖类不由 ...
- Spring 依赖注入方式详解(四)
IoC 简介 平常的Java开发中,程序员在某个类中需要依赖其它类的方法. 通常是new一个依赖类再调用类实例的方法,这种开发存在的问题是new的类实例不好统一管理. Spring提出了依赖注入的思想 ...
- Unity依赖注入使用详解
写在前面 构造器注入 Dependency属性注入 InjectionMethod方法注入 非泛型注入 标识键 ContainerControlledLifetimeManager单例 Unity注册 ...
- SpringDI四种依赖注入方式详解
文章已托管到GitHub,大家可以去GitHub查看阅读,欢迎老板们前来Star!搜索关注微信公众号 [码出Offer] 领取各种学习资料! LOGO SpringDI(依赖注入) 一.DI概述 De ...
- Spring IOC 注入方式详解 附代码
引言 Spring框架作为优秀的开源框架之一,深受各大Java开发者的追捧,相信对于大家来说并不陌生,Spring之所以这么流行,少不了他的两大核心技术IOC和IOP.我们这里重点讲述Spring框架 ...
- .NET Core 中依赖注入框架详解 Autofac
本文将通过演示一个Console应用程序和一个ASP.NET Core Web应用程序来说明依赖注入框架Autofac是如何使用的 Autofac相比.NET Core原生的注入方式提供了强大的功能, ...
- AngularJS开发指南10:AngularJS依赖注入的详解
依赖注入是一种软件设计模式,用来处理代码的依赖关系. 一般来说有三种方法让函数获得它需要的依赖: 它的依赖是能被创建的,一般用new操作符就行. 能够通过全局变量查找依赖. 依赖能在需要时被导入. 前 ...
- Spring 依赖注入(DI) 的三种方式 和 对集合类型的注入
// 分别省略了getter setter public class Student { private String name; private int age; private Teacher t ...
- 依赖注入(IOC) 详解
https://blog.csdn.net/qq_27093465/article/details/52547290 https://blog.csdn.net/qq_27093465/article ...
- 1.4 Spring 依赖注入(DI)和控制反转(IOC)详解
自己开发了一个股票智能分析软件,功能很强大,需要的点击下面的链接获取: https://www.cnblogs.com/bclshuai/p/11380657.html 1.1 Spring 依赖注 ...
随机推荐
- LoRaWAN调试踩坑心得(二)
先说两句 抱歉,由于工作原因和个人原因,中间停更了这么久.接下来,本人会继续往下更,内容包括但不仅限于LoRa.文章还是会按照个人的习惯,坚持原创,一是作为自己的笔记,二是和广大工程师分享交流. Lo ...
- 微服务架构 - 网关 Spring Cloud Gateway
Spring Cloud Gateway 工作原理 客户端向 Spring Cloud Gateway 发出请求,如果请求与网关程序定义的路由匹配,则将其发送到网关 Web 处理程序,此处理程序运行特 ...
- 用Python写了个下载快手视频的小脚本
最近又重新拾起了,对python的热情. 贴个地址: https://github.com/d1y/lovepack/blob/master/kuaishou.py 前戏说明 因为我近乎癫狂的喜欢一个 ...
- 实验Oracle数据文件被误删除的场景恢复
环境:RHEL 5.4 + Oracle 11.2.0.3 背景:数据库没有备份,数据库文件被误操作rm,此时数据库尚未关闭,也就是对应句柄存在,如何快速恢复? 1.某个普通数据文件被删除 2.所有数 ...
- Oracle笔记_基础
1 登录启动 sqlplus / as sysdba #以管理员方式登录 sqlplus 用户名/密码 #本地登录 sqlplus 用户名/密码@//主机IP/实例名(默认orcl) #远程登录 sq ...
- .NET平台下,钉钉微应用开发之:获取userid
工作需求,开发钉钉微应用和小程序,之前有接触过支付宝小程序和生活号的开发,流程没有很大的差别,这里记录下我用ASP.NET MVC实现钉钉微应用的开发,并实现获取用户的userid.小弟我技术有限,本 ...
- 使用SpringSecurity保护程序安全
首先,引入依赖: <dependency> <groupId>org.springframework.boot</groupId> <artifactId&g ...
- 用Python操作文件
用Python操作文件 用word操作一个文件的流程如下: 1.找到文件,双击打开. 2.读或修改. 3.保存&关闭. 用Python操作文件也差不多: f=open(filename) # ...
- Light It Up CF1000B 思维
Light It Up time limit per test 1 second memory limit per test 256 megabytes input standard input ou ...
- codeforces 766 D. Mahmoud and a Dictionary(种类并查集+stl)
题目链接:http://codeforces.com/contest/766/problem/D 题意:给你n个单词,m个关系(两个单词是反义词还是同义词),然后问你所给的关系里面有没有错的,最后再给 ...
